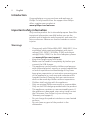
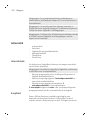
3000 Series
4000 Series


1
2
3
4
6
5
7 8

empty page before TOC

English 6
Azərbaycanca 21
Čeština 37
Dansk 52
Deutsch 67
Eesti 84
Español 100
Français 116
Hrvatski 133
Italiano 148
Latviešu 164
Lietuviškai 179
Magyar 195
Nederlands 211
Norsk 228
O'zbek 243
Polski 260
Português 277
Română 293
Shqip 309
Slovenščina 325
Slovensky 340
Srpski 355
Suomi 371
Svenska 387
Türkmençe 402
Ελληνικά 418
Български 436
Кыргызча 453
Македонски 470
Русский 487
Тоҷикӣ 505
Українська 523
Қазақша 540
Հայերեն 557
ქართული ენა 575
תירבע 593

English
6English
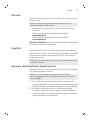
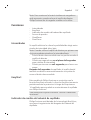
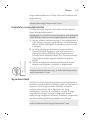
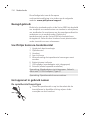
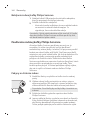
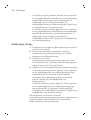
Introduction
Congratulations on your purchase and welcome to
Philips! To fully benefit from the support that Philips
offers, register your product at
www.philips.com/welcome.
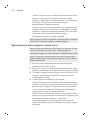
Important safety information
Only use the product for its intended purpose. Read this
important information carefully before you use the
product and its batteries and accessories, and save it for
future reference. Misuse can lead to hazards or serious
injuries.
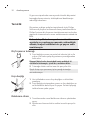
Warnings
- Charge only with Philips WAA1001, WAA2001, UL or
equivalent safety approved adapters with input
ratings (100 - 240V~; 50/60Hz; 3.5W) and output
ratings (5Vdc; 2.5W). For the list of adapters, please
see www.philips.com/support
- Keep the charger away from water.
- Make sure the handle is completely dry before you
connect the USB charger.
- This appliance can be used by children and persons
with reduced physical, sensory or mental capabilities
or lack of experience and knowledge if they have
been given supervision or instruction concerning use
of the appliance in a safe way and understand the
hazards involved. Cleaning and user maintenance
shall not be made by children without supervision.
- Children shall not play with the appliance.
- Only use original Philips accessories or consumables.
Only use the USB charger provided with the product.
- This appliance contains no user-serviceable parts. If
the appliance is damaged, stop using it and contact
the Consumer Care Center in your country (see
'Warranty and support').
- Do not charge the product outdoors or near heated
surfaces.
- Do not clean any part of the product in the
dishwasher.

7
English
- This appliance has only been designed for cleaning
teeth, gums and tongue.
- Stop using the appliance and consult your
dentist/doctor if excessive bleeding occurs after use, if
bleeding continues to occur after 1 week of use or if
you experience discomfort or pain.
- If you have had oral or gum surgery in the previous 2
months, consult your dentist before you use this
appliance.
- If you have a pacemaker or other implanted device,
contact your doctor or the manufacturer of the
implanted device prior to use.
- If you have medical concerns, consult your doctor
before you use this appliance.
- This appliance is a personal care device and is not
intended for use on multiple patients in a dental
practice or institution.
- Stop using a brush head with crushed or bent bristles.
Replace the brush head every 3 months or sooner if
signs of wear appear.
- If your toothpaste contains peroxide, baking soda or
bicarbonate (common in whitening toothpastes),
thoroughly clean the brush head with soap and water
after each use. This prevents possible cracking of the
plastic.
- Avoid direct contact with products that contain
essential oils or coconut oil. Contact may result in
bristles dislodging.
- Charge, use and store the product at a temperature
between 32 °F / 0°C and 104 °F / 40°C.
- Keep product and batteries away from fire and do not
expose them to direct sunlight or high temperatures.
- If the product becomes abnormally hot or smelly,
changes color or if charging takes longer than usual,
stop using and charging the product and contact
Philips.
- Do not place products and their batteries in
microwave ovens or on induction cookers.

8English
- Do not open, modify, pierce, damage or dismantle the
product or battery to prevent batteries from heating
up or releasing toxic or hazardous substances. Do not
short-circuit, overcharge or reverse charge batteries.
- If batteries are damaged or leaking, avoid contact
with the skin or eyes. If this occurs, immediately rinse
well with water and seek medical care.
Electromagnetic fields (EMF)
This Philips appliance complies with all applicable
standards and regulations regarding exposure to
electromagnetic fields.
Radio Equipment Directive
Hereby, Philips declares that electric toothbrushes
equipped with a radio frequency interface (Bluetooth or
BrushSync) are in compliance with Directive 2014/53/EU.
- Bluetooth radio frequency: 2.4 GHz
- Maximum Bluetooth radio frequency power: 3 dBm
- NFC radio frequency: 13.56 MHz
- Maximum NFC radio frequency power: 30.16 dBm
The full text of the EU declaration of conformity is
available at the following internet address:
www.philips.com/support
Intended use
3000 Series power toothbrushes are intended to remove
adherent plaque and food debris from the teeth to
reduce tooth decay and improve and maintain oral
health. 3000 Series power toothbrushes are intended for
consumer home use. Use by children should be with
adult supervision.
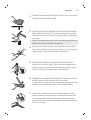
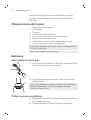
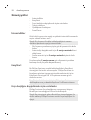
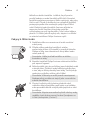
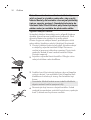
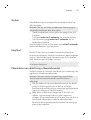
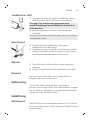
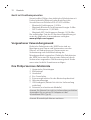
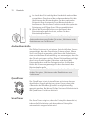
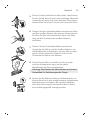
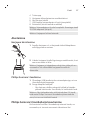
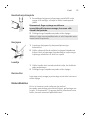
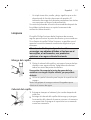
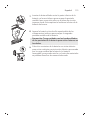
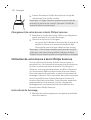
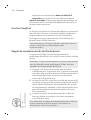
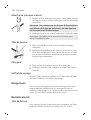
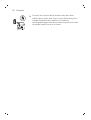
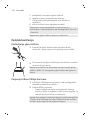
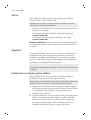
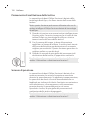
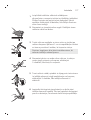
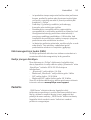
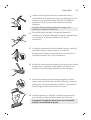
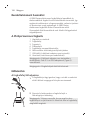
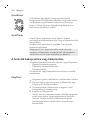
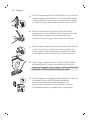
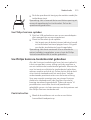
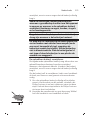
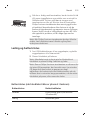
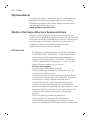
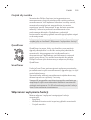
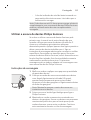
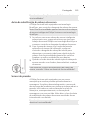
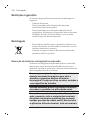
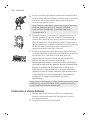
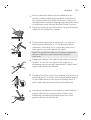
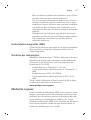
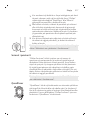
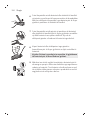
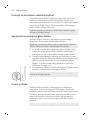
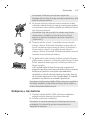
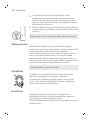
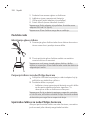
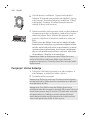
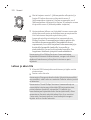
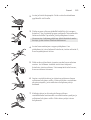
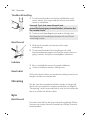
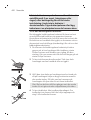
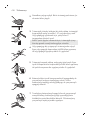
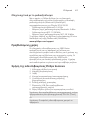
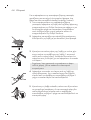
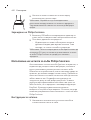
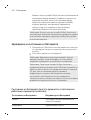
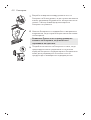
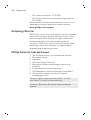
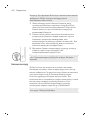
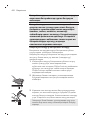
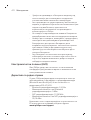
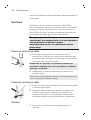
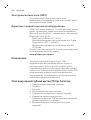
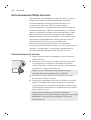
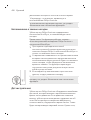
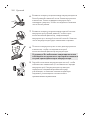
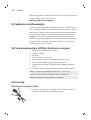
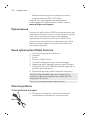
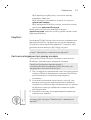
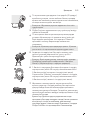
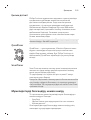
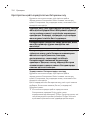
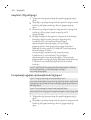
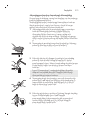
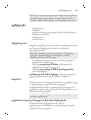
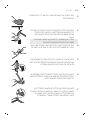
Your Philips Sonicare toothbrush
1 Hygienic travel cap
2 Brush head
3 Handle
4 Power on/off button
5 Brush head replacement reminder
6 Battery level indicator
7 USB charger (wall adapter not included)

9
English
8 Travel case (Specific models only)
Note: Wall adapter not included. Only use 5V IPX4
adapter (Type A).
Note: Brush heads may vary.
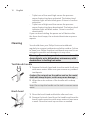
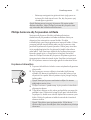
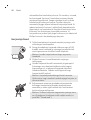
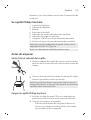
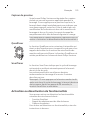
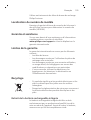
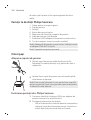
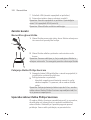
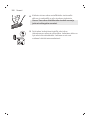
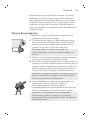
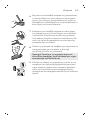
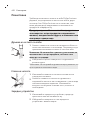
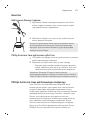
Getting started
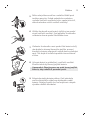
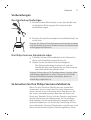
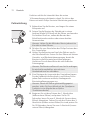
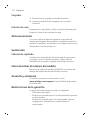
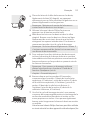
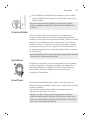
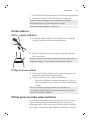
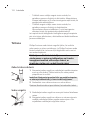
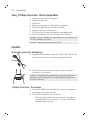
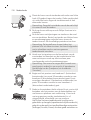
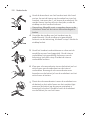
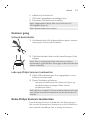
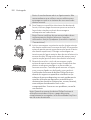
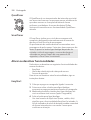
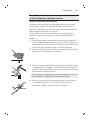
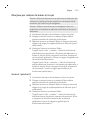
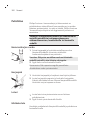
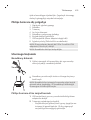
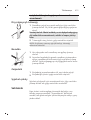
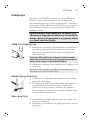
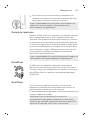
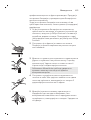
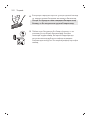
Attaching the brush head
1Align the brush head so the bristles point in the same
direction as the front of the handle.
2Firmly press the brush head down onto the metal
shaft until it stops.
Note: It is normal to see a slight gap between the brush
head and the handle. This allows the brush head to
vibrate properly.
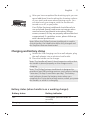
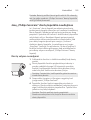
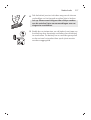
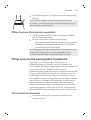
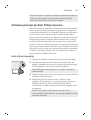
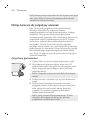
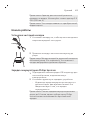
Charging your Philips Sonicare
1Plug the USB charging cord into a wall adapter that is
connected to a electrical outlet.
2Place the handle on the charger.
- The light of the battery level indicator illuminates
and the handle beeps twice. This indicates that the
toothbrush is charging.
Note: It can take up to 24 hours to fully charge the
battery, but you can use the Philips Sonicare toothbrush
before it is fully charged.
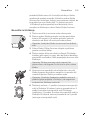
Using your Philips Sonicare toothbrush
If you are using your Sonicare toothbrush for the first
time, it is normal to feel more vibration than when using
a non-electric toothbrush. It is common for first time
users to apply too much pressure. Only apply gentle
pressure and let the toothbrush do the brushing for you.

10 English
Please follow brushing instructions below for the best
experience. To help you transition to your new Sonicare
power toothbrush, it comes with the EasyStart feature
turned on. This feature gently increases the power over
the first 14 brushings to help you adapt to brushing with
a Philips Sonicare toothbrush.
Brushing instructions
1Wet the bristles and apply a small amount of
toothpaste.
2Place the toothbrush bristles against the teeth at a
slight angle (45 degrees), pressing gently to make the
bristles reach the gumline or slightly beneath the
gumline.
Note: Keep the center of the brush in contact with the
teeth at all times.
3Press the power on/off button to turn on the Philips
Sonicare.
4Gently keep the bristles placed on the teeth and in the
gumline. Brush your teeth with small back and forth
motion so the bristles reach between the teeth.
Continue this motion throughout your brushing cycle.
Note: The bristles should slightly flare. It is not
recommended to scrub as you would with a manual
toothbrush.
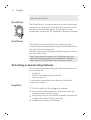
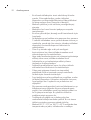
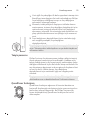
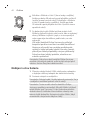
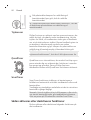
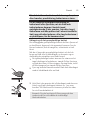
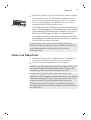
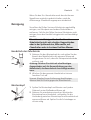
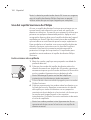
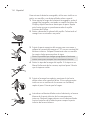
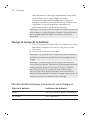
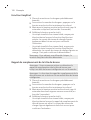
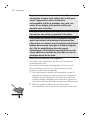
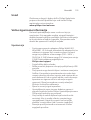
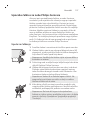
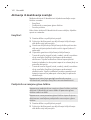
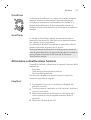
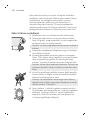
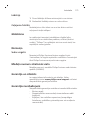
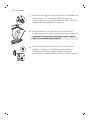
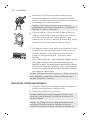
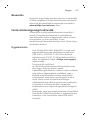
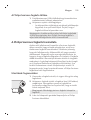
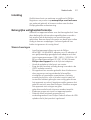
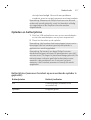
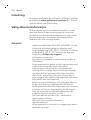
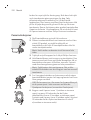
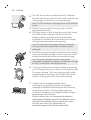
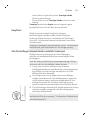
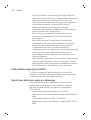
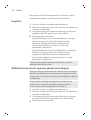
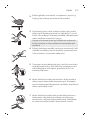
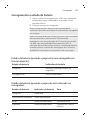
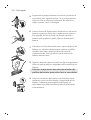
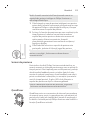
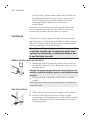
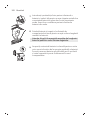
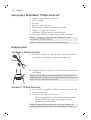
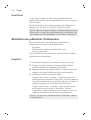
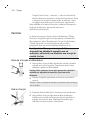
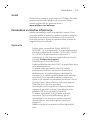
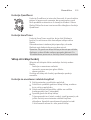
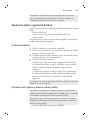
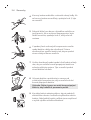
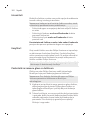
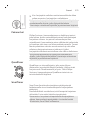
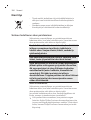
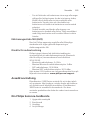
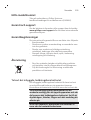
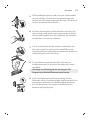
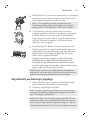
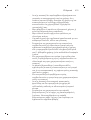
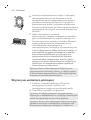
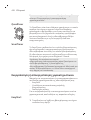
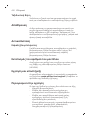
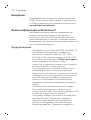
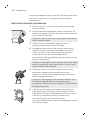
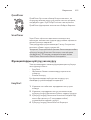
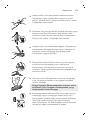
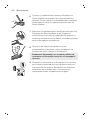
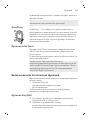
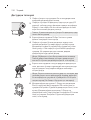
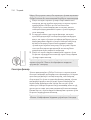
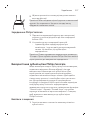
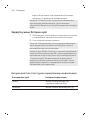
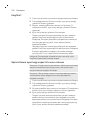
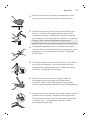
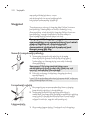
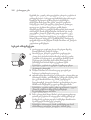
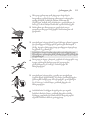
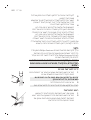
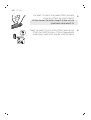
5To clean the inside surfaces of the front teeth, tilt the
brush handle semi-upright and make several vertical
overlapping brushing strokes on each tooth.
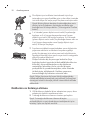
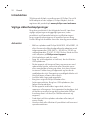
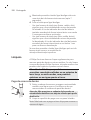
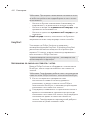
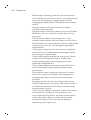
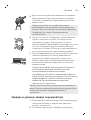
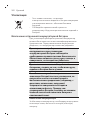
Note: To make sure you brush evenly throughout the
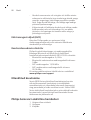
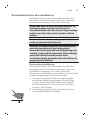
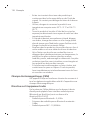
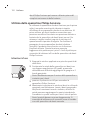
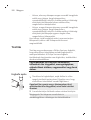
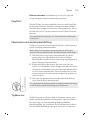
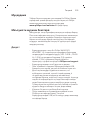
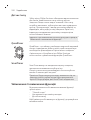
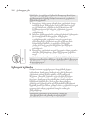
mouth, divide your mouth into 4 sections using the
Quadpacer feature (see chapter ‘Features’).
2
4
3
1
6Begin brushing in section 1 (outside upper teeth) and
brush for 30 seconds before you move to section 2
(inside upper teeth). Continue brushing in section 3
(outside lower teeth) and brush for 30 seconds before
you move to section 4 (inside lower teeth).

11
English
7After you have completed the brushing cycle, you can
spend additional time brushing the chewing surfaces
of your teeth and areas where staining occurs. You
can also brush your tongue, with the toothbrush
turned on or off, as you prefer.
Your Philips Sonicare toothbrush should be safe to
use on braced (brush heads wear out sooner when
used on braces) and dental restorations (fillings,
crowns, veneers) if they are properly adhered and not
compromised. If a problem occurs, please follow up
with a dental professional.
Note: When the Philips Sonicare toothbrush is used in
clinical studies, the handle should be fully charged and
the EasyStart feature deactivated.
Charging and battery status
1Attach the USB charging cord to a wall adapter, plug
the wall adapter into an electrical wall outlet.
2Place the handle on the charger.
Note: The handle will emit 2 short beeps to confirm that
the handle is placed properly on the charger and is
charging.
Note: This Philips Sonicare toothbrush is designed to
provide at least 28 brushing sessions, each session lasting
2 minutes (14 days if used twice per day). The battery
level indicator shows the battery status when you
complete the 2-minute brushing session, when you pause
the handle, or while it is charging.
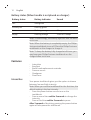
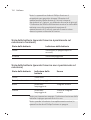
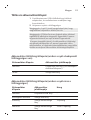
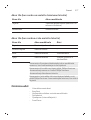
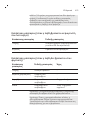
Battery status (when handle is on a working charger)
Battery status Battery indicator
Full Solid green (turns off after 30
seconds)
Charging Flashing green

12 English
Battery status (When handle is not placed on charger)
Battery status Battery indicator Sound
Full Solid green -
Partially full Flashing green -
Low Flashing orange 3 beeps
Empty Flashing orange 2 sets of 5 beeps
Note: To save energy, the battery light will turn off when
not in use.
Note: When the battery is completely empty, the Philips
Sonicare toothbrush turns off. Place the Philips Sonicare
toothbrush on the charger to charge it.
Note: To keep the battery fully charged at all times, you
may keep your Philips Sonicare toothbrush on the
charger when not in use.
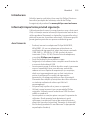
Features
- Intensities
- EasyStart
- Brush head replacement reminder
- Pressure sensor
- Quadpacer
- SmarTimer
Intensities
Your power toothbrush gives you the option to choose
between low and high intensity.
Note: When you use the toothbrush for the first time, the
default setting is the low intensity.
- Press the power button once to turn on the
toothbrush.
- Press a second time within 2 seconds to change the
intensity.
- Press a third time within 2 seconds to pause.
After 2 seconds of brushing, pressing the power button
again will also pause the toothbrush.

13
English
EasyStart
This Philips Sonicare model comes with the EasyStart
feature activated. The EasyStart feature gently increases
the power over the first 14 brushings to help you get
used to the brushing with the Philips Sonicare.
To deactivate EasyStart see 'Activating or deactivating
features'.
Brush head replacement reminder
Your Philips Sonicare is equipped with BrushSync
technology that tracks the wear of your brush head.
Note: This feature only works with Philips Sonicare smart
brush heads with BrushSync technology.
1When attaching a new smart brush head for the first
time the handle recognizes that you have a Philips
brush head with BrushSync technology and begins
tracking brush head wear.
2Over time, based on the pressure you apply and the
amount of time used, the handle will track brush head
wear in order to determine the optimal time to
change your brush head. This feature gives you the
guarantee for the best cleaning and care of your
teeth.
3When the brush head replacement reminder light
lights up amber, you should replace your brush head.
To deactivate the brush head replacement reminder see
'Activating or deactivating features'.
Pressure Sensor
Your Philips Sonicare is equipped with an advanced
sensor that measures the pressure you apply while
brushing. If you apply too much pressure, the toothbrush
will provide immediate feedback to indicate that you
need to reduce the pressure. This feedback is given by a
change in vibration and therefore brushing sensation and
sound. Additionally, the brush head replacement
reminder light will flash amber.

14 English
To deactivate the pressure sensor see 'Activating or
deactivating features'.
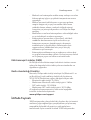
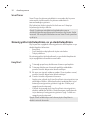
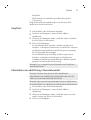
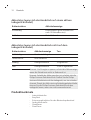
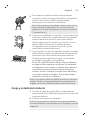
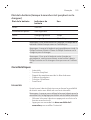
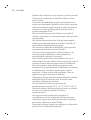
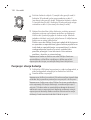
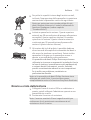
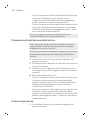
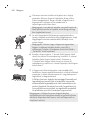
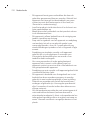
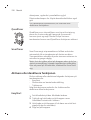
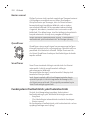
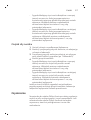
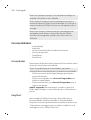
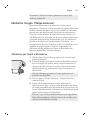
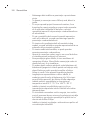
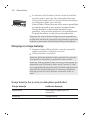
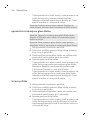
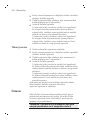
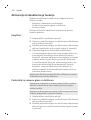
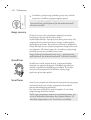
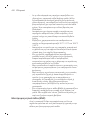
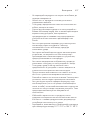
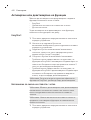
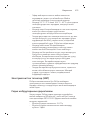
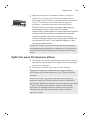
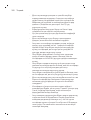
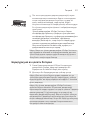
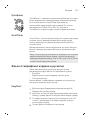
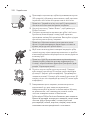
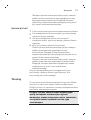
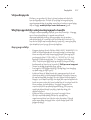
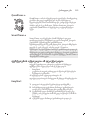
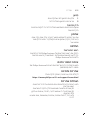
QuadPacer
2
4
3
1
The QuadPacer is an interval timer that has a short beep
and pause to remind you to brush the 4 sections of your
mouth evenly and thoroughly. This Philips Sonicare
toothbrush comes with the QuadPacer feature activated.
SmarTimer
The SmarTimer indicates that your brushing cycle is
complete by automatically turning off the toothbrush at
the end of the brushing cycle.
Dental professionals recommend brushing no less than 2
minutes twice a day.
Note: If you press the power on/off button after you
started the brushing cycle, the toothbrush will pause.
After a pause of 30 seconds, the SmarTimer resets.
Activating or deactivating features
You can activate or deactivate the following features of
your toothbrush:
- EasyStart
- Brush head replacement reminder
- Pressure sensor
To activate or deactivate these features, follow the
instructions below:
EasyStart
1Put the handle on the plugged-in charger.
2Press and hold the power on/off button while the
handle remains on the charger.
3Keep the power on/off button pressed until you hear
a single short beep (after 3 seconds).
4Release the power on/off button.

15
English
- Triple tone of low-med-high means the EasyStart
feature has been activated. The battery level indicator
light will also blink green 2 times to confirm
activation.
- Triple tone of high-med-low means the EasyStart
feature has been deactivated. The battery level
indicator light will blink amber 1 time to confirm
deactivation.
Note: To achieve clinical efficacy, EasyStart needs to be
deactivated.
Brush head replacement reminder
Note: You can only activate or deactivate the brush head
replacement reminder when a smart brush head is on the
handle.
Note: New smart brush heads come with the brush head
replacement reminder feature activated.
1Put the handle on the plugged-in charger.
2Press and hold the power on/off button while the
handle remains on the charger.
3Keep the power on/off button pressed until you hear
a series of two short beeps (after 5 seconds).
4Release the power on/off button.
- Triple tone of low-med-high means the brush head
replacement reminder feature has been activated.
The battery level indicator light will also blink green 2
times to confirm activation.
- Triple tone of high-med-low means the brush head
replacement reminder feature has been deactivated.
The battery level indicator light will blink amber 1
time to confirm deactivation.
Pressure sensor
1Put the handle on the plugged-in charger.
2Press and hold the power on/off button while the
handle remains on the charger.
3Keep the power on/off button pressed until you hear
a series of three short beeps (after 7 seconds).
4Release the power on/off button.

16 English
- Triple tone of low-med-high means the pressure
sensor feature has been activated. The battery level
indicator light will also blink green 2 times to confirm
activation.
- Triple tone of high-med-low means the pressure
sensor feature has been deactivated. The battery level
indicator light will blink amber 1 time to confirm
deactivation.
If you continue holding the power on/off button after
the three short beeps, the activate/deactivate sequence
repeats.
Cleaning
You should clean your Philips Sonicare toothbrush
regularly to remove toothpaste and other residue. Failure
to clean your Philips Sonicare toothbrush may result in an
unhygienic product and damage to it may occur.
Warning: Do not clean product or accessories with
sharp objects or in dishwasher, microwave, with
chemicals or in boiling hot water
Toothbrush handle
1Remove the brush head and rinse the metal shaft area
with warm water. Make sure you remove any residual
toothpaste.
Caution: Do not push on the rubber seal on the metal
shaft with sharp objects, as this may cause damage.
2Wipe the entire surface of the handle with a damp
cloth.
Note: Do not tap the handle on the sink to remove excess
water.
Brush head
1Rinse the brush head and bristles after each use.
2Remove the brush head from the handle and rinse the
brush head connection with warm water at least once
a week. Rinse the travel cap as often as needed.

17
English
Charger
1Unplug the charger before you clean it.
2Wipe the surface of the charger with a damp cloth.
Travel case
Rinse with warm water and use a damp cloth to clean
inside of travel case.
Storage
If you are not going to use the product for a long time,
unplug it, clean it (see chapter 'Cleaning') and store it in a
cool and dry place away from direct sunlight.
Replacement
Brush head
Replace Philips Sonicare brush heads every 3 months to
achieve optimal results. Use only Philips Sonicare
replacement brush heads.
Locating the model number
Look on the bottom of the Philips Sonicare toothbrush
handle for the model number (HX36XX).
Warranty and support
If you need information or support, please visit
www.philips.com/support or read the international
warranty leaflet.
Warranty restrictions
The terms of the international warranty do not cover the
following:
- Brush heads.
- Damage caused by use of unauthorized replacement
parts.
- Damage caused by misuse, abuse, neglect, alterations
or unauthorized repair.
- Normal wear and tear, including chips, scratches,
abrasions, discoloration or fading.

18 English
Recycling
- This symbol means that electrical products and
batteries shall not be disposed of with normal
household waste.
- Follow your country’s rules for the separate collection
of electrical products and batteries.
Removal of built-in rechargeable battery
The built-in rechargeable battery must only be removed
by a qualified professional when the appliance is
discarded. Before removing the battery, make sure that
the battery is completely empty.
Take any necessary safety precautions when you
handle tools to open the appliance and when you
dispose of the rechargeable battery. Be sure to
protect your eyes, hands, fingers, and the surface
on which you work.
When you handle batteries, make sure that your
hands, the product and the batteries are dry.
To avoid accidental short-circuiting of batteries
after removal, do not let battery terminals come
into contact with metal objects (e.g. coins,
hairpins, rings). Do not wrap batteries in
aluminum foil. Tape battery terminals or put
batteries in a plastic bag before you discard them.
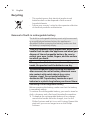
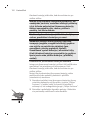
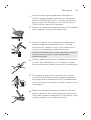
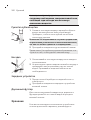
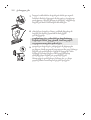
Removing the rechargeable battery
Before removing the battery, make sure that the battery
is completely empty.
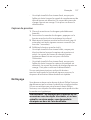
To remove the rechargeable battery, you need a towel or
cloth, a hammer and a flat-head (standard) screwdriver.
1To deplete the rechargeable battery of any charge,
remove the handle from the charger, turn on the
Philips Sonicare and let it run until it stops. Repeat this
step until you can no longer turn on the Philips
Sonicare.

19
English
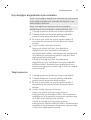
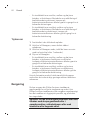
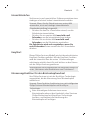
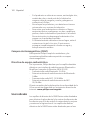
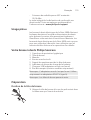
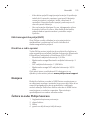
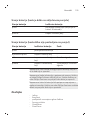
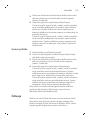
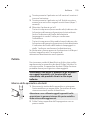
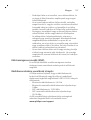
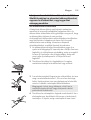
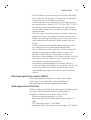
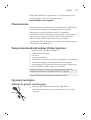
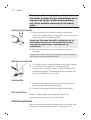
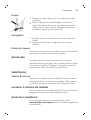
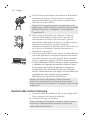
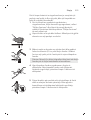
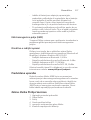
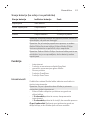
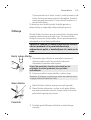
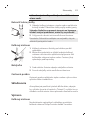
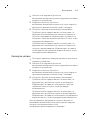
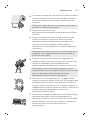
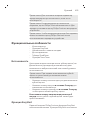
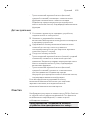
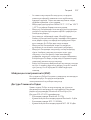
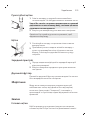
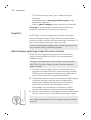
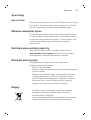
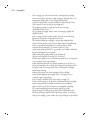
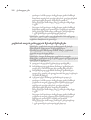
2Remove and discard the brush head. Cover the entire
handle with a towel or cloth.
1
2
3Hold the top of the handle with one hand and strike
the handle housing 0.5 inch above the bottom end.
Strike firmly with a hammer on all 4 sides to eject the
end cap.
Note: You may have to hit on the end several times to
break the internal snap connections.
4Remove the end cap from the toothbrush handle. If
the end cap does not release easily from the housing,
repeat step 3 until the end cap is released.
5Holding the handle upside down, press the shaft
down on a hard surface. If the internal components
do not easily release from the housing, repeat step 3
until the internal components are released.
6Wedge the screwdriver between the battery and the
white frame at the bottom of the internal
components. Then pry the screwdriver away from the
battery to break the bottom of the white frame.
7Insert the screwdriver between the bottom of the
battery and the white frame to break the metal tab
connecting the battery to the green printed circuit
board. This will release the bottom end of the battery
from the frame.

20 English
8Grab the battery and pull it away from the internal
components to break the second metal battery tab.
Caution: Be aware of the sharp edges of the
battery tabs so as to avoid injury to your fingers.
9Cover the battery contacts with tape to prevent any
electrical short from residual battery charge. The
rechargeable battery can now be recycled and the
rest of the product discarded appropriately.
Pagina se încarcă...
Pagina se încarcă...
Pagina se încarcă...
Pagina se încarcă...
Pagina se încarcă...
Pagina se încarcă...
Pagina se încarcă...
Pagina se încarcă...
Pagina se încarcă...
Pagina se încarcă...
Pagina se încarcă...
Pagina se încarcă...
Pagina se încarcă...
Pagina se încarcă...
Pagina se încarcă...
Pagina se încarcă...
Pagina se încarcă...
Pagina se încarcă...
Pagina se încarcă...
Pagina se încarcă...
Pagina se încarcă...
Pagina se încarcă...
Pagina se încarcă...
Pagina se încarcă...
Pagina se încarcă...
Pagina se încarcă...
Pagina se încarcă...
Pagina se încarcă...
Pagina se încarcă...
Pagina se încarcă...
Pagina se încarcă...
Pagina se încarcă...
Pagina se încarcă...
Pagina se încarcă...
Pagina se încarcă...
Pagina se încarcă...
Pagina se încarcă...
Pagina se încarcă...
Pagina se încarcă...
Pagina se încarcă...
Pagina se încarcă...
Pagina se încarcă...
Pagina se încarcă...
Pagina se încarcă...
Pagina se încarcă...
Pagina se încarcă...
Pagina se încarcă...
Pagina se încarcă...
Pagina se încarcă...
Pagina se încarcă...
Pagina se încarcă...
Pagina se încarcă...
Pagina se încarcă...
Pagina se încarcă...
Pagina se încarcă...
Pagina se încarcă...
Pagina se încarcă...
Pagina se încarcă...
Pagina se încarcă...
Pagina se încarcă...
Pagina se încarcă...
Pagina se încarcă...
Pagina se încarcă...
Pagina se încarcă...
Pagina se încarcă...
Pagina se încarcă...
Pagina se încarcă...
Pagina se încarcă...
Pagina se încarcă...
Pagina se încarcă...
Pagina se încarcă...
Pagina se încarcă...
Pagina se încarcă...
Pagina se încarcă...
Pagina se încarcă...
Pagina se încarcă...
Pagina se încarcă...
Pagina se încarcă...
Pagina se încarcă...
Pagina se încarcă...
Pagina se încarcă...
Pagina se încarcă...
Pagina se încarcă...
Pagina se încarcă...
Pagina se încarcă...
Pagina se încarcă...
Pagina se încarcă...
Pagina se încarcă...
Pagina se încarcă...
Pagina se încarcă...
Pagina se încarcă...
Pagina se încarcă...
Pagina se încarcă...
Pagina se încarcă...
Pagina se încarcă...
Pagina se încarcă...
Pagina se încarcă...
Pagina se încarcă...
Pagina se încarcă...
Pagina se încarcă...
Pagina se încarcă...
Pagina se încarcă...
Pagina se încarcă...
Pagina se încarcă...
Pagina se încarcă...
Pagina se încarcă...
Pagina se încarcă...
Pagina se încarcă...
Pagina se încarcă...
Pagina se încarcă...
Pagina se încarcă...
Pagina se încarcă...
Pagina se încarcă...
Pagina se încarcă...
Pagina se încarcă...
Pagina se încarcă...
Pagina se încarcă...
Pagina se încarcă...
Pagina se încarcă...
Pagina se încarcă...
Pagina se încarcă...
Pagina se încarcă...
Pagina se încarcă...
Pagina se încarcă...
Pagina se încarcă...
Pagina se încarcă...
Pagina se încarcă...
Pagina se încarcă...
Pagina se încarcă...
Pagina se încarcă...
Pagina se încarcă...
Pagina se încarcă...
Pagina se încarcă...
Pagina se încarcă...
Pagina se încarcă...
Pagina se încarcă...
Pagina se încarcă...
Pagina se încarcă...
Pagina se încarcă...
Pagina se încarcă...
Pagina se încarcă...
Pagina se încarcă...
Pagina se încarcă...
Pagina se încarcă...
Pagina se încarcă...
Pagina se încarcă...
Pagina se încarcă...
Pagina se încarcă...
Pagina se încarcă...
Pagina se încarcă...
Pagina se încarcă...
Pagina se încarcă...
Pagina se încarcă...
Pagina se încarcă...
Pagina se încarcă...
Pagina se încarcă...
Pagina se încarcă...
Pagina se încarcă...
Pagina se încarcă...
Pagina se încarcă...
Pagina se încarcă...
Pagina se încarcă...
Pagina se încarcă...
Pagina se încarcă...
Pagina se încarcă...
Pagina se încarcă...
Pagina se încarcă...
Pagina se încarcă...
Pagina se încarcă...
Pagina se încarcă...
Pagina se încarcă...
Pagina se încarcă...
Pagina se încarcă...
Pagina se încarcă...
Pagina se încarcă...
Pagina se încarcă...
Pagina se încarcă...
Pagina se încarcă...
Pagina se încarcă...
Pagina se încarcă...
Pagina se încarcă...
Pagina se încarcă...
Pagina se încarcă...
Pagina se încarcă...
Pagina se încarcă...
Pagina se încarcă...
Pagina se încarcă...
Pagina se încarcă...
Pagina se încarcă...
Pagina se încarcă...
Pagina se încarcă...
Pagina se încarcă...
Pagina se încarcă...
Pagina se încarcă...
Pagina se încarcă...
Pagina se încarcă...
Pagina se încarcă...
Pagina se încarcă...
Pagina se încarcă...
Pagina se încarcă...
Pagina se încarcă...
Pagina se încarcă...
Pagina se încarcă...
Pagina se încarcă...
Pagina se încarcă...
Pagina se încarcă...
Pagina se încarcă...
Pagina se încarcă...
Pagina se încarcă...
Pagina se încarcă...
Pagina se încarcă...
Pagina se încarcă...
Pagina se încarcă...
Pagina se încarcă...
Pagina se încarcă...
Pagina se încarcă...
Pagina se încarcă...
Pagina se încarcă...
Pagina se încarcă...
Pagina se încarcă...
Pagina se încarcă...
Pagina se încarcă...
Pagina se încarcă...
Pagina se încarcă...
Pagina se încarcă...
Pagina se încarcă...
Pagina se încarcă...
Pagina se încarcă...
Pagina se încarcă...
Pagina se încarcă...
Pagina se încarcă...
Pagina se încarcă...
Pagina se încarcă...
Pagina se încarcă...
Pagina se încarcă...
Pagina se încarcă...
Pagina se încarcă...
Pagina se încarcă...
Pagina se încarcă...
Pagina se încarcă...
Pagina se încarcă...
Pagina se încarcă...
Pagina se încarcă...
Pagina se încarcă...
Pagina se încarcă...
Pagina se încarcă...
Pagina se încarcă...
Pagina se încarcă...
Pagina se încarcă...
Pagina se încarcă...
Pagina se încarcă...
Pagina se încarcă...
Pagina se încarcă...
Pagina se încarcă...
Pagina se încarcă...
Pagina se încarcă...
Pagina se încarcă...
Pagina se încarcă...
Pagina se încarcă...
Pagina se încarcă...
Pagina se încarcă...
Pagina se încarcă...
Pagina se încarcă...
Pagina se încarcă...
Pagina se încarcă...
Pagina se încarcă...
Pagina se încarcă...
Pagina se încarcă...
Pagina se încarcă...
Pagina se încarcă...
Pagina se încarcă...
Pagina se încarcă...
Pagina se încarcă...
Pagina se încarcă...
Pagina se încarcă...
Pagina se încarcă...
Pagina se încarcă...
Pagina se încarcă...
Pagina se încarcă...
Pagina se încarcă...
Pagina se încarcă...
Pagina se încarcă...
Pagina se încarcă...
Pagina se încarcă...
Pagina se încarcă...
Pagina se încarcă...
Pagina se încarcă...
Pagina se încarcă...
Pagina se încarcă...
Pagina se încarcă...
Pagina se încarcă...
Pagina se încarcă...
Pagina se încarcă...
Pagina se încarcă...
Pagina se încarcă...
Pagina se încarcă...
Pagina se încarcă...
Pagina se încarcă...
Pagina se încarcă...
Pagina se încarcă...
Pagina se încarcă...
Pagina se încarcă...
Pagina se încarcă...
Pagina se încarcă...
Pagina se încarcă...
Pagina se încarcă...
Pagina se încarcă...
Pagina se încarcă...
Pagina se încarcă...
Pagina se încarcă...
Pagina se încarcă...
Pagina se încarcă...
Pagina se încarcă...
Pagina se încarcă...
Pagina se încarcă...
Pagina se încarcă...
Pagina se încarcă...
Pagina se încarcă...
Pagina se încarcă...
Pagina se încarcă...
Pagina se încarcă...
Pagina se încarcă...
Pagina se încarcă...
Pagina se încarcă...
Pagina se încarcă...
Pagina se încarcă...
Pagina se încarcă...
Pagina se încarcă...
Pagina se încarcă...
Pagina se încarcă...
Pagina se încarcă...
Pagina se încarcă...
Pagina se încarcă...
Pagina se încarcă...
Pagina se încarcă...
Pagina se încarcă...
Pagina se încarcă...
Pagina se încarcă...
Pagina se încarcă...
Pagina se încarcă...
Pagina se încarcă...
Pagina se încarcă...
Pagina se încarcă...
Pagina se încarcă...
Pagina se încarcă...
Pagina se încarcă...
Pagina se încarcă...
Pagina se încarcă...
Pagina se încarcă...
Pagina se încarcă...
Pagina se încarcă...
Pagina se încarcă...
Pagina se încarcă...
Pagina se încarcă...
Pagina se încarcă...
Pagina se încarcă...
Pagina se încarcă...
Pagina se încarcă...
Pagina se încarcă...
Pagina se încarcă...
Pagina se încarcă...
Pagina se încarcă...
Pagina se încarcă...
Pagina se încarcă...
Pagina se încarcă...
Pagina se încarcă...
Pagina se încarcă...
Pagina se încarcă...
Pagina se încarcă...
Pagina se încarcă...
Pagina se încarcă...
Pagina se încarcă...
Pagina se încarcă...
Pagina se încarcă...
Pagina se încarcă...
Pagina se încarcă...
Pagina se încarcă...
Pagina se încarcă...
Pagina se încarcă...
Pagina se încarcă...
Pagina se încarcă...
Pagina se încarcă...
Pagina se încarcă...
Pagina se încarcă...
Pagina se încarcă...
Pagina se încarcă...
Pagina se încarcă...
Pagina se încarcă...
Pagina se încarcă...
Pagina se încarcă...
Pagina se încarcă...
Pagina se încarcă...
Pagina se încarcă...
Pagina se încarcă...
Pagina se încarcă...
Pagina se încarcă...
Pagina se încarcă...
Pagina se încarcă...
Pagina se încarcă...
Pagina se încarcă...
Pagina se încarcă...
Pagina se încarcă...
Pagina se încarcă...
Pagina se încarcă...
Pagina se încarcă...
Pagina se încarcă...
Pagina se încarcă...
Pagina se încarcă...
Pagina se încarcă...
Pagina se încarcă...
Pagina se încarcă...
Pagina se încarcă...
Pagina se încarcă...
Pagina se încarcă...
Pagina se încarcă...
Pagina se încarcă...
Pagina se încarcă...
Pagina se încarcă...
Pagina se încarcă...
Pagina se încarcă...
Pagina se încarcă...
Pagina se încarcă...
Pagina se încarcă...
Pagina se încarcă...
Pagina se încarcă...
Pagina se încarcă...
Pagina se încarcă...
Pagina se încarcă...
Pagina se încarcă...
Pagina se încarcă...
Pagina se încarcă...
Pagina se încarcă...
Pagina se încarcă...
Pagina se încarcă...
Pagina se încarcă...
Pagina se încarcă...
Pagina se încarcă...
Pagina se încarcă...
Pagina se încarcă...
Pagina se încarcă...
Pagina se încarcă...
Pagina se încarcă...
Pagina se încarcă...
Pagina se încarcă...
Pagina se încarcă...
Pagina se încarcă...
Pagina se încarcă...
Pagina se încarcă...
Pagina se încarcă...
Pagina se încarcă...
Pagina se încarcă...
Pagina se încarcă...
Pagina se încarcă...
Pagina se încarcă...
Pagina se încarcă...
Pagina se încarcă...
Pagina se încarcă...
Pagina se încarcă...
Pagina se încarcă...
Pagina se încarcă...
Pagina se încarcă...
Pagina se încarcă...
Pagina se încarcă...
Pagina se încarcă...
Pagina se încarcă...
Pagina se încarcă...
Pagina se încarcă...
Pagina se încarcă...
Pagina se încarcă...
Pagina se încarcă...
Pagina se încarcă...
Pagina se încarcă...
Pagina se încarcă...
Pagina se încarcă...
Pagina se încarcă...
Pagina se încarcă...
Pagina se încarcă...
Pagina se încarcă...
Pagina se încarcă...
Pagina se încarcă...
Pagina se încarcă...
Pagina se încarcă...
Pagina se încarcă...
Pagina se încarcă...
Pagina se încarcă...
Pagina se încarcă...
Pagina se încarcă...
Pagina se încarcă...
Pagina se încarcă...
Pagina se încarcă...
Pagina se încarcă...
Pagina se încarcă...
Pagina se încarcă...
Pagina se încarcă...
Pagina se încarcă...
Pagina se încarcă...
Pagina se încarcă...
Pagina se încarcă...
Pagina se încarcă...
Pagina se încarcă...
Pagina se încarcă...
Pagina se încarcă...
Pagina se încarcă...
Pagina se încarcă...
Pagina se încarcă...
Pagina se încarcă...
Pagina se încarcă...
Pagina se încarcă...
Pagina se încarcă...
Pagina se încarcă...
Pagina se încarcă...
Pagina se încarcă...
Pagina se încarcă...
Pagina se încarcă...
Pagina se încarcă...
Pagina se încarcă...
Pagina se încarcă...
Pagina se încarcă...
Pagina se încarcă...
Pagina se încarcă...
Pagina se încarcă...
Pagina se încarcă...
Pagina se încarcă...
Pagina se încarcă...
Pagina se încarcă...
Pagina se încarcă...
Pagina se încarcă...
Pagina se încarcă...
Pagina se încarcă...
Pagina se încarcă...
Pagina se încarcă...
Pagina se încarcă...
Pagina se încarcă...
Pagina se încarcă...
Pagina se încarcă...
Pagina se încarcă...
Pagina se încarcă...
Pagina se încarcă...
Pagina se încarcă...
Pagina se încarcă...
Pagina se încarcă...
Pagina se încarcă...
Pagina se încarcă...
Pagina se încarcă...
Pagina se încarcă...
Pagina se încarcă...
Pagina se încarcă...
Pagina se încarcă...
Pagina se încarcă...
Pagina se încarcă...
Pagina se încarcă...
Pagina se încarcă...
Pagina se încarcă...
Pagina se încarcă...
Pagina se încarcă...
Pagina se încarcă...
Pagina se încarcă...
Pagina se încarcă...
Pagina se încarcă...
Pagina se încarcă...
Pagina se încarcă...
Pagina se încarcă...
Pagina se încarcă...
Pagina se încarcă...
Pagina se încarcă...
Pagina se încarcă...
Pagina se încarcă...
Pagina se încarcă...
Pagina se încarcă...
Pagina se încarcă...
Pagina se încarcă...
Pagina se încarcă...
Pagina se încarcă...
Pagina se încarcă...
Pagina se încarcă...
Pagina se încarcă...
Pagina se încarcă...
Pagina se încarcă...
Pagina se încarcă...
Pagina se încarcă...
Pagina se încarcă...
Pagina se încarcă...
Pagina se încarcă...
Pagina se încarcă...
Pagina se încarcă...
Pagina se încarcă...
Pagina se încarcă...
Pagina se încarcă...
-
 1
1
-
 2
2
-
 3
3
-
 4
4
-
 5
5
-
 6
6
-
 7
7
-
 8
8
-
 9
9
-
 10
10
-
 11
11
-
 12
12
-
 13
13
-
 14
14
-
 15
15
-
 16
16
-
 17
17
-
 18
18
-
 19
19
-
 20
20
-
 21
21
-
 22
22
-
 23
23
-
 24
24
-
 25
25
-
 26
26
-
 27
27
-
 28
28
-
 29
29
-
 30
30
-
 31
31
-
 32
32
-
 33
33
-
 34
34
-
 35
35
-
 36
36
-
 37
37
-
 38
38
-
 39
39
-
 40
40
-
 41
41
-
 42
42
-
 43
43
-
 44
44
-
 45
45
-
 46
46
-
 47
47
-
 48
48
-
 49
49
-
 50
50
-
 51
51
-
 52
52
-
 53
53
-
 54
54
-
 55
55
-
 56
56
-
 57
57
-
 58
58
-
 59
59
-
 60
60
-
 61
61
-
 62
62
-
 63
63
-
 64
64
-
 65
65
-
 66
66
-
 67
67
-
 68
68
-
 69
69
-
 70
70
-
 71
71
-
 72
72
-
 73
73
-
 74
74
-
 75
75
-
 76
76
-
 77
77
-
 78
78
-
 79
79
-
 80
80
-
 81
81
-
 82
82
-
 83
83
-
 84
84
-
 85
85
-
 86
86
-
 87
87
-
 88
88
-
 89
89
-
 90
90
-
 91
91
-
 92
92
-
 93
93
-
 94
94
-
 95
95
-
 96
96
-
 97
97
-
 98
98
-
 99
99
-
 100
100
-
 101
101
-
 102
102
-
 103
103
-
 104
104
-
 105
105
-
 106
106
-
 107
107
-
 108
108
-
 109
109
-
 110
110
-
 111
111
-
 112
112
-
 113
113
-
 114
114
-
 115
115
-
 116
116
-
 117
117
-
 118
118
-
 119
119
-
 120
120
-
 121
121
-
 122
122
-
 123
123
-
 124
124
-
 125
125
-
 126
126
-
 127
127
-
 128
128
-
 129
129
-
 130
130
-
 131
131
-
 132
132
-
 133
133
-
 134
134
-
 135
135
-
 136
136
-
 137
137
-
 138
138
-
 139
139
-
 140
140
-
 141
141
-
 142
142
-
 143
143
-
 144
144
-
 145
145
-
 146
146
-
 147
147
-
 148
148
-
 149
149
-
 150
150
-
 151
151
-
 152
152
-
 153
153
-
 154
154
-
 155
155
-
 156
156
-
 157
157
-
 158
158
-
 159
159
-
 160
160
-
 161
161
-
 162
162
-
 163
163
-
 164
164
-
 165
165
-
 166
166
-
 167
167
-
 168
168
-
 169
169
-
 170
170
-
 171
171
-
 172
172
-
 173
173
-
 174
174
-
 175
175
-
 176
176
-
 177
177
-
 178
178
-
 179
179
-
 180
180
-
 181
181
-
 182
182
-
 183
183
-
 184
184
-
 185
185
-
 186
186
-
 187
187
-
 188
188
-
 189
189
-
 190
190
-
 191
191
-
 192
192
-
 193
193
-
 194
194
-
 195
195
-
 196
196
-
 197
197
-
 198
198
-
 199
199
-
 200
200
-
 201
201
-
 202
202
-
 203
203
-
 204
204
-
 205
205
-
 206
206
-
 207
207
-
 208
208
-
 209
209
-
 210
210
-
 211
211
-
 212
212
-
 213
213
-
 214
214
-
 215
215
-
 216
216
-
 217
217
-
 218
218
-
 219
219
-
 220
220
-
 221
221
-
 222
222
-
 223
223
-
 224
224
-
 225
225
-
 226
226
-
 227
227
-
 228
228
-
 229
229
-
 230
230
-
 231
231
-
 232
232
-
 233
233
-
 234
234
-
 235
235
-
 236
236
-
 237
237
-
 238
238
-
 239
239
-
 240
240
-
 241
241
-
 242
242
-
 243
243
-
 244
244
-
 245
245
-
 246
246
-
 247
247
-
 248
248
-
 249
249
-
 250
250
-
 251
251
-
 252
252
-
 253
253
-
 254
254
-
 255
255
-
 256
256
-
 257
257
-
 258
258
-
 259
259
-
 260
260
-
 261
261
-
 262
262
-
 263
263
-
 264
264
-
 265
265
-
 266
266
-
 267
267
-
 268
268
-
 269
269
-
 270
270
-
 271
271
-
 272
272
-
 273
273
-
 274
274
-
 275
275
-
 276
276
-
 277
277
-
 278
278
-
 279
279
-
 280
280
-
 281
281
-
 282
282
-
 283
283
-
 284
284
-
 285
285
-
 286
286
-
 287
287
-
 288
288
-
 289
289
-
 290
290
-
 291
291
-
 292
292
-
 293
293
-
 294
294
-
 295
295
-
 296
296
-
 297
297
-
 298
298
-
 299
299
-
 300
300
-
 301
301
-
 302
302
-
 303
303
-
 304
304
-
 305
305
-
 306
306
-
 307
307
-
 308
308
-
 309
309
-
 310
310
-
 311
311
-
 312
312
-
 313
313
-
 314
314
-
 315
315
-
 316
316
-
 317
317
-
 318
318
-
 319
319
-
 320
320
-
 321
321
-
 322
322
-
 323
323
-
 324
324
-
 325
325
-
 326
326
-
 327
327
-
 328
328
-
 329
329
-
 330
330
-
 331
331
-
 332
332
-
 333
333
-
 334
334
-
 335
335
-
 336
336
-
 337
337
-
 338
338
-
 339
339
-
 340
340
-
 341
341
-
 342
342
-
 343
343
-
 344
344
-
 345
345
-
 346
346
-
 347
347
-
 348
348
-
 349
349
-
 350
350
-
 351
351
-
 352
352
-
 353
353
-
 354
354
-
 355
355
-
 356
356
-
 357
357
-
 358
358
-
 359
359
-
 360
360
-
 361
361
-
 362
362
-
 363
363
-
 364
364
-
 365
365
-
 366
366
-
 367
367
-
 368
368
-
 369
369
-
 370
370
-
 371
371
-
 372
372
-
 373
373
-
 374
374
-
 375
375
-
 376
376
-
 377
377
-
 378
378
-
 379
379
-
 380
380
-
 381
381
-
 382
382
-
 383
383
-
 384
384
-
 385
385
-
 386
386
-
 387
387
-
 388
388
-
 389
389
-
 390
390
-
 391
391
-
 392
392
-
 393
393
-
 394
394
-
 395
395
-
 396
396
-
 397
397
-
 398
398
-
 399
399
-
 400
400
-
 401
401
-
 402
402
-
 403
403
-
 404
404
-
 405
405
-
 406
406
-
 407
407
-
 408
408
-
 409
409
-
 410
410
-
 411
411
-
 412
412
-
 413
413
-
 414
414
-
 415
415
-
 416
416
-
 417
417
-
 418
418
-
 419
419
-
 420
420
-
 421
421
-
 422
422
-
 423
423
-
 424
424
-
 425
425
-
 426
426
-
 427
427
-
 428
428
-
 429
429
-
 430
430
-
 431
431
-
 432
432
-
 433
433
-
 434
434
-
 435
435
-
 436
436
-
 437
437
-
 438
438
-
 439
439
-
 440
440
-
 441
441
-
 442
442
-
 443
443
-
 444
444
-
 445
445
-
 446
446
-
 447
447
-
 448
448
-
 449
449
-
 450
450
-
 451
451
-
 452
452
-
 453
453
-
 454
454
-
 455
455
-
 456
456
-
 457
457
-
 458
458
-
 459
459
-
 460
460
-
 461
461
-
 462
462
-
 463
463
-
 464
464
-
 465
465
-
 466
466
-
 467
467
-
 468
468
-
 469
469
-
 470
470
-
 471
471
-
 472
472
-
 473
473
-
 474
474
-
 475
475
-
 476
476
-
 477
477
-
 478
478
-
 479
479
-
 480
480
-
 481
481
-
 482
482
-
 483
483
-
 484
484
-
 485
485
-
 486
486
-
 487
487
-
 488
488
-
 489
489
-
 490
490
-
 491
491
-
 492
492
-
 493
493
-
 494
494
-
 495
495
-
 496
496
-
 497
497
-
 498
498
-
 499
499
-
 500
500
-
 501
501
-
 502
502
-
 503
503
-
 504
504
-
 505
505
-
 506
506
-
 507
507
-
 508
508
-
 509
509
-
 510
510
-
 511
511
-
 512
512
-
 513
513
-
 514
514
-
 515
515
-
 516
516
-
 517
517
-
 518
518
-
 519
519
-
 520
520
-
 521
521
-
 522
522
-
 523
523
-
 524
524
-
 525
525
-
 526
526
-
 527
527
-
 528
528
-
 529
529
-
 530
530
-
 531
531
-
 532
532
-
 533
533
-
 534
534
-
 535
535
-
 536
536
-
 537
537
-
 538
538
-
 539
539
-
 540
540
-
 541
541
-
 542
542
-
 543
543
-
 544
544
-
 545
545
-
 546
546
-
 547
547
-
 548
548
-
 549
549
-
 550
550
-
 551
551
-
 552
552
-
 553
553
-
 554
554
-
 555
555
-
 556
556
-
 557
557
-
 558
558
-
 559
559
-
 560
560
-
 561
561
-
 562
562
-
 563
563
-
 564
564
-
 565
565
-
 566
566
-
 567
567
-
 568
568
-
 569
569
-
 570
570
-
 571
571
-
 572
572
-
 573
573
-
 574
574
-
 575
575
-
 576
576
-
 577
577
-
 578
578
-
 579
579
-
 580
580
-
 581
581
-
 582
582
-
 583
583
-
 584
584
-
 585
585
-
 586
586
-
 587
587
-
 588
588
-
 589
589
-
 590
590
-
 591
591
-
 592
592
-
 593
593
-
 594
594
-
 595
595
-
 596
596
-
 597
597
-
 598
598
-
 599
599
-
 600
600
-
 601
601
-
 602
602
-
 603
603
-
 604
604
-
 605
605
-
 606
606
-
 607
607
-
 608
608