
Product images are for illustrative purposes only and may differ from the actual product.
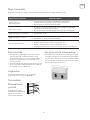
SIDE-BY-SIDE
REFRIGERATOR
FREEZER
RB5210FHX
User Manual
BG GR HU ROENG SRB
BiH/
CG

2
ENG
In the interest of your safety and to ensure the correct use,
before installing and first using the appliance, read this
user manual carefully, including its hints and warnings. To
avoid unnecessary mistakes and accidents, it is important
to ensure that all people using the appliance are
thoroughly familiar with its operation and safety features.
Save these instructions and make sure that they remain
with the appliance if it is moved or sold, so that everyone
using it through its life will be properly informed on
appliance use and safety.
For the safety of life and property keep to the precautions
of these user instructions as the manufacturer is not
responsible for damages caused by omission.
Children and vulnerable people safety
• This appliance can be used by children aged of 8
years and above and persons with reduced physical,
sensory or mental capabilities, or lack of experience and
knowledge if they have supervision or have been given
instructions concerning the use of the appliance in a
safe way and understand the hazards involved.
• Children aged from 3 to 8 years are allowed to load and
unload this appliance.
• Children should be supervised to ensure that they do
not play with the appliance.
• Cleaning and user maintenance should not be done by
children unless they are aged from 8 years and above
and supervised.
• Keep all packaging well away from children. There is risk
of suffocation.
• If you are discarding the appliance pull the plug out
of the socket, cut the connection cable (as close to the
appliance as you can) and remove the door to prevent
SAFETY INFORMATION

3
ENG
playing children from suffering electric shock or closing
themselves in.
• If this appliance features a magnetic door seal to replace
an older appliance having a spring lock (latch) on the
door or lid, be sure to make that spring lack unusable
before you discard the old appliance. This will prevent it
from becoming a death trap for a child.
General safety
Keep ventilation openings, in the appliance enclosure or
in the built-in structure, clear of obstruction.
Do not use mechanical devices or other means to
accelerate the defrosting process, other than those
recommended by the manufacturer.
Do not damage the refrigerant circuit.
Do not use other electrical appliances (such as ice cream
makers) inside of refrigerating appliances, unless they are
approved for this purpose by the manufacture.
Do not touch the light bulb if it has been on for a long
period of time because it could be very hot.1
When positioning the appliance, ensure the supply cord
is not trapped or damaged.
Do not locate multiple portable socket-outlets or portable
power suppliers at the rear of the appliance.
• Do not store explosive substances such as aerosol cans
with a flammable propellant in this appliance.
• The refrigerant isobutene (R600a) is contained within
the refrigerant circuit of the appliance, a natural gas with
a high level of environmental compatibility, which is
nevertheless flammable.
• During transportation and installation of the appliance,
be certain that none of the components of the
refrigerant circuit become damaged.

4
ENG
- avoid open flames and sources of ignition
- thoroughly ventilate the room in which the appliance is
situated
• It is dangerous to alter the specifications or modify this
product in any way. Any damage to the cord may cause
a short circuit, fire and/or electric shock.
• This appliance is intended to be used in a household
and similar applications such as
- staff kitchen areas in shops, offices and other working
environments;
- farm houses and by clients in hotels, motels and other
residential type environments;
- bed and breakfast type environments;
- catering and similar non-retail applications.
Any electrical components (plug, power cord,
compressor and etc.) must be replaced by a certified
service agent or qualified service personnel.
The light bulb supplied with this appliance is a “special
use light bulb” usable only with the appliance supplied.
This “special use lamp” is not usable for domestic
lighting.1
• Power cord must not be lengthened.
• Make sure that the power plug is not squashed or
damaged by the back of the appliance. A squashed or
damaged power plug may overheat and cause a fire.
• Make sure that you can come to the main plug of the
appliance.
• Do not pull the main cable.
• If the power plug socket is loose, do not insert the
power plug. There is a risk of electric shock or fire.
• You must not operate the appliance without the lamp.

5
ENG
• This appliance is heavy. Care should be taken when
moving it.
• Do not remove nor touch items from the freezer
compartment if your hands are damp/wet, as this could
cause skin abrasions or frost/freezer burns.
• Avoid prolonged exposure of the appliance to direct
sunlight.
Daily use
• Do not put hot things on the plastic parts in the
appliance.
• Do not place food products directly against the rear
wall.
• Frozen food must not be re-frozen once it has been
thawed out. 2
• Store pre-packed frozen food in accordance with the
frozen food manufacture, s instructions. 2
• Appliance, s manufactures storage recommendations
should be strictly adhered to. Refer to relevant
instructions.
• Do not place carbonated of fizzy drinks in the freezer
compartment as it creates pressure on the container,
which may cause it to explode, resulting in damage to
the appliance.2
• Ice lollies can cause frost burns if consumed straight
from the appliance.2
To avoid contamination of food, please respect the
following
instructions
• Opening the door for long periods can cause
a significant increase of the temperature in the
compartments of the appliance.
• Clean regularly surfaces that can come in contact with

6
ENG
food and accessible drainage systems.
• Clean water tanks if they have not been used for 48h;
flush the water system connected to a water supply if
water has not been drawn for 5 days.
• Store raw meat and fish in suitable containers in the
refrigerator, so that it is not in contact with or drip onto
other food.
• Two-star frozen-food compartments (if they are
presented in the appliance) are suitable for storing pre-
frozen food, storing or making ice-cream and making
ice cubes.
• One-, two- and three -star compartments (if they are
presented in the appliance) are not suitable for the
freezing of fresh food.
• If the appliance is left empty for long periods, switch off,
defrost, clean, dry and leave the door open to prevent
mount developing within the appliance.
Care and cleaning
• Before maintenance, switch off the appliance and
disconnect the main plug from the power socket.
• Do not clean the appliance with metal objects.
• Do not use sharp objects to remove frost from the
appliance. Use a plastic scraper. 2
• Regularly examine the drain in the refrigerator for
defrosted water. If necessary, clean the drain. If the
drain is blocked, water will collect at the bottom of the
appliance. 3
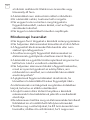
Installation
• For electrical connection carefully follow the instructions
given in specific paragraphs.
• Unpack the appliance and check if there are damages

7
ENG
on it. Do not connect the appliance if it is damaged.
Report possible damages immediately to the place you
bought it. In that case retain packing.
• It is advisable to wait at least four hours before
connecting the appliance to allow the oil to flow back in
the compressor.
• Adequate air circulation should be provided around the
appliance, lacking this leads to overheating. To achieve
sufficient ventilation, follow the instructions relevant to
installation.
• Wherever possible the spacers of the product should
be against a wall to avoid touching or catching warm
parts (compressor, con- denser) to prevent possible
burn.
• The appliance must not be located close to radiators or
cookers.
• Make sure that the main plug is accessible after the
installation of the appliance.
Service
• Any electrical work required to do the servicing of
the appliance should be carried out by a qualified
electrician or competent person.
• This product must be serviced by an authorized Service
Center, and only genuine spare parts must be used.
Energy saving
• Do not put hot food in the appliance;
• Do not pack food close together as this prevents air
circulating;
• Make sure food does not touch the back of the
compartment(s);
• If electricity goes off, do not open the door(s);

8
ENG
• Do not open the door(s) frequently;
• Do not keep the door(s) open for a long time;
• Do not set the thermostat on exceeding cold
temperatures;
• All accessories, such as drawers, shelves balconies,
should be kept there for lower energy consumption.
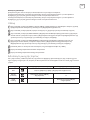
1 If there is a light in the compartment.
2 If there is a freezer compartment.
3 If there is a fresh-food storage compartment.
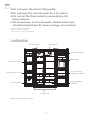
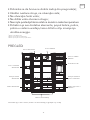
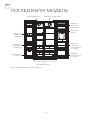
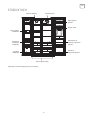
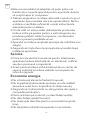
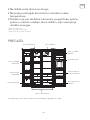
OVERVIEW
Note: Picture is for reference only.
Fridge Shelves
Fridge door shelves
Water Tank
Covers for fridge
vegetable containers
Fridge vegetable
containers
Levelling feet
Freezer drawers
Freezer drawer covers
Freezer door shelves
Freezer Shelves

9
ENG
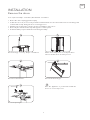
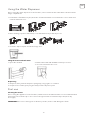
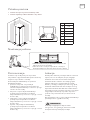
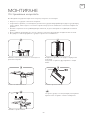
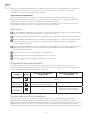
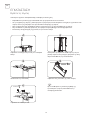
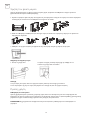
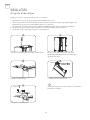
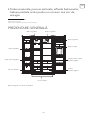
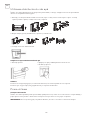
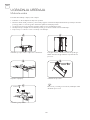
Remove the doors
Tool required: Philips screwdriver, Flat bladed screwdriver.
• Ensure the unit is unplugged and empty.
• To take the door off, it is necessary to tilt the unit backwards. You should rest the unit on something solid
so that it will not slip during the door reversing process.
• All parts removed must be saved to do the reinstallation of the door.
• Do not lay the unit flat as this may damage the coolant system.
• It’s better that 2 people handle the unit during assembly.
Unscrew hinge cover by Philips screwdriver. Lift the door and place it on a soft pad. Then
remove another door as same process.
Disconnect the harness.
Unscrew top hinge.
1 4
5
3
Unscrew bottom hinges.
After the appliance is positioned! install the
doors as reversed process.
2
6
INSTALLATION

10
ENG
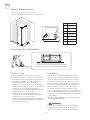
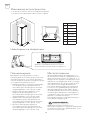
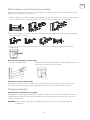
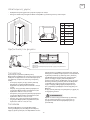
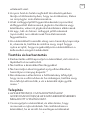
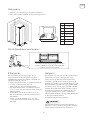
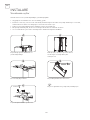
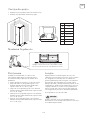
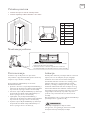
Space Requirement
• Keep enough space of door open.
• Keep at least 50mm gap at two sides and back.
Levelling the refrigerator
A900
B660
C1770
Dmin=50
Emin=50
F1800
G1560
H135°
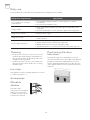
Positioning
Install this appliance at a location where the
ambient temperature corresponds to the climate
class indicated on the rating plate of the appliance:
For refrigerating appliances with climate class:
• extended temperate: this refrigerating
appliance is intended to be used at ambient
temperatures ranging from 10 °C to 32 °C (SN);
• temperate: this refrigerating appliance is
intended to be used at ambient temperatures
ranging from 16 °C to 32 °C (N);
• subtropical: this refrigerating appliance is
intended to be used at ambient temperatures
ranging from 16 °C to 38 °C (ST);
• tropical: this refrigerating appliance is intended
to be used at ambient temperatures ranging
from 16 °C to 43 °C (T);
Location
The appliance should be installed well away
from sources of heat such as radiators, boilers,
direct sunlight etc. Ensure that air can circulate
freely around the back of the cabinet to ensure
best performance. If the appliance is positioned
below an overhanging wall unit, the minimum
distance between the top of the cabinet and
the wall unit must be at least 100 mm. Ideally,
however, the appliance should not be positioned
below overhanging wall units. Accurate leveling is
ensured by one or more adjustable feet at the base
of the cabinet.
This refrigerating appliance is not intended to be
used as a built-in appliance.
WARNING!
It must be possible to disconnect the appliance
from the mains power supply; the plug must
therefore be easily accessible after installation.
Doors
- Clockwise rotate feet to highten them by hand
- Anticlockwise rotate feet to lower them by hand

11
ENG
Electrical connection
Before plugging in, ensure that the voltage and frequency shown on the rating plate correspond to your
domestic power supply. The appliance must be grounded. The power supply cable plug is provided with
a contact for this purpose. If the domestic power supply socket is not grounded, connect the appliance to
a separate grounder in compliance with current regulations, consulting a qualified electrician.
The manufacturer declines all responsibility if the above safety precautions are not observed. This
appliance complies with the E.E.C. Directives.
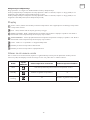
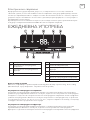
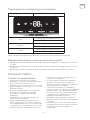
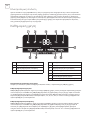
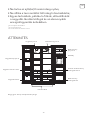
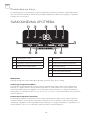
DAILY USE
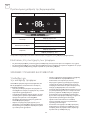
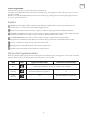
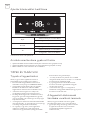
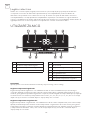
AMode settings
BRefrigerator temperature adjustment
CFreezer temperature adjustment
DLock or unlock
1ECO mode
2Holiday mode
3Refrigerator or freezer temperature
4Super freezing
5Lock icon
6Refrigerator temperature icon
7Freezer temperature icon
Mode button
Press to select running mode from ECO- Holiday- Super freezing - User’s setting
Refrigerator temperature adjustment
Refrigerator temperature adjustment: it is valid in the user’s setting mode and the super freezing mode.
Press this button to enter the temperature setting of the refrigerator compartment. At this time, the icon
of the refrigerator temperature lights up, and the temperature digital tube flashes. Press this button
continuously and the temperature will cycle between “2°C, 3°C, 4°C, 5°C, 6°C, 7°C, 8°C” in sequence; after
selection, it will be confirmed after flashing for 5s.
Freezer temperature adjustment:
Freezer temperature adjustment: it is valid in user’s setting mode and holiday mode. Press this key to enter
the temperature setting of the freezer. At this time, the icon of the freezing temperature lights up, and the
temperature digital tube flashes. Press this button continuously and the temperature will cycle between
-14°C and -22°C in sequence; after selection, it will be confirmed after flashing for 5s.

12
ENG
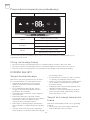
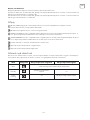
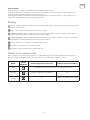
Display
Door open alarm
SMART mode, the refrigerator sets the temperature of two compartments automatically according to
Internal temperature and ambient temperature.
ECO mode, the refrigerator runs in lowest energy consumption setting.
SUPER COOLING cools the fridge compartment to the lowest temperature for approx. 2 hours. Then
the temperature set before super mode is automatically restored.
SUPER FREEZING cools the freezer compartment to the lowest temperature for approx. 6 hours. Then
the temperature set before super mode is automatically restored.
LOCK, the symbol will light on if buttons are locked.
Display the setting temperature of freezer compartment.
Display the setting temperature of fridge compartment.
If the door is opened for 60 seconds, the buzzer will sound the alarm according to the following rules:
Beep 5 times at 1Hz frequency, stop for 30 seconds; repeat this cycle until the door closes.
Mode Icon Freezer temperature display Refrigerator temperature display
ECO Smart settings based on ambient temperature
Holiday Keep the original temperature setting 17
Super
freezing -25 Keep the original temperature
setting
Lock or unlock
Long press this button to enter/exit the lock function.
Unlock function: In locked state, press and hold for 3 seconds, the buzzer will beep for a long time, and all
buttons will be unlocked.
Lock function: In the unlocked state, press and hold for 3 seconds, the buzzer will beep for a long time,
and all buttons will be locked.

13
ENG
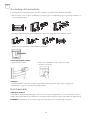
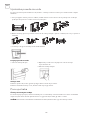
Using the Water Dispenser
Before using the water dispenser for the first time, remove and clean the water tank located inside the
fridge compartment.
1. Lift and take off tank balcony first, then take off water tank with cover. Detach the cover to wash and
clean the tank and cover.
2. After cleaning, reposition water tank, cover and tank balcony as below process.
3. Clean the dispenser pad outside the fridge door.
Filing the water tank with water
Dispensing
To dispense water, push the dispenser pad gently, using a glass or container.
To stop the flow of water, pull your glass away from the dispenser pad.
First use
Cleaning the interior
Before using the appliance for the first time, wash the interior and all internal accessories with lukewarm
water and some neutral soap so as to remove the typical smell of a brand new product, then dry
thoroughly
IMPORTANT! Do not use detergents or abrasive powders, as these will damage the finish.
1. Open the small lid 2. Fill the water tank with drinkable water up to 3 L line.
3. Close the small lid on the cover

14
ENG
Daily use
Position different food in different compartments according to be below table
Refrigerator compartments Type of food
Door or balconies of fridge
compartment
• Foods with natural preservatives, such as jams,juices, drinks,
condiments.
• Do not store perishable foods.
Crisper drawer
• Fruits, herbs and vegetables should be placed separately in the
crisper bin.
• Do not store bananas, onions, potatoes, garlic in the refrigerator.
Fridge shelf – middle • Dairy products, eggs
Fridge shelf – top • Foods that do not need cooking, such as ready-to-eat foods, deli
meats, leftovers.
Freezer drawer(s)/shelf
• Foods for long-term storage.
• Bottom drawer/shelf for raw meat, poultry, fish.
• Middle drawer/shelf for frozen vegetables, chips.
• Top drawer/shelf for ice cream, frozen fruit, frozen, baked goods.
Thawing
• Deep-frozen or frozen food, prior to be used,
can be thawed in the fridge compartment or
at room temperature, depending on the time
available for this operation.
• Small pieces may even be cooked still frozen,
directly from the freezer. In this case, cooking
will take longer.
Ice-cube
This appliance may be equipped with one or more
ice-cube to produce ice.
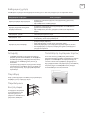
Accessories
Movable
shelves
The walls of the
refrigerator are equipped
with a series of runners
so that the shelves can be
positioned as desired.
Positioning the door
balconies
To permit storage of food packages of various
sizes, the door balconies can be placed at different
heights. To make these adjustments proceed as
follows: gradually pull the balcony in the direction
of the arrows until it comes free, then reposition as
required.

15
ENG
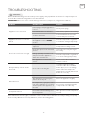
Environment Temperature Temperature Setting
Summer Fridge set on 4°C
Freezer set on -18°C
Normal Fridge set on 4°C
Freezer set on -18°C
Winter Fridge set on 4°C
Freezer set on -18°C
Temperature setting recommendation
Information above give users recommendation of temperature setting.
Impact on Food Storage
• Under Recommended setting, the best storage time of fridge is no more than 3 days.
• Under Recommended setting, the best storage time of freezer is no more than 1 month.
• The best storage time may reduce under other settings.
Hints for freezing
To help you make the most of the freezing process,
here are some important hints:
• the maximum quantity of food which can be
frozen in 24 hrs. is shown on the rating plate;
• the freezing process takes 24 hours. No further
food to be frozen should be added during this
period;
• only freeze top quality, fresh and thoroughly
cleaned, foodstuffs;
• prepare food in small portions to enable it to
be rapidly and completely frozen and to make it
possible subsequently to thaw only the quantity
required;
• wrap up the food in aluminum foil or polythene
and make sure that the packages are airtight;
• do not allow fresh, unfrozen food to touch food
which is already frozen, thus avoiding a rise in
temperature of the latter;
• lean foods store better and longer than fatty
ones; salt reduces the storage life of food;
• water ices, if consumed immediately after
removal from the freezer compartment, can
possibly cause the skin to be freeze burnt;
• removal from the freezer compartment, can
possibly cause the skin to be freeze burnt;
• it is advisable to show the freezing in date on
each individual pack to enable you to keep tab
of the storage time.
Hints for storage of frozen
food
To obtain the best performance from this
appliance, you should:
• make sure that the commercially frozen
foodstuffs were adequately stored by the
retailer;
HELPFUL HITS AND TIPS

16
ENG
• be sure that frozen foodstuffs are transferred
from the food store to the freezer in the shortest
possible time;
• do not open the door frequently or leave it
open longer than absolutely necessary.
• Once defrosted, food deteriorates rapidly and
cannot be refrozen.
• Do not exceed the storage period indicated by
the food manufacture.
Hints for fresh food
refrigeration
To obtain the best performance:
• Do not store warm food or evaporating liquids
in the refrigerator
• Do cover or wrap the food, particularly if it has a
strong flavor
Hints for refrigeration
• Meat (all types): wrap in polythene bags and
place on the glass shelves above the vegetable
drawer.
• For safety, store in this way only one or two days
at the most.
• Cooked foods, cold dishes, etc...: these should
be covered and may be placed on any shelf.
• Fruit and vegetables: these should be
thoroughly cleaned and placed in the special
drawer(s) provided.
• butter and cheese: these should be placed
in special airtight containers or wrapped in
aluminum foil or polythene bags to exclude as
much air as possible.
• Milk bottle: these should have a cap and should
be stored in the balconies on the door.
• Bananas, potatoes, onions and garlic, if not
packed, must not be kept in the fridge.
Cleaning
For hygienic reasons the appliance interior,
including interior accessories, should be cleaned
regularly.
CAUTION!
The appliance may not be connected to the mains
during cleaning. Danger of electrical shock! Before
cleaning switch the appliance off and remove the
plug from the mains, or switch off or turn out the
circuit breaker or fuse. Never clean the appliance
with a steam cleaner. Moisture could accumulate in
electrical components, danger of electrical shock!
Hot vapors can lead to the damage of plastic parts.
The appliance must be dry before it is placed back
into service.
IMPORTANT! Ethereal oils and organic solvents
can attack plastic parts, e.g. lemon juice or the
juice form orange peel, butyric acid, cleanser that
contain acetic acid.
• Do not allow such substances to come into
contact the appliance parts.
• Do not use any abrasive cleaners
• Remove the food from the freezer. Store them in
a cool place, well covered.
• Switch the appliance off and remove the plug
from the mains, or switch off the circuit breaker
or fuse.
• Clean the appliance and the interior accessories
with a cloth and lukewarm water. After cleaning
wipe with fresh water and rub dry.
• After everything is dry place appliance back into
service.

17
ENG
CAUTION!
Before troubleshooting, disconnect the power supply. Only a qualified electrician of competent person
must do the troubleshooting that is not in this manual.
IMPORTANT! There are some sounds during normal use (compressor, refrigerant circulation).
If the malfunction shows again, contact the Service Center. These data are necessary to help you quickly
and correctly. Write the necessary data here, refer to the rating plate.
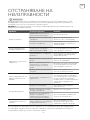
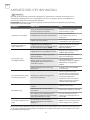
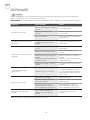
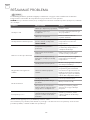
TROUBLESHOOTING
Problem Possible cause Solution
Appliance does not work
Power plug is not plugged in or
is loose Insert power plug.
Fuse has blown or is defective Check fuse, replace if necessary.
Socket is defective Socket malfunctions are to be
corrected by an electrician.
Appliance freezes or cools too
much
Temperature is set too cold or
the appliance runs at SUPER
modes.
Turn the temperature regulator
to a warmer setting temporarily.
The food is not frozen enough.
Temperature is not properly
adjusted.
Please look in the initial
Temperature Setting section.
Door was open for an extended
period.
Open the door only as long as
necessary.
A large quantity of warm food
was placed in the appliance
within the last 24 hours.
Turn the temperature regulation
to a colder setting temporarily.
The appliance is near a heat
source.
Please look in the installation
location section.
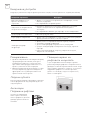
Heavy build up of frost on the
door seal. Door seal is not air tight.
Carefully warm the leaking
sections of the door seal with
a hair dryer (on a cool setting).
At the same time shape the
warmed door seal by hand such
that it sits correctly.
Unusual noises
Appliance is not level. Re-adjust the feet.
The appliance is touching the
wall or other objects. Move the appliance slightly.
A component, e.g. a pipe, on the
rear of the appliance is touching
another part of the appliance or
the wall.
If necessary, carefully bend the
component out of the way.
Side panels are hot It’s normal. Heat exchange is in
the side panels.
Take gloves to touch side panels
if need.

18
ENG
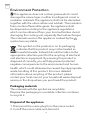
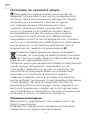
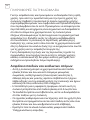
Environment Protection
This appliance does not contain gasses which could
damage the ozone layer, in either its refrigerant circuit or
insulation materials. The appliance shall not be discarded
together with the urban refuse and rubbish. The insulation
foam contains flammable gases: the appliance shall
be disposed according to the appliance regulations
which can be obtained from your local authorities. Avoid
damaging the cooling unit, especially the heat exchanger.
The materials used on this appliance marked by the
symbol are recyclable.
The symbol on the product or on its packaging
indicates that this product may not be treated as
household waste. Instead it should be taken to the
appropriate collection point for the recycling of electrical
and electronic equipment. By ensuring this product is
disposed of correctly, you will help prevent potential
negative consequences to the environment and human
health, which could otherwise be caused by inappropriate
waste handling of this product. For more detailed
information about recycling of this product, please
contact your local council, your household waste disposal
service or the shop where you purchased the product.
Packaging materials
The materials with the symbol are recyclable.
Dispose the packaging in a suitable collection container
to recycle it.
Disposal of the appliance
1. Disconnect the mains plug from the mains socket.
2. Cut off the mains cable and discard it.

19
ENG
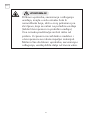
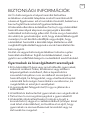
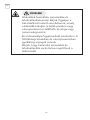
WARNING!
During using, service and disposal the
appliance, please pay attention to symbol
similar as left side, which is located on rear of
appliance (rear panel or compressor) and with
yellow or orange color.
It’s risk of fire warning symbol. There are
flammable materials in refrigerant pipes and
compressor.
Please be far away fire source during using,
service and disposal.

20
ENG
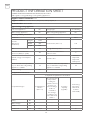
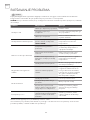
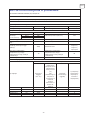
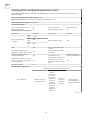
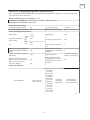
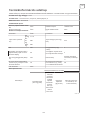
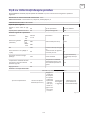
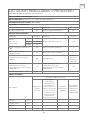
PRODUCT INFORMATION SHEET
COMMISSION DELEGATED REGULATION (EU) 2019/2016
with regard to energy labelling of refrigerating appliances
Supplier's name or trademark: Tesla
Supplier's address: Tesla Electronics, Litijska 47, 1000 Ljubljana, SI
Model identifier: RB5210FHX
Type of refrigerating appliance:
Low-noise appliance: No Design type: freestanding
Wine storage appliance: No Other refrigerating appliance: No
General product parameters:
Parameter Value Parameter Value
Overall
dimensions
(millimetre)
Height 1 770
Total volume (dm³ or l) 532Width 900
Depth 660
EEI 125 Energy efficiency class F
Airborne acoustical noise
emissions (dB(A) re 1 pW) 40 Airborne acoustical noise
emission class C
Annual energy consumption
(kWh/a) 392 Climate class:
extended
temperate,
temperate,
subtropical
Minimum ambient temperature
(ºC), for which the refrigerating
appliance is suitable
10
Maximum ambient temperature
(ºC), for which the refrigerating
appliance is suitable
38
Winter setting No
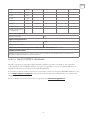
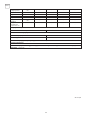
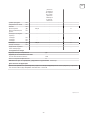
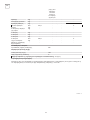
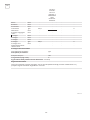
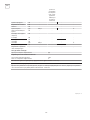
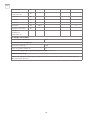
Compartment Parameters:
Compartment type
Compartment parameters and values
Compartment
volume
(dm³ or l)
Recommended
temperature
setting for
optimised food
storage (ºC)
These settings
shall not
contradict
the storage
conditions set
out in Annex IV,
Table 3
Freezing
capacity
(kg/24h)
Defrosting
type (auto-
defrost=A,
manual
defrost=M)
Pantry No - - - -
Wine storage No - - - -
Cellar No - - - -
Fresh food Yes 347,0 - - A
Pagina se încarcă...
Pagina se încarcă...
Pagina se încarcă...
Pagina se încarcă...
Pagina se încarcă...
Pagina se încarcă...
Pagina se încarcă...
Pagina se încarcă...
Pagina se încarcă...
Pagina se încarcă...
Pagina se încarcă...
Pagina se încarcă...
Pagina se încarcă...
Pagina se încarcă...
Pagina se încarcă...
Pagina se încarcă...
Pagina se încarcă...
Pagina se încarcă...
Pagina se încarcă...
Pagina se încarcă...
Pagina se încarcă...
Pagina se încarcă...
Pagina se încarcă...
Pagina se încarcă...
Pagina se încarcă...
Pagina se încarcă...
Pagina se încarcă...
Pagina se încarcă...
Pagina se încarcă...
Pagina se încarcă...
Pagina se încarcă...
Pagina se încarcă...
Pagina se încarcă...
Pagina se încarcă...
Pagina se încarcă...
Pagina se încarcă...
Pagina se încarcă...
Pagina se încarcă...
Pagina se încarcă...
Pagina se încarcă...
Pagina se încarcă...
Pagina se încarcă...
Pagina se încarcă...
Pagina se încarcă...
Pagina se încarcă...
Pagina se încarcă...
Pagina se încarcă...
Pagina se încarcă...
Pagina se încarcă...
Pagina se încarcă...
Pagina se încarcă...
Pagina se încarcă...
Pagina se încarcă...
Pagina se încarcă...
Pagina se încarcă...
Pagina se încarcă...
Pagina se încarcă...
Pagina se încarcă...
Pagina se încarcă...
Pagina se încarcă...
Pagina se încarcă...
Pagina se încarcă...
Pagina se încarcă...
Pagina se încarcă...
Pagina se încarcă...
Pagina se încarcă...
Pagina se încarcă...
Pagina se încarcă...
Pagina se încarcă...
Pagina se încarcă...
Pagina se încarcă...
Pagina se încarcă...
Pagina se încarcă...
Pagina se încarcă...
Pagina se încarcă...
Pagina se încarcă...
Pagina se încarcă...
Pagina se încarcă...
Pagina se încarcă...
Pagina se încarcă...
Pagina se încarcă...
Pagina se încarcă...
Pagina se încarcă...
Pagina se încarcă...
Pagina se încarcă...
Pagina se încarcă...
Pagina se încarcă...
Pagina se încarcă...
Pagina se încarcă...
Pagina se încarcă...
Pagina se încarcă...
Pagina se încarcă...
Pagina se încarcă...
Pagina se încarcă...
Pagina se încarcă...
Pagina se încarcă...
Pagina se încarcă...
Pagina se încarcă...
Pagina se încarcă...
Pagina se încarcă...
Pagina se încarcă...
Pagina se încarcă...
Pagina se încarcă...
Pagina se încarcă...
Pagina se încarcă...
Pagina se încarcă...
Pagina se încarcă...
Pagina se încarcă...
Pagina se încarcă...
Pagina se încarcă...
Pagina se încarcă...
Pagina se încarcă...
Pagina se încarcă...
Pagina se încarcă...
Pagina se încarcă...
Pagina se încarcă...
Pagina se încarcă...
Pagina se încarcă...
Pagina se încarcă...
Pagina se încarcă...
Pagina se încarcă...
Pagina se încarcă...
Pagina se încarcă...
Pagina se încarcă...
Pagina se încarcă...
Pagina se încarcă...
Pagina se încarcă...
Pagina se încarcă...
-
 1
1
-
 2
2
-
 3
3
-
 4
4
-
 5
5
-
 6
6
-
 7
7
-
 8
8
-
 9
9
-
 10
10
-
 11
11
-
 12
12
-
 13
13
-
 14
14
-
 15
15
-
 16
16
-
 17
17
-
 18
18
-
 19
19
-
 20
20
-
 21
21
-
 22
22
-
 23
23
-
 24
24
-
 25
25
-
 26
26
-
 27
27
-
 28
28
-
 29
29
-
 30
30
-
 31
31
-
 32
32
-
 33
33
-
 34
34
-
 35
35
-
 36
36
-
 37
37
-
 38
38
-
 39
39
-
 40
40
-
 41
41
-
 42
42
-
 43
43
-
 44
44
-
 45
45
-
 46
46
-
 47
47
-
 48
48
-
 49
49
-
 50
50
-
 51
51
-
 52
52
-
 53
53
-
 54
54
-
 55
55
-
 56
56
-
 57
57
-
 58
58
-
 59
59
-
 60
60
-
 61
61
-
 62
62
-
 63
63
-
 64
64
-
 65
65
-
 66
66
-
 67
67
-
 68
68
-
 69
69
-
 70
70
-
 71
71
-
 72
72
-
 73
73
-
 74
74
-
 75
75
-
 76
76
-
 77
77
-
 78
78
-
 79
79
-
 80
80
-
 81
81
-
 82
82
-
 83
83
-
 84
84
-
 85
85
-
 86
86
-
 87
87
-
 88
88
-
 89
89
-
 90
90
-
 91
91
-
 92
92
-
 93
93
-
 94
94
-
 95
95
-
 96
96
-
 97
97
-
 98
98
-
 99
99
-
 100
100
-
 101
101
-
 102
102
-
 103
103
-
 104
104
-
 105
105
-
 106
106
-
 107
107
-
 108
108
-
 109
109
-
 110
110
-
 111
111
-
 112
112
-
 113
113
-
 114
114
-
 115
115
-
 116
116
-
 117
117
-
 118
118
-
 119
119
-
 120
120
-
 121
121
-
 122
122
-
 123
123
-
 124
124
-
 125
125
-
 126
126
-
 127
127
-
 128
128
-
 129
129
-
 130
130
-
 131
131
-
 132
132
-
 133
133
-
 134
134
-
 135
135
-
 136
136
-
 137
137
-
 138
138
-
 139
139
-
 140
140
-
 141
141
-
 142
142
-
 143
143
-
 144
144
-
 145
145
-
 146
146
-
 147
147
-
 148
148


Lucrări înrudite
Alte documente
-
Candy CDV1S514EWHE Manual de utilizare
-
Candy C1DV145SFW Manual de utilizare
-
Heinner HSBS-H439NFXWDE++ Manualul proprietarului
-
-
-
-
-
Candy CDG5T717ES Manual de utilizare