Candy C1DV145SFW Manual de utilizare
- Categorie
- Frigidere
- Tip
- Manual de utilizare

Fridge - Freezer / User ManualEN
Refrigerador - Congelador / Manual de UsoES
Congélateur - Réfrigérateur / Guide D’utilisation
FR
Хладилник - фризер / Ръководство за потребителя
БГ
Køleskab-Fryser / Brugsanvisning
DA
Ψυγειοκαταψύκτης / Εγχειρίδιο Χρήστη
EL
Hladnjak – zamrzivač / Korisnički priručnik
HR

EN - 2
Thank you for choosing this product.
This user manual contains important information on safety and instructions intended to
assist you in the operation and maintenance of your appliance.
Please take the time to read this user manual before using your appliance and keep this
book for future reference.
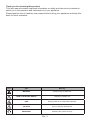
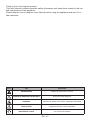
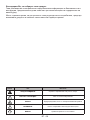
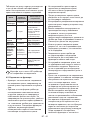
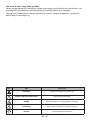
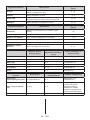
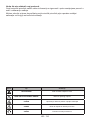
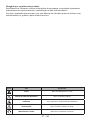
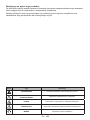
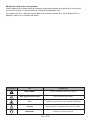
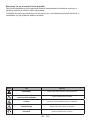
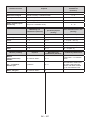
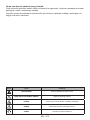
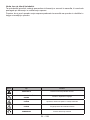
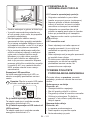
Icon Type Meaning
WARNING Serious injury or death risk
RISK OF ELECTRIC SHOCK Dangerous voltage risk
FIRE Warning; Risk of re / ammable materials
CAUTION Injury or property damage risk
IMPORTANT Operating the system correctly

EN - 3
CONTENTS
1 SAFETY INSTRUCTIONS ...............................................................................4
1.1 General Safety Warnings ...............................................................................................4
1.2 Installation warnings .......................................................................................................8
1.3 During Usage..................................................................................................................8
2 DESCRIPTION OF THE APPLIANCE ..........................................................10
2.1 Dimensions ................................................................................................................... 11
3 USING THE APPLIANCE ..............................................................................12
3.1 Information on Less Frost Technology ..........................................................................12
3.2 Thermostat Setting .......................................................................................................12
3.3 Temperature Settings Warnings ...................................................................................12
3.4 Accessories ..................................................................................................................13
3.4.1 Ice Tray (In some models) .......................................................................................13
3.4.2 The Plastic Scraper (In some models).....................................................................13
3.4.3 The Bottle Holder (In some models) ........................................................................13
4 FOOD STORAGE ...........................................................................................14
4.1 Refrigerator Compartment ............................................................................................14
4.2 Freezer Compartment ..................................................................................................15
5 CLEANING AND MAINTENANCE ................................................................18
5.1 Defrosting .....................................................................................................................18
6 SHIPMENT AND REPOSITIONING .............................................................. 19
6.1 Transportation and Changing Positioning ....................................................................19
6.2 Repositioning the Door .................................................................................................19
7 BEFORE CALLING AFTER-SALES SERVICE ........................................... 20
8 TIPS FOR SAVING ENERGY ........................................................................21
9 TECHNICAL DATA .........................................................................................21
10 INFORMATION FOR TEST INSTITUTES .................................................. 22
11 CUSTOMER CARE AND SERVICE ............................................................22

EN - 4
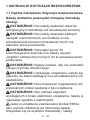
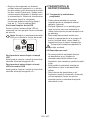
1 SAFETY INSTRUCTIONS
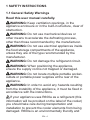
1.1 General Safety Warnings
Read this user manual carefully.
WARNING: Keep ventilation openings, in the
appliance enclosure or in the built-in structure, clear of
obstruction.
WARNING: Do not use mechanical devices or
other means to accelerate the defrosting process,
other than those recommended by the manufacturer.
WARNING: Do not use electrical appliances inside
the food storage compartments of the appliance,
unless they are of the type recommended by the
manufacturer.
WARNING: Do not damage the refrigerant circuit.
WARNING: When positioning the appliance,
ensure the supply cord is not trapped or damaged.
WARNING: Do not locate multiple portable socket-
outlets or portable power supplies at the rear of the
appliance.
WARNING: In order to avoid any hazards resulting
from the instability of the appliance, it must be xed in
accordance with the instructions.
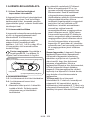
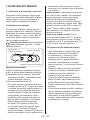
If your appliance uses R600a as a refrigerant (this
information will be provided on the label of the cooler)
you should take care during transportation and
installation to prevent the cooler elements from being
damaged. R600a is an environmentally friendly and

EN - 5
natural gas, but it is explosive. In the event of a leak
due to damage of the cooler elements, move your
fridge away from open ames or heat sources and
ventilate the room where the appliance is located for a
few minutes.
• While carrying and positioning the fridge, do not
damage the cooler gas circuit.
• Do not store explosive substances such as aerosol
cans with a ammable propellant in this appliance.
• This appliance is intended to be used in household
and domestic applications such as:
–sta kitchen areas in shops, oces and other
working environments.
–farm houses and by clients in hotels, motels and
other residential type environments.
–bed and breakfast type environments;
–catering and similar non-retail applications.
• If the socket does not match the refrigerator plug,
it must be replaced by the manufacturer, a service
agent or similarly qualied persons in order to avoid
a hazard.
• A specially grounded plug has been connected
to the power cable of your refrigerator. This plug
should be used with a specially grounded socket
of 16 amperes. If there is no such socket in your
house, please have one installed by an authorised
electrician.

EN - 6
•This appliance can be used by children aged from
8 years and above and persons with reduced
physical, sensory or mental capabilities or lack of
experience and knowledge if they have been given
supervision or instruction concerning use of the
appliance in a safe way and understand the hazards
involved. Children shall not play with the appliance.
Cleaning and user maintenance shall not be made
by children without supervision.
•Children aged from 3 to 8 years are allowed to load
and unload refrigerating appliances. Children are not
expected to perform cleaning or user maintenance
of the appliance, very young children (0-3 years old)
are not expected to use appliances, young children
(3-8 years old) are not expected to use appliances
safely unless continuous supervision is given, older
children (8-14 years old) and vulnerable people can
use appliances safely after they have been given
appropriate supervision or instruction concerning
use of the appliance. Very vulnerable people are
not expected to use appliances safely unless
continuous supervision is given.
•If the supply cord is damaged, it must be replaced
by the manufacturer, an authorised service agent or
similar qualied persons, in order to avoid a hazard.
•This appliance is not intended for use at altitudes
exceeding 2000 m.

EN - 7
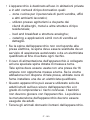
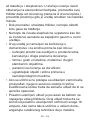
To avoid contamination of food, please respect the
following instructions:
• Opening the door for long periods can cause
a signicant increase of the temperature in the
compartments of the appliance.
• Clean regularly surfaces that can come in contact
with food and accessible drainage systems
• Store raw meat and sh in suitable containers in the
refrigerator, so that it is not in contact with or drip
onto other food.
• Two-star frozen-food compartments are suitable for
storing pre-frozen food, storing or making ice cream
and making ice cubes.
• One-, two- and three-star compartments are not
suitable for the freezing of fresh food.
• If the refrigerating appliance is left empty for long
periods, switch o, defrost, clean, dry, and leave the
door open to prevent mould developing within the
appliance.

EN - 8
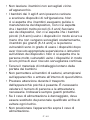
1.2 Installation warnings
Before using your fridge freezer for the first
time, please pay attention to the following
points:
• The operating voltage for your fridge
freezer is 220-240 V at 50Hz.
• The plug must be accessible after
installation.
• Your fridge freezer may have an odour
when it is operated for the first time. This
is normal and the odour will fade when
your fridge freezer starts to cool.
• Before connecting your fridge freezer,
ensure that the information on the data
plate (voltage and connected load)
matches that of the mains electricity
supply. If in doubt, consult a qualified
electrician.
• Insert the plug into a socket with an
efficient ground connection. If the socket
has no ground contact or the plug does
not match, we recommend you consult a
qualified electrician for assistance.
• The appliance must be connected
with a properly installed fused socket.
The power supply (AC) and voltage at
the operating point must match with
the details on the name plate of the
appliance (the name plate is located on
the inside left of the appliance).
• We do not accept responsibility for any
damages that occur due to ungrounded
usage.
• Place your fridge freezer where it will not
be exposed to direct sunlight.
• Your fridge freezer must never be used
outdoors or exposed to rain.
• Your appliance must be at least 50 cm
away from stoves, gas ovens and heater
cores, and at least 5 cm away from
electrical ovens.
• If your fridge freezer is placed next to a
deep freezer, there must be at least 2
cm between them to prevent humidity
forming on the outer surface.
• Do not cover the body or top of fridge
freezer with lace. This will affect the
performance of your fridge freezer.
• Clearance of at least 150 mm is required
at the top of your appliance. Do not place
anything on top of your appliance.
• Do not place heavy items on the
appliance.
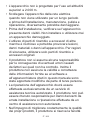
• Clean the appliance thoroughly before
use (see Cleaning and Maintenance).
• Before using your fridge freezer, wipe all
parts with a solution of warm water and
a teaspoon of sodium bicarbonate. Then,
rinse with clean water and dry. Return all
parts to the fridge freezer after cleaning.
• Use the adjustable front legs to make
sure your appliance is level and stable.
You can adjust the legs by turning them
in either direction. This must be done
before placing food in the appliance.
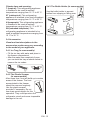
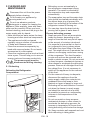
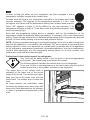
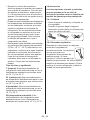
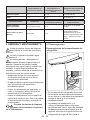
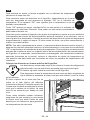
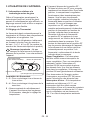
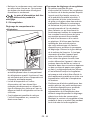
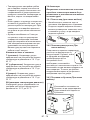
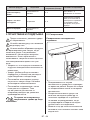
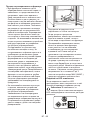
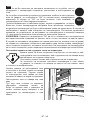
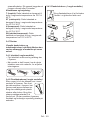
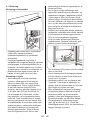
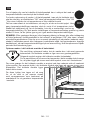
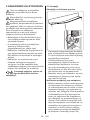
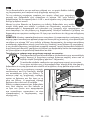
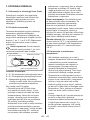
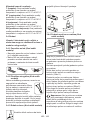
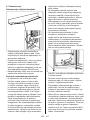
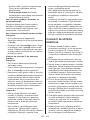
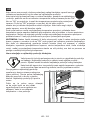
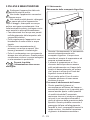
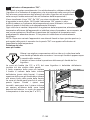
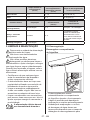
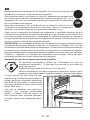
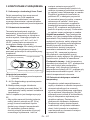
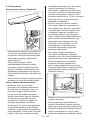
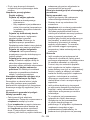
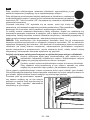
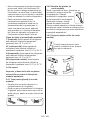
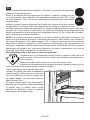
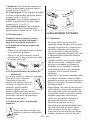
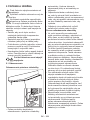
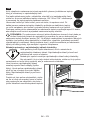
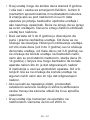
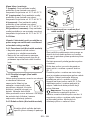
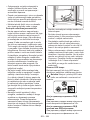
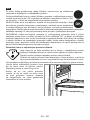
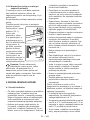
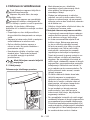
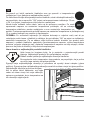
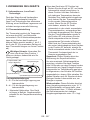
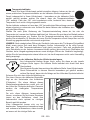
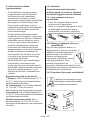
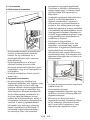
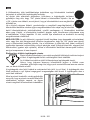
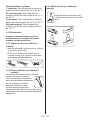
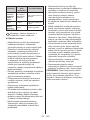
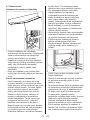
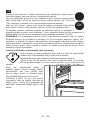
• Install the two plastic distance guides (the
parts on the black vanes
-condenser- at the rear)
by turning it 90° (as
shown in the figure) to
prevent the condenser
from touching the wall.
• The distance between
the appliance and back wall must be a
maximum of 75 mm.
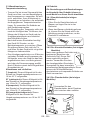
1.3 During Usage
• Do not connect your fridge freezer to
the mains electricity supply using an
extension lead.
• Do not use damaged, torn or old plugs.
• Do not pull, bend or damage the cord.
• Do not use plug adapter.
• This appliance is designed for use by
adults. Do not allow children to play with
the appliance or hang off the door.
• Never touch the power cord/plug with wet
hands. This may cause a short circuit or
electric shock.
• Do not place glass bottles or cans in the
ice-making compartment as they will
burst when the contents freeze.
• Do not place explosive or flammable
material in your fridge. Place drinks with

EN - 9
high alcohol content vertically in the
fridge compartment and make sure their
tops are tightly closed.
•When removing ice from the ice-making
compartment, do not touch it. Ice may
cause frost burns and/or cuts.
•Do not touch frozen goods with wet
hands. Do not eat ice-cream or ice cubes
immediately after they are removed from
the ice-making compartment.
•Do not re-freeze thawed frozen food. This
may cause health issues such as food
poisoning.
Old and Out-of-order Fridges
•If your old fridge or freezer has a
lock, break or remove the lock before
discarding it, because children may
get trapped inside it and may cause an
accident.
•Old fridges and freezers contain
isolation material and refrigerant with
CFC. Therefore, take care not to harm
environment when you are discarding
your old fridges.
CE Declaration of conformity
We declare that our products meet the
applicable European Directives, Decisions
and Regulations and the requirements
listed in the standards referenced.
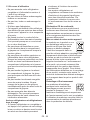
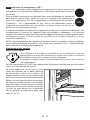
Disposal of your old appliance
The symbol on the product or on
its packaging indicates that this
product may not be treated as
household waste. Instead it shall
be handed over to the applicable
collection point for the recycling of electrical
and electronic equipment. By ensuring
this product is disposed of correctly,
you will help prevent potential negative
consequences for the environment and
human health, which could otherwise be
caused by inappropriate waste handling
of this product. For more detailed
information about recycling of this product,
please contact your local city office, your
household waste disposal service or the
shop where you purchased the product.
Packaging and the Environment
Packaging materials protect
your machine from damage that
may occur during transportation.
The packaging materials are
environmentally friendly as they are
recyclable. The use of recycled material
reduces raw material consumption and
therefore decreases waste production.
Notes:
•Please read the instruction manual
carefully before installing and using your
appliance. We are not responsible for the
damage occurred due to misuse.
•Follow all instructions on your appliance
and instruction manual, and keep this
manual in a safe place to resolve the
problems that may occur in the future.
•This appliance is produced to be used
in homes and it can only be used in
domestic environments and for the
specified purposes. It is not suitable for
commercial or common use. Such use
will cause the guarantee of the appliance
to be cancelled and our company will not
be responsible for any losses incurred.
•This appliance is produced to be used
in houses and it is only suitable for
cooling / storing foods. It is not suitable
for commercial or common use and/or
for storing substances except for food.
Our company is not responsible for any
losses incurred by inappropriate usage of
the appliance.

EN - 10
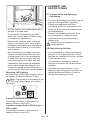
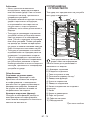
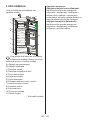
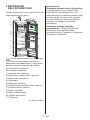
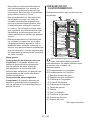
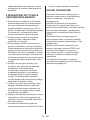
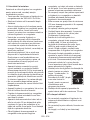
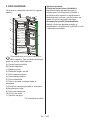
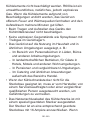
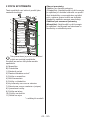
2 DESCRIPTION OF THE
APPLIANCE
This appliance is not intended to be used
as a built-in appliance.
1
2
3
5
6
7
4
8
10
9
11
A
B
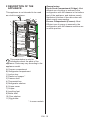
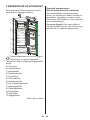
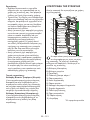
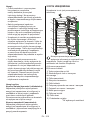
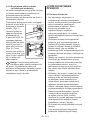
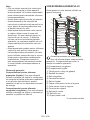
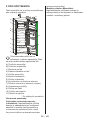
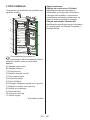
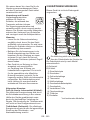
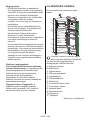
This presentation is only for
information about the parts of the
appliance. Parts may vary according to the
appliance model.
A) Freezer compartment
B) Refrigerator compartment
1) Ice box tray
2) Plastic ice scraper *
3) Freezer shelf
4) Thermostat box
5) Refrigerator shelves
6) Crisper cover
7) Crisper
8) Levelling feet
9) Bottle shelf
10) Door shelves
11) Egg holder
* In some models
General notes:
Fresh Food Compartment (Fridge): Most
efficient use of energy is ensured in the
configuration with the drawers in the bottom
part of the appliance, and shelves evenly
distributed, position of door bins does not
affect energy consumption.
Freezer Compartment (Freezer): Most
Efficient use of energy is ensured in the
configuration with the drawers and bins are
on stock position.

EN - 11
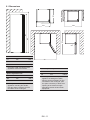
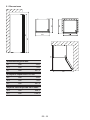
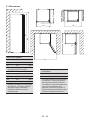
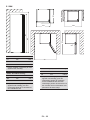
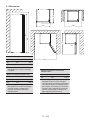
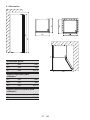
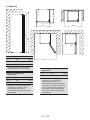
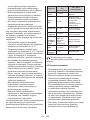
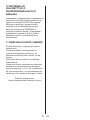
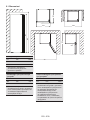
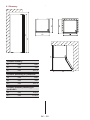
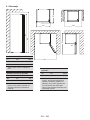
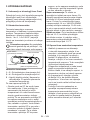
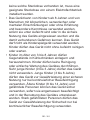
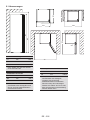
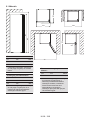
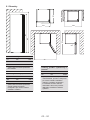
2.1 Dimensions
W2
D2
W1
D1
W3
90o
D3
Space required in use 2
H2 mm 1600,0
W2 mm 640,0
D2 mm 667,8
2 the height, width and depth of the
appliance including the handle,
plus the space necessary for free
circulation of the cooling air.
Overall space required in use 3
W3 mm 658,5
D3 mm 1106,5
3 the height, width and depth of the
appliance including the handle,
plus the space necessary for free
circulation of the cooling air, plus
the space necessary to allow door
opening to the minimum angle
permitting removal of all internal
equipment.
Overall dimensions 1
H1 mm 1450,0
W1 mm 540,0
D1 mm 570,0
1 the height, width and depth of the
appliance without the handle.
H1
H2

EN - 12
3 USING THE APPLIANCE
3.1 Information on Less Frost
Technology
Thanks to the wrap around evaporator,
Less Frost technology offers more efficient
cooling, less manual defrost requirement,
and more flexible storage room.
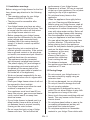
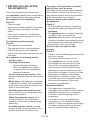
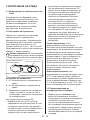
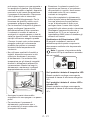
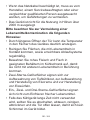
3.2 Thermostat Setting
The thermostat automatically regulates the
temperature inside the cooler and freezer
compartments. Refrigerator temperatures
can be obtained by rotating the knob
to higher numbers; 1 to 3, 1 to 5 or SF
(Maximum numbers on the thermostat
depends on your product.)
Important note: Do not try to rotate
the knob beyond position 1, it will stop
your appliance from working.
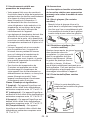
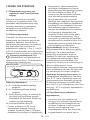
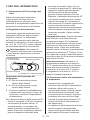
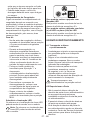
Super switch
(In some models)Thermostat knob
Lamp cover
(The images are representative)
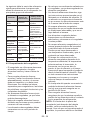
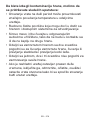
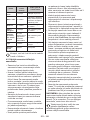
Thermostat settings:
1 – 2 : For short-term storage of food
3 – 4 : For long-term storage of food
5 : Maximum cooling position. The
appliance will work longer.If required,
change the temperature setting.
If device has SF position:
• Turn the knob to SF to freeze fresh
food quickly. In this position, the freezer
compartment will operate at lower
temperatures. After your food freezes,
turn the thermostat knob to its normal
use position. If you do not change the
SF position, your appliance work will
automatically return to its last used
thermostat position according to the
time indicated in the note. Return the
thermostat switch to the SF position
and return it to normal use according
to the time indicated in the note.If the
thermostat switch is in the SF position
when your appliance is first started, your
appliance work will automatically return
to the operation in the thermostat-3
position according to the time indicated in
the note.
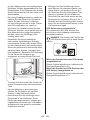
Super freezing: This switch shall be used
as superfreeze switch. For maximum
freezing capacity, please turn on this switch
before 24 hours placing fresh food. After
placing fresh food in the freezer, 24 hours
ON position is generally sufficient. In order
to save energy, please turn off this switch
after 24 hours from placingfresh food.
Winter Switch: If ambiant temperature
is below 16 oC, this switch shall be used
as winter switch and it keeps your fridge
above 0 oC while freezer is below -18 oC in
low ambiants.
3.3 Temperature Settings Warnings
• Your appliance is designed to operate in
the ambient temperature ranges stated
in the standards, according to the climate
class stated in the information label. It
is not recommended that your fridge is
operated in the environments which are
outside of the stated temperature ranges.
This will reduce the cooling efficiency of
the appliance.
• Temperature adjustments should be
made according to the frequency of
door openings, the quantity of food kept
inside the appliance and the ambient
temperature in the location of your
appliance.
• When the appliance is first switched on,
allow it to run for 24 hours in order to
reach operating temperature. During this
time, do not open the door and do not
keep a large quantity of food inside.
• A 5 minute delay function is applied
to prevent damage to the compressor
of your appliance when connecting
or disconnecting to mains, or when
an energy breakdown occurs. Your
appliance will begin to operate normally
after 5 minutes.

EN - 13
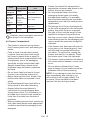
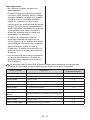
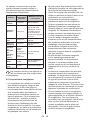
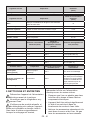
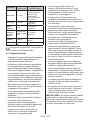
Climate class and meaning:
T (tropical): This refrigerating appliance
is intended to be used at ambient
temperatures ranging from 16 °C to 43 °C.
ST (subtropical): This refrigerating
appliance is intended to be used at ambient
temperatures ranging from 16 °C to 38 °C.
N (temperate): This refrigerating appliance
is intended to be used at ambient
temperatures ranging from 16 °C to 32 °C.
SN (extended temperate): This
refrigerating appliance is intended to be
used at ambient temperatures ranging from
10 °C to 32 °C.
3.4 Accessories
Visual and text descriptions in the
accessories section may vary according
to the model of your appliance.
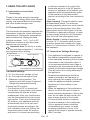
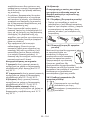
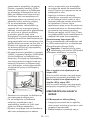
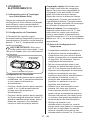
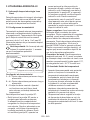
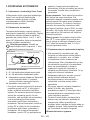
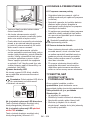
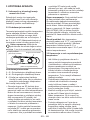
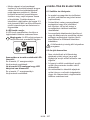
3.4.1 Ice Tray (In some models)
• Fill the ice tray with water and place in
the freezer compartment.
• After the water has completely frozen,
you can twist the tray as shown below to
remove the ice cubes.
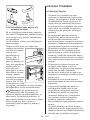
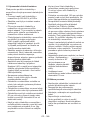
3.4.2 The Plastic Scraper
(In some models)
After some time, frost will build up in certain
areas of the freezer. The frost
accumulated in the freezer
should be removed regularly.
Use the plastic scraper
provided, if necessary. Do not
use sharp metal objects for this
operation. They could puncture the
refrigerator circuit and cause irreparable
damage to the unit.
3.4.3 The Bottle Holder (In some models)
Use the bottle holder to prevent
bottles from slipping or falling over.

EN - 14
4 FOOD STORAGE
4.1 Refrigerator Compartment
• To reduce humidity and avoid the
consequent formation of frost, always
store liquids in sealed containers in the
refrigerator. Frost tends to concentrate in
the coldest parts of the evaporating liquid
and, in time, your appliance will require
more frequent defrosting.
• Cooked dishes must remain covered
when they are kept in the fridge.Do
not place warm foods in fridge.Place
them when they are cool, otherwise the
temperature/humidity inside the fridge will
increases, reducing the fridge’s efficiency.
• Make sure no items are in direct contact
with the rear wall of the appliance as
frost will develop and packaging will stick
to it. Do not open the refrigerator door
frequently.
• We recommend that meat and clean fish
are loosely wrapped and stored on the
glass shelf just above the vegetable bin
where the air is cooler, as this provides
the best storage conditions.
• Store loose fruit and vegetable items in
the crisper containers.
• Storing fruit and vegetables separately
helps prevent ethylene-sensitive
vegetables (green leaves, broccoli,
carrot, etc.) being affected by ethylene-
releaser fruits (banana, peach, apricot,
fig etc.).
• Do not put wet vegetables into the
refrigerator.
• Storage time for all food products
depends on the initial quality of the food
and an uninterrupted refrigeration cycle
before refrigerator storage.
• Water leaking from meat may
contaminate other products in the
refrigerator. You should package meat
products and clean any leakages on the
shelves.
• Do not put food in front of the air flow
passage.
• Consume packaged foods before the
recommended expiry date.
Do not allow food to come into contact with
the temperature sensor, which is located
in the refrigerator compartment, in order
to keep the refrigerator compartment at
optimum temperature.
• For normal working conditions, it will
be sufficient to adjust the temperature
setting of your refrigerator to +4 °C.
• The temperature of the fridge
compartment should be in the range
of 0-8 °C, fresh foods below 0 °C are
iced and rotted, bacterial load increases
above 8 °C, and spoils.
• Do not put hot food in the refrigerator
immediately, wait for the temperature
to pass outside. Hot foods increase the
degree of your refrigerator and cause
food poisoning and unnecessary spoiling
of the food.
• Meat, fish, etc. should be store in the
chiller compartment of the food, and the
vegetable compartment is preferred for
vegetables. (if available)
• To prevent cross contamination, meat
products and fruit vegetables are not
stored together.
• Foods should be placed in the
refrigerator in closed containers or
covered to prevent moisture and odors.
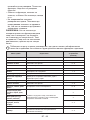
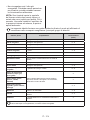
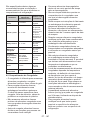
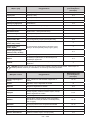
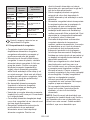
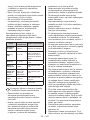
The table below is a quick guide to show
you the most efficient way to store the
major food groups in your refrigerator
compartment.
Food Maximum
storage time
How and where to
store
Vegetables
and fruits 1 week Vegetable bin
Meat and
sh 2 - 3 days
Wrap in plastic foil,
bags, or in a meat
container and store
on the glass shelf
Fresh
cheese 3 - 4 days On the designated
door shelf

EN - 15
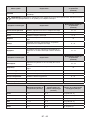
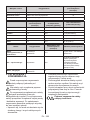
Food Maximum
storage time
How and where to
store
Butter and
margarine 1 week On the designated
door shelf
Bottled
products
e.g. milk
and
yoghurt
Until the
expiry date
recommended
by the
producer
On the designated
door shelf
Eggs 1 month On the designated
egg shelf
Cooked
food 2 days All shelves
NOTE:
Potatoes, onions and garlic should not
be stored in the refrigerator.
4.2 Freezer Compartment
• The freezer is used for storing frozen
food, freezing fresh food, and making ice
cubes.
• Food in liquid form should be frozen
in plastic cups and other food should
be frozen in plastic folios or bags.For
freezing fresh food; wrap and seal fresh
food properly, that is the packaging
should be air tight and shouldn’t leak.
Special freezer bags, aluminum foil
polythene bags and plastic containers
are ideal.
• Do not store fresh food next to frozen
food as it can thaw the frozen food.
• Before freezing fresh food, divide it into
portions that can be consumed in one
sitting.
• Consume thawed frozen food within a
short period of time after defrosting
• Always follow the manufacturer's
instructions on food packaging when
storing frozen food. If no information is
provided food, should not be stored for
more than 3 months from the date of
purchase.
• When purchasing frozen food, make sure
that it has been stored under appropriate
conditions and that the packaging is not
damaged.
• Frozen food should be transported in
appropriate containers and placed in the
freezer as soon as possible.
• Do not purchase frozen food if the
packaging shows signs of humidity
and abnormal swelling. It is probable
that it has been stored at an unsuitable
temperature and that the contents have
deteriorated.
• The storage life of frozen food depends
on the room temperature, the thermostat
setting, how often the door is opened,
the type of food, and the length of time
required to transport the product from
the shop to your home. Always follow the
instructions printed on the packaging and
never exceed the maximum storage life
indicated.
• If the freezer door has been left open for
a long time or not closed properly, frost
will form and can prevent efficient air
circulation. To resolve this, unplug the
freezer and wait for it to defrost. Clean
the freezer once it has fully defrosted.
• The freezer volume stated on the label is
the volume without baskets, covers, and
so on.
• Do not refreeze thawed food. It may
pose a danger to your health and cause
problems such as food poisoning.
NOTE: If you attempt to open the freezer
door immediately after closing it, you
will find that it will not open easily. This
is normal. Once equilibrium has been
reached, the door will open easily.

EN - 16
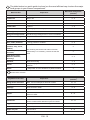
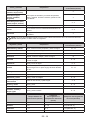
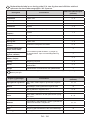
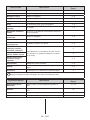
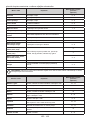
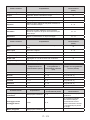
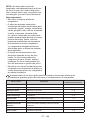
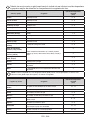
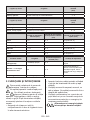
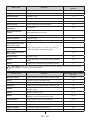
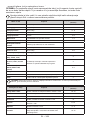
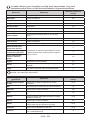
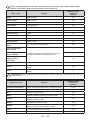
The table below is a quick guide to show you the most efficient way to store the major
food groups in your freezer compartment.
Meat and sh Preparation Maximum storage time
(months)
Steak Wrap in foil 6 - 8
Lamb meat Wrap in foil 6 - 8
Veal roast Wrap in foil 6 - 8
Veal cubes In small pieces 6 - 8
Lamb cubes In pieces 4 - 8
Minced meat In packaging without using spices 1 - 3
Giblets (pieces) In pieces 1 - 3
Bologna sausage/salami Should be kept packaged even if it has a membrane
Chicken and turkey Wrap in foil 4 - 6
Goose and duck Wrap in foil 4 - 6
Deer, rabbit, wild boar In 2.5 kg portions or as llets 6 - 8
Freshwater sh
(Salmon, Carp, Crane,
Catsh)
After cleaning the bowels and scales of the sh,
wash and dry it. If necessary, remove the tail and
head.
2
Lean sh (Bass, Turbot,
Flounder) 4
Fatty shes (Tuna,
Mackerel, Bluesh,
Anchovy)
2 - 4
Shellsh Clean and in a bag 4 - 6
Caviar In its packaging, or in an aluminium or plastic
container 2 - 3
Snails In salty water, or in an aluminium or plastic container 3
NOTE: Thawed frozen meat should be cooked as fresh meat. If the meat is not cooked after defrosting, it
must not be re-frozen.
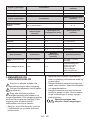
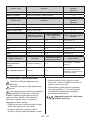
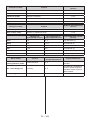
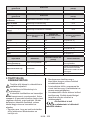
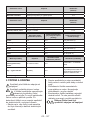
Vegetables and Fruits Preparation Maximum storage time
(months)
String beans and beans Wash, cut into small pieces and boil in water 10 - 13
Beans Hull, wash and boil in water 12
Cabbage Clean and boil in water 6 - 8
Carrot Clean, cut into slices and boil in water 12
Pepper Cut the stem, cut into two pieces, remove the core
and boil in water 8 - 10
Spinach Wash and boil in water 6 - 9
Cauliower Remove the leaves, cut the heart into pieces and
leave it in water with a little lemon juice for a while 10 - 12
Eggplant Cut into pieces of 2cm after washing 10 - 12
Corn Clean and pack with its stem or as sweet corn 12
Apple and pear Peel and slice 8 - 10
Apricot and Peach Cut into two pieces and remove the stone 4 - 6

EN - 17
Vegetables and Fruits Preparation Maximum storage time
(months)
Strawberry and
Blackberry Wash and hull 8 - 12
Cooked fruits Add 10 % of sugar to the container 12
Plum, cherry, sourberry Wash and hull the stems 8 - 12
Maximum storage time
(months)
Thawing time at room
temperature (hours)
Thawing time in oven
(minutes)
Bread 4 - 6 2 - 3 4-5 (220-225 °C)
Biscuits 3 - 6 1 - 1,5 5-8 (190-200 °C)
Pastry 1 - 3 2 - 3 5-10 (200-225 °C)
Pie 1 - 1,5 3 - 4 5-8 (190-200 °C)
Phyllo dough 2 - 3 1 - 1,5 5-8 (190-200 °C)
Pizza 2 - 3 2 - 4 15-20 (200 °C)
Dairy products Preparation Maximum storage time
(months) Storage conditions
Packet (Homogenized)
Milk In its own packet 2 - 3 Pure Milk – in its own packet
Cheese - excluding
white cheese In slices 6 - 8
Original packaging may be
used for short-term storage.
Keep wrapped in foil for
longer periods.
Butter, margarine In its packaging 6

EN - 18
5 CLEANING AND
MAINTENANCE
Disconnect the unit from the power
supply before cleaning.
Do not wash your appliance by
pouring water on it.
Do not use abrasive products,
detergents or soaps for cleaning the
appliance. After washing, rinse with clean
water and dry carefully. When you have
finished cleaning, reconnect the plug to the
mains supply with dry hands.
• Make sure that no water enters the lamp
housing and other electrical components.
• The appliance should be cleaned
regularly using a solution of bicarbonate
of soda and lukewarm water.
• Clean the accessories separately by
hand with soap and water. Do not wash
accessories in a dish washer.
• Clean the condenser with a brush at least
twice a year. This will help you to save on
energy costs and increase productivity.
The power supply must be
disconnected during cleaning.
5.1 Defrosting
Defrosting the Refrigerator
Compartment
• Defrosting occurs automatically in
the refrigerator compartment during
operation. The water is collected by
the evaporation tray and evaporates
automatically.
• The evaporation tray and the water drain
hole should be cleaned periodically with
the defrost drain plug to prevent the
water from collecting at the bottom of the
refrigerator instead of flowing out.
• You can also clean the drain hole by
pouring half a glass of water down it.
Freezer defrosting process
• Small amounts of frost will accumulate
inside the freezer, depending on the
length of time the door may be left open
or the amount of moisture introduced.
It is essential to ensure that no frost or
ice is allowed to form in places where
it will affect the close fitting of the door
seal. This might allow air to penetrate the
cabinet, encouraging continuous running
of the compressor. Thin frost formation
is quite soft and can be removed with a
brush or plastic scraper. Do not use metal
or sharp scrapers, mechanical devices or
other means to accelerate the defrosting
process. Remove all dislodged frost from
the cabinet floor. It is not necessary to
switch off the appliance for the removal
of thin frost.
• For the removal of heavy ice deposits,
disconnect the appliance from the
mains supply, empty the contents into
cardboard boxes and wrap in thick
blankets or layers of paper to keep cool.
Defrosting will be most effective if carried
out when the freezer is nearly empty
and should be carried out as quickly
as possible to prevent an unnecessary
increase in the temperature of the
contents.
• Do not use metal or sharp scrapers,
mechanical devices or other means to
accelerate the defrosting process. An
increase in temperature of frozen food
during defrosting will shorten the storage
life. Keep contents well wrapped and cool
while defrosting is taking place.

EN - 19
•Dry the inside of the compartment with a
sponge or a clean cloth.
•To accelerate the defrosting process,
place one or more bowls of warm water
in the freezer compartment.
• Examine the contents when replacing
them in the freezer and if some of the
packages have thawed out, they should
be eaten within 24hours, or be cooked
and re-frozen.
•After defrosting is complete, clean the
inside of the appliance with a solution
of warm water and a little bicarbonate
of soda, then dry thoroughly. Wash all
removable parts in the same way and
reassemble. Reconnect the appliance
to the mains supply and leave for 2 to
3 hours on setting number MAX before
introducing the food back into the freezer.
Replacing LED Lighting
To replace any of the LEDs, please contact
the nearest Authorised Service Centre.
Note: The numbers and location of the
LED strips may change according to
the model.
If product equipped with LED lamp
This product contains a light source of
energy efficiency class <E>.
If product equipped with LED Strip(s) or
LED card(s)
This product contains a light source of
energy efficiency class <F>.
6 SHIPMENT AND
REPOSITIONING
6.1 Transportation and Changing
Positioning
•The original packaging and foam may be
kept for re-transportation (optional).
•Fasten your appliance with thick
packaging, bands or strong cords and
follow the instructions for transportation
on the packaging.
• Remove all movable parts or fix them
into the appliance against shocks
using bands when re-positioning or
transporting.
Always carry your appliance in the
upright position.
6.2 Repositioning the Door
•It is not possible to change the opening
direction of your appliance door if door
handles are installed on the front surface
of the appliance door.
•It is possible to change the opening
direction of the door on models without
handles.
•If the door-opening direction of your
appliance can be changed, contact the
nearest Authorised Service Centre to
change the opening direction.

EN - 20
7 BEFORE CALLING AFTER-
SALES SERVICE
If you are experiencing a problem with
your appliance, please check the following
before contacting the after-sales service.
Your appliance is not operating
Check if:
• There is power
• The plug is correctly placed in the socket
• The plug fuse or the mains fuse has
blown
• The socket is defective. To check this,
plug another working appliance into the
same socket.
The appliance performs poorly
Check if:
• The appliance is overloaded
• The appliance door is closed properly
• There is any dust on the condenser
• There is enough space near the rear and
side walls.
Your appliance is operating noisily
Normal noises
Cracking noise occurs:
• During automatic defrosting
• When the appliance is cooled
or warmed (due to expansion of
appliance material).
Short cracking noise occurs: When
the thermostat switches the compressor
on/off.
Motor noise: Indicates the compressor
is operating normally. The compressor
may cause more noise for a short time
when it is first activated.
Bubbling noise and splash occurs:
Due to the flow of the refrigerant in the
tubes of the system.
Water flowing noise occurs: Due
to water flowing to the evaporation
container. This noise is normal during
defrosting.
Air blowing noise occurs: In some
models during normal operation of the
system due to the circulation of air.
The edges of the appliance in contact
with the door joint are warm
Especially during summer (warm seasons),
the surfaces in contact with the door joint
may become warmer during the operation
of the compressor, this is normal.
There is a build-up of humidity inside
the appliance
Check if:
• All food is packed properly. Containers
must be dry before being placed in the
appliance.
• The appliance door is opened frequently.
Humidity of the room enters the
appliance when the doors are opened.
Humidity increases faster when the doors
are opened more frequently, especially if
the humidity of the room is high.
The door does not open or close
properly
Check if:
• There is food or packaging preventing the
door from closing
• The door joints are broken or torn
• Your appliance is on a level surface.
• The compressor can run loudly or the
noise of the compressor/refrigerator
may increase in some models during
operating in some conditions such that
the product is plugged in for the first time,
depending on change in the ambient
temperature or change of usage. That
is normal; when the refrigerator reaches
the required temperature, the noise
decreases automatically.
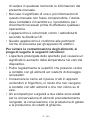
Recommendations
• If the appliance is switched off or
unplugged, wait at least 5 minutes before
plugging the appliance in or restarting
it in order to prevent damage to the
compressor.
• If you will not use your appliance for
a long time (e.g. in summer holidays)
unplug it. Clean your appliance according
to chapter cleaning and leave the door
open to prevent humidity and smell.
Pagina se încarcă ...
Pagina se încarcă ...
Pagina se încarcă ...
Pagina se încarcă ...
Pagina se încarcă ...
Pagina se încarcă ...
Pagina se încarcă ...
Pagina se încarcă ...
Pagina se încarcă ...
Pagina se încarcă ...
Pagina se încarcă ...
Pagina se încarcă ...
Pagina se încarcă ...
Pagina se încarcă ...
Pagina se încarcă ...
Pagina se încarcă ...
Pagina se încarcă ...
Pagina se încarcă ...
Pagina se încarcă ...
Pagina se încarcă ...
Pagina se încarcă ...
Pagina se încarcă ...
Pagina se încarcă ...
Pagina se încarcă ...
Pagina se încarcă ...
Pagina se încarcă ...
Pagina se încarcă ...
Pagina se încarcă ...
Pagina se încarcă ...
Pagina se încarcă ...
Pagina se încarcă ...
Pagina se încarcă ...
Pagina se încarcă ...
Pagina se încarcă ...
Pagina se încarcă ...
Pagina se încarcă ...
Pagina se încarcă ...
Pagina se încarcă ...
Pagina se încarcă ...
Pagina se încarcă ...
Pagina se încarcă ...
Pagina se încarcă ...
Pagina se încarcă ...
Pagina se încarcă ...
Pagina se încarcă ...
Pagina se încarcă ...
Pagina se încarcă ...
Pagina se încarcă ...
Pagina se încarcă ...
Pagina se încarcă ...
Pagina se încarcă ...
Pagina se încarcă ...
Pagina se încarcă ...
Pagina se încarcă ...
Pagina se încarcă ...
Pagina se încarcă ...
Pagina se încarcă ...
Pagina se încarcă ...
Pagina se încarcă ...
Pagina se încarcă ...
Pagina se încarcă ...
Pagina se încarcă ...
Pagina se încarcă ...
Pagina se încarcă ...
Pagina se încarcă ...
Pagina se încarcă ...
Pagina se încarcă ...
Pagina se încarcă ...
Pagina se încarcă ...
Pagina se încarcă ...
Pagina se încarcă ...
Pagina se încarcă ...
Pagina se încarcă ...
Pagina se încarcă ...
Pagina se încarcă ...
Pagina se încarcă ...
Pagina se încarcă ...
Pagina se încarcă ...
Pagina se încarcă ...
Pagina se încarcă ...
Pagina se încarcă ...
Pagina se încarcă ...
Pagina se încarcă ...
Pagina se încarcă ...
Pagina se încarcă ...
Pagina se încarcă ...
Pagina se încarcă ...
Pagina se încarcă ...
Pagina se încarcă ...
Pagina se încarcă ...
Pagina se încarcă ...
Pagina se încarcă ...
Pagina se încarcă ...
Pagina se încarcă ...
Pagina se încarcă ...
Pagina se încarcă ...
Pagina se încarcă ...
Pagina se încarcă ...
Pagina se încarcă ...
Pagina se încarcă ...
Pagina se încarcă ...
Pagina se încarcă ...
Pagina se încarcă ...
Pagina se încarcă ...
Pagina se încarcă ...
Pagina se încarcă ...
Pagina se încarcă ...
Pagina se încarcă ...
Pagina se încarcă ...
Pagina se încarcă ...
Pagina se încarcă ...
Pagina se încarcă ...
Pagina se încarcă ...
Pagina se încarcă ...
Pagina se încarcă ...
Pagina se încarcă ...
Pagina se încarcă ...
Pagina se încarcă ...
Pagina se încarcă ...
Pagina se încarcă ...
Pagina se încarcă ...
Pagina se încarcă ...
Pagina se încarcă ...
Pagina se încarcă ...
Pagina se încarcă ...
Pagina se încarcă ...
Pagina se încarcă ...
Pagina se încarcă ...
Pagina se încarcă ...
Pagina se încarcă ...
Pagina se încarcă ...
Pagina se încarcă ...
Pagina se încarcă ...
Pagina se încarcă ...
Pagina se încarcă ...
Pagina se încarcă ...
Pagina se încarcă ...
Pagina se încarcă ...
Pagina se încarcă ...
Pagina se încarcă ...
Pagina se încarcă ...
Pagina se încarcă ...
Pagina se încarcă ...
Pagina se încarcă ...
Pagina se încarcă ...
Pagina se încarcă ...
Pagina se încarcă ...
Pagina se încarcă ...
Pagina se încarcă ...
Pagina se încarcă ...
Pagina se încarcă ...
Pagina se încarcă ...
Pagina se încarcă ...
Pagina se încarcă ...
Pagina se încarcă ...
Pagina se încarcă ...
Pagina se încarcă ...
Pagina se încarcă ...
Pagina se încarcă ...
Pagina se încarcă ...
Pagina se încarcă ...
Pagina se încarcă ...
Pagina se încarcă ...
Pagina se încarcă ...
Pagina se încarcă ...
Pagina se încarcă ...
Pagina se încarcă ...
Pagina se încarcă ...
Pagina se încarcă ...
Pagina se încarcă ...
Pagina se încarcă ...
Pagina se încarcă ...
Pagina se încarcă ...
Pagina se încarcă ...
Pagina se încarcă ...
Pagina se încarcă ...
Pagina se încarcă ...
Pagina se încarcă ...
Pagina se încarcă ...
Pagina se încarcă ...
Pagina se încarcă ...
Pagina se încarcă ...
Pagina se încarcă ...
Pagina se încarcă ...
Pagina se încarcă ...
Pagina se încarcă ...
Pagina se încarcă ...
Pagina se încarcă ...
Pagina se încarcă ...
Pagina se încarcă ...
Pagina se încarcă ...
Pagina se încarcă ...
Pagina se încarcă ...
Pagina se încarcă ...
Pagina se încarcă ...
Pagina se încarcă ...
Pagina se încarcă ...
Pagina se încarcă ...
Pagina se încarcă ...
Pagina se încarcă ...
Pagina se încarcă ...
Pagina se încarcă ...
Pagina se încarcă ...
Pagina se încarcă ...
Pagina se încarcă ...
Pagina se încarcă ...
Pagina se încarcă ...
Pagina se încarcă ...
Pagina se încarcă ...
Pagina se încarcă ...
Pagina se încarcă ...
Pagina se încarcă ...
Pagina se încarcă ...
Pagina se încarcă ...
Pagina se încarcă ...
Pagina se încarcă ...
Pagina se încarcă ...
Pagina se încarcă ...
Pagina se încarcă ...
Pagina se încarcă ...
Pagina se încarcă ...
Pagina se încarcă ...
Pagina se încarcă ...
Pagina se încarcă ...
Pagina se încarcă ...
Pagina se încarcă ...
Pagina se încarcă ...
Pagina se încarcă ...
Pagina se încarcă ...
Pagina se încarcă ...
Pagina se încarcă ...
Pagina se încarcă ...
Pagina se încarcă ...
Pagina se încarcă ...
Pagina se încarcă ...
Pagina se încarcă ...
Pagina se încarcă ...
Pagina se încarcă ...
Pagina se încarcă ...
Pagina se încarcă ...
Pagina se încarcă ...
Pagina se încarcă ...
Pagina se încarcă ...
Pagina se încarcă ...
Pagina se încarcă ...
Pagina se încarcă ...
Pagina se încarcă ...
Pagina se încarcă ...
Pagina se încarcă ...
Pagina se încarcă ...
Pagina se încarcă ...
Pagina se încarcă ...
Pagina se încarcă ...
Pagina se încarcă ...
Pagina se încarcă ...
Pagina se încarcă ...
Pagina se încarcă ...
Pagina se încarcă ...
Pagina se încarcă ...
Pagina se încarcă ...
Pagina se încarcă ...
Pagina se încarcă ...
Pagina se încarcă ...
Pagina se încarcă ...
Pagina se încarcă ...
Pagina se încarcă ...
Pagina se încarcă ...
Pagina se încarcă ...
Pagina se încarcă ...
Pagina se încarcă ...
Pagina se încarcă ...
Pagina se încarcă ...
Pagina se încarcă ...
Pagina se încarcă ...
Pagina se încarcă ...
Pagina se încarcă ...
Pagina se încarcă ...
Pagina se încarcă ...
Pagina se încarcă ...
Pagina se încarcă ...
Pagina se încarcă ...
Pagina se încarcă ...
Pagina se încarcă ...
Pagina se încarcă ...
Pagina se încarcă ...
Pagina se încarcă ...
Pagina se încarcă ...
Pagina se încarcă ...
Pagina se încarcă ...
Pagina se încarcă ...
Pagina se încarcă ...
Pagina se încarcă ...
Pagina se încarcă ...
Pagina se încarcă ...
Pagina se încarcă ...
Pagina se încarcă ...
Pagina se încarcă ...
Pagina se încarcă ...
Pagina se încarcă ...
Pagina se încarcă ...
Pagina se încarcă ...
Pagina se încarcă ...
Pagina se încarcă ...
Pagina se încarcă ...
Pagina se încarcă ...
Pagina se încarcă ...
Pagina se încarcă ...
Pagina se încarcă ...
Pagina se încarcă ...
Pagina se încarcă ...
Pagina se încarcă ...
Pagina se încarcă ...
Pagina se încarcă ...
Pagina se încarcă ...
Pagina se încarcă ...
Pagina se încarcă ...
Pagina se încarcă ...
Pagina se încarcă ...
Pagina se încarcă ...
Pagina se încarcă ...
Pagina se încarcă ...
Pagina se încarcă ...
Pagina se încarcă ...
Pagina se încarcă ...
Pagina se încarcă ...
Pagina se încarcă ...
Pagina se încarcă ...
Pagina se încarcă ...
Pagina se încarcă ...
Pagina se încarcă ...
Pagina se încarcă ...
Pagina se încarcă ...
Pagina se încarcă ...
Pagina se încarcă ...
Pagina se încarcă ...
Pagina se încarcă ...
Pagina se încarcă ...
Pagina se încarcă ...
Pagina se încarcă ...
Pagina se încarcă ...
Pagina se încarcă ...
Pagina se încarcă ...
Pagina se încarcă ...
Pagina se încarcă ...
Pagina se încarcă ...
Pagina se încarcă ...
Pagina se încarcă ...
Pagina se încarcă ...
Pagina se încarcă ...
Pagina se încarcă ...
Pagina se încarcă ...
Pagina se încarcă ...
Pagina se încarcă ...
Pagina se încarcă ...
Pagina se încarcă ...
Pagina se încarcă ...
Pagina se încarcă ...
Pagina se încarcă ...
Pagina se încarcă ...
Pagina se încarcă ...
Pagina se încarcă ...
Pagina se încarcă ...
Pagina se încarcă ...
Pagina se încarcă ...
Pagina se încarcă ...
Pagina se încarcă ...
Pagina se încarcă ...
Pagina se încarcă ...
Pagina se încarcă ...
Pagina se încarcă ...
Pagina se încarcă ...
Pagina se încarcă ...
-
 1
1
-
 2
2
-
 3
3
-
 4
4
-
 5
5
-
 6
6
-
 7
7
-
 8
8
-
 9
9
-
 10
10
-
 11
11
-
 12
12
-
 13
13
-
 14
14
-
 15
15
-
 16
16
-
 17
17
-
 18
18
-
 19
19
-
 20
20
-
 21
21
-
 22
22
-
 23
23
-
 24
24
-
 25
25
-
 26
26
-
 27
27
-
 28
28
-
 29
29
-
 30
30
-
 31
31
-
 32
32
-
 33
33
-
 34
34
-
 35
35
-
 36
36
-
 37
37
-
 38
38
-
 39
39
-
 40
40
-
 41
41
-
 42
42
-
 43
43
-
 44
44
-
 45
45
-
 46
46
-
 47
47
-
 48
48
-
 49
49
-
 50
50
-
 51
51
-
 52
52
-
 53
53
-
 54
54
-
 55
55
-
 56
56
-
 57
57
-
 58
58
-
 59
59
-
 60
60
-
 61
61
-
 62
62
-
 63
63
-
 64
64
-
 65
65
-
 66
66
-
 67
67
-
 68
68
-
 69
69
-
 70
70
-
 71
71
-
 72
72
-
 73
73
-
 74
74
-
 75
75
-
 76
76
-
 77
77
-
 78
78
-
 79
79
-
 80
80
-
 81
81
-
 82
82
-
 83
83
-
 84
84
-
 85
85
-
 86
86
-
 87
87
-
 88
88
-
 89
89
-
 90
90
-
 91
91
-
 92
92
-
 93
93
-
 94
94
-
 95
95
-
 96
96
-
 97
97
-
 98
98
-
 99
99
-
 100
100
-
 101
101
-
 102
102
-
 103
103
-
 104
104
-
 105
105
-
 106
106
-
 107
107
-
 108
108
-
 109
109
-
 110
110
-
 111
111
-
 112
112
-
 113
113
-
 114
114
-
 115
115
-
 116
116
-
 117
117
-
 118
118
-
 119
119
-
 120
120
-
 121
121
-
 122
122
-
 123
123
-
 124
124
-
 125
125
-
 126
126
-
 127
127
-
 128
128
-
 129
129
-
 130
130
-
 131
131
-
 132
132
-
 133
133
-
 134
134
-
 135
135
-
 136
136
-
 137
137
-
 138
138
-
 139
139
-
 140
140
-
 141
141
-
 142
142
-
 143
143
-
 144
144
-
 145
145
-
 146
146
-
 147
147
-
 148
148
-
 149
149
-
 150
150
-
 151
151
-
 152
152
-
 153
153
-
 154
154
-
 155
155
-
 156
156
-
 157
157
-
 158
158
-
 159
159
-
 160
160
-
 161
161
-
 162
162
-
 163
163
-
 164
164
-
 165
165
-
 166
166
-
 167
167
-
 168
168
-
 169
169
-
 170
170
-
 171
171
-
 172
172
-
 173
173
-
 174
174
-
 175
175
-
 176
176
-
 177
177
-
 178
178
-
 179
179
-
 180
180
-
 181
181
-
 182
182
-
 183
183
-
 184
184
-
 185
185
-
 186
186
-
 187
187
-
 188
188
-
 189
189
-
 190
190
-
 191
191
-
 192
192
-
 193
193
-
 194
194
-
 195
195
-
 196
196
-
 197
197
-
 198
198
-
 199
199
-
 200
200
-
 201
201
-
 202
202
-
 203
203
-
 204
204
-
 205
205
-
 206
206
-
 207
207
-
 208
208
-
 209
209
-
 210
210
-
 211
211
-
 212
212
-
 213
213
-
 214
214
-
 215
215
-
 216
216
-
 217
217
-
 218
218
-
 219
219
-
 220
220
-
 221
221
-
 222
222
-
 223
223
-
 224
224
-
 225
225
-
 226
226
-
 227
227
-
 228
228
-
 229
229
-
 230
230
-
 231
231
-
 232
232
-
 233
233
-
 234
234
-
 235
235
-
 236
236
-
 237
237
-
 238
238
-
 239
239
-
 240
240
-
 241
241
-
 242
242
-
 243
243
-
 244
244
-
 245
245
-
 246
246
-
 247
247
-
 248
248
-
 249
249
-
 250
250
-
 251
251
-
 252
252
-
 253
253
-
 254
254
-
 255
255
-
 256
256
-
 257
257
-
 258
258
-
 259
259
-
 260
260
-
 261
261
-
 262
262
-
 263
263
-
 264
264
-
 265
265
-
 266
266
-
 267
267
-
 268
268
-
 269
269
-
 270
270
-
 271
271
-
 272
272
-
 273
273
-
 274
274
-
 275
275
-
 276
276
-
 277
277
-
 278
278
-
 279
279
-
 280
280
-
 281
281
-
 282
282
-
 283
283
-
 284
284
-
 285
285
-
 286
286
-
 287
287
-
 288
288
-
 289
289
-
 290
290
-
 291
291
-
 292
292
-
 293
293
-
 294
294
-
 295
295
-
 296
296
-
 297
297
-
 298
298
-
 299
299
-
 300
300
-
 301
301
-
 302
302
-
 303
303
-
 304
304
-
 305
305
-
 306
306
-
 307
307
-
 308
308
-
 309
309
-
 310
310
-
 311
311
-
 312
312
-
 313
313
-
 314
314
-
 315
315
-
 316
316
-
 317
317
-
 318
318
-
 319
319
-
 320
320
-
 321
321
-
 322
322
-
 323
323
-
 324
324
-
 325
325
-
 326
326
-
 327
327
-
 328
328
-
 329
329
-
 330
330
-
 331
331
-
 332
332
-
 333
333
-
 334
334
-
 335
335
-
 336
336
-
 337
337
-
 338
338
-
 339
339
-
 340
340
-
 341
341
-
 342
342
-
 343
343
-
 344
344
-
 345
345
-
 346
346
-
 347
347
-
 348
348
-
 349
349
-
 350
350
-
 351
351
-
 352
352
-
 353
353
-
 354
354
-
 355
355
-
 356
356
-
 357
357
-
 358
358
-
 359
359
-
 360
360
-
 361
361
-
 362
362
-
 363
363
-
 364
364
-
 365
365
-
 366
366
-
 367
367
-
 368
368
-
 369
369
-
 370
370
-
 371
371
-
 372
372
-
 373
373
-
 374
374
-
 375
375
-
 376
376
-
 377
377
-
 378
378
-
 379
379
-
 380
380
-
 381
381
-
 382
382
-
 383
383
-
 384
384
-
 385
385
-
 386
386
-
 387
387
-
 388
388
-
 389
389
-
 390
390
-
 391
391
-
 392
392


Candy C1DV145SFW Manual de utilizare
- Categorie
- Frigidere
- Tip
- Manual de utilizare
în alte limbi
- français: Candy C1DV145SFW Manuel utilisateur
- slovenčina: Candy C1DV145SFW Používateľská príručka
- italiano: Candy C1DV145SFW Manuale utente
Alte documente
-
Tesla RD2101H Manual de utilizare
-
Tesla RB5210FHX Manual de utilizare
-
LG GR-L227YVQA Manualul proprietarului
-
Whirlpool B 23 (SP) Manualul utilizatorului
-
-
-
Groupe Brandt FIC-541UK Manualul proprietarului
-