
EN
FR
NL
DE
MS
TH
RU
UK
AR
FA
CS
PL
RO
BG
HR
SL
LV
ET
LT
SK
HU
SR
BS
ZH
www.tefal.com
1800141094-03
IT65XX

4
5
6
7
1B*
1A
2B
2A
11
8
9
10
3
12A*
12B*
12C*
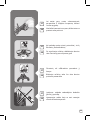
* EN Depending on model / FR Selon le modèle / NL afhankelijk van het model / DE je nach Modell /
MS Bergantung kepada model / TH / RU В зависимости от модели / UK Залежно від
моделі /AR / FA / CS V závislosti na modelu/ PL W zależności od modelu / RO În funcţie de
model / BG В зависимост от модела / HR Ovisno o modelu / SL Odvisno od modela / ET Oleneb mudelist /
HU A modelltől függően / LV Atkarībā no modeļa / LT Priklausomai nuo modelio/ SR Zavisno od modela /
BS Ovisno o modelu / SK V závislosti na modeli / ZH視乎型號

........................... p. 5
EN
........................... p. 5
FR
........................... p. 23
NL
........................... p. 23
DE
MS
........................... p. 23
TH
........................... p. 41
RU
........................... p. 41
UK
........................... p. 41
AR
........................... p. 76
FA
........................... p. 76
........................... p. 77
PL
........................... p. 77
CS
........................... p. 77
RO
........................... p. 96
BG
........................... p. 96
HR
........................... p. 96
SL
........................... p. 115
LV
........................... p. 115
ET
........................... p. 134
LT
........................... p. 153
SK
........................... p. 153
BS
........................... p. 115
HU
........................... p. 134
SR
........................... p. 153
ZH


* EN Depending on model / FR Selon le modèle /
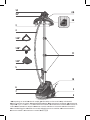
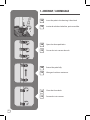
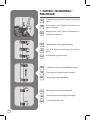
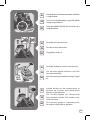
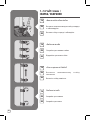
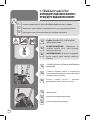
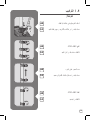
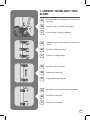
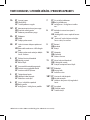
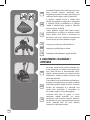
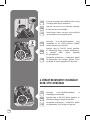
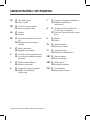
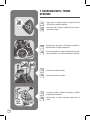
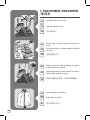
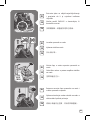
PRODUCT DESCRIPTION / DESCRIPTION DU PRODUIT
1A. EN Steam Head
FR Tête vapeur
1B*. EN Precision Shot Button
FR Bouton vapeur précision
2A. EN Hanger
FR Cintre
2B. EN Lock system for hanger rotation
FR Bouton verrouillage de rotation du
cintre.
3. EN Trouser Clips
FR Pinces à pantalons
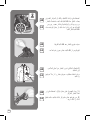
4. EN Woven fabric steam hose
FR Tuyau vapeur
5. EN Power Cord Hook
FR Crochet du cordon d’alimentation
6. EN On/O Pedal
FR Pédale Marche/Arrêt
7. EN On/O Indicator
FR Voyant lumineux Marche/
Arrêt
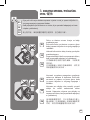
8. EN “Anti calc” screwing cap &
entry
FR Bouchon de vidange
9. EN Wheels
FR Roues
10. EN Water tank
FR Réservoir d’eau amovible
11. EN Pole locking clips
FR Dispositifs de blocage
du mât
12A*. EN Fabric Brush
FR Brosse à tissu
12B*. EN Crease attachment
FR Accessoire de pli
12C*. EN Steam Cap
FR Housse

6
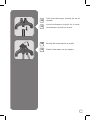
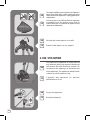
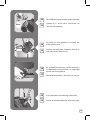
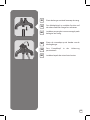
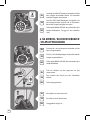
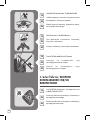
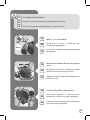
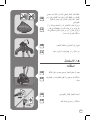
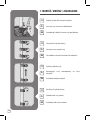
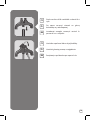
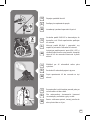
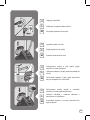
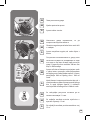
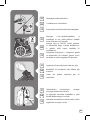
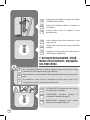
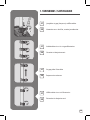
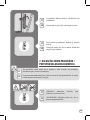
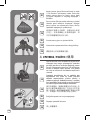
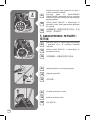
1. ASSEMBLY / ASSEMBLAGE
EN
FR
Insert the pole in the housing & then lock.
Insérez le mât dans le boîtier, puis verrouillez.
EN
FR
Open the three pole locks.
Ouvrez les trois verrous du mât.
EN
FR
Extend the pole fully.
Allongez le mât au maximum.
EN
FR
Close the three locks.
Fermez les trois verrous.

7
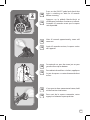
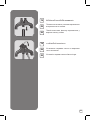
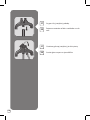
EN
FR
Fully insert the hanger vertically on top of
the pole.
Insérez entièrement jusqu’au clic le cintre
verticalement sur le dessus du mât.
EN
FR
Position the steam head on its cradle.
Placez la tête vapeur sur son support.

8
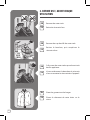
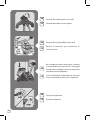
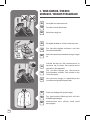
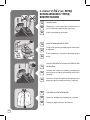
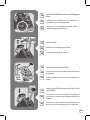
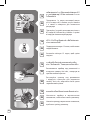
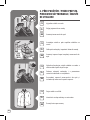
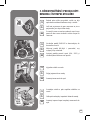
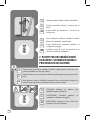
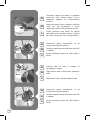
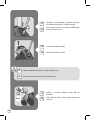
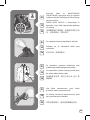
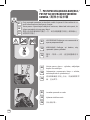
2. BEFORE USE / AVANT CHAQUE
UTILISATION
EN
FR
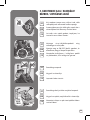
Remove the water tank.
Retirez le réservoir d’eau.
2,5L
84OZ
MAX
EN
FR
Remove the cap then ll the water tank.
Retirez le bouchon, puis remplissez le
réservoir d’eau.
EN
FR
Fully screw the water tank cap and insert tank
back in appliance.
Vissez entièrement le bouchon du réservoir
d’eau et remettez le réservoir dans l’appareil.
EN
FR
Place the garment on the hanger.
Placez le vêtement de votre choix sur le
cintre.

9
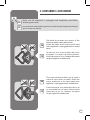
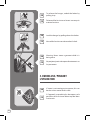
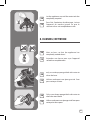
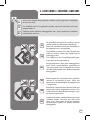
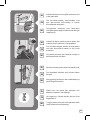
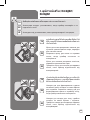
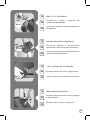
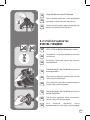
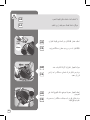
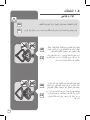
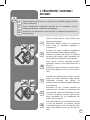
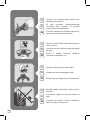
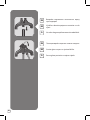
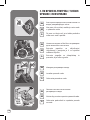
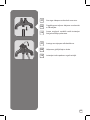
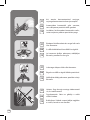
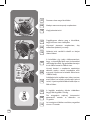
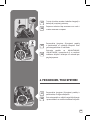
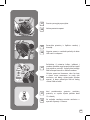
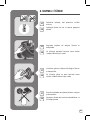
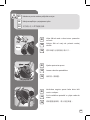
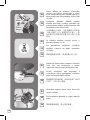
3. ACCESSORIES / ACCESSOIRES
EN
FR
The fabric brush opens the weaves of the
fabrics for better steam penetration.
Attach the fabric brush to the steam head
when appliance is unplugged and has cooled
down.
La brosse à tissu ouvre les bres des tissus
et permet à la vapeur de mieux pénétrer.
Fixez la brosse à tissu sur l’embout de vapeur
lorsque l’appareil est débranché.
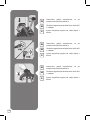
EN
FR
Make sure the appliance is unplugged and completely cool before
attaching accessories.
Les accessoires doivent être ajoutés ou retirés lorsque l’appareil est froid et
qu’il n’est pas en marche.
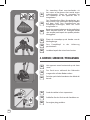
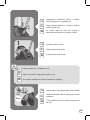
EN
FR
The crease attachment allows you to create a
crease on your trousers or jackets. Attach the
crease attachment to the steam head when
appliance is unplugged and has cooled down.
L’accessoire de pli vous permet de créer un pli
sur vos pantalons et vos vestes. Fixez et retirez
l’accessoire de pli sur l’embout de vapeur
lorsque l’appareil est débranché.

10
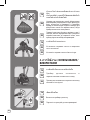
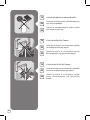
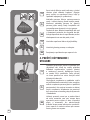
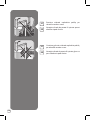
EN
FR
Position the steam head on its cradle.
Placez la tête vapeur sur son support.
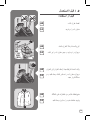
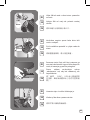
EN
FR
The steam cap lters water impurities and protects
fabrics from water drips. Attach steam cap to the
steam head when appliance is unplugged and has
cooled down.
La housse pour tissus délicats ltre les impuretés
et protège le tissu des coulures d’eau. Fixez et
retirez l’accessoire sur l’embout de vapeur lorsque
l’appareil est débranché.
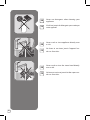
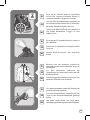
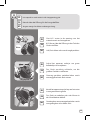
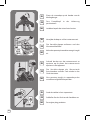
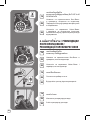
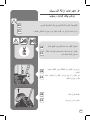
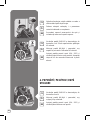
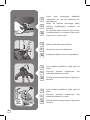
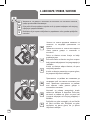
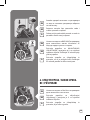
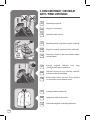
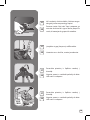
4. USE / UTILISATION
EN
FR
Only operate the appliance on a oor clear of
any materials which may obstruct the base of
the steamer (at and horizontal surface). Do
not obstruct the openings on the lower part
of the appliance. This appliance should not be
used on very thick carpets or rugs.
L’appareil doit demeurer en position
horizontale sur le sol.
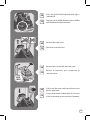
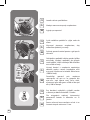
EN
FR
Plug in the appliance.
Branchez l’appareil.

11
EN
FR
Press on the ON/OFF pedal and check that
light is switching on. Wait for 45 seconds
before steaming.
Appuyez sur la pédale Marche/Arrêt et
vériez que l’indicateur lumineux est allumé.
Attendez 45secondes avant que la vapeur
soit disponible.
EN
FR
After 45 seconds approximately, steam will
come out.
Après 45secondes environ, la vapeur sortira
de l’appareil.
45s
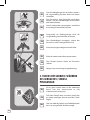
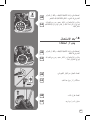
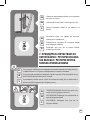
EN
FR
For optimal use, pass the steam jets on your
garment from top to bottom.
Pour obtenir de meilleurs résultats, appliquez
les jets de vapeur sur votre vêtement de haut
en bas.
EN
FR
If you want to have concentrated steam, hold
on the Precision shot button.
Pour avoir de la vapeur concentrée, restez
appuyé sur le bouton vapeur précision.

12
EN
FR
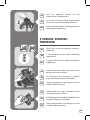
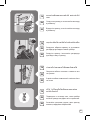
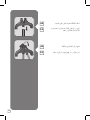
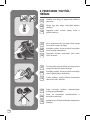
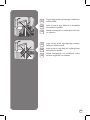
Warning: Never steam a garment while it is
being worn.
Ne projetez jamais de vapeur directement sur
les personnes.
EN
FR
If steam is not coming out anymore, this can
be due to low water level in tank.
Si l’appareil ne produit plus de vapeur, cela
peut-être dû à un niveau d’eau trop bas dans
le réservoir.
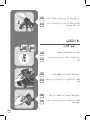
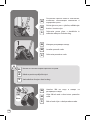
5. DURING USE / PENDANT
L’UTILISATION
EN
FR
Lock the hanger by pulling down the locker.
Verrouillez le cintre en descendant le lock.
360°
EN
FR
To release the hanger, unlock the locker by
pulling it up.
Déverrouillez le cintre en levant verrou puis
orienter le cintre.

13
EN
FR
Remove the water tank.
Retirez le réservoir d’eau.
2,5L
84OZ
MAX
EN
FR
Remove the cap then ll the water tank.
Retirez le bouchon, puis remplissez le
réservoir d’eau.
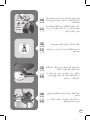
EN
FR
Fully screw the water tank cap and insert tank
back in appliance.
Vissez entièrement le bouchon du réservoir
d’eau et remettez le réservoir dans l’appareil.
EN
FR
Press the On/O Pedal and check that light is
switched O.
Appuyez sur la pédale Marche/Arrêt et vériez
que l’indicateur lumineux est éteint.

14
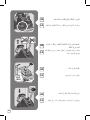
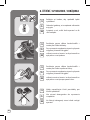
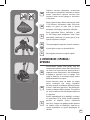
6. AFTER USE / APRÈS CHAQUE
UTILISATION
EN
FR
Press the On/O Pedal and check that light is
switched O.
Appuyez sur la pédale Marche/Arrêt et vériez
que l’indicateur lumineux est éteint.
EN
FR
Unplug the appliance.
Débranchez l’appareil.
EN
FR
Remove the water tank.
Retirez le réservoir d’eau.
EN
FR
Press the ON/OFF pedal and check that light
is switching on. Wait for 45 seconds before
steaming.
Appuyez sur la pédale Marche/Arrêt et vériez
que l’indicateur lumineux est allumé. Attendez
45secondes avant que la vapeur soit disponible.
45s

15
Screw back the cap and place the water tank
back onto the appliance.
Revissez le bouchon et remettez le réservoir
d’eau dans l’appareil.
EN
FR
Roll up the power cord and place it on its
hook.
Enroulez le cordon d’alimentation et placez-le
sur son crochet.
1h
EN
FR
Wait for an hour for your appliance to cool
before storing.
Attendez une heure pour que votre appareil
refroidisse avant de le ranger.
EN
FR
Unscrew the cap and then empty the water
tank completely in a sink.
Dévissez le bouchon, puis videz
complètement le réservoir d’eau dans un
évier.
EN
FR

16
1h
EN
FR
Remove the steam head from the hanger &
unlock the locker and pull out the pole.
Enlevez la tête vapeur du cintre et libérez le
dispositif de blocage et tirez sur le mât pour
le retirer.
EN
FR
WARNING! Wait an hour so that the appliance
has completely cooled down.
ATTENTION ! Débranchez le produit et
attendez une heure pour que l’appareil
refroidisse entièrement.
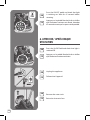
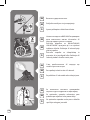
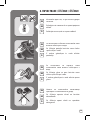
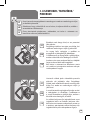
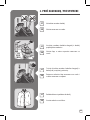
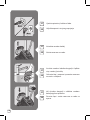
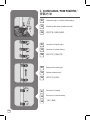
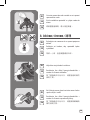
7. DESCALING PROCEDURE/
DÉTARTRAGE
FR
EN
Remove the water tank.
Retirez le réservoir d’eau.
EN
FR
This process should be made every 6 months or as soon as you feel that the
performance of the appliance (steam output) is decreasing.
A eectuer tous les 6 mois ou en cas de baisse de performance.

17
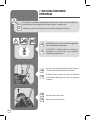
Water
0.5 L
17OZ
EN
FR
Pour 500 ml of water into the water tank inlet.
Ajoutez 0,5 l d’eau dans l’ouverture du
réservoir de l’appareil.
EN
FR
Vertically tilt the appliance to empty the
water into the sink.
Inclinez verticalement l’appareil an de le
vider de son eau dans l’évier.
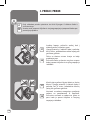
EN
FR
Gently shake the appliance.
Secouez doucement l’appareil afin de
décoller les plus grosses particules.
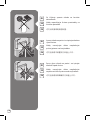
EN
FR
Never ll inside the pole connection.
Ne versez jamais d’eau dans le raccord du mât.

18
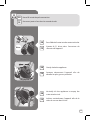
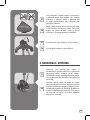
EN
FR
Vertically tilt the appliance to empty the
water into the sink.
Inclinez verticalement l’appareil an de le
vider du mélange dans l’évier.
12h
EN
FR
For best results leave to soak for a minimum
of 12hrs.
Attendez au moins 12 heures pour que le
mélange fasse eet.
EN
FR
Place the appliance over a sink & unscrew the
“Anti calc” cap by turning it anti clockwise
Positionnez l’appareil au dessus d’un évier
et dévissez le bouchon « Anti calc » en le
tournant dans le sens contraire de l’aiguille
d’une montre.
50%
White
Vinegar
White
Vinegar
50%
Water
Water
1 L
34OZ
EN
FR
Descale the appliance by lling the water tank
inlet with a preparation of white vinegar / water
(cold appliance). In a bottle, mix by adding 500
ml of white vinegar and 500 ml of water.
Préparez un mélange de 1 l composé de 0,5 l
d’eau et de 0,5 l de vinaigre blanc uniquement.
Ajoutez 1 l dans l’ouverture du réservoir de
l’appareil.

19
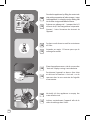
Water
0.5 L
17OZ
EN
FR
Re-assemble the anti-calc cap by screwing it
in completely to ensure that it is watertight
but do not over tighten it
Remettez le bouchon « Anti calc » et revissez.
EN
FR
Pour 500 ml of water into the water tank inlet.
Ajoutez 0,5 l d’eau dans l’ouverture du
réservoir de l’appareil.
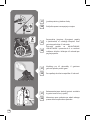
EN
FR
Vertically tilt the appliance to empty the
water into the sink.
Inclinez verticalement l’appareil an de le
vider de son eau dans l’évier.
EN
FR
Insert the pole in the housing & then lock.
Insérez le mât dans le boîtier, puis verrouillez.

20
EN
FR
Re-assemble the water tank cap by screwing
it in completely to ensure that it is watertight
but do not over tighten it and insert the water
tank back into the appliance.
Vissez entièrement le bouchon du réservoir
d’eau et remettez le réservoir sur l’appareil.
EN
FR
Plug in the appliance.
Branchez l’appareil.
EN
FR
Position the steam head on its cradle.
Placez la tête vapeur sur son support.
2,5L
84OZ
MAX
EN
FR
Remove the cap then llthe water tank.
Retirez le bouchon, puis remplissez le
réservoir d’eau.
Pagina se încarcă...
Pagina se încarcă...
Pagina se încarcă...
Pagina se încarcă...
Pagina se încarcă...
Pagina se încarcă...
Pagina se încarcă...
Pagina se încarcă...
Pagina se încarcă...
Pagina se încarcă...
Pagina se încarcă...
Pagina se încarcă...
Pagina se încarcă...
Pagina se încarcă...
Pagina se încarcă...
Pagina se încarcă...
Pagina se încarcă...
Pagina se încarcă...
Pagina se încarcă...
Pagina se încarcă...
Pagina se încarcă...
Pagina se încarcă...
Pagina se încarcă...
Pagina se încarcă...
Pagina se încarcă...
Pagina se încarcă...
Pagina se încarcă...
Pagina se încarcă...
Pagina se încarcă...
Pagina se încarcă...
Pagina se încarcă...
Pagina se încarcă...
Pagina se încarcă...
Pagina se încarcă...
Pagina se încarcă...
Pagina se încarcă...
Pagina se încarcă...
Pagina se încarcă...
Pagina se încarcă...
Pagina se încarcă...
Pagina se încarcă...
Pagina se încarcă...
Pagina se încarcă...
Pagina se încarcă...
Pagina se încarcă...
Pagina se încarcă...
Pagina se încarcă...
Pagina se încarcă...
Pagina se încarcă...
Pagina se încarcă...
Pagina se încarcă...
Pagina se încarcă...
Pagina se încarcă...
Pagina se încarcă...
Pagina se încarcă...
Pagina se încarcă...
Pagina se încarcă...
Pagina se încarcă...
Pagina se încarcă...
Pagina se încarcă...
Pagina se încarcă...
Pagina se încarcă...
Pagina se încarcă...
Pagina se încarcă...
Pagina se încarcă...
Pagina se încarcă...
Pagina se încarcă...
Pagina se încarcă...
Pagina se încarcă...
Pagina se încarcă...
Pagina se încarcă...
Pagina se încarcă...
Pagina se încarcă...
Pagina se încarcă...
Pagina se încarcă...
Pagina se încarcă...
Pagina se încarcă...
Pagina se încarcă...
Pagina se încarcă...
Pagina se încarcă...
Pagina se încarcă...
Pagina se încarcă...
Pagina se încarcă...
Pagina se încarcă...
Pagina se încarcă...
Pagina se încarcă...
Pagina se încarcă...
Pagina se încarcă...
Pagina se încarcă...
Pagina se încarcă...
Pagina se încarcă...
Pagina se încarcă...
Pagina se încarcă...
Pagina se încarcă...
Pagina se încarcă...
Pagina se încarcă...
Pagina se încarcă...
Pagina se încarcă...
Pagina se încarcă...
Pagina se încarcă...
Pagina se încarcă...
Pagina se încarcă...
Pagina se încarcă...
Pagina se încarcă...
Pagina se încarcă...
Pagina se încarcă...
Pagina se încarcă...
Pagina se încarcă...
Pagina se încarcă...
Pagina se încarcă...
Pagina se încarcă...
Pagina se încarcă...
Pagina se încarcă...
Pagina se încarcă...
Pagina se încarcă...
Pagina se încarcă...
Pagina se încarcă...
Pagina se încarcă...
Pagina se încarcă...
Pagina se încarcă...
Pagina se încarcă...
Pagina se încarcă...
Pagina se încarcă...
Pagina se încarcă...
Pagina se încarcă...
Pagina se încarcă...
Pagina se încarcă...
Pagina se încarcă...
Pagina se încarcă...
Pagina se încarcă...
Pagina se încarcă...
Pagina se încarcă...
Pagina se încarcă...
Pagina se încarcă...
Pagina se încarcă...
Pagina se încarcă...
Pagina se încarcă...
Pagina se încarcă...
Pagina se încarcă...
Pagina se încarcă...
Pagina se încarcă...
Pagina se încarcă...
Pagina se încarcă...
Pagina se încarcă...
Pagina se încarcă...
Pagina se încarcă...
Pagina se încarcă...
Pagina se încarcă...
Pagina se încarcă...
Pagina se încarcă...
-
 1
1
-
 2
2
-
 3
3
-
 4
4
-
 5
5
-
 6
6
-
 7
7
-
 8
8
-
 9
9
-
 10
10
-
 11
11
-
 12
12
-
 13
13
-
 14
14
-
 15
15
-
 16
16
-
 17
17
-
 18
18
-
 19
19
-
 20
20
-
 21
21
-
 22
22
-
 23
23
-
 24
24
-
 25
25
-
 26
26
-
 27
27
-
 28
28
-
 29
29
-
 30
30
-
 31
31
-
 32
32
-
 33
33
-
 34
34
-
 35
35
-
 36
36
-
 37
37
-
 38
38
-
 39
39
-
 40
40
-
 41
41
-
 42
42
-
 43
43
-
 44
44
-
 45
45
-
 46
46
-
 47
47
-
 48
48
-
 49
49
-
 50
50
-
 51
51
-
 52
52
-
 53
53
-
 54
54
-
 55
55
-
 56
56
-
 57
57
-
 58
58
-
 59
59
-
 60
60
-
 61
61
-
 62
62
-
 63
63
-
 64
64
-
 65
65
-
 66
66
-
 67
67
-
 68
68
-
 69
69
-
 70
70
-
 71
71
-
 72
72
-
 73
73
-
 74
74
-
 75
75
-
 76
76
-
 77
77
-
 78
78
-
 79
79
-
 80
80
-
 81
81
-
 82
82
-
 83
83
-
 84
84
-
 85
85
-
 86
86
-
 87
87
-
 88
88
-
 89
89
-
 90
90
-
 91
91
-
 92
92
-
 93
93
-
 94
94
-
 95
95
-
 96
96
-
 97
97
-
 98
98
-
 99
99
-
 100
100
-
 101
101
-
 102
102
-
 103
103
-
 104
104
-
 105
105
-
 106
106
-
 107
107
-
 108
108
-
 109
109
-
 110
110
-
 111
111
-
 112
112
-
 113
113
-
 114
114
-
 115
115
-
 116
116
-
 117
117
-
 118
118
-
 119
119
-
 120
120
-
 121
121
-
 122
122
-
 123
123
-
 124
124
-
 125
125
-
 126
126
-
 127
127
-
 128
128
-
 129
129
-
 130
130
-
 131
131
-
 132
132
-
 133
133
-
 134
134
-
 135
135
-
 136
136
-
 137
137
-
 138
138
-
 139
139
-
 140
140
-
 141
141
-
 142
142
-
 143
143
-
 144
144
-
 145
145
-
 146
146
-
 147
147
-
 148
148
-
 149
149
-
 150
150
-
 151
151
-
 152
152
-
 153
153
-
 154
154
-
 155
155
-
 156
156
-
 157
157
-
 158
158
-
 159
159
-
 160
160
-
 161
161
-
 162
162
-
 163
163
-
 164
164
-
 165
165
-
 166
166
-
 167
167
-
 168
168
-
 169
169
-
 170
170


Tefal IT6540Z0 Manual de utilizare
- Tip
- Manual de utilizare
în alte limbi
- slovenčina: Tefal IT6540Z0 Používateľská príručka
Lucrări înrudite
-
Tefal IT3274E1 Manual de utilizare
-
-
-
-
-
-
-
-
-