STATYW DO LATARKA ROBOCZA LED (SPR. 60004) . . . . . . . . . . . . . . . . . . . . . . . . . . . . . . 12
TRÍPODE PARA FARO DE TRABAJO LED (REF. 60004) . . . . . . . . . . . . . . . . . . . . . . . . . . . . . 2
TRIPODE PARA FAROL DE TRABALHO LED (REF. 60004). . . . . . . . . . . . . . . . . . . . . . . . . . . 7
LEDES SZERELŐ LÁMPA VALÓ ÁLLVÁNY (60004. sz.) . . . . . . . . . . . . . . . . . . . . . . . . . . . . . . 10
TRÉPIED POUR FEU DE TRAVAIL LED (REF. 60004) . . . . . . . . . . . . . . . . . . . . . . . . . . . . . . 4
TRIPOD FOR LED WORKING LIGHT (REF. 60004) . . . . . . . . . . . . . . . . . . . . . . . . . . . . . . . . 3
STATIV FÜR LED-BETRIEBSLEUCHTE (REF. 60004) . . . . . . . . . . . . . . . . . . . . . . . . . . . . . . 5
STAND PENTRU LAMPĂ DE LUCRU CU DIODĂ ELECTROLUMINISCENTĂ (ART. 60004) . . . . . . 8
ПОДСТАВКА ДЛЯ СВЕТОДИОДНЫЙ РАБОЧИЙ ФОНАРЬ (REF. 60004) . . . . . . . . . . . . . . . . 11
TREPPIEDE PER LAMPADA DA LAVORO A LED (RIF. 60004). . . . . . . . . . . . . . . . . . . . . . . . . 6
STATIEF VOOR LED WERKLAMP (REF. 60004). . . . . . . . . . . . . . . . . . . . . . . . . . . . . . . . . . 9
15049
MANUAL DE INSTRUCCIONES · INSTRUCTION MANUAL · GUIDE D’UTILISATION ·BEDIENUNGSANLEITUNG ·
MANUALE D’USO ·MANUAL DE INSTRUÇÕES ·MANUAL DE INSTRUCŢIUNI ·INSTRUCTIEHANDLEIDING·
ÜZEMELTETÉSI UTASÍTÁS ·РУКОВОДСТВО ПО ЭКСПЛУАТАЦИИ ·INSTRUKCJA OBSŁUGI

· 2 ·
REF. 15049
MANUAL DE INSTRUCCIONES
ES
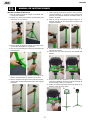
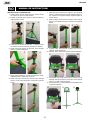
INSTRUCCIONES DE MONTAJE
1. Gire la perilla de bloqueo inferior en sentido anti-
horario para aojarla.
2. Empuje las patas hacia afuera suavemente para
colocarlas en su posición.
3. Gire la perilla de bloqueo inferior en sentido hora-
rio para jar las patas en su posición.
4. Gire la manga de bloqueo inferior hacia la derecha
para aojarla.
5. Ajuste el tubo telescópico medio a la longitud de-
seada, ajustable hasta un máximo de 32.5cm.
6. Gire la manga de bloqueo inferior hacia la izquier-
da para jar el tubo telescópico medio a la longitud
deseada.
7. Gire la manga de bloqueo superior hacia la dere-
cha para aojarla, y coloque el tubo telescópico
superior a la longitud deseada, ajustable hasta un
máximo de 28cm.
8. Gire la manga de bloqueo superior hacia la iz-
quierda para jar el tubo telescópico superior a la
longitud deseada.
9. Encaje el travesaño del faro de trabajo LED en el
cabezal del trípode.
10. Levante los dos clips pequeños del cabezal del
trípode.
11. Encaje los dos clips pequeños en el clip grande y
presione la palanca negra hacia abajo para jar el
faro de trabajo LED en su posición.
12. El faro de trabajo LED está ahora bien jado en el
trípode y lista para ser usado.
1 2
3
5 6
4
7 7 8
9 10
11 12 12

· 3 ·
REF. 15049
INSTRUCTION MANUAL
EN
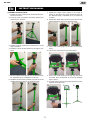
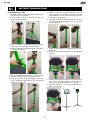
ASSEMBLY INSTRUCTIONS
1. Rotate the lower locking knob clockwise anticloc-
kwise to loosen it.
2. Push the legs out without excessive pressure to
place them in position.
3. Rotate the lower locking knob clockwise to x the
legs in position.
4. Rotate the lower locking sleeve to the right to loo-
sen it.
5. Set the middle telescopic tube to the desired leng-
th, adjustable up to a maximum of 32.5cm
6. Rotate the lower locking sleeve to the left to x the
middle telescopic tube to the desired length.
7. Rotate the upper locking sleeve to the right to
loosen it, and place the upper telescopic tube to
the desired length, adjustable up to a maximum
of 28cm
8. Rotate the upper locking sleeve to the left to x the
upper telescopic tube to the desired length.
9. Fit the led working light cross-beam to the tripod
head.
10. Lift the two small clips on the tripod head.
11. Fit the two small clips into the big clip and press
the black lever downwards to x the led working
light in place
12. The led working light is now properly xed onto the
tripod and ready to use.
1 2
3
5 6
4
7 7 8
9 10
11 1212

· 4 ·
REF. 15049
GUIDE D’UTILISATION
FR
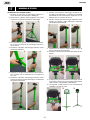
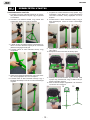
INSTRUCTIONS DE MONTAGE
1. Tournez la poignée de verrouillage inférieure dans
le sens inverse des aiguilles d’une montre pour la
desserrer.
2. Tirez les pieds sans forcer et ajustez la position
requise.
3. Tournez la poignée de verrouillage inférieure dans
le sens des aiguilles d’une montre pour verrouiller
les pieds en position souhaitée.
4. Faites pivoter la douille de verrouillage inférieure
vers la droite pour la desserrer.
5. Réglez le tube télescopique central à la longueur
requise, le tube s’étendant jusqu’à un maximum
de 32,5 cm.
6. Faites pivoter la douille de verrouillage inférieure
vers la gauche pour serrer le tube télescopique
central à la longueur requise.
7. Faites pivoter la douille de verrouillage supérieure
vers la droite pour la desserrer et ajustez le tube
télescopique supérieur à la longueur requise, le
tube s’étendant jusqu’à un maximum de 28 cm.
8. Faites pivoter la douille de verrouillage supérieure
vers la gauche pour serrer le tube télescopique
supérieur à la longueur requise.
9. Installez la barre transversale de la lampe de tra-
vail LED sur la tête du trépied.
10. Soulevez deux petits clips sur la tête du trépied.
11. Placez deux petits clips dans le grand clip et appu-
yez sur le levier noir pour verrouiller la lampe de
travail LED en position souhaitée.
12. La lampe de travail LED est maintenant correcte-
ment installée et prête à être utilisée.
1 2
3
5 6
4
7 7 8
9 10
11 1212

· 5 ·
REF. 15049
BEDIENUNGSANLEITUNG
DE
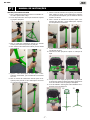
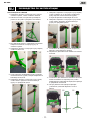
MONTAGEANLEITUNG
1. Drehen Sie den unteren Verriegelungsgri gegen
den Uhrzeigersinn, um das Klemmen zu lösen.
2. Entfernen Sie die Beine, ohne übermäßige Kraft
anzulegen, und stellen Sie die gewünschte Posi-
tion ein.
3. Um die Beine in der gewünschten Position zu
xieren, drehen Sie den unteren Verriegelungsgri
im Uhrzeigersinn.
4. Drehen Sie die untere Verriegelungshülse nach
rechts, um sie zu lösen.
5. Stellen Sie die erforderliche Länge des mittleren
Teleskoprohrs ein, das sich um max. 32,5 cm
ausziehen lässt.
6. Drehen Sie die untere Verriegelungshülse nach
Links, um das mittlere Teleskoprohr auf der
gewünschten Länge zu klemmen.
7. Drehen Sie die obere Verriegelungshülse nach re-
chts, um sie zu lösen, und stellen Sie die gewüns-
chte Länge des oberen Teleskoprohrs ein, das
sich um max. 28 cm ausziehen lässt.
8. Drehen Sie die obere Verriegelungshülse nach
Links, um das obere Teleskoprohr auf der gewüns-
chten Länge zu klemmen.
9. Montieren Sie den Querträger der LED-Betriebs-
leuchte am Stativkopf.
10. Heben Sie zwei kleine Clips am Stativkopf an.
11. Setzen Sie zwei kleinen Clips in den großen Clip
ein und drücken Sie den schwarzen Hebel, um die
LED-Betriebsleuchte in der gewünschten Position
zu xieren.
12. Die LED-Betriebsleuchte ist jetzt richtig installiert
und betriebsbereit.
1 2
3
5 6
4
7 7 8
9 10
11 1212

· 6 ·
REF. 15049
MANUALE D’USO
IT
ISTRUZIONI DI ASSEMBLAGGIO
1. Ruotare la manopola di bloccaggio inferiore in
senso antiorario per allentare lo staaggio.
2. Rimuovere le gambe senza applicare una forza
eccessiva e regolare la posizione desiderata.
3. Per bloccare le gambe nella posizione desidera-
ta, ruotare la manopola di bloccaggio inferiore in
senso orario.
4. Ruotare il manicotto di bloccaggio inferiore verso
destra per allentarlo.
5. Regolare la lunghezza richiesta del tubo telesco-
pico centrale, che si estende per un massimo di
32,5 cm.
6. Ruotare il manicotto di bloccaggio inferiore verso
sinistra per ssare il tubo telescopico centrale alla
lunghezza desiderata.
7. Ruotare il manicotto di bloccaggio superiore ver-
so destra per allentarlo e regolare la lunghezza
desiderata del tubo telescopico superiore, che si
estende per un massimo di 28 cm.
8. Ruotare il manicotto di bloccaggio superiore verso
sinistra per ssare il tubo telescopico superiore
alla lunghezza desiderata.
9. Posizionare la traversa della lampada a LED di
lavoro sulla testa del treppiede.
10. Sollevare i due piccoli morsetti sulla testa del tre-
ppiede.
11. Installare due piccoli morsetti nel fermaglio grande
e premere la leva nera per bloccare la lampada a
LED di lavoro nella posizione desiderata.
12. La lampada a LED di lavoro è ora correttamente
installata e pronta per l’uso.
1 2
3
5 6
4
7 7 8
9 10
11 1212

· 7 ·
REF. 15049
MANUAL DE INSTRUÇÕES
PT
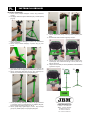
INSTRUÇÕES DE MONTAGEM
1. Gire o botão de travamento inferior no sentido an-
ti-horário para soltar a alça.
2. Puxe as pernas sem usar força excessiva e ajuste
a posição desejada.
3. Gire o botão de travamento inferior no sentido
horário para travar as pernas na posição.
4. Gire a bucha de travamento inferior para a direita
para soltá-la.
5. Ajuste o tubo telescópico do meio para o com-
primento necessário, que se estende no máximo
32,5 cm.
6. Gire a bucha de travamento inferior para a es-
querda para prender o tubo telescópico do meio
no comprimento desejado.
7. Gire a bucha de travamento superior para a direita
para soltá-la e ajuste o tubo telescópico superior
no comprimento desejado, que se estende até um
máximo de 28 cm.
8. Gire a bucha de travamento superior para a es-
querda para prender o tubo telescópico superior
no comprimento necessário.
9. Instale a barra transversal da luz de trabalho LED
na cabeça do tripé.
10. Levante os dois pequenos clipes na cabeça do
tripé.
11. Coloque os dois clipes pequenos no clipe grande
e empurre a alavanca preta para baixo para travar
a luz de trabalho LED na posição desejada.
12. A luz de trabalho LED agora está instalada corre-
tamente e pronta para uso.
1 2
3
5 6
4
7 7 8
9 10
11 1212

· 8 ·
REF. 15049
MANUAL DE INSTRUCŢIUNI
RO
INSTRUCȚIUNI DE ASAMBLARE
1. Rotiți butonul inferior de blocare în sensul acelor
de ceasornic pentru a slăbi xarea.
2. Trageți picioarele fără a folosi o forță excesivă și
reglați poziția dorită.
3. Rotiți butonul inferior de blocare în sensul acelor
de ceasornic pentru a bloca picioarele în poziție.
4. Rotiți manșonul inferior de blocare spre dreapta
pentru i-a slăbi strângerea.
5. Setați tubul telescopic central la lungimea dorită,
reglabilă până la maximum 32,5 cm.
6. Rotiți manșonul inferior de blocare spre stânga
pentru a xa tubul telescopic central la lungimea
dorită.
7. Rotiți manșonul de blocare superior spre dreapta
pentru i-a slăbi strângerea și așezați tubul telesco-
pic superior la lungimea dorită, reglabilă până la
maxim 28cm.
8. Rotiți manșonul de blocare superior spre stânga
pentru a xa tubul telescopic superior la lungimea
dorită.
9. Instalați bara transversală a lămpii de lucru cu
LED pe capul trepiedului.
10. Ridicați două cleme mici de pe capul trepiedului.
11. Introduceți cele două cleme mici în clema mare și
apăsați maneta neagră în jos pentru a xa lampa
de lucru u LED în poziția dorită.
12. Lampa de lucru cu LED este acum instalată corect
și gata de utilizare.
1 2
3
5 6
4
7 7 8
9 10
11 1212

· 9 ·
REF. 15049
INSTRUCTIEHANDLEIDING
NL
MONTAGEINSTRUCTIES
1. Draai de onderste vergrendelingsknop linksom om
de handgreep los te maken.
2. Trek de poten zonder al te veel kracht uit en pas
de gewenste positie aan.
3. Draai de onderste vergrendelingsknop rechtsom
om de poten op hun plaats te vergrendelen.
4. Draai de onderste vergrendelingshuls naar rechts
om deze los te maken.
5. Stel de middelste telescoopbuis in op de gewens-
te lengte, die uitschuift tot maximaal 32,5 cm.
6. Draai de onderste vergrendelingshuls naar links
om de middelste telescoopbuis op de gewenste
lengte vast te klemmen.
7. Draai de bovenste vergrendelingshuls naar re-
chts om deze los te maken en stel de bovenste
telescoopbuis in op de gewenste lengte, die uits-
chuift tot maximaal 28 cm.
8. Draai de bovenste vergrendelingshuls naar links
om de bovenste telescoopbuis op de gewenste
lengte te klemmen.
9. Plaats de dwarsbalk van de LED-werklamp op de
statiefkop.
10. Breng de twee kleine klemmen op de statiefkop
omhoog.
11. Plaats de twee kleine klemmen in de grote klem
en druk op de zwarte hendel om de LED-wer-
klamp in de gewenste positie te vergrendelen
12. De led-werklamp is nu correct geïnstalleerd en
klaar voor gebruik.
1 2
3
5 6
4
7 7 8
9 10
11 1212

· 10 ·
REF. 15049
ÜZEMELTETÉSI UTASÍTÁS
HU
ÖSSZESZERELÉSI UTASÍTÁS
1. Fordítsa el az alsó reteszelő fogantyút az óramu-
tató járásával ellentétes irányba, hogy meglazítsa
a markolatot.
2. Távolítsa el a lábakat anélkül, hogy túlzott erőt
gyakorolna, állítsa be a kívánt helyzetet.
3. A lábak kívánt helyzetbe történő rögzítéséhez for-
dítsa el az alsó reteszelő fogantyút az óramutató
járásával megegyező irányba.
4. Fordítsa jobbra az alsó reteszelő hüvelyt, hogy
meglazítsa.
5. Állítsa be a középső teleszkópos cső kívánt hoss-
zát, amely legfeljebb 32,5 cm-re terjed ki.
6. Fordítsa balra az alsó reteszelő hüvelyt, hogy a
középső teleszkópos csövet a kívánt hosszúságra
rögzítse.
7. Forgassa el a felső reteszelő hüvelyt jobbra, hogy
meglazítsa, majd állítsa be a felső teleszkópos
cső kívánt hosszát, amely legfeljebb 28 cm-re
terjed ki.
8. Fordítsa balra a felső reteszelő hüvelyt, hogy a
felső teleszkópos csövet a kívánt hosszúságra
rögzítse.
9. Szerelje fel a LED-es lámpa keresztlécét az áll-
vány fejére.
10. Emelje fel a két kis szorítót az állvány fején.
11. Szereljen be két kis szorítóta nagy szorítóba, majd
nyomja meg a fekete kart, hogy a LED-es fényt a
kívánt helyzetbe rögzítse
12. Most a LED-es lámpa megfelelően van felszerel-
ve, készen áll a munkára.
1 2
3
5 6
4
7 7 8
9 10
11 1212

· 11 ·
REF. 15049
РУКОВОДСТВО ПО ЭКСПЛУАТАЦИИ
RU
ИНСТРУКЦИЯ ПО СБОРКЕ
1. Поверните нижнюю стопорную ручку против
часовой стрелки, чтобы ослабить зажатие.
2. Извлеките ножки, не прилагая чрезмерное
усилие, и настройте требуемое положение.
3. Для фиксации ножек в требуемом положении
поверните нижнюю стопорную ручку по
часовой стрелке.
4. Поверните нижнюю стопорную втулку вправо,
чтобы ослабить ее.
5. Отрегулируйте необходимую длину средней
телескопической трубки, которая выдвигается
максимум на 32,5 см.
6. Поверните нижнюю стопорную втулку влево,
чтобы зажать среднюю телескопическую
трубку на требуемой длине.
7. Поверните верхнюю стопорную втулку вправо,
чтобы ослабить ее, и настройте требуемую
длину верхней телескопической трубки,
которая выдвигается максимум на 28 см.
8. Поверните верхнюю стопорную втулку влево,
чтобы зажать верхнюю телескопическую
трубку на требуемой длине.
9. Установите на головку штатива поперечину
рабочего светодиодного фонаря.
10. Поднимите два небольших зажима на головке
штатива.
11. Установите два небольших зажима в большой
зажим и нажмите на черный рычаг, чтобы
зафиксировать рабочий светодиодный фонарь
в требуемом положении
12. Теперь рабочий светодиодный фонарь
установлен должным образом и готов к
работе.
1 2
3
5 6
4
7 7 8
910
11 1212

INSTRUKCJA OBSŁUGI
PL
INSTRUKCJA MONTAŻU
1. Obróć dolne pokrętło blokujące w lewo, aby poluzować
uchwyt.
2. Wyciągnij nóżki bez użycia nadmiernej siły i ustaw żądaną
pozycję.
3. Obróć dolne pokrętło blokujące w prawo, aby zablokować
nóżki na miejscu.
4. Obróć dolny kołnierz blokujący w prawo, aby go polu-
zować.
5. Wyreguluj środkową rurę teleskopową na wymaganą dłu-
gość, która może rozciągnąć się maksymalnie do 32,5 cm.
6. Obróć dolną tuleję blokującą w lewo, aby zacisnąć śro-
dkową rurę teleskopową na wymaganą długość.
7. Obróć górną tuleję blokującą w prawo, aby ją poluzować
i wyreguluj górną rurę teleskopową na żądaną długość,
która rozciąga się maksymalnie do 28 cm.
8. Obróć górną tuleję ograniczającą w lewo, aby zacisnąć
górną rurę teleskopową na wymaganej długośći.
9. Umieść poprzeczkę lampy roboczej LED na głowicy sta-
tywu.
10. Podnieś dwa małe zaciski na głowicy statywu.
11. Umieść dwa małe zaciski w dużym zacisku i naciśnij czar-
ną dźwignię, aby zablokować lampę roboczą LED w żą-
danym położeniu.
12. Lampa robocza LED jest teraz prawidłowo zainstalowana
i gotowa do użycia.
1 2
3
5 6
4
7 7 8
9 10
11 1212
www.jbmcamp.com
C/ Rejas, 2 - P5, Ocina 17
28821 Coslada (Madrid)
jbm@jbmcamp.com
Tel. +34 972 405 721
Fax. +34 972 245 437
15049
-
 1
1
-
 2
2
-
 3
3
-
 4
4
-
 5
5
-
 6
6
-
 7
7
-
 8
8
-
 9
9
-
 10
10
-
 11
11
-
 12
12


în alte limbi
- français: JBM 15049 Mode d'emploi
- italiano: JBM 15049 Guida utente
- español: JBM 15049 Guía del usuario
- português: JBM 15049 Guia de usuario