
SERIES 9
43S906BUS
50S906BUS
55S906BUS
65S906BUS
LED TV
QUICK
START
GUIDE
HUN
MKD ROU S LVRUS SRB
ENG
BIH/
MNE
BGR GRC HRV

OPERATING INSTRUCTION
Please read these instructions before operating
your set and retain them for future reference.
UPUTSTVO ZA UPOTREBU
Prije upotrebe uređaja pročitati ova uputstva
i zadržati ih radi kasnijih referenci.
UPUTE ZA KORIŠTENJE
Prije korištenja uređaja pažljivo pročitati
upute i sačuvati ih za buduću upotrebu.
KEZELÉSI UTASÍTÁ
Kérjük, a készülék használata előtt olvassa el ezeket az
utasításokat, és őrizze ezeket meg későbbi betekintésre.
ΟΗΓΙΑ ΛΕΙΤΟΥΡΓΙΑΣ
Διαβάστε αυτές τις οδηγίες πριν από τη λειτουργία της μονάδας
σας και να τα διατηρήσετε για μελλοντική αναφορά.
ИНСТРУКЦИИ ЗА ЕКСПЛОАТАЦИЯ
Моля, прочетете тези инструкции, преди да използвате
устройството и ги запазете за бъдещи справки.
NAVODILA ZA UPORABO
Pred uporabo pozorno preberite navodila
in jih shranite za morebitno uporabo v prihodnosti.
INSTRUCȚIUNI DE UTILIZARE
Vă rugăm să citiți aceste instrucțiuni înainte de a folosi
televizorul și păstrați-le pentru referințe ulterioare.
UPUTSTVO ZA UPOTREBU
Pre upotrebe uređaja pročitati ova uputstva
i zadržati ih radi kasnijih referenci.
УПАТСТВО ЗА КОРИСТЕЊЕ
Ве молиме прочитајте го ова упатство пред да го
инсталирате и употребувате вашиот уред.
ENG
BIH/
MNE
HRV
HUN
GRC
BGR
MKD
S LV
ROU
SRB
ИНСТРУКЦИЯ ПО ЭКСПЛУАТАЦИИ
Пожалуйста, внимательно прочтите эти инструкции перед использованием
изделия и сохраните его для будущего использования.
RUS

3
ENG
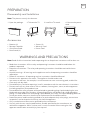
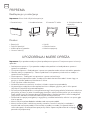
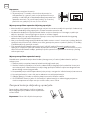
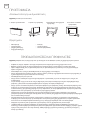
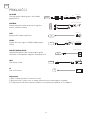
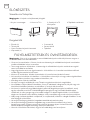
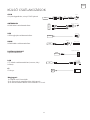
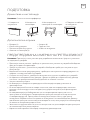
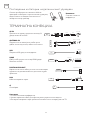
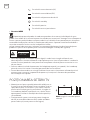
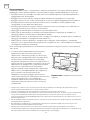
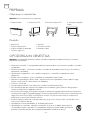
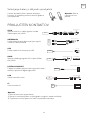
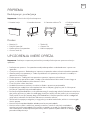
PREPARATION
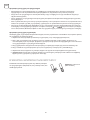
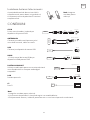
Disassembly and Installation
Accessories
Note: The pictures are only for reference.
1. Open the package.
• Batteries (2)
• Remote Controller
• Quick Start Guide
• Base Stands (2)
• Screws (4)
• Warranty Card
• Power Cord
2. Take out the TV. 3. Install the TV stands.
4. Connect the power
cord.
WARNINGS AND PRECAUTIONS
Note: Read all of the instructions before operating the set. Keep these instructions well for later use.
• Read these instructions -All the safety and operating instructions should be read before this
product is operated.
• Keep these instructions - The safety and operating instructions should be retained for future
reference.
• Heed all warnings - All warnings on the appliance and in the operating instructions should be
adhered to.
• Follow all instructions- All operating and use instructions should be followed.
• Do not use this apparatus near water - The appliance should not be used
near water or moisture - for example, in a wet basement or near a swimming pool, and the like.
• Clean only with dry cloth.
• Do not block any ventilation openings. Install in accordance with the manufacturer's instructions.
• Do not install near any heat sources such as radiators, heat registers, stoves, or other apparatus
(Including amplifiers) that produce heat.
• Do not defeat the safety purpose of the polarized or grounding plug. A polarized plug has two
blades with one wider than the other. A grounding plug has two blades and a third grounding
prong. The wide blade or the third prong is provided for your safety. If the provided plug does not
fit into your outlet, consutt an electrician for replacement of the obsolete outlet.
• Protect the power cord from being walked on or pinched particularly at the plugs, convenience
receptacles, and at the point where they exit from the apparatus.
• Only use attachments/accessories specified by the manufacturer.
• Use only with the cart, stand, tripod, bracket, or table specified by the manufacturer, or
sold with the apparatus. When a cart or rack is used, use caution when moving the cart/
apparatus combination to avoid injury from tip-over.

4
ENG
• Unplug the apparatus during lightning storms or when unused for long periods of time.
• Refer all servicing to qualified personnel. Servicing is required when the apparatus has been
damaged in any way, such as power supply cord or plug is damaged, liquid has been spilled or
objects have fallen into the apparatus, the apparatus has been exposed to rain or moisture, does
not operate normally, or has been dropped.
• CAUTION: These servicing instructions are for use by qualified service personnel only. To reduce
the risk of electric shock, do not perform any servicing other than that contained in the operating
instructions unless you are qualified to do so.
• Do not install this equipment in a confined or building-in space such as a book case or similar unit,
and remain a well ventilation conditions at open site. The ventilation should not be impeded by
covering the ventilation openings with items such as newspaper, table-cloths, curtains etc.
• Please refer the information on rear enclosure for electrical and safety information before installing
or operating the apparatus.
• To reduce the risk of fire or electric shock, do not expose this apparatus to rain or moisture.
• The apparatus shall not be exposed to dripping or splashing and that no objects filled with
liquids, such as vases, shall be placed on the apparatus.
• For the terminals marked with symbol of "
" may be of sufficient magnitude to constitute a risk of
electric shock. The external wiring connected to the terminals requires Installation by an instructed
person or the used of ready-made leads or cords.
• To prevent injury, this apparatus must be securely attached to the floor/wall in accordance with the
installation instructions.
• Danger of explosion if battery is incorrectly replaced. Replace only with the same or equivalent
type.
• The battery (battery or batteries or battery pack) shall not be exposed to excessive heat such as
sunshine, fire or the like.
• Excessive sound pressure from earphones and headphones can cause hearing loss. Listening to
music at high volume levels and for extended durations can damage one's hearing. In order to
reduce the risk of damage to hearing, one should lower the volume to a safe, comfortable level,
and reduce the amount of time listening at high levels.
• The mains plug/appliance coupler/direct plug-in adapter is used as disconnect device, the
disconnect device shall remain readily operable.
• When not in use and during movement, please take care of the power cordset, e.g. tie up the
power cordset with cable tie or something like that. It shall be free from sharp edges and the like
that can cause abrasion of the power cordset. When put into use again, please make sure the
power cord set being not damaged, If any damages found, please look for the service person to
replace the power cord set specified by the manufacturer or have the same characteristics as the
original one.
• Attention should be drawn to environmental aspects of battery disposal.
• No naked flame sources, such as lighted candles, should be placed on the apparatus. To prevent
the spread of fire, keep candles or other open flames away from the apparatus at all times.
• If the apparatus have the symbol
in its rating label and the power cord has two pins, it means
that the equipment is a Class II or double insulated electrical appliance. It has been designed in
such a way that it does not require a safety connection to electrical earth.
• The following information are recommended to be included as far as applicable where
applicable:
Refers to alternating current (AC)
Refers to direct current (DC)
Refers to ClassII equipment

5
ENG
Refers to stand-by
Refers to pow er ON.
Refers to dangerous voltage
• WEEE Directive
Correct Disposal of this product. This marking indicates that this product should not be
disposed with other household wastes throughout the EU. To prevent possible harm to the
environment or human health from uncontrolled waste disposal, recycle it responsibly to promote
the sustainable reuse of material resources. To return your used device, please use the return and
collection systems or contact the retailer where the product was purchased. They can taka this
product for environmental safe recycling.
CAUTION
RISK OF ELECTRIC SHOCK
DO NOT OPEN
• This lightning flash with arrowhead symbol within an equilateral triangle is intended to
alert the user to the presence of non-insulated "dangerous voltage" within the product's
enclosure that may be of sufficient magnitude to constitute a risk of electric shock.
• To reduce the risk of electric shock. Do not remove cover (or back). No user serviceable parts
inside. Refer to qualified service personnel.
• The exclamation point within an equilateral triangle is intended to alert the user to
the presence of important operating and maintenance instructions in the literature
accompanying the appliance.
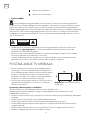
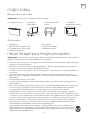
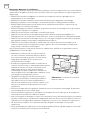
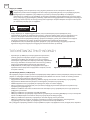
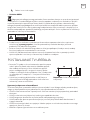
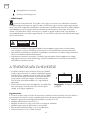
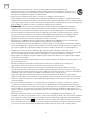
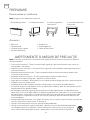
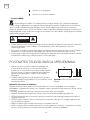
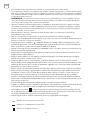
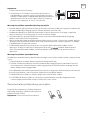
POSITIONING THE TV SET
• Install Display on solid horizontal surface such as a
table or desk. For ventilation, leave a space of at least
10 cm free all around the set. To prevent any faul and
unsafe situations,
please do not place any objects on top of the
set. This apparatuscan beused in tropical and/or
moderate climates.
• Fixing the rear of enclosure to wall. Below picture is
different from actual item, thus it s only for reference.
(only for some regions)
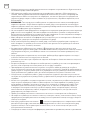
Warning: Stability Hazard
A television set may fall, causing serious personal injury or death. Many injuries, particularly to
children, can be avoided by taking simple precautions such as:
• ALWAYS use cabinets or stands or mounting methods recommended by the manufacturer of the
television set.
• ALWAYS use furniture that can safely support the television set.
• ALWAYS ensure the television set is not overhanging the edge of the supporting furniture.
• ALWAYS educate children about the dangers of climbing on furniture to reach the television set or
its controls.
Note: The pictures are only for reference.

6
ENG
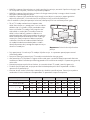
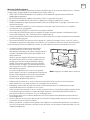
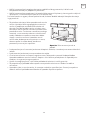
• An optional wall mount can be used with your
television. Consult with your local dealer for a wall
mount that supports the VESA standard used by
your TV model.
Carefully attach the wall mount bracket at the rear
of the TV. Install the wall mount bracket on a solid
wall perpendicular to the floor. If you are attaching
the TV to other building materials, please contact
qualified personnel to install the wall mount.
Detailed instructions will be included with the wall
mount. Please use a wall mount bracket where
the device is adequately secured to the wall with
enough space to allow connectivity to external
devices.
Note: The pictures are only for reference.
• Disconnect the power before moving or installing the TV. Otherwise electric shock may occur.
• Remove the stand before installing the TV on a wall mount by performing the stand attachment in
reverse.
• If you install the TV on a ceiling or slanted wall, it may fall and result in severe injury. Use an
authorized wall mount and contact the local dealer or qualified personnel. Otherwise it is not
covered by the warranty.
• Do not over tighten the screws as this may cause damage to the TV and void your warranty
• To prevent injury, this apparatus must be securely attached to the floor/wall in accordance with the
installation instructions.
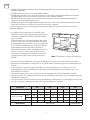
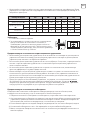
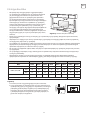
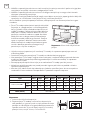
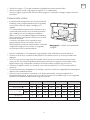
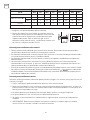
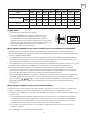
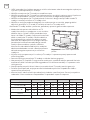
• Use the screws and wall mounts that meet the following specifications. Any damages or injuries by
misuse or using an improper accessory are not covered by the warranty.
Model Size 43” 50” 55” 65”
Screw Top Down Top Down Top Down Top Down
Diameter (mm) "E" M6 M6 M6 M6 M6 M6 M6 M6
Depth (mm) “D”
Max 20 15 26 26 25 25 30 30
Min 12 5 22 22 22 22 20 20
Quantity 2 2 2 2 2 2 2 2
VESA (AxBxC) 200x200x200 400x200x400
• ALWAYS route cords and cables connected to your television so they cannot be tripped over,
pulled or grabbed.
• NEVER place a television set in an unstable location.
• NEVER place the television set on tall furniture (for example, cupboards or bookcases) without
anchoring both the furniture and the television set to a suitable support.
• NEVER place the television set on cloth or other materials that may be located between the
television set and supporting furniture.
• NEVER place items that might tempt children to climb, such as toys and remote controls, on the
top of the television or furniture on which the television is placed.
If the existing television set is being retained and relocated, the same considerations as above
should be applied.

7
ENG
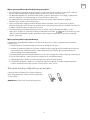
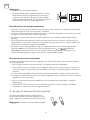
Note:
1. The pictures are for reference only.
2. For the TV sets with terminals towards the wall, in
order to leave enough space to use the terminals, a
rubber cushion is needed together with the screw
to fix the wall mount. It is a small hollow pillar whose
internal diameter is 8mm, external diameter is 18mm
and height is 30mm.
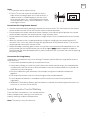
Inadequate use of batteries may cause leakage. Therefore, please follow the steps below and use
them with care.
1. Please note the batteries polarity to avoid short circuit.
2. If the battery voltage is insufficient, which affects the remote control range, you should replace
used batteries with the new ones. Remove batteries from the remote control unit if you do not
intend to use it for a long time.
3. Do not use different types of batteries (for example, manganese and alkaline batteries)
together.
4. Do not put the batteries into fire. Do not charge or disassemble batteries.
5. Please dispose of batteries in accordance with the relevant environmental protection
regulations.
6. WARNING: The batteries (battery pack or batteries installed) shall not be exposed to excessive
heat such as sunshine, fire or the like.
Precautions for Using Battery
• Use the remote control by pointing it towards the remote sensor. The items between the remote
control and the remote sensor will interfere with the normal operation.
• Do not expose the remote control to violent vibrations. Also, do not splash liquid on the remote
control and do not place the remote control in high humidity areas.
• Do not expose the remote control to direct sunlight which can cause deformation of the unit due
to heat.
• When the remote sensor is exposed to direct sunlight or strong light, the remote control will
not work. If this is the case, please change the light direction or the position of the TV, or use the
remote control closer to the remote sensor.
• Before Bluetooth searching, please make sure you have turn ed external Bluetooth devices in the
pairing mode. For the remote control, you can press
and buttons together to open its
pairing mode. For other Bluetooth devices, please read their own instruction manuals for opening
the pairing mode.
Precautions for Using Remote Control
Install Remote Control Battery
Place two AAA size batteries in the remote controls
battery compartment, making sure to match the
polarity markings inside the compartment.
Note: The picture is only for reference.

8
ENG
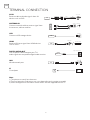
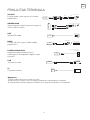
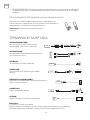
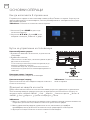
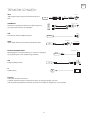
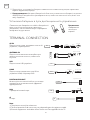
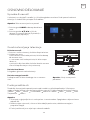
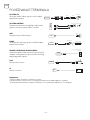
AV IN
Receive audio and video signals from AV
devices such as DVD.
ANTENNA IN
Connect a coaxial cable to receive signal from
the antenna, cable or satellite.
USB
Connect a USB storage device.
HDMI
Receive HD input signal from HDMI devices
such as DVD.
DIGITAL AUDIO OUT
Use an optical cable to output your TV’s
audio signal to a compatible digital audio receiver.
LAN
Wired network port.
CI
CI card port.
Note:
1) The pictures are only for references.
2) Terminal quantities and names may vary depending on the region or model.
3) External equipments and cables shown herein are not supplied with the TV.
TERMINAL CONNECTION
CI
AV IN
DVD STB
Camcorder
USB Disk
USB
Recorder / DVD
Camcorder
HDMI
Digital Audio Device
DIGITAL
AUDIO OUT
Router
LAN
ANTENNA IN
Atenna or cable TV
Satellite

9
ENG
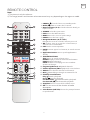
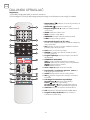
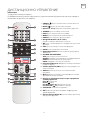
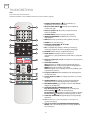
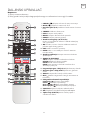
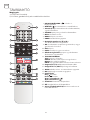
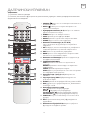
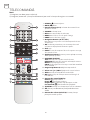
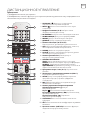
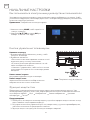
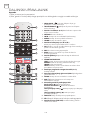
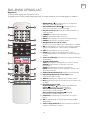
REMOTE CONTROL
1. POWER ( ) Turn the TV on or to standby mode.
2. MUTE (
) Mute or restore the TV sound.
3. Numeric buttons (0~9) Select the channel directly, or
input a number.
4. SOURCE Select the input source.
5. INFO Access the INFO interface.
6. MENU Access the menu of quick settings.
7. HOME Access the home page.
8. Navigation Buttons ( // /)
Navigate the menu to select the content you need.
9. OK Confirm, enter or execute the selected item, or
show the list of Quick Button.
10. EXIT Exit the current operation.
11. BACK Return to upper-level content, or exit the current
screen.
12. Application Buttons Access specific applications
directly.
13. TELETEXT BUTTONS
TEXT Access or exit the teletext menu.
REVEAL Display or hide the concealed information.
INDEX Display index page.
HOLD Hold the teletext page on screen without
updates or changes.
14. Program Up/Down (P ˄/˅) Switch channels.
15. Volume Up/Down (VOL+/-) Adjust the sound volume.
16. GUIDE Access the EPG interface in DTV mode.
17. MIC (
) Start talking to Google Assistant of the TV.
18. USB Play Control Buttons
Play (
) Start the playback.
Pause (
) Pause the playback.
Fast Backward (
) Fast backward the playback.
Fast Forward (
) Fast forward the playback.
19. SUBTITLE Turn on or turn off the subtitle menu.
20. AD Turn on or turn off the function of audio
description.
21. Color Buttons (R/G/Y/B) Execute the prompt function
in specific mode.
Note:
1) The picture is only for reference.
2) The image, buttons and functions of remote control may vary depending on the region or model.

10
ENG
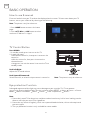
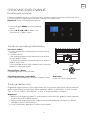
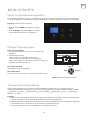
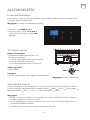
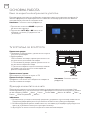
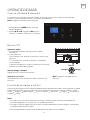
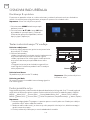
BASIC OPERATION
How to use E-manual
E-manual are built into your TV and can be displayed on the screen. To learn more about your TV
features, access your e-Manual by referring to the following.
Note: The picture is only for reference.
1. Press HOME button to access the home
page.
2. Press /// and OK button to select
and enter “E-Manual” in “Apps”.
TV Control Button
Eye-protection Function
Note: The picture is only for reference.
Note:
1. Please don’t watch TV for long time, and please take a break every half an hour. looking into the
distance will help your eyes have a good rest.
2. Please take eye exercise regularly, which can improve blood circulation, relieve asthenopia and
prevent myopia.
3. The eye-protection function is only available for some models.
Press Middle:
1. In standby mode, press it to turn on the TV.
2. ln work ing status,
• Without the source list, short press it to access the
source list.
• With the source list, short press it to enter the
selected source.
• Long press it to exit the source list or turn the TV to
standby mode.
Push Left/Right:
Adjust the TV sound volume.
Push Upward/Downward:
Switch channels, or select the input source in source list.
Prolonged exposure to blue light may cause damage to your eyesight. This TV can protect
your eyes by filtering the blue light. To enjoy it, please select <MENU
More Picture Picture
Mode Movie> & <MENU More Picture Color Temperature Warm>.
Downward
Upward
Right
Left

11
ENG
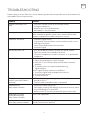
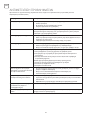
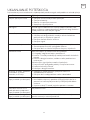
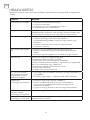
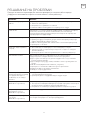
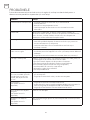
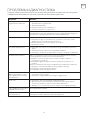
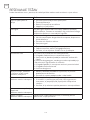
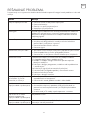
TROUBLESHOOTING
Before calling a service technician, review following information for possible causes and solutions for
the problem you are experiencing.
Problem Solution
Remote control does not
work.
• Check the remote sensor on the remote control.
• Change the batteries.
• Batteries are not installed correctly.
• Main power is not connected.
Poor signal This is usually caused by interference from cell phones, walkie-
talkie, automotive ignition system; neon, electric drill or other
electronic equipment or radio interference sources.
No picture, no sound • Check the signal source.
• Plug another electrical device into the outlet to make sure it is
working or turned on.
• Power Plug is bad contact with the outlet.
• Check the signal.
No sound, picture OK • If no sound, do not mute or increase the sound volume.
• Open the sound menu and adjust ‘Balance’.
• Check if a headphone has been inserted in, if so, pull out the
headphone.
Abnormal picture For no color or bad picture quality, you may:
1. Adjust the color option in menu settings.
2. Keep the TV at a sufficient distance from other electronic
products.
3. Try another channel, maybe exit broadcasting
signal problem.
Bad TV signal (Display mosaic or snowflakes)
1. Check the signal cable and adjust the antenna.
2. Fine tune the channel.
3. Try anther channel.
‘This file is invalid’ appears or
audio is normal but video is
abnormal
• The media file maybe damaged, check if the file can be
played on the PC.
• Check if video and audio codec is supported.
Network failure
(May not be available)
• Check if the router works well.
• For models needing USB dongle to connect to internet, check
if the USB dongle is inserted well.
• Make sure the TV has connected to the router successfully.
Web page can not be
displayed completely
(May not be available)
Flash is not supported.
Browser is forced to be shut
down (May not be available)
Web page include too many large pictures, thus lead to sufficient
memory and close the browser.

12
ENG
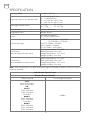
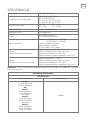
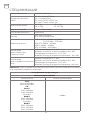
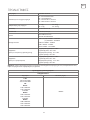
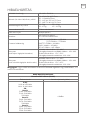
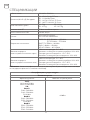
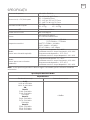
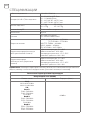
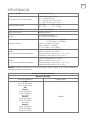
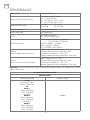
SPECIFICATION
Working voltage 100-240V~50/60 Hz
Dimensions (W x H x D) without stand
43“: 959.3x596.4x75.7mm
50“: 1113x680x75mm
55“: 1227.4 X 747.9 X 75.5 mm
65“: 1447.7 X 869.3 X 76.5 mm
Net weight without stand
43“: 7 kg
50“: 9.7 kg
55“: 12 kg
65“: 18.5 kg
RF aerial input 75 ohm unbalanced
Language of OSD Multiple options
System
DTV: DVB-T/T2/S/S2/C
ATV: PAL/SECAM BG/DK/I
Channel coverage
DVB-S/ S2: [KU] 950 MHz ~ 2150 MHz
[C] 5150 MHz ~ 5750 MHz
DVB-T/T2: 50MHz ~ 862MHz
DVB-C: 48MHz ~ 859MHz
ATV: 47.25MHz ~ 865.25MHz
Environment
(only for Tropical climates zone)
Working temperature: 5ºC~40ºC
Working humidity: 20%~80%
Storage temperature: -15ºC~50ºC
Storage humidity: 10%~90%
Environment
(only for Moderate climates zone)
Working temperature: 5ºC~40ºC
Working humidity: 20%~80%
Storage temperature: -15ºC~45ºC
Storage humidity: 10%~90%
Radio Module Specifications
Wireless Network(WLAN)
Frequency Band Transmitting Power (Max.)
2.4G:
2412 to 2472 MHz
2422 10 2462 MHz
5G:
Band I:
5180~5240 MHz
5190~5230 MHz
5210 MHz
Band II:
5260~5320 MHz
5270~5310 MHz
5290 MHz
Band II:
5500~5700 MHz
5510~5670 MHz
5530~5610 MHz
<20dBm
Note: Some specifications may differ by different regions or models, and please take your actual TV
set as the standard.

13
ENG
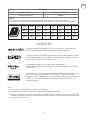
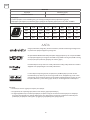
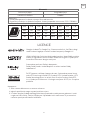
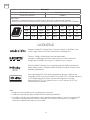
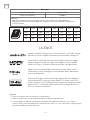
LICENCES
Manufactured under license from Dolby Laboratories.
Dolby, Dolby Audio and the double-D symbol are trademarks of Dolby
Laboratories.
For DTS patents, see http://patents.dts.com. Manufactured under license
from DTS Licensing Limited. DTS, the Symbol, DTS and the Symbol
together, and DTS Studio Sound are registered trademarks or trademarks
of DTS, Inc. in the United States and/or other countries. © DTS, Inc. All
Rights Reserved.
Google, Android TV, Google Play, Chromecast built-in, YouTube and
other related marks and logos are trademarks of Google LLC.
The terms HDMI and HDMI High-Definition Multimedia Interface, and the
HDMI logo are trademarks or registered trademarks of HDMI Licensing
LLC in the United States and other countries.
Note:
1. The pictures in this document are only for references.
2. Appearances and specifications are subject to change without notice.
3. In dry environment due to static electricity, the product may restart and return to the main OSD
interface, USB player interface or the previous source mode. It is normal and please continue to
operate the TV as you will.
Bluetooth
Frequency Band Transmitting Power (Max.)
2.402GHz-2.480GHz <20dBm
Remark:
1. The device should be positioned or operated at least 20cm away from the user.
2. Restrictions or Requirements in following countries: Indoor use only within 5150-5350MHz.
FR DE UK IT NL BE LU TR
DK IE GR ES PT AT FI LI
SE CY MT PL HU CZ SK IS
SI EE LV LT BG RO HR NO

14
BIH/
MNE
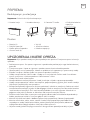
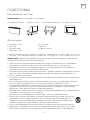
PRIPREMA
Rasklapanje i postavljanje
Dodaci
Napomena: Prikazi služe isključivo kao primjer.
1. Otvorite kutiju.
• Baterije (2)
• Daljinski upravljač
• Kratke upute za uporabu
• Osnovni stalci (2)
• Vijci (4)
• Garantna kartica
• Kabel za napajanje
2. Izvadite televizor. 3. Postavite TV stalke.
4. Priključite kabel za
napajanje.
UPOZORENJA I MJERE OPREZA
Napomena: Prije uporabe uređaja u cijelosti pročitajte ova uputstva. Čuvajte ove upute i za kasniju
upotrebu.
• Pročitajte ova uputstva – Prije upotrebe uređaja treba pročitati sva bezbjednosna uputstva i
uputstva za upotrebu.
• Čuvajte ova uputstva – Bezbjednosna i uputstva za upotrebu treba sačuvati za buduću upotrebu.
• Obratite pažnju na upozorenja – Treba se pridržavati svih upozorenja istaknutih na uređaju i u
uputstvima za korištenje.
• Pratite uputstva – Treba pratiti sva operativna i uputstva za korištenje.
• Ne koristite ovaj aparat blizu vode – Uređaj ne bi trebalo koristiti blizu vode ili izvora vlage, na
primjer, u vlažnom podrumu, blizu bazena i slično.
• Čistiti isključivo suhom tkaninom.
• Ne blokirati otvore za ventilaciju. Instalirati u skladu s uputstvima proizvođača.
• Ne postavljajte uređaj blizu izvora toplote kao što su radijatori, grijalice, peći ili slični aparati
(uključujući i pojačala) koji proizvode toplotu.
• Ne zanemarujte bezbjednosnu svrhu polarizovanog ili uzemljenog utikača. Polarizovani utikač ima
dva jezička, pri čemu je jedan širi od drugog. Uzemljeni utikač ima dva jezička i pin za uzemljenje.
Široki jezičak ili treći pin postoje zbog vaše bezbjednosti. Ukoliko isporučeni utikač ne odgovara
vašoj utičnici, obratite se električaru radi zamjene zastarjele utičnice.
• Zaštite kabl za napajanje od gaženja i nagnječenja, naročito kod utikača, utičnice i na mjestu gdje
izlazi iz aparata.
• Koristiti isključivo pribor/dodatke određene od strane proizvođača.
• Koristiti samo na polici s točkićima, postolju, tronošcu, nosaču ili stolu koji su određeni/
označeni od strane proizvođača ili onima koje se prodaju uz uređaj. Pri upotrebi kolica ili
stalka treba paziti, naročito prilikom pomjeranja stalka i aparata zajedno kako bi se izbjegle
povrede uslijed prevrtanja.

15
BIH/
MNE
• Isključiti aparat tokom grmljavine ili ukoliko se ne koristi duži vremenski period.
• Za sve popravke obratite se kvalificiranom osoblju. Popravka je potrebna u slučaju oštećenja bilo
koje vrste, kao što je oštećenje kabla za napajanje ili utikača, ukoliko se tekućina prospe na uređaj
ili neki predmet upadne u njega, ako je uređaj bio izložen kiši ili vlazi, ako ne funkcioniše normalno
ili je ispušten prilikom nošenja.
• UPOZORENJE: Ova uputstva za servisiranje su samo za kvalificirano servisno osoblje. Da bi se
smanjio rizik od električnog udara niko osim za to kvalificiranih osoba ne bi trebalo da obavlja
servisiranje koje nije opisano u uputstvu za upotrebu.
• Opremu nemojte instalirati u ograničenim ili ograđenim prostorima kao što su police za knjige i
slični komadi namještaja; uređaju je potrebno otvoreno mjesto sa slobodnim protokom vazduha.
Ventilacija ne bi smjela biti onemogućena prekrivanjem ventilacionih otvora predmetima poput
novina, stolnjaka, zavjesa i slično.
• Molimo da prije instalacije i upotrebe aparata obratite pažnju na informacije o električnoj
bezbjednosti na dnu kućišta.
• Aparat ne izlagati kiši ili vlazi kako bi se spriječio rizik od požara ili električnog udara.
• Aparat ne bi smeo da bude izložen kapanju ili prskanju i na njemu ne bi trebalo da stoje predmeti,
kao što su vaze, koji su ispunjeni tečnošću.
• Priključci označeni simbolom "
" mogu biti dovoljno visokog napona da predstavljaju rizik od
električnog udara. Instalaciju spoljnog ožičenja povezanog na ovakve priključke treba da obavi
stručno lice ili treba koristiti gotove vodove ili kablove.
• Aparat se mora pričvrstiti na pod/zid na bezbjedan način u skladu s uputstvima za postavljanje
kako bi se spriječilo povređivanje.
• Postoji opasnost od eksplozije ako je baterija nepravilno zamijenjena. Bateriju zamijeniti istim ili
odgovarajućim tipom baterija.
• Bateriju (jednu bateriju ili više baterija ili pakovanje baterija) ne izlagati prekomjernoj toploti kao
što su sunčeva svjetlost, vatra i slično.
• Pretjerano glasan zvuk iz slušalica može uzrokovati gubitak sluha. Slušanje glasne muzike tokom
dužeg vremenskog perioda može oštetiti sluh. Da biste smanjili rizik od oštećenja sluha trebalo bi
da smanjite jačinu zvuka na bezbjedan, ugodan nivo i smanjite vremenske periode provedene u
slušanju glasne muzike.
• Mrežni utikač i utičnica treba da budu lako dostupni ukoliko se koriste za isključivanje uređaja.
• Kada ne koristite uređaj ili ga pomjerate, vodite računa o kablovima, npr. uvežite ih vezicama za
kablove ili nečim sličnim. Pazite da ne dođu u dodir s oštrim ivicama ili nečim sličnim što bi moglo
izazvati njihovo oštećenje. Prilikom ponovne upotrebe provjerite da li su kablovi oštećeni. Ukoliko
primjetite bilo kakva oštećenja pozovite servisera kako bi oštećene kablove zamijenio onima koje
proizvođač preporučuje u specifikaciji ili nekim drugim koji posjeduju iste funkcije kao i originalni.
• Prilikom odlaganja baterija treba obratiti pažnju na zaštitu životne sredine.
• Uređaju ne treba pristupati s otvorenim plamenom, npr. upaljenom svijećom. Kako biste spriječili
širenje požara, uvijek držite svijeće ili druge izvore vatre dalje od ovog proizvoda.
• Ako uređaj ima simbol
u klasnim oznakama i kabl za napajanje ima dva jezička, to znači da
se radi o opremi klase II ili duplo izolovanom električnom aparatu koji je tako dizajniran da ne
zahtjeva bezbjednosno povezivanje na električno uzemljenje.
• Preporučljivo je da se sljedeće informacije primjenjuju gdje god je to moguće:
Odnosi se na naizmjeničnu struju (AC)
Odnosi se na jednosmjernu struju (DC)
Odnosi se na opremu klase II
Odnosi se na stanje mirovanja

16
BIH/
MNE
Odnosi se na Uključeno
Odnosi se na visok napon
• Direktiva OEEO
Pravilno odlaganje ovog proizvoda. Ovom oznakom se ukazuje na to da ovaj proizvod u
zemljama EU ne bi trebalo odlagati s ostalim otpadom iz domaćinstva. Da biste spriječili nastanak
potencijalne opasnosti po životnu sredinu ili ljudsko zdravlje uslijed nekontrolisanog odlaganja
otpada, otpad odgovorno reciklirajte kako biste unaprijedili održivu ponovnu upotrebu ovog izvora
materijala. Za vraćanje polovnog uređaja koristite sistem za vraćanje i sakupljanje ili kontaktirajte
maloprodaju u kojoj je proizvod kupljen. Oni će se postarati da proizvod bude recikliran na način
koji ne šteti okolišu.
CAUTION
RISK OF ELECTRIC SHOCK
DO NOT OPEN
• Simbol munje sa strelicom u jednakostraničnom trouglu upozorava korisnika na prisustvo
neizolovanog „opasnog napona“ u kućištu proizvoda koji može biti dovoljne jačine da
predstavlja rizik od električnog udara.
• Da biste smanjili rizik od električnog udara ne uklanjajte poklopac (ili zadnju stranu) uređaja.
Servisiranje povjerite samo obučenim serviserima.
• Uzvičnik u jednakostraničnom trouglu ima za cilj da upozori korisnika na postojanje važnih
uputstava za korišćenje i servisiranje u literaturi koja se dobija s uređajem.
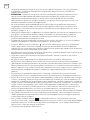
POSTAVLJANJE TV UREĐAJA
• Postavite uređaj na čvrstu horizontalnu podlogu poput
stola ili pulta. Ostavite slobodan prostor od najmanje 10
cm za slobodan protok vazduha. Da biste spriječili pojavu
grešaka ili nebezbjednih situacija ne stavljajte nikakve
predmete na uređaj. Ovaj uređaj se može upotrebljavati
u tropskim i/ili umjerenim klimatskim zonama.
• Učvršćivanje stražnjeg dijela kućišta na zid. Donja slika se
razlikuje od stvarnog artikla te služi samo za referencu.
(Samo za neka tržišta.)
Napomena: Prikazi služe isključivo
kao primjer.
Upozorenje: Obratiti pažnju na stabilnost
Televizor može pasti i prouzrokovati ozbiljne tjelesne ozljede ili smrt.
Mnoge ozljede, posebno kod djece, mogu se izbjeći poduzimanjem jednostavnih mjera
predostrožnosti, kao što su:
• UVIJEK se koristite ormarićima ili postoljima ili načinima montiranja koje preporučuje proizvođač
televizora.
• UVIJEK koristite namještaj koji sigurno može podržati televizor.
• UVIJEK osigurajte da televizor ne prelazi preko ruba potpornog namještaja.
• UVIJEK educirajte djecu o opasnostima penjanja na namještaj kako bi došli do televizora ili
njegovih komandi.
• UVIJEK kablove od televizora usmjeravajte tako da se ne biste mogli spotaknuti od iste.
• NIKADA ne postavljajte televizor na nestabilno mjesto.

17
BIH/
MNE
• Za vaš TV uređaj možete koristiti opcioni zidni
držač. Konsultujte se s prodavcem u vezi sa zidnim
držačem koji je u skladu s VESA standardima koje
koristi vaš model TV uređaja. Pažljivo pričvrstite
zidni držač na stražnji dio TV uređaja. Postavite
držač na čvrsti zid koji je okomit u odnosu na
pod. Kontaktirajte kvalificirano osoblje da montira
držač ukoliko želite da bude pričvršćen na druge
materijale . Detaljna uputstva dolaze u paketu
s držačem. Koristite one zidne držače kod kojih
će uređaj biti adekvatno obezbijeđen na zidu s
dovoljno prostora da je omogućeno povezivanje s
eksternim uređajima.
Napomena: Prikazi služe isključivo kao
primjer.
• NIKADA ne postavljajte televizor na visoki namještaj (na primjer, ormariće ili police za knjige), a da
ne namjestite namještaj i televizor na prikladnu potporu.
• NIKADA ne postavljajte televizor na tkaninu ili druge materijale koji se mogu nalaziti između
televizora i pomoćnog namještaja.
• NIKADA ne postavljajte predmete koji bi mogli navesti djecu na penjanje, poput igračaka i
daljinskih upravljača, na vrh televizora ili namještaja na koji je televizor postavljen.
Ako se zadržava i premješta postojeći televizor, treba primijeniti ista razmatranja kao i gore.
• Prije pomjeranja ili instaliranja TV uređaja isključite struju . U suprotnom postoji opasnost od
električnog udara.
• Pomjerite stalak prije postavljanja TV uređaja na zid tako što ćete ga gurati.
• Ako postavljate TV na plafon ili nagnut zid on može pasti i uzrokovati ozbiljne povrede. Koristite
autorizovani držač i kontaktirajte lokalnog prodavca ili kvalificirano osoblje. U suprotnom garancija
neće važiti.
• Nemojte pretjerano pričvršćivati šrafove, jer to može oštetiti TV uređaj i poništiti garanciju.
• Da biste spriječili povrede, ovaj aparat mora biti bezbjedno pričvršćen za pod/zid u skladu s
uputstvima za postavljanje.
• Koristite šarafe i zidne nosače koju udovoljavaju sledećim specifikacijama. Garancija ne pokriva
nadostatke ili štetu uzrokovanu zloupotrebom ili upotrebom nepravilne opreme.
Veličina modela 43” 50” 55” 65”
Šaraf Vrh Dno Vrh Dno Vrh Dno Vrh Dno
Prečnik (mm) "E" M6 M6 M6 M6 M6 M6 M6 M6
Dubina (mm) “D”
Max 20 15 26 26 25 25 30 30
Min 12 5 22 22 22 22 20 20
Količina 2 2 2 2 2 2 2 2
VESA (AxBxC) 200x200x200 400x200x400

18
BIH/
MNE
Napomena:
1. Slike služe samo kao ilustracija.
2. Za postavljanje TV uređaja s terminalima okrenutim ka
zidu potreban je i gumeni jastuk uz šraf prilikom fiksiranja
postolja na zidu kako bi se obezbedilo dovoljno prostora za
upotrebu terminala. To je mali šupalj stub čiji je unutrašnji
prečnik 8 mm, spoljašnji 18 mm, a visina 30 mm
• Koristite daljinski upravljač tako što ćete ga usmjeriti ka senzoru za daljinski upravljač. Predmeti koji
se nađu između daljinskog upravljača i senzora ometaće normalan rad.
• Ne dozvolite da daljinski upravljač bude izložen snažnim vibracijama. Osim toga, ne polivajte
daljinski upravljač i ne ostavljajte ga na mjesta sa velikom vlagom.
• Ne izlažite daljinski upravljač direktnom utijecaju sunca, koje može da dovede do njegovog
deformisanja uslijed visokih temperatura.
• Ako je senzor daljinskog upravljača direktno izložen zracima sunca ili intenzivnoj svjetlosti, daljinski
upravljač neće funkcionisati. Ukoliko je to slučaj, promjenite pravac svjetlosti ili poziciju TV uređaja,
ili približite daljinski upravljač senzoru.
• Prije pretraživanja Bluetootha provjerite jeste li uključili spoljne Bluetooth uređaje u način
uparivanja. Za daljinski upravljač možete zajedno pritisnuti tipke
i da biste otvorili taj način
rada. Za ostale Bluetooth uređaje, pročitajte njihova uputstva za upotrebu za otvaranje njihovog
načina uparivanja.
Mjere opreza prilikom upotrebe daljinskog upravljača
Neadekvatna upotreba baterija dovešće do njihovog curenja. Pratite sijledeće korake i pažljivo
rukujte njima.
1. Obratite pažnju na polove baterija kako biste izbjegli kratak spoj.
2. Ukoliko su baterije oslabljene, što utiče na domet daljinskog upravljača, trebalo bi ih zamjeniti
novim baterijama. Uklonite baterije iz daljinskog upravljača ukoliko ne planirate da ga koristite
tokom dužeg vremenskog perioda.
3. Ne upotrebljavajte različite tipove baterija (na primjer, manganske i alkalne baterije)istovremeno.
4. Ne stavljajte baterije u vatru. Ne punite, odnosno ne rasklapajte baterije.
5. Odlažite baterije u skladu sa važećim propisima o zaštiti životne sredine.
6. UPOZORENJE: Bateriju (jednu ili više baterija ili paket baterija) ne treba izlagati pretjerano
visokim temperaturama koje stvaraju sunčeve zrake, vatra i slično.
Mjere opreza prilikom upotrebe baterije
Zamjena baterija daljinskog upravljača
Postavite dvije AAA baterije u ležište za baterije
daljinskog upravljača, vodeći računa o polaritetu
unutar ležišta.
Napomena: Prikaz služi isključivo kao primjer.

19
BIH/
MNE
PRIKLJUČAK TERMINALA
AV ULAZ
Primajte audio i video signale s AV uređaja
poput DVD-a.
ANTENA ULAZ
Spojite koaksijalni kabal za primanje signala sa
antene, kabla ili satelita.
USB
Spojite USB uređaj.
HDMI
Primajte HD ulazni signal s HDMI uređaja,
poput DVD-a.
DIGITAL AUDIO IZLAZ
Upotrijebite optički kabal za izlaz TV
audio signala na kompatibilni digitalni audio
prijemnik.
LAN
Ulaz žičane mreže.
CI
CI prostor za karticu.
Napomena:
1) Slike su date isključivo u ilustrativne svrhe.
2) Broj terminala i njihovi nazivi se mogu razlikovati zavisno od regiona ili modela.
3) Ovde prikazana eksterna oprema i kablovi se ne isporučuju zajedno sa TV uređajem.
CI
AV ULAZ
DVD STB
Video kamera
USB memorija
USB
Rekorder / DVD
Video kamera
HDMI
Uređaj za prijem digitalnog
audio signala
DIGITAL AUDIO
IZLAZ
Ruter
LAN
ANTENA ULAZ
Antena ili kablovska televizija
Satelit

20
BIH/
MNE
DALJINSKI UPRAVLJAČ
1. NAPAJANJE ( ) Uključite televizor ili prebacite na
stanje mirovanja.
2. NEČUJNO (
) Isključite ili vratite zvuk.
3. Brojčani dugmići (0~9) Odaberite kanal izravno ili
unesite broj.
4. IZVOR Odaberite ulazni izvor.
5. INFO Pristupite sekciji INFO.
6. IZBORNIK Pristupite izborniku brzih postavki.
7. DOM Pristup početnoj stranici.
8. Navigacijski dugmići ( // /)
Krećite se kroz izbornik da biste odabrali sadržaj koji
vam je potreban.
9. OK Potvrdite, unesite ili izvršite odabranu stavku ili
pokažite popis brzih postavki.
10. EXIT Izađite iz trenutne operacije.
11. NAZAD Povratak na prethodni sadržaj ili izlaz iz
trenutnog zaslona.
12. Dugmići aplikacija Izravno pristupite određenim
aplikacijama.
13. DUGMIĆ ZA TELETEKST
TEXT Pristup ili izlazak iz izbornika teleteksta.
REVEAL Otkrivanje ili skrivanje skrivenih podataka.
INDEX Prikaz indeksne stranice.
HOLD Zadržite stranicu.
14. Gore / dolje (P ˄/˅) Prebacivanje kanala.
15. Pojačavanje / smanjivanje glasnoće (VOL+/-)
Prilagodite glasnoću zvuka.
16. VODIČ Pristupite EPG sučelju u DTV načinu.
17. MIC (
) Počnite razgovarati s Google asistentom
televizora.
18. USB dugmići za kontrolu reprodukcije
Reproduciraj (
) Pokrenite reprodukciju.
Pauza (
) Pauziranje reprodukcije.
Fast Backward (
) Brza reprodukcija unatrag.
Fast Forward (
) Brza reprodukcija unaprijed.
19. SUBTITLE Uključite ili isključite izbornik titlova.
20. AD Uključite ili isključite funkciju audio opisa.
21. Dugmići za boju (R/G/Y/B) Izvršite funkciju u
određenom načinu boje.
Napomena:
1) Slika daljinskog upravljača je samo za referencu.
2) Slika, dugmići i funkcije daljinskog upravljača mogu se razlikovati ovisno o regiji ili modelu
Pagina se încarcă...
Pagina se încarcă...
Pagina se încarcă...
Pagina se încarcă...
Pagina se încarcă...
Pagina se încarcă...
Pagina se încarcă...
Pagina se încarcă...
Pagina se încarcă...
Pagina se încarcă...
Pagina se încarcă...
Pagina se încarcă...
Pagina se încarcă...
Pagina se încarcă...
Pagina se încarcă...
Pagina se încarcă...
Pagina se încarcă...
Pagina se încarcă...
Pagina se încarcă...
Pagina se încarcă...
Pagina se încarcă...
Pagina se încarcă...
Pagina se încarcă...
Pagina se încarcă...
Pagina se încarcă...
Pagina se încarcă...
Pagina se încarcă...
Pagina se încarcă...
Pagina se încarcă...
Pagina se încarcă...
Pagina se încarcă...
Pagina se încarcă...
Pagina se încarcă...
Pagina se încarcă...
Pagina se încarcă...
Pagina se încarcă...
Pagina se încarcă...
Pagina se încarcă...
Pagina se încarcă...
Pagina se încarcă...
Pagina se încarcă...
Pagina se încarcă...
Pagina se încarcă...
Pagina se încarcă...
Pagina se încarcă...
Pagina se încarcă...
Pagina se încarcă...
Pagina se încarcă...
Pagina se încarcă...
Pagina se încarcă...
Pagina se încarcă...
Pagina se încarcă...
Pagina se încarcă...
Pagina se încarcă...
Pagina se încarcă...
Pagina se încarcă...
Pagina se încarcă...
Pagina se încarcă...
Pagina se încarcă...
Pagina se încarcă...
Pagina se încarcă...
Pagina se încarcă...
Pagina se încarcă...
Pagina se încarcă...
Pagina se încarcă...
Pagina se încarcă...
Pagina se încarcă...
Pagina se încarcă...
Pagina se încarcă...
Pagina se încarcă...
Pagina se încarcă...
Pagina se încarcă...
Pagina se încarcă...
Pagina se încarcă...
Pagina se încarcă...
Pagina se încarcă...
Pagina se încarcă...
Pagina se încarcă...
Pagina se încarcă...
Pagina se încarcă...
Pagina se încarcă...
Pagina se încarcă...
Pagina se încarcă...
Pagina se încarcă...
Pagina se încarcă...
Pagina se încarcă...
Pagina se încarcă...
Pagina se încarcă...
Pagina se încarcă...
Pagina se încarcă...
Pagina se încarcă...
Pagina se încarcă...
Pagina se încarcă...
Pagina se încarcă...
Pagina se încarcă...
Pagina se încarcă...
Pagina se încarcă...
Pagina se încarcă...
Pagina se încarcă...
Pagina se încarcă...
Pagina se încarcă...
Pagina se încarcă...
Pagina se încarcă...
Pagina se încarcă...
-
 1
1
-
 2
2
-
 3
3
-
 4
4
-
 5
5
-
 6
6
-
 7
7
-
 8
8
-
 9
9
-
 10
10
-
 11
11
-
 12
12
-
 13
13
-
 14
14
-
 15
15
-
 16
16
-
 17
17
-
 18
18
-
 19
19
-
 20
20
-
 21
21
-
 22
22
-
 23
23
-
 24
24
-
 25
25
-
 26
26
-
 27
27
-
 28
28
-
 29
29
-
 30
30
-
 31
31
-
 32
32
-
 33
33
-
 34
34
-
 35
35
-
 36
36
-
 37
37
-
 38
38
-
 39
39
-
 40
40
-
 41
41
-
 42
42
-
 43
43
-
 44
44
-
 45
45
-
 46
46
-
 47
47
-
 48
48
-
 49
49
-
 50
50
-
 51
51
-
 52
52
-
 53
53
-
 54
54
-
 55
55
-
 56
56
-
 57
57
-
 58
58
-
 59
59
-
 60
60
-
 61
61
-
 62
62
-
 63
63
-
 64
64
-
 65
65
-
 66
66
-
 67
67
-
 68
68
-
 69
69
-
 70
70
-
 71
71
-
 72
72
-
 73
73
-
 74
74
-
 75
75
-
 76
76
-
 77
77
-
 78
78
-
 79
79
-
 80
80
-
 81
81
-
 82
82
-
 83
83
-
 84
84
-
 85
85
-
 86
86
-
 87
87
-
 88
88
-
 89
89
-
 90
90
-
 91
91
-
 92
92
-
 93
93
-
 94
94
-
 95
95
-
 96
96
-
 97
97
-
 98
98
-
 99
99
-
 100
100
-
 101
101
-
 102
102
-
 103
103
-
 104
104
-
 105
105
-
 106
106
-
 107
107
-
 108
108
-
 109
109
-
 110
110
-
 111
111
-
 112
112
-
 113
113
-
 114
114
-
 115
115
-
 116
116
-
 117
117
-
 118
118
-
 119
119
-
 120
120
-
 121
121
-
 122
122
-
 123
123
-
 124
124


Tesla 65S906BUS Manual de utilizare
- Tip
- Manual de utilizare
Lucrări înrudite
-
Tesla 50S635BUS Manual de utilizare
-
Tesla 55S905BUS Manual de utilizare
-
-
-
-
Tesla 43S901SUS Manual de utilizare
-
-
Tesla 43S605BFS Manual de utilizare
-
-
Tesla 43E625BFS Manual de utilizare