Philips SCF358/00 Manual de utilizare
- Categorie
- Încălzitoare pentru sticle
- Tip
- Manual de utilizare

SCF358

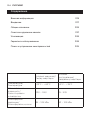
English 3
19
Čeština 37
Ελληνικά 54
Eesti 71
Hrvatski 88
Magyar 105
Қазақша 122
Lietuviškai 139
Latviešu 156
173
Polski 190
Română 207
224
Slovensky 241
Slovenščina 258
Shqip 275
Srpski 292
309


4 ENGLISH
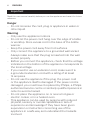
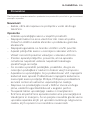
Important
Read this user manual carefully before you use the appliance and save it for future
reference.
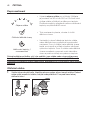
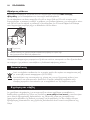
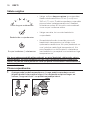
Danger
- Do not immerse the cord, plug or appliance in water or
other liquid.
Warning
- Only use the appliance indoors.
- Do not let the power cord hang over the edge of a table
or worktop. Store excess cord in the base of the bottle
warmer.
- Keep the power cord away from hot surfaces.
- Only connect the appliance to a grounded wall socket.
Always make sure that the plug is inserted into the wall
socket properly.
- Before you connect the appliance, check that the voltage
indicated on the bottom of the appliance corresponds to
the local voltage.
- If you need to use an extension cord, make sure it is
a grounded extension cord with a rating of at least
13 amperes.
- Do not use the appliance if the plug, the power cord
or the appliance itself is damaged. If the power cord is
damaged, you must have it replaced by Philips, a Philips
authorized service centre or similarly qualied persons in
order to avoid a hazard.
- Do not place the appliance on or near a hot gas or
electric cooker, or in a heated oven.
- This appliance can be used by persons with reduced
physical, sensory or mental capabilities or lack of
experience and knowledge if they have been given
supervision or instruction concerning use of the
appliance in a safe way and understand the hazards
involved.

5ENGLISH
- This appliance can be used by children aged from 8
years and above if they have been given supervision or
instruction concerning use of the appliance in a safe way
and if they understand the hazards involved. Cleaning
and user maintenance shall not be made by children
unless they are older than 8 and supervised. Keep the
appliance and its cord out of reach of children aged less
than 8 years.
- Children must not play with the appliance.
- Do not spill water on the power plug.
- Only use the appliance as described in the user manual
to avoid injury due to misuse.
- Do not preheat the appliance.
- Always place a fully assembled bottle with cap in the
bottle warmer before you add water.
- Make sure you add water before you switch on the bottle
warmer.
- Hot water can cause serious burns. Be careful when the
bottle warmer contains hot water.
- The accessible surfaces of the appliance may become
hot during use and are subject to residual heat after use.
- Do not move the appliance when it contains hot water.
- When the food or milk has reached the required
temperature, remove the bottle or container from the
bottle warmer. If you leave food or milk in the bottle
warmer, the temperature of the food or milk increases.
Caution
- This appliance is intended for use in household and
similar applications such as farm houses, bed and
breakfast accommodations, sta kitchen areas in stores,
oces and other work environments, and by guests in
hotels, motels and other residential type environments.
- The food should not be heated for too long.

6 ENGLISH
- Always check the food temperature before you feed
your child. Gently swirl the bottle and check by sprinkling
a few drops on the inside of your wrist. (Follow the
instructions in section ‘‘Feed your baby the milk’’.)
- Unplug the appliance when it is not in use.
- The surface of the heating element is subject to residual
heat after use.
- Let the appliance cool down before you clean it.
- Follow the descaling instructions to avoid irreparable
damage.
- Do not try to open or repair the appliance yourself.
Contact the Philips Consumer Care Centre in your
country (see www.philips.com/support).
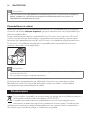
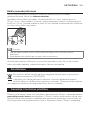
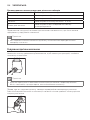
The production date code YYWW is located in the cord storage compartment in the
base of the bottle warmer.
Electromagnetic elds (EMF)
This Philips appliance complies with all applicable standards and regulations
regarding exposure to electromagnetic elds.
Introduction
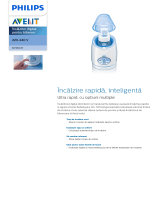
Congratulations on your purchase and welcome to Philips Avent! To fully benet
from the support that Philips Avent oers, register your product at
www.philips.com/welcome.
With this bottle warmer, you can safely warm and defrost milk in Philips Avent and
other most common branded feeding bottles and baby food in containers.
To help preserve the quality of your breast milk, it is important to warm the milk
in a safe and controlled way. The built-in sensor tracks the temperature to avoid
overheating.

7ENGLISH
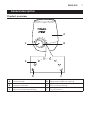
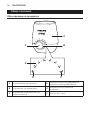
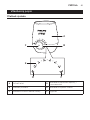
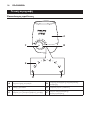
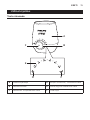
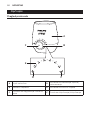
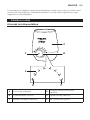
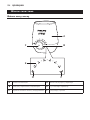
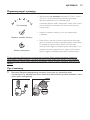
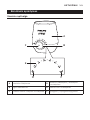
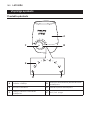
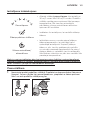
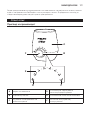
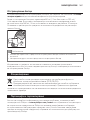
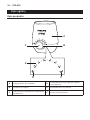
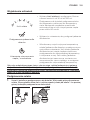
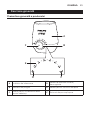
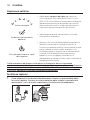
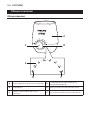
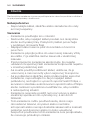
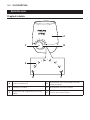
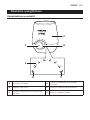
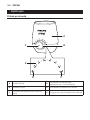
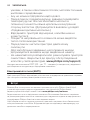
General description
Product overview
A
B
CD
F
E
A Bottle warmer D Keep warm/defrost setting
B Progress indicator E Milk volume setting
C Baby food warming setting F On/o button

8 ENGLISH
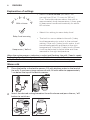
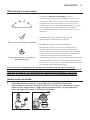
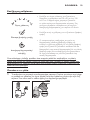
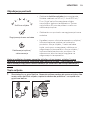
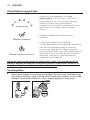
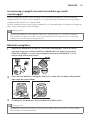
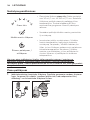
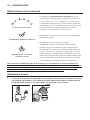
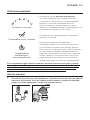
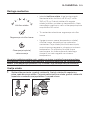
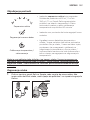
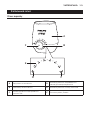
Explanation of settings
Milk volume
• Select the milk volume you warm. You
can set from 30 ml / 1 oz up to 330 ml /
11 oz. The bottle warmer warms the milk to
approximately body temperature. It then goes
to keep warm mode automatically for about
60 minutes.
Baby food warming
• Select this setting to warm baby food.
Keep warm / defrost
• The built-in sensor detects the milk / baby
food temperature to switch to the optimal
setting. If the milk / baby food is warm, it will
be warmed gradually and kept at the right
temperature. If the milk / baby food is frozen,
it will be defrosted to liquid state and then
warmed to the right temperature.
When the entire progress indicator is on but not ashing, the milk / food is ready
for feeding. Feed your baby when the milk / food is warmed. Do not rewarm the
milk / food after it has cooled down, as bacteria may start to develop in it.
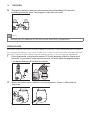
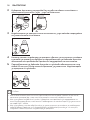
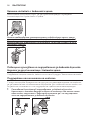
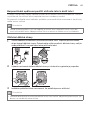
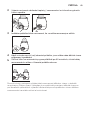
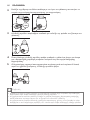
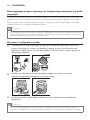
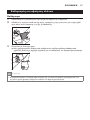
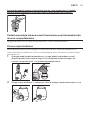
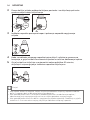
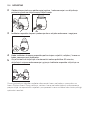
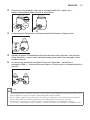
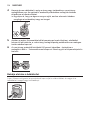
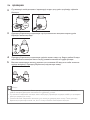
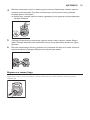
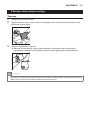
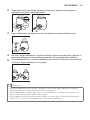
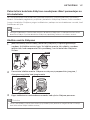
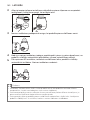
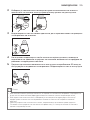
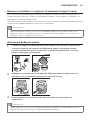
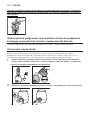
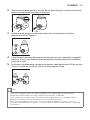
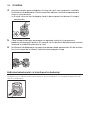
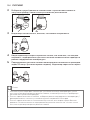
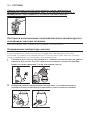
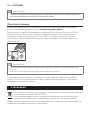
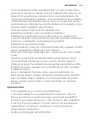
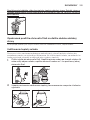
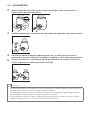
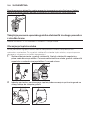
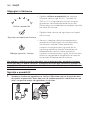
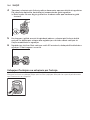
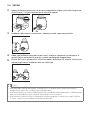
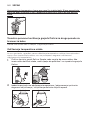
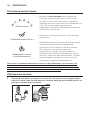
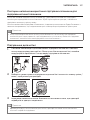
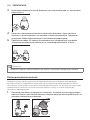
Warm milk
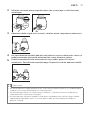
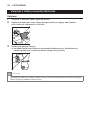
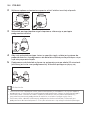
1
Place the bottle in the bottle warmer. Fill with drinking water to the level of
the milk. If you have a large volume of milk, ll with water to approximately
1 cm below the top of the bottle warmer.
2
Select the desired setting based on the milk volume and press the on / o
button to switch on.
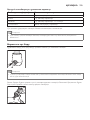
7
210
7oz
210ml

9ENGLISH
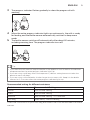
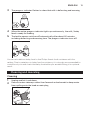
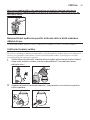
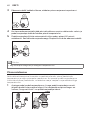
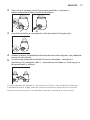
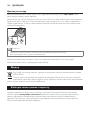
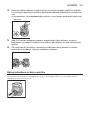
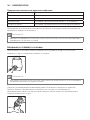
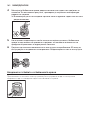
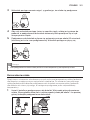
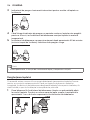
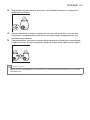
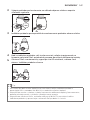
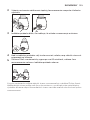
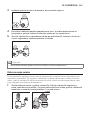
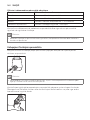
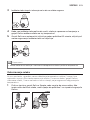
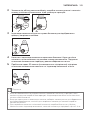
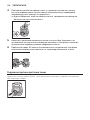
3
The progress indicator ashes gradually to show the progress of milk
warming.
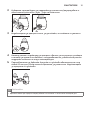
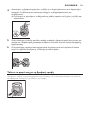
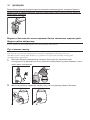
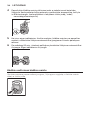
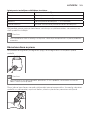
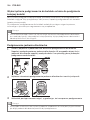
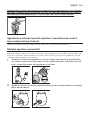
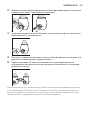
4
When the entire progress indicator lights up continuously, the milk is ready
for feeding and the bottle warmer automatically switches to keep warm
mode.
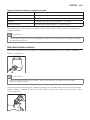
5
The bottle warmer switches o automatically after about 60 minutes,
including warming time. The progress indicator turns o.
60 min
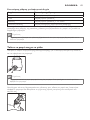
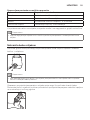
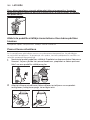
Tip
• If you want the milk warmer, keep the bottle in the appliance until it reaches the desired
temperature after the entire progress indicator lights up.
• If you are using a milk bag, select the keep warm / defrost setting because it takes less
power to warm milk bags.
• If you are using a silicone bottle, it takes longer time to warm milk. Keep it in the bottle
warmer for 3-4 minutes after the entire progress indicator lights up.
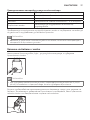
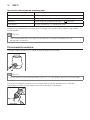
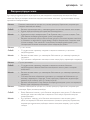
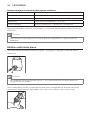
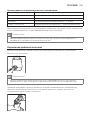
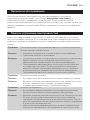
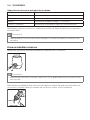
Recommended setting for dierent containers
Container Recommended Setting
Plastic Milk volume setting
Glass Milk volume setting
Silicone Milk volume setting + 3-4 minutes
Milk bag Keep warm/ Defrost setting
Check the instructions of your milk bag and make sure it can be warmed in a bottle
warmer.

10 ENGLISH
Note
• The time to warm milk depends on the volume, initial temperature and milk bottle
material.
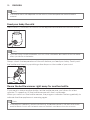
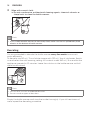
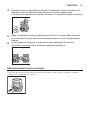
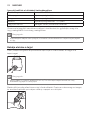
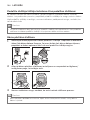
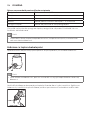
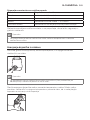
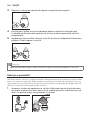
Feed your baby the milk
Press the on / o button to switch o the appliance and take out the milk bottle.
Note
• If you are using a small milk bottle, such as a 2 oz milk bottle, be careful of the hot water
when you take out the bottle.
Always check the temperature of the milk before you feed your baby. Gently swirl
the bottle and check by sprinkling a few drops on the inside of your wrist.
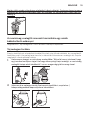
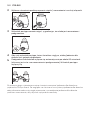
Reuse the bottle warmer right away for another bottle
If you want to warm another bottle, let the bottle warmer cool down for a few
minutes. To speed up, ll the bottle warmer with fresh cold water.
When you switch on the bottle warmer, the progress indicator ashes gradually to
indicate that the appliance is warming again.
Note
• If the progress indicator is on but not ashing, the bottle warmer is still too hot to warm
another bottle. Switch o the bottle warmer and let it cool down for a few minutes.

11ENGLISH
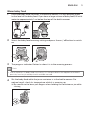
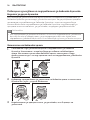
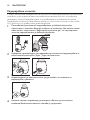
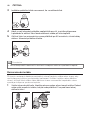
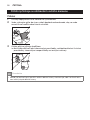
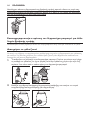
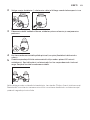
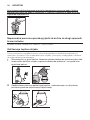
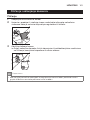
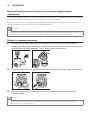
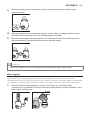
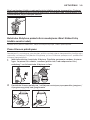
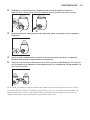
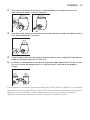
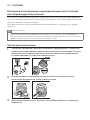
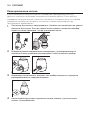
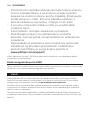
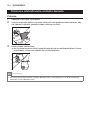
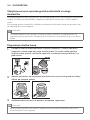
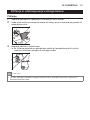
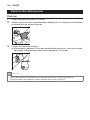
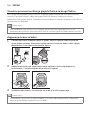
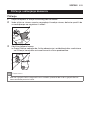
Warm baby food
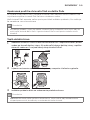
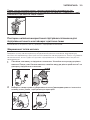
1
Place the baby food container in the bottle warmer. Fill with drinking water
to the level of the baby food. If you have a large volume of baby food, ll with
water to approximately 1 cm below the top of the bottle warmer.
2
Select the baby food warming setting and press the on / o button to switch
on.
3
The progress indicator ashes to show it is in the warming process.
Note
• Due to variations in baby food consistency, it is not possible for the appliance to detect
precisely how long the baby food should be warmed.
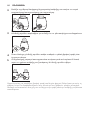
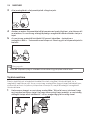
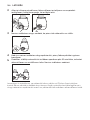
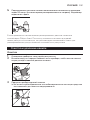
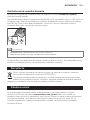
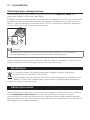
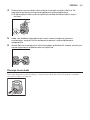
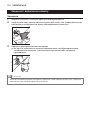
4
Stir the baby food while the jar or container is in the bottle warmer. For
optimal result, check its temperature while it is warming up.
» Be careful not to burn your ngers when holding the container or jar while
stirring.

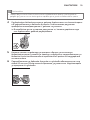
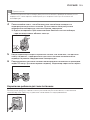
12 ENGLISH
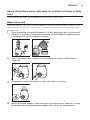
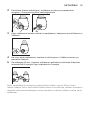
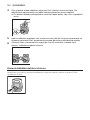
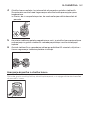
5
When the entire progress indicator lights up continuously, the baby food
is ready for feeding and the bottle warmer automatically switches to keep
warm mode.
6
The bottle warmer switches o automatically after about 60 minutes,
including warming time. The progress indicator turns o.
60 min
Feed your baby the baby food
Press the on / o button to switch o the appliance and take out the food
container or jar.
Always check the temperature of the baby food before you feed your baby. Gently
stir the baby food in the food container or jar and taste it to make sure it is not
too hot.

13ENGLISH
Reuse the bottle warmer right away for another container of baby
food
Follow the same steps as indicated in the section “Warm milk”
Keep warm milk
With this setting, the built-in sensor detects the milk temperature to switch to the
optimal setting. If you put warm milk, it is warmed gradually and kept at the right
temperature.
1
Place the bottle in the bottle warmer. Fill with drinking water to the level of
the milk. If you have a large volume of milk, ll with water to approximately
1 cm below the top of the bottle warmer.
2
Select the keep warm / defrost setting and press the on / o button to
switch on.
3
The progress indicator ashes to show that milk is warming.
4
When the entire progress indicator lights up continuously, the milk is ready
for feeding and the bottle warmer keeps the milk at this temperature.

14 ENGLISH
5
The bottle warmer switches o automatically after about 60 minutes,
including warming time. The progress indicator turns o.
60 min
Note
• The time may vary depends on the milk volume and starting temperature.
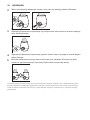
Defrost milk
With this setting, the built-in sensor detects the milk / food temperature to switch
to the optimal setting. If you put frozen milk / baby food, the bottle warmer defrosts
the milk / baby food to liquid state and then warms it to the right temperature.
1
Place the bottle in the bottle warmer. Fill with drinking water to the level of
the milk. If you have a large volume of milk, ll with water to approximately
1 cm below the top of the bottle warmer.
2
Select the keep warm / defrost setting and press the on / o button to
switch on.

15ENGLISH
3
The progress indicator ashes to show that milk is defrosting and warming.
4
When the entire progress indicator lights up continuously, the milk / baby
food is ready for feeding.
5
The bottle warmer switches o automatically after about 60 minutes,
including defrosting and warming time. The progress indicator turns o.
60 min
You can also defrost baby food in the Philips Avent food container with this
setting. Due to variations in baby food consistency, it is strongly recommended to
continuously stir and check the baby food while you are defrosting it for optimal
result.
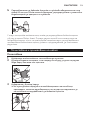
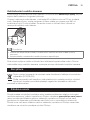
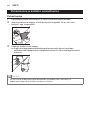
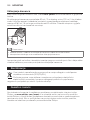
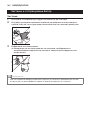
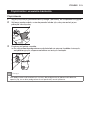
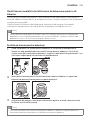
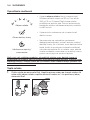
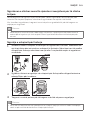
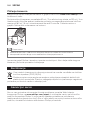
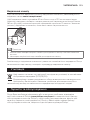
Cleaning and descaling
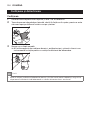
Cleaning
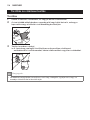
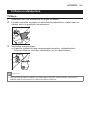
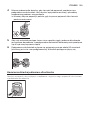
1
Unplug and let it cool down.
2
Pour out water sideways rather than forwards or backwards to keep water
from spilling onto the knob or main plug.

16 ENGLISH
3
Wipe with a moist cloth.
» Do not use abrasive, antibacterial cleaning agents, chemical solvents or
sharp tools to clean the bottle warmer.
Note
• If you used the bottle warmer to warm baby food, make sure that no spilled baby food
remains at the bottom of bottle warmer.
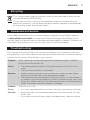
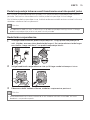
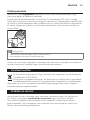
Descaling
It is recommended to descale the bottle warmer every four weeks to ensure it
works eciently.
To descale, mix 60 ml / 2 oz of white vinegar with 120 ml / 4oz of cold water. Switch
on and select the milk warming setting for contents under 180 ml / 6 oz and let the
appliance operate for 10 minutes. Leave the solution in the bottle warmer until all
scale has dissolved.
10 min
180ml
6oz
Note
• You can also use citric acid based descalers.
• Do not use other types of descalers.
Empty the bottle warmer and rinse the inside thoroughly. If you still see traces of
scale, repeat the descaling procedure.

17ENGLISH
Recycling
This symbol means that this product shall not be disposed of with normal
household waste (2012/19/EU).
Follow your country’s rules for the separate collection of electrical and
electronic products. Correct disposal helps prevent negative consequences
for the environment and human health.
Guarantee and service
If you need information or if you have problems, please visit the Philips website
at www. philips. com / avent or contact the Philips Customer Care Center in your
country (refer to the enclosed worldwide guarantee leaet for details). If there is no
Customer Care Center in your country, go to your local Philips dealer.
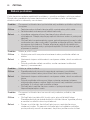
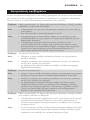
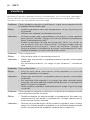
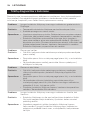
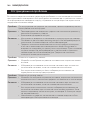
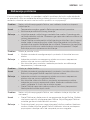
Troubleshooting
This chapter summarizes the most common problems you could encounter with
the appliance. If you are unable to resolve the problem with the information below,
contact the Consumer Care Center in your country.
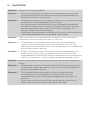
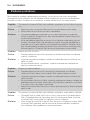
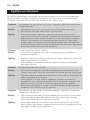
Problem After switching on the bottle warmer, the entire progress indicator
blinks fast and switches o.
Cause
•
The temperature of water in the bottle warmer is too hot or too
cold.
•
The boil-dry protection is activated.
Solution
•
Switch o and unplug. Let it cool down for a few minutes. Make
sure you ll it with fresh room temperature water.
•
The bottle warmer automatically switches o if it is on and there is
no water or not enough water in it. Switch o and unplug. Let it cool
down rst. Make sure you ll it with enough fresh room temperature
water. The bottle warmer is ready to use again.
Problem The milk is too hot.
Cause
•
You may have selected an incorrect setting or are using a milk bag.
Solution
•
Select the milk volume setting based on the milk volume, not the
bottle size.
•
If you are using a milk bag, select the keep warm / defrost setting.

18 ENGLISH
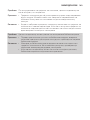
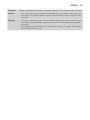
Problem The milk is still cold.
Cause
•
You may have selected an incorrect setting, are using a silicone
bottle, or have lled the bottle warmer with warm water.
Solution
•
Select the milk volume setting based on the milk volume, not the
bottle size.
•
If you are using a silicone bottle, select the milk volume setting
based on the milk volume. When the entire progress indicator is on,
wait for 3-4 minutes for the milk to warm.
•
Fill the bottle warmer with fresh room temperature water. Do not
use warm water.
Problem After switching on the bottle warmer, the entire progress indicator is
on but not ashing.
Cause
•
The bottle warmer is still too hot to warm another bottle. You may
have just nished warming a bottle. Switch o and let it cool down
for a few minutes.
Solution
•
To speed up, rell the bottle warmer with fresh cold water. When
you switch on the bottle warmer, the progress indicator lls up
gradually to indicate that the appliance is warming again.
Problem The entire progress indicator ashes when warming baby food.
Cause
•
Due to variations in baby food consistency, it is not possible for the
appliance to detect precisely how long the baby food should be
warmed.
Solution
•
Stir the baby food while the jar or container is in the bottle warmer.
For optimal result, check its temperature while it is warming .
•
When the entire progress indicator lights up continuously, the baby
food is ready for feeding.


20
,
.
- ,
.
- .
-
.
.
-
.
- .
.
- ,
.
- ,
,
- 13 .
- , ,
.
,
Philips, Philips
.
-
.
Pagina se încarcă...
Pagina se încarcă...
Pagina se încarcă...
Pagina se încarcă...
Pagina se încarcă...
Pagina se încarcă...
Pagina se încarcă...
Pagina se încarcă...
Pagina se încarcă...
Pagina se încarcă...
Pagina se încarcă...
Pagina se încarcă...
Pagina se încarcă...
Pagina se încarcă...
Pagina se încarcă...
Pagina se încarcă...
Pagina se încarcă...
Pagina se încarcă...
Pagina se încarcă...
Pagina se încarcă...
Pagina se încarcă...
Pagina se încarcă...
Pagina se încarcă...
Pagina se încarcă...
Pagina se încarcă...
Pagina se încarcă...
Pagina se încarcă...
Pagina se încarcă...
Pagina se încarcă...
Pagina se încarcă...
Pagina se încarcă...
Pagina se încarcă...
Pagina se încarcă...
Pagina se încarcă...
Pagina se încarcă...
Pagina se încarcă...
Pagina se încarcă...
Pagina se încarcă...
Pagina se încarcă...
Pagina se încarcă...
Pagina se încarcă...
Pagina se încarcă...
Pagina se încarcă...
Pagina se încarcă...
Pagina se încarcă...
Pagina se încarcă...
Pagina se încarcă...
Pagina se încarcă...
Pagina se încarcă...
Pagina se încarcă...
Pagina se încarcă...
Pagina se încarcă...
Pagina se încarcă...
Pagina se încarcă...
Pagina se încarcă...
Pagina se încarcă...
Pagina se încarcă...
Pagina se încarcă...
Pagina se încarcă...
Pagina se încarcă...
Pagina se încarcă...
Pagina se încarcă...
Pagina se încarcă...
Pagina se încarcă...
Pagina se încarcă...
Pagina se încarcă...
Pagina se încarcă...
Pagina se încarcă...
Pagina se încarcă...
Pagina se încarcă...
Pagina se încarcă...
Pagina se încarcă...
Pagina se încarcă...
Pagina se încarcă...
Pagina se încarcă...
Pagina se încarcă...
Pagina se încarcă...
Pagina se încarcă...
Pagina se încarcă...
Pagina se încarcă...
Pagina se încarcă...
Pagina se încarcă...
Pagina se încarcă...
Pagina se încarcă...
Pagina se încarcă...
Pagina se încarcă...
Pagina se încarcă...
Pagina se încarcă...
Pagina se încarcă...
Pagina se încarcă...
Pagina se încarcă...
Pagina se încarcă...
Pagina se încarcă...
Pagina se încarcă...
Pagina se încarcă...
Pagina se încarcă...
Pagina se încarcă...
Pagina se încarcă...
Pagina se încarcă...
Pagina se încarcă...
Pagina se încarcă...
Pagina se încarcă...
Pagina se încarcă...
Pagina se încarcă...
Pagina se încarcă...
Pagina se încarcă...
Pagina se încarcă...
Pagina se încarcă...
Pagina se încarcă...
Pagina se încarcă...
Pagina se încarcă...
Pagina se încarcă...
Pagina se încarcă...
Pagina se încarcă...
Pagina se încarcă...
Pagina se încarcă...
Pagina se încarcă...
Pagina se încarcă...
Pagina se încarcă...
Pagina se încarcă...
Pagina se încarcă...
Pagina se încarcă...
Pagina se încarcă...
Pagina se încarcă...
Pagina se încarcă...
Pagina se încarcă...
Pagina se încarcă...
Pagina se încarcă...
Pagina se încarcă...
Pagina se încarcă...
Pagina se încarcă...
Pagina se încarcă...
Pagina se încarcă...
Pagina se încarcă...
Pagina se încarcă...
Pagina se încarcă...
Pagina se încarcă...
Pagina se încarcă...
Pagina se încarcă...
Pagina se încarcă...
Pagina se încarcă...
Pagina se încarcă...
Pagina se încarcă...
Pagina se încarcă...
Pagina se încarcă...
Pagina se încarcă...
Pagina se încarcă...
Pagina se încarcă...
Pagina se încarcă...
Pagina se încarcă...
Pagina se încarcă...
Pagina se încarcă...
Pagina se încarcă...
Pagina se încarcă...
Pagina se încarcă...
Pagina se încarcă...
Pagina se încarcă...
Pagina se încarcă...
Pagina se încarcă...
Pagina se încarcă...
Pagina se încarcă...
Pagina se încarcă...
Pagina se încarcă...
Pagina se încarcă...
Pagina se încarcă...
Pagina se încarcă...
Pagina se încarcă...
Pagina se încarcă...
Pagina se încarcă...
Pagina se încarcă...
Pagina se încarcă...
Pagina se încarcă...
Pagina se încarcă...
Pagina se încarcă...
Pagina se încarcă...
Pagina se încarcă...
Pagina se încarcă...
Pagina se încarcă...
Pagina se încarcă...
Pagina se încarcă...
Pagina se încarcă...
Pagina se încarcă...
Pagina se încarcă...
Pagina se încarcă...
Pagina se încarcă...
Pagina se încarcă...
Pagina se încarcă...
Pagina se încarcă...
Pagina se încarcă...
Pagina se încarcă...
Pagina se încarcă...
Pagina se încarcă...
Pagina se încarcă...
Pagina se încarcă...
Pagina se încarcă...
Pagina se încarcă...
Pagina se încarcă...
Pagina se încarcă...
Pagina se încarcă...
Pagina se încarcă...
Pagina se încarcă...
Pagina se încarcă...
Pagina se încarcă...
Pagina se încarcă...
Pagina se încarcă...
Pagina se încarcă...
Pagina se încarcă...
Pagina se încarcă...
Pagina se încarcă...
Pagina se încarcă...
Pagina se încarcă...
Pagina se încarcă...
Pagina se încarcă...
Pagina se încarcă...
Pagina se încarcă...
Pagina se încarcă...
Pagina se încarcă...
Pagina se încarcă...
Pagina se încarcă...
Pagina se încarcă...
Pagina se încarcă...
Pagina se încarcă...
Pagina se încarcă...
Pagina se încarcă...
Pagina se încarcă...
Pagina se încarcă...
Pagina se încarcă...
Pagina se încarcă...
Pagina se încarcă...
Pagina se încarcă...
Pagina se încarcă...
Pagina se încarcă...
Pagina se încarcă...
Pagina se încarcă...
Pagina se încarcă...
Pagina se încarcă...
Pagina se încarcă...
Pagina se încarcă...
Pagina se încarcă...
Pagina se încarcă...
Pagina se încarcă...
Pagina se încarcă...
Pagina se încarcă...
Pagina se încarcă...
Pagina se încarcă...
Pagina se încarcă...
Pagina se încarcă...
Pagina se încarcă...
Pagina se încarcă...
Pagina se încarcă...
Pagina se încarcă...
Pagina se încarcă...
Pagina se încarcă...
Pagina se încarcă...
Pagina se încarcă...
Pagina se încarcă...
Pagina se încarcă...
Pagina se încarcă...
Pagina se încarcă...
Pagina se încarcă...
Pagina se încarcă...
Pagina se încarcă...
Pagina se încarcă...
Pagina se încarcă...
Pagina se încarcă...
Pagina se încarcă...
Pagina se încarcă...
Pagina se încarcă...
Pagina se încarcă...
Pagina se încarcă...
Pagina se încarcă...
Pagina se încarcă...
Pagina se încarcă...
Pagina se încarcă...
Pagina se încarcă...
Pagina se încarcă...
Pagina se încarcă...
Pagina se încarcă...
Pagina se încarcă...
Pagina se încarcă...
Pagina se încarcă...
Pagina se încarcă...
Pagina se încarcă...
Pagina se încarcă...
Pagina se încarcă...
Pagina se încarcă...
Pagina se încarcă...
Pagina se încarcă...
Pagina se încarcă...
Pagina se încarcă...
Pagina se încarcă...
Pagina se încarcă...
Pagina se încarcă...
Pagina se încarcă...
Pagina se încarcă...
Pagina se încarcă...
Pagina se încarcă...
Pagina se încarcă...
Pagina se încarcă...
Pagina se încarcă...
Pagina se încarcă...
Pagina se încarcă...
Pagina se încarcă...
Pagina se încarcă...
Pagina se încarcă...
Pagina se încarcă...
-
 1
1
-
 2
2
-
 3
3
-
 4
4
-
 5
5
-
 6
6
-
 7
7
-
 8
8
-
 9
9
-
 10
10
-
 11
11
-
 12
12
-
 13
13
-
 14
14
-
 15
15
-
 16
16
-
 17
17
-
 18
18
-
 19
19
-
 20
20
-
 21
21
-
 22
22
-
 23
23
-
 24
24
-
 25
25
-
 26
26
-
 27
27
-
 28
28
-
 29
29
-
 30
30
-
 31
31
-
 32
32
-
 33
33
-
 34
34
-
 35
35
-
 36
36
-
 37
37
-
 38
38
-
 39
39
-
 40
40
-
 41
41
-
 42
42
-
 43
43
-
 44
44
-
 45
45
-
 46
46
-
 47
47
-
 48
48
-
 49
49
-
 50
50
-
 51
51
-
 52
52
-
 53
53
-
 54
54
-
 55
55
-
 56
56
-
 57
57
-
 58
58
-
 59
59
-
 60
60
-
 61
61
-
 62
62
-
 63
63
-
 64
64
-
 65
65
-
 66
66
-
 67
67
-
 68
68
-
 69
69
-
 70
70
-
 71
71
-
 72
72
-
 73
73
-
 74
74
-
 75
75
-
 76
76
-
 77
77
-
 78
78
-
 79
79
-
 80
80
-
 81
81
-
 82
82
-
 83
83
-
 84
84
-
 85
85
-
 86
86
-
 87
87
-
 88
88
-
 89
89
-
 90
90
-
 91
91
-
 92
92
-
 93
93
-
 94
94
-
 95
95
-
 96
96
-
 97
97
-
 98
98
-
 99
99
-
 100
100
-
 101
101
-
 102
102
-
 103
103
-
 104
104
-
 105
105
-
 106
106
-
 107
107
-
 108
108
-
 109
109
-
 110
110
-
 111
111
-
 112
112
-
 113
113
-
 114
114
-
 115
115
-
 116
116
-
 117
117
-
 118
118
-
 119
119
-
 120
120
-
 121
121
-
 122
122
-
 123
123
-
 124
124
-
 125
125
-
 126
126
-
 127
127
-
 128
128
-
 129
129
-
 130
130
-
 131
131
-
 132
132
-
 133
133
-
 134
134
-
 135
135
-
 136
136
-
 137
137
-
 138
138
-
 139
139
-
 140
140
-
 141
141
-
 142
142
-
 143
143
-
 144
144
-
 145
145
-
 146
146
-
 147
147
-
 148
148
-
 149
149
-
 150
150
-
 151
151
-
 152
152
-
 153
153
-
 154
154
-
 155
155
-
 156
156
-
 157
157
-
 158
158
-
 159
159
-
 160
160
-
 161
161
-
 162
162
-
 163
163
-
 164
164
-
 165
165
-
 166
166
-
 167
167
-
 168
168
-
 169
169
-
 170
170
-
 171
171
-
 172
172
-
 173
173
-
 174
174
-
 175
175
-
 176
176
-
 177
177
-
 178
178
-
 179
179
-
 180
180
-
 181
181
-
 182
182
-
 183
183
-
 184
184
-
 185
185
-
 186
186
-
 187
187
-
 188
188
-
 189
189
-
 190
190
-
 191
191
-
 192
192
-
 193
193
-
 194
194
-
 195
195
-
 196
196
-
 197
197
-
 198
198
-
 199
199
-
 200
200
-
 201
201
-
 202
202
-
 203
203
-
 204
204
-
 205
205
-
 206
206
-
 207
207
-
 208
208
-
 209
209
-
 210
210
-
 211
211
-
 212
212
-
 213
213
-
 214
214
-
 215
215
-
 216
216
-
 217
217
-
 218
218
-
 219
219
-
 220
220
-
 221
221
-
 222
222
-
 223
223
-
 224
224
-
 225
225
-
 226
226
-
 227
227
-
 228
228
-
 229
229
-
 230
230
-
 231
231
-
 232
232
-
 233
233
-
 234
234
-
 235
235
-
 236
236
-
 237
237
-
 238
238
-
 239
239
-
 240
240
-
 241
241
-
 242
242
-
 243
243
-
 244
244
-
 245
245
-
 246
246
-
 247
247
-
 248
248
-
 249
249
-
 250
250
-
 251
251
-
 252
252
-
 253
253
-
 254
254
-
 255
255
-
 256
256
-
 257
257
-
 258
258
-
 259
259
-
 260
260
-
 261
261
-
 262
262
-
 263
263
-
 264
264
-
 265
265
-
 266
266
-
 267
267
-
 268
268
-
 269
269
-
 270
270
-
 271
271
-
 272
272
-
 273
273
-
 274
274
-
 275
275
-
 276
276
-
 277
277
-
 278
278
-
 279
279
-
 280
280
-
 281
281
-
 282
282
-
 283
283
-
 284
284
-
 285
285
-
 286
286
-
 287
287
-
 288
288
-
 289
289
-
 290
290
-
 291
291
-
 292
292
-
 293
293
-
 294
294
-
 295
295
-
 296
296
-
 297
297
-
 298
298
-
 299
299
-
 300
300
-
 301
301
-
 302
302
-
 303
303
-
 304
304
-
 305
305
-
 306
306
-
 307
307
-
 308
308
-
 309
309
-
 310
310
-
 311
311
-
 312
312
-
 313
313
-
 314
314
-
 315
315
-
 316
316
-
 317
317
-
 318
318
-
 319
319
-
 320
320
-
 321
321
-
 322
322
-
 323
323
-
 324
324
-
 325
325
-
 326
326


Philips SCF358/00 Manual de utilizare
- Categorie
- Încălzitoare pentru sticle
- Tip
- Manual de utilizare
în alte limbi
- slovenčina: Philips SCF358/00 Používateľská príručka
Lucrări înrudite
Alte documente
-
 Avent SCF356/00 Manual de utilizare
-
Avent SCF355/00 Manual de utilizare
-
 Avent SCF255/54 Manual de utilizare
-
 Avent SCF260/37 Product Datasheet
-
Avent SCD809/01 Manual de utilizare
-
mothercare Chicco_digital bottle warmer Manualul utilizatorului
-
mothercare SCF810/00 Manual de utilizare
-
Gorenje BW330BY Manualul proprietarului
-
-
Avent SCF330 Manual de utilizare


