BST MX62BT-DSP Manualul proprietarului
- Categorie
- Egalizatoare audio
- Tip
- Manualul proprietarului
Acest manual este potrivit și pentru

©Copyright LOTRONIC 2017 MX62BT-DSP 1
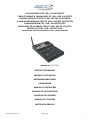
6-CH MIXER WITH BT, USB + 16 DSP EFFECTS
TABLE DE MIXAGE 6 CANAUX AVEC BT, USB + DSP A 16 EFFETS
6-KANAL MISCHPULT MIT BT, USB + DSP MIT 16 EFFEKTEN
6-KANAALS MENGPANEEL MET BT, USB + DSP MET 16 EFFECTEN
6 KANALNI MIXER Z BT, USB + 16 DSP EFEKTOV
MEZCLADOR DE 6 CANALES CON BT, USB + DSP DE 16 EFFETS
MIXER 6-CH CU BT, USB + 16 EFECTE DSP
6-KANAŁOWY MIKSER Z BLUETOOTH, USB + 16 EFEKTÓW DSP
MX62BT-DSP (15-2779)
INSTRUCTION MANUAL
MANUEL D’UTILISATION
BEDIENUNGSANLEITUNG
HANDLEIDING
MANUAL DE INSTRUÇÕES
MANUAL DE INSTRUCCIONES
NAVODILA ZA UPORABO
MANUAL DE UTILIZARE
INSTRUKCJA OBSŁUGI

©Copyright LOTRONIC 2017 MX62BT-DSP 2

©Copyright LOTRONIC 2017 MX62BT-DSP 3
INSTRUCTIONS OF USE
IMPORTANT SAFETY INSTRUCTIONS
1. Read the manual prior to using this unit and keep it for future reference.
2. Adhere to all warnings and instructions marked on the unit and contained in the manual.
3. Don’t place the unit close to water, e.g. in a bathroom, near a wash tub, a swimming pool, etc.
4. Do not place the unit on an unstable surface. Ensure the unit is placed on a secure table or stand to avoid risk of
damage or injury.
5. Keep away from heat sources such as radiator, stove and amplifier etc.
6. Operate the unit only with the supplied power supply.
7. Do not crush or squeeze the power cord.
8. Clean the unit with a soft cloth.
9. Unplug the power cord if the unit is not used for a long time or during a thunderstorm to prevent voltage surges
causing damage the internal circuitry.
10. Prevent objects and liquids entering into unit.
11. If one of the following happens, refer to qualified service personnel:
A) Power cord or plug is damaged; or
B) An object or liquid has entered into the unit; or
C) The unit has been exposed to rain ; or
D) The unit doesn’t work; or
E) The unit has fallen or doesn’t work normally.
12. Repair ---Do not attempt to repair the unit yourself. All repairs must be carried out by a qualified technician. The
user is only allowed to perform manipulations, settings and controls specified in this manual.
13. Ventilation --- Do not cover the ventilation openings to prevent overheating of the unit. Do not place the unit on
a bed, blanket, sofa or other similar soft surface. Do not place the unit inside a bookcase, a closed cupboard, etc.
14. Accessories---Do not use parts that are not recommended by the manufacturer in order to avoid damage.
15. Spare parts---If the unit requires spare parts, use only spares recommended by the manufacturer and that are in
all aspects identical to the original parts. .
16. Safety check---After repairing, repairer must test the unit for safety.
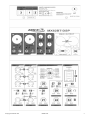
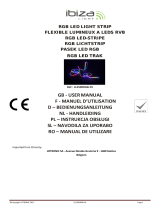
FEATURES
1. DC IN +12V
Connect the supplied mains adaptor to the DC IN 12V socket. The supplied mains adaptor delivers an output voltage
of 12Vdc 1A.
2. POWER: Press this switch to power the unit on.
3. USB TO PC: Use a USB A-USB B cable to connect the mixer to your computer for music playback.
4. BT ANT: Bluetooth antenna.
5. MIC/LINE: Microphone/line input. This input can deliver a voltage of +48V for a condenser microphone requiring
phantom power.
6. PHANTOM: Press to apply a voltage of +48V to this input. The red LED lights up.
GB

©Copyright LOTRONIC 2017 MX62BT-DSP 4
7. CH1 PAD: Press the switch to attenuate the signal of Channel 1 by 20dB
8. MIC/LINE/INST: Connect a microphone, line level device or guitar to this input.
9. INST/HI-Z: Press this switch when a guitar is connected to the input (8).
10. CH2 PAD: Press the switch to attenuate the signal of Channel 2 by 20dB
11. GAIN: Gain controls for channels 1 & 2.
12. EQ HIGH: Setting of the high frequencies of CH1/CH2
13. EQ LOW: Setting of low frequencies on CH1/CH2
14. FX: Press the switch to add a DSP effect to the signal of CH1/CH2.
15. LEVEL: CH1/CH2 level control.
16. MONO/STEREO: In the upper position the overall output will be mono.
17. CLIP LED: Lights up when the signal of CH1/CH2 is overloaded
18. CH3/CH4 INPUT: Line inputs for channels 3 & 4. Will accept a balanced or unbalanced signal.
19. CH3/CH4 GAIN: Press the GAIN switch to attenuate the signal of Channel 3 & 4 by 20dB
20. FX: Press the switch to add a DSP effect to the signal of CH3/CH4.
21. CH3/4: Level control of channel 3 & 4.
22. CH5/CH6 INPUT: Line inputs for channels 5 & 6. Will accept a balanced or unbalanced signal.
23. CH5/CH6 GAIN: Press the GAIN switch to attenuate the signal by 20dB
24. CH5/6: Level control of channel 5 & 6.
25. FX LEVEL: DSP level control.
26. DIGITAL EFFECT PROCESSOR: Rotate the button to choose from 16 DSP effects.
27. USB/BT: Select between PC music and Bluetooth music
28. MAIN/PHONES: Select between the USB or BT signal that you wish to monitor in the headphones.
29. USB/BT LEVEL: USB/BT level control.
30. BLUETOOTH: Press the Bluetooth switch to start working in Bluetooth mode.
31. BLUETOOTH LED: Lights up when the unit is working in Bluetooth mode
32. LED VU-METER: The device has two rows of LEDs, which display the Left and Right output level.
33. PHONES: Sets the volume of the headphones.
34. MAIN: Master level control. Sets the overall output volume
35. HEADPHONE: Connect your headphones via a 6.35mm stereo jack to the mixer.
36. 6.35mm JACK MASTER OUTPUTS: Unbalanced Left & Right line level output.
37. BALANCED OUTPUT: Balanced Left & Right output via XLR connectors.

©Copyright LOTRONIC 2017 MX62BT-DSP 5
QUICK GUIDE
1. Be sure that your mixer is turned off and that all level controls are turned all the way down.
2. Turn off any other external devices, and then connect microphones, line level devices, instruments and speakers.
3. To avoid damage to your speakers, power up the devices in the following order:
Peripheral devices→ mixer→power amps or powered speakers. Reverse this order when turning power off.
NOTE: If you are using a condenser microphone that requires phantom power, turn the phantom power switch (6)
on before turning on the power to the power amp or powered speakers.
4. Adjust the channel GAIN controls so that the corresponding CLIP indicators flash briefly on the highest peak levels.
5. Set the MAIN MIX control (34) to the "MIN" position.
6. Set the Channel gain controls to create the desired initial balance, then adjust the overall volume using the
STEREO OUT Master fader.
If the CLIP indicator lights frequently, lower the Channel controls a little to avoid distortion
BLUETOOTH PAIRING PROCEDURE
Select the BLUETOOTH input by pressing the button (27) into the lower position. Press the Bluetooth button (30). The
Bluetooth LED (31) lights up steadily in blue. Activate the search for Bluetooth devices on your smartphone. Select
“Bluetooth” in the list of found devices. When both units are paired successfully, the Bluetooth LED (31) flashes
continuously in blue. Set the volume via the USB/BT level control (29). The DSP effects cannot be applied to the
Bluetooth signal.
SPECIFICATIONS
INPUTS:
DJ MIC ........................................................................................... 1.5mv/1K Ohm balanced
LINE ............................................................................................................ 150mv/27K Ohm
OUTPUTS:
MASTER ............................................................................................................. 1V/5K6 Ohm
GENERAL:
Frequency Response ............................................................................ 20Hz-20KHz @ ±2dB
THD ................................................................................................................................ 0.1%
S/N Ratio ................................................................................................................... >80 d B
Headphone Impedance ............................................................................................ 32 Ohm
Power supply ......................... 100-240Vac 50/60Hz via 12Vdc 1A mains adaptor (supplied)
Dimensions ...................................................................................................... 22 x 17 x 6cm
Weight ....................................................................................................................... 1.090kg
Electric products must not be put into household waste. Please bring them to a recycling centre.
Ask your local authorities or your dealer about the way to proceed.

©Copyright LOTRONIC 2017 MX62BT-DSP 6
.
MODE D’EMPLOI
Notes Importantes:
1) Lire le mode d’emploi avant la première mise en service du produit.
2) Conservez ce mode d’emploi pour référence ultérieure.
3) Lisez les consignes de sécurité avant d’effectuer des branchements et mettre l’appareil en service.
4) Respectez toutes les consignes de sécurité et d’utilisation contenues dans le manuel.
5) Respectez toutes les consignes de sécurité pour éviter un incendie et/ou des chocs électriques.
6) Eau et humidité : Ne pas utiliser l’appareil à proximité d’eau, p.ex. près d’une baignoire, d’un lavabo.
7) Ne pas placer l’appareil sur un chariot, un support, un tabouret ou une table instable. L’appareil peut tomber et
provoquer des blessures et des dommages. Utilisez l’appareil uniquement avec un chariot, support, tabouret ou
table recommandé par le fabricant et vendu avec l’appareil.
8) Lorsque l’appareil est installé sur un support, déplacez-le avec précaution. Des arrêts soudains, une force
excessive et des surfaces irrégulières peuvent provoquer une chute.
9) Placer l’appareil loin des sources de chaleur telles que radiateurs, poêles et autres appareils
10) Placez l’appareil de façon à ne pas compromettre sa ventilation. Ne pas placer sur une surface molle qui risque
de bloquer ses fentes de ventilation.
11) Passez le cordon secteur de telle façon qu’il ne peut pas être pincé ou écrasé, notamment à proximité de la sortie
du cordon de l’appareil ou près de la prise secteur.
12) Débranchez l’appareil du secteur avant de le nettoyer.
13) Utilisez uniquement un chiffon doux et humide. Ne pas laisser de l’eau pénétrer dans l’appareil.
14) En cas de non-utilisation prolongée, débranchez l’appareil du secteur.
15) Faites vérifier l’appareil par un technicien qualifié si
- le cordon ou la fiche secteur ont été endommagés,
- des objets ou des liquides ont pénétrés dans l’appareil,
- l’appareil a été exposé à la pluie ou tout autre liquide,
- l’appareil ne fonctionne pas normalement ou présente un changement significatif dans son
fonctionnement,
- l’appareil est tombé et le boîtier a été endommagé.
16) Pour les réparations, assurez-vous qu’uniquement des pièces détachés homologuées par le fabricant ont été
utilisés qui présentent exactement les mêmes caractéristiques techniques que les pièces d’origine.
17) Après chaque réparation, demandez au réparateur d’effectuer tous les tests de routine afin de s’assurer du bon
fonctionnement de l’appareil.
CONNECTEURS & CONTROLES
1. DC IN +12V
Branchez l'adaptateur secteur fourni sur la prise DC IN 12V. L'adaptateur secteur fourni délivre une tension de sortie
de 12Vdc 1A.
2. POWER: Appuyez sur ce commutateur pour mettre l'appareil sous et hors tension.
3. USB TO PC: Branchez la table de mixage sur votre ordinateur au moyen d'un cordon USB A-B.
4. BT ANT: Antenne Bluetooth
5. MIC/LINE: Entrée Microphone/Ligne. Cette entrée peut délivrer une tension de +48V pour un microphone à
F

©Copyright LOTRONIC 2017 MX62BT-DSP 7
condensateur qui requiert une tension fantôme.
6. PHANTOM: Appuyez pour appliquer une tension de +48V à cette entrée. La LED rouge s'allume.
7. CH1 PAD: Appuyez sur ce commutateur pour atténuer le signal du canal 1 de 20dB.
8. MIC/LINE/INST: Branchez un microphone, un appareil de niveau ligne ou une guitare sur cette entrée.
9. INST/HI-Z: Appuyez sur ce commutateur lorsqu'une guitare est branchée sur cette entrée (8).
10. CH2 PAD: Appuyez sur ce commutateur pour atténuer le signal du canal 2 de 20dB.
11. GAIN: Contrôles de gain pour les canaux 1 & 2.
12. EQ HIGH: Réglage des hautes fréquences de Canal 1/Canal 2
13. EQ LOW: Réglage des basses fréquences de Canal 1/Canal 2
14. FX: Appuyez sur ce commutateur pour ajouter un effet DSP au signal de Canal 1/Canal 2.
15. NIVEAU: Réglage de niveau Canal 1/Canal 2.
16. MONO/STEREO: En position haute, la sortie générale sera en mono.
17. LED de Clipping: s'allume lorsque le signal de Canal 1/Canal 2 est surchargé.
18. ENTREE Canal 3/Canal 4 : Entrées ligne des canaux 3 & 4. Elles acceptent des signaux symétriques ou
asymétriques.
19. GAIN Canal 3/Canal 4: Appuyez sur le commutateur GAIN pour atténuer le signal du Canal 3 & 4 de 20dB.
20. FX: Appuyez sur ce commutateur pour ajouter un effet DSP au signal de Canal 3/Canal 4.
21. CH3/4: Réglage de niveau canal 3 & 4.
22. ENTREE Canal 5/Canal 6: Entrées ligne des canaux 5 & 6. Elles acceptent des signaux symétriques ou
asymétriques.
23. CH5/CH6 GAIN: Appuyez sur le commutateur GAIN pour atténuer le signal de 20dB.
24. CH5/6: Réglage de niveau canal 5 & 6.
25. FX LEVEL: Réglage de niveau des effets DSP.
26. DIGITAL EFFECT PROCESSOR: Tournez le bouton pour choisir parmi 16 effets.
27. USB/BT: Sélectionnez entre la source PC ou Bluetooth
28. MAIN/PHONES: Sélectionnez le signal USB ou BT que vous souhaitez écouter dans le casque
29. USB/BT LEVEL: Réglage de niveau USB/Bluetooth.
30. BLUETOOTH: Appuyez sur le commutateur Bluetooth pour travailler en mode Bluetooth.
31. BLUETOOTH LED: S'allume lorsque l'appareil est en mode Bluetooth
32. VU-METRE A LED: L'appareil possède deux rangées de LED qui affichent le niveau de sortie gauche et droit
33. PHONES: Réglage de volume du casque
34. MAIN: Réglage de niveau général. Réglage de volume général
35. HEADPHONE: Branchez votre casque au moyen d'un Jack 6,35mm sur la table de mixage.
36. SORTIES GENERALES PAR JACK 6,35mmSortie de niveau ligne gauche & droite asymétrique.
37. SORTIE SYMETRIQUE: Sortie gauche & droite symétrique par connecteurs XLR.

©Copyright LOTRONIC 2017 MX62BT-DSP 8
GUIDE RAPIDE
1. Assurez-vous que la table de mixage est éteinte et tous les contrôles sont au minimum.
2. Eteignez tous les appareils externes et branchez les microphones, appareils de niveau ligne, instruments et haut-
parleurs.
3. Afin d’éviter d’endommager vos haut-parleurs, allumez les équipements dans l’ordre suivant:
Périphériques → table de mixage → amplis de puissance ou enceintes actives. Eteignez dans l’ordre inverse.
NOTE: Si vous utilisez un micro à condensateur qui a besoin d’une alimentation fantôme, allumez l’alimentation
fantôme avant d’allumer votre ampli ou enceintes actives.
4. Réglez les contrôles de GAIN des canaux de façon à ce que les voyants CLIP correspondant s’allument brièvement
lors des plus fortes crêtes.
5. Mettez le contrôle MAIN MIX (34) sur la position "MIN".
6. Réglez les contrôles des canaux de façon à établir l’équilibre initial recherché. Ajustez ensuite le volume général au
moyen des contrôles de sortie.
Si le voyant CLIP s’allume souvent, baissez un peu les contrôles des canaux pour éviter une distorsion.
PROCEDURE D’APPAIRAGE BLUETOOTH
Sélectionnez l’entrée BLUETOOTH en mettant le bouton (27) en position basse. Appuyez sur le bouton Bluetooth (30).
La LED Bluetooth (30) s’allume en bleu. Activez la recherche d’appareils Bluetooth sur votre smartphone.
Sélectionnez « Bluetooth » dans la liste des appareils trouvés. Lorsque les deux appareils sont appairés, la LED
Bluetooth (31) clignote en bleu. Réglez le volume au moyen du contrôle USB/BT LEVEL (29). Les effets DSP ne
s’appliquent pas au signal Bluetooth.
CARACTÉRISTIQUES TECHNIQUES
ENTREES:
MICRO DJ .................................................................................. 1.5mV/1K Ohms symétrique
Ligne ......................................................................................................... 150mV/27k Ohms
SORTIES:
MASTER ........................................................................................................... 1V/5K6 Ohms
GENERALITES:
Bande passante ....................................................................................20Hz-20KHz (+/-2dB)
THD ................................................................................................................................ 0.1%
Rapport S/B ................................................................................................................ >80 dB
Impédance casque .................................................................................................. 32 Ohms
Alimentation: ................. 100-240Vac 50/60Hz par l'adaptateur secteur 12Vdc 1A (fourni)
Dimensions ...................................................................................................... 22 x 17 x 6cm
Poids ......................................................................................................................... 1,090kg
NOTE IMPORTANTE : Les produits électriques ne doivent pas être mis au rebut avec les ordures ménagères. Veuillez
les faire recycler à un point de collecte spécialisé. Consultez les autorités locales ou votre revendeur sur la façon de les
recycler.

©Copyright LOTRONIC 2017 MX62BT-DSP 9
BEDIENUNGSANLEITUNG
Wichtige Hinweise:
1. Bitte lesen Sie diese Anleitung sorgfältig vor der Inbetriebnahme durch. Anleitung für spätere
Bezugnahme aufbewahren.
2. Alle Warnhinweise auf dem Gerät und in der Anleitung genau befolgen.
3. Behandeln Sie die Netzschnur mit Sorgfalt und beschädigen oder verformen Sie sie nicht. Eine
beschädigte oder verformte Netzschnur kann Stromschlag und Defekte verursachen. Beim Abziehen des
Steckers aus der Steckdose immer am Stecker anfassen, nie an der Schnur ziehen.
4. Nicht das Netzkabel betreten oder quetschen.
5. Vor dem Reinigen oder bei längerem Nichtgebrauch den Netzstecker abziehen.
6. Keine Metallgegenstände oder Flüssigkeiten ins Gehäuse dringen lassen. Sie können zu Stromschlag und
Störungen führen.
7. Das Gerät niemals auf einen unsicheren Wagen, Ständer oder Tisch stellen. Das Gerät kann
herunterfallen und Menschen verletzen. Nur mit einem vom Hersteller zugelassenen oder mit dem
Gerät zusammen verkauften Wagen, Stativ oder Tisch benutzen
8. Wenn das Gerät auf einem Gestell steht, das Ganze vorsichtig bewegen. Plötzliches Bremsen, große
Kraftanwendung und unebene Flächen können zum Umkippen führen.
9. Das Gerät nicht in der Nähe von Wasser benutzen z.B. neben einer Badewanne, Spüle, Waschmaschine.
10. Nicht die Belüftung behindern. Nicht auf ein Sofa, Bett, Sessel oder ähnliche weiche Unterlagen stellen.
Nicht in ein geschlossenes Gehäuse wie einen Schrank einbauen, wo die Hitze nicht abgeleitet werden
kann.
11. Das Gerät nicht in der Nähe von Wärmequellen wie Heizkörpern, Öfen und ähnlichen Geräten
aufstellen.
12. Das Gerät nur mit einem feuchten Tuch abwischen. Kein Wasser ins Gehäuse dringen lassen.
13. Das Gerät muss von einem Techniker überprüft werden, wenn:
das Netzkabel oder die –schnur beschädigt sind;
das Gerät Regen oder anderen Flüssigkeiten ausgesetzt war;
das Gerät nicht richtig funktioniert oder eine beachtliche Leistungsänderung aufweist;
das Gerät gefallen oder das Gehäuse beschädigt ist.
15. Reparaturen dürfen nur von qualifiziertem Fachpersonal ausgeführt werden.
16. Nach Abschluss der Wartungs- und Reparaturarbeiten lassen Sie alle Routineüberprüfungen
durchführen, um die Sicherheit des Geräts zu gewährleisten.
BEDIENELEMENTE & ANSCHLÜSSE
1. DC IN +12V
Das mitgelieferte Netzteil an die DC IN 12V Buchse anschließen. Das mitgelieferte Netzteil liefert eine
Ausgangsspannung von 12Vdc 1A.
2. POWER: Diesen Schalter drücken, um das Gerät einzuschalten.
3. USB TO PC: Mit einem A-B USB Kabel das Mischpult an einen Computer anschließen, um Musikdateien
D

©Copyright LOTRONIC 2017 MX62BT-DSP 10
abzuspielen.
4. BT ANT: Bluetooth Antenne
5. MIC/LINE: Mikrofon/Line Eingang. Diese Buchse lieferte eine Spannung von +48V für ein Kondensatormikrofon.
6. PHANTOM: Schalter drücken, um eine Spannung von +48V anzulegen. Die rote LED leuchtet.
7. CH1 PAD: Schalter drücken, um das Signal von Kanal 1 um 20dB zu mindern.
8. MIC/LINE/INST: Mikrofon, Line-Pegel Gerät oder Gitarre an diesen Eingang anschließen.
9. INST/HI-Z: Diesen Schalter eindrücken, wenn eine Gitarren an diesen Eingang angeschlossen ist (8).
10. CH2 PAD: Schalter drücken, um das Signal von Kanal 2 um 20dB zu mindern.
11. GAIN: Verstärkungsregler für Kanäle 1 & 2.
12. EQ HIGH: Einstellen der hohen Frequenzen von Kanal 1/Kanal 2
13. EQ LOW: Einstellen der tiefen Frequenzen von Kanal 1/Kanal 2
14. FX: Taste drücken, um dem Signal von Kanal 1/Kanal 2 einen DSP Effekt zuzufügen.
15. LEVEL: Kanal 1/Kanal 2 Pegelregler.
16. MONO/STEREO: In der oberen Stellung ist das Ausgangssignal Mono.
17. Clip: Leuchtet, wenn das Signal von Kanal 1/Kanal 2 überlastet ist.
18. Kanal 3/Kanal 4 Eingang: Line Eingänge der Kanäle 3 & 4. Sie können sowohl ein symmetrisches als auch ein
asymmetrisches Signal anschließen.
19. Kanal 3/Kanal 4 Verstärkung: GAIN Taste drücken, um das Signal von Kanal 3 & 4 um 20dB zu mindern.
20. FX: Taste drücken, um dem Signal von Kanal 3/Kanal 4 einen DSP Effekt zuzufügen..
21. KANAL 3/4: Pegelregler von Kanal 3 & 4.
22. Kanal 5/Kanal 6 Eingang: Line Eingänge der Kanäle 5 & 6. Sie können sowohl ein symmetrisches als auch ein
asymmetrisches Signal anschließen.
23. Kanal 5/Kanal 6 Verstärkung: GAIN Taste drücken, um das Signal um 20dB zu mindern.
24. Kanal 5/6: Pegelregler von Kanal 5 & 6.
25. FX LEVEL: DSP Pegelregler.
26. DIGITAL EFFECT PROCESSOR: Knopf drehen, um einen der 16 DSP Effekte zu wählen.
27. USB/BT: Wahl zwischen Musik vom PC oder Bluetooth
28. MAIN/PHONES: Wählen Sie zwischen USB und Bluetooth das Signal, dass Sie im Kopfhörer hören möchten.
29. USB/BT LEVEL: USB/BT Pegelregler
30. BLUETOOTH: Bluetooth Taste drücken, um im Bluetooth Betrieb zu arbeiten.
31. BLUETOOTH LED: Leuchtet, wenn das Gerät im Bluetooth Betrieb arbeitet.
32. LED VU-METER: Das Gerät besitzt eine LED Leiter, die den rechten und linken Ausgangspegel anzeigt.
33. PHONES: Stellt die Lautstärke des Kopfhörers ein.
34. MAIN: Hauptpegelregler. Einstellung der Hauptlautstärke
35. HEADPHONE: Kopfhörer mit 6,35mm Klinkenstecker an diese Buchse anschließen.
36. MASTER AUSGÄNGE ÜBER 6,35mm KLINKENBUCHSEN Asymmetrischer linker & rechter Line-Pegel Ausgang.
37. SYMMETRISCHER AUSGANG: Symmetrischer rechter & linker Ausgang über XLR Verbinder

©Copyright LOTRONIC 2017 MX62BT-DSP 11
GRUNDREGELN
1. Das Mischpult muss ausgeschaltet und alle Pegelregler müssen vollständig heruntergefahren sein.
2. Alle Fremdgeräte ausschalten, bevor Sie die Mikrofone, Instrumente und Boxen anschließen.
3. Um die Lautsprecher nicht zu beschädigen, müssen die Geräte in folgender Reihenfolge eingeschaltet werden:
Peripheriegeräte→Mischpult→Leistungsverstärker oder Aktivboxen. Die Geräte in umgekehrter Reihenfolge
ausschalten.
Hinweis: Wenn Sie ein Kondensatormikrofon mit Phantomspeisung benutzen, schalten Sie die Phantomspeisung am
Mischpult ein, bevor Sie den Leistungsverstärker oder die Aktivboxen einschalten.
4. Die GAIN Regler so einstellen, dass die entsprechenden CIP Anzeiger nur bei Spitzenpegeln kurz aufleuchten.
5. Den MAIN MIX Master Regler auf "MIN" stellen.
6. Mit den Kanalreglern die gewünschte Grundbalance einstellen und dann die Gesamtlautstärke mit dem MAIN MIX
Regler einstellen.
HINWEIS: Wenn der CLIP Anzeiger häufig aufleuchtet, muss der Kanalregler leicht heruntergestellt werden, um
Klangverzerrung zu vermeiden
Bluetooth Verbindung
BLUETOOTH Eingang wählen, indem die Taste (27) in die untere Stellung gedrückt wird. Bluetooth Taste (30) drücken.
Die Bluetooth LED (31) leuchtet blau. Aktivieren Sie die Bluetooth Suchfunktion auf Ihrem Smartphone. "Bluetooth"
in der Liste der gefundenen Geräte wählen. Wenn beide Geräte miteinander verbunden sind, blinkt die Bluetooth
LED (31) blau. USB/BT Lautstärke mit dem Regler (29) einstellen. Die DSP Effekte haben keinen Einfluss auf das
Bluetooth Signal.
Technische Daten
EINGÄNGE:
DJ MIC ..................................................................................... 1.5mV/1K Ohm symmetrisch
LINE ............................................................................................................ 150mV/27K Ohm
AUSGÄNGE:
MASTER ............................................................................................................. 1V/5K6 Ohm
ALLGEMEINES:
Frequenzbereich ..................................................................................20Hz-20KHz (+/-2dB)
THD ................................................................................................................................ 0.1%
Störabstand ................................................................................................................ >80 dB
Impedanz.................................................................................................................. 32 Ohm
Versorgung: ................................ 100-240Vac 50/60Hz über 12Vdc 1A Netzteil (enthalten)
Abmessungen .................................................................................................. 22 x 17 x 6cm
Gewicht ..................................................................................................................... 1.090kg
WICHTIGER HINWEIS: Elektrogeräte gehören nicht in den Hausmüll. Sie müssen in speziellen Betrieben recycelt
werden. Bringen Sie sie zu einer speziellen Entsorgungsstelle für Elektrokleingeräte (Wertstoffhof)!

©Copyright LOTRONIC 2017 MX62BT-DSP 12
HANDLEIDING
Belangrijke veiligheids en risico waarschuwingen
• Aandachtig de handleiding lezen en bewaren.
• Alle veiligheidsinstructies en waarschuwingen moeten worden nageleefd. Ze maken deel uit van de handleiding en
moet worden bewaard met de handleiding.
• Het apparaat is goedgekeurd voor gebruik in droge, gesloten ruimtes alleen. Niet het apparaat in de buurt van
water, zoals in de badkamer of zwembaden gebruiken.
• Het apparaat mag niet worden blootgesteld aan sterke trillingen of zware mechanische belasting.
• Plaats geen ontvangers gevuld met vloeistoffen, zoals glazen of vazen, op of direct naast het apparaat. Plaats geen
kleine voorwerpen, zoals munten of paperclips, op het toestel. Als er vloeistof of voorwerpen in het apparaat
dringen, trek dan onmiddellijk de stekker uit het stopcontact en raadpleeg een deskundige.
• Altijd de stekker uit het stopcontact trekken
- Alvorens u het toestel schoonmaakt
- in geval van onweer
- als u het toestel over een langere tijd niet gebruikt (>1 week)
• Elektrische apparaten buiten het bereik van kinderen houden.
• Onder spanning staande delen kunnen worden blootgesteld door het openen van deksels of het verwijderen van
onderdelen (tenzij dit kan worden gedaan zonder gereedschap). Contactpunten kunnen ook onder spanning
staan. Als het apparaat moet worden geopend om te kalibreren, repareren of vervangen van onderdelen of
componenten, moet eerst al haar polen worden losgekoppeld van alle spanningsbronnen. Als het apparaat moet
worden gehouden open en onder spanning tijdens onderhoud of reparaties, kan dit werk alleen worden
uitgevoerd door een vakman die vertrouwd is met de risico's en de relevante regelgeving.
• Sluit nooit het apparaat direct na de overdracht van een koude naar een warme kamer. Het condenswater dat
hierbij gevormd wordt kan een elektrische schok veroorzaken. Laat het apparaat eerst op kamertemperatuur
komen voordat u het aansluit. Wacht tot het condenswater verdampt is. Dit kan enkele uren duren.
• Gebruik het apparaat alleen in een gematigd klimaat, niet in een tropische omgeving.
• Defecte stroomkabels mogen enkel vervangen worden door specialisten. Gevaar van elektrische schok!
FEATURES
1. DC IN +12V
Sluit de meegeleverde netadapter aan op de DC IN 12V connector. De meegeleverde netadapter levert een
uitgangsspanning van 12Vdc 1A.
2. POWER: Druk op deze knop om het apparaat in te schakelen.
3. USB TO PC: Gebruik een A-B USB-kabel om de mixer op uw computer aan te sluiten om muziek af te spelen.
NL

©Copyright LOTRONIC 2017 MX62BT-DSP 13
4. BT ANT: Bluetooth antenne.
5. MIC/LINE: Microfoon/lijn ingang. Deze ingang kan een spanning van +48V leveren voor een condensatormicrofoon
die fantoomvoeding nodig heeft.
6. PHANTOM: Druk op om een spanning van +48V toe te passen op deze ingang. De rood LED licht op.
7. CH1 PAD: Druk op de schakelaar om het signaal van kanaal 1 met 20 dB te dempen
8. MIC/LINE/INST: Sluit een microfoon, line level-apparaat of gitaar aan op deze ingang.
9. INST/HI-Z: Druk op deze schakelaar wanneer een gitaar op de ingang (8) is aangesloten.
10. CH2 PAD: Druk op de schakelaar om het signaal van kanaal 2 met 20 dB te dempen
11. GAIN: Versterkingscontroles voor kanalen 1 & 2.
12. EQ HIGH: Instelling van de hoge frequenties van KANAAL 1/KANAAL 2
13. EQ LOW: Instelling van de lage frequenties van KANAAL 1/KANAAL 2
14. FX: Druk op de schakelaar om een DSP-effect toe te voegen aan het signaal van KANAAL 1/KANAAL 2.
15. LEVEL: Niveau controle van KANAAL 1/KANAAL 2.
16. MONO/STEREO: In de bovenste positie is de totale uitgang mono.
17. CLIP LED: Licht op als het signaal van CH1 / CH2 overbelast is
18. KANAAL 3/KANAAL 4 INGANG: Lijn ingangen kanalen 3 & 4. Ze accepteren een gebalanceerd of ongebalanceerd
signaal.
19. VERSTERKING KANAAL 3/KANAAL 4: Druk op de schakelaar GAIN om het signaal van kanaal 3 en 4 met 20 dB te
dempen
20. FX: Druk op de schakelaar om een DSP-effect toe te voegen aan het signaal van CH3 / CH4.
21. KANAAL 3/4: Niveau controle van kanaal 3 & 4.
22. KANAAL 5/KANAAL 6 INGANG: Lijn ingangen kanalen 5 & 6. Ze accepteren een gebalanceerd of ongebalanceerd
signaal.
23. VERSTERKING KANAAL 5/KANAAL 6: Druk op de schakelaar GAIN om het signaal met 20 dB te dempen
24. KANAAL 5/6: Niveau controle van kanaal 5 & 6.
25. FX LEVEL: DSP niveau controle.
26. DIGITAL EFFECT PROCESSOR: Draai de knop om uit 16 DSP-effecten te kiezen.
27. USB/BT: Kies tussen muziek van de PC of Bluetooth
28. MAIN/PHONES: Selecteer tussen het USB- of BT-signaal dat u in de hoofdtelefoon wilt luisteren.
29. USB/BT LEVEL: USB/BT niveau controle.
30. BLUETOOTH: Druk op de Bluetooth-schakelaar om in de Bluetooth-modus te werken.
31. BLUETOOTH LED: Licht op wanneer het apparaat in Bluetooth-modus werkt
32. LED VU-METER: Het apparaat heeft twee rijen leds, die het uitgangsniveau links en rechts weergeven.
33. PHONES: Stelt het volume van de hoofdtelefoon in
34. MAIN: Hoofd niveau controle Hoofd uitgang volume
35. HEADPHONE: Sluit uw hoofdtelefoon via een 6.35mm jack aan op het mengpaneel.
36. 6,35mm JACK MASTER UITGANGEN: Ongebalanceerde uitgang van het linker en rechter lijn niveau.
37. GEBALANCEERDE UITGANG: Gebalanceerde linker en rechter uitgang via XLR-connectoren.

©Copyright LOTRONIC 2017 MX62BT-DSP 14
BASISREGELS
1. Zorg ervoor dat uw mixer is uitgeschakeld en dat alle bedieningselementen helemaal naar beneden gedraaid zijn.
2. Schakel alle andere externe toestellen uit en sluit vervolgens microfoons, instrumenten en luidsprekers aan.
3. Om uw luidsprekers niet te beschadigen, schakel deze toestellen in deze volgorde aan: externe toestellen→
mengpaneel→versterker of actieve boxen). Schakel in omgekeerde volgorder uit.
NOTE: Als u een condensator microfoon met fantoom voeding gebruikt, zet de fantoom power schakelaar aan
alvorens U de versterker of actieve luidsprekers aanschakelt.
4. Stel de GAIN controles van de kanalen zo in dat de CLIP indicatie kort oplicht tijdens de hoogste transienten.
5. Zet de MAIN MIX regelaar (34) op de "MIN" positie.
6. Stel de gewenste balansen d.m.v. de kanaal regelaars in en stel daarna het algemene volume d.m.v. de MAIN MIX
controle in.
Als de CLIP indicatie vaak oplicht, verminder de instelling van de kanaal regelaars om vervorming te vermijden.
BLUETOOTH PAIRING PROCEDURE
Selecteer de BLUETOOTH-ingang door op de knop (27) in de onderste positie te drukken. Druk de Bluetooth toets
(30). De Bluetooth led licht blauw. Activeer de zoekactie naar Bluetooth-apparaten op uw smartphone. Kies
"Bluetooth” in de lijst van gevonden apparaten. Wanneer beide toestellen met elkaar zijn gekoppeld, knippert de
Bluetooth-led (31) continu in blauw. Stel het volume in via de USB / BT niveauregeling (29) in. De DSP-effecten
kunnen niet worden toegepast op het Bluetooth-signaal.
TECHNISCHE KENMERKEN
INGANGEN:
DJ MIC .................................................................................... 1.5mv/1K Ohm gebalanceerd
LINE ............................................................................................................ 150mV/27K Ohm
UITGANGEN:
MASTER ............................................................................................................. 1V/5K6 Ohm
ALGEMEEN:
Frequentiebereik ..................................................................................20Hz-20KHz (+/-2dB)
THD ................................................................................................................................ 0.1%
Signaal/ruis verhouding ............................................................................................. >80 dB
Impedantie ................................................................................................................ 32 ohm
Ingangsspanning: ........... 100-240Vac 50/60Hz via de meegeleverde 12Vdc 1A netadapter
Afmetingen ...................................................................................................... 22 x 17 x 6cm
Gewicht ..................................................................................................................... 1,090kg
BELANGRIJKE OPMERKING: Elektrische producten mogen niet samen met het huishoudelijk afval worden verwijderd. Lever ze a.u.b. in
bij een gespecialiseerd inzamelpunt. Raadpleeg de plaatselijke autoriteiten of uw verkoper over hoe de producten te recycleren
.

©Copyright LOTRONIC 2017 MX62BT-DSP 15
NAVODILA ZA UPORABO
POMEMBNA VARNOSTNA NAVODILA
1. Pozorno preberite navodila in jih shranite za poznejšo uporabo.
2. Vsa varnostna navodila in opozorila je treba upoštevati. So del priročnika in se hranijo s priročnikom.
3. Naprave ne postavljajte blizu vode, npr. v kopalnici, v bližini kad, bazen, itd.
4. Enota mora ustrezati nosilcu in kovčku, ki ga priporoča proizvajalec.
Nenadna zaustavitev, velika moč in groba površina lahko povzročijo kombinacijo obračanja.
5. Hranite ločeno od virov toplote, kot so radiator, štedilnik in ojačevalnik itd.
6. Napravo upravljajte samo z nazivno napajalno napetostjo.
7. Ne hodite in ne stiskajte napajalnega kabla.
8. Enoto čistite z mehko krpo. Preprečiti vstop vode in / ali drugih tekočin v ohišje.
9. Izključite napajalni kabel, če se enota ne uporablja dalj časa ali med nevihto, da preprečite nevarnost napetosti,
katera lahko poškodujete notranje vezje.
10. Preprečite vstop predmetov in tekočin v enoto.
11. Če se zgodi nekaj od naslednjega, se obrnite na usposobljeno servisno osebje:
A) Napajalni kabel ali vtikač poškodovan; ali
B) V enoto je vstopil predmet ali tekočina; ali
C) Enota je bila izpostavljena dežju; ali
D) Enota ne deluje; ali
E) Enota je padla ali ne deluje normalno.
12. Popravilo --- Enote ne poskušajte popravljati sami. Vsa popravila mora opraviti usposobljeni tehnik. Uporabniku je
dovoljeno izvajati le manipulacije, nastavitve in kontrole, navedene v tem priročniku.
13. Prezračevanje --- Ne prekrivajte prezračevalnih odprtin, da preprečite pregrevanje enote. Naprave ne postavljajte
na posteljo, odejo, kavč ali podobno mehko površino. Enote ne postavljajte v zaprto omarico itd.
14. Dodatki --- Ne uporabljajte delov, ki jih proizvajalec ne priporoča, da bi se izognili poškodbam.
15. Dodatna oprema --- Naprave ne postavljajte na nestabilno vozilo, polico, stojalo ali mizo. To povzroča resno škodo
otroku ali odraslemu, če se enota pade. Prosimo, uporabite vozilo, polico, stojalo ali mizo, ki jo priporoča
proizvajalec.
16. Rezervni deli --- Če enota potrebuje rezervne dele, uporabljajte samo rezervne dele, ki jih priporoča proizvajalec
in so v vseh pogledih enaki originalnim delom.
17. Varnostni pregled --- Po popravilu mora serviser preveriti enoto za varnost.
LASTNOSTI
1. DC IN +12V
Priloženi omrežni adapter priključite na vtičnico DC IN 12V. Priloženi napajalnik zagotavlja izhodno napetost 12V DC
1A.
2. POWER: Pritisnite to stikalo, da vklopite napravo.
3. USB IN / OUT: Uporabite kabel A-B USB za povezavo mixerja z računalnikom za predvajanje glasbe.
4. BT ANT: Bluetooth antena.
5. MIC/LINE: Mikrofon / Line vhod. Ta vhod lahko zagotavlja napetost + 48V za kondenzatorski mikrofon, ki zahteva
fantomsko napajanje.
SL

©Copyright LOTRONIC 2017 MX62BT-DSP 16
6. PHANTOM: Pritisnite za napajanje + 48V na ta vhod. Rdeči LED zasveti.
7. CH1 PAD: Pritisnite stikalo za zmanjšanje signala kanala 1 za 20dB
8. MIC/LINE/INST: Na ta vhod priključite mikrofon, line napravo ali kitaro.
9. INST/HI-Z: Pritisnite to stikalo, ko je kitara priključen na vhod (8).
10. CH2 PAD: Pritisnite stikalo za zmanjšanje signala kanala 2 za 20dB
11. GAIN: Gain kontrole za kanale 1 in 2.
12. EQ HIGH: Nastavitev visokih frekvenc na CH1/CH2
13. EQ LOW: Nastavitev nizkih frekvenc na CH1/CH2
14. FX: Pritisnite stikalo, da dodate DSP efekte signal na CH1/CH2.
15. LEVEL: CH1/CH2 kontrola nivoja.
16. MONO/STEREO: V zgornjem položaju bo skupni izhod mono.
17. CLIP LED: Zasveti, ko je signal CH1 / CH2 preobremenjen
18. CH3/CH4 INPUT: Line vhodi za kanale 3 in 4. Sprejemajo balansiran ali nebalansiran signal.
19. CH3/CH4 GAIN: Pritisnite stikalo GAIN, da zmanjšate signal kanala 3 in 4 za 20 dB
20. FX: Pritisnite stikalo, da dodate DSP efekte signal na CH3/CH4.
21. CH3/4: Kontrola nivoja za kanale 3 in 4.
22. CH5/CH6 INPUT: Line vhodi za kanale 5 in 6. Sprejemajo balansiran ali nebalansiran signal.
23. CH5/CH6 GAIN: Pritisnite stikalo GAIN, da zmanjšate signal za 20 dB
24. CH5/6: Kontrola nivoja za kanale 5 in 6.
25. FX LEVEL: DSP kontrola nivoja.
26. DIGITAL EFFECT PROCESSOR: Zasukajte gumb, da izberete med 16 DSP efekti.
27. USB/BT: Izberite med glasbo iz računalnika in Bluetooth glasbo
28. MAIN/PHONES: Izberite med signalom USB ali BT, ki ga želite kontrolirati v slušalkah.
29. USB/BT LEVEL: USB/BT kontrola nivoja.
30. BLUETOOTH: Pritisnite stikalo Bluetooth, da začnete delovanje v načinu Bluetooth.
31. BLUETOOTH LED: Zasveti, ko enota deluje v načinu Bluetooth
32. LED VU-METER: Naprava ima dve vrsti LED, ki prikazujejo levi in desni izhodni nivo.
33. PHONES: Nastavite glasnost slušalk.
34. MAIN: Kontrola glavnega nivoja. Nastavite splošno izhodno glasnost
35. HEADPHONE: Povežite Slušalke povežite s Jack 6,35 mm priključkom v mixer.
36. 6.35mm JACK MASTER OUTPUTS: Nebalansirani levi in desni Line izhod.
37. BALANCED OUTPUT: Balansirani levi in desni izhod preko XLR priključkov.

©Copyright LOTRONIC 2017 MX62BT-DSP 17
HITRI VODNIK
1. Prepričajte se, da je vaš mixer izklopljen in da so vse kontrole nivojev obrnjene navzdol.
2. Izklopite vse druge zunanje naprave in nato priključite mikrofone, naprave na Line vhode, instrumente in zvočnike.
3. Da bi se izognili poškodbam vaših zvočnikov, priključite naprave v naslednjem vrstnem redu:
Periferne naprave → mixer→
ojačevalniki ali aktivni zvočniki. Ob izklopu izklopite po tem vrstem redu.
OPOMBA: Če uporabljate kondenzatorski mikrofon, ki potrebuje fantomsko napajanje, vklopite fantomsko stikalo za
vklop (6), preden vključite napajanje v ojačevalnik ali aktivne zvočnike.
4. Prilagodite krmiljenje kanala GAIN tako, da se na kratko premikajo ustrezni indikatorji CLIP.
5. Nastavite MAIN MIX kontrolo (34) do "MIN" položaja.
6. Nastavite kontrole za pridobitev kanala, da ustvarite želeno začetno ravnovesje, nato pa prilagodite celotno
glasnost z glavnim drsnikom STEREO OUT.
Če se indikator CLIP pogosto prižge, zmanjšajte kontrolo kanalov, da preprečite popačenje.
POSTOPEK BLUETOOTH SEZNANJANJA
Izberite BLUETOOTH vhod s pritiskom na tipko (27) v spodnji položaj. Pritisnite gumb Bluetooth (30). Bluetooth LED
(31) sveti neprestano v modri barvi. Vključite iskanje naprav Bluetooth na pametnem telefonu. Na seznamu najdenih
naprav izberite »Bluetooth«. Ko sta obe enoti seznjanjeni uspešno, LED-lučka Bluetooth (31) utripa neprekinjeno v
modri barvi. Glasnost nastavite prek USB / BT kontrole (29). DSP efekte ni mogoče uporabiti za signal Bluetooth.
TEHNIČNI PODATKI
VHODI:
DJ MIC ............................................................................................... 1.5mv/1K Ω balansiran
LINE ................................................................................................................. 150mv/27K Ω
IZHODI:
MASTER .................................................................................................................. 1V/5K6 Ω
SPLOŠNO:
Frekvenčni razpon ................................................................................ 20Hz-20KHz @ ±2dB
Popačenje ...................................................................................................................... 0.1%
Razmerje Signal / Šum .............................................................................................. >80 d B
Impendanca slušalk ........................................................................................................ 32 Ω
Napajanje ............................... 100-240VAC 50/60Hz preko 12V DC 1A adapterja (priložen)
Dimenzije ........................................................................................................ 22 x 17 x 6cm
Teža............................................................................................................................ 1.090kg
Električni izdelki ne smejo biti dana v gospodinjske odpadke. Prosimo, da jih pripeljete do reciklažnega centra.
Vprašajte svoje lokalne oblasti ali svojega prodajalca o nadaljevanju.

©Copyright LOTRONIC 2017 MX62BT-DSP 18
.
MANUAL DE INSTRUCCIONES
Notas Importantes:
1) Lea este manual de instrucciones antes de la primera puesta en marcha del equipo.
2) Conserve este manual para futuras consultas.
3) Lea las instrucciones de seguridad antes de conectar o poner en marcha el equipo.
4) Respete todas las instrucciones de seguridad y de uso contenidas en este manual.
5) Respete todas las instrucciones de seguridad para evitar incendios y/o descargas eléctricas.
6) Agua y humedad: No coloque ni utilice el equipo cerca del agua, por ejemplo un baño, lavabo, etc…
7) No coloque el equipo en un carro, soporte, taburete o mesa inestable. El equipo se puede caer y provocar daños.
Utilice el equipo solo en un soporte recomendado por el fabricante o vendido con él.
8) Cuándo el equipo esté instalado en un soporte, desplácelo con precaución. Las paradas bruscas, una fuerza
excesiva o las superficies irregulares pueden provocar una caída y golpe.
9) Coloque el equipo lejos de las fuentes de calor, tal y como radiadores, estufas y equipos similares.
10) Coloque el equipo de manera que no quede comprometida su ventilación. No o coloque sobre una superficie
blanda, ya que corre el riesgo de bloquear las rejillas de ventilación.
11) Coloque el cable de corriente de tal manera que no pueda ser pellizcado o dañado, especialmente cerca de la
salida del cable del dispositivo o cerca de la toma de corriente.
12) Desenchufe el equipo de la corriente antes de limpiarlo.
13) Utilice únicamente un paño seco. No deje penetrar líquidos en el interior del equipo.
14) En caso de no utilización por un periodo largo, desenchufe el equipo de la corriente.
15) Es necesario hacer revisar el equipo por un técnico, en caso de:
- El cable o la clavija de corriente hayan estado dañados
- En caso de penetración de líquidos u objetos en el equipo
- El equipo ha estado expuesto a la lluvia o cualquier otro líquido
- El equipo no funciona normalmente o presenta cambios significativos en su funcionamiento
- El equipo se ha caído y/o se ha dañado
16) Para las reparaciones, asegúrese que solo se utilizan recambios originales homologados por el fabricante con
características idénticas al original.
17) Después de cada reparación, pida a técnico que haga una comprobación de rutina para asegurar el correcto
funcionamiento de la totalidad del equipo.
CONECTORES Y CONTROLES
1. DC IN +12V
Conecte el adaptador de corriente incluido en la toma DC IN 12V. El adaptador de corriente incluido, ofrece una
tensión de salida de 12Vdc 1A.
2. POWER: Apriete este conmutador para encender el equipo.
3. USB TO PC: Conecte el mezclador al ordenador mediante un cable USB A-B.
4. BT ANT: Antena Bluetooth
5. MIC/LINE: Entrada Micrófono/Línea. Esta entrada puede ofrecer una tensión de +48V para un micrófono de
condensador que requiera alimentación fantôme.
6. PHANTOM: Apriete para aplicar una tensión de +48V a esta entrada. El LED rojo se ilumina.
ES

©Copyright LOTRONIC 2017 MX62BT-DSP 19
7. CH1 PAD: Apriete en este conmutador para atenuar la señal del canal 1 en 20dB.
8. MIC/LINE/INST: Conecte un micrófono, un equipo a nivel de línea o una guitarra en esta entrada.
9. INST/HI-Z: Apriete en este conmutador cuándo conecte una guitarra en esta entrada (8).
10. CH2 PAD: Apriete este conmutador para atenuar la señal del canal 2 en 20dB.
11. GAIN: Control de ganancia para los canales 1 y 2.
12. EQ HIGH: Control de frecuencias agudas para los canales 1 y 2.
13. EQ LOW: Control de frecuencias graves para los canales 1 y 2.
14. FX: Apriete este conmutador para añadir un efecto DSP a la señal del Canal 1/Canal 2.
15. NIVEAU: Ajuste del nivel Canal 1/Canal 2.
16. MONO/STEREO: En posición alta, la salida general, será Mono.
17. LED de Clipping: Se ilumina cuándo la señal del Canal 1/Canal 2 está sobrecargada.
18. ENTREE Canal 3/Canal 4: Entradas de línea de los canales 3 y 4. Aceptan señales simétricas o asimétricas.
19. GAIN Canal 3/Canal 4: Apriete en el conmutador GAIN para atenuar la señal del canal 3 & 4 en 20dB.
20. FX: Apriete este conmutador para añadir un efecto DSP a la señal del Canal 3/Canal 4.
21. CH3/4: Control de ganancia para los canales 3 & 4.
22. ENTREE Canal 5/Canal 6: Entradas de línea de los canales 5 & 6. Aceptan señales simétricas o asimétricas.
23. CH5/CH6 GAIN: Apriete este conmutador GAIN para atenuar la señal en 20dB.
24. CH5/6: Ajuste del nivel Canal 5 & 6.
25. FX LEVEL: Ajuste del nivel de los efectos DSP.
26. DIGITAL EFFECT PROCESSOR: Gire el botón para seleccionar entre los 16 efectos.
27. USB/BT: Seleccione entre la fuente PC o Bluetooth
28. MAIN/PHONES: Seleccione la señal USB o BT que desee escuchar en los auriculares
29. USB/BT LEVEL: Ajuste del nivel USB/Bluetooth.
30. BLUETOOTH: Apriete es el conmutador Bluetooth para trabajar en modo Bluetooth.
31. BLUETOOTH LED: Se ilumina cuándo el equipo está en modo Bluetooth
32. VU-METRE A LED: El equipo cuenta con dos barras de LED que indican el nivel de salida derecha e izquierda
33. PHONES: Ajuste del volumen de auriculares
34. MAIN: Ajuste de nivel general. Ajuste de volumen general.
35. HEADPHONE: Conecte sus auriculares mediante un Jack 6,35mm a la mesa de mezclas.
36. SORTIES GENERALES PAR JACK 6,35mm Salida de nivel de línea derecha e izquierda asimétrica.
37. SORTIE SYMETRIQUE: Salida derecha e izquierda simétrica por conectores XLR.

©Copyright LOTRONIC 2017 MX62BT-DSP 20
GUIA RAPIDA
1. Asegúrese de que el mezclador se apague con todos los controles al mínimo
2. Apague todos los equipos externos y conecte los micrófonos, equipos a nivel de línea, instrumentos y altavoces.
3. Con el fin de evitar dañar sus altavoces, encienda los equipos en el siguiente orden:
Periféricos → Mezclador → Amplificadores de potencia o altavoces activos. Apague en el orden inverso.
NOTA: Si utiliza un micro de condensador que necesite alimentación fantôme, encienda la alimentación fantôme
antes de encender su amplificador o bafles activos.
4. Ajuste los controles de GAIN de los canales, de tal manera que los indicadores CLIP correspondientes se iluminen
brevemente durante los picos fuertes de señal.
5. Ponga el control MAIN MIX (34) en la posición "MIN".
6. Ajuste los controles de canal de manera que se establezca el equilibrio inicial que necesite. Ajuste entonces el
volumen general mediante los controles de salida.
Si el indicador CLIP se ilumina a menudo, baje un poco los controles de canal, para evitar distorsión.
PROCEDIMIENTO DE EMPAREJAMIENTO BLUETOOTH
Seleccione la entrada BLUETOOTH manteniendo el botón (27) en posición pulsado. Apriete en el botón Bluetooth
(30). El LED Bluetooth (30) se ilumina en Azul. Active la búsqueda de dispositivos Bluetooth en su Smartphone.
Seleccione « Bluetooth » en la lista de equipos encontrados. Cuándo los dos equipo estén emparejados, el LED
Bluetooth (31) parpadeará en Azul. Ajuste el volumen por medio del control USB/BT LEVEL (29). Los efectos DSP no
se pueden aplicar a la señal Bluetooth.
CARACTERISTICAS TECNICAS
ENTRADAS:
MICRO DJ ..................................................................................... 1.5mV/1K Ohms simétrico
Línea ......................................................................................................... 150mV/27k Ohms
SALIDAS:
MASTER ........................................................................................................... 1V/5K6 Ohms
GENERALIDADES:
Banda pasante ......................................................................................20Hz-20KHz (+/-2dB)
THD ................................................................................................................................ 0.1%
Relación S/R ............................................................................................................... >80 dB
Impedancia de auriculares ...................................................................................... 32 Ohms
Alimentación: ......... 100-240Vac 50/60Hz por adaptador de corriente 12Vdc 1A (Incluido)
Dimensiones .................................................................................................... 22 x 17 x 6cm
Peso .......................................................................................................................... 1,090kg
NOTA IMPORTANTE: Los productos eléctricos, no deben ser tirados a la basura doméstica. Hágalos reciclar en lugar
destinado a ello. Pregunte a las autoridades locales por el punto más cercano a si domicilio.
Pagina se încarcă...
Pagina se încarcă...
Pagina se încarcă...
Pagina se încarcă...
Pagina se încarcă...
Pagina se încarcă...
-
 1
1
-
 2
2
-
 3
3
-
 4
4
-
 5
5
-
 6
6
-
 7
7
-
 8
8
-
 9
9
-
 10
10
-
 11
11
-
 12
12
-
 13
13
-
 14
14
-
 15
15
-
 16
16
-
 17
17
-
 18
18
-
 19
19
-
 20
20
-
 21
21
-
 22
22
-
 23
23
-
 24
24
-
 25
25
-
 26
26


BST MX62BT-DSP Manualul proprietarului
- Categorie
- Egalizatoare audio
- Tip
- Manualul proprietarului
- Acest manual este potrivit și pentru
în alte limbi
- français: BST MX62BT-DSP Le manuel du propriétaire
- Deutsch: BST MX62BT-DSP Bedienungsanleitung
- español: BST MX62BT-DSP El manual del propietario
- Nederlands: BST MX62BT-DSP de handleiding
Alte documente
-
Ibiza Sound ULTRA-STATION Manualul proprietarului
-
-
 Ibiza TABLE DE MIXAGE DJ A 2 CANAUX USB, SD & BLUETOOTH (DJM250BT-MKII) Manual de utilizare
-
 Ibiza 2-WEG / 5-KANAAL MENGPANEEL MET VHF MICROFOON (DJM150BT-VHF) Manual de utilizare
-
 Ibiza DJM150USB-BT Manualul proprietarului
-
-
 Ibiza DJM102-BT Manualul proprietarului
-
-
Yamaha RM800 Manual de utilizare
-
 Ibiza Light LLS500RGB-PACK Manualul proprietarului


