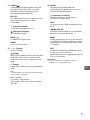
Sony Bravia KD-55AG9 Manualul proprietarului
- Categorie
- Televizoare LCD
- Tip
- Manualul proprietarului

4-748-699-12(1)
Television
Reference Guide
GB
Guide de référence
FR
Guía de referencia
ES
Referentiegids
NL
Referenzanleitung
DE
Guia de referência
PT
Guida di riferimento
IT
Referensmaterial
SE
Referencevejledning
DK
Viiteopas
FI
Referanseveiledning
NO
Przewodnik
PL
Referenční příručka
CZ
Referenčná príručka
SK
Felhasználói útmutató
HU
Ghid de referinţă
RO
Информация за продукта
BG
Οδηγός αναφοράς
GR
Başvuru Kılavuzu
TR
KD-77AG9 / 65AG9 / 55AG9

2
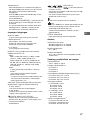
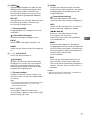
GB
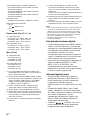
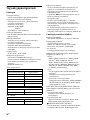
Table of Contents
IMPORTANT NOTICE . . . . . . . . . . . . . . . . . . . . 2
Safety Information . . . . . . . . . . . . . . . . . . . . . 3
Protecting the TV Screen (OLED TV) . . . . . . .4
Parts and Controls . . . . . . . . . . . . . . . . . . . 5
Controls and Indicators . . . . . . . . . . . . . . . . . 5
Using Remote Control . . . . . . . . . . . . . . . . 6
Remote Control Parts Description. . . . . . . . .6
Connection Diagram . . . . . . . . . . . . . . . . . 8
Installing the TV to the Wall . . . . . . . . . . .11
Using the optional Wall-Mount Bracket
(SU-WL850 or SU-WL450) . . . . . . . . . . . . . . 11
Troubleshooting. . . . . . . . . . . . . . . . . . . . 13
Troubles and Solutions. . . . . . . . . . . . . . . . . 13
Specifications . . . . . . . . . . . . . . . . . . . . . . 14
Introduction
Thank you for choosing this Sony product.
Before operating the TV, please read this manual thoroughly and
retain it for future reference.
Note
• Before operating the TV, please read the “Safety Information”
(page
3).
• Read the supplied Safety Information for additional safety
information.
• Images and illustrations used in the Setup Guide and this
manual are for reference only and may differ from the actual
product.
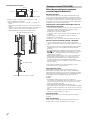
Location of the identification label
Labels for the TV Model No., Production Date (year/month) and
Power Supply rating are located on the rear of the TV or package.
They can be found by removing the stand cover .
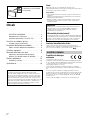
Notice for Radio Equipment
Hereby, Sony Visual Products Inc. declares
that the radio equipment types
KD-77AG9, KD-65AG9, KD-55AG9 are in
compliance with Directive 2014/53/EU. The full text of the EU
declaration of conformity is available at the following internet
address:
http://www.compliance.sony.de/
Notice for customers: the following information is only applicable
t
o equipment sold in countries applying EU directives.
For this radio equipment, the following restrictions on putting into
se
rvice or of requirements for authorization of use apply in
AT, BE, HR, CY, CZ, DK, EE, FI, FR, DE, EL, HU, IE, IT, LV, LT, LU, MT,
NL, P
L, PT, SK, SI, ES, SE, UK, IS, LI, NO, CH, BG, RO, TR, AL, BA, MK,
MD, RS, ME, Kosovo :
5150 - 5350 MHz band is restricted to indoor operations only.
To attach the Table-Top
Stand, refer to the Setup
Gui
de.
Internet Connection and Data Privacy
This product connects to the internet during initial setup as soon
as a network is connected in order to confirm internet
connection, and later to configure the Home screen. Your IP
address is used in these and all other internet connections. If
you do not want your IP address be used at all, do not set-up the
wireless internet function and do not connect an internet cable.
Please refer to the privacy information presented in the set-up
screens for further details of internet connections.
Help
Find more troubleshooting and other useful information
directly from your TV. Press HELP on the remote control to
display a list of topics, or to search by keyword.
Help Guide (Manual)
For more detailed information, select [Help Guide] from the
Help menu on your TV. You can also check the Help Guide from
your PC or smartphone (information provided on the back
cover of this manual).
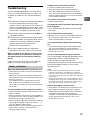
IMPORTANT NOTICE

3
GB
GB
Installation/Set-up
Install and use the TV set in accordance with the instructions
below in order to avoid any risk of fire, electric shock or damage
and/or injuries.
Installation
• The TV set should be installed near an easily accessible mains
socket.
• Place the TV set on a stable, level surface to prevent it from
falling over and causing personal injury or property damage.
• Install the TV where it cannot be pulled, pushed, or knocked
ov
er.
• Install the TV so that the TV’s Table-Top Stand does not protrude
out from the TV stand (not supplied). If the TV’s Table-Top Stand
protrudes out from the TV stand, it may cause TV set to topple
over, fall down, and cause personal injury or damage to the TV.
• For safety reasons, be sure to attach the centre covers to the
r
ear of the TV when TV in Table-Top condition.
• Only qualified service personnel should carry out wall-mount
installations.
• For safety reasons, it is strongly recommended that you use
S
ony accessories, including:
Wall-Mount Bracket SU-WL850
Wall-Mount Bracket SU-WL450
• Be sure to use the screws supplied with the Wall-Mount Bracket
when attaching the Wall-Mount Bracket to the TV set. The
supplied screws are designed as indicated by illustration when
measured from the attaching surface of the Wall-Mount Bracket.
The diameter and length of the screws differ depending on the
W
all-Mount Bracket model.
Use of screws other than those supplied may result in internal
damage to the TV set or cause it to fall, etc.
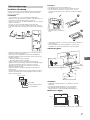
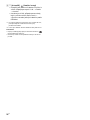
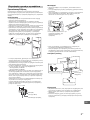
Transporting
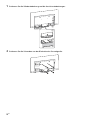
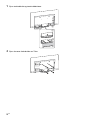
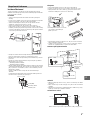
• Before transporting the TV set, disconnect all cables.
• Two or three people are needed to transport a large TV set.
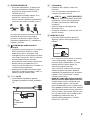
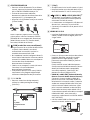
• When transporting the TV set by hand, hold it as shown below.
Do not put stress on the panel and the frame around the screen.
• When handling or mounting the
T
V set, do not lay down the TV.
• When transporting the TV set, do
not s
ubject it to jolts or excessive vibration.
• When transporting the TV set for repairs or when moving, pack
i
t using the original carton and packing material.
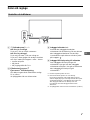
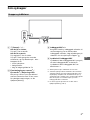
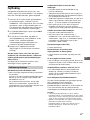
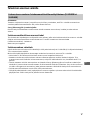
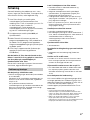
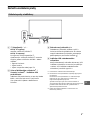
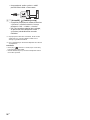
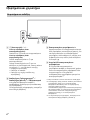
Topple prevention
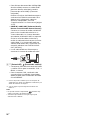
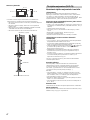
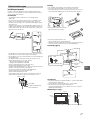
Ventilation
• Never cover the ventilation holes or insert anything into the
cabinet.
• Leave space around the TV set as shown below.
• It is strongly recommended that you use a Sony Wall-Mount
Br
acket in order to provide adequate air circulation.
Installed on the wall
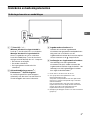
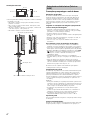
Safety Information
Screw (M6)
Wall-Mount Bracket
9 mm - 13 mm
TV’s rear cover
M4 screw (not supplied)
1.5 N·m
{15 kgf·cm}
Screw (not supplied)
6 mm - 7 mm
Cord (not
supplied)
30 cm
10 cm
10 cm
10 cm
Leave at least this much space around the set.
1 cm

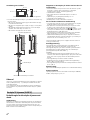
4
GB
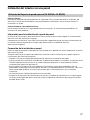
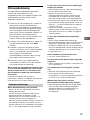
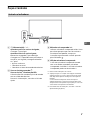
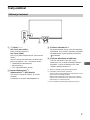
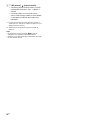
Installed with stand
• To ensure proper ventilation and prevent the collection of dirt or
dust:
Do not lay the TV set flat, install upside down, backwards, or
sideways.
D
o not place the TV set on a shelf, rug, bed or in a closet.
Do not cover the TV set with a cloth, such as curtains, or items
such as newspapers, etc.
Do not install the TV set as shown below.
Precautions to Protect the Screen from
Damage
Image retention
OLED TV‘s are susceptible to image retention (burn-in) due to the
characteristics of the materials used. Image retention may occur if
images are displayed in the same location on the screen
repeatedly or over extended periods of time. This is not a
malfunction of the TV. Avoid displaying images that may cause
image retention.
The following are examples of images that may
cause image retention:
• Content with black bars either on the top and bottom and/or
the left and right sides of the screen. (for example, Letterboxed,
4:3 screen, Standard definition)
• Static images such as photos.
• Video games that might have static content in some part of the
s
creen.
• On-screen menus, programme guides, channel logos etc.
• Static content from applications.
• On-screen tickers, such as those used for news and headlines.
To reduce the risk of image retention:
• Sony recommends that you turn off the TV normally by pressing
the power button on the remote control or the TV.
• Fill the screen by changing [Wide mode] to eliminate the black
bars. Select [Wide mode] other than [Normal].
• Turn off the OSD (On Screen Display) by pressing the /
button, and turn off the menus from connected equipment. For
d
etails, refer to the instruction manuals for the connected
equipment.
• Avoid displaying static images with bright colours (including
white), clocks or logos on any portion of the screen.
• Set the picture settings based on the ambient conditions. The
Standard Picture is recommended for home use and when
viewing content that often displays the station logos, etc.
The TV has following features to help reduce/prevent image
re
tention.
Panel refresh
Panel refresh will automatically run to adjust the uniformity of the
TV screen after it has been in use for long periods of time. Panel
refresh can also be performed manually and should only be used
if image retention is very noticeable or you see the following
message: [Panel refresh did not finish…]
Caution:
• The Panel refresh function may affect the panel. As a reference,
perform the Panel refresh only once a year, do not perform it
more than once a year as it may affect the usable life of the
panel.
• Panel refresh takes about one hour to complete.
• A white line may be displayed on the screen during the Panel
re
fresh, this is not a malfunction of the TV.
• Panel refresh will only work when the room temperature is
between 10 ºC and 40 ºC.
Pixel shift
Automatically moves the image on the screen to prevent image
retention.
Other feature
The screen brightness is automatically reduced when displaying
still images, clocks, bright colours or logos etc.
30 cm
10 cm
10 cm
Leave at least this space around the set.
6 cm
Do not block the air circulation area.
Air circulation
Wall
Air circulation is blocked.
Wall
Protecting the TV Screen (OLED TV)

5
GB
GB
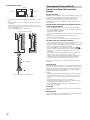
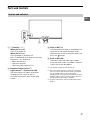
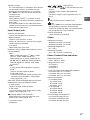
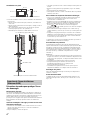
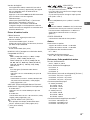
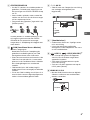
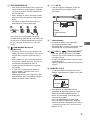
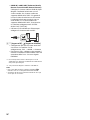
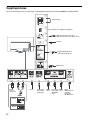
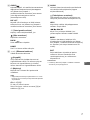
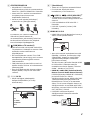
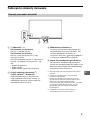
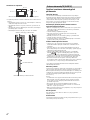
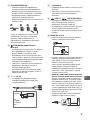
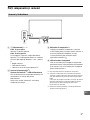
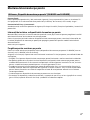
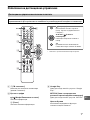
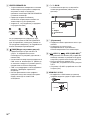
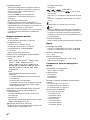
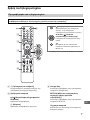
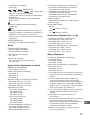
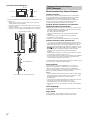
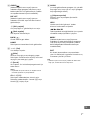
Parts and Controls
(Power) / + / –
When the TV is off,
Press to
power on.
When the TV is on,
Press and hold to
power off.
Press
repeatedly to change the function,
then press + or – button to:
•Adjust the volume.
• Select the channel.
• Select the input source of TV.
Remote Control sensor*
1
/
Light sensor*
1
/ Illumination LED
The illumination LED lights up or blinks
according to the status of the TV.
For more information, refer to the Help
Gu
ide.
Built-in MIC*
2
*
3
Use the hands-free built-in microphone for
voice search. To enable the built-in MIC,
follow the on-screen instructions when you
press the button.
Built-in MIC LED
The built-in MIC LED lights up in amber
when the built-in MIC is enabled. The built-
in MIC LED can be disabled.*
3
*1 Do not place anything near the sensor.
*2 The voice search requires an Internet connection.
The voice search with the built-in MIC is available
only on limited region/country/language.
Standby power consumption will increase because
the built-in MIC is always listening when the voice
search with the built-in MIC is enabled.
*3 For more information, see the Online Help Guide
(page 2).
Controls and Indicators
ȩ
ȬȫȪ

6
GB
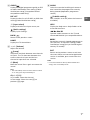
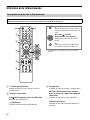
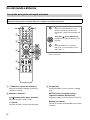
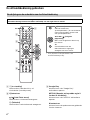
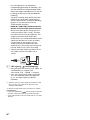
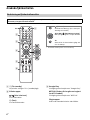
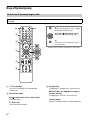
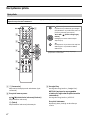
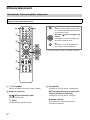
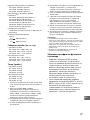
Using Remote Control
(TV standby)
Turn on or turn off the TV (standby mode).
Number buttons
/ (Info/Text reveal)
Display information.
(Text)
Display text information.
Google Play
Access the “Google Play” online service.
NETFLIX (Only on limited region/
country/TV model)
Access the “NETFLIX” online service.
Colour buttons
Execute corresponding function at that time.
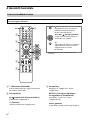
Remote Control Parts Description
The remote control shape, location, availability and function of remote control buttons may vary
depending on your region/country/TV model.
MIC
Ȫ
ȫ
Ȭ
ȭ
Ȯ
ȩ
(Microphone)
Use voice search*. (e.g., Search
various content by voice.)
//// (Navigation D-Pad)
On screen menu navigation and
selection.
TV
Switch to a TV channel or input and
display the TV menu.
* The voice search requires an Internet connection.

7
GB
GB
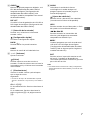
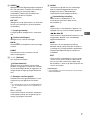
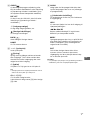
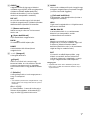
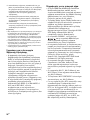
GUIDE/
Display the digital programme guide, or EPG
of cable/satellite box after setting [Cable/
Satellite box setup] (Set top box control
compatible models only).
REC LIST
Display the Rec list of USB HDD, or DVR after
setting [Cable/Satellite box setup].
(Input select)
Display and select the input source, etc.
(Quick settings)
Display Quick Settings.
BACK/
Return to the previous screen.
HOME
Display the TV Home Menu.
+/– (Volume)
Adjust the volume.
(Jump)
Jump back and forth between two channels
or inputs. The TV alternates between the
current channel or input and the last
channel or input that was selected.
(Mute)
Mute the sound. Press again to restore the
sound.
Hint
• The accessibility shortcut service can be turned
on or off by pressing and holding .
CH +/–//
In TV mode: Select the channel.
In Text mode: Select the next () or
previous () page.
AUDIO
Select the sound of multilingual source or
dual sound for the programme currently
being viewed (depend on programme
source).
(Subtitle setting)
Turn subtitles on or off (when the feature is
available).
HELP
Display the Help menu. Help Guide can be
accessed from here.
///
Operate media contents on the TV and
connected BRAVIA Sync-compatible device.
REC
Record the currently viewed programme on
the USB HDD, or DVR after setting [Cable/
Satellite box setup] (only on limited region/
country/TV model).
EXIT
Return to the previous screen or exit from
the menu. When an Interactive Application
service is available, press to exit from the
service.
Note
• For more information about [Cable/Satellite box
setup], refer to the Help Guide.

8
GB
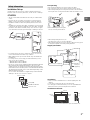
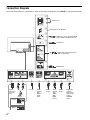
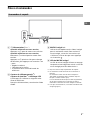
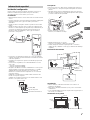
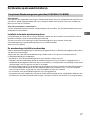
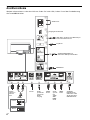
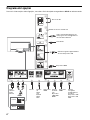
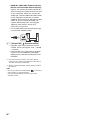
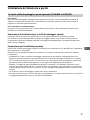
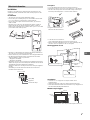
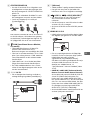
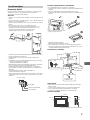
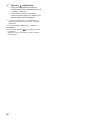
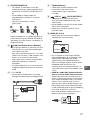
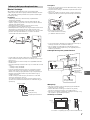
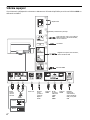
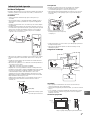
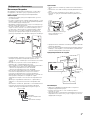
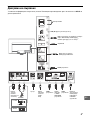
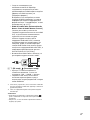
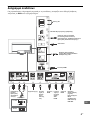
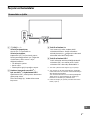
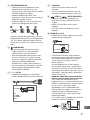
Connection Diagram
For more information on connections, refer to the Help Guide by pressing HELP on the remote control.
<
<
<
ȭȯ
Ȫ
ȩ
ȫ
Ȭ
ȭ
̙
Ȯ
Cable/
Antenna/
External
Box
Router
Satellite
Headphone
7 mm
HDMI Device
HDMI
Device
VCR/Video game equipment/DVD
player/Camcorder/External Box*
1
14 mm
Conditional Access Module
HDMI
Device
Audio
System
with
Optical
Audio
Input
AV Receiver
Digital still
camera/
Camcorder/
USB storage
media/
USB HDD
device
Digital still camera/Camcorder/
USB storage media
Audio
System
with
eARC/
ARC/
HDMI
Device
1.5 mm

9
GB
GB
CENTER SPEAKER IN
• To use your TV speakers as the centre
speaker, connect the output of your AV
receiver to the CENTER SPEAKER IN on
your TV.
• Before connecting cables, disconnect the
m
ains lead of both TV and AV receiver.
• Make sure the [Speakers] is set to [Audio
sy
stem].
To prevent hiss when not connecting the
CEN
TER SPEAKER IN to an AV receiver,
disable [TV centre speaker mode]. For
details, refer to the Help Guide.
CAM (Conditional Access Module)
•Provides access to pay TV services. For
details, refer to the instruction manual
supplied with your CAM.
• Do not insert the smart card directly into
th
e TV CAM slot. It must be fitted into the
Conditional Access Module provided by
your authorised dealer.
• CAM is not supported in some countries/
a
reas. Check with your authorised dealer.
• A CAM message may appear when you
s
witch to a digital programme after using
the Internet video.
/ AV IN
• For a composite connection, use an
Analogue Extension Cable (not supplied).
•
(Headphone)
• Supports 3-pole stereo mini jack only.
• You cannot output sound from both the
hea
dphone and the TV speakers at the
same time.
USB 1/2, USB 3 (HDD REC)*
2
• Connecting a large USB device may
interfere with other connected devices
beside it.
• When connecting a large USB device,
c
onnect to the USB 1 port.
• Connect a USB HDD device to the USB 3
po
rt (blue).
HDMI IN 1/2/3/4
• HDMI interface can transfer the digital
video and audio on a single cable.
•
• To enjoy high quality 4K 50p/60p
contents, connect a Premium High Speed
HDMI cable and set the [HDMI signal
format] to [Enhanced format].
Do this setting individually for each
c
onnected HDMI IN terminal. For details of
supported formats, refer to the
“Specifications“ in this manual (page 14-
16).
• HD
MI IN 3 eARC/ARC (Enhanced Audio
Return Channel/Audio Return Channel)
Connect your audio system to the
HDMI IN 3 to route TV audio to your audio
sy
stem. An audio system that supports
HDMI eARC/ARC can send video to the TV,
and receive audio from the TV via the
same HDMI cable. If your audio system
does not support HDMI eARC/ARC, an
additional connection with DIGITAL AUDIO
OUT (OPTICAL) is necessary.
• Use the HDMI cable with Ethernet to
c
onnect audio system with eARC.
10 mm
3.5 mm
1234
1: L
2: Video
3: Ground
4: R
< 12 mm
< 21 mm

10
GB
(RF input), (Satellite input)
• Connections for terrestrial/cable and
satellite. Connection steps: SUB. MAIN
Antenna
• For SUB. jack, connect only when you are
us
ing twin tuner mode except for Single
Cable Distribution EN50494.
*1 For an external device which has only SCART AV
OUT, use a SCART-RCA adaptor and Analogue
Extension Cable.
*2 Only on limited region/country/TV model.
Note
• You cannot attach the side cover while the
cables are connected to side terminal.
• Be sure to store the side cover in a safe place for
futu
re use.

11
GB
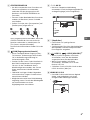
GB
Installing the TV to the Wall
To Customers:
For product protection and safety reasons, Sony strongly recommends that installation of your TV be
p
erformed by Sony dealers or licensed contractors. Do not attempt to install it yourself.
To Sony Dealers and Contractors:
Provide full attention to safety during the installation, periodic maintenance and examination of this
pr
oduct.
Wall-Mount Bracket Installation Information
This TV’s instruction manual only provides the steps to prepare the TV for Wall-Mount installation
before it is installed on the wall.
For instructions on Wall-Mount Bracket installation, see the Installation Information (Wall-Mount
B
racket) on the product page for your TV model.
www.sony.eu/support/
Preparing for Wall-Mount Installation
Use the Wall-Mount Bracket SU-WL850 (not supplied) or SU-WL450 (not supplied) to install the TV to
the wall.
Make sure to attach the Table-Top Stand before installing the TV to the wall by referring to the Setup
Gu
ide.
• Prepare the TV for the Wall-Mount Bracket before making cable connections.
• Follow the instruction guide provided with the Wall-Mount Bracket for your model. Sufficient
e
xpertise is required in installing this TV, especially to determine the strength of the wall for
withstanding the TV’s weight.
• Be sure to entrust the attachment of this product to the wall to Sony dealers or licensed contractors
a
nd pay adequate attention to safety during the installation. Sony is not liable for any damage or
injury caused by mishandling or improper installation.
• The screws for Wall-Mount Bracket are not supplied.
• Be sure to store the unused screws and Table-Top Stand in a safe place until you are ready to
attach the Table-Top Stand. Keep the screws away from small children.
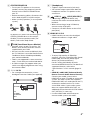
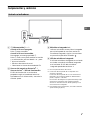
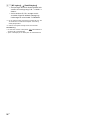
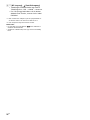
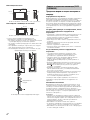
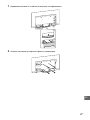
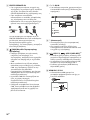
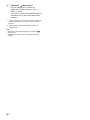
Using the optional Wall-Mount Bracket (SU-WL850 or SU-WL450)

12
GB
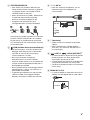
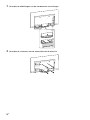
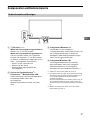
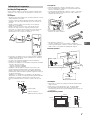
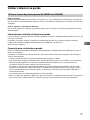
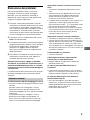
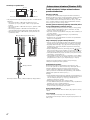
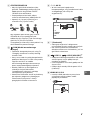
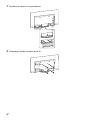
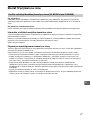
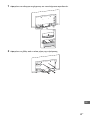
1 Remove the stand cover and terminal covers.
2 Remove the screws from the rear of the TV.
ʕ
ͧ
ͨ
ͧ
ͦ

13
GB
GB
Troubleshooting
General troubleshooting for issues like: black
screen, no sound, frozen picture, TV does not
respond, or network is lost, do the following
steps.
1 Restart your TV by pressing the power button
on the remote control until a message
appears. The TV will restart. If the TV does not
recover, try unplugging the mains lead. Then
press the power button on the TV and wait for
two minutes, and plug in the mains lead.
2 Refer to the Help menu by pressing HELP on
the remote control.
3 Connect your TV to the Internet and perform
a software update. Sony recommends you to
keep your TV software updated. Software
updates provide new features and
performance improvements.
4 Visit Sony support website (information
provided on the front cover of this manual).
When you plug in the TV, the TV may not be
able to turn on for a while even if you press
the power button on the remote control or
the TV.
It takes time to initialize the system. Wait for
ab
out one minute, then operate it again.
Troubles and Solutions
When the illumination LED is flashing in red.
Count how many times it flashes (interval time is
three seconds).
Reboot the TV by disconnecting the mains lead
unt
il the illumination LED stopped flashing in red,
then turn on the TV.
If the problem persists, disconnect the mains
l
ead, and contact your dealer or Sony service
centre with the number of times the illumination
LED flashes.
Terrestrial/cable service cannot be received.
Check the antenna (aerial)/cable connection and
booster settings.
Select terrestrial/cable service by pressing TV on
the remote control, and then select [Digital] if the
broadcasting service is not displayed.
Terrestrial signal might be suppressed if there is a
strong signal supplied nearby. Set [LNA (CH ---)]
to [Off] in digital tuning settings.
After moving to a new house or trying to receive
new services, attempt a service search by
selecting [Digital tuning].
Satellite service cannot be received.
Check the satellite cable connection.
When [No signal. LNB overload detected…]
message is displayed, unplug the mains lead.
Then, ensure the satellite cable is not damaged
and the satellite signal line is not short-circuited
in the satellite connector.
The remote control does not function.
Replace the batteries.
The parental lock for broadcast password has
been forgotten.
Enter 9999 for the PIN code and select [Change
PIN code].
The TV surrounds become warm.
When the TV is used for an extended period, the
TV surrounds become warm. You may feel hot
when touching there by the hand.
The screen becomes darker while watching
TV.
If the whole image or part of the image remains
still, the screen brightness will be gradually
reduced to prevent image retention. This is not a
malfunction of the TV.
You are concerned about image retention.
If the same image is displayed repeatedly or for
l
ong periods of time, image retention may
occur. To reduce image retention, we
recommend that you turn off the TV normally by
pressing the power button on the remote
control or the TV.
Note
• Perform Panel refresh manually only when image
retention is particularly noticeable. As a reference,
perform it only once a year. Avoid performing it more
than once a year because it may affect the usable life
of the panel.
• Images that include clocks, logos and bright colours
(including white) easily cause image retention. Avoid
displaying these types of images for long periods of
time, otherwise image retention may occur.
A white line appears on the screen.
Panel refresh automatically runs after the TV has
been used for long periods of time to reduce
image retention. Panel refresh starts after the TV
is turned off and takes about one hour to
complete. A white line may be displayed on the
screen during the Panel refresh. This is not a
malfunction of the TV.

14
GB
The message [Panel refresh did not finish…] is
displayed.
Panel refresh automatically runs after the TV has
been
used for long periods of time to reduce
image retention. If the TV is turned on, the
mains lead is unplugged, or the room
temperature falls outside of the range between
10 ºC and 40 ºC during the Panel refresh, the
process will not be completed and this message
will appear.
If Panel refresh started automatically, it will restart
when you turn off the TV with the remote control.
If Panel refresh initiated manually, you must
select it again.
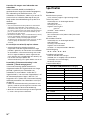
Specifications
System
Panel system
OLED (Organic Light Emitting Diode) Panel
TV system
Depending on your country/area selection/TV
model
Analogue: B/G, D/K, I
Digital: DVB-T/DVB-C
DVB-T2*
1
Satellite*
1
: DVB-S/DVB-S2
Colour system
PAL/SECAM/NTSC3.58 (Video only)/NTSC4.43
(Video only)
Channel coverage
Depending on your country/area selection/TV
model
Analogue: UHF/VHF/Cable
Digital: UHF/VHF/Cable
Satellite*
1
: IF Frequency 950-2,150 MHz
Sound output
20 W + 20 W + 10 W + 10 W
Wireless technology
Protocol IEEE802.11ac/a/b/g/n
(IEEE802.11ac may not be available depending on
cou
ntries/regions.)
Bluetooth Version 4.2
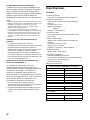
Frequency band(s)
RMF-TX600E
Wireless LAN (IEEE802.11ac/a/b/g/n)
Frequency range Output Power
2400 - 2483.5 MHz < 20.0 dBm
5150 - 5250 MHz < 23.0 dBm
5250 - 5350 MHz < 20.0 dBm
5470 - 5725 MHz < 20.0 dBm
5725 - 5850 MHz < 13.9 dBm
Bluetooth
Frequency range Output Power
2400 - 2483.5 MHz < 10.0 dBm
Bluetooth
F
requency range Output Power
2400 - 2483.5 MHz < 10.0 dBm

15
GB
GB
Software version
This radio equipment is intended to be used with
the approved version(s) of software that are
indicated in the EU Declaration of Conformity.
Press HE
LP on the remote control to know the
software version.
Remote control: _._.__.___
Select [Remote control] [S
oftware version]
from [Settings]. For more information, refer to the
Help Guide.
The software loaded on this radio equipment is
v
erified to comply with the essential requirements
of the Directive 2014/53/EU.
Input/Output jacks
Antenna (aerial)/cable
75 ohm external terminal for VHF/UHF
Satellite antenna*
1
Female F Type Connector, 75 ohm.
DiSEqC 1.0, LNB 13 V/18 V & 22 kHz tone, Single
Ca
ble Distribution EN50494.
/ AV IN
Video/Audio input (mini jack)
HDMI IN 1/2/3/4 (support 4K resolution, HDCP
2.3-compatible)
Video:
4096 × 2160p (50, 60 Hz)*
2
*
3
, 4096 × 2160p
(24 Hz)*
2
, 3840 × 2160p (50, 60 Hz)*
3
,
3840 × 2160p (24, 25, 30 Hz), 1080p (30, 50,
60, 100, 120 Hz), 1080/24p, 1080i (50, 60 Hz),
720p
(30, 50, 60 Hz), 720/24p, 576p, 480p,
PC Formats*
4
Audio:
In eARC (Enhanced Audio Return Channel)
mo
de*
5
Refer to the Help Guide for details.
Except eARC mode
5.1 channel linear PCM: 32/44.1/48/88.2/96/
17
6.4/192 kHz 16/20/24 bits, Dolby Digital,
Dolby Digital Plus, DTS
eARC/ARC (Enhanced Audio Return Channel/
Audio Return Channel) (HDMI IN 3 only)
In eARC mode*
5
Refer to the Help Guide for details.
In ARC mode
Two channel linear PCM: 48 kHz 16 bits, Dolby
D
igital, Dolby Digital Plus, DTS
DIGITAL AUDIO OUT (OPTICAL)
Digital optical jack (Two channel linear PCM:
48 kHz 16 bits, Dolby Digital, DTS)
(Stereo mini jack)
Headphone
1, 2, 3 (HDD REC)*
6
USB device port ( 3 USB HDD device for REC
feature)
USB port 1 and 2 support High Speed USB
(USB 2.0)
USB port 3 supports Super Speed USB (USB 3.1
Ge
n 1)
CAM (Conditional Access Module) slot
LAN
10BASE-T/100BASE-TX connector (Depending on
the operating environment of the network,
connection speed may differ. The communication
rate and quality are not guaranteed.)
CENTER SPEAKER IN
Centre speaker input terminal
Others
Optional accessories
Wall-Mount Bracket: SU-WL850
Wall-Mount Bracket: SU-WL450
Operating temperature
0 ºC – 40 ºC
Operating humidity
10 % – 80 % RH (non-condensing)
Power, Product Fiche and others
Power requirements
220 V - 240 V AC, 50 Hz
Energy Efficiency Class
KD-77AG9: A
KD-65AG9: B
KD-55AG9: B
Screen size (measured diagonally) (Approx.)
KD-77AG9: 194.7 cm / 77 inches
KD-65AG9: 163.9 cm / 65 inches
KD-55AG9: 138.8 cm / 55 inches
Power consumption
In [Standard] mode
KD-77AG9: 211 W
KD-65AG9: 169 W
KD-55AG9: 132 W
In [Vivid] mode
KD-77AG9: 674 W
KD-65AG9: 490 W
KD-55AG9: 394 W
Annual energy consumption*
7
KD-77AG9: 293 kWh per year
KD-65AG9: 234 kWh per year
KD-55AG9: 183 kWh per year

16
GB
Standby power consumption*
8
*
9
KD-77AG9: 0.50 W (29 W in software/EPG update
mode)
KD-65AG9: 0.50 W (27 W in software/EPG update
mod
e)
KD-55AG9: 0.50 W (27 W in software/EPG update
mod
e)
Display resolution
3,840 dots (horizontal) × 2,160 lines (vertical)
Output Rating
USB 1/2
5 V , 500 mA MAX
USB 3
5 V , 900 mA MAX
Dimensions (Approx.) (w × h × d)
with Table-Top Stand
KD-77AG9: 172.1 × 100.1 × 30.2 cm
KD-65AG9: 144.7 × 83.8 × 25.5 cm
KD-55AG9: 122.6 × 71.4 × 25.5 cm
without Table-Top Stand
KD-77AG9: 172.1 × 99.6 × 4.9 cm
KD-65AG9: 144.7 × 83.4 × 4.0 cm
KD-55AG9: 122.6 × 71.0 × 4.0 cm
Mass (Approx.)
with Table-Top Stand
KD-77AG9: 39.7 kg
KD-65AG9: 24.8 kg
KD-55AG9: 22.3 kg
without Table-Top Stand
KD-77AG9: 35.3 kg
KD-65AG9: 21.2 kg
KD-55AG9: 18.7 kg
*1 Not all the TV sets have DVB-T2 or DVB-S/S2
technology or satellite antenna terminal.
*2 When 4096 × 2160p is input and [Wide mode] is
set to [Normal], the resolution is displayed as
3840 × 2160p. To display 4096 × 2160p, set
[Wide mode] setting to [Full 1] or [Full 2].
*3 To support 18 Gbps, set [HDMI signal format] to
[Enhanced format].
*4 Refer to the Help Guide for details.
*5 eARC mode is active when [eARC mode] is set to
[Auto], [Speakers] is set to [Audio system] and
eARC compatible audio system is connected.
*6 Only on limited region/country/TV model.
*7 Energy consumption in kWh per year, based on
the power consumption of the television
operating 4 hours per day for 365 days.
The actual energy consumption will depend on
how the television is used.
*8 Specified standby power is reached after the TV
finishes necessary internal processes.
*9 Standby power consumption will increase when
your TV is connected to the network.
Note
• Do not remove the dummy card or cover (availability
depends on TV model) from TV CAM (Conditional
Access Module) slot other than to insert a smart card
fitted in CAM.
• Optional accessories availability depends on
countries/region/TV model/stock.
• Design and specifications are subject to change
wi
thout notice.
Notes on Digital TV function
• Digital TV (DVB terrestrial, satellite and
cable), interactive services and network
functions may not be available in all
countries or areas. Some functions might
not be enabled or might not operate
correctly with some providers and network
environments. Some TV service providers
may charge a fee for their services.
• This TV supports digital broadcasting using
MPE
G-2, H.264/MPEG-4 AVC and H.265/
HEVC codecs, but compatibility with all
operator/service signals, which may
change over time, cannot be guaranteed.
Trademark Information
• The terms HDMI and HDMI High-Definition
Multimedia Interface, and the HDMI Logo
are trademarks or registered trademarks of
HDMI Licensing Administrator, Inc. in the
United States and other countries.
• Dolby, Dolby Vision, Dolby Audio, and the
doubl
e-D symbol are trademarks of Dolby
Laboratories. Manufactured under license
from Dolby Laboratories. Confidential
unpublished works. Copyright ©1992-2015
Dolby Laboratories. All rights reserved.
•“BRAVIA”, and BRAVIA Sync are
trademarks or registered marks of Sony
C
orporation.
• Gracenote, the Gracenote logo and
logo
type, “Powered by Gracenote” logo are
either registered trademarks or trademarks
of Gracenote, Inc. in the United States and/
or other countries.
• Vewd® Core. Copyright 1995-2019 Vewd
S
oftware AS. All rights reserved.
• Google, Google Play, Chromecast,
Y
ouTube, Android TV and other related
marks and logos are trademarks of Google
LLC.
• Wi-Fi®, Wi-Fi Alliance® and Wi-Fi Direct® are
r
egistered trademarks of Wi-Fi Alliance.

17
GB
GB
• The Wi-Fi CERTIFIED™ Logo is a
certification mark of Wi-Fi Alliance.
• For DTS patents, see http://
patents.dts.com. Manufactured under
license from DTS, Inc. DTS, the Symbol, &
DTS and the Symbol together are
registered trademarks, and DTS Digital
Surround is a trademark of DTS, Inc. © DTS,
Inc. All Rights Reserved.
• The Bluetooth® word mark and logos are
r
egistered trademarks owned by the
Bluetooth SIG, Inc. and any use of such
marks by Sony Corporation is under
license. Other trademarks and trade names
are those of their respective owners.
• Netflix is a registered trademark of Netflix,
In
c.
• DiSEqC™ is a trademark of EUTELSAT. This
TV
supports DiSEqC 1.0. This TV is not
intended for controlling motorized
antennas.
• TUXERA is a registered trademark of Tuxera
I
nc. in the US and other countries.
• USB-IF SuperSpeed USB Trident logo is a
r
egistered trademark of USB Implementers
Forum, Inc.
• All other trademarks are the property of
th
eir respective owners.

2
FR
Table des matières
AVIS IMPORTANT. . . . . . . . . . . . . . . . . . . . . . . 2
Consignes de sécurité . . . . . . . . . . . . . . . . . . 3
Protection de l’écran du téléviseur
(Téléviseur OLED) . . . . . . . . . . . . . . . . . . . . . .4
Pièces et commandes . . . . . . . . . . . . . . . . 5
Commandes et voyants . . . . . . . . . . . . . . . . . 5
Utilisation de la télécommande . . . . . . . . 6
Description des pièces de la
télécommande . . . . . . . . . . . . . . . . . . . . . . . .6
Schéma de connexion . . . . . . . . . . . . . . . . 8
Installation du téléviseur au mur . . . . . . .11
Utilisation du Support de fixation murale
en option (SU-WL850 ou SU-WL450) . . . . . 11
Dépannage . . . . . . . . . . . . . . . . . . . . . . . . 13
Problèmes et solutions . . . . . . . . . . . . . . . . 13
Spécifications . . . . . . . . . . . . . . . . . . . . . . 14
Introduction
Sony vous remercie d’avoir choisi ce téléviseur.
Avant de l’utiliser, nous vous invitons à lire attentivement ce
manuel et à le conserver pour vous y référer ultérieurement.
Remarque
• Avant d’utiliser le téléviseur, lisez les « Consignes de sécurité »
(page
3).
• Veuillez lire les Consignes de sécurité fournies pour plus
d’informations sur la sécurité.
• Les images et illustrations reprises dans ce manuel et dans le
Guide d’installation sont fournies pour référence uniquement et
peuvent présenter des différences par rapport au produit
proprement dit.
Emplacement de l’étiquette d’identification
Les étiquettes reprenant le numéro de modèle, la date de
production (année/mois) et les caractéristiques nominales de
l’alimentation se trouvent à l’arrière du téléviseur ou de
l’emballage. Vous les trouverez en retirant le couvercle du support
.
Avis concernant les
équipements radio
Le soussigné, Sony Visual Products Inc.,
déclare que les équipements radioélectriques de type
KD-77AG9, KD-65AG9, KD-55AG9 sont conformes à la directive
2014/53/UE. Le texte complet de la déclaration UE de conformité
est disponible à l’adresse internet suivante :
http://www.compliance.sony.de/
Avis aux clients : les informations suivantes s’appliquent
uniquement aux appareils vendus dans les pays qui appliquent
les directives de l’UE.
Pour cet équipement radio, les restrictions de mise en service ou
d
e demandes d’autorisation d’utilisation suivantes s’appliquent
en AT, BE, HR, CY, CZ, DK, EE, FI, FR, DE, EL, HU, IE, IT, LV, LT, LU, MT,
NL, PL, PT, SK, SI, ES, SE, UK, IS, LI, NO, CH, BG, RO, TR, AL, BA, MK,
MD, RS, ME, Kosovo :
La bande 5 150-5 350 MHz est limitée aux utilisations en intérieur
uniquement.
Pour attacher le support
de table, reportez-vous au
Gui
de d’installation.
Connexion Internet et confidentialité des données
Ce produit se connecte à Internet au cours de la configuration
initiale dès qu’un réseau est connecté afin de confirmer la
connexion Internet, puis ultérieurement pour configurer l’écran
d’accueil. Votre adresse IP est utilisée dans ces connexions
Internet et toutes les autres. Si vous ne voulez pas que votre
adresse IP soit utilisée, ne configurez pas la fonction Internet
sans fil et ne connectez pas de câble Internet. Veuillez vous
référer aux informations de confidentialité présentées dans les
écrans de configuration pour en savoir plus sur les connexions
Internet.
Aide
Vous trouverez des renseignements supplémentaires sur le
dépannage et d’autres informations utiles directement sur
votre téléviseur. Appuyez sur HELP sur la télécommande pour
afficher une liste de thèmes ou cherchez par mot-clé.
Guide d’aide (Manuel)
Pour obtenir des informations supplémentaires, sélectionnez
[Guide d'aide] du menu Aide sur votre téléviseur. Vous pouvez
également consulter le Guide d’aide depuis votre PC ou
smartphone (informations fournies sur le cache arrière de ce
manuel).
AVIS IMPORTANT

3
FR
FR
Installation/Mise en place
Installez et utilisez le téléviseur conformément aux instructions
ci-dessous afin d’éviter tout risque d’incendie, d’électrocution ou
autre dommage et/ou blessure.
Installation
• Le téléviseur doit être installé à proximité d’une prise de courant
aisément accessible.
• Positionnez le téléviseur sur une surface stable et horizontale
afin d'éviter qu'il ne tombe, n'entraîne des blessures ou
n'endommage des biens.
• Installez le téléviseur dans un endroit où vous ne risquez pas de
le p
ousser, de le tirer ou de le renverser.
• Installez le téléviseur de façon à ce que son support de table ne
dépasse pas du support TV (non fourni). Si le support de table
dépasse du support TV, le téléviseur risque d’être renversé, de
tomber, d’être endommagé ou de provoquer des blessures.
• Pour des raisons de sécurité, assurez-vous de fixer le couvercle
c
entral du téléviseur lorsque le téléviseur est posé sur le dessus
d'une table.
• L’installation murale du téléviseur doit être confiée à un
t
echnicien spécialisé.
• Pour des raisons de sécurité, il est vivement recommandé
d’utiliser les accessoires Sony, notamment :
Support de fixation murale SU-WL850
S
upport de fixation murale SU-WL450
• Veillez à bien utiliser les vis fournies avec le Support de fixation
murale lors de la mise en place du Support de fixation murale
sur le téléviseur. Les vis fournies sont conçues de la manière
illustrée, mesurées à partir de la surface de fixation du Support
de fixation murale.
Leur diamètre et leur longueur varient suivant le modèle de
S
upport de fixation murale.
L’utilisation de vis autres que celles fournies peut occasionner
des dégâts à l’intérieur du téléviseur ou provoquer sa chute, etc.
Transport
• Avant de transporter le téléviseur, débranchez tous ses câbles.
• La présence de deux ou trois personnes est nécessaire pour le
transport des téléviseurs de grande taille.
• Pour transporter le téléviseur à la main, saisissez-le de la
manière illustrée. N’exercez aucune pression sur le panneau et
le cadre qui l’entoure.
• Lors de la manipulation ou du
mo
ntage du téléviseur, ne
couchez pas le téléviseur.
• Lorsque vous transportez le téléviseur, ne le soumettez pas à
d
es secousses ou des vibrations excessives.
• Lorsque vous transportez le téléviseur pour le porter à réparer
ou lorsque vous déménagez, glissez-le dans son emballage et
son carton d’origine.
Prévention des basculements
Aération
• Vous ne devez jamais obstruer les orifices d’aération du boîtier
ni y introduire un objet quelconque.
• Laissez un espace libre autour du téléviseur, comme indiqué
ci-dessous.
• Il est vivement recommandé d’utiliser le support de fixation
murale Sony pour favoriser la circulation adéquate de l’air.
Installation murale
Consignes de sécurité
Vis (M6)
Support de fixation murale
9 mm - 13 mm
Couvercle arrière du téléviseur
Vis M4 (non fournie)
1,5 N·m
{15 kgf·cm}
Vis (non fournie)
6 mm - 7 mm
Cordon (non
fourni)
30 cm
10 cm
10 cm
10 cm
Laissez au moins cet espace libre autour du téléviseur.
1 cm

4
FR
Installation sur pied
• Pour une ventilation correcte, sans accumulation de salissures ni
de poussière :
Ne placez pas le téléviseur à plat, à l’envers, vers l’arrière ou
sur le côté.
N
e placez pas le téléviseur sur une étagère, un tapis, un lit ou
dans un placard.
Ne couvrez pas le téléviseur avec des tissus tels que des
rideaux, pas plus qu’avec des journaux, etc.
N’installez pas le téléviseur comme illustré ci-dessous.
Précautions à prendre pour protéger l’écran
des dommages
Rémanence d’image
Les téléviseurs OLED sont sensibles à la rémanence d’image en
raison des caractéristiques des matériaux utilisés. La rémanence
d’image peut survenir si des images s’affichent plusieurs fois au
même emplacement sur l’écran ou pendant des périodes
prolongées. Il ne s’agit pas d’un dysfonctionnement du téléviseur.
Évitez d’afficher des images pouvant causer une rémanence
d’image.
Voici des exemples d’images pouvant causer une
rémanence d’image :
• Contenu avec des bandes noires en haut et en bas et/ou sur la
gauche et la droite de l’écran. (ex : écran 4:3 « letterboxé »,
définition Standard)
• Images statiques, comme des photos.
• Jeux vidéo pouvant avoir un contenu statique sur une partie de
l’
écran.
• Menus à l’écran, guides des programmes, logos des chaînes,
etc.
• Contenu statique des applications.
• Téléscripteurs à l’écran, comme ceux utilisés dans les journaux
té
lévisés et les titres.
Pour réduire le risque de rémanence d’image :
• Sony vous recommande de mettre le téléviseur hors tension
normalement en appuyant sur le bouton marche de la
télécommande ou du téléviseur.
• Remplissez l’écran en modifiant [Mode Large] pour éliminer les
ba
ndes noires. Sélectionnez un [Mode Large] autre que [4:3].
• Désactivez l’OSD (affichage sur écran) en appuyant sur le
bouton / puis désactivez les menus de l’appareil
raccordé. Pour plus de détails, reportez-vous au mode d’emploi
de l’appareil raccordé.
• Évitez d’afficher des images statiques aux couleurs vives (y
c
ompris du blanc), des horloges ou des logos sur une partie de
l’écran.
• Configurez les réglages de l’image en fonction des conditions
ambiantes. L’image Standard est recommandée pour un usage
domestique et lors de la visualisation d’un contenu affichant
souvent les logos de la station, etc.
Le téléviseur possède les fonctionnalités suivantes pour aider à
r
éduire/empêcher la rémanence d’image.
Actualisation du panneau
L’actualisation du panneau s’exécute automatiquement pour
ajuster l’uniformité de l’écran du téléviseur après qu’il a été utilisé
pendant de longues périodes. L’actualisation du panneau peut
également être effectuée manuellement et ne doit être utilisée
que si la rémanence d’image est très visible ou si vous voyez le
message suivant : [L'actualisation du panneau ne s'est pas
terminée…]
Attention :
• La fonction Actualisation du panneau peut affecter le panneau.
En guise de référence, effectuez l’actualisation du panneau une
seule fois par an et pas plus, car elle peut réduire la durée de vie
du panneau.
• L’actualisation du panneau dure environ une heure.
• Une ligne blanche peut s’afficher sur l’écran lors de
l’actualisation du panneau ; il ne s’agit pas d’un
dysfonctionnement du téléviseur.
• L’actualisation du panneau ne fonctionne que lorsque la
te
mpérature ambiante est comprise entre 10 ºC et 40 ºC.
Décalage des pixels
Place automatiquement l’image sur l’écran pour empêcher la
rémanence d’image.
Autre fonctionnalité
La luminosité de l’écran est automatiquement réduite lors de
l’affichage d’images fixes, d’horloges, de couleurs vives ou de
logos, etc.
Protection de l’écran du téléviseur
(Téléviseur OLED)
30 cm
10 cm
10 cm
Laissez au moins cet espace libre autour du téléviseur.
6 cm
Ne bloquez pas la zone de circulation d’air.
Circulation d’air
Mur
La circulation de l’air est bloquée.
Mur
Pagina se încarcă...
Pagina se încarcă...
Pagina se încarcă...
Pagina se încarcă...
Pagina se încarcă...
Pagina se încarcă...
Pagina se încarcă...
Pagina se încarcă...
Pagina se încarcă...
Pagina se încarcă...
Pagina se încarcă...
Pagina se încarcă...
Pagina se încarcă...
Pagina se încarcă...
Pagina se încarcă...
Pagina se încarcă...
Pagina se încarcă...
Pagina se încarcă...
Pagina se încarcă...
Pagina se încarcă...
Pagina se încarcă...
Pagina se încarcă...
Pagina se încarcă...
Pagina se încarcă...
Pagina se încarcă...
Pagina se încarcă...
Pagina se încarcă...
Pagina se încarcă...
Pagina se încarcă...
Pagina se încarcă...
Pagina se încarcă...
Pagina se încarcă...
Pagina se încarcă...
Pagina se încarcă...
Pagina se încarcă...
Pagina se încarcă...
Pagina se încarcă...
Pagina se încarcă...
Pagina se încarcă...
Pagina se încarcă...
Pagina se încarcă...
Pagina se încarcă...
Pagina se încarcă...
Pagina se încarcă...
Pagina se încarcă...
Pagina se încarcă...
Pagina se încarcă...
Pagina se încarcă...
Pagina se încarcă...
Pagina se încarcă...
Pagina se încarcă...
Pagina se încarcă...
Pagina se încarcă...
Pagina se încarcă...
Pagina se încarcă...
Pagina se încarcă...
Pagina se încarcă...
Pagina se încarcă...
Pagina se încarcă...
Pagina se încarcă...
Pagina se încarcă...
Pagina se încarcă...
Pagina se încarcă...
Pagina se încarcă...
Pagina se încarcă...
Pagina se încarcă...
Pagina se încarcă...
Pagina se încarcă...
Pagina se încarcă...
Pagina se încarcă...
Pagina se încarcă...
Pagina se încarcă...
Pagina se încarcă...
Pagina se încarcă...
Pagina se încarcă...
Pagina se încarcă...
Pagina se încarcă...
Pagina se încarcă...
Pagina se încarcă...
Pagina se încarcă...
Pagina se încarcă...
Pagina se încarcă...
Pagina se încarcă...
Pagina se încarcă...
Pagina se încarcă...
Pagina se încarcă...
Pagina se încarcă...
Pagina se încarcă...
Pagina se încarcă...
Pagina se încarcă...
Pagina se încarcă...
Pagina se încarcă...
Pagina se încarcă...
Pagina se încarcă...
Pagina se încarcă...
Pagina se încarcă...
Pagina se încarcă...
Pagina se încarcă...
Pagina se încarcă...
Pagina se încarcă...
Pagina se încarcă...
Pagina se încarcă...
Pagina se încarcă...
Pagina se încarcă...
Pagina se încarcă...
Pagina se încarcă...
Pagina se încarcă...
Pagina se încarcă...
Pagina se încarcă...
Pagina se încarcă...
Pagina se încarcă...
Pagina se încarcă...
Pagina se încarcă...
Pagina se încarcă...
Pagina se încarcă...
Pagina se încarcă...
Pagina se încarcă...
Pagina se încarcă...
Pagina se încarcă...
Pagina se încarcă...
Pagina se încarcă...
Pagina se încarcă...
Pagina se încarcă...
Pagina se încarcă...
Pagina se încarcă...
Pagina se încarcă...
Pagina se încarcă...
Pagina se încarcă...
Pagina se încarcă...
Pagina se încarcă...
Pagina se încarcă...
Pagina se încarcă...
Pagina se încarcă...
Pagina se încarcă...
Pagina se încarcă...
Pagina se încarcă...
Pagina se încarcă...
Pagina se încarcă...
Pagina se încarcă...
Pagina se încarcă...
Pagina se încarcă...
Pagina se încarcă...
Pagina se încarcă...
Pagina se încarcă...
Pagina se încarcă...
Pagina se încarcă...
Pagina se încarcă...
Pagina se încarcă...
Pagina se încarcă...
Pagina se încarcă...
Pagina se încarcă...
Pagina se încarcă...
Pagina se încarcă...
Pagina se încarcă...
Pagina se încarcă...
Pagina se încarcă...
Pagina se încarcă...
Pagina se încarcă...
Pagina se încarcă...
Pagina se încarcă...
Pagina se încarcă...
Pagina se încarcă...
Pagina se încarcă...
Pagina se încarcă...
Pagina se încarcă...
Pagina se încarcă...
Pagina se încarcă...
Pagina se încarcă...
Pagina se încarcă...
Pagina se încarcă...
Pagina se încarcă...
Pagina se încarcă...
Pagina se încarcă...
Pagina se încarcă...
Pagina se încarcă...
Pagina se încarcă...
Pagina se încarcă...
Pagina se încarcă...
Pagina se încarcă...
Pagina se încarcă...
Pagina se încarcă...
Pagina se încarcă...
Pagina se încarcă...
Pagina se încarcă...
Pagina se încarcă...
Pagina se încarcă...
Pagina se încarcă...
Pagina se încarcă...
Pagina se încarcă...
Pagina se încarcă...
Pagina se încarcă...
Pagina se încarcă...
Pagina se încarcă...
Pagina se încarcă...
Pagina se încarcă...
Pagina se încarcă...
Pagina se încarcă...
Pagina se încarcă...
Pagina se încarcă...
Pagina se încarcă...
Pagina se încarcă...
Pagina se încarcă...
Pagina se încarcă...
Pagina se încarcă...
Pagina se încarcă...
Pagina se încarcă...
Pagina se încarcă...
Pagina se încarcă...
Pagina se încarcă...
Pagina se încarcă...
Pagina se încarcă...
Pagina se încarcă...
Pagina se încarcă...
Pagina se încarcă...
Pagina se încarcă...
Pagina se încarcă...
Pagina se încarcă...
Pagina se încarcă...
Pagina se încarcă...
Pagina se încarcă...
Pagina se încarcă...
Pagina se încarcă...
Pagina se încarcă...
Pagina se încarcă...
Pagina se încarcă...
Pagina se încarcă...
Pagina se încarcă...
Pagina se încarcă...
Pagina se încarcă...
Pagina se încarcă...
Pagina se încarcă...
Pagina se încarcă...
Pagina se încarcă...
Pagina se încarcă...
Pagina se încarcă...
Pagina se încarcă...
Pagina se încarcă...
Pagina se încarcă...
Pagina se încarcă...
Pagina se încarcă...
Pagina se încarcă...
Pagina se încarcă...
Pagina se încarcă...
Pagina se încarcă...
Pagina se încarcă...
Pagina se încarcă...
Pagina se încarcă...
Pagina se încarcă...
Pagina se încarcă...
Pagina se încarcă...
Pagina se încarcă...
Pagina se încarcă...
Pagina se încarcă...
Pagina se încarcă...
Pagina se încarcă...
Pagina se încarcă...
Pagina se încarcă...
Pagina se încarcă...
Pagina se încarcă...
Pagina se încarcă...
Pagina se încarcă...
Pagina se încarcă...
Pagina se încarcă...
Pagina se încarcă...
Pagina se încarcă...
Pagina se încarcă...
Pagina se încarcă...
Pagina se încarcă...
Pagina se încarcă...
Pagina se încarcă...
Pagina se încarcă...
Pagina se încarcă...
Pagina se încarcă...
Pagina se încarcă...
Pagina se încarcă...
Pagina se încarcă...
Pagina se încarcă...
Pagina se încarcă...
Pagina se încarcă...
Pagina se încarcă...
Pagina se încarcă...
Pagina se încarcă...
Pagina se încarcă...
Pagina se încarcă...
Pagina se încarcă...
Pagina se încarcă...
Pagina se încarcă...
Pagina se încarcă...
Pagina se încarcă...
Pagina se încarcă...
Pagina se încarcă...
Pagina se încarcă...
-
 1
1
-
 2
2
-
 3
3
-
 4
4
-
 5
5
-
 6
6
-
 7
7
-
 8
8
-
 9
9
-
 10
10
-
 11
11
-
 12
12
-
 13
13
-
 14
14
-
 15
15
-
 16
16
-
 17
17
-
 18
18
-
 19
19
-
 20
20
-
 21
21
-
 22
22
-
 23
23
-
 24
24
-
 25
25
-
 26
26
-
 27
27
-
 28
28
-
 29
29
-
 30
30
-
 31
31
-
 32
32
-
 33
33
-
 34
34
-
 35
35
-
 36
36
-
 37
37
-
 38
38
-
 39
39
-
 40
40
-
 41
41
-
 42
42
-
 43
43
-
 44
44
-
 45
45
-
 46
46
-
 47
47
-
 48
48
-
 49
49
-
 50
50
-
 51
51
-
 52
52
-
 53
53
-
 54
54
-
 55
55
-
 56
56
-
 57
57
-
 58
58
-
 59
59
-
 60
60
-
 61
61
-
 62
62
-
 63
63
-
 64
64
-
 65
65
-
 66
66
-
 67
67
-
 68
68
-
 69
69
-
 70
70
-
 71
71
-
 72
72
-
 73
73
-
 74
74
-
 75
75
-
 76
76
-
 77
77
-
 78
78
-
 79
79
-
 80
80
-
 81
81
-
 82
82
-
 83
83
-
 84
84
-
 85
85
-
 86
86
-
 87
87
-
 88
88
-
 89
89
-
 90
90
-
 91
91
-
 92
92
-
 93
93
-
 94
94
-
 95
95
-
 96
96
-
 97
97
-
 98
98
-
 99
99
-
 100
100
-
 101
101
-
 102
102
-
 103
103
-
 104
104
-
 105
105
-
 106
106
-
 107
107
-
 108
108
-
 109
109
-
 110
110
-
 111
111
-
 112
112
-
 113
113
-
 114
114
-
 115
115
-
 116
116
-
 117
117
-
 118
118
-
 119
119
-
 120
120
-
 121
121
-
 122
122
-
 123
123
-
 124
124
-
 125
125
-
 126
126
-
 127
127
-
 128
128
-
 129
129
-
 130
130
-
 131
131
-
 132
132
-
 133
133
-
 134
134
-
 135
135
-
 136
136
-
 137
137
-
 138
138
-
 139
139
-
 140
140
-
 141
141
-
 142
142
-
 143
143
-
 144
144
-
 145
145
-
 146
146
-
 147
147
-
 148
148
-
 149
149
-
 150
150
-
 151
151
-
 152
152
-
 153
153
-
 154
154
-
 155
155
-
 156
156
-
 157
157
-
 158
158
-
 159
159
-
 160
160
-
 161
161
-
 162
162
-
 163
163
-
 164
164
-
 165
165
-
 166
166
-
 167
167
-
 168
168
-
 169
169
-
 170
170
-
 171
171
-
 172
172
-
 173
173
-
 174
174
-
 175
175
-
 176
176
-
 177
177
-
 178
178
-
 179
179
-
 180
180
-
 181
181
-
 182
182
-
 183
183
-
 184
184
-
 185
185
-
 186
186
-
 187
187
-
 188
188
-
 189
189
-
 190
190
-
 191
191
-
 192
192
-
 193
193
-
 194
194
-
 195
195
-
 196
196
-
 197
197
-
 198
198
-
 199
199
-
 200
200
-
 201
201
-
 202
202
-
 203
203
-
 204
204
-
 205
205
-
 206
206
-
 207
207
-
 208
208
-
 209
209
-
 210
210
-
 211
211
-
 212
212
-
 213
213
-
 214
214
-
 215
215
-
 216
216
-
 217
217
-
 218
218
-
 219
219
-
 220
220
-
 221
221
-
 222
222
-
 223
223
-
 224
224
-
 225
225
-
 226
226
-
 227
227
-
 228
228
-
 229
229
-
 230
230
-
 231
231
-
 232
232
-
 233
233
-
 234
234
-
 235
235
-
 236
236
-
 237
237
-
 238
238
-
 239
239
-
 240
240
-
 241
241
-
 242
242
-
 243
243
-
 244
244
-
 245
245
-
 246
246
-
 247
247
-
 248
248
-
 249
249
-
 250
250
-
 251
251
-
 252
252
-
 253
253
-
 254
254
-
 255
255
-
 256
256
-
 257
257
-
 258
258
-
 259
259
-
 260
260
-
 261
261
-
 262
262
-
 263
263
-
 264
264
-
 265
265
-
 266
266
-
 267
267
-
 268
268
-
 269
269
-
 270
270
-
 271
271
-
 272
272
-
 273
273
-
 274
274
-
 275
275
-
 276
276
-
 277
277
-
 278
278
-
 279
279
-
 280
280
-
 281
281
-
 282
282
-
 283
283
-
 284
284
-
 285
285
-
 286
286
-
 287
287
-
 288
288
-
 289
289
-
 290
290
-
 291
291
-
 292
292
-
 293
293
-
 294
294
-
 295
295
-
 296
296
-
 297
297
-
 298
298
-
 299
299
-
 300
300
-
 301
301
-
 302
302
-
 303
303
-
 304
304
-
 305
305
-
 306
306
-
 307
307
-
 308
308
-
 309
309
-
 310
310
-
 311
311
-
 312
312


Sony Bravia KD-55AG9 Manualul proprietarului
- Categorie
- Televizoare LCD
- Tip
- Manualul proprietarului
în alte limbi
- slovenčina: Sony Bravia KD-55AG9 Návod na obsluhu
- italiano: Sony Bravia KD-55AG9 Manuale del proprietario
- dansk: Sony Bravia KD-55AG9 Brugervejledning
- Nederlands: Sony Bravia KD-55AG9 de handleiding
Lucrări înrudite
-
Sony KD55AG9 Manualul proprietarului
-
Sony KD-49XH8599 Manualul proprietarului
-
Sony KD-98ZG9 Manualul proprietarului
-
Sony KD-65AG8 Ghid de referință
-
Sony KD-65AF9 Manualul proprietarului
-
Sony KD-55XG9505 Manualul proprietarului
-
Sony KD-65A8 Manualul proprietarului
-
-
Sony XR-65A90J Manualul proprietarului
-
Sony MHC-V82D Manualul proprietarului