Philips RQ1260/16 Manual de utilizare
- Categorie
- Aparate de bărbierit
- Tip
- Manual de utilizare

User manual
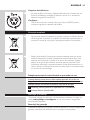
Always here to help you
RQ1200 series

1


4
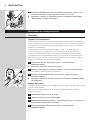
Introduction
Congratulations on your purchase and welcome to Philips! To fully benet
from the support that Philips offers, register your product at
www.philips.com/welcome.
Please read this user manual, as it contains information about the features
of this shaver as well as some tips to make shaving easier and more
enjoyable.
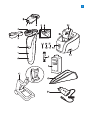
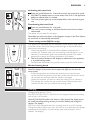
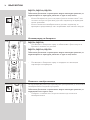
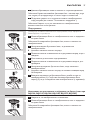
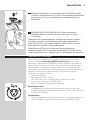
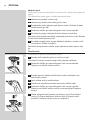
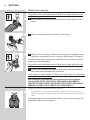
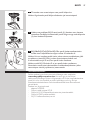
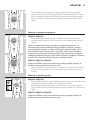
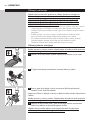
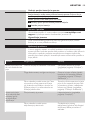
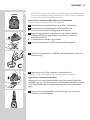
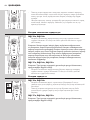
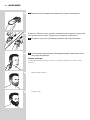
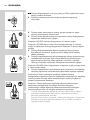
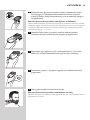
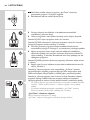
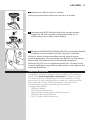
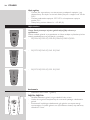
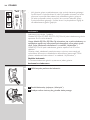
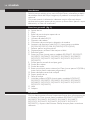
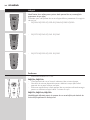
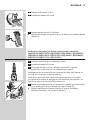
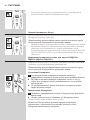
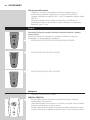
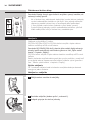
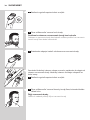
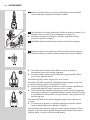
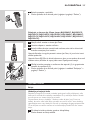
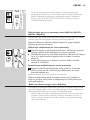
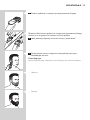
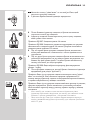
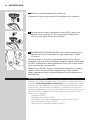
General description (Fig. 1)
A Shaver
1 Display
2 Shaver on/off button
3 Protection cap
4 RQ12 Shaving unit
5 Trimmer
6 Trimmer on/off slide
B RQ111 Beard Styler attachment (RQ1296, RQ1295, RQ1286, RQ1285,
RQ1275, RQ1265 only)
7 Hair length selector
8 Comb of Beard Styler attachment
C Foldable charger
D Jet Clean System (RQ1296CC, RQ1295CC, RQ1290CC, RQ1286CC,
RQ1285CC, RQ1284CC, RQ1280CC, RQ1275CC, RQ1265CC,
RQ1260CC, RQ1252CC, RQ1251CC, RQ1250CC only)
9 ’Cleaning chamber empty’ symbol
10 Cleaning symbol
11 Drying symbol
12 Jet Clean System on/off button (RQ1008 only: and up/down button
for program selection)
13 Cleaning chamber release button
14 Shaver holder
E Cleaning brush
F HQ200 Cleaning uid (RQ1296CC, RQ1295CC, RQ1290CC,
RQ1286CC, RQ1285CC, RQ1284CC, RQ1280CC, RQ1275CC,
RQ1265CC, RQ1260CC, RQ1252CC, RQ1251CC, RQ1250CC only)
G Pouch
H Adapter
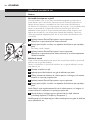
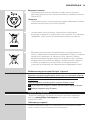
Important
Read this important information carefully before you use the shaver,
the Jet Clean system (RQ1296CC, RQ1295CC, RQ1290CC, RQ1286CC,
RQ1285CC, RQ1284CC, RQ1280CC, RQ1275CC, RQ1265CC,
RQ1260CC, RQ1252CC, RQ1251CC, RQ1250CC only) and the charging
stand. Save this leaet for future reference.
ENGLISH

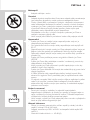
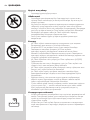
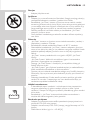
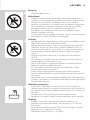
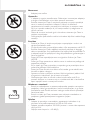
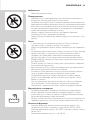
Danger
- Keep the adapter dry.
Warning
- The adapter contains a transformer. Do not cut off the adapter to
replace it with another plug, as this causes a hazardous situation.
- The shaver, the Jet Clean system and the charging stand are not
intended for use by persons (including children) with reduced physical,
sensory or mental capabilities, or lack of experience and knowledge,
unless they have been given supervision or instruction concerning use
of these appliances by a person responsible for their safety.
- Children should be supervised to ensure that they do not play with
the shaver, the Jet Clean system and the charging stand.
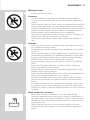
- Always unplug the shaver before you clean it under the tap.
Caution
- Never immerse the Jet Clean system or the charging stand in water
nor rinse it under the tap.
- Never use water hotter than 80°C to rinse the shaver.
- Do not use the shaver, Jet Clean system, adapter, charging stand or any
other part if it is damaged, as this may cause injury. Always replace a
damaged adapter, charging stand or part with one of the original type.
- Only use the Jet Clean system with the original HQ200 Jet Clean
solution.
- Always place the Jet Clean system on a stable, level and horizontal
surface to prevent leakage.
- When the Jet Clean system is ready for use, do not move it to prevent
leakage of cleaning uid.
- The Jet Clean system thoroughly cleans but does not disinfect your
shaver, therefore do not share the shaver with others.
- Never use compressed air, scouring pads, abrasive cleaning agents or
aggressive liquids such as petrol or acetone to clean the appliance.
- Water may leak from the socket at the bottom of the shaver when you
rinse it. This is normal and not dangerous because all electronics are
enclosed in a sealed power unit inside the shaver.
Compliance with standards
- This shaver is waterproof and complies with the internationally
approved safety regulations. It is suitable for use in the bath or shower
and for cleaning under the tap. For safety reasons, the shaver can
therefore only be used cordlessly.
- The shaver and the Jet Clean system comply with all applicable
standards and regulations regarding exposure to electromagnetic elds.
General
- The adapter is equipped with an automatic voltage selector and is
suitable for mains voltages ranging from 100 to 240 volts.
- The adapter transforms 100-240 volts to a safe low voltage of less than
24 volts.
- Maximum noise level: Lc = 69dB(A)
ENGLISH 5

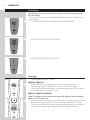
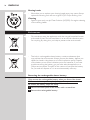
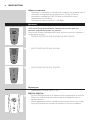
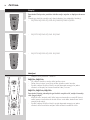
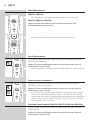
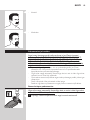
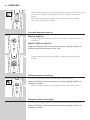
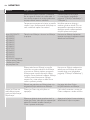
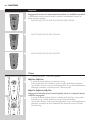
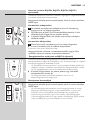
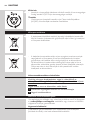
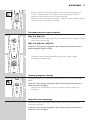
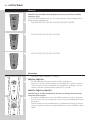
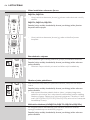
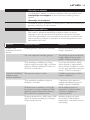
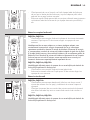
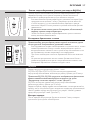
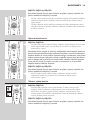
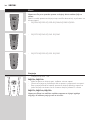
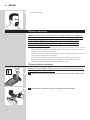
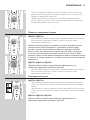
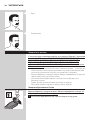
The display
Note: Before you use the shaver for the rst time, remove the protective foil
from the display.
The various shaver types have different displays, which are shown in the
gures below.
- RQ1296, RQ1295, RQ1290, RQ1286, RQ1285, RQ1280
- RQ1275, RQ1265, RQ1261, RQ1260
- RQ1273, RQ1252, RQ1251, RQ1250
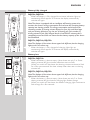
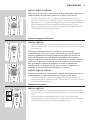
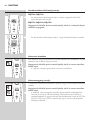
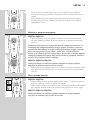
Charging
- Charging takes approx. 1 hour.
RQ129x, RQ128x
- When the shaver is charging, the minutes indication ashes.
- The shaving minutes increase until the shaver is fully charged.
- Quick charge: When the shaver contains enough energy for one shave,
the display shows 5 minutes in red.
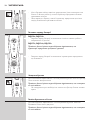
RQ127x, RQ126x, RQ125x
Note: The displays of the various shaver types look different, but the charging
lights work in the same way.
- When the shaver is charging, rst the bottom charging light ashes, then
the second charging light, and so on until the shaver is fully charged.
- Quick charge: When the shaver contains enough energy for one shave,
the bottom charging light alternately ashes orange and white.
MINUTES LEFT
MINUTES LEFT
MINUTES LEFT
MINUTES LEFT
ENGLISH6

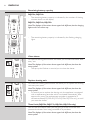
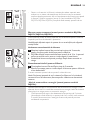
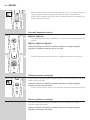
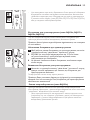
Battery fully charged
RQ129x, RQ128x
- When the battery is fully charged, the minutes indication lights up
continuously. After approx. 30 minutes, the display automatically
switches off again.
Note: The shaver is equipped with an intelligent self-learning system that
monitors the shaver’s energy consumption and converts the remaining battery
capacity into shaving minutes. The energy consumption and therefore the
remaining number of shaving minutes depend on your skin and beard type
and your shaving behaviour (e.g. the use of shaving gel). If the number of
shaving minutes of the fully charged shaver is less than 60 minutes, this is
completely normal and does not mean that the battery capacity of the shaver
has diminished.
RQ127x, RQ126x, RQ125x
Note: The displays of the various shaver types look different, but the charging
lights work in the same way.
- When the battery is fully charged, all charging lights light up
continuously. After approx. 30 minutes, the display automatically
switches off again.
Battery low
RQ129x, RQ128x
- When the battery is almost empty (when there are only 5 or fewer
shaving minutes left), the minutes indication starts to ash.
- When you switch off the shaver, the shaving minutes continue to ash
for a few more seconds. You hear a beep when there are no shaving
minutes left.
RQ127x, RQ126x, RQ125x
Note: The displays of the various shaver types look different, but the charging
lights work in the same way.
- When the battery is almost empty (when there are only 5 or fewer
shaving minutes left), the bottom charging light ashes orange.
- When you switch off the shaver, the bottom charging light continues to
ash orange for a few seconds.
MINUTES LEFT
MINUTES LEFT
MINUTES LEFT
MINUTES LEFT
ENGLISH 7

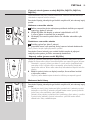
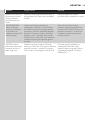
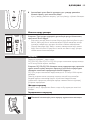
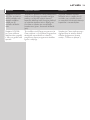
Remaining battery capacity
RQ129x, RQ128x
- The remaining battery capacity is indicated by the number of shaving
minutes shown on the display.
RQ127x, RQ126x, RQ125x
Note: The displays of the various shaver types look different, but the charging
lights work in the same way.
- The remaining battery capacity is indicated by the ashing charging
lights.
Clean shaver
For optimal shaving performance, we advise you to clean the shaver after
every use.
Note: The displays of the various shaver types look different, but show the
same symbol.
- The tap symbol ashes to remind you to clean the shaver.
Replace shaving unit
For maximum shaving performance, we advise you to replace the shaving
unit every two years.
Note: The displays of the various shaver types look different, but show the
same symbol.
- To remind you to replace the shaving unit, the appliance is equipped
with a replacement reminder which is activated automatically after
approx. two years. The replacement reminder is repeated at 9
successive shaves(RQ128x, RQ127x, RQ126x, RQ125x only) or until
you reset the shaver.
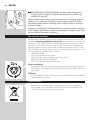
Travel lock (RQ128x, RQ127x, RQ126x, RQ125x only)
You can lock the shaver when you are going to travel. The travel lock
prevents the shaver from being switched on by accident.
Note: The displays of the various shaver types look different, but show the
same symbol.
MINUTES LEFT
MINUTES LEFT
MINUTES LEFT
MINUTES LEFT
MINUTES LEFT
MINUTES LEFT
ENGLISH8

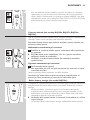
Activating the travel lock
1 Press the on/off button for 3 seconds to enter the travel lock mode.
, RQ128x: The display starts to count down from 3. At 1, the appliance
beeps to indicate that it is locked.
, The lock symbol lights up on the display. After a few seconds it goes
out.
Deactivating the travel lock
1 Press the on/off button for 3 seconds.
, The motor starts running to indicate that the travel lock has been
deactivated.
The shaver is now ready for use again.
Note: When you place the shaver in the plugged-in charger or Jet Clean System,
the travel lock is automatically deactivated.
Power-saving mode (RQ129x only)
The appliance is equipped with an automatic power-saving mode. When
the shaver enters the power-saving mode, the light in the on/off button
goes out to save energy.
- When the appliance is switched off but detects movement for 5
minutes (for instance when you are travelling with the shaver in your
suitcase), it automatically goes into power-saving mode. This mode
prevents the shaver from being switched on by accident.
, The lock symbol ashes on the display to indicate that the appliance
is in power-saving mode.
- To deactivate the power-saving mode, simply press the on/off button.
Blocked shaving heads
Note: The displays of the various shaver types look different, but show the
same symbol.
- If the shaving heads are blocked, the shaving unit symbol, the tap
symbol and the exclamation mark ash. In this case, the motor cannot
run because the shaving heads are soiled or damaged.
- When this happens, you have to clean the shaving unit or replace it.
- The shaving unit symbol, the tap symbol and the exclamation mark
continue to ash until you unblock the shaving heads.
Charging
Charging takes approx. 1 hour.
RQ129x, RQ128x, RQ127x, RQ126x: A fully charged shaver has a shaving
time of up to 60 minutes.
Note: RQ129x, RQ128x: When the battery is fully charged, the display shows
the actual remaining shaving minutes (see section ‘Battery fully charged’ in
chapter ‘The display’).
RQ125x: A fully charged shaver has a shaving time of up to 50 minutes.
Charge the shaver before you use it for the rst time and when the display
indicates that the battery is almost empty (see section ‘Battery low’ in
chapter ‘The display’).
MINUTES LEFT
MINUTES LEFT
ENGLISH 9

Quick charge
After the shaver has charged for 3 minutes, it contains enough energy for
one shave.
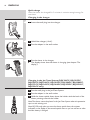
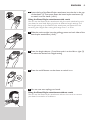
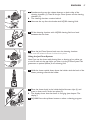
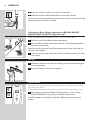
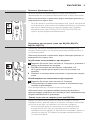
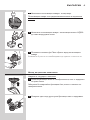
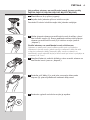
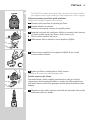
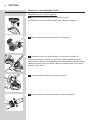
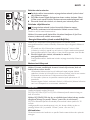
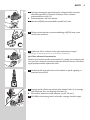
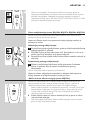
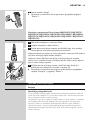
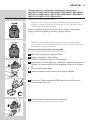
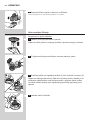
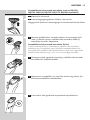
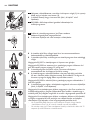
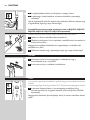
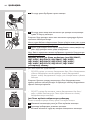
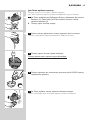
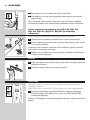
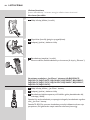
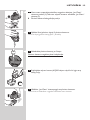
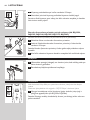
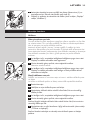
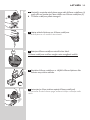
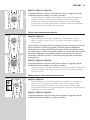
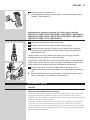
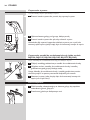
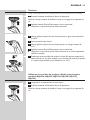
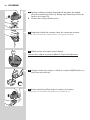
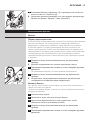
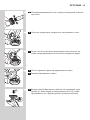
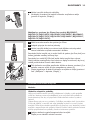
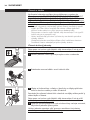
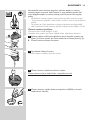
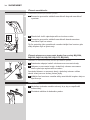
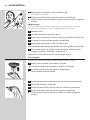
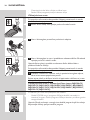
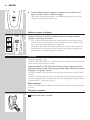
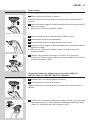
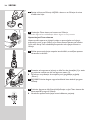
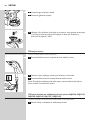
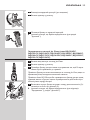
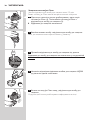
Charging in the charger
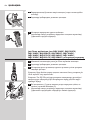
1 Insert the small plug into the charger.
2 Unfold the charger (‘click’).
3 Put the adapter in the wall socket.
4 Put the shaver in the charger.
, The display shows that the shaver is charging (see chapter ‘The
display’).
Charging in the Jet Clean System (RQ1296CC, RQ1295CC,
RQ1290CC, RQ1286CC, RQ1285CC, RQ1284CC, RQ1280CC,
RQ1275CC, RQ1265CC, RQ1260CC, RQ1252CC, RQ1251CC,
RQ1250CC only)
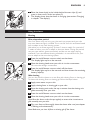
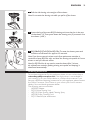
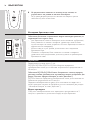
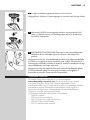
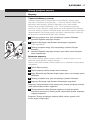
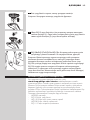
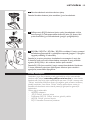
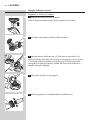
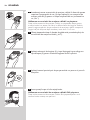
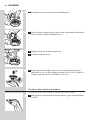
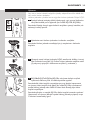
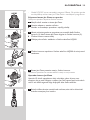
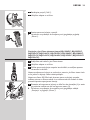
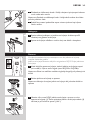
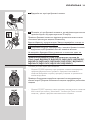
1 Put the small plug in the Jet Clean System.
2 Put the adapter in the wall socket.
3 Hold the shaver upside down above the holder with the back of the
shaver pointing towards the holder.
Note: The shaver cannot be placed in the Jet Clean System when the protection
cap is on the shaving unit.
Note: RQ129x only: when you turn the shaver upside down, the minutes
indication on the display is also turned upside down so you can still see to what
level the battery is charged.
ENGLISH10

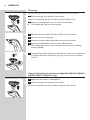
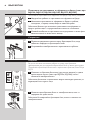
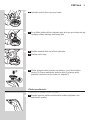
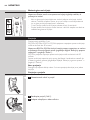
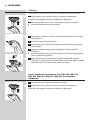
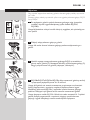
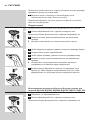
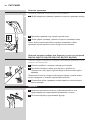
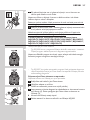
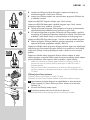
4 Place the shaver body in the holder behind the two clips (1) and
press it down until it locks into place (2).
, The display shows that the shaver is charging (see section ‘Charging’
in chapter ‘The display’).
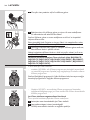
Using the shaver
Shaving
Skin adaptation period
Your rst shaves may not bring you the result you expect and your skin
may even become slightly irritated. This is normal. Your skin and beard need
time to adapt to any new shaving system.
We advise you to shave regularly (at least 3 times a week) for a period of
3 weeks to allow your skin to adapt to the new shaver. During this period,
use your new electric shaver exclusively and do not use other shaving
methods. If you use different shaving methods, it is more difcult for your
skin to adapt to the new shaving system.
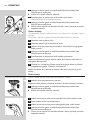
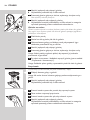
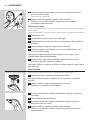
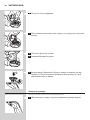
1 Press the on/off button once to switch on the shaver.
, The display lights up for a few seconds.
2 Move the shaving heads over your skin in circular movements.
- Do not make straight movements.
3 Press the on/off button once to switch off the shaver.
, The display lights up for a few seconds and then shows the remaining
battery capacity.
Wet shaving
You can also use this shaver on a wet face with shaving foam or shaving gel.
To shave with shaving foam or shaving gel, follow the steps below:
1 Apply some water to your skin.
2 Apply shaving foam or shaving gel to your skin.
3 Rinse the shaving unit under the tap to ensure that the shaving unit
glides smoothly over your skin.
4 Press the on/off button once to switch on the shaver.
5 Move the shaving heads over your skin in circular movements.
Note: Rinse the shaver under the tap regularly to ensure that it continues to
glide smoothly over your skin.
6 Dry your face and thoroughly clean the shaver after use (see chapter
‘Cleaning and maintenance’).
Note: Make sure you rinse all foam or shaving gel off the shaver.
ENGLISH 11

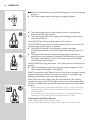
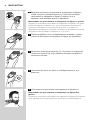
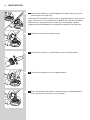
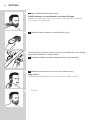
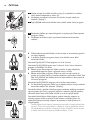
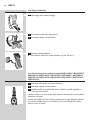
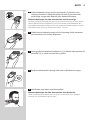
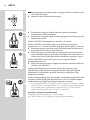
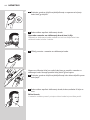
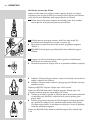
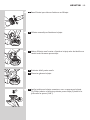
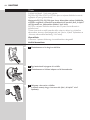
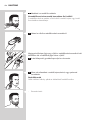
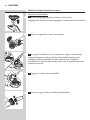
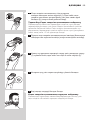
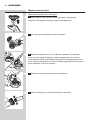
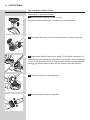
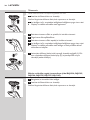
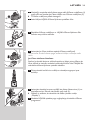
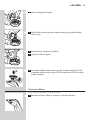
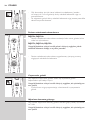
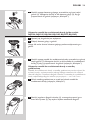
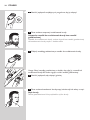
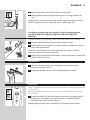
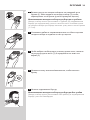
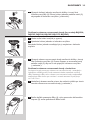
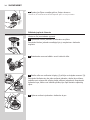
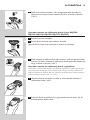
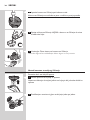
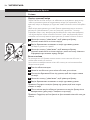
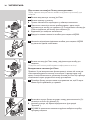
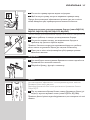
Trimming
You can use the trimmer to groom your sideburns and moustache.
1 Pull the shaving unit straight off the shaver.
Note: Do not twist the shaving unit while you pull it off the shaver.
2 Press the on/off button once to switch on the shaver.
, The display lights up for a few seconds.
3 Slide the trimmer slide forwards to slide out the trimmer.
4 You can now start trimming.
5 Slide the trimmer slide backwards to retract the trimmer.
6 Press the on/off button once to switch off the shaver.
, The display lights up for a few seconds and shows the remaining
battery capacity.
7 Insert the lug of the shaving unit into the slot in the top of the shaver
(1). Then press down the shaving unit (2) to attach it to the shaver
(‘click’).
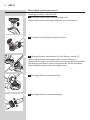
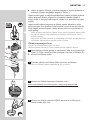
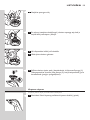
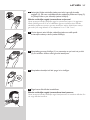
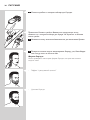
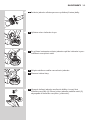
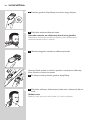
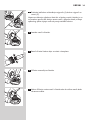
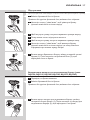
Using the Beard Styler attachment (RQ1296, RQ1295, RQ1286,
RQ1285, RQ1275, RQ1265 only)
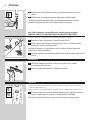
1 Make sure the shaver is switched off.
2 Pull the shaving unit straight off the shaver.
Note: Do not twist the shaving unit while you pull it off the shaver.
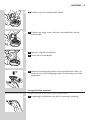
ENGLISH12

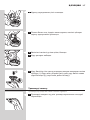
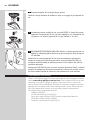
3 Insert the lug of the Beard Styler attachment into the slot in the top
of the shaver (1). Then press down the beard styler attachment (2)
to attach it to the shaver (‘click’).
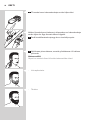
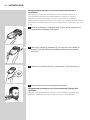
Using the Beard Styler attachment with comb
You can use the Beard Styler attachment with the comb attached to style
your beard at one xed setting, but also at different length settings. The
hair length settings on the Beard Styler attachment correspond to the
remaining hair length after cutting and range from 1 to 5mm.
1 Slide the comb straight into the guiding grooves on both sides of the
beard styler attachment (‘click’).
2 Press the length selector (1) and then push it to the left or right (2)
to select the desired hair length setting.
3 Press the on/off button on the shaver to switch it on.
4 You can now start styling your beard.
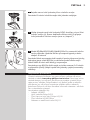
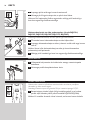
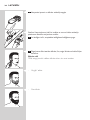
Using the Beard Styler attachment without comb
You can use the Beard Styler attachment without the comb to contour
your beard, moustache or sideburns.
ENGLISH 13

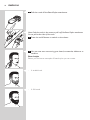
1 Pull the comb off the Beard Styler attachment.
Note: Grab the comb in the centre to pull it off the Beard Styler attachment.
Do not pull at the sides of the comb.
2 Press the on/off button to switch on the shaver.
3 You can now start contouring your beard, moustache, sideburns or
neckline.
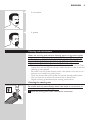
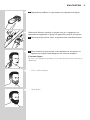
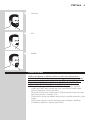
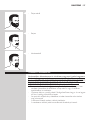
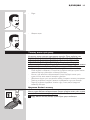
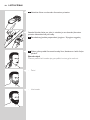
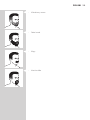
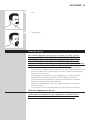
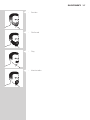
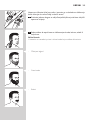
Beard styles
Below you nd some examples of beard styles you can create.
- A stubble look
- A full beard
ENGLISH14

- A moustache
- A goatee
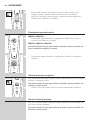
Cleaning and maintenance
Never use scouring pads, abrasive cleaning agents or aggressive liquids
such as petrol or acetone to clean the shaver, its accessories and the
Jet Clean System (RQ1296CC, RQ1295CC, RQ1290CC, RQ1286CC,
RQ1285CC, RQ1284CC, RQ1280CC, RQ1275CC, RQ1265CC,
RQ1260CC, RQ1252CC, RQ1251CC, RQ1250CC only).
- The best and most hygienic way to clean the shaver is in the Jet Clean
System. You can also rinse the shaver under the tap or clean it with the
cleaning brush supplied.
- Be careful with hot water. Always check if the water is not too hot, to
prevent your hands from getting burnt.
- Clean the shaver after every shave for optimal shaving performance.
- You can clean the outside of the shaver with a damp cloth.
- Regular cleaning guarantees better shaving performance.
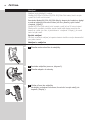
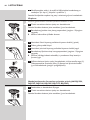
Cleaning the shaving unit
Be careful with hot water. Always check if the water is not too hot, to
prevent your hands from getting burnt.
1 Rinse the shaving unit under a hot tap for some time.
ENGLISH 15

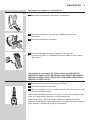
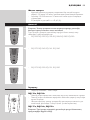
2 Pull open the three shaving heads one by one.
3 Rinse all three shaving heads and all three hair chambers under a hot
tap for 30 seconds.
Note: You can also brush the shaving heads and hair chambers with the
cleaning brush supplied.
Be careful with hot water. Always check if the water is not too hot, to
prevent your hands from getting burnt.
4 Carefully shake off excess water and leave the shaving heads open to
let the shaving unit dry completely.
Never dry the shaving unit with a towel or tissue, as this may damage the
shaving heads.
Cleaning the shaving unit in the Jet Clean System (RQ1296CC,
RQ1295CC, RQ1290CC, RQ1286CC, RQ1285CC, RQ1284CC,
RQ1280CC, RQ1275CC, RQ1265CC, RQ1260CC, RQ1252CC,
RQ1251CC, RQ1250CC only)
The Jet Clean System comes in two types:
- Type RQ1008 has three cleaning programs: the eco program, the auto
program and the intensive program. Press the up/down button to
select the cleaning program you prefer.
Note: The eco program has a shorter drying time, to save energy. The intensive
program is a more thorough cleaning program.
- Type RQ1007 has one automatic cleaning program. When you
press the on/off button, the Jet Clean System starts cleaning in the
automatic cleaning program.
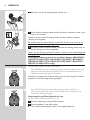
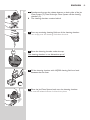
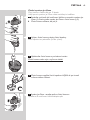
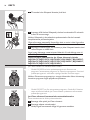
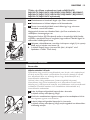
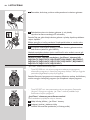
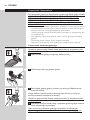
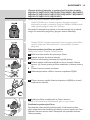
Preparing the Jet Clean System for use
Fill the cleaning chamber before rst use.
1 Put the small plug in the Jet Clean System.
2 Put the adapter in the wall socket.
, The holder automatically moves to the highest position.
ENGLISH16

3 Simultaneously press the release buttons on both sides of the
cleaning chamber (1). Then lift the Jet Clean System off the cleaning
chamber (2).
, The cleaning chamber remains behind.
4 Unscrew the cap from the bottle with HQ200 cleaning uid.
5 Fill the cleaning chamber with HQ200 cleaning uid to a level
between the two lines.
6 Place the Jet Clean System back onto the cleaning chamber.
Make sure the release buttons click back into place.
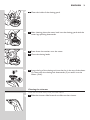
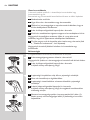
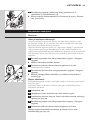
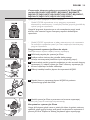
Using the Jet Clean System
Note: If you use the shaver with shaving foam or shaving gel, we advise you
to rinse it under the hot tap before you clean it in the Jet Clean System. This
guarantees an optimal lifetime for the cleaning uid.
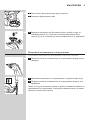
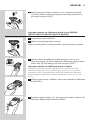
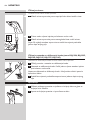
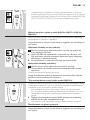
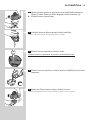
1 Hold the shaver upside down above the holder with the back of the
shaver pointing towards the holder.
2 Place the shaver body in the holder behind the two clips (1) and
press it down until it locks into place (2).
, The display shows that the shaver is charging (see chapter ‘The
display’).
3 RQ1008: Press the up/down button to select a cleaning program.
ENGLISH 17

4 Press the on/off button on the Jet Clean System to start the cleaning
program.
, The shaver display stops showing the charging indication.
, The cleaning light starts to ash and the shaver is automatically
lowered into the cleaning uid.
, The cleaning light ashes throughout the cleaning program, which
takes a few minutes.
Note: RQ1007: The cleaning program takes 4 to 6 minutes.
Note: RQ1008: The auto and eco cleaning programs take 4 to 6 minutes. The
intensive program takes approx. 35 minutes.
, During the rst phase of the cleaning program, the shaver
automatically switches on and off several times and moves up and
down.
, During the second phase of the cleaning program, the shaver is
placed in the drying position, indicated by the ashing drying symbol.
This phase takes approx. 2 hours. The shaver stays in this position
until the end of the program.
Note: RQ1008: The drying phase takes 1 hour when you have selected the eco
program.
, After the cleaning program, the charging indication appears on the
shaver display (see chapter ‘The display’).
Note: If you press the on/off button of the Jet Clean System during the cleaning
program, the program aborts. In this case, the cleaning or drying light stops
ashing and the holder moves to the highest position.
Note: If you remove the adapter from the wall socket during the cleaning
program, the program aborts. The holder remains in its current position. When
you put the adapter back into the wall socket, the holder moves to the highest
position.
- When the cleaning uid drops below the minimum level, the ‘cleaning
chamber empty’ symbol starts to ash and the holder returns to its
starting position.
- If you use the Jet Clean System to clean your shaver every day, you
need to rell the cleaning chamber approx. every 15 days.
Cleaning the Jet Clean System
Clean the cleaning chamber every 15 days.
You can wipe the outside of the Jet Clean System with a damp cloth.
ENGLISH18

1 Simultaneously press the release buttons on both sides of the Jet
Clean System (1). Then lift the Jet Clean System off the cleaning
chamber (2).
, The cleaning chamber remains behind.
2 Pour any remaining cleaning uid out of the cleaning chamber.
You can simply pour the cleaning uid down the sink.
3 Rinse the cleaning chamber under the tap.
The cleaning chamber is not dishwasher-proof.
4 Fill the cleaning chamber with HQ200 cleaning uid to a level
between the two lines.
5 Place the Jet Clean System back onto the cleaning chamber.
Make sure the release buttons click back into place.
ENGLISH 19

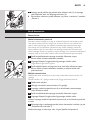
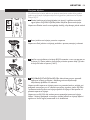
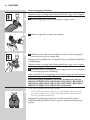
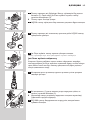
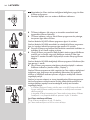
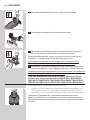
Extra-thorough cleaning method
Make sure the appliance is switched off.
1 Pull the shaving unit straight off the shaver.
Note: Do not twist the shaving unit while you pull it off the shaver.
2 Pull open the three shaving heads one by one.
3 Press the retainer release tab (1) until the retainer opens (2).
Note: Do not clean more than one cutter and shaving guard at a time, since
they are all matching sets. If you accidentally put a cutter in the wrong shaving
guard, it may take several weeks before optimal shaving performance is
restored.
4 Remove the cutter from the shaving guard.
5 Clean the cutter with the cleaning brush supplied.
ENGLISH20
Pagina se încarcă...
Pagina se încarcă...
Pagina se încarcă...
Pagina se încarcă...
Pagina se încarcă...
Pagina se încarcă...
Pagina se încarcă...
Pagina se încarcă...
Pagina se încarcă...
Pagina se încarcă...
Pagina se încarcă...
Pagina se încarcă...
Pagina se încarcă...
Pagina se încarcă...
Pagina se încarcă...
Pagina se încarcă...
Pagina se încarcă...
Pagina se încarcă...
Pagina se încarcă...
Pagina se încarcă...
Pagina se încarcă...
Pagina se încarcă...
Pagina se încarcă...
Pagina se încarcă...
Pagina se încarcă...
Pagina se încarcă...
Pagina se încarcă...
Pagina se încarcă...
Pagina se încarcă...
Pagina se încarcă...
Pagina se încarcă...
Pagina se încarcă...
Pagina se încarcă...
Pagina se încarcă...
Pagina se încarcă...
Pagina se încarcă...
Pagina se încarcă...
Pagina se încarcă...
Pagina se încarcă...
Pagina se încarcă...
Pagina se încarcă...
Pagina se încarcă...
Pagina se încarcă...
Pagina se încarcă...
Pagina se încarcă...
Pagina se încarcă...
Pagina se încarcă...
Pagina se încarcă...
Pagina se încarcă...
Pagina se încarcă...
Pagina se încarcă...
Pagina se încarcă...
Pagina se încarcă...
Pagina se încarcă...
Pagina se încarcă...
Pagina se încarcă...
Pagina se încarcă...
Pagina se încarcă...
Pagina se încarcă...
Pagina se încarcă...
Pagina se încarcă...
Pagina se încarcă...
Pagina se încarcă...
Pagina se încarcă...
Pagina se încarcă...
Pagina se încarcă...
Pagina se încarcă...
Pagina se încarcă...
Pagina se încarcă...
Pagina se încarcă...
Pagina se încarcă...
Pagina se încarcă...
Pagina se încarcă...
Pagina se încarcă...
Pagina se încarcă...
Pagina se încarcă...
Pagina se încarcă...
Pagina se încarcă...
Pagina se încarcă...
Pagina se încarcă...
Pagina se încarcă...
Pagina se încarcă...
Pagina se încarcă...
Pagina se încarcă...
Pagina se încarcă...
Pagina se încarcă...
Pagina se încarcă...
Pagina se încarcă...
Pagina se încarcă...
Pagina se încarcă...
Pagina se încarcă...
Pagina se încarcă...
Pagina se încarcă...
Pagina se încarcă...
Pagina se încarcă...
Pagina se încarcă...
Pagina se încarcă...
Pagina se încarcă...
Pagina se încarcă...
Pagina se încarcă...
Pagina se încarcă...
Pagina se încarcă...
Pagina se încarcă...
Pagina se încarcă...
Pagina se încarcă...
Pagina se încarcă...
Pagina se încarcă...
Pagina se încarcă...
Pagina se încarcă...
Pagina se încarcă...
Pagina se încarcă...
Pagina se încarcă...
Pagina se încarcă...
Pagina se încarcă...
Pagina se încarcă...
Pagina se încarcă...
Pagina se încarcă...
Pagina se încarcă...
Pagina se încarcă...
Pagina se încarcă...
Pagina se încarcă...
Pagina se încarcă...
Pagina se încarcă...
Pagina se încarcă...
Pagina se încarcă...
Pagina se încarcă...
Pagina se încarcă...
Pagina se încarcă...
Pagina se încarcă...
Pagina se încarcă...
Pagina se încarcă...
Pagina se încarcă...
Pagina se încarcă...
Pagina se încarcă...
Pagina se încarcă...
Pagina se încarcă...
Pagina se încarcă...
Pagina se încarcă...
Pagina se încarcă...
Pagina se încarcă...
Pagina se încarcă...
Pagina se încarcă...
Pagina se încarcă...
Pagina se încarcă...
Pagina se încarcă...
Pagina se încarcă...
Pagina se încarcă...
Pagina se încarcă...
Pagina se încarcă...
Pagina se încarcă...
Pagina se încarcă...
Pagina se încarcă...
Pagina se încarcă...
Pagina se încarcă...
Pagina se încarcă...
Pagina se încarcă...
Pagina se încarcă...
Pagina se încarcă...
Pagina se încarcă...
Pagina se încarcă...
Pagina se încarcă...
Pagina se încarcă...
Pagina se încarcă...
Pagina se încarcă...
Pagina se încarcă...
Pagina se încarcă...
Pagina se încarcă...
Pagina se încarcă...
Pagina se încarcă...
Pagina se încarcă...
Pagina se încarcă...
Pagina se încarcă...
Pagina se încarcă...
Pagina se încarcă...
Pagina se încarcă...
Pagina se încarcă...
Pagina se încarcă...
Pagina se încarcă...
Pagina se încarcă...
Pagina se încarcă...
Pagina se încarcă...
Pagina se încarcă...
Pagina se încarcă...
Pagina se încarcă...
Pagina se încarcă...
Pagina se încarcă...
Pagina se încarcă...
Pagina se încarcă...
Pagina se încarcă...
Pagina se încarcă...
Pagina se încarcă...
Pagina se încarcă...
Pagina se încarcă...
Pagina se încarcă...
Pagina se încarcă...
Pagina se încarcă...
Pagina se încarcă...
Pagina se încarcă...
Pagina se încarcă...
Pagina se încarcă...
Pagina se încarcă...
Pagina se încarcă...
Pagina se încarcă...
Pagina se încarcă...
Pagina se încarcă...
Pagina se încarcă...
Pagina se încarcă...
Pagina se încarcă...
Pagina se încarcă...
Pagina se încarcă...
Pagina se încarcă...
Pagina se încarcă...
Pagina se încarcă...
Pagina se încarcă...
Pagina se încarcă...
Pagina se încarcă...
Pagina se încarcă...
Pagina se încarcă...
Pagina se încarcă...
Pagina se încarcă...
Pagina se încarcă...
Pagina se încarcă...
Pagina se încarcă...
Pagina se încarcă...
Pagina se încarcă...
Pagina se încarcă...
Pagina se încarcă...
Pagina se încarcă...
Pagina se încarcă...
Pagina se încarcă...
Pagina se încarcă...
Pagina se încarcă...
Pagina se încarcă...
Pagina se încarcă...
Pagina se încarcă...
Pagina se încarcă...
Pagina se încarcă...
Pagina se încarcă...
Pagina se încarcă...
Pagina se încarcă...
Pagina se încarcă...
Pagina se încarcă...
Pagina se încarcă...
Pagina se încarcă...
Pagina se încarcă...
Pagina se încarcă...
Pagina se încarcă...
Pagina se încarcă...
Pagina se încarcă...
Pagina se încarcă...
Pagina se încarcă...
Pagina se încarcă...
Pagina se încarcă...
Pagina se încarcă...
Pagina se încarcă...
Pagina se încarcă...
Pagina se încarcă...
Pagina se încarcă...
Pagina se încarcă...
Pagina se încarcă...
Pagina se încarcă...
Pagina se încarcă...
Pagina se încarcă...
Pagina se încarcă...
Pagina se încarcă...
Pagina se încarcă...
Pagina se încarcă...
Pagina se încarcă...
Pagina se încarcă...
Pagina se încarcă...
Pagina se încarcă...
Pagina se încarcă...
Pagina se încarcă...
Pagina se încarcă...
Pagina se încarcă...
Pagina se încarcă...
Pagina se încarcă...
Pagina se încarcă...
Pagina se încarcă...
Pagina se încarcă...
Pagina se încarcă...
Pagina se încarcă...
Pagina se încarcă...
Pagina se încarcă...
Pagina se încarcă...
Pagina se încarcă...
Pagina se încarcă...
Pagina se încarcă...
Pagina se încarcă...
Pagina se încarcă...
Pagina se încarcă...
Pagina se încarcă...
Pagina se încarcă...
Pagina se încarcă...
Pagina se încarcă...
Pagina se încarcă...
Pagina se încarcă...
Pagina se încarcă...
Pagina se încarcă...
Pagina se încarcă...
Pagina se încarcă...
Pagina se încarcă...
Pagina se încarcă...
Pagina se încarcă...
Pagina se încarcă...
Pagina se încarcă...
Pagina se încarcă...
Pagina se încarcă...
Pagina se încarcă...
Pagina se încarcă...
Pagina se încarcă...
Pagina se încarcă...
Pagina se încarcă...
Pagina se încarcă...
Pagina se încarcă...
Pagina se încarcă...
Pagina se încarcă...
Pagina se încarcă...
Pagina se încarcă...
Pagina se încarcă...
Pagina se încarcă...
Pagina se încarcă...
Pagina se încarcă...
Pagina se încarcă...
Pagina se încarcă...
Pagina se încarcă...
Pagina se încarcă...
Pagina se încarcă...
Pagina se încarcă...
Pagina se încarcă...
Pagina se încarcă...
Pagina se încarcă...
Pagina se încarcă...
Pagina se încarcă...
Pagina se încarcă...
Pagina se încarcă...
Pagina se încarcă...
Pagina se încarcă...
Pagina se încarcă...
Pagina se încarcă...
Pagina se încarcă...
Pagina se încarcă...
Pagina se încarcă...
Pagina se încarcă...
Pagina se încarcă...
Pagina se încarcă...
Pagina se încarcă...
Pagina se încarcă...
Pagina se încarcă...
Pagina se încarcă...
Pagina se încarcă...
Pagina se încarcă...
Pagina se încarcă...
Pagina se încarcă...
Pagina se încarcă...
Pagina se încarcă...
Pagina se încarcă...
Pagina se încarcă...
Pagina se încarcă...
Pagina se încarcă...
Pagina se încarcă...
Pagina se încarcă...
Pagina se încarcă...
Pagina se încarcă...
Pagina se încarcă...
Pagina se încarcă...
Pagina se încarcă...
Pagina se încarcă...
Pagina se încarcă...
Pagina se încarcă...
Pagina se încarcă...
Pagina se încarcă...
Pagina se încarcă...
Pagina se încarcă...
-
 1
1
-
 2
2
-
 3
3
-
 4
4
-
 5
5
-
 6
6
-
 7
7
-
 8
8
-
 9
9
-
 10
10
-
 11
11
-
 12
12
-
 13
13
-
 14
14
-
 15
15
-
 16
16
-
 17
17
-
 18
18
-
 19
19
-
 20
20
-
 21
21
-
 22
22
-
 23
23
-
 24
24
-
 25
25
-
 26
26
-
 27
27
-
 28
28
-
 29
29
-
 30
30
-
 31
31
-
 32
32
-
 33
33
-
 34
34
-
 35
35
-
 36
36
-
 37
37
-
 38
38
-
 39
39
-
 40
40
-
 41
41
-
 42
42
-
 43
43
-
 44
44
-
 45
45
-
 46
46
-
 47
47
-
 48
48
-
 49
49
-
 50
50
-
 51
51
-
 52
52
-
 53
53
-
 54
54
-
 55
55
-
 56
56
-
 57
57
-
 58
58
-
 59
59
-
 60
60
-
 61
61
-
 62
62
-
 63
63
-
 64
64
-
 65
65
-
 66
66
-
 67
67
-
 68
68
-
 69
69
-
 70
70
-
 71
71
-
 72
72
-
 73
73
-
 74
74
-
 75
75
-
 76
76
-
 77
77
-
 78
78
-
 79
79
-
 80
80
-
 81
81
-
 82
82
-
 83
83
-
 84
84
-
 85
85
-
 86
86
-
 87
87
-
 88
88
-
 89
89
-
 90
90
-
 91
91
-
 92
92
-
 93
93
-
 94
94
-
 95
95
-
 96
96
-
 97
97
-
 98
98
-
 99
99
-
 100
100
-
 101
101
-
 102
102
-
 103
103
-
 104
104
-
 105
105
-
 106
106
-
 107
107
-
 108
108
-
 109
109
-
 110
110
-
 111
111
-
 112
112
-
 113
113
-
 114
114
-
 115
115
-
 116
116
-
 117
117
-
 118
118
-
 119
119
-
 120
120
-
 121
121
-
 122
122
-
 123
123
-
 124
124
-
 125
125
-
 126
126
-
 127
127
-
 128
128
-
 129
129
-
 130
130
-
 131
131
-
 132
132
-
 133
133
-
 134
134
-
 135
135
-
 136
136
-
 137
137
-
 138
138
-
 139
139
-
 140
140
-
 141
141
-
 142
142
-
 143
143
-
 144
144
-
 145
145
-
 146
146
-
 147
147
-
 148
148
-
 149
149
-
 150
150
-
 151
151
-
 152
152
-
 153
153
-
 154
154
-
 155
155
-
 156
156
-
 157
157
-
 158
158
-
 159
159
-
 160
160
-
 161
161
-
 162
162
-
 163
163
-
 164
164
-
 165
165
-
 166
166
-
 167
167
-
 168
168
-
 169
169
-
 170
170
-
 171
171
-
 172
172
-
 173
173
-
 174
174
-
 175
175
-
 176
176
-
 177
177
-
 178
178
-
 179
179
-
 180
180
-
 181
181
-
 182
182
-
 183
183
-
 184
184
-
 185
185
-
 186
186
-
 187
187
-
 188
188
-
 189
189
-
 190
190
-
 191
191
-
 192
192
-
 193
193
-
 194
194
-
 195
195
-
 196
196
-
 197
197
-
 198
198
-
 199
199
-
 200
200
-
 201
201
-
 202
202
-
 203
203
-
 204
204
-
 205
205
-
 206
206
-
 207
207
-
 208
208
-
 209
209
-
 210
210
-
 211
211
-
 212
212
-
 213
213
-
 214
214
-
 215
215
-
 216
216
-
 217
217
-
 218
218
-
 219
219
-
 220
220
-
 221
221
-
 222
222
-
 223
223
-
 224
224
-
 225
225
-
 226
226
-
 227
227
-
 228
228
-
 229
229
-
 230
230
-
 231
231
-
 232
232
-
 233
233
-
 234
234
-
 235
235
-
 236
236
-
 237
237
-
 238
238
-
 239
239
-
 240
240
-
 241
241
-
 242
242
-
 243
243
-
 244
244
-
 245
245
-
 246
246
-
 247
247
-
 248
248
-
 249
249
-
 250
250
-
 251
251
-
 252
252
-
 253
253
-
 254
254
-
 255
255
-
 256
256
-
 257
257
-
 258
258
-
 259
259
-
 260
260
-
 261
261
-
 262
262
-
 263
263
-
 264
264
-
 265
265
-
 266
266
-
 267
267
-
 268
268
-
 269
269
-
 270
270
-
 271
271
-
 272
272
-
 273
273
-
 274
274
-
 275
275
-
 276
276
-
 277
277
-
 278
278
-
 279
279
-
 280
280
-
 281
281
-
 282
282
-
 283
283
-
 284
284
-
 285
285
-
 286
286
-
 287
287
-
 288
288
-
 289
289
-
 290
290
-
 291
291
-
 292
292
-
 293
293
-
 294
294
-
 295
295
-
 296
296
-
 297
297
-
 298
298
-
 299
299
-
 300
300
-
 301
301
-
 302
302
-
 303
303
-
 304
304
-
 305
305
-
 306
306
-
 307
307
-
 308
308
-
 309
309
-
 310
310
-
 311
311
-
 312
312
-
 313
313
-
 314
314
-
 315
315
-
 316
316
-
 317
317
-
 318
318
-
 319
319
-
 320
320
-
 321
321
-
 322
322
-
 323
323
-
 324
324
-
 325
325
-
 326
326
-
 327
327
-
 328
328
-
 329
329
-
 330
330
-
 331
331
-
 332
332
-
 333
333
-
 334
334
-
 335
335
-
 336
336
-
 337
337
-
 338
338
-
 339
339
-
 340
340
-
 341
341
-
 342
342
-
 343
343
-
 344
344
-
 345
345
-
 346
346
-
 347
347
-
 348
348
-
 349
349
-
 350
350
-
 351
351
-
 352
352
-
 353
353
-
 354
354
-
 355
355
-
 356
356
-
 357
357
-
 358
358
-
 359
359
-
 360
360
-
 361
361
-
 362
362
-
 363
363
-
 364
364
-
 365
365
-
 366
366
-
 367
367
-
 368
368
-
 369
369
-
 370
370
-
 371
371
-
 372
372
-
 373
373
-
 374
374
-
 375
375
-
 376
376
-
 377
377
-
 378
378
-
 379
379
-
 380
380
-
 381
381
-
 382
382
-
 383
383
-
 384
384
-
 385
385
-
 386
386
-
 387
387
-
 388
388
-
 389
389
-
 390
390
-
 391
391
-
 392
392
-
 393
393
-
 394
394


Philips RQ1260/16 Manual de utilizare
- Categorie
- Aparate de bărbierit
- Tip
- Manual de utilizare
în alte limbi
- slovenčina: Philips RQ1260/16 Používateľská príručka
- eesti: Philips RQ1260/16 Kasutusjuhend
Lucrări înrudite
-
Philips Click&Style YS536/71 Manual de utilizare
-
Philips RQ1260/21 Manual de utilizare
-
Philips CP9331/01 Product Datasheet
-
-
Philips HQ 8290/21 Manual de utilizare
-
Philips RQ1150 Manual de utilizare
-
Philips RQ1150 Manual de utilizare
-
-
-