Parkside PABSW 10.8 B2 Translation Of Original Operation Manual
- Categorie
- Burghie combinate fără fir
- Tip
- Translation Of Original Operation Manual

CORDLESS DRILL PABSW 10.8 B2
MAȘINĂ DE ÎNȘURUBAT ȘI GĂURIT
CU ACUMULATOR
Traducerea instrucţiunilor de utilizare originale
АКУМУЛАТОРНА БОРМАШИНА
Превод на оригиналното ръководство за експлоатация
AKKU-BOHRSCHRAUBER
Originalbetriebsanleitung
ΕΠΑΝΑΦΟΡΤΙΖΟΜΕΝΟ
ΔΡΑΠΑΝΟΚΑΤΣΑΒΙΔΟ
Μετάφραση των αυθεντικών οδηγιών λειτουργίας
AKU ODVIJAČ
Prijevod originalnih uputa za uporabu
CORDLESS DRILL
Translation of original operation manual
IAN 96229
96229_par_Akku-Bohrschrauber_cover_HR_RO_BG_GR.indd 2 23.10.13 12:22

GB Translation of original operation manual Page
HR Prijevod originalnih uputa za uporabu Stranica
RO Traducerea instrucţiunilor de utilizare originale Pagina
BG Превод на оригиналното ръководство за експлоатация Страница
GR Μετάφραση των αυθεντικών οδηγιών λειτουργίας Σελίδα
DE / AT / CH Originalbetriebsanleitung Seite
Before reading, unfold the page containing the illustrations and familiarise yourself with all functions
of the device.
Prije nego što pročitate tekst, otvorite stranicu sa slikama i upoznajte se na osnovu toga sa svim
funkcijama uređaja.
Înainte de a citi instrucţiunile, priviţi imaginile şi familiarizaţi-vă cu toate funcţiile aparatului.
Преди да прочетете отворете страницата с фигурите и след това се запознайте с всички
функции на уреда.
Πριν ξεκινήσετε την ανάγνωση, ανοίξτε τη σελίδα με τις εικόνες και εξοικειωθείτε με όλες τις
λειτουργίες της συσκευής.
Klappen Sie vor dem Lesen die Seite mit den Abbildungen aus und machen Sie sich anschließend
mit allen Funktionen des Gerätes vertraut.
96229_par_Akku-Bohrschrauber_cover_HR_RO_BG_GR.indd 3 23.10.13 12:22
4
18
31
46
63
79

1 2 3 4
5
6
7
8
9
10
15
16
1
2
3
4
12 11
13
14

4
GB
Content
Introduction .................................4
Intended purpose .........................4
General description ......................5
Extent of the delivery ........................5
Overview ........................................5
Functional description .......................5
Technical data ..............................5
Safety instructions ........................6
Symbols and icons ...........................6
Symbols on the appliance .................6
Symbols on the battery .....................6
Symbols on the recharger ..................7
General safety instructions for power
tools ...............................................7
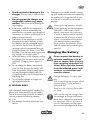
Charging the battery .................. 11
Removing / inserting the battery .... 12
Recharging the battery .................. 12
Used batteries .............................. 12
Checking the battery charge level ... 12
Operation ..................................13
Choice of gear .............................. 13
Direction switch ............................. 13
Torque adjustment .......................... 13
Keyless drill chuck removal .............. 13
Tool change .................................. 13
Using the bitholder ......................... 13
Switching on/off ............................ 14
Cleaning and maintenance .........14
Cleaning ..................................... 14
Maintenance ................................ 14
Storage ......................................14
Disposal and protection of the
environment ..............................14
Replacement parts .....................15
Guarantee .................................15
Repair Service ............................16
Service-Center ............................17
Importer ....................................17
Translation of the original EC
declaration of conformity ............94
Introduction
Congratulations on the purchase of your
new device. With it, you have chosen a
high quality product.
During production, this equipment has
been checked for quality and subjected to
a nal inspection. The functionality of your
equipment is therefore guaranteed. It can-
not be ruled out that residual quantities of
water or lubricants will remain on or in the
equipment/hose lines in isolated cases.
This is not a fault or defect and it repre-
sents no cause for concern.
The operating instructions constitute part
of this product. They contain important in-
formation on safety, use and disposal.
Before using the product, familiarise your-
self with all of the operating and safety
instructions. Use the product only as de-
scribed and for the applications specied.
Keep this manual safely and in the event
that the product is passed on, hand over
all documents to the third party.
Intended purpose
The device is intended for drilling screws
in and out and for drilling holes in wood,
metal or plastic. The appliance must only
be used by adults. Young people aged 16
and over may only use the trimmer under
adult supervision.
The user or operator is responsible for ac-
cidents causing injury to other people or
damage to property.
The manufacturer cannot be held liable
for damage when the trimmer is not used
in conformity with its intended purpose or
due to incorrect operation.

5
GB
General description
Extent of the delivery
Carefully unpack the appliance and check
that it is complete:
- Cordless Drill
- Battery-charger
- Battery
- Storage case
- Instruction Manual
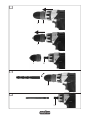
Pictured bit and drill not included.
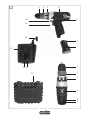
The illustrations are on the
front fold-out page.
Overview
1 Keyless drill chuck
2 Chuck ring
3 Torque adjustment ring
4 Speed selector
5 Direction of rotation switch
6 Battery
7 Battery release button
8 Battery Indicator
9 Activation button
Battery Indicator
10 Storage case
11 Red LED
12 Green LED
13 Charger
14 Charger power supply cord
15 On/off switch
16 LED working light
17 Bitholder
Functional description
The cordless drill with two-speed gearing
has a 17+1 level torque adjustment, left/
right running, a removable keyless chuck,
a 6-point bitholder and an LED working
light. Maximum torque of 20 Nm.
Technical data
Appliance
Motor voltage........................10,8 V
Idling speed ...........0-300/0-1050 min
-1
Span-chuck ............................1-10 mm
Weight (without battery charger) . 1.1 kg
Drilling capacity for wood . max. 25 mm
Drilling diameter for steel ..... max. 8 mm
Sound power level
(L
pA
) .............65.3 dB (A), K= 3 dB (A)
Sound power level (L
wA
)
Guaranteed .......................76 dB (A)
Measured ...... 73.3 dB (A); K= 3 dB (A)
Vibration (a
n
) ......................................
Drilling in metal ...............................
.................... < 2.5 m/s
2
, K= 1.5 m/s
2
Screwdriving without impact
.....................< 2.5 m/s
2
, K= 1.5 m/s
2
Battery (Li-Ion)
Nominal voltage ....................10,8 V
Capacity .................................. 1,3 Ah
Charging time .......................... ca. 1 h
Recharger .........................HP70GH
Nominal consumption ..................12 W
Uptake voltage/Input
.......100-240 V~, 50 Hz, max. 500 mA
Voltage output/Output
.............................10,8 V
1500 mA
Protection class .............................
II
Protection category ...................... IPX0

6
GB
Noise and vibration values have been
determined according to the standards and
regulations mentioned in the declaration of
conformity.
Technical and optical changes may be
undertaken in the course of further devel-
opment without notice. All dimensions,
references and information in this instruc-
tion manual are therefore not guaranteed.
Legal claims made on the basis of the
instruction manual can therefore not be
considered as valid.
The stated vibration emission value was
measured in accordance with a standard
testing procedure and may be used to com-
pare one power tool to another.
The stated vibration emission value may
also be used for a preliminary exposure
assessment.
Warning: The vibration emission
value may differ during actual use
of the power tool from the stated
value depending on the manner in
which the power tool is used.
Safety precautions aimed at protect-
ing the user should be based on esti-
mated exposure under actual usage
conditions (all parts of the operating
cycle are to be considered, includ-
ing, for example, times during which
the power tool is turned off and
times when the tool is turned on but
is running idle).
Safety instructions
Ensure that the safety instructions are ob-
served when operating the appliance.
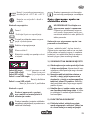
Symbols and icons
Symbols on the appliance:
Carefully read these Operating In-
structions.
Electrical appliances must not be dis-
posed of with the domestic waste.
Stopping device to
change gear
Symbols on the battery:
Do not dispose of
batteries in house-
water.
Do not subject the battery to strong
sunlight over long periods and
do not leave it on a heater (max.
45°C).
Take batteries to an old battery
collection point where they will
be recycled in an environmentally
friendly manner.
Store the battery in
charged condition
The battery requires an ambient
temperature of
+10°C to + 40 °C
The battery should never come
into contact with water

7
GB
Help symbols with information on
improving tool handling.
General safety instructions
for power tools
WARNING! Read all safety
directions and instructions.
Omissions in the compliance with
safety directions and instructions
and/or severe injuries.
Retain all safety directions and in-
structions for future use.
The term “Power Tools” used in the safety
instructions refers to mains-operated power
tools (with power cord) and to battery-oper-
ated power tools (without power cord).
1) WORK AREA SAFETY
a) Keep work area clean and well
lit. Cluttered or dark areas invite acci-
dents.
b) Do not operate power tools in
explosive atmospheres, such as
in the presence of ammable
Iiquids, gases or dust. Power tools
create sparks which may ignite the dust
or fumes.
c) Keep children and bystanders
away while operating a power
tool. Distractions can cause you to lose
control.
Symbols on the recharger:
Warning!
-
fully read through the user manual
The recharger is for indoor use
only.
130°C
Protective temperature limiter
Protection class II
Electrical appliances must not be dis-
posed of with the domestic waste.
Green LED ashes
Charger ready
Red LED lights up Battery charging
Green LED lights up
Battery such alleged charged
Green and red LED ashing
Defective battery
Green and Red LED light up
Battery is too hot or too cold
Symbols in the manual
Warning symbols with in-
formation on damage and
injury prevention.
Instruction symbols (the instruction is
explained at the place of the excla-
mation mark) with information on
preventing damage.
T3.15A

8
GB
2) ELECTRICAL SAFETY
a) Power tool plugs must match the
outlet. Never modify the plug in
any way. Do not use any adapter
plugs with earthed (grounded)
power tools.
matching outlets will reduce risk of electric
shock.
b) Avoid body contact with earthed
or grounded surfaces, such as
pipes, radiators, ranges and re-
frigerators. There is an increased risk
of electric shock if your body is earthed
or grounded.
c) Do not expose power tools to rain
or wet conditions. Water entering a
power tool will increase the risk of electric
shock.
d) Do not abuse the cord. Never use
the cord for carrying, pulling or
unplugging the power tool. Keep
cord away from heat, oil, sharp
edges or moving parts. Damaged
or entangled cords increase the risk of
electric shock.
e) When operating a power tool
outdoors, use an extension cord
suitable for outdoor use. Use of a
cord suitable for outdoor use reduces the
risk of electric shock.
f) If operating a power tool in a
damp location is unavoidable,
use a residual current device
(RCD) protected supply. Use of an
RCD reduces the risk of electric shock.
3) PERSONAL SAFETY
a) Stay alert, watch what you are
doing and use common sense
when operating a power tool. Do
not use a power tool while you
are tired or under the inuence
of drugs, alcohol or medication.
A moment of inattention white operating
power tools may result in serious personal
injury.
b) Use personal protective equip-
ment. Always wear eye protec-
tion. Protective equipment such as dust
mask, non-slip safety shoes, hard hat, or
hearing protection used for appropriate
conditions will reduce personal injuries.
c) Prevent unintentional starting.
Ensure the switch is in the off-po-
sition before connecting to power
source and/or battery pack,
picking up or carrying the tool.
the switch or energising power tools that
have the switch on invites accidents.
d) Remove any adjusting key or
wrench before turning the power
tool on. A wrench or a key left attached
to a rotating part of the power tool may
result in personal injury.
e) Do not overreach. Keep proper
footing and balance at all times.
This enables better control of the power
tool in unexpected situations.
f) Dress properly. Do not wear loose
clothing or jewellery. Keep your
hair, clothing and gloves away
from moving parts. Loose clothes,
jewellery or long hair can be caught in
moving parts.
g) If devices are provided for the
connection of dust extraction and
collection facilities, ensure these
are connected and properly used.
Use of dust collection can reduce dust-
related hazards.

9
GB
4) POWER TOOL USE AND CARE
a) Do not force the power tool. Use
the correct power tool for your
application. The correct power tool will
do the job better and safer at the rate for
which it was designed.
b) Do not use the power tool if the
switch does not turn it on and off.
Any power tool that cannot be controlled
with the switch is dangerous and must be
repaired.
c) Disconnect the plug from the
power source and/or the bat-
tery pack from the power tool
before making any adjust -ments,
changing accessories, or storing
power tools. Such preventive safety
measures reduce the risk of starting the
power tool accidentaIly.
d) Store idle power tools out of the
reach of children and do not al-
low persons unfamiliar with the
power tool or these instructions to
operate the power tool. Power tools
are dangerous in the hands of untrained
users.
e) Maintain power tools. Check for
misalignment or binding of mov-
ing parts, breakage of parts and
any other condition that may af-
fect the power tool’s operation. If
damaged, have the power tool repaired
before use. Many accidents are caused
by poorly maintained power tools.
f) Keep cutting tools sharp and
clean. Properly maintained cutting tools
with sharp cutting edges are less Iikely to
bind and are easier to control.
g) Use the power tool, accessories
and tool bits etc. in accordance
with these instructions, taking into
account the working conditions
and the work to be performed.
Use of the power tool for operations dif-
ferent from those intended could result in
a hazardous situation.
h) Hold the device by the insulated
gripping surfaces when perfor-
ming work in which the cutting
tool may come into contact with
hidden wiring or its own cord.
Contact with a live wire can also cause
a charge in metal parts of the device
and result in an electric shock.
5) CAREFUL HANDLING AND USE OF
BATTERY DEVICES
a) Charge the batteries only in
chargers that are recommended
by the manufacturer.
of battery is used with other batteries.
b) In the power tools, use only the
batteries designed for the pur-
pose. The use of other batteries may
c) Keep the unused battery away
from paper clips, coins, keys,
nails, screws and other small
metal objects, which could cause
bridging of the contacts. A short
circuit between the battery contacts may
d) If used incorrectly, liquid may
leak from the battery. Avoid
contact with this. In the event of
accidental contact, rinse off with
water. If the liquid gets into eyes,
seek medical assistance. Leaking
burns.

10
GB
6) SERVICE
Have your power tool serviced by
a qualied repair person using
only identical replacement parts.
This will ensure that the safety of the
power tool is maintained.
7) SPECIAL SAFETY DIRECTIONS FOR
BATTERY-OPERATED TOOLS
a) Ensure that the device is switched
off before inserting the battery.
Inserting a battery into a power tool that
is switched on may result in accidents.
b) Recharge the batteries indoors
only because the battery charger
is designed for indoor use only.
c) To reduce the electric shock haz-
ard, unplug the battery charger
from the mains before cleaning
the charger.
d) Do not subject the battery to
strong sunlight over long periods
and do not leave it on a heater.
Heat damages the battery and there is a
risk of explosion.
e) Allow a hot battery to cool before
charging.
f) Do not open up the battery and
avoid mechanical damage to the
battery. Risk of short circuit and fumes
may be emitted that irritate the respiratory
tract. Ensure fresh air and seek medical
assistance in the event of discomfort.
g) Do not use non-rechargeable bat-
teries!
8) CORRECT HANDLING OF THE BAT-
TERY CHARGER
• This appliance is not intended for opera-
tion by persons (including children) with
reduced physical, sensory or mental
capabilities, or lacking experience and/
or knowledge, unless they are under the
supervision of or have been instructed on
how to use the appliance by a person
responsible for their safety.
• Keep the equipment away from children
and pets. Children should be supervised
in order to ensure that they do not play
with the equipment.
• To charge the battery, use only
the charger supplied.
that the safety of the device is maintained.
• Before each use, check the charg-
er, cable and plug and have them
repaired by qualied profession-
als and only with original parts.
Do not use a defective charger and do
not open it up yourself. This ensures that
the safety of the device is maintained.
• Connect the charger only to a
socket with an earth. Ensure that
the mains voltage matches the
specications on the charger rat-
ing plate. Risk of electric shock.
• Disconnect the charger from the
mains before closing or opening
connection to the battery / power
tool / device.
• Keep the charger clean and away
from wet and rain. Do not use
the charger outdoors. Dirt and the
entry of water increase the risk of electric
shock.
• Operate the charger only with
the appropriate original batteries.
Charging other batteries may result in

11
GB
• Avoid mechanical damage to the
charger. This can result in internal short
circuits.
• Do not operate the charger on a
combustible surface (e.g. paper,
textiles).-
ing charging.
• If the power cable for this equipment is
damaged, it must be replaced by the
manufacturer, a customer service agent of
order to prevent hazards.
• The battery of the appliance is not fully
charged at the time of delivery. It there-
fore needs to be fully recharged before
recharge cycle we recommend that you
charge the battery for about 1 hour. Slot
the battery into the base and plug the bat-
tery charger into a mains outlet.
• When the battery is fully charged, unplug
the charger from the mains and from the
appliance. Charging time is approx. 1
hour.
• Do not charge the battery continuously
since this may damage the battery cells.
Note: Repeatedly charging small capaci-
ties may damage the battery cells. Re-
charge the battery only if the appliance is
becoming slow.
• Do not use the charger to charge non-
rechargeable batteries.
9) RESIDUAL RISKS
Even if properly operating and handling this
electric tool, some residual risks will remain.
Due to its construction and build, this electric
tool may present the following hazards:
a) Cuts
b) Ear damage if working without ear pro-
tection.
c) Damage to your health caused by swing-
ing your hands and arms when operating
the appliance for longer periods of time
or if the unit is not held or maintained
properly.
Warning! During operation, this elec-
tric tool generates an electromagnetic
-
stances, may impair the functionality
of active or passive medical implants.
To reduce the risk of serious or lethal
injuries, we recommend that persons
with medical implants consult their
doctor and the manufacturer of their
medical implant before operating the
machine.
Charging the battery
Do not expose the battery to
extreme conditions such as
heat or impact. Risk of injury
from escaping electrolytic so-
lution! After eye/skin contact,
rinse the affected areas with
water or a neutraliser and
consult a doctor.
Charge the battery in a dry room
only.
Prior to attaching the charger, check
that the battery‘s outer surface is
clean and dry.
There is a risk of injury due to elec-
tric shock.
Only use the original charger from
the package to charge the battery.
Mind not to charge the appliance
for more than 5 hours at a time. If
you do, the battery and the appli-
ance may be damaged and longer

12
GB
charging times would be a waste
of energy. Excessive charging will
void the warranty.
the battery several time in a row.
• Recharge the battery when you no-
tice that the appliance is becoming
slower.
• If a fully recharged battery lasts
for considerably shorter operating
times, the battery is used up and
needs to be replaced. Only use an
OEM spare battery available from
our Customer Service.
• Always take heed of the applicable
safety instructions as well as the en-
vironmental protection regulations
and information.
• The warranty excludes all defects
caused by improper handling.
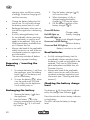
Removing / inserting the
battery
1. To remove the battery ( 6) from
the appliance, press the release
button (
7) on the battery and
pull out the battery.
2. To insert the battery (
6), place
it on the guide track (20) and
push it back into the appliance.
It will audibly snap in.
Recharging the battery
1. Remove the battery ( 6) from
the appliance.
2. Inser the battery (
6) in the
charging compartment of the bat-
tery charger (
13). It will audi-
bly snap in.
3. Plug the battery charger (
13)
into a mains outlet.
4. When the battery is fully re-
charged unplug the battery
charger (
13) from the mains.
5. Pull the battery (
6)out of the
battery charger (
13).
Green LED ashes
Charger ready
Red LED lights up Battery charging
Green LED lights up
Battery such alleged charged
Green and red LED ashing
Defective battery
Green and Red LED light up
Battery is too hot or too cold
Used batteries
• If a fully recharged battery lasts for
considerably shorter operating times,
the battery is used up and needs to be
replaced. Only use an OEM battery
pack replacement available from our
Customer Service.
• Always take heed of the applicable
safety instructions as well as the envi-
ronmental protection regulations and
information (see “Cleaning and Main-
tenance”).
Checking the battery charge
level
The battery’s ( 8) charge level is indicat-
ed by the charge state indicator (
6).
Press the activation button battery indicator
on the battery.
The LEDs indicate the battery’s charge
level.

13
GB
red-yellow-green =Battery fully charged
red and yellow =Battery half charged
red =Battery needs to be charged
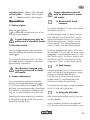
Operation
1. Choice of gear
Slide the gear selector
(
4) to LO or HI, corresponding to a low
or high torque selection.
A gear change may only be
performed in standstill mode!
2. Direction switch
You can toggle between right and left ro-
tation by pushing the direction of rotation
switch (
5).
If you move the direction switch (
5) to
the middle position, the device is secured
against being switched on.
The direction changed may
only be performed in stand-
still mode!
3. Torque adjustment
You can preset the maximum torque by
rotating the torque adjustment ring (
3)
17+1 torque levels are provided. At the
last level, the maximum torque is available.
This position is especially suitable for dril-
ling, so it is also marked with a drill icon.
Reaching the preset torque limit produces
a noticeable rasping sound. This sound is
caused by the slip clutch.
Torque adjustment should
only be performed in stand-
still mode!
4. Keyless drill chuck
removal
To use the bitholder (17), you must remove
the keyless chuck (1).
front and pull or push the Chuck ring (2)
against the keyless chuck (1) in the direc-
tion of the arrow mark „Unlock“ on the
Chuck ring (2). This unlocks the keyless
chuck (1) and it can be pulled forward.
To set the keyless chuck again, pull it onto
the bitholder (17) until you can push it over
completely. Lock the keyless chuck (1) with
the Chuck ring (2). To do this, push or pull
the Chuck ring (2) in the direction of the
arrow mark „Lock“ on the Chuck ring (2).
5. Tool change
Rotate the keyless chuck (1) counter-clock-
wise, until the drill chuck aperture is large
enough to accommodate the tool.
Push the tool as far as possible into the
keyless chuck (1) and rotate the chuck
To remove the tool again, rotate the keyless
chuck (1) and pull out the tool.
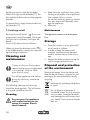
6. Using the bitholder
After removing the keyless chuck (1) you can
use the bitholder.
Insert a suitable 6-point bit in the bitholder
(17). Because of the 6-point bit holder, it may

14
GB
be that you need to rotate the bit slightly.
Slide the bit right into the bitholder (17). The
bitholder.
To remove the bit, simply remove the bit from
the bitholder (17).
7. Switching on/off
By using the on/off switch (
15) you can
progressively control the speed. The longer
you push the on-off button, the higher the
speed.
To turn it off, release the on-off button.
When you move the direction switch (
5)
to the middle position, the device is secured
against being switched on.
Cleaning and
maintenance
Contact our Service Centre about
repairs and servicing not described
in this manual. Only use OEM
parts. Risk of injury!
Turn off the appliance and, before
doing any servicing, remove the
battery.
The following cleaning and servicing
should be done regularly. This will ensure
a long and reliable service life.
Cleaning
Do not spray the appliance
with water and do not im-
merse it in water. Electric
shock hazard!
• Keep clean the ventilation slots, motor
housing and handles of the appliance.
Use a damp cloth or a brush.
Do not use cleaning agents or solvents.
You may otherwise irreparably dam-
age the appliance.
• After ever
Maintenance
The appliance cleaner is maintenance
free.
Storage
• Store the trimmer in a dry place well
out of reach of children.
• In order to keep the battery well
charged, avoid exposing the appli-
ance to extreme heat or cold in stor-
age.
• Remove the battery before storing the
unit for longer periods of time.
Disposal and protection
of the environment
Remove the battery from the device and
take the device, battery, accessories and
packaging for environmentally friendly
recycling.
Machines do not belong with domes-
tic waste.
Do not dispose of batteries in
-
sion) or water. Damaged batteries
may damage the environment and
your health if toxic fumes or liquids
leak out.

15
GB
• Return the unit to a recycling centre.
The plastics and metals in the unit can
be sorted and appropriately recycled.
Ask our Service Centre for details.
• Dispose of batteries in discharged condi-
tion. We recommend covering the pole
with adhesive tape to prevent a short
circuit. Do not open up the battery.
• Dispose of batteries in accordance with
the local regulations. Take batteries to
an old battery collection point where
they will be recycled in an environ-
mentally friendly manner. For informa-
tion about this, ask your local waste
management company or our service
centre.
• Defective units returned to us will be
disposed of for free.
Replacement parts
The following spares are available
from Service-Center. Please indicate the
machine type and the number of the spare
part with your order.
Guarantee
Dear Customer,
This equipment is provided with a 3-year
guarantee from the date of purchase.
In case of defects, you have statutory rights
against the seller of the product. These
statutory rights are not restricted by our
guarantee presented below.
Terms of Guarantee
The term of the guarantee begins on the
date of purchase. Please retain the original
receipt. This document is required as proof
of purchase.
If a material or manufacturing defect
occurs within three years of the date of
purchase of this product, we will repair or
replace – at our choice – the product for
you free of charge. This guarantee requires
the defective equipment and proof of pur-
chase to be presented within the three-year
period with a brief written description of
what constitutes the defect and when it oc-
curred.
If the defect is covered by our guarantee,
you will receive either the repaired product
or a new product. No new guarantee pe-
riod begins on repair or replacement of the
product.
Guarantee Period and Statutory
Claims for Defects
The guarantee period is not extended by
the guarantee service. This also applies for
replaced or repaired parts. Any damages
and defects already present at the time of
purchase must be reported immediately af-
ter unpacking. Repairs arising after expiry
of the guarantee period are chargeable.
Guarantee Cover
The equipment has been carefully pro-
duced in accordance with strict quality
guidelines and conscientiously checked
prior to delivery.
Spare parts and accessories can be obtained at www.grizzly-service.eu.
If you do not have internet access, please contact the Service Centre via
telephone (see “Sercice-Center” Page 17). Please have the order number
mentioned below ready.

16
GB
The guarantee applies for all material and
manufacturing defects. This guarantee
does not extend to cover product parts that
are subject to normal wear and may there-
fore be considered as wearing parts (e.g.
to breakable parts (e.g. switches, batteries,
or parts made of glass).
This guarantee shall be invalid if the prod-
uct has been damaged, used incorrectly or
not maintained. Precise adherence to all of
manual is required for proper use of the
product. Intended uses and actions against
which the operating manual advises or
warns must be categorically avoided.
The product is designed only for private
and not commercial use. The guarantee
will be invalidated in case of misuse or
improper handling, use of force, or inter-
ventions not undertaken by our authorised
service branch.
Processing in Case of Guarantee
please follow the directions below:
• Please have the receipt and item num-
ber (IAN 96229) ready as proof of
purchase for all enquiries.
-
ing plate.
• Should functional errors or other de-
fects occur, please initially contact the
telephone or by e-mail. You will then
receive further information on the pro-
cessing of your complaint.
• After consultation with our customer
service, a product recorded as defective
can be sent postage paid to the service
address communicated to you, with the
proof of purchase (receipt) and speci-
and when it occurred. In order to avoid
acceptance problems and additional
costs, please be sure to use only the ad-
dress communicated to you. Ensure that
the consignment is not sent carriage
forward or by bulky goods, express or
other special freight. Please send the
equipment inc. all accessories supplied
at the time of purchase and ensure ad-
equate, safe transport packaging.
Repair Service
For a charge, repairs not covered by
the guarantee can be carried out by
our service branch, which will be happy to
issue a cost estimate for you.
We can handle only equipment that has
been sent with adequate packaging and
postage.
Attention: Please send your equipment to
our service branch in clean condition and
with an indication of the defect.
Equipment sent carriage forward or by
bulky goods, express or other special
freight will not be accepted.
We will dispose of your defective devices
free of charge when you send them to us.

17
GB
Service-Center
Service Great Britain
Tel.: 0871 5000 720
(£ 0.10/Min.)
E-Mail: [email protected]
IAN 96229
Importer
Please note that the following address is
not a service address. Please initially con-
Grizzly Gartengeräte
GmbH & CO KG
Am Gewerbepark 2
64823 Groß-Umstadt
Germany
www.grizzly-service.eu

18
HR
Sadržaj
Uvod..........................................18
Namjena....................................18
Opći opis ....................................19
Obim isporuke...............................19
Prikaz ..........................................19
Opis funkcionirnaja ........................19
Tehnički podatci ...........................19
Sigurnosne upute .........................20
Simboli i slikovni znakovi ............... 20
............. 20
Simboli na akumulatoru.................. 20
Simboli na punjaču ........................ 21
Slikovni u uputi ............................. 21
alate ............................................ 21
Postupak punjenja ....................... 25
Vađenje / umetanje akumulatora ..... 25
Punjenje akumulatora .................... 25
Provjera stanja punjenja
akumulatora ............................... 26
Upravljanje ..................................26
Odabir stupnja prijenosa ................ 26
.. 26
Podešavanje okretnog momenta ....... 26
Brzozatezni zaglavnik
svrdla skinuti ................................. 26
Zamjena alata ............................... 27
Upotreba prihvatnika bitova ............ 27
................ 27
Čišćenje i održavanje .................... 27
Čišćenje ....................................... 28
Održavanje ................................... 28
Skladištenje.................................28
Uklanjanje/zaštita okoliša .............. 28
Rezervni dijelovi ..........................28
Garancija ....................................29
Servis za popravke ...................30
Service-Center ............................30
Proizvođač ..................................30
Prijevod originalne CE Izjave o po-
dudarnosti .................................94
Uvod
jedan visokokvalitetni proizvod.
Tijekom proizvodnje ispitana je kvaliteta
kontroli. Time je osigurana funkcionalnost
nedostatak ili kvar i razlog za brigu.
Uputa za upravljanje sastavni je dio ovo-
za sigurnost, uporabu i uklanjanje. Prije
korištenja proizvoda upoznajte se sa svim
uputama za upravljanje i sigurnost. Proi-
zvod koristite samo kako je opisano i za
-
-
mentaciju.
Namjena
vijaka, kao i za bušenje drveta, metala ili
osobe. Mladi iznad 16 godina smiju ure-
garancija.
Svako korištenje u druge svrhe, koje u ovoj
-
ozbiljnu opasnost.
imovine.

19
HR
prouzrokovana nenamjenskom uporabom
ili pogrešnim upravljanjem.
Opći opis
Obim isporuke
kompletno. Propisno uklonite materijal za
pakiranje.
- Bušilica s baterijskim pogonom
-
- Akumulator
-
opsegu isporuke.
i prednjoj preklopljenoj stra-
nici.
Prikaz
1 Brzozatezni zaglavnik za svrdlo
2 Prsten zaglavnika za svrdlo
3 Prsten za podešavanje momenta
sile
prijenosa
6 Akumulator
7 Tipka za deblokadu
8
9 Gumb za aktiviranje
11 Crveni LED
12 Zeleni LED
15 -
16 LED-radna svjetiljka
17 Prihvat uloška (bit)
Opis funkcioniranja
Bušilica na baterijski pogon s dvostupan-
jskim prijenosnikom posjeduje 17+1-stu-
panjsko podešavanja okretnog momenta,
desni/lijevi hod, brzozatezni zateznik
za svrdlo, šestokutni prihvatnik bitova i
LED-radnu svjetiljku. Maksimalan okretni
moment od 20 Nm.
Tehnički podatci
Uređaja
Napon motora .......................10,8 V
............................0-300/0-1050 min
-1
Raspon zaglavnika za svrdlo .... 1-10 mm
.................... 1,1 kg
Promjer bušenja drveta ....maks. 25 mm
.......maks. 8 mm
(L
pA
) ..............65,3 dB (A), K=3 dB (A)
Razina snage zvuka (L
wA
)
..........................76 dB (A)
Izmjereni ........ 73,3 dB (A); K=3 dB (A)
Vibracija (a
n
) ......................................
Bušenje u metalu ..............................
.....................< 2,5 m/s
2
, K= 1,5 m/s
2
Zatezanje/otpuštanje bez udara
.....................< 2,5 m/s
2
, K= 1,5 m/s
2
Akumulator (Li-Ion)
Nazivni ................................10,8 V
Napon .................................... 1,3 Ah
Vrijeme punjenja .......................ca. 1 h

20
HR
Punjač ..............................HP70GH
Nazivna snaga ...........................12 W
Ulazni napon/Input
.......100-240 V~, 50 Hz, max. 500 mA
Izlazni napon/Output
.............................10,8 V
1500 mA
Zaštitna klasa ...............................
II
Vrsta zaštite ................................. IPX0
Navedena emisijska vrijednost vibracija
je izmjerena prema jednom normiranom
nekim drugim.
Navedena emisijska vrijednost vibracija se
-
nu prekida.
Upozorenje:
Emisijska vrijednost vibracija se
-
podatkovne vrijednosti, ovisno od
sigurnosnih mjera radi zaštite poslu-
prekida za vrijeme uvjeta stvarnog
korištenja (pri tome se moraju
uzeti u obzir svi udjeli pogonskog
ciklusa, primjerice vrijeme, kada je
-
-
vanja.
Sve dimenzije, napomene i podaci u ovoj
uputi za korištenje stoga su bez jamstva.
rukovanje ne mogu biti priznata.
Sigurnosne upute
sigurnosnih uputa.
Simboli i slikovni znakovi
Slikovni znakovi na uređaju:
Električni uređaji ne spadaju u kuć-
ni otpad.
Izjava o sukladnosti za ovaj proiz-
vod dostupna je na internet stranici
www.lidl.hr.
promjene stupnja
prijenosa
Simboli na akumulatoru:
Punjače nemojte ba-
cati u kućno smeće,
u vatru ili u vodu.
Punjač / uređaj nemojte dulje
vrijeme izlagati jakom Sunčevom
zračenju i nemojte ih ostavljati na
radijatoru (max. 45°C).
Predajte punjače na sabirno mje-
sto za stare baterije, gdje će biti
podvrgnuti ponovnoj preradi uz
zaštitu okoliša.
napunjenom stanju
Pagina se încarcă ...
Pagina se încarcă ...
Pagina se încarcă ...
Pagina se încarcă ...
Pagina se încarcă ...
Pagina se încarcă ...
Pagina se încarcă ...
Pagina se încarcă ...
Pagina se încarcă ...
Pagina se încarcă ...
Pagina se încarcă ...
Pagina se încarcă ...
Pagina se încarcă ...
Pagina se încarcă ...
Pagina se încarcă ...
Pagina se încarcă ...
Pagina se încarcă ...
Pagina se încarcă ...
Pagina se încarcă ...
Pagina se încarcă ...
Pagina se încarcă ...
Pagina se încarcă ...
Pagina se încarcă ...
Pagina se încarcă ...
Pagina se încarcă ...
Pagina se încarcă ...
Pagina se încarcă ...
Pagina se încarcă ...
Pagina se încarcă ...
Pagina se încarcă ...
Pagina se încarcă ...
Pagina se încarcă ...
Pagina se încarcă ...
Pagina se încarcă ...
Pagina se încarcă ...
Pagina se încarcă ...
Pagina se încarcă ...
Pagina se încarcă ...
Pagina se încarcă ...
Pagina se încarcă ...
Pagina se încarcă ...
Pagina se încarcă ...
Pagina se încarcă ...
Pagina se încarcă ...
Pagina se încarcă ...
Pagina se încarcă ...
Pagina se încarcă ...
Pagina se încarcă ...
Pagina se încarcă ...
Pagina se încarcă ...
Pagina se încarcă ...
Pagina se încarcă ...
Pagina se încarcă ...
Pagina se încarcă ...
Pagina se încarcă ...
Pagina se încarcă ...
Pagina se încarcă ...
Pagina se încarcă ...
Pagina se încarcă ...
Pagina se încarcă ...
Pagina se încarcă ...
Pagina se încarcă ...
Pagina se încarcă ...
Pagina se încarcă ...
Pagina se încarcă ...
Pagina se încarcă ...
Pagina se încarcă ...
Pagina se încarcă ...
Pagina se încarcă ...
Pagina se încarcă ...
Pagina se încarcă ...
Pagina se încarcă ...
Pagina se încarcă ...
Pagina se încarcă ...
Pagina se încarcă ...
Pagina se încarcă ...
Pagina se încarcă ...
Pagina se încarcă ...
Pagina se încarcă ...
Pagina se încarcă ...
-
 1
1
-
 2
2
-
 3
3
-
 4
4
-
 5
5
-
 6
6
-
 7
7
-
 8
8
-
 9
9
-
 10
10
-
 11
11
-
 12
12
-
 13
13
-
 14
14
-
 15
15
-
 16
16
-
 17
17
-
 18
18
-
 19
19
-
 20
20
-
 21
21
-
 22
22
-
 23
23
-
 24
24
-
 25
25
-
 26
26
-
 27
27
-
 28
28
-
 29
29
-
 30
30
-
 31
31
-
 32
32
-
 33
33
-
 34
34
-
 35
35
-
 36
36
-
 37
37
-
 38
38
-
 39
39
-
 40
40
-
 41
41
-
 42
42
-
 43
43
-
 44
44
-
 45
45
-
 46
46
-
 47
47
-
 48
48
-
 49
49
-
 50
50
-
 51
51
-
 52
52
-
 53
53
-
 54
54
-
 55
55
-
 56
56
-
 57
57
-
 58
58
-
 59
59
-
 60
60
-
 61
61
-
 62
62
-
 63
63
-
 64
64
-
 65
65
-
 66
66
-
 67
67
-
 68
68
-
 69
69
-
 70
70
-
 71
71
-
 72
72
-
 73
73
-
 74
74
-
 75
75
-
 76
76
-
 77
77
-
 78
78
-
 79
79
-
 80
80
-
 81
81
-
 82
82
-
 83
83
-
 84
84
-
 85
85
-
 86
86
-
 87
87
-
 88
88
-
 89
89
-
 90
90
-
 91
91
-
 92
92
-
 93
93
-
 94
94
-
 95
95
-
 96
96
-
 97
97
-
 98
98
-
 99
99
-
 100
100


Parkside PABSW 10.8 B2 Translation Of Original Operation Manual
- Categorie
- Burghie combinate fără fir
- Tip
- Translation Of Original Operation Manual
Lucrări conexe
-
Parkside PBSA 12 A1 Manual de utilizare
-
Parkside PDSSA 18 A1 Original Instructions Manual
-
-
Parkside PKGA 14.4 A1 Original Instructions Manual
-
Parkside IAN 75636 Instrucțiuni de utilizare
-
Parkside PABS 18 A1 Manual de utilizare
-
-
Parkside 60489 Original Operation Manual
-
Parkside PSBS 24 A1 Operation and Safety Notes
-
Alte documente
-
Meister MAS 12ib i-drill Original Instructions Manual
-
KingFisher SPK13 Manual de utilizare
-
Ferm CDM1118 Manual de utilizare
-
Stanley KFMCF647 Manual de utilizare
-
Flex DD 2G 10.8-LD Manual de utilizare
-
Güde GEH 3000 Manual de utilizare
-
Ferm CDM1138 Manual de utilizare
-
-
-