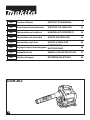
Makita DUB363 Manual de utilizare
- Categorie
- Unelte electrice
- Tip
- Manual de utilizare

DUB363
EN Cordless Blower INSTRUCTION MANUAL 7
PL Dmuchawa akumulatorowa INSTRUKCJA OBSŁUGI 15
HU Akkumulátoros lombfúvó HASZNÁLATI KÉZIKÖNYV 24
SK Akumulátorové dúchadlo NÁVOD NA OBSLUHU 32
CS Akumulátorový fukar NÁVOD K OBSLUZE 40
UK Акумуляторна повітродувка ІНСТРУКЦІЯ З
ЕКСПЛУАТАЦІЇ 48
RO Suantă fără r MANUAL DE INSTRUCŢIUNI 57
DE Gebläse (Sauger) BETRIEBSANLEITUNG 66

1
2
1
Fig.1
1
2
Fig.2
1 2
Fig.3
1
2
3
Fig.4
2

2
1
3
Fig.5
1
1
Fig.6
1
Fig.7
1 2
33
Fig.8
1
2 3
Fig.9
1
2
3
Fig.10
3

1
2
Fig.11
2
3
1
Fig.12
1
2
1
Fig.13
1
1
Fig.14
1
2
3
Fig.15
4

1
2
Fig.16
21
3
Fig.17
1
Fig.18
1
Fig.19
1
Fig.20
Fig.21
1
4
3
2
Fig.22
5

Fig.23
1
Fig.24
6

7ENGLISH
ENGLISH (Original instructions)
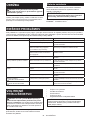
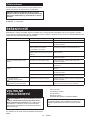
SPECIFICATIONS
Model: DUB363
Capacities Air volume 0 - 13.4 m3/min
Air speed (average) 0 - 54 m/s
Air speed (max.) 0 - 65 m/s
Dimensions (L x W x H) *1 341 mm x 193 mm x 415 mm
Rated voltage D.C. 36 V
Net weight Blower *2 3.8 - 5.2 kg
Vacuum *3 6.0 - 6.6 kg
*1. Without pipes, nozzles, dust bag, shoulder strap, and battery cartridges.
*2. With blower pipe, end nozzle and at nozzle, and without suction pipe, suction nozzle, elbow pipe, dust bag and
shoulder strap.
*3. With suction pipe, suction nozzle, elbow pipe, dust bag and shoulder strap, and without blower pipe, end nozzle
and at nozzle.
• Due to our continuing program of research and development, the specications herein are subject to change
without notice.
• Specications may dier from country to country.
• The weight may dier depending on the attachment(s), including the battery cartridge. The lightest and heavi-
est combination, according to EPTA-Procedure 01/2014, are shown in the table.
Applicable battery cartridge
BL1815N / BL1820 / BL1820B / BL1830 / BL1830B / BL1840 / BL1840B / BL1850 / BL1850B / BL1860B
• Some of the battery cartridges listed above may not be available depending on your region of residence.
WARNING: Only use the battery cartridges listed above. Use of any other battery cartridges may cause
injury and/or re.
Symbols
The followings show the symbols used for the equip-
ment. Be sure that you understand their meaning before
use.
Take particular care and attention.
Read instruction manual.
Keep hands away from rotating parts.
Long hair may cause entanglement
accident.
Keep bystanders away.
Wear eye and ear protection.
Do not expose to moisture.
Ni-MH
Li-ion
Only for EU countries
Do not dispose of electric equipment or
battery pack together with household waste
material!
In observance of the European Directives,
on Waste Electric and Electronic
Equipment and Batteries and Accumulators
and Waste Batteries and Accumulators
and their implementation in accordance
with national laws, electric equipment and
batteries and battery pack(s) that have
reached the end of their life must be col-
lected separately and returned to an envi-
ronmentally compatible recycling facility.
Intended use
The machine is intended for blowing and vacuuming.
Noise
The typical A-weighted noise level determined accord-
ing to EN50636-2-100:
Sound pressure level (LpA) : 84.8 dB(A)
Uncertainty (K) : 1.3 dB(A)
Sound power level (LWA) : 94.9 dB (A)
Uncertainty (K) : 0.3 dB(A)

8ENGLISH
NOTE: The declared noise emission value(s) has
been measured in accordance with a standard test
method and may be used for comparing one tool with
another.
NOTE: The declared noise emission value(s)
may also be used in a preliminary assessment of
exposure.
WARNING: Wear ear protection.
WARNING: The noise emission during actual
use of the power tool can dier from the declared
value(s) depending on the ways in which the
tool is used especially what kind of workpiece is
processed.
WARNING: Be sure to identify safety mea-
sures to protect the operator that are based on an
estimation of exposure in the actual conditions of
use (taking account of all parts of the operating
cycle such as the times when the tool is switched
o and when it is running idle in addition to the
trigger time).
Vibration
The vibration total value (tri-axial vector sum) deter-
mined according to EN50636-2-100:
Work mode: operation without load (blowing)
Vibration emission (ah) : 2.5 m/s2 or less
Uncertainty (K) : 1.5 m/s2
Work mode: operation without load (vacuuming)
Vibration emission (ah) : 2.5 m/s2 or less
Uncertainty (K) : 1.5 m/s2
NOTE: The declared vibration total value(s) has been
measured in accordance with a standard test method
and may be used for comparing one tool with another.
NOTE: The declared vibration total value(s) may also
be used in a preliminary assessment of exposure.
WARNING: The vibration emission during
actual use of the power tool can dier from the
declared value(s) depending on the ways in which
the tool is used especially what kind of workpiece
is processed.
WARNING: Be sure to identify safety mea-
sures to protect the operator that are based on an
estimation of exposure in the actual conditions of
use (taking account of all parts of the operating
cycle such as the times when the tool is switched
o and when it is running idle in addition to the
trigger time).
EC Declaration of Conformity
For European countries only
The EC declaration of conformity is included as Annex A
to this instruction manual.
SAFETY WARNINGS
Cordless Blower Safety Instructions
WARNING: Read all safety warnings and
all instructions. Failure to follow the warnings and
instructions may result in electric shock, re and/or
serious injury.
Save all warnings and instruc-
tions for future reference.
Training
1. Read the instructions carefully. Be familiar
with the controls and the correct use of the
machine.
2. Never allow children, persons with reduced
physical, sensory or mental capabilities or
lack of experience and knowledge or people
unfamiliar with these instructions to use the
machine. Local regulations may restrict the
age of the operator.
3. Never operate the machine while people, espe-
cially children, or pets are nearby.
4. Keep in mind that the operator or user is
responsible for accidents or hazards occurring
to other people or their property.
Preparation
1. Always wear substantial footwear and long
trousers while operating the machine.
2. Do not wear loose clothing or jewellery that
can be drawn into the air inlet. Keep long hair
away from the air inlets.
3. Always wear protective goggles to protect
your eyes from injury when using power tools.
The goggles must comply with ANSI Z87.1 in
the USA, EN 166 in Europe, or AS/NZS 1336
in Australia/New Zealand. In Australia/New
Zealand, it is legally required to wear a face
shield to protect your face, too.
It is an employer's responsibility to enforce
the use of appropriate safety protective equip-
ments by the tool operators and by other per-
sons in the immediate working area.
4. To prevent dust irritation the wearing of a face
mask is recommended.

9ENGLISH
5. While operating the machine, always wear
non-slip and protective footwear. Non-skid,
closed-toed safety boots and shoes will reduce the
risk of injury.
6. Use personal protective equipment. Always
wear eye protection. Protective equipment such
as a dust mask, non-skid safety shoes, hard hat or
hearing protection used for appropriate conditions
will reduce personal injuries.
Operation
1. Switch o the machine and remove the battery
cartridge and make sure that all moving parts
have come to a complete stop
• whenever you leave the machine.
• before clearing blockages.
• before checking, cleaning or working on
the machine.
• if the machine starts to vibrate
abnormally.
• whenever you convert the machine from
blower to vacuum, and vice versa.
2. Operate the machine only in daylight or in
good articial light.
3. Do not overreach and keep proper balance and
footing at all times.
4. Always be sure of your footing on slopes.
5. Walk, never run.
6. Keep all cooling air inlets clear of debris.
7. Never blow debris in the direction of
bystanders.
8. Operate the machine in a recommended posi-
tion and on a rm surface.
9. Do not operate the machine at high places.
10. Never point the nozzle at anyone in the vicinity
when using the machine.
11. Never block suction inlet and/or blower outlet.
• Be careful not to block suction inlet or
blower outlet with dust or dirt when oper-
ating in dusty area.
• Do not use nozzles other than the nozzles
provided by Makita.
• Do not use the blower to inate balls,
rubber boat or the similar.
12. Do not operate the machine near open window,
etc.
13. Operating the machine only at reasonable
hours is recommended - not early in the
morning or late at night when people might be
disturbed.
14. Using rakes and brooms to loosen debris
before blowing is recommended.
15. If the machine strikes any foreign objects or
should start making any unusual noise or
vibration, immediately switch o the machine
to stop it. Remove the battery cartridge from
the machine and inspect the machine for
damage before restarting and operating the
machine. If the machine is damaged, ask
Makita Authorized Service Centers for repair.
16. Do not insert ngers or other objects into
suction inlet or blower outlet.
17. Prevent unintentional starting. Ensure the
switch is in the o-position before inserting
battery cartridge, picking up or carrying the
machine. Carrying the machine with your n-
ger on the switch or energizing the machine
that has the switch on invites accidents.
18. Never blow or vacuum dangerous materials,
such as nails, fragments of glass, or blades.
19. Do not operate the machine near ammable
materials.
20. Avoid operating the machine for a long time in
low temperature environment.
Maintenance and storage
1. Keep all nuts, bolts and screws tight to be sure
the machine is in safe working condition.
2. If the parts are worn or damaged, replace them
with parts provided by Makita.
3. Store the machine in a dry place out of the
reach of children.
4.
When you stop the machine for inspection, ser-
vicing, storage, or changing accessory, switch
o the machine and make sure that all moving
parts come to a complete stop, and remove the
battery cartridge. Cool down the machine before
making any work on the machine. Maintain the
machine with care and keep it clean.
5. Always cool down the machine before storing.
6. Do not expose the machine to rain. Store the
machine indoors.
7.
When you lift the machine, be sure to bend your
knees and be careful not to hurt your back.
Battery tool use and care
1. Recharge only with the charger specied by
the manufacturer. A charger that is suitable for
one type of battery pack may create a risk of re
when used with another battery pack.
2. Use power tools only with specically desig-
nated battery packs. Use of any other battery
packs may create a risk of injury and re.
3. When battery pack is not in use, keep it away
from other metal objects, like paper clips,
coins, keys, nails, screws or other small metal
objects, that can make a connection from one
terminal to another. Shorting the battery termi-
nals together may cause burns or a re.
4. Under abusive conditions, liquid may be
ejected from the battery; avoid contact. If con-
tact accidentally occurs, ush with water. If
liquid contacts eyes, additionally seek medical
help. Liquid ejected from the battery may cause
irritation or burns.
5. Do not use a battery pack or tool that is dam-
aged or modied. Damaged or modied batteries
may exhibit unpredictable behaviour resulting in
re, explosion or risk of injury.
6. Do not expose a battery pack or tool to re or
excessive temperature. Exposure to re or tem-
perature above 130 °C may cause explosion.
7. Follow all charging instructions and do not
charge the battery pack or tool outside the
temperature range specied in the instruc-
tions. Charging improperly or at temperatures
outside the specied range may damage the
battery and increase the risk of re.

10 ENGLISH
Electrical and battery safety
1. Do not dispose of the battery(ies) in a re.
The cell may explode. Check with local codes for
possible special disposal instructions.
2. Do not open or mutilate the battery(ies).
Released electrolyte is corrosive and may cause
damage to the eyes or skin. It may be toxic if
swallowed.
3. Do not charge battery in rain, or in wet
locations.
4. Do not charge the battery outdoors.
5. Do not handle charger, including charger plug,
and charger terminals with wet hands.
Service
1. Have your power tool serviced by a qualied
repair person using only identical replacement
parts. This will ensure that the safety of the power
tool is maintained.
2. Never service damaged battery packs. Service
of battery packs should only be performed by the
manufacturer or authorized service providers.
SAVE THESE INSTRUCTIONS.
WARNING: DO NOT let comfort or familiarity
with product (gained from repeated use) replace
strict adherence to safety rules for the subject
product.
MISUSE or failure to follow the safety rules stated
in this instruction manual may cause serious
personal injury.
Important safety instructions for
battery cartridge
1. Before using battery cartridge, read all instruc-
tions and cautionary markings on (1) battery
charger, (2) battery, and (3) product using
battery.
2. Do not disassemble battery cartridge.
3. If operating time has become excessively
shorter, stop operating immediately. It may
result in a risk of overheating, possible burns
and even an explosion.
4. If electrolyte gets into your eyes, rinse them
out with clear water and seek medical atten-
tion right away. It may result in loss of your
eyesight.
5. Do not short the battery cartridge:
(1) Do not touch the terminals with any con-
ductive material.
(2) Avoid storing battery cartridge in a con-
tainer with other metal objects such as
nails, coins, etc.
(3) Do not expose battery cartridge to water
or rain.
A battery short can cause a large current
ow, overheating, possible burns and even a
breakdown.
6. Do not store the tool and battery cartridge in
locations where the temperature may reach or
exceed 50 °C (122 °F).
7. Do not incinerate the battery cartridge even if
it is severely damaged or is completely worn
out. The battery cartridge can explode in a re.
8. Be careful not to drop or strike battery.
9. Do not use a damaged battery.
10.
The contained lithium-ion batteries are subject to
the Dangerous Goods Legislation requirements.
For commercial transports e.g. by third parties,
forwarding agents, special requirement on pack-
aging and labeling must be observed.
For preparation of the item being shipped, consult-
ing an expert for hazardous material is required.
Please also observe possibly more detailed
national regulations.
Tape or mask o open contacts and pack up the
battery in such a manner that it cannot move
around in the packaging.
11. When disposing the battery cartridge, remove
it from the tool and dispose of it in a safe
place. Follow your local regulations relating to
disposal of battery.
12. Use the batteries only with the products
specied by Makita. Installing the batteries to
non-compliant products may result in a re, exces-
sive heat, explosion, or leak of electrolyte.
13. If the tool is not used for a long period of time,
the battery must be removed from the tool.
SAVE THESE INSTRUCTIONS.
CAUTION: Only use genuine Makita batteries.
Use of non-genuine Makita batteries, or batteries that
have been altered, may result in the battery bursting
causing res, personal injury and damage. It will
also void the Makita warranty for the Makita tool and
charger.
Tips for maintaining maximum
battery life
1. Charge the battery cartridge before completely
discharged. Always stop tool operation and
charge the battery cartridge when you notice
less tool power.
2. Never recharge a fully charged battery car-
tridge. Overcharging shortens the battery
service life.
3. Charge the battery cartridge with room tem-
perature at 10 °C - 40 °C (50 °F - 104 °F). Let
a hot battery cartridge cool down before
charging it.
4. Charge the battery cartridge if you do not use
it for a long period (more than six months).
ASSEMBLY
CAUTION: Always be sure that the machine is
switched o and the battery cartridge is removed
before carrying out any work on the machine.
NOTICE: Before operating the machine, be sure
to completely assemble the machine. Otherwise,
the machine does not work.

11 ENGLISH
Assembly for blowing
Installing or removing blower pipe
and nozzle
1. Attach the blower pipe to the main unit.
Insert the blower pipe into the main unit with the bolt
facing left as shown in the gure. Turn the blower pipe
as shown in the gure so that the bolt is aligned with the
hole on the main unit, and then tighten the bolt rmly
using the hex wrench.
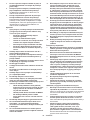
► Fig.1: 1. Bolt 2. Blower pipe
2. Align the protrusion on the blower pipe with the
groove on the end nozzle, then attach the end nozzle to
the blower pipe, and then turn the end nozzle to lock it
into place.
► Fig.2: 1. End nozzle 2. Blower pipe
To remove the blower pipe and end nozzle, perform the
installation procedure in reverse.
NOTE: The length of the nozzle can be changed by
moving the nozzle as shown in the gure.
► Fig.3: 1. End nozzle 2. Blower pipe
Installing or removing at nozzle or
extension nozzle
Optional accessory
Attach the at nozzle or extension nozzle to the end
nozzle, and then turn it to lock it into place.
► Fig.4: 1. Flat nozzle 2. Extension nozzle 3. End
nozzle
You can also attach the at nozzle or extension nozzle
to the blower pipe.
► Fig.5: 1. Flat nozzle 2. Extension nozzle 3. Blower
pipe
To remove the at nozzle or extension nozzle, perform
the installation procedure in reverse.
Attaching shoulder strap
CAUTION: Be sure to attach the hooks of
the shoulder strap to the machine securely. If the
hooks are attached incompletely, they may come o
and cause an injury.
CAUTION: Be sure to use the shoulder strap
dedicated to this machine. Using other shoulder
strap may cause an injury.
Attach the hooks of the shoulder strap to the machine
as shown in the gure.
► Fig.6: 1. Hook
The shoulder strap features a means of quick release.
Simply squeeze the sides of the buckle to release the
machine from the shoulder strap.
► Fig.7: 1. Buckle
Assembly for vacuuming
Installing or removing suction pipe
and nozzle
Optional accessory
1. Align the triangle mark on the suction nozzle with
that on the suction pipe, and then insert the suction
nozzle into the suction pipe until the latch on the nozzle
snaps into place.
► Fig.8: 1. Suction nozzle 2. Suction pipe 3. Triangle
mark
2. Loosen the bolt on the fan cover using the hex
wrench, and open the fan cover.
► Fig.9: 1. Bolt 2. Fan cover 3. Hex wrench
3. Align the triangle mark on the suction pipe
with mark on the main unit, and then attach the
suction pipe to the main unit.
► Fig.10: 1. Suction pipe 2. Triangle mark 3. mark
4. Turn the suction pipe clockwise so that the bolt
on the pipe is aligned with the hole on the main unit,
and then fasten the bolt rmly using the hex wrench to
secure the pipe to the main unit.
► Fig.11: 1. Suction pipe 2. Bolt
To remove the suction pipe and nozzle, perform the
installation procedure in reverse.
Installing or removing elbow pipe
and dust bag
Optional accessory
1. Insert the elbow pipe into the dust bag and tighten
the belt to x the elbow pipe as shown in the gure.
► Fig.12: 1. Dust bag 2. Elbow pipe 3. Belt
2. Attach the elbow pipe to the main unit.
Insert the elbow pipe into the main unit with the bolt
facing left as shown in the gure. Turn the elbow pipe
as shown in the gure so that the bolt is aligned with the
hole on the main unit, and then tighten the bolt rmly
using the hex wrench.
► Fig.13: 1. Bolt 2. Elbow pipe
3. Attach the hook of the dust bag to the shoulder
strap, and then attach the hooks of the shoulder strap to
the main unit as shown in the gure.
► Fig.14: 1. Hook
To remove the dust bag and elbow pipe, perform the
installation procedure in reverse.

12 ENGLISH
FUNCTIONAL DESCRIPTION
CAUTION: Always be sure that the machine is
switched o and the battery cartridge is removed
before adjusting or checking function on the
machine.
Installing or removing battery cartridge
CAUTION:
Always switch o the machine before
installing or removing of the battery cartridge.
CAUTION:
Hold the machine and the battery car-
tridge rmly when installing or removing battery cartridge.
Failure to hold the machine and the battery cartridge rmly may
cause them to slip o your hands and result in damage to the
machine and battery cartridge and a personal injury.
CAUTION: Always install the battery cartridge
fully until the red indicator cannot be seen. If not,
it may accidentally fall out of the machine, causing
injury to you or someone around you.
CAUTION: Do not install the battery cartridge
forcibly. If the cartridge does not slide in easily, it is
not being inserted correctly.
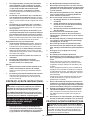
► Fig.15:
1. Red indicator 2. Button 3. Battery cartridge
To remove the battery cartridge, slide it from the machine
while sliding the button on the front of the cartridge.
To install the battery cartridge, align the tongue on the
battery cartridge with the groove in the housing and slip
it into place. Insert it all the way until it locks in place
with a little click. If you can see the red indicator on the
upper side of the button, it is not locked completely.
Indicating the remaining battery capacity
Only for battery cartridges with the indicator
► Fig.16: 1. Indicator lamps 2. Check button
Press the check button on the battery cartridge to indi-
cate the remaining battery capacity. The indicator lamps
light up for a few seconds.
Indicator lamps Remaining
capacity
Lighted O Blinking
75% to 100%
50% to 75%
25% to 50%
0% to 25%
Charge the
battery.
The battery
may have
malfunctioned.
NOTE: Depending on the conditions of use and the
ambient temperature, the indication may dier slightly
from the actual capacity.
Machine/battery protection system
The machine is equipped with a machine/battery
protection system. This system automatically cuts o
power to the motor to extend machine and battery life.
The machine will automatically stop during operation if
the machine or battery is placed under one of the fol-
lowing conditions:
Overload protection
When the machine or battery is operated in a manner
that causes it to draw an abnormally high current, the
machine automatically stops and the lamp for mode
1 blinks in green. In this situation, turn the machine
o and stop the application that caused the machine
to become overloaded. Then turn the machine on to
restart.
Overheat protection
When the machine or battery is overheated, the
machine stops automatically and the lamp for mode 1
lights up in red. In this case, let the machine and battery
cool down before turning the machine on again.
Overdischarge protection
When the battery capacity is not enough, the machine
stops automatically and the lamp for mode 1 blinks in
red. In this case, remove the battery from the machine
and charge the battery.
Main power switch
WARNING: Always turn o the main power
switch when not in use.
To turn on the machine, press the main power switch.
The lamps for mode 1 and mode 2 light up in green. To
turn o, keep pressing the main power switch until the
lamps for mode 1 and mode 2 go o.
► Fig.17: (1) Lamp for mode 1 (2) Lamp for mode 2
(3) Main power switch
You can use the machine in the vacuuming mode. In the
vacuuming mode, the suction volume becomes smaller
than in the normal mode.
When you turn on the machine, the machine starts up in
the normal mode. To use the machine in the vacuuming
mode, press the main power switch when the machine
is turned on. The lamp for mode 2 goes o and only the
lamp for mode 1 lights up in green. When you press the
main power switch again, the machine returns to the
normal mode, and the lamps for mode 1 and mode 2
light up in green.

13 ENGLISH
NOTE: The lamp for mode 1 blinks in green if the
machine is operated under unoperatable conditions.
The lamp blinks in one of the following conditions.
• The switch trigger is pulled, when the bolt on the
fan cover or suction pipe is not tightened rmly,
or the bolt on the blower pipe or elbow pipe is
not tightened rmly.
• The machine is turned on, when the control
lever is not fully returned to the o position, or
while you are pulling the switch trigger.
NOTE: This machine employs the auto power-o
function. To avoid unintentional start up, the main
power switch will automatically shut down when the
switch trigger is not pulled for a certain period after
the main power switch is turned on.
Switch action
WARNING: Before installing the battery car-
tridge into the machine, always check to see that
the switch trigger actuates properly and returns
to the "OFF" position when released.
► Fig.18: 1. Switch trigger
To start the machine, simply pull the switch trigger. The
speed is increased by increasing pressure on the switch
trigger. Release the switch trigger to stop.
Cruise control function
The cruise control function allows the operator to main-
tain a constant speed without pulling the trigger. To
increase the speed, turn the control lever forward. To
decrease the speed, turn the control lever backward.
► Fig.19: 1. Control lever
Hex wrench storage
When not in use, store the hex wrench as illustrated to
keep it from being lost.
► Fig.20: 1. Hex wrench
Accidental re-start preventive
function
If you turn on the machine while pulling the switch trig-
ger or while the control lever is not in the o position,
the machine does not start. To start the machine, rst
release the switch trigger and return the control lever
fully, and then turn on the machine.
Electronic function
The machine is equipped with the electronic function for
easy operation.
• Constant speed control
The speed control function provides the constant
rotation speed regardless of load conditions.
OPERATION
CAUTION: Do not place the machine on the
ground while it is switched on. Sand or dust may
enter from suction inlet and cause a malfunction or
personal injury.
Blower operation
CAUTION: When performing the blower
operation, be sure to remove the suction pipe,
suction nozzle, elbow pipe and dust bag from the
machine, and attach the blower pipe and nozzles
to the machine.
Hold the machine rmly with a hand and perform the
blowing operation by moving it around slowly. When
blowing around building, big stone or vehicle, direct the
nozzle away from them. When performing an operation
in a corner, start from the corner and then move to wide
area.
► Fig.21
Vacuuming operation
CAUTION: When performing the vacuuming
operation, be sure to remove the blower pipe and
nozzles from the machine, and attach the suction
pipe, suction nozzle, elbow pipe, dust bag, and
shoulder strap to the machine.
CAUTION: Check the dust bag frequently for
wear or deterioration.
CAUTION: Be sure to fasten the fastener of
the dust bag before operating the machine.
CAUTION: Always switch o the machine
before opening or fastening the fastener of the
dust bag.
NOTICE: Do not allow wet materials, such as
wet leaves, and foreign materials, such as large
wood chips, metals, glass, pebbles, etc., to be
sucked into the machine. Otherwise, a malfunction
may occur.
NOTICE: Empty the dust bag before it becomes
full. Otherwise, a malfunction may occur.
NOTICE: To prevent the suction of foreign mate-
rials, operating the machine in the vacuuming
mode is recommended.
1. Put the shoulder strap and dust bag on the shoul-
der as shown in the gure. Adjust the length of the
strap.
► Fig.22: 1. Shoulder strap 2. Carry handle 3. Assist
handle 4. Dust bag
2. Hold the carry handle with your right hand and the
assist handle with the other hand.
► Fig.23
3. While operating the machine, adjust the switch
trigger so that the suction force is appropriate for the
work location and conditions.

14 ENGLISH
MAINTENANCE
CAUTION: Always be sure that the machine is
switched o and the battery cartridge is removed
before attempting to perform inspection or
maintenance.
To maintain product SAFETY and RELIABILITY,
repairs, any other maintenance or adjustment should
be performed by Makita Authorized or Factory Service
Centers, always using Makita replacement parts.
Cleaning the machine
Clean the machine by wiping o dust with a dry cloth or
one dipped in soapy water and wrung out.
NOTICE: Never use gasoline, benzine, thinner,
alcohol or the like. Discoloration, deformation or
cracks may result.
Remove dust or dirt from the suction inlets.
► Fig.24: 1. Suction inlet
TROUBLESHOOTING
Before asking for repairs, conduct your own inspection rst. If you nd a problem that is not explained in the man-
ual, do not attempt to dismantle the machine. Instead, ask Makita Authorized Service Centers, always using Makita
replacement parts for repairs.
State of abnormality Probable cause (malfunction) Remedy
Motor does not run. Battery cartridge is not installed. Install the battery cartridge.
Battery problem (under voltage) Recharge the battery. If recharging is not eective,
replace battery.
For blower
The blower pipe is not attached.
The fan cover is not closed.
Attach the blower pipe, and then tighten the bolt.
Close the fan cover, and then tighten the bolt.
For vacuum
The elbow pipe or suction pipe is not
attached.
Attach the elbow pipe or suction pipe, and then
tighten the bolt.
The drive system does not work
correctly.
Ask your local authorized service center for repair.
Motor stops running after a little use. Battery's charge level is low. Recharge the battery. If recharging is not eective,
replace battery.
Overheating. Stop using the machine to allow it to cool down.
The machine does not reach the
maximum speed.
Battery is installed improperly. Install the battery cartridge as described in this
manual.
Battery power is dropping. Recharge the battery. If recharging is not eective,
replace battery.
The drive system does not work
correctly.
Ask your local authorized service center for repair.
Abnormal vibration:
stop the machine immediately!
The drive system does not work
correctly.
Ask your local authorized service center for repair.
Motor cannot stop:
Remove the battery immediately!
Electric or electronic malfunction. Remove the battery and ask your local authorized
service center for repair.
OPTIONAL
ACCESSORIES
CAUTION: These accessories or attachments
are recommended for use with your Makita prod-
uct specied in this manual. The use of any other
accessories or attachments might present a risk of
injury to persons. Only use accessory or attachment
for its stated purpose.
If you need any assistance for more details regard-
ing these accessories, ask your local Makita Service
Center.
• Vacuum kit
• Extension nozzle
• Flat nozzle
• Shoulder strap
• Makita genuine battery and charger
NOTE: Some items in the list may be included in the
product package as standard accessories. They may
dier from country to country.

15 POLSKI
POLSKI (Instrukcja oryginalna)
DANE TECHNICZNE
Model: DUB363
Zakresy wydajności Przepływ powietrza 0–13,4 m3/min
Prędkość powietrza (średnia) 0–54 m/s
Prędkość powietrza (maks.) 0–65 m/s
Wymiary (dług. x szer. x wys.) *1 341 mm x 193 mm x 415 mm
Napięcie znamionowe Prąd stały 36 V
Masa netto Dmuchawa *2 3,8–5,2 kg
Odkurzacz *3 6,0–6,6 kg
*1. Bez rur, końcówek, worka na pył, paska na ramię i akumulatorów.
*2. Z rurą dmuchawy, złączką i płaską końcówką, a bez rury ssawnej, końcówki ssawnej, kolanka, worka na pył i
paska na ramię.
*3. Z rurą ssawną, końcówką ssawną, kolankiem, workiem na pył i paskiem na ramię, a bez rury dmuchawy, złączki i
płaskiej końcówki.
• W związku ze stale prowadzonym przez naszą rmę programem badawczo-rozwojowym niniejsze dane mogą
ulec zmianom bez wcześniejszego powiadomienia.
• Dane techniczne mogą różnić się w zależności od kraju.
• Masa może być różna w zależności od osprzętu, w tym akumulatora. W tabeli przedstawiona jest najlżejsza i
najcięższa konguracja, zgodnie z procedurą EPTA 01/2014.
Kompatybilne akumulatory
BL1815N / BL1820 / BL1820B / BL1830 / BL1830B / BL1840 / BL1840B / BL1850 / BL1850B / BL1860B
• Pewne z wymienionych powyżej akumulatorów mogą być niedostępne w regionie zamieszkania użytkownika.
OSTRZEŻENIE: Należy używać wyłącznie akumulatorów wymienionych powyżej. Używanie innych aku-
mulatorów może stwarzać ryzyko wystąpienia obrażeń ciała lub pożaru.
Symbole
Poniżej pokazano symbole zastosowane na urządze-
niu. Przed rozpoczęciem użytkowania należy zapoznać
się z ich znaczeniem.
Zachować szczególną ostrożność.
Przeczytać instrukcję obsługi.
Trzymać ręce z dala od części obrotowych.
Istnieje ryzyko wypadku związanego z
zaplątaniem się długich włosów.
Osoby postronne powinny przebywać w
bezpiecznej odległości.
Nosić okulary ochronne i ochronniki słuchu.
Chronić przed wilgocią.
Ni-MH
Li-ion
Dotyczy tylko państw UE
Nie wyrzucać urządzeń elektrycznych ani
akumulatorów wraz z odpadami z gospo-
darstwa domowego!
Zgodnie z dyrektywami europejskimi w
sprawie zużytego sprzętu elektrycznego i
elektronicznego oraz baterii i akumulato-
rów oraz zużytych baterii i akumulatorów,
a także dostosowaniem ich do prawa
krajowego, zużyte urządzenia elektryczne,
baterie i akumulatory, należy składować
osobno i przekazywać do zakładu recy-
klingu działającego zgodnie z przepisami
dotyczącymi ochrony środowiska.
Przeznaczenie
Urządzenie jest przeznaczone do wydmuchiwania i
odkurzania.
Hałas
Typowy równoważny poziom dźwięku A określony w
oparciu o normę EN50636-2-100:
Poziom ciśnienia akustycznego (LpA): 84,8 dB(A)
Niepewność (K): 1,3 dB(A)
Poziom mocy akustycznej (LWA): 94,9 dB (A)
Niepewność (K): 0,3 dB(A)

16 POLSKI
WSKAZÓWKA: Deklarowana wartość emisji hałasu
została zmierzona zgodnie ze standardową metodą
testową i można ją wykorzystać do porównywania
narzędzi.
WSKAZÓWKA: Deklarowaną wartość emisji hałasu
można także wykorzystać we wstępnej ocenie
narażenia.
OSTRZEŻENIE: Nosić ochronniki słuchu.
OSTRZEŻENIE: Poziom hałasu wytwa-
rzanego podczas rzeczywistego użytkowania
elektronarzędzia może się różnić od wartości
deklarowanej w zależności od sposobu użytko-
wania narzędzia, a w szczególności od rodzaju
obrabianego elementu.
OSTRZEŻENIE: W oparciu o szacowane
narażenie w rzeczywistych warunkach użytkowa-
nia należy określić środki bezpieczeństwa w celu
zapewnienia ochrony operatora (uwzględniając
wszystkie elementy cyklu działania, tj. czas, kiedy
narzędzie jest wyłączone i kiedy pracuje na biegu
jałowym, a także czas, kiedy jest włączone).
Drgania
Całkowita wartość poziomu drgań (suma wektorów w 3
osiach) określona zgodnie z normą EN50636-2-100:
Tryb pracy: praca bez obciążenia (dmuchanie)
Emisja drgań (ah): 2,5 m/s2 lub mniej
Niepewność (K): 1,5 m/s2
Tryb pracy: praca bez obciążenia (odkurzanie)
Emisja drgań (ah): 2,5 m/s2 lub mniej
Niepewność (K): 1,5 m/s2
WSKAZÓWKA: Deklarowana wartość poziomu
drgań została zmierzona zgodnie ze standardową
metodą testową i można ją wykorzystać do porówny-
wania narzędzi.
WSKAZÓWKA: Deklarowaną wartość poziomu
drgań można także wykorzystać we wstępnej ocenie
narażenia.
OSTRZEŻENIE: Drgania wytwarzane pod-
czas rzeczywistego użytkowania elektronarzędzia
mogą się różnić od wartości deklarowanej w
zależności od sposobu użytkowania narzędzia,
a w szczególności od rodzaju obrabianego
elementu.
OSTRZEŻENIE: W oparciu o szacowane
narażenie w rzeczywistych warunkach użytkowa-
nia należy określić środki bezpieczeństwa w celu
zapewnienia ochrony operatora (uwzględniając
wszystkie elementy cyklu działania, tj. czas, kiedy
narzędzie jest wyłączone i kiedy pracuje na biegu
jałowym, a także czas, kiedy jest włączone).
Deklaracja zgodności WE
Dotyczy tylko krajów europejskich
Deklaracja zgodności WE jest dołączona jako załącznik
A do niniejszej instrukcji obsługi.
OSTRZEŻENIA
DOTYCZĄCE
BEZPIECZEŃSTWA
Instrukcje bezpieczeństwa
dotyczące dmuchawy
akumulatorowej
OSTRZEŻENIE: Przeczytać wszystkie ostrze-
żenia bezpieczeństwa i wszystkie instrukcje.
Niezastosowanie się do wspomnianych ostrzeżeń i
instrukcji może doprowadzić do porażenia prądem
elektrycznym, pożaru i/lub poważnych obrażeń ciała.
Wszystkie ostrzeżenia i instruk-
cje należy zachować do wykorzy-
stania w przyszłości.
Informacje podstawowe
1. Należy uważnie przeczytać niniejszą instruk-
cję. Należy zapoznać się z elementami stero-
wania i zasadami poprawnego użytkowania
urządzenia.
2. Urządzenie nie może być użytkowane przez
dzieci, osoby, które nie przeczytały niniejszej
instrukcji obsługi, osoby niebędące w pełni
władz zycznych, poznawczych lub umysło-
wych ani osoby niemające odpowiedniej wie-
dzy i doświadczenia. Lokalne przepisy mogą
ograniczać wiek operatora.
3. Nie wolno użytkować urządzenia, gdy w
pobliżu znajdują się inne osoby, zwłaszcza
dzieci, oraz zwierzęta.
4. Należy pamiętać, że operator lub użytkownik
odpowiada za wypadki lub niebezpieczeństwa
zagrażające innym osobom lub ich mieniu.
Przygotowanie
1. Podczas używania urządzenia nosić odpowied-
nie obuwie oraz spodnie z długimi nogawkami.
2. Nie nosić luźnych ubrań ani biżuterii, które
mogłyby zostać wciągnięte do wlotu powie-
trza. Długie włosy trzymać z dala od wlotów
powietrza.
3. Należy zawsze nosić okulary ochronne,
aby zabezpieczyć oczy przed urazami pod-
czas użytkowania elektronarzędzi. Okulary
ochronne muszą spełniać wymagania normy
ANSI Z87.1 w USA, EN 166 w Europie oraz AS/
NZS 1336 w Australii/Nowej Zelandii. Przepisy
prawne obowiązujące w Australii/Nowej
Zelandii wymagają również obowiązkowego
stosowania osłony twarzy.

17 POLSKI
Odpowiedzialność za egzekwowanie używania
odpowiednich środków ochrony osobistej
przez operatorów narzędzi oraz inne osoby
przebywające w bezpośrednim sąsiedztwie
obszaru roboczego ponosi pracodawca.
4. Aby uniknąć podrażnienia pyłem, zaleca się
noszenie maski ochronnej.
5. Podczas użytkowania maszyny należy zawsze
nosić antypoślizgowe i ochronne obuwie.
Antypoślizgowe obuwie ochronne z zakrytymi
palcami zmniejsza ryzyko odniesienia obrażeń.
6. Używać środków ochrony osobistej. Zawsze
nosić okulary ochronne. Odpowiednie środki
ochrony, takie jak maska przeciwpyłowa,
ochronne obuwie antypoślizgowe, kask czy
ochronniki słuchu, dostosowane do panujących
warunków, zmniejszają ryzyko obrażeń.
Obsługa
1. Wyłączyć urządzenie i wyjąć akumulator oraz
upewnić się, że wszystkie ruchome elementy
dmuchawy się zatrzymały:
• gdy operator oddala się od urządzenia;
• przed usunięciem niedrożności;
• przed przeprowadzeniem kontroli, czysz-
czenia lub konserwacji urządzenia;
• gdy urządzenie zaczyna drgać w niety-
powy sposób;
• gdy dmuchawa przekształcana jest w
odkurzacz i odwrotnie.
2. Urządzenie należy użytkować tylko przy świe-
tle dziennym lub odpowiednio silnym sztucz-
nym oświetleniu.
3. Nie należy sięgać zbyt daleko i należy zawsze
pamiętać o utrzymywaniu równowagi.
4. Podczas pracy na pochyłym terenie należy
zadbać o dobre oparcie dla nóg.
5. Podczas użytkowania urządzenia należy cho-
dzić, a nie biegać.
6. Dbać o to, by we wlotach powietrza chłodzą-
cego nie gromadziły się odłamki.
7. Nigdy nie wydmuchiwać odłamków w kierunku
znajdujących się w pobliżu osób.
8. Zawsze używać urządzenia w zalecanej pozycji
oraz na stabilnym podłożu.
9. Nie używać urządzenia na dużych
wysokościach.
10. Podczas używania urządzenia nigdy nie kie-
rować końcówki w stronę znajdujących się w
pobliżu osób.
11. Nigdy nie blokować otworu zasysania ani
otworu dmuchawy.
• Podczas pracy w zapylonej przestrzeni
należy uważać, aby otwór zasysania lub
otwór dmuchawy nie zostały zatkane
pyłem lub brudem.
• Używać wyłącznie końcówek dostarczo-
nych przez rmę Makita.
• Nie używać dmuchawy do napełnia-
nia piłek, pontonów lub podobnych
przedmiotów.
12. Nie użytkować urządzenia w pobliżu otwartych
okien itp.
13. Zaleca się używać urządzenia wyłącznie w
rozsądnych godzinach — nie wczesnym ran-
kiem ani późnym wieczorem, gdy mogłoby to
przeszkadzać innym.
14. Przed rozpoczęciem dmuchania zaleca się
poluzować odłamki grabiami lub miotłą.
15. Jeśli urządzenie uderzy w jakiś przedmiot lub
zacznie drgać lub wydawać dźwięki w niety-
powy sposób, należy je niezwłocznie wyłączyć.
Przed ponownym uruchomieniem i dalszym
użytkowaniem wyjąć akumulator i sprawdzić
urządzenie pod kątem uszkodzeń. Jeśli urzą-
dzenie jest uszkodzone, zwrócić się do autory-
zowanego centrum serwisowego rmy Makita
w celu naprawy.
16. Nie wkładać palców ani żadnych przedmiotów
do otworu zasysania ani otworu dmuchawy.
17. Nie dopuszczać do przypadkowego urucho-
mienia. Przed włożeniem akumulatora, podnie-
sieniem lub przeniesieniem urządzenia należy
sprawdzić, czy przełącznik znajduje się w
pozycji wyłączenia. Przenoszenie urządzenia z
palcem na przełączniku lub podłączanie urzą-
dzenia do zasilania przy włączonym przełącz-
niku grozi wypadkiem.
18. Nigdy nie należy wydmuchiwać ani odkurzać
niebezpiecznych materiałów, takich jak gwoź-
dzie, odłamki szkła czy ostrza.
19. Nie używać urządzenia w pobliżu materiałów
łatwopalnych.
20. Unikać używania urządzenia przez długi czas
w niskiej temperaturze.
Konserwacja i przechowywanie
1. Wszystkie nakrętki, wkręty i śruby powinny
być dokręcone, co pozwoli utrzymać urządze-
nie w bezpiecznym stanie technicznym.
2. Jeśli części są zużyte lub uszkodzone, należy
je wymienić na części dostarczone przez rmę
Makita.
3. Urządzenie należy przechowywać w suchym,
niedostępnym dla dzieci miejscu.
4. Po wyłączeniu urządzenia w celu przepro-
wadzenia przeglądu lub prac serwisowych,
odłożenia do przechowywania lub wymiany
akcesoriów należy upewnić się, że wszyst-
kie ruchome elementy zostały całkowicie
zatrzymane, oraz wyjąć akumulator. Przed
wykonaniem jakichkolwiek prac związanych
z urządzeniem należy poczekać, aż ono osty-
gnie. Starannie wykonywać czynności konser-
wacyjne i utrzymywać urządzenie w czystości.

18 POLSKI
5. Zawsze przed odłożeniem urządzenia do prze-
chowywania należy poczekać, aż urządzenie
ostygnie.
6. Nie wystawiać urządzenia na działanie desz-
czu. Urządzenie należy przechowywać w
pomieszczeniach.
7. Podczas podnoszenia urządzenia należy
ugiąć kolana i uważać, aby nie uszkodzić
kręgosłupa.
Użytkowanie narzędzi akumulatorowych i dbałość
o nie
1. Akumulator należy ładować wyłącznie przy
użyciu określonej przez producenta łado-
warki. Ładowarka przeznaczona do jednego typu
akumulatora może stwarzać zagrożenie poża-
rem, gdy będzie używana do ładowania innego
akumulatora.
2. Do zasilania elektronarzędzi używać tylko
specjalnie do tego celu przeznaczonych aku-
mulatorów. Używanie innych akumulatorów może
stwarzać ryzyko wystąpienia obrażeń ciała lub
pożaru.
3. Gdy akumulator nie jest używany, należy
zabezpieczyć go przed kontaktem z metalo-
wymi przedmiotami, typu spinacze, monety,
klucze, gwoździe, wkręty lub innymi metalo-
wymi drobiazgami, które mogą powodować
zwarcie styków akumulatora. Zwarcie styków
akumulatora grozi poparzeniami lub pożarem.
4. W niewłaściwych warunkach eksploatacji
może dojść do wycieku elektrolitu z akumu-
latora. Nie należy go dotykać. W razie przy-
padkowego kontaktu należy przemyć skażoną
skórę wodą. W przypadku dostania się elek-
trolitu do oczu należy dodatkowo skorzystać
z porady lekarza. Elektrolit z akumulatora może
powodować podrażnienia lub poparzenia.
5. Nie używać uszkodzonego lub przerobionego
akumulatora ani narzędzia. Uszkodzone lub
przerobione akumulatory mogą działać w nieprze-
widywalny sposób i spowodować pożar, wybuch
lub obrażenia ciała.
6. Nie wystawiać akumulatora ani narzędzia na
działanie ognia ani nadmiernej temperatury.
Narażenie na ogień lub temperaturę wyższą niż
130°C może spowodować wybuch.
7. Przestrzegać wszystkich instrukcji ładowania
i nie ładować akumulatora ani narzędzia w
temperaturze wykraczającej poza zakres okre-
ślony w instrukcji. Nieprawidłowe ładowanie lub
temperatury wykraczająca poza określony zakres
mogą spowodować uszkodzenie akumulatora
oraz wzrost zagrożenia pożarem.
Zasady bezpieczeństwa dotyczące urządzeń elek-
trycznych i akumulatora
1. Nie wyrzucać akumulatorów do ognia. Ogniwo
może eksplodować. Należy zapoznać się z obo-
wiązującymi lokalnie przepisami, które określają
specjalne wytyczne dotyczące utylizacji odpadów.
2. Nie wolno otwierać ani niszczyć akumulato-
rów. Uwolniony elektrolit jest substancją żrącą,
która może spowodować uszkodzenie oczu lub
skóry. W przypadku połknięcia może być trujący.
3. Akumulatora nie należy ładować w deszczu ani
w wilgotnym otoczeniu.
4. Nie ładować akumulatora na zewnątrz.
5. Nie dotykać ładowarki, w tym jej wtyczki i
styków, mokrymi rękami.
Serwis
1. Elektronarzędzie powinno być serwisowane
przez wykwalikowany personel, z użyciem
wyłącznie oryginalnych części zamiennych.
Zapewni to zachowanie bezpieczeństwa pracy z
elektronarzędziem.
2. Nie wolno naprawiać uszkodzonych akumu-
latorów. Naprawa akumulatorów powinna być
wykonywana wyłącznie przez producenta lub
autoryzowane punkty usługowe.
ZACHOWAĆ NINIEJSZE
INSTRUKCJE.
OSTRZEŻENIE: NIE WOLNO pozwolić, aby
wygoda lub rutyna (nabyta w wyniku wielokrot-
nego używania urządzenia) zastąpiły ścisłe prze-
strzeganie zasad bezpieczeństwa obsługi.
NIEWŁAŚCIWE UŻYTKOWANIE narzędzia lub
niestosowanie się do zasad bezpieczeństwa
podanych w niniejszej instrukcji obsługi może
prowadzić do poważnych obrażeń ciała.
Ważne zasady bezpieczeństwa
dotyczące akumulatora
1. Przed użyciem akumulatora zapoznać się ze
wszystkimi instrukcjami i znakami ostrze-
gawczymi na (1) ładowarce, (2) akumulatorze
i (3) produkcie, w którym będzie używany
akumulator.
2. Akumulatora nie wolno rozbierać.
3. Jeśli czas działania uległ znacznemu skróce-
niu, należy natychmiast przerwać pracę. Może
bowiem dojść do przegrzania, ewentualnych
poparzeń, a nawet eksplozji.
4. W przypadku przedostania się elektrolitu do
oczu, przemyć je czystą wodą i niezwłocznie
uzyskać pomoc lekarską. Może on bowiem
spowodować utratę wzroku.
5. Nie doprowadzać do zwarcia akumulatora:
(1) Nie dotykać styków materiałami przewo-
dzącymi prąd.
(2) Unikać przechowywania akumulatora w
pojemniku z metalowymi przedmiotami,
takimi jak gwoździe, monety itp.
(3) Chronić akumulator przed deszczem lub
wodą.
Zwarcie prowadzi do przepływu prądu elek-
trycznego o dużym natężeniu i przegrzania
akumulatora, co w konsekwencji może grozić
poparzeniami a nawet awarią urządzenia.
6. Narzędzia i akumulatora nie wolno przecho-
wywać w miejscach, w których temperatura
osiąga bądź przekracza 50°C (122°F).
7. Akumulatorów nie wolno spalać, również tych
poważnie uszkodzonych lub całkowicie zuży-
tych. Akumulator może eksplodować w ogniu.

19 POLSKI
8. Chronić akumulator przed upadkiem i
uderzeniami.
9. Nie wolno używać uszkodzonego akumulatora.
10. Stanowiące wyposażenie akumulatory lito-
wo-jonowe podlegają przepisom dotyczącym
produktów niebezpiecznych.
Na potrzeby transportu komercyjnego, np. świad-
czonego przez rmy trzecie czy spedycyjne,
należy przestrzegać specjalnych wymagań w
zakresie pakowania i oznaczania etykietami.
Przygotowanie produktu do wysyłki wymaga
skonsultowania się ze specjalistą ds. materiałów
niebezpiecznych. Należy także przestrzegać
przepisów krajowych, które mogą być bardziej
szczegółowe.
Zakleić taśmą lub zaślepić otwarte styki akumula-
tora oraz zabezpieczyć go, aby nie mógł się prze-
suwać w opakowaniu.
11. Jeśli zajdzie konieczność utylizacji akumula-
tora, należy wyjąć go z narzędzia i przekazać
w bezpieczne miejsce. Postępować zgodnie z
przepisami lokalnymi dotyczącymi utylizacji
akumulatorów.
12. Używać akumulatorów tylko z produktami
określonymi przez rmę Makita. Zastosowanie
akumulatorów w niezgodnych produktach może
spowodować pożar, przegrzanie, wybuch lub
wyciek elektrolitu.
13. Jeśli narzędzie nie będzie używane przez dłuż-
szy czas, należy wyjąć z niego akumulator.
ZACHOWAĆ NINIEJSZE
INSTRUKCJE.
PRZESTROGA: Używać wyłącznie oryginal-
nych akumulatorów rmy Makita. Używanie nie-
oryginalnych akumulatorów rm innych niż Makita lub
akumulatorów, które zostały zmodykowane, może
spowodować wybuch akumulatora i pożar, obrażenia
ciała oraz zniszczenie mienia. Stanowi to również
naruszenie warunków gwarancji rmy Makita doty-
czących narzędzia i ładowarki.
Wskazówki dotyczące zacho-
wania maksymalnej trwałości
akumulatora
1. Akumulator należy naładować zanim zostanie
do końca rozładowany. Po zauważeniu spadek
mocy narzędzia należy przerwać pracę i nała-
dować akumulator.
2. Nie wolno ładować powtórnie w pełni nałado-
wanego akumulatora. Przeładowanie akumula-
tora skraca jego trwałość.
3. Akumulator należy ładować w temperaturze
pokojowej w przedziale 10–40°C (50–104°F). W
przypadku gorącego akumulatora przed przy-
stąpieniem do ładowania należy poczekać, aż
ostygnie.
4. Akumulatory niklowo-wodorkowe należy nała-
dować po okresie długiego nieużytkowania
(dłuższego niż sześć miesięcy).
MONTAŻ
PRZESTROGA:
Przed przystąpieniem do prac
konserwacyjnych przy urządzeniu upewnić się, że
jest ono wyłączone oraz że akumulator został wyjęty.
UWAGA:
Przed rozpoczęciem eksploatacji urządze-
nia należy pamiętać, aby je dokładnie zmontować. W
przeciwnym razie urządzenie nie będzie działać.
Montaż w celu dmuchania
Montaż lub demontaż rury dmuchawy
i końcówki
1.
Przymocować rurę dmuchawy do jednostki głównej.
Włożyć rurę dmuchawy do jednostki głównej, tak
aby śruba była skierowana w lewo, jak pokazano na
rysunku. Obrócić rurę dmuchawy w sposób pokazany
na rysunku, tak aby śruba była wyrównana z otworem
w jednostce głównej, a następnie dokładnie dokręcić
śrubę za pomocą klucza imbusowego.
► Rys.1: 1. Śruba 2. Rura dmuchawy
2. Wyrównać występ w rurze dmuchawy z rowkiem
na złączce, a następnie przymocować złączkę do rury
dmuchawy i obrócić złączkę, aby ją zablokować.
► Rys.2: 1. Złączka 2. Rura dmuchawy
Aby wymontować rurę dmuchawy i złączkę, należy
wykonać czynności procedury montażu w odwrotnej
kolejności.
WSKAZÓWKA: Długość końcówki można regulować,
przesuwając ją, jak pokazano na rysunku.
► Rys.3: 1. Złączka 2. Rura dmuchawy
Montaż lub demontaż płaskiej
końcówki lub rury przedłużającej
Osprzęt dodatkowy
Do złączki przymocować płaską końcówkę lub rurę prze-
dłużającą i przekręcić tak, aby zablokować ją na miejscu.
► Rys.4: 1. Płaska końcówka 2. Rura przedłużająca
3. Złączka
Płaską końcówkę lub rurę przedłużającą można rów-
nież przymocować do rury dmuchawy.
► Rys.5: 1. Płaska końcówka 2. Rura przedłużająca
3. Rura dmuchawy
Aby wymontować płaską końcówkę lub rurę przedłużającą, należy
wykonać czynności procedury montażu w odwrotnej kolejności.
Zakładanie paska na ramię
PRZESTROGA: Zaczepy paska na ramię
powinny być prawidłowo przymocowane do
urządzenia. Nieprawidłowo przymocowane zaczepy
mogą się odpiąć i spowodować obrażenia ciała.
PRZESTROGA: Należy używać wyłącznie
paska na ramię przeznaczonego do użytku z tym
narzędziem. Używanie innego paska na ramię może
spowodować obrażenia ciała.

20 POLSKI
Zaczepy paska na ramię należy przymocować do urzą-
dzenia w sposób przedstawiony na rysunku.
► Rys.6: 1. Zaczep
Pasek na ramię jest wyposażony w mechanizm szyb-
kiego odpinania. Aby odpiąć urządzenie od paska na
ramię, należy po prostu ścisnąć klamrę z obu stron.
► Rys.7: 1. Klamra
Montaż w celu odkurzania
Montaż lub demontaż rury ssawnej i
końcówki
Akcesoria opcjonalne
1. Wyrównać symbol trójkąta na końcówce ssawnej
z tym na rurze ssawnej, a następnie włożyć końcówkę
ssawną do rury ssawnej, tak aby zaczep na końcówce
wskoczył na miejsce.
► Rys.8: 1. Końcówka ssawna 2. Rura ssawna
3. Symbol trójkąta
2. Odkręcić śrubę na pokrywie wentylatora za
pomocą klucza imbusowego i otworzyć ją.
► Rys.9: 1. Śruba 2. Pokrywa wentylatora 3. Klucz
imbusowy
3. Wyrównać symbol trójkąta na rurze ssawnej z
oznaczeniem na jednostce głównej, a następnie
przymocować rurę ssawną do jednostki głównej.
► Rys.10: 1. Rura ssawna 2. Symbol trójkąta
3. oznaczenie
4.
Przekręcić rurę ssawną w prawo, aby śruba na
rurze wyrównała się z otworem w jednostce głównej, a
następnie przykręcić śrubę mocno za pomocą klucza
imbusowego, aby zamocować rurę do jednostki głównej.
► Rys.11: 1. Rura ssawna 2. Śruba
Aby wymontować rurę ssawną i końcówkę, należy wyko-
nać czynności procedury montażu w odwrotnej kolejności.
Montaż lub demontaż kolanka i
worka na pył
Akcesoria opcjonalne
1.
Włożyć kolanko do worka na pył i zacisnąć pasek,
aby zamocować kolanko w sposób pokazany na rysunku.
► Rys.12: 1. Worek na pył 2. Kolanko 3. Pasek
2. Przymocować kolanko do jednostki głównej.
Włożyć kolanko do jednostki głównej, tak aby śruba
była skierowana w lewo, jak pokazano na rysunku.
Obrócić kolanko w sposób pokazany na rysunku, tak
aby śruba była wyrównana z otworem w jednostce
głównej, a następnie dokładnie dokręcić śrubę za
pomocą klucza imbusowego.
► Rys.13: 1. Śruba 2. Kolanko
3.
Przymocować zaczep worka na pył do paska na
ramię, a następnie przymocować zaczepy paska na ramię
do jednostki głównej w sposób pokazany na rysunku.
► Rys.14: 1. Zaczep
Aby wymontować worek na pył i kolanko, należy
wykonać czynności procedury montażu w odwrotnej
kolejności.
OPIS DZIAŁANIA
PRZESTROGA:
Przed przystąpieniem do regula-
cji lub kontroli działania urządzenia upewnić się, że
jest ono wyłączone oraz że akumulator został wyjęty.
Wkładanie i wyjmowanie akumulatora
PRZESTROGA: Przed włożeniem lub wyjęciem
akumulatora należy zawsze wyłączyć urządzenie.
PRZESTROGA: Podczas wkładania lub wyj-
mowania akumulatora należy mocno trzymać
urządzenie i akumulator. W przeciwnym razie mogą
się one wyślizgnąć z rąk, powodując uszkodzenie
urządzenia lub akumulatora oraz obrażenia ciała.
PRZESTROGA: Akumulator należy włożyć
do końca, tak aby czerwony wskaźnik nie był
widoczny. W przeciwnym razie może on przypad-
kowo wypaść z urządzenia, powodując obrażenia u
operatora lub znajdujących się w pobliżu osób.
PRZESTROGA: Nie wkładać akumulatora na
siłę. Jeśli akumulator nie daje się swobodnie wsunąć,
oznacza to, że został włożony nieprawidłowo.
► Rys.15:
1. Czerwony wskaźnik 2. Przycisk 3. Akumulator
Aby wyjąć akumulator, należy wysunąć go z urządzenia, przesu-
wając przycisk znajdujący się w przedniej części akumulatora.
Aby włożyć akumulator, wyrównaj występ na akumulato-
rze z rowkiem w obudowie i wsuń go na swoje miejsce.
Akumulator należy wsunąć do oporu, aż się zatrzaśnie na
miejscu, co jest sygnalizowane delikatnym kliknięciem.
Jeśli w górnej części przycisku jest widoczny czerwony
wskaźnik, akumulator nie został całkowicie zatrzaśnięty.
Wskazanie stanu naładowania akumulatora
Tylko w przypadku akumulatorów ze wskaźnikiem
► Rys.16: 1. Lampki wskaźnika 2. Przycisk kontrolny
Nacisnąć przycisk kontrolny na akumulatorze w celu
wyświetlenia stanu naładowania akumulatora. Lampki
wskaźnika zaświecą się przez kilka sekund.
Lampki wskaźnika Pozostała
energia
akumulatora
Świeci się Wyłączony Miga
75–100%
50–75%
25–50%
0–25%
Naładować
akumulator.
Akumulator
może nie
działać
poprawnie.
Pagina se încarcă ...
Pagina se încarcă ...
Pagina se încarcă ...
Pagina se încarcă ...
Pagina se încarcă ...
Pagina se încarcă ...
Pagina se încarcă ...
Pagina se încarcă ...
Pagina se încarcă ...
Pagina se încarcă ...
Pagina se încarcă ...
Pagina se încarcă ...
Pagina se încarcă ...
Pagina se încarcă ...
Pagina se încarcă ...
Pagina se încarcă ...
Pagina se încarcă ...
Pagina se încarcă ...
Pagina se încarcă ...
Pagina se încarcă ...
Pagina se încarcă ...
Pagina se încarcă ...
Pagina se încarcă ...
Pagina se încarcă ...
Pagina se încarcă ...
Pagina se încarcă ...
Pagina se încarcă ...
Pagina se încarcă ...
Pagina se încarcă ...
Pagina se încarcă ...
Pagina se încarcă ...
Pagina se încarcă ...
Pagina se încarcă ...
Pagina se încarcă ...
Pagina se încarcă ...
Pagina se încarcă ...
Pagina se încarcă ...
Pagina se încarcă ...
Pagina se încarcă ...
Pagina se încarcă ...
Pagina se încarcă ...
Pagina se încarcă ...
Pagina se încarcă ...
Pagina se încarcă ...
Pagina se încarcă ...
Pagina se încarcă ...
Pagina se încarcă ...
Pagina se încarcă ...
Pagina se încarcă ...
Pagina se încarcă ...
Pagina se încarcă ...
Pagina se încarcă ...
Pagina se încarcă ...
Pagina se încarcă ...
Pagina se încarcă ...
Pagina se încarcă ...
-
 1
1
-
 2
2
-
 3
3
-
 4
4
-
 5
5
-
 6
6
-
 7
7
-
 8
8
-
 9
9
-
 10
10
-
 11
11
-
 12
12
-
 13
13
-
 14
14
-
 15
15
-
 16
16
-
 17
17
-
 18
18
-
 19
19
-
 20
20
-
 21
21
-
 22
22
-
 23
23
-
 24
24
-
 25
25
-
 26
26
-
 27
27
-
 28
28
-
 29
29
-
 30
30
-
 31
31
-
 32
32
-
 33
33
-
 34
34
-
 35
35
-
 36
36
-
 37
37
-
 38
38
-
 39
39
-
 40
40
-
 41
41
-
 42
42
-
 43
43
-
 44
44
-
 45
45
-
 46
46
-
 47
47
-
 48
48
-
 49
49
-
 50
50
-
 51
51
-
 52
52
-
 53
53
-
 54
54
-
 55
55
-
 56
56
-
 57
57
-
 58
58
-
 59
59
-
 60
60
-
 61
61
-
 62
62
-
 63
63
-
 64
64
-
 65
65
-
 66
66
-
 67
67
-
 68
68
-
 69
69
-
 70
70
-
 71
71
-
 72
72
-
 73
73
-
 74
74
-
 75
75
-
 76
76


Makita DUB363 Manual de utilizare
- Categorie
- Unelte electrice
- Tip
- Manual de utilizare
în alte limbi
- slovenčina: Makita DUB363 Používateľská príručka
- polski: Makita DUB363 Instrukcja obsługi
Lucrări conexe
-
Makita DUB184 Manual de utilizare
-
Makita UB100D Manual de utilizare
-
-
-
Makita UB001C Manual de utilizare
-
Makita CF002G Manual de utilizare
-
Makita CF001G Manual de utilizare
-
Makita DCF203 Cordless Manual de utilizare
-
Makita PDC1200 Manual de utilizare
-
Alte documente
-
EGO LB5800E Manual de utilizare
-
Dolmar AG3750 Manualul proprietarului
-
Tryton TOE3000 Manual de utilizare
-
Raider Garden Tools RDP-SEBV20 Manual de utilizare
-
Blaupunkt BV4010 Manualul proprietarului
-
-
-
-
Worx WG583E Manual de utilizare