Wolfcraft PID 6939 Manualul proprietarului
- Tip
- Manualul proprietarului

lOriginal-Bedienungsanleitung
tTranslation of the original operating instructions
pTraduction de la notice d'utilisation originale
nTraducción del manual de instrucciones original
LVertaling van de oorspronkelijke handleiding
yTraduzione del manuale d’uso originale
MTradução do manual original
mOversættelse af den originale betjeningsvejledning
SÖversättning av original bruksanvisningen
qAlkuperäisen käyttöohjeen käännös
KOversettelse av original bruksanvisning
NTłumaczenie oryginalnej instrukcji obsługi
vΜετάφραση του πρωτότυπου οδηγιών χρήσης
WOrijinal işletim kılavuzunun çevirisi
k Překlad originálního Návodu na obsluhu
w Az eredeti használati útmutató fordítása
P Traducerea instrucţiunilor de operare originale
e Превод на оригиналното упътване за употреба
x Prevod originalnog uputstva za upotrebu
rПеревод оригинала инструкции
по эксплуатации
6939 000
VLC 800
wolfcraft GmbH
Wolffstraße 1
56746 Kempenich
Germany
www.wolfcraft.com
Bdal 6939.000 143006939 31.01.18 12:57 Seite 1

2
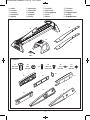
l Inhalt
t Contens
pContenu
n Contenido
L Inhoud
y Contenuto
M Conteúdo
m Indhold
S Innehåll
q Sisältö
K Innehåll
N Zawartošć
v Περιεχόμενο
W İçerik
k Obsah
w Tartalom
P Conţinut
e Съдържание
x Sadržaj
rСодержание
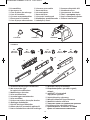
1x
1x
1x
1x
1x
SW 5
119906939
2x
M 8
DIN 985
2x
M8 x 25
DIN 7380
3x
2x
M5 x 10
DIN 7985
2x
A 5,3
DIN 125
2x
M5
DIN 557
1x 1x 1x
1x
1x
1x 1x
Bdal 6939.000 143006939 31.01.18 12:57 Seite 2

33
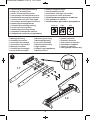
l Notwendiges Montagewerkzeug
t Necessary assembly tools
pOutils de montage nécessaires
n Herramientas de montaje necesarias
L Noodzakelijk montage gereedschap
y Attrezzi necessari per il montaggio
M Ferramenta de montagem necessária
m Nødvendigt montageværktøj
S Erforderliga monteringsverktyg
q Tarvittava asennustyökalu
K Nødvendig monteringsverktøy
N Narzędzia niezbędne do montażu
v Απαρατητα εργαλεα μνταρσματς
W Montaj için gerekli takım
k Nutné montážní nářadí
w Szereléshez szükséges szerszámok
P Sunt necesare unelte de montat
e Необходими инструменти за монтаж
x Alat potreban za montažu
rНеобходимые монтажные инструменты
SW 5SW 8+13 PZ 2
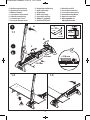
l Montageanleitung
t Assembly instructions
pInstructions de montage
n Instrucciones de montaje
L Montage instrukties
y Istruzioni per montaggio
M Instrução de montagem
m Monteringsanvisning
S Montagevejledning
q Asennus Käyttöohje
K Monteringsanvisning
N Opis montażu
v δηγες μνταρσματς
W Montaj talimatı
k Návod k montáži
w Szerelési útmutató
P Îndrumător de montare
e Упътване за работа
x Uputa za montažu
rИнструкция по монтажу
1
1.2
1.1
3x
Bdal 6939.000 143006939 31.01.18 12:57 Seite 3

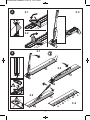
2x
M8 x 25
DIN 7380
2x
M8
DIN 985
4
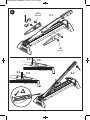
2
2.1
2.2
1/4
1/4
2.3
2.4
Bdal 6939.000 143006939 31.01.18 12:57 Seite 4

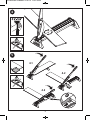
5
3
3.1
3.2
< 5
mm
6x
6x
5 - 11
mm
3.2.1
3.2.2
Bdal 6939.000 143006939 31.01.18 12:57 Seite 5

6
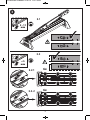
l Bedienungsanleitung
t Operating instructions
pMode d’emploi
n Istrucciones de manejo
L Gebruiksaanwijzing
y Istruzioni per l’uso
M Instrução de operação
m Betjeningsvejledning
S Bruksanvisning
q Käyttöohje
K Bruksanvisning
N Instrukcja obsługi
v δηγες ρσηις
W Kullanma talimatı
k Návod k použití
w Használati útmutató
P Instrucţiuni de montaj
e Упътване за работа
x Uputa za uporabu
rИнструкция по
обслуживанию
1
1.2 1.3
1.1
a
b
c
210 - 465
mm
max.
11 mm
210 mm
max.
465 mm
X
X
= 210 mm
max.
465 mm
Bdal 6939.000 143006939 31.01.18 12:57 Seite 6

7
2
3
2.1 2.3
2.2
abcde
3.1
3.2
3.3
3.4
Bdal 6939.000 143006939 31.01.18 12:57 Seite 7

8
4.1
4.2
5
4
4.3
Bdal 6939.000 143006939 31.01.18 12:58 Seite 8

9
6
6.1
6.2
6.3
6.4 6.5
abcde
50 mm
2x
M5 x 10
DIN 7985
2x
A 5,3
DIN 125
2x
M5
DIN 557
50 mm
Bdal 6939.000 143006939 31.01.18 12:58 Seite 9

10
9
661 mm
211
mm
7
8.1 8.2
8
197
mm
Bdal 6939.000 143006939 31.01.18 12:58 Seite 10

l Ersatzteilliste
t Spare parts list
pListe de pièces de rechange
n Lista de recambios
L Lijst met reserveonderdelen
y Elenco pezzi di ricambio
M Lista de peças sobresselentes
m Liste over reservedele
S Reservdelslista
q Varaosaluettelo
K Reservdelsliste
N Lista części zamiennych
v Κατλγς ανταλλακτικν
W Yedek parça listesi
k Seznam náhradních dílů
w Pótalkatrész lista
P Componente de schimb
e Лист с резервни части
x Popis nadomjesnih dijelova
rСписок запчастей
11
lTechnische Änderungen vorbehalten
tWe reserve the right
for technical modifications
pModifications réservées
nSalvo modificaciones
LVeranderingen voorbehouden
ySalvo modifiche
MDireito reservado a alterações técnicas
mÆndringer forbeholdes
SRätt till ändringar förbehålles
qOikeus teknisiin muutoksiin pipädetää
KDet tas forbehold om tekniske endringer
NWszelkie zmiany zastrzeżone
vΕπιυλασσμαστε για κθε τενικ
αλλαγ
Wwolfcraft®üründe teknik
değişiklikler yapabilir
kTechnické změny vyhrazeny
wMűszaki változtatás joga fenntartva
PModificări tehnice rezervate
eЗапазено право за технически промени
xPridržano pravo tehničkih izmjena
rПроизводитель оставляет за собой
право на технические изменения
116620488
119906939
117710142 116620477
2x
M 8
DIN 985
2x
M8 x 25
DIN 7380
3x
2x
M5 x 10
DIN 7985
2x
A 5,3
DIN 125
2x
M5
DIN 557
1x 1x1x
1x 1x1x
1x
Bdal 6939.000 143006939 31.01.18 12:58 Seite 11

l
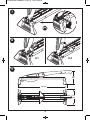
Vinyl- und Laminatschneider
Bestimmungsgemäßer Gebrauch
Dieser Vinyl- und Laminatschneider ist ausschließlich geeignet und einzusetzen zum maschinenlosen Ablängen von:
• selbstklebenden sowie nicht selbstklebenden Vinyl- bzw. PVC-Paneelen mit einer maximalen Breite von 46,5 cm
und einer maximalen Stärke von 6 mm
• Laminat in einer maximalen Breite von 46,5 cm und einer Stärke des MDF/HDF von 11 mm + Trittschalldämmung
Die Klinge des Vinyl- und Laminatschneiders besteht aus einem verschleißfreien Material mit einer speziellen Anti-Haft Beschich-
tung. Für bestmögliche Schnittergebnisse sollten eventuelle Kleberrückstände auf der Klinge oder dem Aluminiumprofil entfernt
werden. Aufgrund der besonderen Form der Klinge ist ein Schleifen oder Schärfen der Schneidklinge nicht notwendig und auch
nicht zulässig.
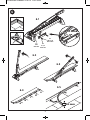
Achtung: Die Schraubverbindungen an der Klingenaufnahme sind bei Bedarf nachzuziehen. Die Schraubverbindungen dürfen
nur so fest angezogen werden, dass die Schneidklinge am Handgriff mit leichtem Widerstand geöffnet bzw. geschlossen
werden kann (siehe Bilder, Seite 10).
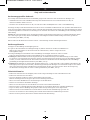
Bitte beachten Sie die Illustrationen auf den Seiten 2 - 10 zur Montage und zur Bedienung des Gerätes.
Bedienungshinweise
1. Klappen Sie Schneidklinge am Handgriff ganz auf.
2. Legen Sie das Laminatbrett am Führungsanschlag an, dadurch entsteht ein exakter Schneidwinkel von
90 Grad. Tipp: Unterfüttern Sie das andere Ende des Laminatbrettes, damit es waagerecht an der
Führungskante anliegt.
3. Durch gleichmäßiges Herunterdrücken der Schneidklinge am Handgriff entsteht ein sauberer Schnitt.
Achten Sie darauf die Klinge gerade herunterzudrücken, um ein optimales Ergebnis zu erzielen.
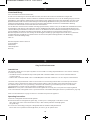
4. Achtung: Bei Winkelschnitten und zum Längsschnitt (z.B.: für Abschlussbretter) ist der Winkelanschlag vor dem Schnitt
zu entfernen. Das Laminat bzw. das Vinyl muss mit der freien Hand mit leichtem Druck bis gegen die Schneidklinge geführt
werden, um einen exakten Ansatz für den Schnitt zu bekommen. Anschließend mit der Führungshand die Schneidklinge
gleichmäßig am Handgriff Herunterdrücken (siehe Bilder, Seite 7).
5. Achtung: Beim Ablängen von Laminat bzw. Vinyl der Stärken von 5 - 11 mm müssen die rechte und linke Schneidleiste in die
Bohrungen (Position 2) montiert werden (= Auslieferungszustand). Beim Ablängen von Laminat bzw. Vinyl von einer Stärke
unter 5 mm müssen die beiden Schneidleisten in die Bohrungen (Position 1) montiert werden. Durch die Verringerung
des Abstandes zur Klinge wird ein sauberer Schnitt gewährleistet (siehe Bilder, Seite 5).
Sicherheitshinweise:
•Bedienen Sie das Gerät nur am Handgriff, halten Sie Ihre Finger unbedingt aus dem Schneidbereich heraus.
•Bedienen Sie das Gerät stets nur alleine!
•Lassen Sie die Klinge geschlossen wenn sie das Produkt nicht verwenden.
Wenn Sie die Klinge öffnen bewegen sie diese bis zum Anschlag nach hinten.
•Führen Sie keinerlei Modifikationen oder Änderungen am Produkt durch.
• Schärfen Sie unter keinen Umständen die Klinge!
• Achten Sie stets darauf, dass Sie und das Gerät einen sicheren und stabilen Stand haben.
• Prüfen Sie immer vor Arbeitsbeginn die richtige Montage der verwendeten Geräte (z.B. Schraubverbindungen).
• Sorgen Sie dafür, dass Ihre Kleidung anliegt (insbesondere Ärmel) und tragen Sie einen Augenschutz.
• Halten Sie Kinder von Ihrer Werkstatt fern und bewahren Sie Ihre Geräte und Werkzeuge gesichert auf.
• Lassen Sie nie Unerfahrene ohne Anleitung oder Aufsicht mit Ihren Geräten und Werkzeugen arbeiten.
• Arbeiten Sie immer planvoll, konzentriert und mit außreichender Beleuchtung.
12
Bdal 6939.000 143006939 31.01.18 12:58 Seite 12

l
Garantieerklärung
Liebe Heimwerkerin und lieber Heimwerker,
Sie haben ein hochwertiges wolfcraft-Produkt erworben, das Ihnen viel Freude beim Heimwerken bringen wird.
wolfcraft Produkte entsprechen hohem technischem Standard und durchlaufen, bevor sie in den Handel gelangen, intensive
Entwicklungs- und Testphasen. Während der Serienfertigung sichern ständige Kontrollen und regelmäßige Tests den hohen
Qualitätsstandard. Solide technische Entwicklungen und zuverlässige Qualitätskontrollen geben Ihnen die Sicherheit einer
richtigen Kaufentscheidung. Auf das erworbene wolfcraft-Produkt gewähren wir Ihnen bei ausschließlicher Nutzung
der Geräte im Heimwerkerbereich 10 Jahre Garantie ab Kaufdatum.
Von der Garantie umfasst sind nur Schäden am Kaufgegenstand selbst, und nur solche, die auf Material- und Fabrikationsfehler
zurückzuführen sind. Nicht von dieser Garantie umfasst sind Mängel und Schäden, die auf unsachgemäße Bedienung oder
fehlende Wartung zurückzuführen sind. Ebenso nicht von der Garantie umfasst sind übliche Abnutzungserscheinungen und
gebrauchsüblicher Verschleiß sowie Mängel und Schäden, die dem Kunden bei Vertragsschluss bekannt waren.
Garantieansprüche können nur unter Vorlage der Rechnung/des Kaufbeleges geltend gemacht werden. Die von wolfcraft
gewährte Garantie schränkt Ihre gesetzlichen Rechte als Verbraucher (Nacherfüllung, Rücktritt oder Minderung,
Schadens- oder Aufwendungsersatz)
nicht ein.
Garantieansprüche sind zu richten an:
wolfcraft GmbH
Wolffstraße 1
56746 Kempenich
Germany
13
t
Vinyl and laminate cutter
Intended use
This appliance which does not require any further tools is suitable for cutting vinyl and laminate to size and can exclusively
be used for processing:
• self-adhesive and non-self-adhesive vinyl or PVC panels with a maximum width of 46.5 cm and a maximum thickness
of 6 mm as well as
• laminate with a maximum width of 46.5 cm and MDF/HDF boards with a thickness of 11 mm + impact sound insulation
The blade of the vinyl and laminate cutter has been made from non-wearing material and comes with a special anti-stick
coating. In order to attain the best cutting results, possible residues of glue should be removed from the blade or from
the aluminium profile. Due to its special shape, the blade needs neither be ground and sharpened nor is it admissible.
The blade holder’s screwed connection should be re-tightened, if necessary.
Attention: The screw joints on the blade holder must be tightened if necessary. The screw joints must only be tightened
to the extent that the cutting blade can be opened and closed at the handle with slight resistance (see illustrations, page 10).
Please note the illustrations on pages 2 - 10 how to assemble and operate the appliance.
Operating instructions
1. Raise the cutting blade with the handle upwards
2. Push the laminate board against the guide edge, so that a precise cutting angle of 90° will be created.
Hint: Support the other end of the laminate board, so that it will be pushed horizontally against
the guide edge.
3. A clean cut is achieved by pressing the cutting blade with the handle steadily downwards.
Please make sure to push the blade straight down, in order to get an optimal result.
Bdal 6939.000 143006939 31.01.18 12:58 Seite 13

t
4. Attention: Remove the angle stop before making angular & longitudinal cuts (e.g. for the end boards). The laminate or vinyl
must be guided against the cutting blade by applying gentle pressure with the free hand in order to achieve precise
positioning for the cut. The cutting blade must then be evenly pressed downwards with the guide hand at the grab handle.
(see illustrations, page 7).
5. Attention: When cutting laminate or vinyl with thicknesses from 5 - 11 mm to length, the right and left cutting bars must be
installed in the holes (position 2) (= as-delivered condition). When cutting laminate or vinyl with thicknesses below 5 mm
to length, the two cutting bars must be installed in the holes (position 1). A cleaner cut can be guaranteed by reducing
the distance to the blade (see illustrations, page 5).
Safety instructions:
• Operate the appliance only by using its handle; keep your fingers off the cutting area.
• Always operate the appliance alone!
• Leave the blade in its closed position, when the appliance is not in use. When opening the blade move it right to the limit stop
at rear.
• Do not make any modifications or changes to the appliance.
• Never sharpen the blade!
• Make sure that both you and the appliance have a safe position on a stable surface.
• Check before starting to work that the equipment used is properly installed (such as screwed connections).
• Make sure your clothing fits tightly (especially the sleeves) and that you wear eye protection.
• Keep children out of your workshop and store your equipment and tools in a secure place.
• Never let inexperienced personnel work with your equipment and tools without duly supervising and instructing them.
• Always work methodically, in a concentrated fashion and with sufficient lighting.
Warranty statement
Dear DIY enthusiast,
You have purchased a high-quality wolfcraft appliance which we know you will enjoy using.
wolfcraft appliances are built to high technical standards and undergo intensive development and testing before leaving
the factory. Constant checks and regular tests during their production ensure a high standard of quality. Sound technical
developments and reliable quality assurance give you the certainty that you have made the right purchase decision.
For this wolfcraft product we grant you a 10 year guarantee from the date of purchase, provided the appliance is used
exclusively for DIY purposes.
This warranty only covers damage to the object of purchase itself and only such damage that is attributable to material
or manufacturing defects. This guarantee does not cover defects or damage attributable to improper operation or inadequate
maintenance of the appliance. Moreover, the guarantee does not include the effects of normal wear, or defects or damage
known to the customer upon conclusion of the purchase contract. Guarantee claims can only be asserted upon submission
of the invoice/proof of purchase. The guarantee granted by wolfcraft does not restrict your legal rights as a consumer
(supplementary performance, rescission or reduction, compensation for damages or expenses).
Warranty claims should be addressed to:s
wolfcraft GmbH
Wolffstraße 1
56746 Kempenich
Germany
14
Bdal 6939.000 143006939 31.01.18 12:58 Seite 14

p
Presse coupante pour vinyle et sols stratifiés
Utilisation conforme
Cette presse coupante pour vinyle et sols stratifiés sert exclusivement à sectionner à la main les objets suivants,
et ne devra être mise en œuvre qu’à cette fin :
• Lames et dalles de vinyle et de PVC adhésives ou à cliquer faisant 46,5 cm de largeur maxi et 6 mm d’épaisseur maxi.
• Sols stratifiés faisant 46,5 cm de largeur maxi. avec une épaisseur du matériau MDF/HDF de 11 mm + l’épaisseur de la feuille
absorbant les bruits de pas
Fabriquée dans un matériau inusable, la lame de la presse coupante pour vinyle et sols stratifiés est dotée d’un revêtement
antiadhésif spécial. Pour obtenir un résultat de coupe optimal, veuillez retirer les résidus de colle éventuellement présents sur
la lame ou sur le profilé en aluminium. En raison de sa forme spéciale, la lame ne demande ni affûtage ni aiguisage,
opérations au demeurant proscrites. Suivant le besoin, il faudra resserrer la vis de jonction équipant le logement de la lame.
Suivant le besoin, il faudra resserrer la vis de jonction équipant le logement de la lame.
Attention : les assemblages à vis au niveau du logement de la lame doivent être resserrés au besoin. Les assemblages à vis
doivent être serrés de façon à ce que la lame de coupe puisse être ouverte ou fermée avec la poignée en offrant une légère
résistance (voir les illustrations en page 10).
Veuillez tenir compte des illustrations aux pages 2 à 10, relatives au montage et à l'utilisation de l'appareil.
Consignes d'utilisation
1. Levez la presse coupante en grand par la poignée.
2. Posez la planche stratifiée contre le bord de guidage. L’angle dès lors formé par la presse coupante et
la planche fait exactement 90°. Un conseil : placez un appui sous l’autre extrémité de la planche pour qu’elle reste bien
à l’horizontale contre l’arête de guidage.
3. Appuyez sur la poignée de la presse coupante et faîtes-la descendre à vitesse constante. La presse réalise une coupe nette
dans la planche. Pour obtenir un résultat optimal, veillez à enfoncer la lame bien droite.
4. Attention : pour réaliser des coupes en angle et longitudinales (p. ex. sur les lames aboutissant en rive),
il faudra retirer la butée d'angle avant d'effectuer la coupe. Présenter le sol stratifié (ou vinyle) sur la lame de coupe à l'aide
de la main libre en exerçant une légère pression pour trouver la position de coupe exacte. Enfin, abaisser la lame de coupe
à l'aide de la main de guidage en appuyant sur la poignée (voir les illustrations en page 7).
5. Attention : pour la découpe des sols stratifiés ou vinyle d'une épaisseur de 5 à 11 mm, les guides de coupe gauche et droit
doivent être placés dans les trous de perçage en position 2 (= position lors de la livraison). Pour la découpe des sols stratifiés
ou vinyle d'une épaisseur inférieure à 5 mm, les deux guides de coupe doivent être placés dans les trous de perçage en
position 1. La réduction de l'écart par rapport à la lame garantit une coupe plus nette (voir les illustrations en page 5).
Consignes de sécurité :
• N'utilisez l’appareil que par la poignée. Ne retenez en aucun cas la planche avec les doigts !
• L’utilisation de cet appareil à deux personnes est interdite !
• Lorsque vous ne vous servez pas de la presse coupante, maintenez la lame en position fermée.
Lorsque vous ouvrez la presse, déplacez la lame jusqu’en butée arrière.
• Ne modifiez aucunement le produit et ne lui changez rien.
• N’affûtez en aucun cas la lame !
• Veillez toujours à vous tenir d’aplomb et à ce que l’appareil repose lui aussi d’aplomb.
• Vérifiez toujours, avant d’entamer le travail, que les appareils utilisés ont été correctement montés
(leurs jonctions par vis par exemple).
• Veillez à porter des vêtements moulants (les manches surtout) et des lunettes enveloppantes.
• Éloignez les enfants de votre atelier et conservez vos appareils et outils en lieu sûr.
• Ne permettez jamais à des personnes inexpérimentées de travailler avec vos appareils et outils sans avoir reçu d’instructions
et sans surveillance.
• Planifiez toujours bien votre travail, concentrez-vous et prévoyez un éclairage suffisant.
15
Bdal 6939.000 143006939 31.01.18 12:58 Seite 15

p
Garantie
Chère amie bricoleuse, cher ami bricoleur,
Vous avez acheté un produit wolfcraft de grande qualité qui vous apportera certainement beaucoup de satisfactions
pour vos travaux de bricolage.
Les produits wolfcraft répondent à une exigence technique élevée et avant leur livraison aux revendeurs, ils subissent des phases
poussées de tests et de développements. Les contrôles permanents et les tests réguliers faits pendant la fabrication en série
garantissent le maintien d’un niveau de qualité élevé. Les développements techniques sérieux et les contrôles fiables de qualité
sont la garantie d’un achat judicieux. Le produit wolfcraft bénéficie d’une garantie de 10 ans à partir de la date d’achat
à condition que vous n’utilisiez le produit que pour le bricolage chez vous.
Ne sont couverts par la garantie que les dommages subis par le produit lui-même et seulement ceux imputables à un vice
de matière ou de fabrication. Ne sont pas couverts par la garantie les vices et les dommages imputables à une utilisation
inappropriée ou à un défaut d’entretien. Ne sont pas non plus couverts par la garantie les effets habituels de l’usure ainsi
que l’usure générale par l’utilisation et les vices et les dommages que l’acheteur connaissait au moment de la vente. Les recours
en garantie ne sont recevables que sur présentation de la facture/justificatif d’achat. La garantie donnée par wolfcraft
ne limite pas vos droits en tant que consommateur (droits à la mise en conformité, résiliation ou minoration,
réparation des dommages ou remboursement des frais).
Les réclamations dans le cadre de la garantie sont à adresser à :
wolfcraft GmbH
Wolffstraße 1
56746 Kempenich
Germany
16
n
Guillotina para corte de vinilo y laminados
Uso destinado:
Esta guillotina para corte de vinilo y laminados está destinada exclusivamente al corte a medida manual de:
• losetas autoadhesivas y no autoadhesivas de vinilo o PVC con un ancho máximo de 46,5 cm y un grosor máximo de 6 mm
• laminados con un ancho máximo de 46,5 cm y un grosor del MDF/HDF de 11 mm + sistema de insonorización de pisadas
La cuchilla de la guillotina para corte de vinilo y laminados está hecha de un material sin desgaste provisto de un revestimiento
antiadherente especial. Para obtener los mejores cortes posibles deberían eliminarse eventuales residuos de adhesivo en la hoja
o el perfil de aluminio. Debido a su forma especial, la cuchilla no requiere afilado ni debería tampoco afilarse.
Reapriete en caso necesario la unión roscada situada en el alojamiento de la cuchilla.
Atención: Las uniones roscadas del portacuchillas se deben reapretar cuando sea necesario. Las uniones roscadas se deben
apretar de forma que sea posible abrir y cerrar la cuchilla por el mango con una ligera resistencia (véanse las imágenes,
página 10).
Observe las ilustraciones en las páginas 2 - 10 para el montaje y manejo de la herramienta.
Instrucciones de uso
1. Abra por completo la hoja tirando del mango.
2. Aplique la tabla de laminado contra el canto de guía. Así obtendrá un ángulo de corte exacto de 90 grados.
Consejo: Coloque un apoyo debajo del extremo opuesto de la tabla de laminado para que descanse horizontalmente
contra el canto de guía.
3. Presionando uniformemente por el mango la hoja hacia abajo, se logra un corte limpio. Asegúrese de presionar
la hoja en forma recta hacia abajo para obtener un resultado óptimo.
Bdal 6939.000 143006939 31.01.18 12:58 Seite 16

n
4. Atención: Retire el tope angular antes de realizar cortes angulares y longitudinales (por ejemplo para tablas terminales).
El laminado o el vinilo debe guiarse con la mano libre ejerciendo una ligera presión hacia la cuchilla de corte, para obtener
una colocación exacta para el corte. A continuación, presionar el mango de la cuchilla de corte hacia abajo de manera
uniforme con la mano guía (véanse las imágenes, página 7).
5. Atención: Al tronzar laminado o vinilo con un grosor de 5 - 11 mm, deben montarse las regletas de corte izquierda y derecha
en los orificios (posición 2) (= estado de entrega). Al tronzar laminado o vinilo con un grosor inferior a 5 mm, deben montarse
ambas regletas de corte en los orificios (posición 1). Reduciendo la distancia hasta la cuchilla se asegura un corte limpio
(véanse las imágenes, página 5).
Instrucciones de seguridad:
• Maneje la unidad sólo por el mango, manteniendo apartados sus dedos de la zona de corte.
• ¡Maneje la unidad únicamente sólo!
• Mantenga cerrada la hoja cuando no esté utilizando el producto. Mueva la hoja hacia atrás hasta el tope cuando la abra.
• No modifique el producto.
• ¡No afile en ningún caso la hoja!
• Asegúrese de que Ud. mismo y la unidad se encuentren siempre en una posición firme y segura.
• Antes de empezar a trabajar, compruebe siempre el montaje correcto de los equipos empleados
(por ejemplo las uniones roscadas).
• Asegúrese de que su ropa se encuentre bien ceñida al cuerpo (especialmente las mangas) y proteja sus ojos.
• No permita la entrada de niños en su taller, y conserve sus equipos y herramientas en un lugar seguro contra el uso indebido.
• No permita nunca que personas inexpertas trabajen con sus equipos y herramientas sin estar debidamente instruidas
o supervisadas.
• Trabaje siempre de manera concentrada y metódica y con un alumbrado suficiente.
Declaración de garantía
Estimado/a aficionado/a al bricolaje:
Acaba de adquirir un valioso producto de wolfcraft que le dará grandes alegrías en sus tareas de bricolaje.
Los productos de wolfcraft cumplen con los estándares técnicos más altos y son sometidos, antes de llegar al mercado,
a procesos intensivos de pruebas y desarrollo. Durante la fabricación en serie se garantiza el alto nivel de calidad mediante
controles continuos y pruebas regulares. La solidez de nuestros desarrollos técnicos y la fiabilidad de nuestros controles
de calidad le garantizan que ha tomado la decisión de compra correcta. Para el producto de wolfcraft que ha adquirido
le ofrecemos 10 años de garantía desde la fecha de compra, siempre que lo utilice únicamente en tareas de bricolaje.
La propia garantía cubre exclusivamente los daños del producto adquirido y solamente aquellos que se deban a defectos
de fabricación o de los materiales. La garantía no cubre los daños y defectos que se produzcan por un uso inadecuado
o por falta de mantenimiento. Del mismo modo, la garantía no cubre los signos de desgaste habitual ni el deterioro normal
por su uso, ni tampoco los daños o defectos que pueda comunicar el cliente una vez finalizado el contrato de garantía.
Las reclamaciones en garantía solo podrán efectuarse presentando una factura o comprobante de compra válidos.
La garantía concedida por wolfcraft no va en perjuicio de sus derechos legales como comprador (cumplimiento posterior,
desistimiento o reducción, así como resarcimiento de los gastos o daños).
Las reclamaciones en garantía deben dirigirse a:
wolfcraft GmbH
Wolffstraße 1
56746 Kempenich
Alemania
17
Bdal 6939.000 143006939 31.01.18 12:58 Seite 17

L
Vinyl- en laminaatsnijder
Voorschriftmatig gebruik
Deze vinyl- en laminaatsnijder is uitsluitend geschikt en mag alleen gebruikt worden voor het niet-machinaal
op maat snijden van:
• zelfklevende en niet zelfklevende vinyl- of PVC-panelen met een maximale breedte van 46,5 cm en een
maximale dikte van 6 mm
• laminaat met een maximale breedte van 46,5 cm en een dikte van MDF/HDF van 11 mm + contactgeluidisolatie
Het mes van de vinyl- en laminaatsnijder bestaat uit slijtvast materiaal met een speciale antikleeflaag.
Voor optimale snijresultaten moeten eventuele lijmresten op het mes of op het aluminiumprofiel verwijderd worden.
Door de speciale vorm van het mes is slijpen of scherpen van het snijmes niet nodig en ook niet toegestaan.
Indien nodig moet de schroefverbinding aan de meshouder vaster worden aangedraaid.
Let op: draai de schroefverbindingen van de meshouder zo nodig aan. De schroefverbindingen mogen slechts zo vast worden
aangedraaid dat het mes aan het handvat met lichte weerstand kan worden geopend of gesloten.
(zie afbeeldingen, pagina 10).
Kijk goed naar de afbeeldingen op pagina 2 - 10 voor de montage en de bediening van het apparaat en neem
de voorschriften in acht.
Gebruiksaanwijzingen
1. Klap het snijblad aan de handgreep volledig open.
2. Leg de laminaatplank tegen de geleidekant aan, daardoor ontstaat een exacte snijhoek van 90 graden.
Tip: Leg iets onder het andere uiteinde van de laminaatplank zodat deze horizontaal tegen de geleidekant
aan ligt.
3. Als het snijblad gelijkmatig aan de handgreep omlaag wordt gedrukt, ontstaat een zuivere snede.
Let erop dat u het snijmes recht naar beneden drukt zodat u een optimaal resultaat bereikt.
4. Let op: Bij hoeksnedes en voor een langssnede (bijv.: voor eindplanken) dient de hoekaanslag vóór de snede te worden
verwijderd. Het laminaat of het vinyl dient met de vrije hand en met lichte druk tegen het mes te worden gedrukt om de
snede nauwkeurig te beginnen. Druk het mes vervolgens met uw dominante hand geleidelijk omlaag door middel van
het handvat (zie afbeeldingen, pagina 7).
5. Let op: Bij het inkorten van laminaat of vinyl met een dikte van vijf tot elf millimeter dienen de rechter en linker snijlatten
in de boringen (positie 2) te worden gemonteerd (dit is de leveringstoestand). Bij het inkorten van laminaat of vinyl met
een dikte van minder dan vijf millimeter dienen de beide snijlatten in de boringen (positie 1) te worden gemonteerd.
Doordat de afstand tot het mes korter is, wordt een zuivere snede gewaarborgd (zie afbeeldingen, pagina 5).
Veiligheidstips:
• Bedien het apparaat uitsluitend aan de handgreep, houd uw vingers in ieder geval buiten het snijbereik van het mes.
• Bedien het apparaat altijd uitsluitend alleen!
• Laat het mes dicht als u het product niet gebruikt. Als u het mes opent, moet u dit tot aan de aanslag naar achteren drukken.
• Geen wijzigingen of veranderingen aan het product uitvoeren.
• Het mes onder geen enkele voorwaarde slijpen!
• Let er steeds op dat u en het apparaat stevig en stabiel staan.
• Controleer iedere keer voor u begint te werken of de gebruikte toestellen goed gemonteerd zijn (bijv. schroefverbindingen).
• Zorg voor goed aansluitende kleding (vooral mouwen) en draag een oogbeschermer.
• Laat geen kinderen toe op de plaats waar u werkt. en bewaar uw apparaten en werktuig achter slot en grendel
op een veilige plaats.
• Laat nooit onervaren krachten zonder instructie of toezicht werken met uw apparaten en werktuig.
• Ga altijd systematisch te werk, werk geconcentreerd en zorg voor voldoende licht.
18
Bdal 6939.000 143006939 31.01.18 12:58 Seite 18

L
Garantieverklaring
Beste doe-het-zelver,
U hebt een hoogwaardig wolfcraft-product gekocht, waarvan u bij het doe-het-zelven veel plezier zult hebben.
wolfcraft-producten voldoen aan een hoge technische norm en doorlopen intensieve ontwikkelings- en testfasen voordat ze
in de handel terechtkomen. Gedurende de serieproductie zorgen voortdurende controles en regelmatige tests voor een hoge
kwaliteitsstandaard. Degelijke technische ontwikkelingen en betrouwbare kwaliteitscontroles bieden u de zekerheid van
een juiste aankoop. Op het gekochte wolfcraft-product verlenen wij 10 jaar garantie vanaf de aankoopdatum, op voorwaarde
dat het product alleen voor het doe-het-zelven wordt gebruikt.
De garantie omvat alleen schade aan het gekochte product zelf, en dan uitsluitend schade als gevolg van materiaal- en
fabricagefouten. Gebreken en schade als gevolg van ondeskundige bediening of gebrekkig onderhoud zijn van deze
garantie uitgesloten. Ook normale gebruikssporen en normale slijtage evenals gebreken en schade die bij het aangaan
van de overeenkomst bij de klant bekend waren, zijn van de garantie uitgesloten. Garantieclaims kunnen alleen op vertoon
van de factuur/aankoopbon in behandeling worden genomen. De door wolfcraft verleende garantie laat uw wettelijke
rechten als consument (nakoming bij non-conformiteit, ontbinding of prijsvermindering, schade- of onkostenvergoeding)
onverlet.
Garantieclaims kunnen worden gericht aan:
wolfcraft GmbH
Wolffstraße 1
56746 Kempenich
Duitsland
19
y
Taglierina per pavimenti vinilici e in laminato
Uso a norma di legge
Questa taglierina per pavimenti vinilici e in laminato può essere utilizzata esclusivamente per tagliare su misura:
• pavimenti autoadesivi, in vinile e/o PVC, con una larghezza massima di 46,5 cm e uno spessore massimo di 6 mm
• pavimenti in laminato con una larghezza massima di 46,5 cm e uno spessore di MDF/HDF di 11 mm + isolamento acustico
anticalpestio
La lama della taglierina per pavimenti vinilici e in laminato è realizzata in materiale non soggetto ad usura, dotato di uno
speciale rivestimento antiaderente. Per ottenere degli ottimi risultati di taglio è consigliabile rimuovere eventuali residui
di colla presenti sulla lama o sul profilo di alluminio. Non è necessario né consentito affilare la lama.
All’occorrenza stringere nuovamente il raccordo a vite sulla base della lama.
Attenzione: i collegamenti a vite all'alloggiamento della lama possono essere stretti all'occorrenza. I collegamenti a vite
dovrebbero essere fissati solo quanto basta perché il coltello possa essere aperto o chiuso fino all'impugnatura opponendo
una leggera resistenza (vedere le figure a pagina 10).
Si prega di osservare le illustrazioni presenti a pagina 2 - 10 per il montaggio e l’uso dell’apparecchio.
Istruzioni per l’uso
1. Alzare la lama.
2. Posizionare la tavola di laminato sul bordo di guida in modo da formare un angolo retto per un taglio preciso.
Consiglio: porre l’altra estremità della tavola in modo che poggi orizzontalmente sul bordo di guida.
3. Tirando la lama verso il basso, con attenzione e precisione, si esegue un taglio netto.
Bdal 6939.000 143006939 31.01.18 12:58 Seite 19

y
4. Attenzione: per tagli angolari e per taglio longitudinale (ad esempio: per tavole di chiusura) rimuovere la staffa
angolare prima di eseguire il taglio. Il laminato e/o il vinile deve essere spostato con la mano libera, mediante una leggera
pressione, fin contro il coltello al fine di ottenere un riferimento esatto per il taglio. In seguito, con la mano guida, spingere
verso il basso il coltello in modo uniforme utilizzando l'impugnatura (vedere le figure a pagina 7).
5. Attenzione: in caso di tagli su misura di laminato e/o vinile spesso 5 - 11 mm, i listelli di taglio destro e sinistro devono essere
montati in corrispondenza dei fori (posizione 2) (= stato al momento della consegna). In caso di tagli su misura di laminato
e/o vinile spesso meno di 5 mm, entrambi i listelli di taglio devono essere montati in corrispondenza dei fori (posizione 1).
La riduzione della distanza dalla lama garantisce un taglio più netto (vedere le figure a pagina 5).
Avvertenze di sicurezza:
• Usare la taglierina con il manico tenendo assolutamente lontano le dita dalla zona di taglio.
• Usare la taglierina sempre da sola!
• Lasciare la lama chiusa quando non si usa l’apparecchio.
• Non apportare alcuna modifica al prodotto.
• Non affilare le lame in nessuna circostanza!
• Fare sempre attenzione che l’apparecchio e voi siate sempre al sicuro in una posizione stabile .
• Verificare sempre prima di iniziare a lavorare il corretto montaggio degli apparecchi in uso (ad esempio i collegamenti a vite).
• Gli abiti (soprattutto le maniche) devono essere ben aderenti ed indossare un paio di occhiali protettivi.
• Tenere lontano i bambini dalla vostra officina e conservare gli apparecchi e gi utensili al sicuro.
• Impedire a persone inesperte di utilizzare gli attrezzi senza opportune istruzioni o senza sorveglianza.
• Per il lavoro usare concentrazione e procedere secondo un piano preciso con un’adeguata illuminazione.
Dichiarazione di garanzia
Gentile cliente,
lei ha acquistato un prodotto wolfcraft di alta qualità che le sarà di grande aiuto nei lavori di bricolage.
I prodotti wolfcraft rispettano i più alti standard tecnici e, prima di essere messi in commercio, vengono sottoposti a fasi
intensive di sviluppo e test. Durante la produzione in serie, controlli continui e test regolari garantiscono i massimi standard
qualitativi. Le regolari fasi di sviluppo tecnico e gli affidabili controlli di qualità le garantiscono di aver preso una corretta
decisione d'acquisto. I prodotti wolfcraft, utilizzati esclusivamente per il settore del bricolage, sono coperti da una garanzia
di 10 anni dalla data di acquisto.
La garanzia comprende solo danni all'oggetto di acquisto stesso e danni riconducibili a difetti di materiale e fabbricazione.
La garanzia non comprende difetti e danni causati da un utilizzo improprio o da una mancanza di manutenzione.
Allo stesso modo, la garanzia non comprende danni dovuti al normale trascorrere del tempo e all'usura, nonché difetti
e danni resi noti dal cliente al termine del contratto. Le richieste di garanzia sono valide solo dietro presentazione dello
scontrino o di una prova d'acquisto. La garanzia concessa da wolfcraft non limita i suoi diritti di consumatore
(adempimento successivo, recesso o riduzione del prezzo, risarcimento dei danni o indennità).
Le richieste di garanzia devono essere rivolte a:
wolfcraft GmbH
Wolffstraße 1
56746 Kempenich
Germania
20
Bdal 6939.000 143006939 31.01.18 12:58 Seite 20
Pagina se încarcă...
Pagina se încarcă...
Pagina se încarcă...
Pagina se încarcă...
Pagina se încarcă...
Pagina se încarcă...
Pagina se încarcă...
Pagina se încarcă...
Pagina se încarcă...
Pagina se încarcă...
Pagina se încarcă...
Pagina se încarcă...
Pagina se încarcă...
Pagina se încarcă...
Pagina se încarcă...
Pagina se încarcă...
Pagina se încarcă...
Pagina se încarcă...
Pagina se încarcă...
Pagina se încarcă...
Pagina se încarcă...
Pagina se încarcă...
Pagina se încarcă...
Pagina se încarcă...
-
 1
1
-
 2
2
-
 3
3
-
 4
4
-
 5
5
-
 6
6
-
 7
7
-
 8
8
-
 9
9
-
 10
10
-
 11
11
-
 12
12
-
 13
13
-
 14
14
-
 15
15
-
 16
16
-
 17
17
-
 18
18
-
 19
19
-
 20
20
-
 21
21
-
 22
22
-
 23
23
-
 24
24
-
 25
25
-
 26
26
-
 27
27
-
 28
28
-
 29
29
-
 30
30
-
 31
31
-
 32
32
-
 33
33
-
 34
34
-
 35
35
-
 36
36
-
 37
37
-
 38
38
-
 39
39
-
 40
40
-
 41
41
-
 42
42
-
 43
43
-
 44
44


Wolfcraft PID 6939 Manualul proprietarului
- Tip
- Manualul proprietarului
în alte limbi
- Türkçe: Wolfcraft PID 6939 El kitabı
- français: Wolfcraft PID 6939 Le manuel du propriétaire
- slovenčina: Wolfcraft PID 6939 Návod na obsluhu
- dansk: Wolfcraft PID 6939 Brugervejledning
- português: Wolfcraft PID 6939 Manual do proprietário
Lucrări înrudite
Alte documente
-
BUT Armoire 2 portes AUTHENTIC en pin massif Naturel vernis Instrucțiuni de utilizare
-
Leitz 90180000 Lever Guillotine 305 Mm Manual de utilizare
-
 Dedeman 3K2FO Manual de utilizare
-
BLACK+DECKER KFBES850 Manual de utilizare
-
Hitachi CR 13VBY Handling Instructions Manual
-
-
Stanley KFFMES340 Manual de utilizare
-
-
Tristar EM-2103 Manual de utilizare
