Sony Cyber Shot DSC-T110 Manual de utilizare
- Categorie
- Camere video
- Tip
- Manual de utilizare

Printed in China
M:\072\XP EN 7.0\0112(10-20)\1\4269986511_DSC-T110-
T110D [IM]_ML\00COV\FM\03BCO.fm
master:Right
DSC-T110/T110D
4-269-986-51(1)
© 2011 Sony Corporation
GB
SK
FR
SE
IT
FI
ES
NO
PT
DK
DE
HR
NL
RO
PL
TR
CZ
GR
HU
M:\072\XP EN 7.0\0112(10-20)\1\4269986511_DSC-T110-
T110D [IM]_ML\00COV\FM\01COV.fm
master:Right
DSC-T110/T110D
4-269-986-51(1)
4-269-986-51(1)
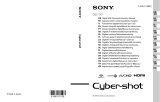
DSC-T110/T110D
GB Digital Still Camera/Instruction Manual
FR Appareil photo numérique/Mode d’emploi
IT Fotocamera digitale/Istruzioni per l’uso
ES
Cámara fotografía digital/Manual de instrucciones
PT
Câmara fotográfica digital/Manual de instruções
DE Digitale Fotokamera/Gebrauchsanleitung
NL Digitale camera/Gebruiksaanwijzing
PL
Cyfrowy aparat fotograficzny/Instrukcja obsługi
CZ Digitální fotoaparát/Návod k obsluze
HU Digitális fényképezőgép/Használati útmutató
SK Digitálny fotoaparát/Návod na používanie
SE Digital stillbildskamera/Handledning
FI Digitaalikamera/Käyttöopas
NO Digitalt stillkamera/Bruksanvisning
DK
Digitalt stillbilledkamera/Betjeningsvejledning
HR Digitalni fotoaparat/Priručnik za upotrebu
RO Aparat foto digital/Manual de instrucţiuni
TR
GR

GB
2
Owner’s Record
The model and serial numbers are located on the bottom. Record the serial number in the
space provided below. Refer to these numbers whenever you call your Sony dealer
regarding this product.
Model No. DSC-T110/T110D
Serial No. ______________________________
To reduce fire or shock hazard, do not expose the unit to rain or
moisture.
If the shape of the plug does not fit the power outlet, use an attachment plug adaptor of the
proper configuration for the power outlet.
[ Battery pack
If the battery pack is mishandled, the battery pack can burst, cause a fire or even chemical
burns. Observe the following cautions.
• Do not disassemble.
• Do not crush and do not expose the battery pack to any shock or force such as
hammering, dropping or stepping on it.
• Do not short circuit and do not allow metal objects to come into contact with the battery
terminals.
English
WARNING
CAUTION

GB
3
GB
• Do not expose to high temperature above 60°C (140°F) such as in direct sunlight or in a
car parked in the sun.
• Do not incinerate or dispose of in fire.
• Do not handle damaged or leaking lithium ion batteries.
• Be sure to charge the battery pack using a genuine Sony battery charger or a device that
can charge the battery pack.
• Keep the battery pack out of the reach of small children.
• Keep the battery pack dry.
• Replace only with the same or equivalent type recommended by Sony.
• Dispose of used battery packs promptly as described in the instructions.
[ Battery charger
Even if the CHARGE lamp is not lit, the battery charger is not disconnected from the AC
power source (mains) as long as it is connected to the wall outlet (wall socket). If some
trouble occurs while using the battery charger, immediately shut off the power by
disconnecting the plug from the wall outlet (wall socket).
The power cord (mains lead), if supplied, is designed specifically for use with this camera
only, and should not be used with other electrical equipment.
[ Notice for the customers in the countries applying EU Directives
The manufacturer of this product is Sony Corporation, 1-7-1 Konan Minato-ku Tokyo,
108-0075 Japan. The Authorized Representative for EMC and product safety is Sony
Deutschland GmbH, Hedelfinger Strasse 61, 70327 Stuttgart, Germany. For any service or
guarantee matters please refer to the addresses given in separate service or guarantee
documents.
This product has been tested and found compliant with the limits set out in the EMC
Directive for using connection cables shorter than 3 meters (9.8 feet).
[ Attention
The electromagnetic fields at the specific frequencies may influence the picture and sound
of this unit.
[ Notice
If static electricity or electromagnetism causes data transfer to discontinue midway (fail),
restart the application or disconnect and connect the communication cable (USB, etc.)
again.
For Customers in Europe

GB
4
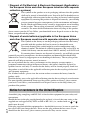
[ Disposal of Old Electrical & Electronic Equipment (Applicable in
the European Union and other European countries with separate
collection systems)
This symbol on the product or on its packaging indicates that this product
shall not be treated as household waste. Instead it shall be handed over to
the applicable collection point for the recycling of electrical and electronic
equipment. By ensuring this product is disposed of correctly, you will help
prevent potential negative consequences for the environment and human
health, which could otherwise be caused by inappropriate waste handling
of this product. The recycling of materials will help to conserve natural
resources. For more detailed information about recycling of this product,
please contact your local Civic Office, your household waste disposal service or the shop
where you purchased the product.
[ Disposal of waste batteries (applicable in the European Union
and other European countries with separate collection systems)
This symbol on the battery or on the packaging indicates that the battery
provided with this product shall not be treated as household waste.
On certain batteries this symbol might be used in combination with a
chemical symbol. The chemical symbols for mercury (Hg) or lead (Pb) are
added if the battery contains more than 0.0005% mercury or 0.004% lead.
By ensuring these batteries are disposed of correctly, you will help prevent
potentially negative consequences for the environment and human health which could
otherwise be caused by inappropriate waste handling of the battery. The recycling of the
materials will help to conserve natural resources.
In case of products that for safety, performance or data integrity reasons require a
permanent connection with an incorporated battery, this battery should be replaced by
qualified service staff only. To ensure that the battery will be treated properly, hand over
the product at end-of-life to the applicable collection point for the recycling of electrical
and electronic equipment.
For all other batteries, please view the section on how to remove the battery from the
product safely.
Hand the battery over to the applicable collection point for the recycling of waste batteries.
For more detailed information about recycling of this product or battery, please contact
your local Civic Office, your household waste disposal service or the shop where you
purchased the product.
A moulded plug complying with BS 1363 is fitted to this equipment for your safety and
convenience.
Should the fuse in the plug supplied need to be replaced, a fuse of the same rating as the
supplied one and approved by ASTA or BSI to BS 1362, (i.e., marked with an or
mark) must be used.
If the plug supplied with this equipment has a detachable fuse cover, be sure to attach the
fuse cover after you change the fuse. Never use the plug without the fuse cover. If you
should lose the fuse cover, please contact your nearest Sony service station.
Notice for customers in the United Kingdom

GB
5
GB
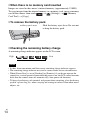
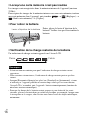
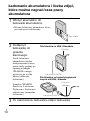
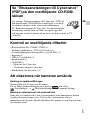
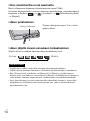
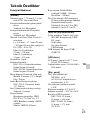
Checking the accessories supplied
• Battery charger BC-CSN/BC-CSNB (1)
• Power cord (mains lead) (not supplied in the USA and Canada) (1)
• Rechargeable battery pack NP-BN1 (1)
• Paint pen (1)
• USB, A/V cable for multi-use terminal (1)
• Wrist strap (1)
•CD-ROM (1)
– Cyber-shot application software
– “Cyber-shot Handbook”
• Instruction Manual (this manual) (1)
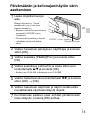
Notes on using the camera
Changing the language setting
The screen language can be changed if necessary.
To change the language setting, touch , then select (Settings) t
(Main Settings) t [Language Setting].
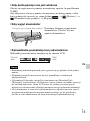
Internal memory and memory card back up
Do not turn off the camera, remove the battery pack, or remove the memory
card while the access lamp is lit. Otherwise, the internal memory data or the
memory card may be damaged. Be sure to make a backup copy to protect your
data.
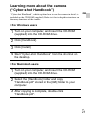
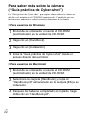
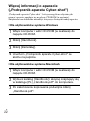
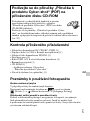
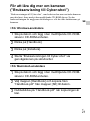
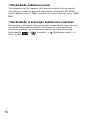
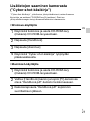
Refer to “Cyber-shot Handbook” (PDF)
on supplied CD-ROM
For details on advanced operations, please read “Cyber-
shot Handbook” (PDF) on the CD-ROM (supplied) using
a computer.
Refer to “Cyber-shot Handbook” for in-depth instructions
on shooting or viewing images and connecting the camera
to your computer, printer or TV (page 21).

GB
6
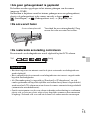
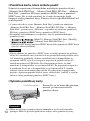
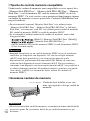
Functions built into this camera
This manual describes each of the functions of TransferJet-compatible/
incompatible devices.
To check if your camera supports the TransferJet function, check for the
following mark on the bottom of the camera.
TransferJet-compatible device: (TransferJet)
On database files
When you insert a memory card without a database file into the camera and
turn on the power, part of the memory card capacity is used to automatically
create a database file. It may take some time until you can perform the next
operation.
Notes on recording/playback
• To ensure stable operations of the memory card, we recommend that you use
this camera to format any memory card being used with this camera for the
first time. Note that formatting will erase all data recorded on the memory
card. This data cannot be restored. Be sure to backup any important data to a
PC or other storage location.
• Before you start recording, make a trial recording to make sure that the
camera is working correctly.
• The camera is neither dust-proof, nor splash-proof, nor water-proof.
• Avoid exposing the camera to water. If water enters inside the camera, a
malfunction may occur. In some cases, the camera cannot be repaired.
• Do not aim the camera at the sun or other bright light. It may cause the
malfunction of the camera.
• Do not use the camera near a location that generates strong radio waves or
emits radiation. Otherwise, the camera may not properly record or play back
images.
• Using the camera in sandy or dusty locations may cause malfunctions.
• If moisture condensation occurs, remove it before using the camera.
• Do not shake or strike the camera. It may cause a malfunction and you may
not be able to record images. Furthermore, the recording media may become
unusable or image data may be damaged.
• Clean the flash surface before use. The heat of flash emission may cause dirt
on the flash surface to become discolored or to stick to the flash surface,
resulting in insufficient light emission.
Notes on the LCD screen
• The LCD screen is manufactured using extremely high-precision technology
so over 99.99% of the pixels are operational for effective use. However,
some tiny black and/or bright dots (white, red, blue or green) may appear on
the LCD screen. These dots are a normal result of the manufacturing process,
and do not affect the recording.

GB
7
GB
• If water droplets or other liquids splash on the LCD screen and make it wet,
immediately wipe off the screen with a soft cloth. Leaving liquids on the
LCD screen surface can harm the quality and cause a malfunction.
• Do not press against the LCD screen. The screen may be discolored and that
may cause a malfunction.
Please use Sony genuine accessories
If you use accessories manufactured by companies other than Sony, this could
cause a camera trouble.
• Using other manufacturers’ camera cases with magnets could cause a power
supply trouble.
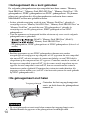
On camera’s temperature
Your camera and battery may get hot due to continuous use, but it is not a
malfunction.
On the overheat protection
Depending on the camera and battery temperature, you may be unable to
record movies or the power may turn off automatically to protect the camera.
A message will be displayed on the LCD screen before the power turns off or
you can no longer record movies. In such a case, wait until the camera and
battery completely cool down, with the power turned off. If you turn the power
on before they completely cool down, the power may turn off again or you
may be unable to record movies.
On battery charging
In rare cases, a battery that has not been used for a long time may not be
charged optimally. This is due to characteristics of the battery and not a
malfunction. Charge the battery again.
On image data compatibility
• The camera conforms with DCF (Design rule for Camera File system)
universal standard established by JEITA (Japan Electronics and Information
Technology Industries Association).
• Sony does not guarantee that the camera will play back images recorded or
edited with other equipment, or that other equipment will play back images
recorded with the camera.
Warning on copyright
Television programs, films, videotapes, and other materials may be
copyrighted. Unauthorized recording of such materials may be contrary to the
provisions of the copyright laws.
No compensation for damaged content or recording failure
Sony cannot compensate for failure to record or loss or damage of recorded
content due to a malfunction of the camera or recording media, etc.

GB
8
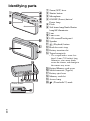
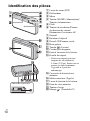
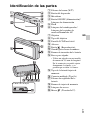
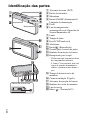
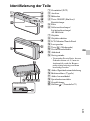
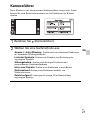
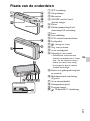
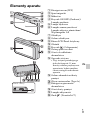
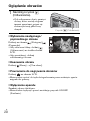
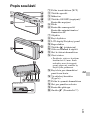
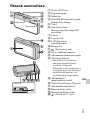
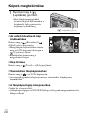
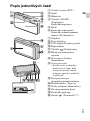
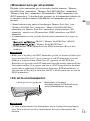
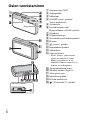
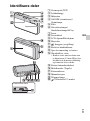
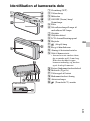
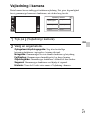
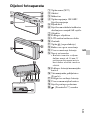
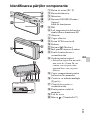
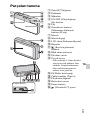
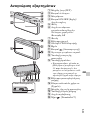
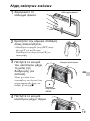
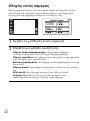
Identifying parts
A Zoom (W/T) lever
B Shutter button
C Microphone
D ON/OFF (Power) button/
Power lamp
E Flash
F Self-timer lamp/Smile Shutter
lamp/AF illuminator
G Lens
H Lens cover
I LCD screen/Touch panel
J Speaker
K (Playback) button
L Hook for wrist strap
M Battery insertion slot
N Tripod receptacle
• Use a tripod with a screw less
than 5.5 mm (7/32 inches) long.
Otherwise, you cannot firmly
secure the camera, and damage to
the camera may occur.
O Battery/Memory card cover
P Multi-connector (Type3a)
Q Battery eject lever
R Memory card slot
S Access lamp
T (TransferJet™) mark
Cover panel

GB
9
GB
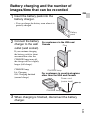
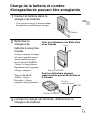
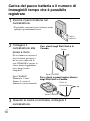
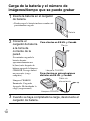
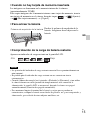
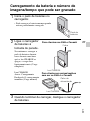
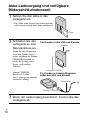
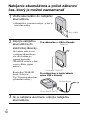
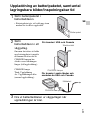
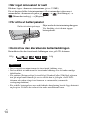
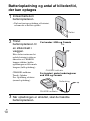
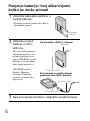
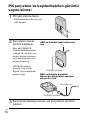
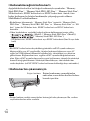
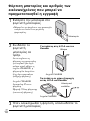
Battery charging and the number of
images/time that can be recorded
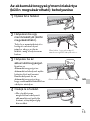
1
Insert the battery pack into the
battery charger.
• You can charge the battery even when it is
partially charged.
2
Connect the battery
charger to the wall
outlet (wall socket).
If you continue charging
the battery pack for about
one more hour after the
CHARGE lamp turns off,
the charge will last slightly
longer (full charge).
CHARGE lamp
Lit: Charging
Off: Charging finished
(normal charge)
3
When charging is finished, disconnect the battery
charger.
Battery
pack
For customers in the USA and
Canada
CHARGE lamp
Power cord
(mains lead)
CHARGE lamp
Plug
For customers in countries/regions
other than the USA and Canada

GB
10
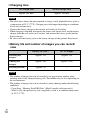
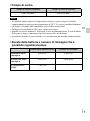
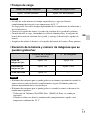
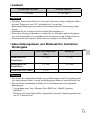
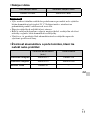
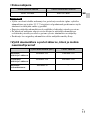
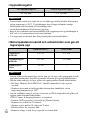
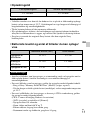
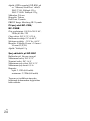
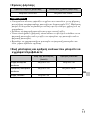
x
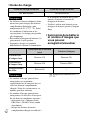
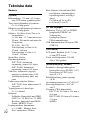
Charging time
• The table above shows the time required to charge a fully depleted battery pack at
a temperature of 25°C (77°F). Charging may take longer depending on conditions
of use and circumstances.
• Connect the battery charger to the nearest wall outlet (wall socket).
• When charging is finished, disconnect the power cord (mains lead) and the battery
charger from the wall outlet (wall socket), and remove the battery pack from the
battery charger.
• Be sure to use the battery pack or the battery charger of the genuine Sony brand.
x
Battery life and number of images you can record/
view
• The number of images that can be recorded is an approximate number when
shooting with a fully charged battery pack. The number may be less depending on
the circumstances.
• The number of images that can be recorded is when shooting under the following
conditions:
– Using Sony “Memory Stick PRO Duo” (Mark2) media (sold separately).
– When a fully charged battery pack (supplied) is used at an ambient temperature
of 25°C (77°F).
Full charge time Normal charge time
Approx. 245 min. Approx. 185 min.
Notes
Battery life (min.) No. of Images
Shooting still
images
Approx. 115 Approx. 230
Viewing still
images
Approx. 250 Approx. 5000
Shooting movies Approx. 90 —
Notes

GB
11
GB
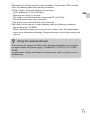
• The number of still images that can be recorded is based on the CIPA standard,
and is for shooting under the following conditions.
(CIPA: Camera & Imaging Products Association)
– [LCD Brightness] is set to [Normal].
– Shooting once every 30 seconds.
– The zoom is switched alternately between the W and T ends.
– The flash strobes once every two times.
– The power turns on and off once every ten times.
• The battery life for movies is when shooting under the following conditions:
– Recording mode: 720 FINE
– When continuous shooting ends because of set limits, press the shutter button
down again and continue shooting. Shooting functions such as the zoom do not
operate.
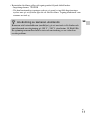
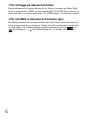
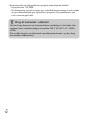
z Using the camera abroad
You can use the camera and the battery charger (supplied) in any country
or region where the power supply is within 100 V to 240 V AC, 50 Hz/
60 Hz.
An electronic voltage transformer is unnecessary and its use may cause a
malfunction.

GB
12
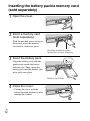
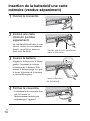
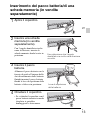
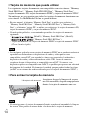
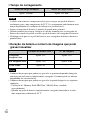
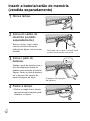
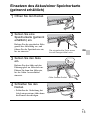
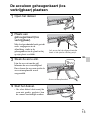
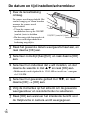
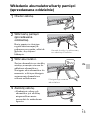
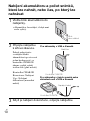
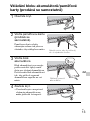
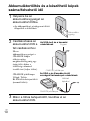
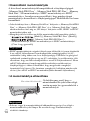
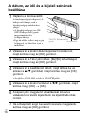
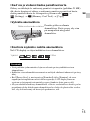
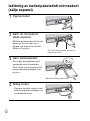
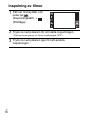
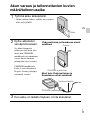
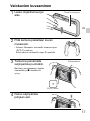
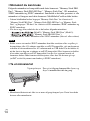
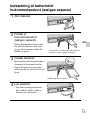
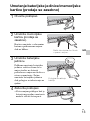
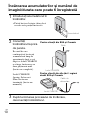
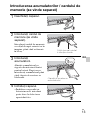
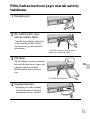
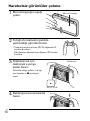
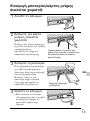
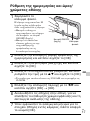
Inserting the battery pack/a memory card
(sold separately)
1
Open the cover.
2
Insert a memory card
(sold separately).
With the notched corner facing as
illustrated, insert the memory
card until it clicks into place.
3
Insert the battery pack.
Align the battery pack with the
guide arrow inside the battery
insertion slot. Then, insert the
battery pack until the battery eject
lever locks into place.
4
Close the cover.
• Closing the cover with the
battery inserted incorrectly may
damage the camera.
Note the notched corner
facing the correct direction.
Battery eject lever

GB
13
GB
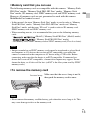
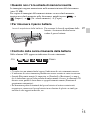
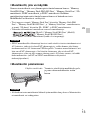
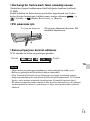
x
Memory card that you can use
The following memory cards are compatible with this camera: “Memory Stick
PRO Duo” media, “Memory Stick PRO-HG Duo” media, “Memory Stick
Duo” media, SD memory card, SDHC memory card and SDXC memory card.
However, all memory cards are not guaranteed to work with this camera.
MultiMediaCard cannot be used.
• In this manual, the term “Memory Stick Duo” media is used to refer to “Memory
Stick PRO Duo” media, “Memory Stick PRO-HG Duo” media and “Memory
Stick Duo” media, and the term “SD card” is used to refer to SD memory card,
SDHC memory card and SDXC memory card.
• When recording movies, it is recommended that you use the following memory
cards:
– (Mark2) (“Memory Stick PRO Duo” (Mark2) media)
– (“Memory Stick PRO-HG Duo” media)
– SD memory card, SDHC memory card or SDXC memory card (Class 4 or faster)
• Images recorded on an SDXC memory card cannot be transferred or played back
on computers or AV devices that are not exFAT-compatible, even when the
camera is connected to the computer or AV device using a USB cable. Before
connecting, make sure that the device is exFAT-compatible. If connected to a
device that is not exFAT-compatible, a format drive request may appear. Do not
format the drive, or all data will be lost. (exFAT is the file system used by SDXC
memory cards.)
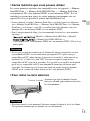
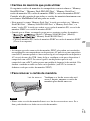
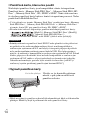
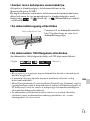
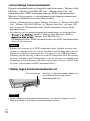
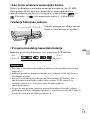
x
To remove the memory card
• Never remove the memory card/the battery pack when the access lamp is lit. This
may cause damage to data or the memory card.
Note
Make sure that the access lamp is not lit,
then push the memory card in once.
Note
Access lamp

GB
14
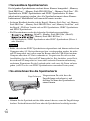
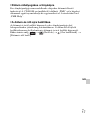
x
When there is no memory card inserted
Images are stored in the camera’s internal memory (approximately 23 MB).
To copy images from the internal memory to a memory card, insert a memory
card in the camera, then touch t (Settings) t (Memory
Card Tool) t [Copy].
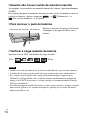
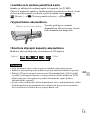
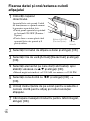
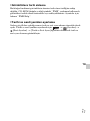
x
To remove the battery pack
x
Checking the remaining battery charge
A remaining charge indicator appears on the LCD screen.
• It takes about one minute until the correct remaining charge indicator appears.
• The remaining charge indicator may not be correct under certain circumstances.
• When [Power Save] is set to [Standard] or [Stamina], if you do not operate the
camera for a certain period of time while the power is on, the LCD screen becomes
dark, then the camera turns off automatically (Auto power-off function).
• To keep clean battery pack terminal and prevent short-circuiting, place the battery
pack in a plastic bag, etc. when carrying and storing to isolate it from other metal
objects, etc.
Slide the battery eject lever. Be sure not
to drop the battery pack.
Notes
B
attery e
j
ect
l
ever
High Low

GB
15
GB
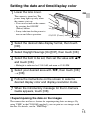
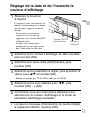
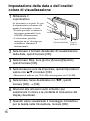
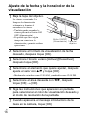
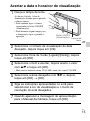
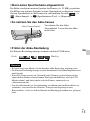
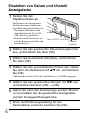
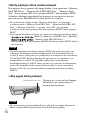
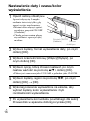
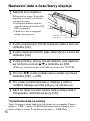
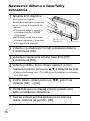
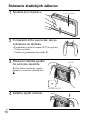
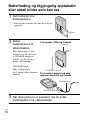
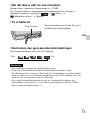
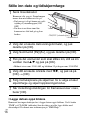
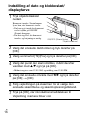
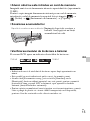
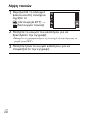
Setting the date and time/display color
x
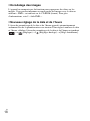
Superimposing the date on the images
The camera does not have a feature for superimposing dates on images. By
using “PMB” in the CD-ROM (supplied), you can print or save images with
the date. For details, see the “PMB Help”.
1
Lower the lens cover.
The camera is turned on. The
power lamp lights up only when
the camera starts up.
• You can also turn on the camera
by pressing the ON/OFF
(Power) button.
• It may take time for the power to
turn on and allow operation.
2
Select the desired date display format, then touch
[OK].
3
Select Daylight Savings [On]/[Off], then touch [OK].
4
Select the item to be set, then set the value with v/V
and touch [OK].
• Midnight is indicated as 12:00 AM, and noon as 12:00 PM.
5
Select your desired area with b/B, then touch [OK]
t [OK].
6
Follow the instructions on the screen to select a
desired display color and display resolution mode.
7
When the introductory message for the In-Camera
Guide appears, touch [OK].
ON/OFF (Power) button
Lens cover

GB
16
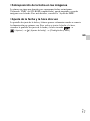
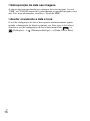
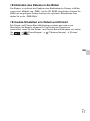
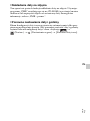
x
Setting the date and time again
The date and time setup screen appears automatically only when the power is
turned on the first time. To reset the date and time, display the date and time
setup screen by touching t (Settings) t (Clock Settings) t
[Date & Time Setting].

GB
17
GB
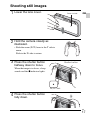
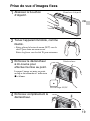
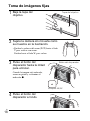
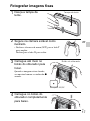
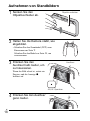
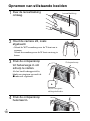
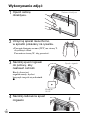
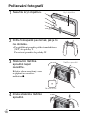
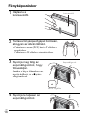
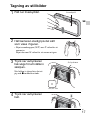
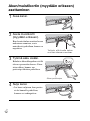
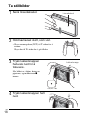
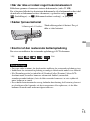
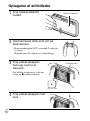
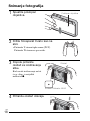
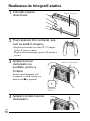
Shooting still images
1
Lower the lens cover.
2
Hold the camera steady as
illustrated.
• Slide the zoom (W/T) lever to the T side to
zoom.
Slide to the W side to return.
3
Press the shutter button
halfway down to focus.
When the image is in focus, a beep
sounds and the z indicator lights.
4
Press the shutter button
fully down.
Lens cover
Shutter button
AE/AF lock

GB
18
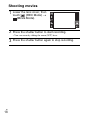
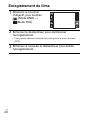
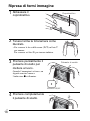
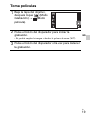
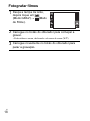
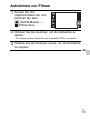
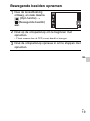
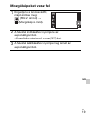
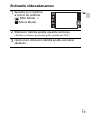
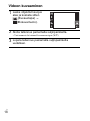
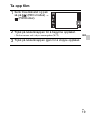
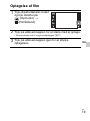
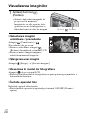
Shooting movies
1
Lower the lens cover, then
touch (REC Mode) t
(Movie Mode).
2
Press the shutter button to start recording.
• You can zoom by sliding the zoom (W/T) lever.
3
Press the shutter button again to stop recording.

GB
19
GB
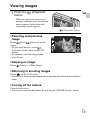
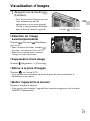
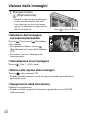
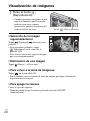
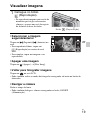
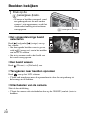
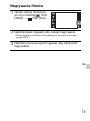
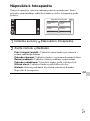
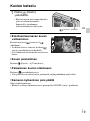
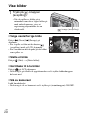
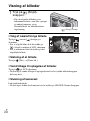
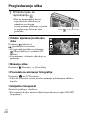
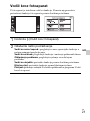
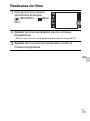
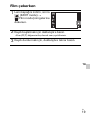
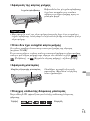
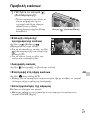
Viewing images
x
Deleting an image
Touch (Delete) t [This Image].
x
Returning to shooting images
Touch on the LCD screen.
• You can also return to shooting mode by pressing the shutter button halfway
down.
x
Turning off the camera
Close the lens cover.
• You can also turn off the camera by pressing the ON/OFF (Power) button.
1
Press the (Playback)
button.
• When you play back images on a
memory card that were recorded on
other cameras, the database file
registration screen appears.
x
Selecting next/previous
image
Touch (Next)/ (Previous) on the
screen.
• To play back movies, touch
(Playback) in the center of the LCD
screen.
• To zoom in, touch the image being
played back.
(Playback) button

GB
20
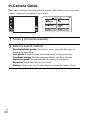
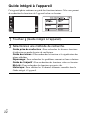
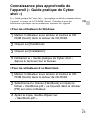
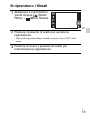
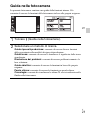
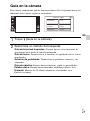
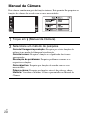
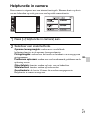
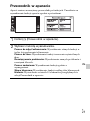
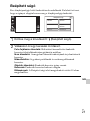
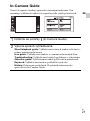
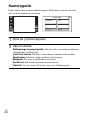
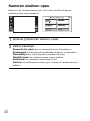
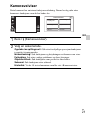
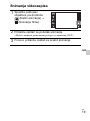
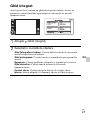
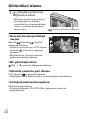
In-Camera Guide
This camera contains an internal function guide. This allows you to search the
camera’s functions according to your needs.
1
Touch (In-Camera Guide).
2
Select a search method.
Shoot/playback guide: Search for various operation functions in
shooting/viewing mode.
Icon guide: Search the function and meaning of displayed icons.
Troubleshooting: Search common problems and their solution.
Objective guide: Search functions according to your needs.
Keyword: Search functions by key words.
History: Display the last 10 items displayed in the In-Camera Guide.
Pagina se încarcă...
Pagina se încarcă...
Pagina se încarcă...
Pagina se încarcă...
Pagina se încarcă...
Pagina se încarcă...
Pagina se încarcă...
Pagina se încarcă...
Pagina se încarcă...
Pagina se încarcă...
Pagina se încarcă...
Pagina se încarcă...
Pagina se încarcă...
Pagina se încarcă...
Pagina se încarcă...
Pagina se încarcă...
Pagina se încarcă...
Pagina se încarcă...
Pagina se încarcă...
Pagina se încarcă...
Pagina se încarcă...
Pagina se încarcă...
Pagina se încarcă...
Pagina se încarcă...
Pagina se încarcă...
Pagina se încarcă...
Pagina se încarcă...
Pagina se încarcă...
Pagina se încarcă...
Pagina se încarcă...
Pagina se încarcă...
Pagina se încarcă...
Pagina se încarcă...
Pagina se încarcă...
Pagina se încarcă...
Pagina se încarcă...
Pagina se încarcă...
Pagina se încarcă...
Pagina se încarcă...
Pagina se încarcă...
Pagina se încarcă...
Pagina se încarcă...
Pagina se încarcă...
Pagina se încarcă...
Pagina se încarcă...
Pagina se încarcă...
Pagina se încarcă...
Pagina se încarcă...
Pagina se încarcă...
Pagina se încarcă...
Pagina se încarcă...
Pagina se încarcă...
Pagina se încarcă...
Pagina se încarcă...
Pagina se încarcă...
Pagina se încarcă...
Pagina se încarcă...
Pagina se încarcă...
Pagina se încarcă...
Pagina se încarcă...
Pagina se încarcă...
Pagina se încarcă...
Pagina se încarcă...
Pagina se încarcă...
Pagina se încarcă...
Pagina se încarcă...
Pagina se încarcă...
Pagina se încarcă...
Pagina se încarcă...
Pagina se încarcă...
Pagina se încarcă...
Pagina se încarcă...
Pagina se încarcă...
Pagina se încarcă...
Pagina se încarcă...
Pagina se încarcă...
Pagina se încarcă...
Pagina se încarcă...
Pagina se încarcă...
Pagina se încarcă...
Pagina se încarcă...
Pagina se încarcă...
Pagina se încarcă...
Pagina se încarcă...
Pagina se încarcă...
Pagina se încarcă...
Pagina se încarcă...
Pagina se încarcă...
Pagina se încarcă...
Pagina se încarcă...
Pagina se încarcă...
Pagina se încarcă...
Pagina se încarcă...
Pagina se încarcă...
Pagina se încarcă...
Pagina se încarcă...
Pagina se încarcă...
Pagina se încarcă...
Pagina se încarcă...
Pagina se încarcă...
Pagina se încarcă...
Pagina se încarcă...
Pagina se încarcă...
Pagina se încarcă...
Pagina se încarcă...
Pagina se încarcă...
Pagina se încarcă...
Pagina se încarcă...
Pagina se încarcă...
Pagina se încarcă...
Pagina se încarcă...
Pagina se încarcă...
Pagina se încarcă...
Pagina se încarcă...
Pagina se încarcă...
Pagina se încarcă...
Pagina se încarcă...
Pagina se încarcă...
Pagina se încarcă...
Pagina se încarcă...
Pagina se încarcă...
Pagina se încarcă...
Pagina se încarcă...
Pagina se încarcă...
Pagina se încarcă...
Pagina se încarcă...
Pagina se încarcă...
Pagina se încarcă...
Pagina se încarcă...
Pagina se încarcă...
Pagina se încarcă...
Pagina se încarcă...
Pagina se încarcă...
Pagina se încarcă...
Pagina se încarcă...
Pagina se încarcă...
Pagina se încarcă...
Pagina se încarcă...
Pagina se încarcă...
Pagina se încarcă...
Pagina se încarcă...
Pagina se încarcă...
Pagina se încarcă...
Pagina se încarcă...
Pagina se încarcă...
Pagina se încarcă...
Pagina se încarcă...
Pagina se încarcă...
Pagina se încarcă...
Pagina se încarcă...
Pagina se încarcă...
Pagina se încarcă...
Pagina se încarcă...
Pagina se încarcă...
Pagina se încarcă...
Pagina se încarcă...
Pagina se încarcă...
Pagina se încarcă...
Pagina se încarcă...
Pagina se încarcă...
Pagina se încarcă...
Pagina se încarcă...
Pagina se încarcă...
Pagina se încarcă...
Pagina se încarcă...
Pagina se încarcă...
Pagina se încarcă...
Pagina se încarcă...
Pagina se încarcă...
Pagina se încarcă...
Pagina se încarcă...
Pagina se încarcă...
Pagina se încarcă...
Pagina se încarcă...
Pagina se încarcă...
Pagina se încarcă...
Pagina se încarcă...
Pagina se încarcă...
Pagina se încarcă...
Pagina se încarcă...
Pagina se încarcă...
Pagina se încarcă...
Pagina se încarcă...
Pagina se încarcă...
Pagina se încarcă...
Pagina se încarcă...
Pagina se încarcă...
Pagina se încarcă...
Pagina se încarcă...
Pagina se încarcă...
Pagina se încarcă...
Pagina se încarcă...
Pagina se încarcă...
Pagina se încarcă...
Pagina se încarcă...
Pagina se încarcă...
Pagina se încarcă...
Pagina se încarcă...
Pagina se încarcă...
Pagina se încarcă...
Pagina se încarcă...
Pagina se încarcă...
Pagina se încarcă...
Pagina se încarcă...
Pagina se încarcă...
Pagina se încarcă...
Pagina se încarcă...
Pagina se încarcă...
Pagina se încarcă...
Pagina se încarcă...
Pagina se încarcă...
Pagina se încarcă...
Pagina se încarcă...
Pagina se încarcă...
Pagina se încarcă...
Pagina se încarcă...
Pagina se încarcă...
Pagina se încarcă...
Pagina se încarcă...
Pagina se încarcă...
Pagina se încarcă...
Pagina se încarcă...
Pagina se încarcă...
Pagina se încarcă...
Pagina se încarcă...
Pagina se încarcă...
Pagina se încarcă...
Pagina se încarcă...
Pagina se încarcă...
Pagina se încarcă...
Pagina se încarcă...
Pagina se încarcă...
Pagina se încarcă...
Pagina se încarcă...
Pagina se încarcă...
Pagina se încarcă...
Pagina se încarcă...
Pagina se încarcă...
Pagina se încarcă...
Pagina se încarcă...
Pagina se încarcă...
Pagina se încarcă...
Pagina se încarcă...
Pagina se încarcă...
Pagina se încarcă...
Pagina se încarcă...
Pagina se încarcă...
Pagina se încarcă...
Pagina se încarcă...
Pagina se încarcă...
Pagina se încarcă...
Pagina se încarcă...
Pagina se încarcă...
Pagina se încarcă...
Pagina se încarcă...
Pagina se încarcă...
Pagina se încarcă...
Pagina se încarcă...
Pagina se încarcă...
Pagina se încarcă...
Pagina se încarcă...
Pagina se încarcă...
Pagina se încarcă...
Pagina se încarcă...
Pagina se încarcă...
Pagina se încarcă...
Pagina se încarcă...
Pagina se încarcă...
Pagina se încarcă...
Pagina se încarcă...
Pagina se încarcă...
Pagina se încarcă...
Pagina se încarcă...
Pagina se încarcă...
Pagina se încarcă...
Pagina se încarcă...
Pagina se încarcă...
Pagina se încarcă...
Pagina se încarcă...
Pagina se încarcă...
Pagina se încarcă...
Pagina se încarcă...
Pagina se încarcă...
Pagina se încarcă...
Pagina se încarcă...
Pagina se încarcă...
Pagina se încarcă...
Pagina se încarcă...
Pagina se încarcă...
Pagina se încarcă...
Pagina se încarcă...
Pagina se încarcă...
Pagina se încarcă...
Pagina se încarcă...
Pagina se încarcă...
Pagina se încarcă...
Pagina se încarcă...
Pagina se încarcă...
Pagina se încarcă...
Pagina se încarcă...
Pagina se încarcă...
Pagina se încarcă...
Pagina se încarcă...
Pagina se încarcă...
Pagina se încarcă...
Pagina se încarcă...
Pagina se încarcă...
Pagina se încarcă...
Pagina se încarcă...
Pagina se încarcă...
Pagina se încarcă...
Pagina se încarcă...
Pagina se încarcă...
Pagina se încarcă...
Pagina se încarcă...
Pagina se încarcă...
Pagina se încarcă...
Pagina se încarcă...
Pagina se încarcă...
Pagina se încarcă...
Pagina se încarcă...
Pagina se încarcă...
Pagina se încarcă...
Pagina se încarcă...
Pagina se încarcă...
Pagina se încarcă...
Pagina se încarcă...
Pagina se încarcă...
Pagina se încarcă...
Pagina se încarcă...
Pagina se încarcă...
Pagina se încarcă...
Pagina se încarcă...
Pagina se încarcă...
Pagina se încarcă...
Pagina se încarcă...
Pagina se încarcă...
Pagina se încarcă...
Pagina se încarcă...
Pagina se încarcă...
Pagina se încarcă...
Pagina se încarcă...
Pagina se încarcă...
Pagina se încarcă...
Pagina se încarcă...
Pagina se încarcă...
Pagina se încarcă...
Pagina se încarcă...
Pagina se încarcă...
Pagina se încarcă...
Pagina se încarcă...
Pagina se încarcă...
Pagina se încarcă...
Pagina se încarcă...
Pagina se încarcă...
Pagina se încarcă...
Pagina se încarcă...
Pagina se încarcă...
Pagina se încarcă...
Pagina se încarcă...
Pagina se încarcă...
Pagina se încarcă...
Pagina se încarcă...
Pagina se încarcă...
Pagina se încarcă...
Pagina se încarcă...
Pagina se încarcă...
Pagina se încarcă...
Pagina se încarcă...
Pagina se încarcă...
Pagina se încarcă...
Pagina se încarcă...
Pagina se încarcă...
Pagina se încarcă...
Pagina se încarcă...
Pagina se încarcă...
Pagina se încarcă...
Pagina se încarcă...
Pagina se încarcă...
Pagina se încarcă...
Pagina se încarcă...
Pagina se încarcă...
Pagina se încarcă...
Pagina se încarcă...
Pagina se încarcă...
Pagina se încarcă...
Pagina se încarcă...
Pagina se încarcă...
Pagina se încarcă...
Pagina se încarcă...
Pagina se încarcă...
Pagina se încarcă...
Pagina se încarcă...
Pagina se încarcă...
Pagina se încarcă...
Pagina se încarcă...
Pagina se încarcă...
Pagina se încarcă...
Pagina se încarcă...
Pagina se încarcă...
Pagina se încarcă...
Pagina se încarcă...
Pagina se încarcă...
Pagina se încarcă...
Pagina se încarcă...
Pagina se încarcă...
Pagina se încarcă...
Pagina se încarcă...
Pagina se încarcă...
Pagina se încarcă...
Pagina se încarcă...
Pagina se încarcă...
Pagina se încarcă...
Pagina se încarcă...
Pagina se încarcă...
Pagina se încarcă...
Pagina se încarcă...
Pagina se încarcă...
Pagina se încarcă...
Pagina se încarcă...
Pagina se încarcă...
Pagina se încarcă...
Pagina se încarcă...
Pagina se încarcă...
Pagina se încarcă...
Pagina se încarcă...
Pagina se încarcă...
Pagina se încarcă...
Pagina se încarcă...
Pagina se încarcă...
Pagina se încarcă...
Pagina se încarcă...
Pagina se încarcă...
Pagina se încarcă...
Pagina se încarcă...
Pagina se încarcă...
Pagina se încarcă...
Pagina se încarcă...
Pagina se încarcă...
Pagina se încarcă...
Pagina se încarcă...
Pagina se încarcă...
Pagina se încarcă...
Pagina se încarcă...
Pagina se încarcă...
Pagina se încarcă...
Pagina se încarcă...
-
 1
1
-
 2
2
-
 3
3
-
 4
4
-
 5
5
-
 6
6
-
 7
7
-
 8
8
-
 9
9
-
 10
10
-
 11
11
-
 12
12
-
 13
13
-
 14
14
-
 15
15
-
 16
16
-
 17
17
-
 18
18
-
 19
19
-
 20
20
-
 21
21
-
 22
22
-
 23
23
-
 24
24
-
 25
25
-
 26
26
-
 27
27
-
 28
28
-
 29
29
-
 30
30
-
 31
31
-
 32
32
-
 33
33
-
 34
34
-
 35
35
-
 36
36
-
 37
37
-
 38
38
-
 39
39
-
 40
40
-
 41
41
-
 42
42
-
 43
43
-
 44
44
-
 45
45
-
 46
46
-
 47
47
-
 48
48
-
 49
49
-
 50
50
-
 51
51
-
 52
52
-
 53
53
-
 54
54
-
 55
55
-
 56
56
-
 57
57
-
 58
58
-
 59
59
-
 60
60
-
 61
61
-
 62
62
-
 63
63
-
 64
64
-
 65
65
-
 66
66
-
 67
67
-
 68
68
-
 69
69
-
 70
70
-
 71
71
-
 72
72
-
 73
73
-
 74
74
-
 75
75
-
 76
76
-
 77
77
-
 78
78
-
 79
79
-
 80
80
-
 81
81
-
 82
82
-
 83
83
-
 84
84
-
 85
85
-
 86
86
-
 87
87
-
 88
88
-
 89
89
-
 90
90
-
 91
91
-
 92
92
-
 93
93
-
 94
94
-
 95
95
-
 96
96
-
 97
97
-
 98
98
-
 99
99
-
 100
100
-
 101
101
-
 102
102
-
 103
103
-
 104
104
-
 105
105
-
 106
106
-
 107
107
-
 108
108
-
 109
109
-
 110
110
-
 111
111
-
 112
112
-
 113
113
-
 114
114
-
 115
115
-
 116
116
-
 117
117
-
 118
118
-
 119
119
-
 120
120
-
 121
121
-
 122
122
-
 123
123
-
 124
124
-
 125
125
-
 126
126
-
 127
127
-
 128
128
-
 129
129
-
 130
130
-
 131
131
-
 132
132
-
 133
133
-
 134
134
-
 135
135
-
 136
136
-
 137
137
-
 138
138
-
 139
139
-
 140
140
-
 141
141
-
 142
142
-
 143
143
-
 144
144
-
 145
145
-
 146
146
-
 147
147
-
 148
148
-
 149
149
-
 150
150
-
 151
151
-
 152
152
-
 153
153
-
 154
154
-
 155
155
-
 156
156
-
 157
157
-
 158
158
-
 159
159
-
 160
160
-
 161
161
-
 162
162
-
 163
163
-
 164
164
-
 165
165
-
 166
166
-
 167
167
-
 168
168
-
 169
169
-
 170
170
-
 171
171
-
 172
172
-
 173
173
-
 174
174
-
 175
175
-
 176
176
-
 177
177
-
 178
178
-
 179
179
-
 180
180
-
 181
181
-
 182
182
-
 183
183
-
 184
184
-
 185
185
-
 186
186
-
 187
187
-
 188
188
-
 189
189
-
 190
190
-
 191
191
-
 192
192
-
 193
193
-
 194
194
-
 195
195
-
 196
196
-
 197
197
-
 198
198
-
 199
199
-
 200
200
-
 201
201
-
 202
202
-
 203
203
-
 204
204
-
 205
205
-
 206
206
-
 207
207
-
 208
208
-
 209
209
-
 210
210
-
 211
211
-
 212
212
-
 213
213
-
 214
214
-
 215
215
-
 216
216
-
 217
217
-
 218
218
-
 219
219
-
 220
220
-
 221
221
-
 222
222
-
 223
223
-
 224
224
-
 225
225
-
 226
226
-
 227
227
-
 228
228
-
 229
229
-
 230
230
-
 231
231
-
 232
232
-
 233
233
-
 234
234
-
 235
235
-
 236
236
-
 237
237
-
 238
238
-
 239
239
-
 240
240
-
 241
241
-
 242
242
-
 243
243
-
 244
244
-
 245
245
-
 246
246
-
 247
247
-
 248
248
-
 249
249
-
 250
250
-
 251
251
-
 252
252
-
 253
253
-
 254
254
-
 255
255
-
 256
256
-
 257
257
-
 258
258
-
 259
259
-
 260
260
-
 261
261
-
 262
262
-
 263
263
-
 264
264
-
 265
265
-
 266
266
-
 267
267
-
 268
268
-
 269
269
-
 270
270
-
 271
271
-
 272
272
-
 273
273
-
 274
274
-
 275
275
-
 276
276
-
 277
277
-
 278
278
-
 279
279
-
 280
280
-
 281
281
-
 282
282
-
 283
283
-
 284
284
-
 285
285
-
 286
286
-
 287
287
-
 288
288
-
 289
289
-
 290
290
-
 291
291
-
 292
292
-
 293
293
-
 294
294
-
 295
295
-
 296
296
-
 297
297
-
 298
298
-
 299
299
-
 300
300
-
 301
301
-
 302
302
-
 303
303
-
 304
304
-
 305
305
-
 306
306
-
 307
307
-
 308
308
-
 309
309
-
 310
310
-
 311
311
-
 312
312
-
 313
313
-
 314
314
-
 315
315
-
 316
316
-
 317
317
-
 318
318
-
 319
319
-
 320
320
-
 321
321
-
 322
322
-
 323
323
-
 324
324
-
 325
325
-
 326
326
-
 327
327
-
 328
328
-
 329
329
-
 330
330
-
 331
331
-
 332
332
-
 333
333
-
 334
334
-
 335
335
-
 336
336
-
 337
337
-
 338
338
-
 339
339
-
 340
340
-
 341
341
-
 342
342
-
 343
343
-
 344
344
-
 345
345
-
 346
346
-
 347
347
-
 348
348
-
 349
349
-
 350
350
-
 351
351
-
 352
352
-
 353
353
-
 354
354
-
 355
355
-
 356
356
-
 357
357
-
 358
358
-
 359
359
-
 360
360
-
 361
361
-
 362
362
-
 363
363
-
 364
364
-
 365
365
-
 366
366
-
 367
367
-
 368
368
-
 369
369
-
 370
370
-
 371
371
-
 372
372
-
 373
373
-
 374
374
-
 375
375
-
 376
376
-
 377
377
-
 378
378
-
 379
379
-
 380
380
-
 381
381
-
 382
382
-
 383
383
-
 384
384
-
 385
385
-
 386
386
-
 387
387
-
 388
388
-
 389
389
-
 390
390
-
 391
391
-
 392
392
-
 393
393
-
 394
394
-
 395
395
-
 396
396
-
 397
397
-
 398
398
-
 399
399
-
 400
400
-
 401
401
-
 402
402
-
 403
403
-
 404
404
-
 405
405
-
 406
406
-
 407
407
-
 408
408
-
 409
409
-
 410
410
-
 411
411
-
 412
412
-
 413
413
-
 414
414
-
 415
415
-
 416
416
-
 417
417
-
 418
418
-
 419
419
-
 420
420
-
 421
421
-
 422
422
-
 423
423
-
 424
424
-
 425
425
-
 426
426
-
 427
427
-
 428
428
-
 429
429
-
 430
430
-
 431
431
-
 432
432
-
 433
433
-
 434
434
-
 435
435
-
 436
436
-
 437
437
-
 438
438
-
 439
439
-
 440
440
-
 441
441
-
 442
442
-
 443
443
-
 444
444
-
 445
445
-
 446
446
-
 447
447
-
 448
448
-
 449
449
-
 450
450
-
 451
451
-
 452
452
-
 453
453
-
 454
454
-
 455
455
-
 456
456
-
 457
457
-
 458
458
-
 459
459
-
 460
460
-
 461
461
-
 462
462
-
 463
463
-
 464
464
-
 465
465
-
 466
466
-
 467
467


Sony Cyber Shot DSC-T110 Manual de utilizare
- Categorie
- Camere video
- Tip
- Manual de utilizare
în alte limbi
Lucrări înrudite
-
Sony Cyber-Shot DSC TX7 Manualul utilizatorului
-
-
Sony Cyber-Shot DSC T99, T99C, T99D, T99DC Manual de utilizare
-
-
 Sony Série Cyber Shot DSC-TX7 Manual de utilizare
-
-
-
-
Sony BC-TRX Manual de utilizare
-
