
2015/05/18
EB EG
SQT0858-1
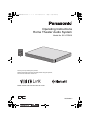
Operating Instructions
Home Theater Audio System
Model No. SC-HTE200
Thank you for purchasing this product.
Please read these instructions carefully before using this product,
and save this manual for future use.
Model number suffix “EB” denotes UK model.
SC-HTE200-SQTxxxx.book 1 ページ 2015年4月27日 月曜日 午前10時2分

2
SQT0858
Safety precautions
Unit
≥ To reduce the risk of fire, electric shock or
product damage,
jDo not expose this unit to rain, moisture,
dripping or splashing.
jDo not place objects filled with liquids, such
as vases, on this unit.
jUse only the recommended accessories.
jDo not remove covers.
jDo not repair this unit by yourself. Refer
servicing to qualified service personnel.
AC mains lead
≥ To reduce the risk of fire, electric shock or
product damage,
jEnsure that the power supply voltage
corresponds to the voltage printed on this
unit.
jInsert the mains plug fully into the socket
outlet.
jDo not pull, bend, or place heavy items on
the lead.
jDo not handle the plug with wet hands.
jHold onto the mains plug body when
disconnecting the plug.
jDo not use a damaged mains plug or socket
outlet.
≥ The mains plug is the disconnecting device.
Install this unit so that the mains plug can be
unplugged from the socket outlet immediately.
Button-type battery (Lithium battery)
≥ Risk of fire, explosion and burns. Do not
recharge, disassemble, heat above 60
o
C or
incinerate.
≥ Keep the Button-Type battery out of the reach
of children. Never put Button-Type battery in
mouth. If swallowed call your doctor.
Unit
≥ Do not place sources of naked flames, such
as lighted candles, on this unit.
≥ This unit may receive radio interference
caused by mobile telephones during use. If
such interference occurs, please increase
separation between this unit and the mobile
telephone.
≥ This unit is intended for use in moderate
climates.
Placement
≥ Place this unit on an even surface.
≥ To reduce the risk of fire, electric shock or
product damage,
jDo not install or place this unit in a
bookcase, built-in cabinet or in another
confined space. Ensure this unit is well
ventilated.
jDo not obstruct this unit’s ventilation
openings with newspapers, tablecloths,
curtains, and similar items.
jDo not expose this unit to direct sunlight,
high temperatures, high humidity, and
excessive vibration.
Button-type battery (Lithium battery)
≥ Danger of explosion if battery is incorrectly
replaced. Replace only with the type
recommended by the manufacturer.
≥ Insert with poles aligned.
≥ Mishandling of batteries can cause electrolyte
leakage and may cause a fire.
jRemove the battery if you do not intend to
use the remote control for a long period of
time. Store in a cool, dark place.
jDo not heat or expose to flame.
jDo not leave the battery(ies) in a car
exposed to direct sunlight for a long period
of time with doors and windows closed.
≥ When disposing of the batteries, please
contact your local authorities or dealer and
ask for the correct method of disposal.
WARNING CAUTION
SC-HTE200-SQTxxxx.book 2 ページ 2015年4月27日 月曜日 午前10時2分

Precautions
SQT0858
3
Caution for AC Mains Lead
(For the AC mains plug of three
pins)
For your safety, please read the following text
carefully.
This appliance is supplied with a moulded three
pin mains plug for your safety and convenience.
A 10-ampere fuse is fitted in this plug.
Should the fuse need to be replaced please
ensure that the replacement fuse has a rating of
10-ampere and that it is approved by ASTA or
BSI to BS1362.
Check for the ASTA mark Ï or the BSI mark Ì
on the body of the fuse.
If the plug contains a removable fuse cover you
must ensure that it is refitted when the fuse is
replaced.
If you lose the fuse cover the plug must not be
used until a replacement cover is obtained.
A replacement fuse cover can be purchased
from your local dealer.
Before use
Remove the connector cover.
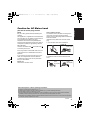
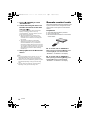
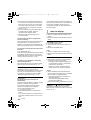
How to replace the fuse
The location of the fuse differ according to the
type of AC mains plug (figures A and B).
Confirm the AC mains plug fitted and follow the
instructions below.
Illustrations may differ from actual AC mains
plug.
1. Open the fuse cover with a screwdriver.
2. Replace the fuse and close or attach the fuse
cover.
Figure A
Figure B
Fuse cover
Figure A Figure B
Fuse
(10 ampere)
Fuse
(10 ampere)
About descriptions in these operating instructions
≥ Pages to be referred to are indicated as “> ±±”.
≥ Labels on this unit and the remote control are indicated as [±±] in these operating instructions.
≥ The illustrations shown may differ from your unit.
≥ These operating instructions are applicable to model SC-HTE200 for variety of regions. Unless otherwise indicated,
illustrations in these operating instructions are of the model for the United Kingdom and Ireland.
≥ Operations in this operating instructions are described mainly with the remote control, but you can perform the operations
on the main unit if the controls are the same.
SC-HTE200-SQTxxxx.book 3 ページ 2015年4月27日 月曜日 午前10時2分

4
SQT0858
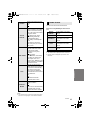
Table of contents
Safety precautions ........................................................................................... 2
Caution for AC Mains Lead ............................................................................. 3
Before use
Supplied items.................................................................................................. 5
This system (SC-HTE200) .................................................................................................. 5
Accessories ......................................................................................................................... 5
Control reference guide................................................................................... 6
This system (Front) ............................................................................................................. 6
This system (Rear) .............................................................................................................. 6
Remote control .................................................................................................................... 7
Getting started
Connections ..................................................................................................... 8
Connection with the TV ....................................................................................................... 8
Connection from an HDMI compatible device ..................................................................... 9
Connection from an other device (AUX) ........................................................................... 10
AC mains lead connection ................................................................................................ 10
Placement ....................................................................................................... 11
Safety precaution .............................................................................................................. 11
Preventing tipping ............................................................................................................. 12
Bluetooth
®
connection................................................................................... 13
Bluetooth
®
pairing ............................................................................................................. 13
Connecting a paired Bluetooth
®
device ............................................................................. 13
One-Touch Connection (Connecting by NFC) .................................................................. 13
Remote control code ..................................................................................... 14
Operations
Using this system .......................................................................................... 15
3D sound ......................................................................................................... 16
Sound menu ................................................................................................... 16
Audio format ...................................................................................................................... 17
Setup menu ..................................................................................................... 18
Linked operations with the TV (VIERA Link “HDAVI Control
TM
”)............... 19
Reference
Troubleshooting ............................................................................................. 20
About Bluetooth
®
........................................................................................... 23
Unit care .......................................................................................................... 23
Licenses .......................................................................................................... 23
Specifications ................................................................................................. 24
SC-HTE200-SQTxxxx.book 4 ページ 2015年4月27日 月曜日 午前10時2分

Getting started
Operations
Reference
Before use
Precautions
SQT0858
5
Before use
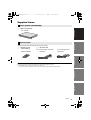
Supplied items
Check the supplied accessories before using this system.
≥ Product numbers are correct as of March 2015. These may be subject to change.
≥ The supplied AC mains lead is for use with this system only.
Do not use it with other equipment. Also, do not use cords from other equipment with this system.
This system (SC-HTE200)
∏ 1 Main unit (speaker)
(SC-HTE200)
Accessories
∏ 1 Remote control
(with a battery)
∏ 1 AC mains lead
For the United Kingdom and Ireland
For Continental Europe
(N2QAYC000098) (SFQ0018) (SFQ0016)
SC-HTE200-SQTxxxx.book 5 ページ 2015年4月27日 月曜日 午前10時2分

6
SQT0858
Control reference guide
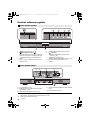
1 [ ] NFC touch area (> 13, 14)
2 [Í/I] Standby/on switch (Í/I)
Touch to switch the unit from on to standby
mode or vice versa. In standby mode, the
unit is still consuming a small amount of
power.
3[VOLj][VOLi] Adjust the volume of this
system (> 15)
4 [INPUT] Select the input source (> 15)
5 [ -PAIRING]
≥ Select the Bluetooth
®
device as the
source (> 15)
≥ Bluetooth
®
pairing (> 13)
≥ Disconnecting a Bluetooth
®
device (> 13)
6 Remote control signal sensor (> 7)
7 Display
8 AC IN terminal (> 10)
9 HDMI AV OUT (TV (ARC)) terminal (ARC
compatible) (> 8, 9)
10 HDMI AV IN (BD/DVD) terminal (> 9)
11 OPTICAL DIGITAL AUDIO IN (TV) terminal
(> 9)
12 AUX IN terminal (> 10)
§1 These switches work just by touching the marks. Each time you touch the switch, there will be a
beep sound. The beep sound can be set to off. (> 18)
§2 USB port (for service use only)
This system (Front)
6
1
7
1 1 1
234 5
1
This system (Rear)
2
8 9
10 11
12
SC-HTE200-SQTxxxx.book 6 ページ 2015年4月27日 月曜日 午前10時2分

Before use
SQT0858
7
1[Í] Turn the main unit on or off (> 15)
2 [INPUT] Select the input source (> 15)
3 [SETUP] Select the setup menu (> 18)
4 [SOUND] Select the sound menu
(> 16, 17)
5 [ -PAIRING]
≥ Select the Bluetooth
®
device as the
source (> 15)
≥ Bluetooth
®
pairing (> 13)
≥ Disconnecting a Bluetooth
®
device (> 13)
6[j VOL i] Adjust the volume of this system
(> 15)
7 [MUTE] Mute the sound (> 15)
8[4][OK][3] Select and confirm the option
∫ Before using for the first time
Remove the insulation sheet A.
≥ Dispose of the insulation sheet responsibly
after removing it.
∫ To replace a button-type battery
Battery type: CR2025 (Lithium battery)
≥ Set the button-type battery with its (i) mark
facing upward.
∫ About remote control signal sensor
The remote control signal sensor is located
on the main unit.
≥ Use the remote control within the correct
operation range.
Distance: Within approx. 7 m directly in front
Angle: Approx. 30
o
left and right
B Remote control signal sensor
Remote control
SOUND
1
5
6
7
8
2
INPUT
SETUP
OK
3
4
SC-HTE200-SQTxxxx.book 7 ページ 2015年4月27日 月曜日 午前10時2分

8
SQT0858
Getting s tarted
Connections
≥ Turn off all equipment before connection and
read the appropriate operating instructions.
Do not connect the AC mains lead until all
other connections are completed.
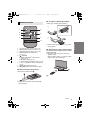
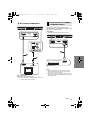
1 Verify if the TV’s HDMI terminal
is labelled “HDMI (ARC)”.
2 Make the connection.
[A] Labelled “HDMI (ARC)”
A HDMI cable
∫ HDMI (High-Definition Multimedia
Interface)
≥ The HDMI connection supports VIERA Link “HDAVI
Control” (> 19) when used with a compatible
Panasonic TV.
≥ Use the ARC compatible High Speed HDMI Cables.
Non-HDMI-compliant cables cannot be utilised.
≥ It is recommended that you use Panasonic’s HDMI
cable.
∫ HDMI standby pass-through
Even if the main unit is in standby mode, the audio and/
or video signal from the device connected to the HDMI
AV IN terminal will be sent to the TV connected to the
HDMI AV OUT terminal (the sound will not be output
from this system).
∫ 3D compatibility
Compatible with FULL HD 3D TV and Blu-ray Disc
player.
≥ The main unit can pass-through the 3D video signal
from a 3D compatible Blu-ray Disc player to a FULL
HD 3D TV.
∫ 4K/60p compatibility
Compatible with 4K Ultra HD TV and Blu-ray Disc
player.
≥ This system can pass-through the 4K content of a 4K
compatible equipment to a 4K Ultra HD TV.
≥ When connecting to 4K compatible equipment and
4K Ultra HD TV, use High Speed HDMI cables which
support 18 Gbps bandwidth.
Connection with the TV
Connection differs depending on the label
printed next to the HDMI terminal.
Labelled “HDMI (ARC)”:
Connection [A]
Not Labelled “HDMI (ARC)”:
Connection [B]
∫ What is ARC?
ARC is an abbreviation of Audio Return Channel, also
known as HDMI ARC. It refers to one of the HDMI
functions. When you connect the main unit to the
terminal labelled “HDMI (ARC)” on the TV, the optical
digital audio cable that is usually required in order to
listen to sound from a TV is no longer required, and TV
pictures and sound can be enjoyed with a single HDMI
cable.
HDMI IN (ARC)
TV
Be sure to connect to the TV’s ARC
compatible terminal. (Refer to the
operating instructions for the TV.)
SC-HTE200-SQTxxxx.book 8 ページ 2015年4月27日 月曜日 午前10時2分

Getting started
SQT0858
9
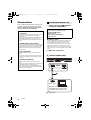
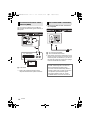
[B] Not Labelled “HDMI (ARC)”
A HDMI cable
B Optical digital audio cable
≥ When you use the optical digital audio cable, insert
the tip correctly into the terminal.
You can direct the audio signal from the
connected Blu-ray Disc player, DVD player, Set
Top Box, etc. to this system.
Preparation
≥ Connect the main unit to the TV. (> 8)
A HDMI cable
HDMI IN
OPTICAL
OUT
TV
Connection from an HDMI
compatible device
≥ Refer to the operating instructions of the connected
HDMI compatible device for the necessary setting, to
output the video and audio signals.
≥ When connecting to 4K compatible equipment and 4K
Ultra HD TV, use High Speed HDMI cables which support
18 Gbps bandwidth.
HDMI OUT
e.g., Blu-ray Disc player
SC-HTE200-SQTxxxx.book 9 ページ 2015年4月27日 月曜日 午前10時2分

10
SQT0858
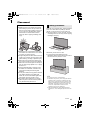
You can connect a device such as a Blu-ray
Disc recorder, DVD recorder, game machine, or
set top box.
A Audio cable
§
Refer to the operating instructions of the
respective devices for the optimal connection.
≥ Connect only after all other connections
are completed.
A AC mains lead (supplied)
B To a household mains socket
≥ This system consumes a small amount of AC
power (> 24) even when it is turned off. In the
interest of power conservation, if you will not
be using this system for a long time, unplug it
from the household mains socket.
Connection from an other
device (AUX)
L
R
AUDIO OUT
A
e.g., Set top box
TV
AC mains lead connection
Saving energy
The main unit is designed to conserve its
power consumption and save energy.
≥ The main unit will automatically switch to
standby mode when no signal is input and
no operation is performed for approx.
20 minutes. Refer to page 18, “AUTO
POWER DOWN” to turn this function off.
SC-HTE200-SQTxxxx.book 10 ページ 2015年4月27日 月曜日 午前10時2分

Getting started
SQT0858
11
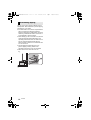
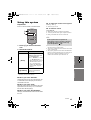
Placement
When the TV is less than 50 k
g
, and the pedestal
of the TV is within 590 mm (width) by 355 mm
(depth), you can put the TV on top of
this unit
.
≥ Do not put the TV on this unit if the TV stand
overhangs this unit. This may result in tipping,
breakage, and injury.
Otherwise, put this unit in a rack.
≥ It may become more difficult to touch
Bluetooth
®
devices to the NFC touch area on
this unit when it is placed in a rack.
Caution
≥ Make sure the TV is upright and not bent
when setting up the TV on top of this unit.
Also, do not put heavy objects on this unit.
or try to get on it. Be particularly careful
when there are small children around.
This may result in tipping, breakage, and
injury.
≥ Moving the TV on the surface of this unit
can scratch the surface of this unit. Lift the
TV when you need to move it.
≥ Toughened glass has been used on the top
of this unit. Incorrect use may result in the
glass breaking, resulting in possible injury.
≥ Take care not to scratch the glass on the
top of this unit with pointy or sharp objects.
≥ Take care not to hit the glass on the top of
this unit, drop pointy objects on it, or apply
shocks to it.
≥ If the toughened glass is used for a long
time after it is scratched, scratches may
grow and eventually lead to the glass
breaking.
≥ In very rare cases, the top glass of this unit
may break naturally. If the glass does
break, do not touch the broken glass with
bare hands. This may result in injury.
≥ Be cautious when lifting the TV. The top
plate may stick to the TV and the product
may be lifted along with the TV.
Safety precaution
≥ Do not put this unit in a metal cabinet.
≥ Interference may occur if you are using other devices
(wireless router, microwaves, cordless phones, etc.)
that use the 2.4 GHz frequency band, causing some
problems with Bluetooth
®
communication (sound is
interrupted, sound skips, there is a lot of noise, etc.).
In this case, separate this unit from the other
equipment so there is no interference.
≥ Keep magnetised items away. Magnetised cards,
watches, etc., can be damaged if put too near to this
unit.
5
9
0
m
m
3
5
5
mm
SC-HTE200-SQTxxxx.book 11 ページ 2015年4月27日 月曜日 午前10時2分

12
SQT0858
The TV may tip over during incidents such as
earthquakes. Take measures to prevent tipping
and falling for your safety.
≥ The information in this section is presented to
help you reduce the damage caused by
tipping or falling due to earthquakes, but is not
meant to guarantee this effect in the event of
an earthquake or similar incident.
≥ When setting up this unit under a TV, take the
measures against tipping described in the
operating instructions of the TV. When the TV
and TV stand are attached with the belt,
attach the belt so that this unit is between the
TV and TV stand.
≥ Use the fittings included with the TV to
prevent tipping or falling. Refer to the
operating instructions of the TV for details.
≥ Take care not to fix this unit to the TV.
A Belt
Preventing tipping
e.g.,
SC-HTE200-SQTxxxx.book 12 ページ 2015年4月27日 月曜日 午前10時2分

Getting started
SQT0858
13
Bluetooth
®
connection
By using the Bluetooth
®
connection, you can
listen to the sound of the Bluetooth
®
audio
device from this system wirelessly.
≥ Refer to the operating instructions of the Bluetooth
®
device for further instruction on how to connect a
Bluetooth
®
device.
Preparation
≥ Turn on the Bluetooth
®
feature of the device
and place the device near the main unit.
1 Press [ -PAIRING] to select
“BLUETOOTH”.
≥ If “PAIRING” is indicated on the display, go to step
3.
2 Press and hold [ -PAIRING]
until “PAIRING” is indicated on
the display.
3 Select “SC-HTE200” from the
Bluetooth
®
device’s Bluetooth
®
menu.
≥ The MAC address (e.g., 6C:5A:B5:B3:1D:0F) may be
displayed before the device name is displayed.
≥ If prompted for the passkey on the Bluetooth
®
device,
enter “0000”.
≥ Once the Bluetooth
®
device is connected, the name of
the connected device will be indicated on the display for
a few seconds.
≥ You can register up to 8 devices with this system. If a 9th
device is paired, the device that has not been used for
the longest time will be replaced.
1 Press [ -PAIRING] to select
Bluetooth
®
mode.
2 After confirming that
“BLUETOOTH READY” is
indicated on the display, select
“SC-HTE200” from the
Bluetooth
®
device’s Bluetooth
®
menu.
∫ Disconnecting a Bluetooth
®
device
Press and hold [ -PAIRING] until the
“BLUETOOTH READY” is indicated on the
display.
≥ When “BLUETOOTH” is selected as the source, this
system will automatically try and connect to the last
connected Bluetooth
®
device. If the connection attempt
fails, try to establish a connection again.
≥ This system can only be connected to one device at a
time.
≥ To change the sound quality, refer to “LINK MODE”.
(> 18)
For NFC-compatible Bluetooth
®
devices
(Android
TM
devices) only
Simply by touching an NFC (Near Field
Communication)-compatible Bluetooth
®
device
on the main unit, you can complete all
preparations, from registering a Bluetooth
®
device to establishing a connection.
Preparation
≥ Turn on the NFC feature of the device.
≥ Android device version lower than 4.1
requires the installation of the app “Panasonic
Music Streaming” (free of charge).
1
Enter “Panasonic Music Streaming” in the search
box of Google Play
TM
to search, and then select
“Panasonic Music Streaming”.
2 Start the app “Panasonic Music Streaming” on the
device.
– Follow on-screen instructions on your device.
– Always use the latest version of the app.
Bluetooth
®
pairing
Connecting a paired
Bluetooth
®
device
One-Touch Connection
(Connecting by NFC)
SC-HTE200-SQTxxxx.book 13 ページ 2015年4月27日 月曜日 午前10時2分

14
SQT0858
1 Press [ -PAIRING] to select
“BLUETOOTH”.
2 Touch and hold your device on
the NFC touch area of the main
unit [ ]. (> 6)
Do not move the Bluetooth
®
device until it beeps,
displays a message or reacts in some way.
Once the Bluetooth
®
device has reacted, move the
device away from the main unit.
≥ When the registration and connection of the
Bluetooth
®
device is complete, the name of the
connected device is indicated on the display for a
few seconds.
≥ The location of the NFC touch area differs
depending on the device. When a connection
cannot be established even if your Bluetooth
®
device has touched the NFC touch area of the main
unit, change the position of the device or main unit.
The condition may also improve if you re-download
the dedicated app “Panasonic Music Streaming”
and start it up.
3 Start playback on the Bluetooth
®
device.
≥ If you touch another device to the main unit, you can
update the Bluetooth
®
connection. The previously
connected device will be disconnected automatically.
≥ When the connection is established, playback may start
automatically depending on the type of device being
used.
≥ The One-Touch Connection may not work properly
depending on the type of device being used.
Remote control code
When other Panasonic devices respond to this
system’s remote control, change the remote
control code on this system and the remote
control.
Preparation
≥ Turn off all other Panasonic products.
≥ Turn on the main unit.
≥ Aim the remote control at this unit’s remote
control sensor.
∫ To set the code to “REMOTE 2”
While pressing and holding [MUTE], press
and hold [OK] for 4 or more seconds.
“REMOTE 2” is indicated on the display.
∫ To set the code to “REMOTE 1”
While pressing and holding [MUTE], press
and hold [4] for 4 or more seconds.
“REMOTE 1” is indicated on the display.
SC-HTE200-SQTxxxx.book 14 ページ 2015年4月27日 月曜日 午前10時2分

Getting started
Operations
SQT0858
15
Operations
Using this system
Preparation
≥ Turn on the TV and/or connected device.
1Press [Í] to turn on the main
unit.
2 Select the source.
≥ This remote control cannot be used to control the
operations of the connected devices.
∫ When you select “BD/DVD”
Change the input on the TV to the one this unit
is connected to, then start play on the device
connected to this unit.
∫ When you select “AUX”
Start play on the device connected to the audio
input terminal on this unit.(> 10, “Connection
from an other device (AUX)”)
∫ When you select “BLUETOOTH”
Start play on the Bluetooth
®
device connected to
this unit.
∫ To adjust the volume of this system
Press [j VOL i].
≥ Volume range: 0 to 100
∫ To mute the sound
Press [MUTE].
≥ While muting, “MUTE” is indicated on the display.
≥ To cancel, press the button again or adjust the volume.
≥ Muting is cancelled if the main unit is turned off.
≥ If there is sound coming out of the TV’s speakers, reduce
the volume of the TV to its minimum.
≥ There may be a difference in the maximum volume value
of the TV and the unit.
≥ When playing equipment connected to the HDMI AV IN
terminal, to switch audio/video to the TV, switch input to
the TV tuner. If VIERA Link (HDMI) (> 19) is not
enabled, also switch the input of this unit to TV.
Press To select
[INPUT]
Input changes in the
following order each time
you press [INPUT].
“TV”# “BD/DVD”# “AUX”
^----“BLUETOOTH”(-}
≥ When switching the source to
“BLUETOOTH” and then to
“TV” in succession, after
switching it to “BLUETOOTH”,
wait for a while, and press
[INPUT].
[ -PAIRING]
Select the Bluetooth
®
device as the source.
(> 13, 14)
SOUND
INPUT
SETUP
OK
1
2
If this system does not operate as
expected or sound is unusual, returning
the settings to the factory preset may
solve the problem. (> 20)
SC-HTE200-SQTxxxx.book 15 ページ 2015年4月27日 月曜日 午前10時2分

16
SQT0858
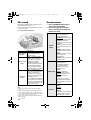
3D sound
This system provides a feeling that the sound
and the image are as one.
≥ To change the applied effect, refer to “Sound
menu”. (> right)
≥ Dolby Virtual Speaker effect is ON except STEREO
mode.
≥ To turn off Dolby Virtual Speaker and the 3D surround
effects, select “STEREO” as the sound mode. (> right)
≥ To turn off the 3D surround and the Clear-mode dialog
effects, refer to “3D CLR DIALOG”. (> 17)
≥ You can also adjust the level of the Clear-mode dialog
effect. (> right)
Sound menu
1 Press [SOUND] repeatedly to
select the sound effect.
2 Press [4][3] repeatedly to
select the desired setting and
then press [OK].
3D sound
Dolby
®
Virtual
Speaker
With this effect you can enjoy
a surround sound effect
similar to 5.1ch.
3D surround
effect
Adding to the Dolby Virtual
Speaker effect, Panasonic has
applied its own sound field
controlling technology to
expand the sound field
forwards, backwards, upwards,
and downwards, providing a
sound with depth and force
that better matches 3D images.
Clear-mode
dialog
Sports commentary and
dialogs from TV dramas are
heard as if the sound is
coming from the TV, giving
the feeling that the sound and
the image are one.
Also, the dialog will stand out
from the other sounds during
normal volume playback and
when the volume is lowered
for night time viewing.
e.g., Image of 3D sound field
SOUND
MODE
Select the sound mode to suit
the TV programme or
connected equipment.
STANDARD
: Best suited for
dramas and comedy shows.
STADIUM: Produces a
realistic sound for live sports
broadcasts.
MUSIC: Enhance the sound
of musical instruments and
songs.
CINEMA: Produces three-
dimensional sound unique to
movies.
NEWS: Enhance the voice of
news and sports
commentaries.
STEREO: Play any source of
sound in stereo.
SUBWOOFER
You can adjust the amount of
bass. This system
automatically selects the
most suitable setting
according to the type of
playback source.
LEVEL 1
LEVEL 2
: Default for
2 channel audio source
LEVEL 3
: Default for multi-
channel audio source
LEVEL 4
The setting you make is
retained and recalled every
time you play the same type
of source.
DIALOG
Adjust the dialog level.
LEVEL 1
LEVEL 2
LEVEL 3
LEVEL 4
“DIALOG” is not indicated on
the display when “3D CLR
DIALOG” is set to “OFF”.
SC-HTE200-SQTxxxx.book 16 ページ 2015年4月27日 月曜日 午前10時2分

Operations
SQT0858
17
≥
The default setting is underlined. Changed settings will be
kept until it is changed again, unless otherwise indicated.
You can view the current audio format.
Press and hold [SOUND] for more than 4
sec.
≥ The audio format is displayed for about 2 seconds.
≥ No audio format is displayed if input to this unit is
Bluetooth
®
.
H.BASS
Enhance the harmonic bass
effect.
ON
OFF
3D CLR
DIALOG
The 3D Clear Mode Dialog
feature creates a sound field
similar to the sound coming
from a TV screen and makes
dialogues clearer.
ON
: 3D Surround, Clear
Mode Dialog and Dolby
Virtual Speaker effect
OFF: Dolby Virtual Speaker
effect
The setting is set back to
“ON” every time you turn the
main unit on.
DUAL AUDIO
Sets the preferred audio
channel mode when there
are two audio modes
received by this system.
M1
: Main
M2: Secondary
M1 + M2: Main + Secondary
This effect only works if the
audio output of the TV or
player is set to “Bitstream” and
“Dolby Dual Mono” is available
in the sound source.
AGC
Auto gain control prevents
sudden loud sound by reducing
the sound level automatically
when the input is too high.
This function is suitable for
TV broadcast that has sound
level difference.
ON
OFF
If the sound becomes
unnatural, select “OFF”.
LOW VOL
MODE
Enhance the dialog in low
volume condition.
ON
OFF
Select “OFF” to cancel this effect
if the dialog does not sound
natural in low volume condition.
Audio format
DOLBY
DIGITAL
Dolby Digital is the audio
source.
DTS DTS
®
is the audio source.
PCM MULTI
Linear pulse-code
modulation is the audio
source.
PCM
2 channel pulse-code
modulation is the audio
source.
ANALOG
Analogue is the audio
source.
SC-HTE200-SQTxxxx.book 17 ページ 2015年4月27日 月曜日 午前10時2分

18
SQT0858
Setup menu
1 Press [SETUP] repeatedly to
select the setup item.
2Press [4][3] repeatedly to
select the desired setting and
then press [OK].
≥ The default setting is underlined. Changed settings will
be kept until it is changed again, unless otherwise
indicated.
DIMMER
Dims the display after
5 seconds of inactivity.
ON
OFF
BEEP
A beep sounds when you
touch the switch on the main
unit or when you turn the unit
on/off.
≥ This works during muting as
well.
ON
OFF
AUTO POWER
DOWN
The main unit automatically is
turned off if there is no audio
input and when you do not
use it for approx. 20 minutes.
ON
OFF
≥ When this is set, the display
shows “P.OFF 1” to indicate
that the main unit will turn
off in approximately 1
minute.
VOL
LIMITATION
Sets the volume limit to 50
when you turn on the main
unit although the volume is
set to above 50 before it is
turned off.
ON
OFF
BLUETOOTH
STANDBY
This function allows you to
connect a paired Bluetooth
®
device when the main unit is
in standby mode.
ON
OFF
The main unit will be turned
on automatically when you
connect a paired Bluetooth
®
device.
≥ If this function is set to
“ON”, the standby power
consumption will increase.
LINK MODE
Change the transmission
mode to prioritise
transmission quality or sound
quality. Make sure that the
Bluetooth
®
device is not
connected (“BLUETOOTH
READY” is indicated on the
display).
MODE 1: Emphasis on
connectivity.
MODE 2
: Emphasis on sound
quality.
VIERA LINK
Turn on the VIERA Link
function.
ON
OFF
Select “OFF” when your
HDAVI Control device does
not work correctly with this
system.
≥ ARC will be disabled.
Connect an optical digital
audio cable.
≥ Turn off all connected
devices and then turn them
on again after changing the
setting.
SC-HTE200-SQTxxxx.book 18 ページ 2015年4月27日 月曜日 午前10時2分

Operations
SQT0858
19
Linked operations
with the TV
(VIERA Link “HDAVI
Control
TM
”)
Preparation
1 Confirm that the HDMI connection has been
made. (> 8, 9)
2 Set the “HDAVI Control” operations on the
connected equipment (e.g., TV).
3 For the optimal “HDAVI Control” operations
change the following settings on the
connected TV
§1
.
≥ Set the default speaker settings to this system.
§2
≥ Set the speaker selection settings to this system.
4 Turn on all “HDAVI Control” compatible
equipment and select the TV’s input for this
system so that the “HDAVI Control” function
works properly.
5 If a device is connected to the HDMI AV IN
terminal, start play to check that the picture
is displayed on the TV correctly.
When the connection or settings are
changed, repeat this procedure.
§1 The availability and function of the settings may vary
depending on the TV. Refer to the operating
instructions for the TV for details.
§
2 If the TV has a default speaker setting within the VIERA Link
setting items, choosing this system as the default speaker will
automatically change the speaker selection to this system.
≥ VIERA Link “HDAVI Control”, based on the control
functions provided by HDMI which is an industry
standard known as HDMI CEC (Consumer Electronics
Control), is a unique function that we have developed
and added. As such, its operation with other
manufacturers’ equipment that supports HDMI CEC
cannot be guaranteed.
≥
This unit supports “HDAVI Control 5” function.
“HDAVI Control 5” is the standard for Panasonic’s HDAVI
Control compatible equipment. This standard is compatible
with Panasonic’s conventional HDAVI equipment.
≥
Please refer to individual manuals for other manufacturers’
equipment supporting VIERA Link function.
To make sure that the audio is output from this system, turn the
main unit on by using the TV’s remote control and selecting
home cinema from the speaker menu of VIERA Link menu.
The availability and function of the settings may vary depending on
the TV. Refer to the operating instructions for the TV for details.
∫ Speaker control
You can select whether audio output is from this system
or the TV speakers by using the TV menu settings.
Home cinema
This system is active.
≥ When the main unit is in standby mode, changing the TV
speakers to this system in the VIERA Link menu will
automatically turn the main unit on.
≥ You can control the volume setting of this system using
the volume or mute button on the TV remote control.
≥ If you turn off the main unit, TV speakers will be
automatically activated.
≥
Audio will automatically be output from this system if the TV
is compatible to VIERA Link “HDAVI Control 4” or later.
TV
TV speakers are active.
≥ The volume of this system is set to its minimum.
∫ Automatic input switching
When the following operations are performed,
the main unit will automatically change the input
to the corresponding source.
j
When play starts on an HDMI connected device.
§3
j
When the TV input or the TV channel is changed.
§
3 If the speaker output setting on the TV is set to this system, the
TV and the main unit turn on automatically (Power on link).
∫ Power off link
When the TV is turned off, the main unit also
turns off automatically. (This function does not
work when Bluetooth
®
or AUX is the source.)
∫ Automatic lip-sync function
(for HDAVI Control 3 or later)
Delay between audio and video is automatically
adjusted by adding time-lag to the audio output,
enabling you to enjoy smooth audio for the picture.
≥
It may take up to 8 seconds for sound to be output from this unit after
turning the TV (VIERA) on. You can reduce the amount of time it takes
for sound to be output by using an optical digital audio cable. If you do
so, reconnect the HDMI cable to a non-ARC compatible HDMI terminal
on the TV (VIERA). (
>
9)
≥
The delay information is automatically set if the TV is compatible to
VIERA Link “HDAVI Control 3” or later and the VIERA Link is set to on.
The setting causes a sound delay of approximately 0.04 seconds
when connected to a Panasonic TV (VIERA) with VIERA Link (HDMI)
version 2 or earlier or a TV from another manufacturer.
What is VIERA Link “HDAVI Control”?
VIERA Link “HDAVI Control” is a convenient
function that offers linked operations of this
system, and a Panasonic TV (VIERA) under
“HDAVI Control”.
You can use this function by connecting the
equipment with an HDMI cable. See the
operating instructions for connected
equipment for operational details.
What you can do with
VIERA Link “HDAVI Control”
SC-HTE200-SQTxxxx.book 19 ページ 2015年4月27日 月曜日 午前10時2分

20
SQT0858
Reference
Troubleshooting
Before requesting service, make the following
checks. If you are in doubt about some of the
check points, or if the solutions indicated in the
following guide do not solve the problem,
consult your dealer for instructions.
No power.
≥ Unplug the AC mains lead for 10 sec before
plug in again.
≥ After turning the main unit on, if the main unit
immediately turns off, unplug the AC mains
lead and consult your dealer.
≥ If the main unit does not turn on by turning on
TV (HDAVI control), turn on the main unit
manually.
If the problem persists, refer to “HDMI” in
“Troubleshooting”.
The remote control does not work properly.
≥ The battery is depleted. Replace it with a new
one. (> 7)
≥ It is possible that the insulation sheet has not
been removed. Remove the insulation sheet.
(> 7)
≥ It may be necessary to set the code of the
remote control again after changing the
battery of the remote control. (> 14)
≥ Use the remote control within the correct
operation range. (> 7)
The main unit is automatically switched to
standby mode.
“AUTO POWER DOWN” function is on.
The main unit will automatically switch to
standby mode when no signal is input and no
operation is performed for approx. 20 minutes.
Refer to page 18 to turn this function off.
The main unit is turned off when the TV’s
speakers are selected in the speaker control.
This is a normal feature when using VIERA Link
(HDAVI Control 4 or later). Please read the
operating instructions for the TV for details
about its power save feature. (> 19)
The switches on the main unit do not work.
[Í/I], [VOL j], [VOL i], [INPUT], and
[ -PAIRING] on the main unit are touch keys.
Touch the switches with your finger. They may
not work if operated with your fingernails or
hands wearing gloves.
Colour irregularities on a CRT TV.
If colour irregularities appear on the TV, turn off
the TV for about 30 minutes and move the TV
away from this unit slightly. If this does not fix
the problem, move this unit away from the TV.
This system does not operate correctly.
If the HDMI cable is connected to the wrong
terminal (HDMI AV IN or HDMI AV OUT), this
system will not operate correctly. Turn the main
unit off, disconnect the AC mains lead and
reconnect the HDMI cable(s). (> 8, 9)
VIERA Link related operations no longer
function properly.
≥ Check the VIERA Link setting on the
connected devices.
jTurn on VIERA Link function on the
connected devices.
jSelect this system as the speaker in the
TV's VIERA Link menu.
≥ Have you turned the VIERA Link settings off?
(> 18)
If this system does not operate as
expected, returning the settings to the
factory preset may solve the problem.
To return to the factory preset.
1 While the main unit is on, touch and hold
[Í/I] on the main unit for more than
4 sec.
(“RESET” is indicated on the display
when this system is reset.)
2 Turn the unit off, then turn it on again.
≥ The remote control code will return to
“REMOTE 1” when this system is returned
to the factory preset. To change the remote
control code, refer to “Remote control
code” (> 14).
General operation
HDMI
SC-HTE200-SQTxxxx.book 20 ページ 2015年4月27日 月曜日 午前10時2分
Pagina se încarcă...
Pagina se încarcă...
Pagina se încarcă...
Pagina se încarcă...
Pagina se încarcă...
Pagina se încarcă...
Pagina se încarcă...
Pagina se încarcă...
-
 1
1
-
 2
2
-
 3
3
-
 4
4
-
 5
5
-
 6
6
-
 7
7
-
 8
8
-
 9
9
-
 10
10
-
 11
11
-
 12
12
-
 13
13
-
 14
14
-
 15
15
-
 16
16
-
 17
17
-
 18
18
-
 19
19
-
 20
20
-
 21
21
-
 22
22
-
 23
23
-
 24
24
-
 25
25
-
 26
26
-
 27
27
-
 28
28


Panasonic SCHTE200EB Manualul proprietarului
- Tip
- Manualul proprietarului
- Acest manual este potrivit și pentru
în alte limbi
- English: Panasonic SCHTE200EB Owner's manual
Lucrări înrudite
-
Panasonic SCHTB500 - HOME THEATER AUDIO SYSTEM Operating Instructions Manual
-
-
-
-
-
Panasonic SCHTB527EG Manualul proprietarului
-
Panasonic SCALL5CDEB Instrucțiuni de utilizare
-
-
-