
5
9
7
1.
HTF313
2. 3.
4.
5.
6. 7.
1
2
3
4
5
7
8
9
6

HTF313
G40HT
OPERATOR MANUAL / BEDIENUNGSHANDBUCH / MANUAL DEL OPERARIO /
MANUALE DELL’OPERATORE / MANUEL OPÉRATEUR / MANUAL DE UTILIZAÇÃO /
GEBRUIKSAANWIJZING / РУКОВОДСТВО ОПЕРАТОРА / KÄYTTÖOPAS /
ANVÄNDARHANDBOK / BRUKERVEILEDNING / BRUGSVEJLEDNING / INSTRUKCJA
UŻYTKOWNIKA / NÁVOD K OBSLUZE / NÁVOD NA OBSLUHU / Uporabniški priročnik /
PRIRUČNIK ZA RUKOVANJE / HASZNÁLATI ÚTMUTATÓ / MANUAL DE UTILIZARE /
РЪКОВОДСТВО НА ОПЕРАТОРА / ΕΓΧΕΙΡΙΔΙΟ ΧΡΗΣΗΣ / / KULLANIM
KILAVUZU / / OPERATORIAU VADOVAS / LIETOTĀJA ROKASGRĀMATA /
KASUTUSJUHEND
Original Instructions / Übersetzung der Originalanweisungen / Traducción de las instrucciones originales / Traduzione delle istruzioni originali / Traduction des
instructions d'origine / Traduzido a partir das instruções originais / Vertaling van de originele gebruiksaanwijzing / Перевод оригинальных инструкций /
Alkuperäisten ohjeiden käännös / Översättning av originalinstruktionerna / Produsentens instruksjoner / Oversættelse af de originale vejledninger / Tłumaczenie
oryginalnej instrukcji / Překlad originálního návodu / Preklad originálneho návodu / Prevod originalnih navodil / Prijevod izvornih uputa / Az eredeti utasítás
fordítása / Traducere a instrucţiunilor originale / Превод на оригиналните инструкции / Αυθεντικές οδηγίες / / Orijinal
Talimatların Tercümesi / / Originalių instrukcijų vertimas / Instrukciju tulkojums no oriģinālvalodas / Originaalkasutusjuhendi tõlge


1 Description.................................... 4
1.1 Purpose......................................................4
1.2 Overview.................................................... 4
2 Safety............................................ 4
3 Installation..................................... 4
3.1 Unpack the machine...................................4
4 Operation.......................................4
4.1 Start the machine....................................... 4
4.2 Stop the machine....................................... 5
4.3 Turn the rear handle...................................5
4.4 Operation tips.............................................5
5 Maintenance..................................5
5.1 Clean the machine..................................... 5
5.2 Lubricate the blade.....................................5
6 Store the machine......................... 5
7 Troubleshooting.............................5
8 Technical data...............................6
9 Warranty........................................6
10 EC Declaration of conformity.........6
3
English
EN

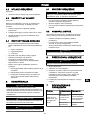
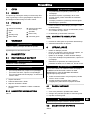
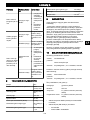
1 DESCRIPTION
1.1 PURPOSE
This machine is intended for cutting and trimming
hedges and bushes in domestic use. It is not intended
to be used for cutting above shoulder level.
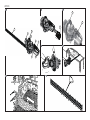
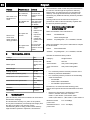
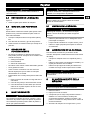
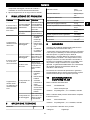
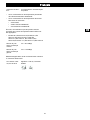
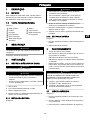
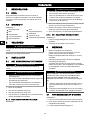
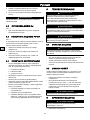
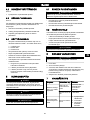
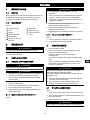
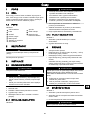
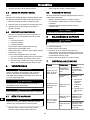
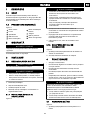
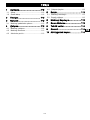
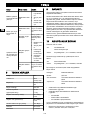
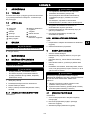
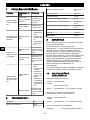
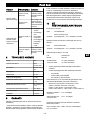
1.2 OVERVIEW
Figure 1
1
Rotating button
2
Blade
3
Guard
4
Front handle
5
Micro switch
6
Battery release
button
7
Trigger
8
Rear handle
9
safety lock button
2 SAFETY
WARNING
Make sure that you do/obey all safety instructions.
Refer to Safety Manual.
3 INSTALLATION
3.1 UNPACK THE MACHINE
WARNING
It is not necessary to assemble the machine.
WARNING
• If the parts have damage, do not use the machine.
• If you do not have all the parts, do not operate the
machine.
• If the parts are damaged or missing, speak to the
service center.
1. Open the package.
2. Read the documentation in the box.
3. Remove the machine from the box.
4. Discard the box and package in compliance with
local regulations.
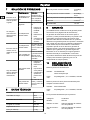
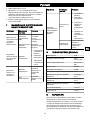
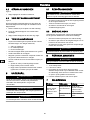
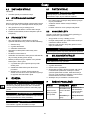
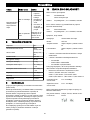
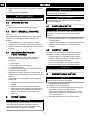
3.1.1 INSTALL THE BATTERY PACK
Figure 2
WARNING
• If the battery pack or charger is damaged, replace
the battery pack or the charger.
• Stop the machine and wait until the motor stops
before you install or remove the battery pack.
• Read, know, and do the instructions in the battery
and charger manual.
1. Align the lift ribs on the battery pack with the
grooves in the battery compartment.
2. Push the battery pack into the battery compartment
until the battery pack locks into place.
3. When you hear a click, the battery pack is installed.
3.1.2 REMOVE THE BATTERY PACK
Figure 2
1. Push and hold the battery release button.
2. Remove the battery pack from the machine.
4 OPERATION
• Touch the blade carefully.
• Do not put your fingers into the notches or in
position where they can get cut.
• Do not touch the blade unless you remove the
battery pack.
• Do not use the machine if the blade is damaged or
bent.
• Remove all objects such as cords, lights, wire, or
string which can become entangled in the cutting
blade and create a risk of personal injury.
WARNING
If the blade jams on an electrical cord or line, DO NOT
TOUCH THE BLADE! IT CAN BE LIVE AND
DANGEROUS. Do the steps below:
1. Hold the insulated rear handle or put the machine
down and away from you.
2. Disconnect the electrically service to the damaged
line or cord before you try to free the blade.
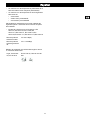
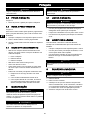
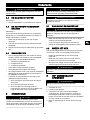
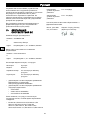
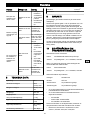
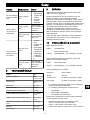
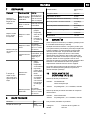
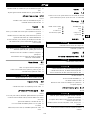
4.1 START THE MACHINE
Figure 3.
1. Push and hold the micro switch with one hand.
2. Push the trigger and the safety lock button with the
other hand.
3. Release the safety lock button.
WARNING
Hold the machine with two hands during operation.
4
English
EN

4.2 STOP THE MACHINE
Figure 3.
1. Release the trigger to stop the machine.
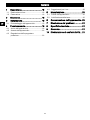
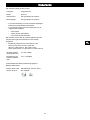
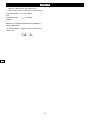
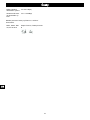
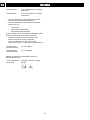
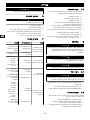
4.3 TURN THE REAR HANDLE
Figure 4.
You can use the rotating button to adjust the rear
handle to 5 different positions to cut the hedges easier.
1. Put the machine on a flat and smooth surface.
2. Pull the rotating button and turn the rear handle.
3. Release the rotating button until it locks into
position.
4.4 OPERATION TIPS
• Do not push the machine through heavy shrubbery.
This can cause the blade blockage. If the blades
blocks,
1. stop the machine.
2. remove the battery pack.
3. remove the blockage.
• Do not try to cut too large stems or twigs.
• Wear the gloves when you cut.
• Cut the new growth with a wide sweeping action so
that the stems are put directly into the blade.
• You can use a string to adjust the height of the
hedge.
1. Stretch a piece of string along the hedge at this
height.
2. Cut the hedge immediately above this string.
3. Cut the side of a hedge until it will be narrower at
the top. More of the hedge will come into view in
that way.
5 MAINTENANCE
CAUTION
Do not let brake fluids, gasoline, petroleum-based
materials touch the plastic parts. Chemicals can cause
damage to the plastic, and make the plastic
unserviceable.
CAUTION
Do not use strong solvents or detergents on the plastic
housing or components.
WARNING
Remove the battery pack from the machine before
maintenance.
5.1 CLEAN THE MACHINE
WARNING
Keep the machine and the motor free of leaves,
branches or excessive oil to prevent fire risks.
• Use a moist cloth with a mild detergent to clean the
machine.
• Clean all moisture with a soft dry cloth.
• Use a small brush to clean the air vents.
5.2 LUBRICATE THE BLADE
To increase the efficiency and life of the blades,
lubricate them carefully after each work session:
• Put the machine on a flat and smooth surface.
• Use a soft cloth to clean the blades and a brush to
remove more dirt.
• Use a light layer of oil to lubricate the blades along
the top edge of the blade.
NOTE
We recommend to use the non-pollutant type oil.
6 STORE THE MACHINE
NOTE
Clean the machine before storage.
1. Remove the battery pack.
2. Let the motor cool.
3. Check that there are no loose or damaged
components. If it is necessary, replace the damaged
components, tighten screws and bolts, or speak to a
person of an approved service center.
4. Store the machine in a cool and dry location.
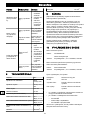
7 TROUBLESHOOTING
Problem Possible cause Solution
The motor does
not start when
you pull the trig-
ger.
The battery pack
is not installed
tightly.
Make sure that
you tighlty install
the battery pack
in the machine.
The battery pack
is out of power.
Charge the bat-
tery pack.
The machine
smokes during
operation.
The machine
has damage.
1. Immediately
stop the ma-
chine.
2. Remove the
battery pack.
3. Speak to
service cen-
ter.
5
English
EN

Problem Possible cause Solution
The motor is on,
blades do not
move.
The machine
has damage.
Do not use the
machine and
speak to service
center.
The blades are
blocked.
Remove battery
pack then clear
blockage from
the blades.
There is too
much noise
and/or vibration
during operation.
The parts are
loosen.
1. Stop the ma-
chine.
2. Remove the
battery.
3. Inspect for
damage.
4. Check and
tighten loose
parts.
The parts have
damage.
Do not use the
machine and
speak to service
center.
8 TECHNICAL DATA
Voltage 40V
No load speed 2800
(±10%) /min
Blade speed 2800(±10%) /
min
Blade length 610 mm
Cutting capacity 27 mm
Weight (without battery pack) 2.7 kg
Measuered sound pressure level 78.6 dB(A),
k=3.0
Measuered sound power level 98.6 dB(A),
k=3.0
Guaranteed sound power level 100 dB(A)
Vibration <2.5 m/s
2
Uncertainty 1.5 m/s
2
9 WARRANTY
(The full warranty terms and conditions can be found on
Greenworks webpage)
The Greenworks warranty is 3 years on the product,
and 2 years on batteries (consumer/private usage) from
the date of purchase. This warranty covers
manufacturing faults. A faulty product under warranty
might be either repaired or replaced. A unit that has
been misused or used in other ways then described in
the owner’s manual might be rejected for warranty.
Normal wear, and wear parts are not considered as
warranty. The original manufacturer warranty is not
affected by any additional warranty offered by a dealer
or retailer.
A faulty product must be returned to the point of
purchase in order to claim for warranty, together with
the proof of purchase (receipt).
10 EC DECLARATION OF
CONFORMITY
Name and address of the manufacturer:
Name: GLOBGRO AB
Globe Group Europe
Address: Propellergatan 1, 211 15 Malmö, Sweden
Name and address of the person authorised to compile
the technical file:
Name: Peter Söderström
Address: Propellergatan 1, 211 15 Malmö, Sweden
Herewith we declare that the product
Category: Hedge Trimmer
Model: HTF313
Serial number: See product rating label
Year of Construc-
tion:
See product rating label
• is in conformity with the relevant provisions of the
Machinery Directive 2006/42/EC.
• is in conformity with the provisions of the following
other EC-Directives:
• 2014/30/EU
• 2000/14/EC & 2005/88/EC
• 2011/65/EU & (EU)2015/863
Furthermore, we declare that the following parts,
clauses of European harmonised standards have been
used:
• EN 60745-1,EN 60745-2-15,EN 55014-1,EN
55014-2, EN ISO 3744,ISO 11094,IEC
62321-3-1,IEC 62321-4, IEC 62321-5,IEC
62321-6,IEC 62321-7-1,IEC 62321-7-2,IEC 62321-8
Measured sound
power level:
L
WA
: 98.6 dB(A)
Guaranteed sound
power level:
L
WA.d
: 100 dB(A)
6
English
EN

Conformity assessment method to Annex V / Directive
2000/14/EC.
Place, date: Malmö,
03.03.2019
Signature: Ted Qu, Quality Di-
rector
7
English
EN

1 Beschreibung................................ 9
1.1 Verwendungszweck................................... 9
1.2 Überblick.................................................... 9
2 Sicherheit...................................... 9
3 Montage........................................ 9
3.1 Maschine auspacken..................................9
4 Bedienung..................................... 9
4.1 Maschine starten........................................9
4.2 Maschine anhalten................................... 10
4.3 Hinteren Griff drehen................................10
4.4 Tipps zur Bedienung................................ 10
5 Wartung und Instandhaltung....... 10
5.1 Maschine reinigen.................................... 10
5.2 Klinge schmieren......................................10
6 Maschine lagern..........................10
7 Fehlerbehebung.......................... 11
8 Technische Daten....................... 11
9 Garantie.......................................11
10 EG-Konformitätserklärung...........12
8
Deutsch
DE

1 BESCHREIBUNG
1.1 VERWENDUNGSZWECK
Diese Maschine dient dem Schneiden und Zuschneiden
von Hecken und Büschen im Privatbereich. Die
Maschine ist nicht für das Schneiden über Schulterhöhe
vorgesehen.
1.2 ÜBERBLICK
Abbildung 1
1
Drehknopf
2
Messer
3
Schutzabdeckung
4
Frontgriff
5
Mikroschalter
6
Batterieentriegelungstaste
7
Auslöser
8
Hinterer Griff
9
Sicherheitssperrtaste
2 SICHERHEIT
WARNUNG
Stellen Sie sicher, dass Sie alle Sicherheitshinweise
befolgen.
Siehe Sicherheitshandbuch.
3 MONTAGE
3.1 MASCHINE AUSPACKEN
WARNUNG
Eine Montage der Maschine ist nicht erforderlich.
WARNUNG
• Wenn Teile beschädigt sein sollten, verwenden
Sie die Maschine nicht.
• Wenn Sie nicht alle Teile haben, dürfen Sie die
Maschine nicht in Betrieb nehmen.
• Wenn Teile beschädigt sind oder fehlen, wenden
Sie sich an die Servicestelle.
1. Öffnen Sie die Verpackung.
2. Lesen Sie die beiliegende Dokumentation.
3. Nehmen Sie die Maschine aus dem Karton.
4. Entsorgen Sie den Karton und die Verpackung
gemäß den örtlichen Vorschriften.
3.1.1 AKKUPACK EINSETZEN
Abbildung 2
WARNUNG
• Wenn der Akkupack oder das Ladegerät
beschädigt ist, ersetzen Sie den Akkupack oder
das Ladegerät.
• Stoppen Sie die Maschine und warten Sie, bis der
Motor stoppt, bevor Sie den Akkupack einbauen
oder entnehmen.
• Lesen, kennen und befolgen Sie die Anweisungen
im Handbuch für Akku und Ladegerät.
1. Richten Sie die Hubrippen am Akkupack mit den
Nuten im Akkufach aus.
2. Schieben Sie den Akkupack in das Akkufach, bis er
einrastet.
3. Wenn Sie ein Klicken hören, ist der Akkupack
eingesetzt.
3.1.2 AKKUPACK ENTFERNEN
Abbildung 2
1. Drücken und halten Sie die
Batterieentriegelungstaste.
2. Nehmen Sie den Akkupack aus der Maschine.
4 BEDIENUNG
• Berühren Sie die Messer vorsichtig.
• Stecken Sie keine Finger in die Kerben oder an
Stellen, an denen Sie geschnitten werden können.
• Berühren Sie die Klinge nur bei entferntem
Akkupack.
• Verwenden Sie die Maschine nicht, wenn die Klinge
beschädigt oder verbogen ist.
• Entfernen Sie alle Gegenstände wie Kabel, Lampen,
Draht oder Faden, die sich in der schneidenden
Klinge verfangen können und eine
Verletzungsgefahr darstellen können.
WARNUNG
Wenn die Klinge an einem Stromkabel oder einer
Leitung hängenbleibt. BERÜHREN SIE DIE KLINGE
NICHT! SIE KANN UNTER STROM STEHEN UND
GEFÄHRLICH SEIN. Führen Sie folgende Schritte
durch:
1. Halten Sie den isolierten hinteren Griff fest oder
legen Sie die Maschine ab und von sich weg.
2. Trennen Sie die Stromversorgung der
beschädigten Leitung oder des Kabels, bevor Sie
versuchen, die Klinge zu befreien.
4.1 MASCHINE STARTEN
Abbildung 3.
1. Drücken und halten Sie den Mikroschalter mit einer
Hand.
9
Deutsch
DE

2. Drücken Sie den Auslöser und die
Sicherheitssperrtaste mit der anderen Hand.
3. Lassen Sie die Sicherheitssperrtaste los.
WARNUNG
Halten Sie die Maschine im laufenden Betrieb mit
beiden Händen fest.
4.2 MASCHINE ANHALTEN
Abbildung 3.
1. Lassen Sie den Auslöser los, um die Maschine
anzuhalten.
4.3 HINTEREN GRIFF DREHEN
Abbildung 4.
Mit dem Drehknopf können Sie den hinteren Griff in 5
verschiedene Positionen verstellen, um Hecken leichter
zu schneiden.
1. Stellen Sie die Maschine auf eine flache und glatte
Fläche.
2. Ziehen Sie den Drehknopf und drehen Sie den
hinteren Griff.
3. Lassen Sie den Drehknopf los, bis er einrastet.
4.4 TIPPS ZUR BEDIENUNG
• Schieben Sie die Maschine nicht durch starkes
Gebüsch. Dies kann zu einer Verstopfung des
Messers führen. Wenn die Messer blockieren,
1. stoppen Sie die Maschine.
2. entfernen Sie den Akkupack.
3. beseitigen Sie die Verstopfung.
• Versuchen Sie nicht, zu große Stämme oder Zweige
zu schneiden.
• Tragen Sie die Handschuhe, wenn Sie schneiden.
• Schneiden Sie den neuen Wuchs mit einer breiten,
schwungvollen Bewegung, so dass die Zweige
direkt ins Messer eingeführt werden.
• Sie können die Höhe der Hecke mit einer Schnur
anpassen.
1. Befestigen Sie ein gerade gezogenes Stück
Schnur entlang der Hecke in der gewünschten
Höhe.
2. Schneiden Sie die Hecke unmittelbar über
dieser Schnur ab.
3. Schneiden Sie die Seite der Hecke ab, bis sie
oben schmaler wird. Auf diese Weise wird mehr
von der Hecke sichtbar.
5 WARTUNG UND
INSTANDHALTUNG
VORSICHT
Lassen Sie Bremsflüssigkeiten, Benzin und
mineralölbasierte Materialien nicht mit den
Kunststoffteilen in Berührung kommen. Chemikalien
können den Kunststoff beschädigen und ihn
unbrauchbar machen.
VORSICHT
Verwenden Sie keine starken Lösungsmittel oder
Reinigungsmittel auf dem Kunststoffgehäuse oder den
Bauteilen.
WARNUNG
Nehmen Sie den Akkupack vor der Wartung aus der
Maschine.
5.1 MASCHINE REINIGEN
WARNUNG
Halten Sie die Maschine und den Motor frei von
Blättern, Zweigen oder überschüssigem Öl, um
Feuergefahren zu vermeiden.
• Verwenden Sie ein feuchtes Tuch, um die Maschine
zu reinigen.
• Entfernen Sie alle Feuchtigkeit mit einem trockenen
Tuch.
• Verwenden Sie einen kleinen Pinsel, um die
Belüftungslöcher zu reinigen.
5.2 KLINGE SCHMIEREN
Um die Wirksamkeit und Standzeit der Klingen zu
verlängern, schmieren Sie sie nach jeder Arbeitssitzung
sorgfältig:
• Stellen Sie die Maschine auf eine flache und glatte
Fläche.
• Verwenden Sie ein weiches Tuch, um die Klingen
zu reinigen, und einen Pinsel, um weitere
Verunreinigungen zu entfernen.
• Verwenden Sie eine leichte Ölschicht, um die
Klingen entlang der oberen Kante der Klinge zu
schmieren.
HINWEIS
Wie empfehlen, umweltfreundliches Öl zu verwenden.
6 MASCHINE LAGERN
HINWEIS
Reinigen Sie die Maschine vor der Lagerung.
10
Deutsch
DE

1. Entfernen Sie den Akkupack.
2. Lassen Sie den Motor abkühlen.
3. Prüfen Sie, dass keine losen oder beschädigten
Bauteile vorliegen. Wenn notwendig, ersetzen Sie
beschädigte Bauteile, ziehen Sie Schrauben und
Bolzen an oder sprechen Sie mit einem Mitarbeiter
eines zugelassenen Servicezentrums.
4. Lagern Sie die Maschine kühl und trocken.
7 FEHLERBEHEBUNG
Problem Mögliche Urs-
ache
Lösung
Der Motor startet
nicht, wenn Sie
den Auslöser
ziehen.
Der Akkupack ist
leer.
Stellen Sie sich-
er, dass der Ak-
kupack fest in
der Maschine in-
stalliert wurde.
Der Akkupack ist
leer.
Laden Sie den
Akkupack auf.
Die Maschine
raucht im Be-
trieb.
Die Maschine ist
beschädigt.
1. Stoppen Sie
die Maschine
sofort.
2. Entfernen
Sie den Ak-
kupack.
3. Sprechen Sie
mit dem
Servicecen-
ter.
Der Motor ist an,
die Klingen be-
wegen sich
nicht.
Die Maschine ist
beschädigt.
Verwenden Sie
die Maschine
nicht mehr und
sprechen Sie mit
dem Servicecen-
ter.
Die Klingen sind
blockiert.
Entnehmen Sie
den Akkupack;
dann entfernen
Sie die Blockade
der Klingen.
Problem Mögliche Urs-
ache
Lösung
Während des
Betriebs treten
zu viele Geräu-
sche und/oder
Vibrationen auf.
Die Teile sind
lose.
1. Stoppen Sie
die Ma-
schine.
2. Entfernen
Sie die Batt-
erie.
3. Auf Schäden
untersuchen.
4. Auf lose
Teile prüfen
und nachzie-
hen.
Die Teile sind
beschädigt.
Verwenden Sie
die Maschine
nicht mehr und
sprechen Sie mit
dem Servicecen-
ter.
8 TECHNISCHE DATEN
Spannung 40 V
Leerlaufdrehzahl 2800
(±10%) /min
Messerdrehzahl 2800(±10%) /
min
Klingenlänge 610 mm
Schnittkapazität 27 mm
Gewicht (ohne Akkupack) 2.7 kg
Gemessener Schalldruckpegel 78.6 dB(A),
k=3,0
Gemessener Schallleistungspegel 98.6 dB(A),
k=3,0
Garantierter Schallleistungspegel 100 dB(A)
Vibration <2.5 m/s
2
Messunsicherheit 1.5 m/s
2
9 GARANTIE
(Die vollständigen Garantiebedingungen finden Sie auf
der Website von Greenworks)
Die Greenworks-Garantie beträgt 3 Jahre auf das
Produkt und 2 Jahre auf die Akkus (Käufer/
Privatgebrauch) ab Kaufdatum. Diese Garantie deckt
Herstellungsfehler ab. Ein im Rahmen der Garantie
fehlerhaftes Produkt kann entweder repariert oder
ersetzt werden. Ein Gerät, das missbräuchlich oder auf
andere Weise als zu in der Bedienungsanleitung
beschrieben Zwecken verwendet wurde, kann von der
11
Deutsch
DE

Garantie ausgeschlossen werden. Normaler Verschleiß
und Verschleißteile sind von der Garantie
ausgeschlossen. Die ursprüngliche Herstellergarantie
wird durch eine zusätzliche Garantie eines Händlers
oder Einzelhändlers nicht beeinträchtigt.
Ein fehlerhaftes Produkt muss zusammen mit dem
Kaufnachweis (Quittung) an die Verkaufsstelle
zurückgeschickt werden, um Garantieansprüche
geltend zu machen.
10 EG-
KONFORMITÄTSERKLÄRUNG
Name und Anschrift des Herstellers:
Name: GLOBGRO AB
Globe Group Europe
Adresse: Propellergatan 1, 211 15 Malmö, Sweden
Name und Anschrift der Person, die zur Erstellung der
technischen Unterlagen berechtigt ist:
Name: Peter Söderström
Adresse: Propellergatan 1, 211 15 Malmö, Sweden
Hiermit erklären wir, dass das Produkt
Kategorie: Heckenschere
Modell: HTF313
Seriennummer: Siehe Produktetikett
Baujahr: Siehe Produktetikett
• den einschlägigen Bestimmungen der
Maschinenrichtlinie 2006/42/EG entspricht.
• den Bestimmungen der folgenden anderen EG-
Richtlinien entspricht:
• 2014/30/EU
• 2000/14/EG & 2005/88/EG
• 2011/65/EU & 2015/863/EU
Darüber hinaus erklären wir, dass die folgenden Teile/
Klauseln von europäischen harmonisierten Normen
verwendet wurden:
• EN 60745-1,EN 60745-2-15,EN 55014-1,EN
55014-2, EN ISO 3744,ISO 11094,IEC
62321-3-1,IEC 62321-4, IEC 62321-5,IEC
62321-6,IEC 62321-7-1,IEC 62321-7-2,IEC 62321-8
Gemessener Schall-
leistungspegel:
L
WA
: 98.6 dB(A)
Garantierter Schall-
leistungspegel:
L
WA.d
: 100 dB(A)
Konformitätsbewertungsmethode nach Anhang V /
Richtlinie 2000/14/EG.
Ort, Datum: Malmö,
03.03.2019
Unterschrift: Ted Qu, Qualität-
sleiter
12
Deutsch
DE

1 Descripción..................................14
1.1 Finalidad...................................................14
1.2 Perspectiva general..................................14
2 Seguridad....................................14
3 Instalación................................... 14
3.1 Desembalaje de la máquina.....................14
4 Funcionamiento...........................14
4.1 Puesta en marcha de la máquina.............14
4.2 Detención de la máquina..........................15
4.3 Giro del asa posterior...............................15
4.4 Consejos de funcionamiento....................15
5 Mantenimiento.............................15
5.1 Limpieza de la máquina........................... 15
5.2 Lubricación de la cuchilla......................... 15
6 Almacenamiento de la máquina.. 15
7 Solución de problemas................16
8 Datos técnicos.............................16
9 Garantía...................................... 16
10 Declaración de conformidad CE..16
13
Español
ES

1 DESCRIPCIÓN
1.1 FINALIDAD
Esta máquina se ha diseñado para cortar y podar setos
y arbustos en un entorno doméstico. No se ha diseñado
para cortes por encima del nivel del hombro.
1.2 PERSPECTIVA GENERAL
Figura 1
1
Botón de rotación
2
Cuchilla
3
Protección
4
Asa delantera
5
Microinterruptor
6
Botón de
desbloqueo de la
batería
7
Gatillo
8
Asa posterior
9
botón de bloqueo de
seguridad
2 SEGURIDAD
AVISO
Asegúrese de seguir/respetar todas las instrucciones
de seguridad.
Consulte el manual de seguridad.
3 INSTALACIÓN
3.1 DESEMBALAJE DE LA MÁQUINA
AVISO
No es necesario montar la máquina.
AVISO
• Si las piezas presentan daños, no utilice la
máquina.
• Si no tiene todas las piezas, no utilice la máquina.
• Si faltan piezas o hay piezas dañadas, hable con
el centro de servicio.
1. Abra el embalaje.
2. Lea la documentación que se encuentra en la caja.
3. Retire la máquina de la caja.
4. Deseche la caja y el embalaje de conformidad con
los reglamentos locales.
3.1.1 INSTALACIÓN DE LA BATERÍA
Figura 2
AVISO
• Si la batería o el cargador ha sufrido daños,
sustituya la batería o el cargador.
• Detenga la máquina y espere hasta que el motor
se pare antes de instalar o retirar la batería.
• Debe leer, conocer y seguir las instrucciones del
manual de la batería y el cargador.
1. Alinee las nervaduras de elevación de la batería con
las ranuras del compartimento de la batería.
2. Introduzca la batería en el compartimento de la
batería hasta que encaje en su posición.
3. Cuando escuche un clic, la batería está instalada.
3.1.2 RETIRADA DE LA BATERÍA
Figura 2
1. Pulse y mantenga pulsado el botón de desbloqueo
de la batería.
2. Retire la batería de la máquina.
4 FUNCIONAMIENTO
• Toque la cuchilla con cuidado.
• No meta los dedos en las muescas o en posiciones
donde puedan cortarse.
• No toque la cuchilla a menos que retire la batería.
• No utilice la máquina si alguna pieza ha sufrido
daños o está doblada.
• Retire todos los objetos, como cordones, luces,
cables o cuerdas que puedan enredarse en la
cuchilla de corte y generar un riesgo de lesiones
personales.
AVISO
Si la cuchilla se atasca en un cable o línea eléctrica,
¡NO TOQUE LA CUCHILLA! PUEDE TENER
CORRIENTE Y SER PELIGROSA. Realice estos
pasos:
1. Sujete el asa posterior aislada o deje la máquina
lejos de usted.
2. Desconecte el suministro eléctrico a la línea o
cable dañado antes de intentar liberar la cuchilla.
4.1 PUESTA EN MARCHA DE LA
MÁQUINA
Figura 3.
1. Pulse y mantenga pulsado el microinterruptor con
una mano.
2. Apriete el gatillo y el botón de bloqueo de seguridad
con la otra mano.
3. Suelte el botón de bloqueo de seguridad.
14
Español
ES

AVISO
Sujete la máquina con las dos manos durante el
funcionamiento.
4.2 DETENCIÓN DE LA MÁQUINA
Figura 3.
1. Suelte el gatillo para detener la máquina.
4.3 GIRO DEL ASA POSTERIOR
Figura 4.
Puede utilizar el botón de rotación para ajustar el asa
posterior en 5 posiciones diferentes para cortar los
setos más fácilmente.
1. Coloque la máquina sobre una superficie plana y
lisa.
2. Tire del botón de rotación y gire el asa posterior.
3. Suelte el botón de rotación hasta que encaje en su
posición.
4.4 CONSEJOS DE
FUNCIONAMIENTO
• No empuje la máquina en arbustos muy densos.
Esto puede provocar el bloqueo de la cuchilla. Si la
cuchilla se bloquea,
1. detenga la máquina.
2. retire la batería.
3. elimine la obstrucción.
• No intente cortar ramas o tallos demasiado grandes.
• Lleve guantes al cortar.
• Corte el nuevo crecimiento con una acción de
barrido amplia para que los tallos se coloquen
directamente en la cuchilla.
• Puede utilizar una cuerda para ajustar la altura del
seto.
1. Estire un tramo de cuerda a lo largo del seto a
esta altura.
2. Corte el seto justo por encima de esta cuerda.
3. Corte el lateral de un seto hasta que sea más
estrecho en la parte superior. El seto se verá
más de esa manera.
5 MANTENIMIENTO
PRECAUCIÓN
No permita que líquidos de frenos, gasolina y otros
derivados del petróleo toquen las piezas de plástico.
Las sustancias químicas pueden dañar el plástico y
hacer que quede inservible.
PRECAUCIÓN
No utilice disolventes o detergentes fuertes en la
carcasa o los componentes de plástico.
AVISO
Retire la batería de la máquina antes de realizar
tareas de mantenimiento.
5.1 LIMPIEZA DE LA MÁQUINA
AVISO
Mantenga la máquina y el motor libres de hojas,
ramas o exceso de aceite para evitar riesgos de
incendio.
• Utilice un paño húmedo con un detergente suave
para limpiar la máquina.
• Limpie toda la humedad con un paño suave y seco.
• Utilice un cepillo pequeño para limpiar los orificios
de ventilación.
5.2 LUBRICACIÓN DE LA CUCHILLA
Para aumentar la eficiencia y la duración de las
cuchillas, lubríquelas cuidadosamente tras cada sesión
de trabajo:
• Coloque la máquina sobre una superficie plana y
lisa.
• Utilice un paño suave para limpiar las cuchillas y un
cepillo para eliminar más suciedad.
• Utilice una capa ligera de aceite para lubricar las
cuchillas a lo largo del filo superior de la cuchilla.
NOTA
Recomendamos utilizar aceite de tipo no
contaminante.
6 ALMACENAMIENTO DE LA
MÁQUINA
NOTA
Limpie la máquina antes del almacenamiento.
1. Retire la batería.
2. Deje que el motor se enfríe.
3. Compruebe que no haya componentes sueltos o
dañados. En caso necesario, sustituya los
componentes dañados, apriete los tornillos y los
pernos o consulte con una persona de un centro de
servicio autorizado.
4. Almacene la máquina en un lugar fresco y seco.
15
Español
ES

7 SOLUCIÓN DE PROBLEMAS
Problema Posible causa Solución
El motor no se
pone en marcha
cuando aprieta
el gatillo.
La batería no se
ha instalado bi-
en.
Asegúrese de
que ha instalado
bien la batería
en la máquina.
La batería se ha
agotado.
Cargue la bate-
ría.
La máquina
echa humo du-
rante el funcio-
namiento.
La máquina ha
sufrido daños.
1. Detenga la
máquina in-
mediata-
mente.
2. Retire la ba-
tería.
3. Consulte con
un centro de
servicio.
El motor está en
marcha, las cu-
chillas no se mu-
even.
La máquina ha
sufrido daños.
No utilice la má-
quina y consulte
con un centro de
servicio.
Las cuchillas es-
tán bloqueadas.
Retire la batería
y posteriormente
elimine la ob-
strucción de las
cuchillas.
Hay demasiado
ruido o vibración
durante el fun-
cionamiento.
Las piezas están
sueltas.
1. Detenga la
máquina.
2. Retire la ba-
tería.
3. Inspeccione
si hay daños.
4. Compruebe y
apriete las
piezas suel-
tas.
Las piezas han
sufrido daños.
No utilice la má-
quina y consulte
con un centro de
servicio.
8 DATOS TÉCNICOS
Tensión 40 V
Velocidad sin carga 2800
(±10%) /min
Velocidad de la cuchilla 2800(±10%) /
min
Longitud de cuchilla 610 mm
Capacidad de corte 27 mm
Peso (sin batería) 2.7 kg
Nivel de presión acústica medida 78.6 dB(A),
k=3,0
Nivel de potencia acústica medida 98.6 dB(A),
k=3,0
Nivel de potencia acústica garantizada 100 dB(A)
Vibración <2.5 m/s
2
Incertidumbre 1.5 m/s
2
9 GARANTÍA
(La totalidad de las condiciones de la garantía puede
encontrarse en la página web de Greenworks)
La garantía de Greenworks es de 3 años para el
producto y 2 años para las baterías (uso privado / del
consumidor) a partir de la fecha de compra. Esta
garantía cubre defectos de fabricación. Un producto
defectuoso en garantía puede ser reparado o sustituido.
Una unidad que haya sido mal utilizada o utilizada de
modo distinto al que se describe en el manual del
propietario puede no tener derecho a garantía. El
desgaste normal y las piezas de desgaste no están
cubiertos por la garantía. La garantía original del
fabricante no se ve afectada por ninguna garantía
adicional ofrecida por un distribuidor o minorista.
Un producto defectuoso debe devolverse al punto de
compra para reclamar la garantía, junto con el
comprobante de compra (ticket).
10 DECLARACIÓN DE
CONFORMIDAD CE
Nombre y dirección del fabricante:
Nombre:
GLOBGRO AB
Globe Group Europe
Direc-
ción:
Propellergatan 1, 211 15 Malmö, Sweden
Nombre y dirección de la persona autorizada para
compilar el archivo técnico:
Nombre:
Peter Söderström
Direc-
ción:
Propellergatan 1, 211 15 Malmö, Sweden
Por la presente declaramos que el producto
Categoría:
Cortasetos
Modelo: HTF313
Número de serie: Véase la etiqueta de clasifica-
ción del producto
Año de construc-
ción:
Véase la etiqueta de clasifica-
ción del producto
16
Español
ES

• es conforme con las disposiciones pertinentes de la
Directiva relativa a las máquinas (2006/42/CE).
• es conforme con las disposiciones de las siguientes
Directivas CE:
• 2014/30/UE
• 2000/14/CE y 2005/88/CE
• 2011/65/UE y 2015/863/UE
Adicionalmente, declaramos que se han utilizado las
siguientes partes o cláusulas de las normas europeas
armonizadas:
• EN 60745-1,EN 60745-2-15,EN 55014-1,EN
55014-2, EN ISO 3744,ISO 11094,IEC
62321-3-1,IEC 62321-4, IEC 62321-5,IEC
62321-6,IEC 62321-7-1,IEC 62321-7-2,IEC 62321-8
Nivel de potencia
acústica medida:
L
WA
: 98.6 dB(A)
Nivel de potencia
acústica garantiza-
da:
L
WA.d
: 100 dB(A)
Método de evaluación de conformidad según el anexo
V / Directiva 2000/14/CE.
Lugar, fecha: Mal-
mö, 03.03.2019
Firma: Ted Qu, Director de cali-
dad
17
Español
ES

1 Descrizione..................................19
1.1 Destinazione d'uso................................... 19
1.2 Panoramica.............................................. 19
2 Sicurezza.....................................19
3 Installazione................................ 19
3.1 Disimballaggio dell'apparecchio............... 19
4 Funzionamento............................19
4.1 Avvio dell'apparecchio..............................19
4.2 Arresto dell'apparecchio...........................20
4.3 Regolazione dell'impugnatura
posteriore................................................. 20
4.4 Suggerimenti per l'uso..............................20
5 Manutenzione..............................20
5.1 Pulizia dell'apparecchio............................20
5.2 Lubrificazione della lama..........................20
6 Conservazione dell'apparecchio..20
7 Risoluzione dei problemi............. 21
8 Specifiche tecniche..................... 21
9 Garanzia......................................21
10 Dichiarazione di conformità CE... 21
18
Italiano
IT

1 DESCRIZIONE
1.1 DESTINAZIONE D'USO
Questo apparecchio è destinato al taglio e alla rifinitura
di siepi e cespugli in ambito domestico. Non è destinato
a tagli sopra l'altezza delle spalle.
1.2 PANORAMICA
Figura 1
1
Pulsante di
rotazione
2
Lama
3
Protezione
4
Impugnatura
anteriore
5
Micro interruttore
6
Pulsante di rilascio
della batteria
7
Interruttore a leva
8
Impugnatura
posteriore
9
Pulsante di
sicurezza
2 SICUREZZA
AVVERTIMENTO
Rispettare e applicare tutte le avvertenze di sicurezza.
Fare riferimento alle avvertenze di sicurezza.
3 INSTALLAZIONE
3.1 DISIMBALLAGGIO
DELL'APPARECCHIO
AVVERTIMENTO
L'apparecchio non richiede assemblaggio.
AVVERTIMENTO
• Se uno o più componenti sono danneggiati, non
usare l'apparecchio.
• Se uno o più componenti sono mancanti, non
usare l'apparecchio.
• In caso di componenti danneggiati o mancanti,
contattare il centro di assistenza.
1. Aprire l'imballaggio.
2. Leggere i documenti contenuti nell'imballaggio.
3. Estrarre l'apparecchio dall'imballaggio.
4. Smaltire l'imballaggio conformemente alle normative
locali.
3.1.1 INSTALLAZIONE DEL GRUPPO
BATTERIA
Figura 2
AVVERTIMENTO
• Se il gruppo batteria o il caricabatteria sono
danneggiati, sostituirli.
• Arrestare l'apparecchio e attendere che il motore
si arresti prima di installare o rimuovere il gruppo
batteria.
• Leggere, comprendere e rispettare le istruzioni
riportate nel manuale della batteria e del
caricabatteria.
1. Allineare le sporgenze sul gruppo batteria con le
scanalature sul vano batteria.
2. Fare scorrere la batteria nel vano batteria finché non
si blocca in posizione.
3. Deve emettere un "clic".
3.1.2 RIMOZIONE DEL GRUPPO BATTERIA
Figura 2
1. Tenere premuto il pulsante di rilascio della batteria.
2. Rimuovere il gruppo batteria dall'apparecchio.
4 FUNZIONAMENTO
• Toccare la lama con attenzione.
• Non inserire le dita nelle tacche o in posizioni in cui
possono subire lesioni.
• Non toccare la lama prima di aver rimosso il gruppo
batteria.
• Non usare l'apparecchio se la lama è danneggiata o
piegata.
• Rimuovere oggetti come corde, luci, cavi o stringhe
perché possono impigliarsi nella lama e comportare
il rischio di lesioni.
AVVERTIMENTO
Se la lama si inceppa in un cavo elettrico, NON
TOCCARE LA LAMA! PUÒ ESSERE
ELETTRIFICATA E MOLTO PERICOLOSA.
Procedere come descritto di seguito.
1. Afferrare l'impugnatura posteriore isolata e
deporre l'apparecchio lontano da sé.
2. Scollegare la fonte di alimentazione del cavo
danneggiato prima di tentare di sbloccare la lama.
4.1 AVVIO DELL'APPARECCHIO
Figura 3.
1. Tenere premuto il micro interruttore con una mano.
2. Premere l'interruttore a leva e il pulsante di
sicurezza on l'altra mano.
3. Rilasciare il pulsante di sicurezza.
19
Italiano
IT
Pagina se încarcă...
Pagina se încarcă...
Pagina se încarcă...
Pagina se încarcă...
Pagina se încarcă...
Pagina se încarcă...
Pagina se încarcă...
Pagina se încarcă...
Pagina se încarcă...
Pagina se încarcă...
Pagina se încarcă...
Pagina se încarcă...
Pagina se încarcă...
Pagina se încarcă...
Pagina se încarcă...
Pagina se încarcă...
Pagina se încarcă...
Pagina se încarcă...
Pagina se încarcă...
Pagina se încarcă...
Pagina se încarcă...
Pagina se încarcă...
Pagina se încarcă...
Pagina se încarcă...
Pagina se încarcă...
Pagina se încarcă...
Pagina se încarcă...
Pagina se încarcă...
Pagina se încarcă...
Pagina se încarcă...
Pagina se încarcă...
Pagina se încarcă...
Pagina se încarcă...
Pagina se încarcă...
Pagina se încarcă...
Pagina se încarcă...
Pagina se încarcă...
Pagina se încarcă...
Pagina se încarcă...
Pagina se încarcă...
Pagina se încarcă...
Pagina se încarcă...
Pagina se încarcă...
Pagina se încarcă...
Pagina se încarcă...
Pagina se încarcă...
Pagina se încarcă...
Pagina se încarcă...
Pagina se încarcă...
Pagina se încarcă...
Pagina se încarcă...
Pagina se încarcă...
Pagina se încarcă...
Pagina se încarcă...
Pagina se încarcă...
Pagina se încarcă...
Pagina se încarcă...
Pagina se încarcă...
Pagina se încarcă...
Pagina se încarcă...
Pagina se încarcă...
Pagina se încarcă...
Pagina se încarcă...
Pagina se încarcă...
Pagina se încarcă...
Pagina se încarcă...
Pagina se încarcă...
Pagina se încarcă...
Pagina se încarcă...
Pagina se încarcă...
Pagina se încarcă...
Pagina se încarcă...
Pagina se încarcă...
Pagina se încarcă...
Pagina se încarcă...
Pagina se încarcă...
Pagina se încarcă...
Pagina se încarcă...
Pagina se încarcă...
Pagina se încarcă...
Pagina se încarcă...
Pagina se încarcă...
Pagina se încarcă...
Pagina se încarcă...
Pagina se încarcă...
Pagina se încarcă...
Pagina se încarcă...
Pagina se încarcă...
Pagina se încarcă...
Pagina se încarcă...
Pagina se încarcă...
Pagina se încarcă...
Pagina se încarcă...
Pagina se încarcă...
Pagina se încarcă...
Pagina se încarcă...
Pagina se încarcă...
Pagina se încarcă...
Pagina se încarcă...
Pagina se încarcă...
Pagina se încarcă...
Pagina se încarcă...
Pagina se încarcă...
Pagina se încarcă...
Pagina se încarcă...
Pagina se încarcă...
Pagina se încarcă...
Pagina se încarcă...
Pagina se încarcă...
Pagina se încarcă...
Pagina se încarcă...
Pagina se încarcă...
Pagina se încarcă...
Pagina se încarcă...
Pagina se încarcă...
-
 1
1
-
 2
2
-
 3
3
-
 4
4
-
 5
5
-
 6
6
-
 7
7
-
 8
8
-
 9
9
-
 10
10
-
 11
11
-
 12
12
-
 13
13
-
 14
14
-
 15
15
-
 16
16
-
 17
17
-
 18
18
-
 19
19
-
 20
20
-
 21
21
-
 22
22
-
 23
23
-
 24
24
-
 25
25
-
 26
26
-
 27
27
-
 28
28
-
 29
29
-
 30
30
-
 31
31
-
 32
32
-
 33
33
-
 34
34
-
 35
35
-
 36
36
-
 37
37
-
 38
38
-
 39
39
-
 40
40
-
 41
41
-
 42
42
-
 43
43
-
 44
44
-
 45
45
-
 46
46
-
 47
47
-
 48
48
-
 49
49
-
 50
50
-
 51
51
-
 52
52
-
 53
53
-
 54
54
-
 55
55
-
 56
56
-
 57
57
-
 58
58
-
 59
59
-
 60
60
-
 61
61
-
 62
62
-
 63
63
-
 64
64
-
 65
65
-
 66
66
-
 67
67
-
 68
68
-
 69
69
-
 70
70
-
 71
71
-
 72
72
-
 73
73
-
 74
74
-
 75
75
-
 76
76
-
 77
77
-
 78
78
-
 79
79
-
 80
80
-
 81
81
-
 82
82
-
 83
83
-
 84
84
-
 85
85
-
 86
86
-
 87
87
-
 88
88
-
 89
89
-
 90
90
-
 91
91
-
 92
92
-
 93
93
-
 94
94
-
 95
95
-
 96
96
-
 97
97
-
 98
98
-
 99
99
-
 100
100
-
 101
101
-
 102
102
-
 103
103
-
 104
104
-
 105
105
-
 106
106
-
 107
107
-
 108
108
-
 109
109
-
 110
110
-
 111
111
-
 112
112
-
 113
113
-
 114
114
-
 115
115
-
 116
116
-
 117
117
-
 118
118
-
 119
119
-
 120
120
-
 121
121
-
 122
122
-
 123
123
-
 124
124
-
 125
125
-
 126
126
-
 127
127
-
 128
128
-
 129
129
-
 130
130
-
 131
131
-
 132
132
-
 133
133
-
 134
134
-
 135
135


Greenworks G40HT Manual de utilizare
- Tip
- Manual de utilizare
în alte limbi
- slovenčina: Greenworks G40HT Používateľská príručka
- eesti: Greenworks G40HT Kasutusjuhend
Lucrări înrudite
-
Greenworks G40UC Manualul proprietarului
-
-
-
-
-
Greenworks G60PHT Manual de utilizare
-
-