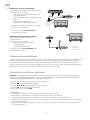
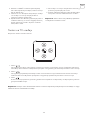
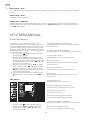
Tesla 50T617SUS Manual de utilizare
- Categorie
- Televizoare LCD
- Tip
- Manual de utilizare

TV T617
USER
MANUAL
HUNENG BGR GRC HRV
ROUPOL S LV SRBMKD
BIH/
MNE

OPERATING INSTRUCTION
Please read these instructions before operating
your set and retain them for future reference.
UPUTSTVO ZA UPOTREBU
Prije upotrebe uređaja pročitati ova uputstva
i zadržati ih radi kasnijih referenci.
UPUTE ZA KORIŠTENJE
Prije korištenja uređaja pažljivo pročitati
upute i sačuvati ih za buduću upotrebu.
KEZELÉSI UTASÍTÁ
Kérjük, a készülék használata előtt olvassa el ezeket az
utasításokat, és őrizze ezeket meg későbbi betekintésre.
ΟΔΗΓΙΑ ΛΕΙΤΟΥΡΓΙΑΣ
Διαβάστε αυτές τις οδηγίες πριν από τη λειτουργία της μονάδας
σας και να τα διατηρήσετε για μελλοντική αναφορά.
ИНСТРУКЦИИ ЗА ЕКСПЛОАТАЦИЯ
Моля, прочетете тези инструкции, преди да използвате
устройството и ги запазете за бъдещи справки.
NAVODILA ZA UPORABO
Pred uporabo pozorno preberite navodila
in jih shranite za morebitno uporabo v prihodnosti.
INSTRUCȚIUNI DE UTILIZARE
Vă rugăm să citiți aceste instrucțiuni înainte de a folosi
televizorul și păstrați-le pentru referințe ulterioare.
INSTRUKCJA OBSŁUGI
Przed rozpoczęciem użytkowania prosimy o zapoznanie się z instruk-
cjami obsługi, a także ich zachowanie do późniejszych konsultacji.
UPUTSTVO ZA UPOTREBU
Pre upotrebe uređaja pročitati ova uputstva
i zadržati ih radi kasnijih referenci.
УПАТСТВО ЗА КОРИСТЕЊЕ
Ве молиме прочитајте го ова упатство пред да го
инсталирате и употребувате вашиот уред.
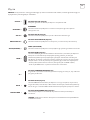
ENG
BIH/
MNE
HRV
HUN
GRC
BGR
MKD
S LV
ROU
POL
SRB

3
ENG
Precautions
Read all of the instructions before operating the set.
Keep these instructions well for future use.
Product
• Do not block or cover the ventilation openings on
the back cover.
• Do not push objects of any kind into this unit
through the cabinet slots as they could touch
the current carrying parts or short-circuit parts,
resulting in fire, electric shock, or damage to the
unit.
• Do not attempt to open the cabinet as this may
cause damage. There are no parts inside you can
service by yourself. Refer all servicing to qualified
personnel.
• Do not touch the screen surface with fingers as
this may scratch or mar the TV screen.
• Do not impact the TV screen with hard pressure
as this may damage the TV screen severely.
Power and Plug
• Unplug the set under the following conditions:
– If the set will not be used for a long period of
time.
– If the power cord or the power outlet/plug is
damaged.
– Follow the instructions to install and adjust the
product. Adjust those controls that are covered
in this operating instructions as improper
adjustment of other controls may result in
damage. If this happens, unplug the set and
refer to the service personnel.
– If the set is subject to impact or has been
dropped to have the cabinet damaged.
Power Cord and Signal Cable
• Do not allow anything to rest on or roll over the
power cord and the signal cable.
• Protect the power cord and the signal cable from
being trampled.
• Do not overload the power cord or the power
outlet.
• Do not expose the power cord and the signal
cable to moisture.
Use Environment
• Do not place the set on an unstable cart, stand,
or table.
• Place the set on a place that allows good
ventilation. Do not use the set near damp, and
cold areas. Protect the set from overheating.
• Keep the set away from direct sunlight.
• Apparatus shall not be exposed to dripping or
splashing and no objects filled with liquids, such
as vases, shall be placed on the apparatus.
• Do not use the set near dust place.
Cleaning
• Dust the set by wiping the screen and the cabinet
with a soft, clean cloth or some special liquid
cleaner.
• Do not apply excessive force to the screen when
cleaning.
• Do not use water or other chemical cleaner to
clean the screen as this may damage the surface
of the TV screen.
•
Hanging the TV Set on the
Wall
Warning: This operation requires two people.
To ensure a safe installation, observe the following
safety notes:
• Check that the wall can support the weight of the
TV set and wall mount assembly.
• Follow the mounting instructions provided with
the wall mount.
• The TV set must be installed on a vertical wall.
• Make sure to use only screws suitable for the
material of the wall.
• Make sure that the TV set cables are placed so
that there is not danger of tripping over them.
All other safety instructions about our TV sets are
also applicable here.
1.
This equipment is a Class II or double
insulated electrical appliance. It has been
designed in such a way that it does not require
a safety connection to electrical earth.
2. Where the MAINS plug or an appliance coupler
is used as the disconnect device, the disconnect
device shall remain readily operable.
3. The apparatus shall not be exposed to dripping
or splashing and that no objects filled with
liquids, such as vases, shall be placed on the
apparatus.
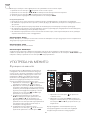
INTRODUCTION

4
ENG
4. A warning that batteries (battery pack or
batteries installed) shall not be exposed to
excessive heat such
as sunshine, fire or the like.
5. No naked flame sources, such as lighted
candles, should be placed on the apparatus;
6. Attention should be drawn to the
environmental aspects of battery disposal;
Note: Illustrations within this publication are
provided for reference only.
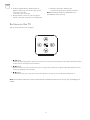
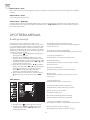
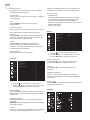
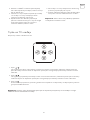
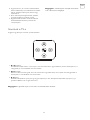
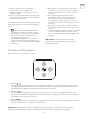
Buttons on the TV
Take a certain model for an example:
1.
\ button
Scans up/down through the channel list. In the menu system, they act like the up/down direction buttons
on the remote and adjust menu controls.
2.
\ button
Increases/decreases the volume. In the menu system, they act like the right/left direction buttons on the
remote and adjust menu controls.
3.
\ button
In standby mode, press it to turn on the TV. In power on mode, press it to show the NAV menu.
Note: The location and names of the function buttons and power button on the TV may vary according to TV
model.

5
ENG
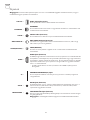
Sockets
Note: The location and names of the sockets on the TV may vary according to TV model, and some sockets
may not available for some models.
USB 2.0 socket (input)
This socket can be used to connect a USB device.
ETHERNET
This socket can be used to connect to external modem or network access
equipment.
SAT IN socket (input)
This socket can be used to connect the satellite receiver pot.
ANT/CABLE IN socket(input)
Lets you connect a coaxial cable to receive the signal from your antenna,
cable, or cable box.
SPDIF(OPTICAL)
This output can be used to connect a compatible digital audio receiver.
HDMI socket (input)
The HDMI (High-Definition Multimedia Interface) socket can be used to
connect a PC with a compatible video card installed, certain DVD players or
a high-definition compatible digital satellite decoder. This socket provides an
uncompressed digital connection that carries both video and audio data by
way of an integrated mini-plug cable.
– ARC (Audio Return Channel) function is only supported on HDMI 3 (ARC)
port.
– Number of HDMI ports may vary.
COMMON INTERFACE(CI) socket
This CI socket can be used to put the CI card in to accept the Scrambled
Programs.
AV IN socket (input)
The AV IN sockets can be used to connect a range of equipment, including
video recorders, camcorders, decoders, satellite receivers, DVD players, or
games consoles.
HEADPHONE OUT socket (output)
Allow you to connect earphones to listen to the sound coming from the TV.
Note: Excessive sound pressure from earphones can cause hearing loss.
USB 2.0 —
ETHERNET —
SAT IN —
ANT/CABLE IN —
SPDIF(OPTICAL) —
HDMI —
CI —
AV IN —
HEADPHONE —

6
ENG
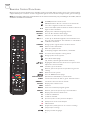
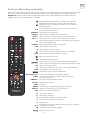
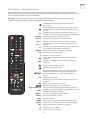
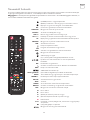
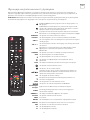
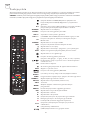
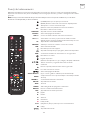
Remote Control Functions
Most of your television’s functions are available on the menu that appear on the screen. The remote control
supplied with your set can be used to navigate through the menus and to configure all the general settings.
Note: The location and names of the buttons on the remote control may vary according to TV model, and not
all buttons available on all models.
(POWER) Turns the TV on or off.
(MUTE) Reduces the TV's volume to its minimum
level. Press again to restore the volume.
0-9
(numeric buttons) Enters channel numbers. Enters a
digit in some functions.
SUBTITLE Displays the Subtitle Language menu.
YouTube Goes to the YouTube homepage.
VOL +/ Increases or decreases the TV’s volume.
CH ./ , Scans up or down through the current channel list.
TV
Press to enter TV mode. This function is unavailable
in Multimedia mode.
SOURCE Brings up the signal source selection menu.
USB Accesses the USB mode.
Enter the option menu.
To display program information, if available.
ECO To select desired power saving mode.
Brings up the menu system.
Goes to the homepage.
(up, down, left and right direction buttons)
Highlights different items in the menu system and
adjusts the menu controls.
OK Confirms your selection.
Returns you to the previous operation in general
setting.
EXIT Exits the menu system.
Goes to NETFLIX main page.
Colour buttons (Red/Green/Yellow/Blue) Selects tasks.
SLEEP Set the TV to turn off after a given amount of time.
ZOOM+/- Selects the desired screen format.
CH LIST Displays the Channel List.
TEXT Teletext.
GUIDE Turns on electronic program guide.
PRE-CH Returns you to the previously viewed channel.
FAV Displays the favorite channel list.
5
Searches backward.
6
Searches forward.
{
(Previous) Goes to the previous chapter.
}
(Next) Goes to the next chapter.
4
PVR function.
u 2
(Play/Pause) Starts, pauses or resumes viewing.
3
(Stop) Stops viewing.
Displays audio language.

7
ENG
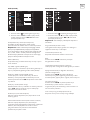
GENERAL OPERATION
Switching on
Switching off
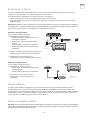
Network Connection
Follow the instructions on this page on how to switch on your TV set and the remote control before going on
to following pages describing how to use the channel set-up procedure.
1. Insert two batteries in the remote control.
Precautions on using batteries:
- Only use the battery types specified.
- Make sure you use the correct polarity.
- Do not mix new and used batteries.
- Do not use rechargeable batteries.
- Do not expose batteries to excessive heat such as sunshine, fire or the like, throw them in a fire,
recharge them or try to open them, as this could cause them to leak or explode.
- Remove the batteries from the remote control if you are not using it for a long period of time.
2. Connect the power cable FIRST to the television, THEN to a mains socket.
(Note: If the power cable is connected to the television, please only connect the power cable to the
mains socket.)
Your TV set should only be connected to an AC supply. It must not be connected to a DC supply. If the
plug is detached from the cable, do not, under any circumstances, connect it to a mains socket, as there
is a risk of electric shock.
3. Connect an outside aerial to the ANTENNA/CABLE IN or SAT IN socket at the back of the TV set.
4. When powered on, the TV will be turned on directly or be in standby.
Note: For some models, switch the TV on by pressing the power button. If the power indicator lights up,
the TV set is in standby mode. Press the
button on the remote control or on the TV set to turn on the
TV.
If the power indicator lights up, the TV set is in standby mode. Press the button on the remote control or on
the TV set to turn on the TV.
• To put the TV set into standby mode, press the
button on the remote control or on the TV, the TV set
remains powered up, but with low energy consumption.
• To switch off the TV set, unplug the mains socket from the mains outlet.
Note: For some models, press the power button to switch off the TV set .
To access the Internet, you must subscribe to high speed broadband Internet service with your Internet
service provider (ISP).
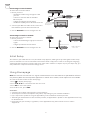
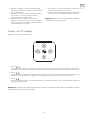
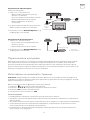
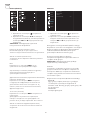
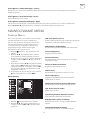
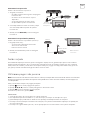
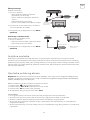
Your TV can be connected to your home network in two ways:
• Wired, using the RJ45 (LAN) connector on the back panel.
• Wireless, using the internal wireless and your home wireless network.
Note: Instructions below are just the usual ways to connect your TV to the wired or wireless network. The
connection method may be different depending on your actual network configuration. If you have any
questions about your home network, please refer to your ISP.

8
ENG
Connecting to a wired network
To connect to a wired network:
1. Ensure you have:
– An Ethernet cable long enough to reach
your TV
– A router or modem with an available
Ethernet port
– A high-speed Internet connection
– An Ethernet (LAN) port on the back of the TV
2. Connect your Ethernet cable to the router and
to the Ethernet port on the back of the TV.
3. Use the Network menu to configure the TV.
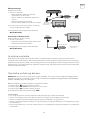
Connecting to a wireless network
To connect to a wireless network:
1. Ensure you have:
– A router broadcasting a high-speed wireless
signal
– A high-speed Internet connection
2. Use the Network menu to configure the TV.
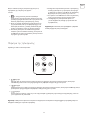
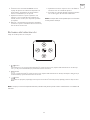
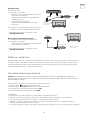
Router
Ethernet
Port on the
back panel
or
TV set
TV set
Wireless Router
Built-in wireless
connection
Modem
Modem
Internet
Initial Setup
Using Homepage
The first time you switch the TV set on, the Initial Setup appears, which guides you through the initial setup
process. Follow the on-screen instructions to finish the initial setup process such as selecting the language,
scanning channels and more. During each step, either make a choice or skip the step. If you skip a step, you
can perform the setup later from the settings menu.
Note: This manual is for common use. Figures and illustrations in this User Manual are provided for reference
only and may differ from actual product appearance. And for some models, certain options are not available.
You can select all the features from homepage.
1. Press
to display homepage.
2. Press \u\\ to select icons from the screen list.
3. Press OK to enter each option.
4. To exit the menu, press EXIT.
WARNING:
• Configure the network settings before using Smart TV.
• Slow responses and/or interruptions may occur, depending on your network conditions.
• If you experience a problem using an application, please contact the content provider.
• According to circumstances of the contents provider, an application’s updates or the application itself may
be discontinued.
• Depending on your country’s regulations, some applications may have limited service or not be
supported.

9
ENG
Homepage-Source
Source: Select the input source from devices connected to TV through different ports.
Homepage-Smart
Smart: Displays the smart menu.
Homepage-Apps
Many useful and entertaining apps for using. After entering the Apps Store, you will see the recommendations.
Press \ u\\ to select, press OK to enter.
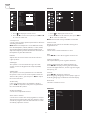
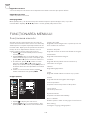
MENU OPERATION
Menu Function
This section explores the system settings menu of
your TV. Each menu is outlined and detailed to help
you get the most from your TV. Please note that
some function might be unavailable in certain input
source. To access the menu system:
1. Press
on remote control to display the main
menu.
2. Press \ to select Picture, Sound, Channel,
Smart TV, Network, System or Support, then
press OK or u to enter the submenu.
3. In the submenu, press \ to select options,
press OK or u to set functions or change
values, press OK to open the corresponding
submenu or activate a setting.
4. To return the previous menu, press
. To close
the menu, press EXIT.
Picture
1. Press
to display the main menu.
2. Press \to select Picture, then press OK or u
to enter the submenu.
Picture preset
Adjusts the picture setting that best suits your
viewing environment.
Backlight
Adjusts the backlight levels of the picture.
Brightness
Adjusts the brightness of the picture.
Contrast
Adjusts the difference between the light and dark
areas of the picture.
Saturation
Adjusts the richness of color.
Tint
Adjusts the balance between the red and green
levels.
Sharpness
Adjusts the crispness of the edges in the picture.
Color temperature
Adjusts the color temperature of the picture.
Screen mode
Selects the picture size.
Dynamic contrast
Adjusts the contrast automatically.
Noise reduction
Reduces picture “static” or any type of interference.
ECO Setting
Configures engergy saving options.

10
ENG
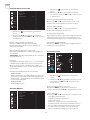
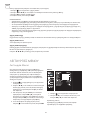
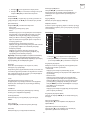
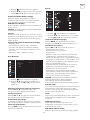
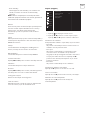
Sound
1. Press
to display the main menu.
2. Press \to select Sound, then press OK or u
to enter the submenu.
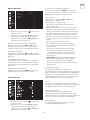
Sound preset
Selects a preset audio option optimized for different
sounding conditions.
Note: When Sound preset is set to different mode,
five Sound options (100 Hz, 500 Hz, 1.5 KHz, 5 KHz,
and 10 KHz) will be adjusted, which enable you to
adjust the frequency levels desired. You can also set
the options to your desired levels.
Balance
Adjusts the amount of audio sent to the left and
right speakers.
SPDIF type
This option is used to control the type of audio
stream sent to the Digital Audio Output (SPDIF)
socket.
SPDIF delay
This option is used to synchronize the sound with
the picture. If the sound is slower/quicker than the
action of the picture, you can press \u to adjust
the numerical value.
Audio delay
if the sound output does not match the picture,
press \u to adjust the delay time to synchronize
the sound with the picture.
Audio description
Selects On to adjust AD volume.
Auto volume control
Selects On to reduce the annoying blasts in volume
during commercial breaks and also amplifies softer
sounds in program material. Eliminates the need to
constantly adjust the volume.
Channel
1. Press
to display the main menu.
2. Press \to select Channel, then press OK or
u to enter the submenu.
Note: This function is only available in TV mode.
Channel scan
Allows you to scan for all available analog and
digital channels.
Channel List
Shows all the searched channel in a list.
EPG
Press OK/u to enter the Program Guide menu.
Channel organizer
This option allows you to organize channels.
Channel diagnostics (on digital TV channels)
Press OK/u to display some signal information
on current digital channel, such as signal strength,
Frequency, etc.
Teletext
Press OK/uto display its submenu.
Decoding page language:select a proper type of
decoding language in which Teletext will display.
Record list
Show the record list menu.
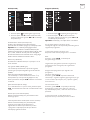
Smart TV
Sound preset
100Hz
500Hz
1.5KHz
5KHz
10KHz
Balance
SPDIF type
SPDIF delay
Audio delay
Audio description
Auto volume cont...
Standard >
50
50
50
50
50
0
PCM >
0
0
Off >
Off >
Picture
Sound
Network
Smart TV
Support
System
Channel
Netflix settings
Wireless Display
FastCast
Networked standby
...
...
...
Picture
Sound
Network
Smart TV
Support
System
Channel
On >

11
ENG
1. Press to display the main menu.
2. Press \to select Smart TV, then press OK or
u to enter the submenu.
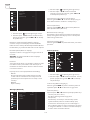
Netflix settings
In Netflix Setting menu, Netflix Deactivation can
deactivate your device form Netflix.
Wireless Display
Displays your smartphone contents on the TV.
Note: This function may be unavailable for some
models.
FastCast
Scan the QR code, ensure TV and mobile phone
in the same network. You can use mobile phone to
enjoy big screen picture quality.
Networked standby
- ON:
Other device (phone) can “wake up” the TV, and
share Youtube content to TV. This needs device
and TV in same network.
- OFF:
Closes the function.
Network
1. Press
to display the main menu.
2. Press \to select Network, then press OK or
u to enter the submenu.
Internet connection
Press OK or u to select On, then you can adjust the
options below.
Interface
Press OK or u to select Wired or Wireless.
IP settings
Sets Address type to Auto, it will acquire and enter
the needed IP address automatically.
Information
Press OK/uto display the information on current
connection.
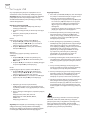
System
1. Press
to display the main menu.
2. Press \to select System, then press OK or u
to enter the submenu.
Menu Language
Press OK/uto display the language list and use
\ to select a language.
Timer
Press OK or u to enter the submenu.
- Time zone
Selects the local time zone.
- Clock
Select on to turn on the Auto synchronization,
the TV will get the time automatically from DTV
signals, and the Time item cannot be adjusted. If
you select off, you should set the options manually.
- Sleep timer
Sets a period of time after which the TV set goes
into standby mode.
- Auto standby
When Auto Standby is set to your desired time, TV
will be in standby mode automatically.
Note: Without any operation in TV interface when
the Auto standby mode is on ,the set will be entering
standby mode automatically.
Lock
This menu can control the special function for TV.
The factory default code is 1234. And
the super password is 0812. If you forget your code,
enter it to override any existing codes.
T-Link
Use this function to turn on the ARC function and
search for CEC devices connected to the HDMI
sockets in your TV.
Location
Selects Home or Shop or Shop with demo
depending on your viewing environment.
HbbTV mode
Selects On to turn on the HBBTV function.
Internet connection
Interface
Wireless settings
IP settings
Information
On >
Wireless >
...
...
...
Picture
Sound
Network
Smart TV
Support
System
Channel

12
ENG
Common Interface
Press OK or u to enter the Common Interface.
Subtitle
Selects On to display the subtitle.
Reset shop
Press OK or u to enter, input the correct password
to restore factory default settings.
Initial Setup
Enters the Initial Setup menu.
Input Settings
User can select the device name of the input source
here, easy to identify the source.
Support
1. Press
to display the main menu.
2. Press \to select Support, then press OK or
u to enter the submenu.
Software update
You can update software by USB, network or
channel.
- By USB
Enables you to install the latest version of the
software from your USB ports.
- By network
Enables you to download and install the latest
software version from the Internet. Make sure to
set up a wired or wireless network connection first.
Press OK/u to enter.
Follow the on-screen instructions to continue.
- By channel
Enables you to update a new software on the air.
Software update(OAD)
Press OK/u button to select On or Off.
Terms and Conditions
Press OK or u to read the Terms and Conditions.
Privacy Notice
Press OK or u to read the Privacy Notice.
USB Function
You can enjoy viewing pictures from your USB
storage device.
Note: Some options may unavailable in some
models. In USB state, if USB device didn’t connected,
the USB interface will be not displayed.
How to enter USB mode
1. Connect the USB storage device into the USB
Input terminal.
2. Press USB button to enter USB mode.
3. Select your USB device to enter.
Picture
To browse pictures if available.
1. Press OK or u to enter, then press \u\\
to select the folder, press OK to enter.
2. Press \u\\ to select your desired file,
then press OK to play.
Music
To playback music if available.
1. 1.Press OK or u to enter, then press \ to
select the folder, press OK to enter.
2. Press \ to select your desired file, then
press OK to play.
Video
To watch video if available.
1. Press OK or u to enter, then press \u\\
to select the folder, press OK to enter.
2. Press \u\\ to select your desired file,
then press OK to play.
1. Some non-standard mobile storage device may
not be recognized. Please change to use the
standard device.
2. This system supports the following file formats:
Picture format: JPEG, JPG, PNG etc..
Video format: H.264, MPEG4, MPEG2,
MPEG1, etc..
Audio format: MP3 etc..
Note: For coding files, there are many kinds
nonstandard coding method, so this system can not
be guaranteed to support the file formats using any
coding method.
Frequently Asked Questions:
1. Under the following conditions, this system
cannot decode the file and the file cannot be
play normally:
- The parameters of file, such as the pixel of
picture,code rate of audio and video file,
sampling rate of audio file, exceed the limit of
the system;
- The format of file is not matched or the file is
harmed.
Software update
Software update(OAD)
About browser
Terms & Conditions
Privacy Notice
...
Off >
...
...
...
Picture
Sound
Network
Smart TV
Support
System
Channel

13
ENG
2. Hot plug: Do not disconnection when the
system is reading or transmitting data, avoid
damaging the system or the device.
3. Pay attention to the power supply of the
device whenyou are using a mobile hard disk
or a digital camera. If the power supply is not
sufficient or not stable, you may encounter
problems during operating or can not operate
at all. In this case, please restart the device, or
unplug the device and plug it again, and ensure
that its power supply is normal.
4. The system supports standard USB1.1 and
USB2.0 devices, such as standard U-disks, MP3
players, mobile hard disks, etc..
5. For obtaining better audio and video quality,
suggests to use the external device which
accords with USB2.0 standard.
6. When playing the video with high compression
ratio, these phenomenons, such as picture
standstill and menu long time response, are
normal.
7. For some USB device with power supply, such
as large size hard disk, MP4, etc., suggests
using it with power to avoid electric power
shortage.
* Do not touch or be close to the ANTENNA,
SATELLITE , HDMI , USB terminals, and prevent
electrostatic discharge to disturb,these terminals
while in LAN and WiFi operation mode, or it will
cause the TV to stop working or abnormal status.
Troubleshhoting
Most problems you encounter with your TV can be
corrected by consulting the following
troubleshooting list.
No picture, no sound
1. Check if the fuse or circuit breaker is working.
2. Plug another electrical device into the outlet to
make sure it is working or turned on.
3. Power plug is in a bad contact with the outlet.
4. Check the signal source.
No color
1. Change the color system.
2. Adjust the saturation.
3. Try another channel. Black-white program may
be received.
Remote control does not work
1. Change the batteries.
2. Batteries are not installed correctly.
3. Main power is not connected.
No picture, normal sound
1. Adjust the brightness and contrast.
2. Broadcasting failure may happen.
Normal picture, no sound
1. Press the Vol+ button to increase volume.
2. Volume is set to mute, press the mute button to
restore sound.
3. Change the sound system.
4. Broadcasting failure may happen.
Unorderly ripples on the picture
It is usually caused by local interference, such as
cars, daylight lamps and hair driers. Adjust the
antenna to minimize the interference.
Snowy dots and interference
If the antenna is located in the fringe area of a
television signal where the signal is weak, the
picture may be marred by dots. When the signal
is extremely weak, it may be necessary to install a
special antenna to improve the reception.
1. Adjust the position and orientation of the
indoor/outdoor antenna.
2. Check the connection of antenna.
3. Fine tune the channel.
4. Try another channel. Broadcasting failure may
happen.
Ignition
Black spots or horizontal streaks appear, or the
picture flutters or drifts. This is usually caused by
interference from car ignition system, neon lamps,
electric drills, or other electrical appliance.
Ghost
Ghosts are caused by the television signal following
two paths. One is the direct path, the other is
reflected from tall buildings, hills, or other objects.
Changing the direction or position of the antenna
may improve the reception.
Radio frequency interference
This interference produces moving ripples or
diagonal streaks, and in some case, loss of contrast
in the picture. Find out and remove the radio
interference source.
OTHER INFORMATION

14
BIH/
MNE
Mjere opreza
Prije rukovanja uređajom, pročitajte sva uputstva.
Dobro sačuvajte ova uputstva za buduću upotrebu.
Proizvod
• Nemojte blokirati ili prekrivati ventilacione otvore
na poklopcu sa zadnje strane.
• Ne ubacujte nikakve predmete u uređaj kroz
proreze kućišta, jer mogu da dođu u kontakt sa
dijelovima koji prenose struju ili koji mogu da
stvore kratak spoj, što može izazvati požar, strujni
udar ili oštećenje na uređaju.
• Ne pokušavajte da otvorite kućište, jer to može
oštetiti uređaj. Unutra ne postoje dijelovi koje
bi ste mogli samostalno servisirati. Za sve vrste
servisiranja, obratite se kvalifikovanom osoblju.
• Ne dodirujte površinu ekrana prstima, jer možete
izgrebati ili uništiti ekran TV uređaja.
• Nemojte snažno pritiskati ekran TV uređaja, jer
na taj način možete ozbiljno oštetiti ekran TV
uređaja.
Napajanje i priključak
• Uređaj isključite iz struje u sljedećim situacijama:
– Ukoliko uređaj nećete upotrebljavati tokom
dužeg vremenskog perioda.
– Ukoliko su kabal za napajanje ili utičnica/utikač
oštećeni.
– Pratite uputstva za instaliranje i podesite
proizvod. Podesite samo one kontrole koje su
pokrivene ovim uputstvom za upotrebu, jer
nepravilno podešavanje ostalih kontrola može
izazvati oštećenje. Ukoliko se ovo i dogodi,
isključite uređaj iz struje i obratite se osoblju za
servisiranje.
– Ukoliko je uređaj doživio udarac ili pad, usljed
čega je došlo do oštećenja kućišta.
Kabal za napajanje i signalni
kabal
• Ne dozvolite da se bilo šta oslanja na ili kreće
preko kabla za napajanje i signalnog kabla.
• Zaštitite kabal za napajanje i signalni kabal od
gaženja.
• Ne preopterećujte kabal za napajanje ili utičnicu.
• Ne izlažite kabal za napajanje i signalni kabal
dejstvu vlage.
Okruženje u kojem se
upotrebljava
• Ne postavljajte uređaj na nestabilne konstrukcije
sa točkićima, postolja ili stolove.
• Uređaj postavite na mjesto koje omogućava
dobru ventilaciju.
• Ne upotrebljavajte uređaj u blizini vlažnih i
hladnih mjesta. Zaštitite uređaj od pregrijavanja.
• Držite uređaj dalje od direktnih sunčevih zraka.
• Tečnost ne smije da kapa niti da prska po uređaju
i na uređaj se ne smiju stavljati predmeti ispunjeni
tečnošću, poput vaza.
• Ne upotrebljavajte uređaj u blizini prašnjavih
mjesta.
Čišćenje
• Uklonite prašinu sa uređaja tako što ćete obrisati
ekran i kućište mekanom, čistom krpom ili nekom
specijalnom tečnošću za čišćenje.
• Nemojte pretjerano pritiskati ekran prilikom
čišćenja.
• Prilikom čišćenja ekrana ne upotrebljavajte vodu,
kao ni druga hemijska sredstva, jer to može
oštetiti površinu ekrana TV uređaja.
Postavljanje TV uređaja na zid
Upozorenje: Za ovu operaciju su potrebne dvije
osobe.
Kako bi ste bili sigurni da je postupak instaliranja
bezbjedan, pridržavajte se sljedećih napomena o
bezbjednosti:
• Provjerite da li zid može da podrži težinu TV
uređaja i konstrukcije za montiranje na zid.
• Pratite uputstva za montiranje, koja su priložena
uz konstrukciju za montiranje.
• TV uređaj se mora instalirati na vertikalni zid.
• Uvjerite se da upotrebljavate isključivo one
zavrtnje koji odgovaraju materijalu od kojeg je zid
napravljen.
• Uvjerite se da su kablovi TV uređaja postavljeni
tako da ne predstavljaju opasnost od saplitanja.
Sva ostala uputstva o bezbjednosti u vezi sa Vašim
TV uređajem se ovde također primjenjuju.
1.
Ova oprema predstavlja Klasu II ili
dvostruko izolovani električni uređaj. Dizajniran
je tako da ne zahtjeva bezbjednosno
povezivanje sa električnim uzemljenjem.
UVOD

15
BIH/
MNE
2. Ukoliko se UTIKAČ ili utičnica upotrebljavaju
kao način isključivanja uređaja, onda oni moraju
biti na dohvat ruke.
3. Tečnost ne smije da kapa niti prska po uređaju
i na uređaj se ne smiju stavljati predmeti
ispunjeni tečnošću, poput vaza.
4. Upozoravamo Vas da baterije (baterijski
paket ili instalirane baterije) ne smijete izlagati
pretjeranoj toploti, poput one nastale dejstvom
sunčevih zraka, vatre i slično.
5. Na uređaj se ne smiju stavljati izvori otvorenog
plamena, poput upaljenih svijeća.
6. Prilikom odlaganja baterija, treba obratiti pažnju
na aspekte u vezi sa zaštitom životne sredine.
Napomena: Slike u okviru ove publikacije prikazane
su isključivo u ilustrativne svrhe.
Tasteri na TV uređaju
Kao primjer uzmite određeni model:
1. Tasteri
\
Omogućavaju kretanje naviše/naniže u okviru liste kanala. U sistemskom meniju, funkcionišu kao tasteri
za kretanje naviše/naniže na daljinskom upravljaču i omogućavaju podešavanje kontrola u okviru menija.
2. Tasteri
\
Omogućavaju pojačavanje/utišavanje zvuka. U sistemskom meniju, funkcionišu kao tasteri za kretanje na
desno/na lijevo na daljinskom upravljaču i omogućavaju podešavanje kontrola u okviru menija.
3. Taster
\
U okviru režima pripravnosti, pritisnite ga kako bi ste uključili TV uređaj. Kada je uređaj uključen, pritisnite
ga za prikaz NAV menija.
Napomena: Lokacija i nazivi funkcionalnih tastera i tastera za uključivanje/isključivanje na TV uređaju se mogu
razlikovati zavisno od modela TV uređaja.

16
BIH/
MNE
Priključci
Napomena: Lokacije i nazivi priključaka na TV uređaju se mogu razlikovati zavisno od modela TV uređaja, a
neki od priključaka možda neće biti dostupni kod određenih modela.
Priključak za USB 2.0 (ulaz)
Ovaj priključak se može koristiti za povezivanje sa USB uređajem.
ETERNET
Ovaj priključak se može koristiti za povezivanje sa eksternim modemom ili
opremom za pristup mreži.
ULAZNI priključak za SAT (ulaz)
Ovaj priključak se može koristiti za povezivanje sa satelitskim prijemnikom.
ULAZNI priključak za ANT/KABL (ulaz)
Omogućava Vam povezivanje sa koaksijalnim kablom radi prijema signala
sa Vaše antene, kabla, ili uređaja za prijem kablovskog signala.
SPDIF (OPTIČKI)
Ovaj izlaz se može koristiti za povezivanje sa kompatibilnim digitalnim
audio prijemnikom.
Priključak za HDMI (ulaz)
Priključak za HDMI (High-Definition Multimedia Interface – multimedijski
interfejs visoke definicije) se može koristiti za povezivanje PC računara sa
instaliranom kompatibilnom video karticom, određenim DVD plejerima
ili kompatibilnim digitalnim satelitskim dekoderom visoke definicije. Ovaj
priključak omogućava nekomprimovanu digitalnu vezu, kojom se i video i
audio podaci prenose putem integrisanog kabla sa mini priključkom.
– ARC (Audio Return Channel – povratni audio kanal) funkcija je podržana
isključivo na HDMI 3 (ARC) portu.
– Broj HDMI portova se može razlikovati od modela do modela.
Priključak za ZAJEDNIČKI INTERFEJS (COMMON INTERFACE, CI)
Ovaj CI priključak se može koristiti za postavljanje CI kartice, koja
omogućava prihvatanje skremblovanih programa.
ULAZNI priključak za AV (ulaz)
Priključci za AV se mogu koristiti za povezivanje sa nizom opreme,
uključujući video rekordere, kamkordere, dekodere, satelitske prijemnike,
DVD plejere ili konzole za igrice.
Priključak za SLUŠALICE (izlaz)
Omogućava Vam da povežete slušalice kako bi ste slušali zvuk koji emituje
TV uređaj.
Napomena: Pretjerano jak zvučni pritisak sa slušalica može da izazove
gubitak sluha.
USB 2.0 —
ETERNET —
ULAZ ZA SAT —
ULAZ ZA ANT/KABL —
SPDIF (OPTIČKI) —
HDMI —
CI —
ULAZ ZA AV —
SLUŠALICE —

17
BIH/
MNE
Funkcije daljinskog upravljača
Najveći broj funkcija Vašeg televizora dostupan je u okviru menija vidljivog na ekranu uređaja. Daljinski upravljač
dostavljen uz Vaš uređaj možete koristiti za kretanje kroz menije i za konfiguraciju svih opštih podešavanja.
Napomena: Lokacija i nazivi tastera na daljinskom upravljaču se mogu razlikovati zavisno od modela TV
uređaja. Nisu svi tasteri dostupni kod svih modela.
(NAPAJANJE) Za uključivanje ili isključivanje TV uređaja.
(NEČUJNO) Za smanjivanje jačine zvuka TV uređaja do
najnižeg nivoa. Ponovo pritisnite kako bi ste zvuk vratili na
prethodnu jačinu.
0-9
(numerički tasteri) Za unos brojeva kanala. U okviru nekih
funkcija, služi za unos cifara.
SUBTITLE Za prikaz menija Jezik titlova.
YouTube Za pristupanje početnoj stranici YouTube-a.
VOL +/ Za povećavanje ili umanjivanje jačine zvuka TV uređaja.
CH ./ , Za kretanje na više ili na niže po postojećoj listi kanala.
TV
Pritisnite da pristupite TV režimu. Ova funkcija nije dostupna u
okviru režima Multimedia.
SOURCE Za prikaz menija za odabir izvora signala.
USB Za pristupanje USB režimu.
Za pristupanje meniju za opcije.
Za prikaz informacija o programu, ukoliko su dostupne.
ECO Za odabir željenog režima uštede energije.
Za prikaz sistemskog menija.
Za odlazak na početni ekran.
(tasteri za gore, dole, lievo i desno) Za označavanje različitih
stavki u okviru sistemskog menija i za promjenu kontrola menija.
OK Za potvrdu Vašeg odabira.
Vraća Vas na prethodnu operaciju u okviru opštih postavki.
EXIT Za napuštanje sistemskog menija.
Za odlazak na glavnu stranicu NETFLIX-a.
Raznoboji tasteri (Crveni/Zeleni/Žuti/Plavi) Za odabir zadataka.
SLEEP
Podešava TV uređaj da se isključi nakon određenog
vremenskog perioda.
ZOOM+/- Za odabir željenog formata ekrana.
CH LIST Za prikaz Liste kanala.
TEXT Teletekst.
GUIDE Za aktiviranje elektronskog programskog vodiča.
PRE-CH Vraća Vas na kanal koji ste posljednji pratili.
FAV Za prikaz liste omiljenih kanala.
5
Za pretragu unazad.
6
Za pretragu unaprijed.
{
(Prethodno) Za odlazak na prethodni blok.
}
(Sljedeće) Za odlazak na sledeći blok.
4
PVR funkcija.
u 2
(Reprodukovanje/Pauza) Da započnete, pauzirate ili nastavite
sa gledanjem sadržaja.
3
(Stop) Za prekid gledanja sadržaja.
Za prikaz audio jezika.

18
BIH/
MNE
OPŠTI PODACI O RUKOVANJU
Uključivanje
Isključivanje
Povezivanje na mrežu
Prije nego što pređete na sljedeće strane, na kojima je opisana procedura podešavanja kanala, pročitajte
uputstva, prikazana na ovoj strani, o tome kako da uključite svoj TV uređaj i daljinski upravljač.
1. Stavite dvije baterije u daljinski upravljač.
Mjere predostrožnosti prilikom upotrebe baterija:
- Upotrebljavajte samo navedene tipove baterija.
- Uvjerite se da bateriju postavljate vodeći računa o njenom polaritetu.
- Ne kombinujte nove sa već upotrebljenim baterijama.
- Ne upotrebljavajte punjive baterije.
- Ne izlažite baterije izvorima prekomjerne toplote, poput sunčevih zraka, vatre i slično, nemojte ih bacati
u vatru, nemojte ih dopunjavati, niti pokušavati da ih otvorite, jer ovo može dovesti do njihovog curenja
ili eksplozije.
- Izvadite baterije iz daljinskog upravljača ukoliko ne planirate da ga koristite tokom dužeg vremenskog
perioda
2. Kabl za napajanje NAJPRIJE povežite sa televizorom, a ZATIM sa utičnicom.
(Napomena: Ukoliko je kabal za napajanje povezan sa televizorom, jednostavno povežite kabal za
napajanje sa utičnicom.)
Vaš TV uređaj bi trebalo priključiti isključivo na AC struju. Ne smije se priključivati na DC struju. Ukoliko
utikač nije povezan sa kablom, nemojte ga, ni pod kojim uslovima, priključivati na utičnicu, jer ovo izaziva
rizik od strujnog udara.
3. Povežite spoljašnju antenu sa priključkom ANTENNA/CABLE IN (ULAZ ZA ANTENU/KABL) ili SAT IN
(ULAZ SA SATELITSKU ANTENU) na poleđini TV uređaja.
4. Kada ga priključite, TV uređaj će se direktno uključiti ili će biti u režimu pripravnosti.
Napomena: Kod nekih modela, TV uređaj uključite pritiskom na taster za uključivanje/isključivanje.
Ukoliko je indikator napona uključen, TV uređaj je u režimu pripravnosti. Pritisnite taster
na daljinskom
upravljaču ili na TV uređaju kako biste uključili TV uređaj.
• Da TV uređaj prebacite u režim pripravnosti, pritisnite taster
na daljinskom upravljaču ili na TV uređaju.
TV uređaj će ostati priključen, ali uz nisku potrošnju energije.
• Da isključite TV uređaj, izvucite utikač iz utičnice.
Napomena: Kod nekih modela, TV uređaj se isključuje pritiskom na taster za uključivanje/isključivanje .
Da bi ste pristupili internetu, morate obezbijediti uslugu širokopojasnog interneta velike brzine od svog
provajdera internet usluga.
Svoj TV uređaj možete povezati na svoju kućnu mrežu na dva načina:
• Kablom, pomoću RJ45 (LAN) konektora na panelu na poleđini.
• Bežično, pomoću internog bežičnog rutera i svoje kućne bežične mreže.
Napomena: Dole navedena uputstva predstavljaju uobičajene načine povezivanja Vašeg TV uređaja na žičnu
ili bežičnu mrežu. Način povezivanja se može razlikovati zavisno od realne konfiguracije Vaše mreže. Ukoliko
imate bilo kakvo pitanje u vezi sa Vašom kućnom mrežom, obratite se svom internet provajderu.

19
BIH/
MNE
Žično povezivanje
Za žično povezivanje:
1. Uvjerite se da imate:
– Eternet kabl čija dužina omogućava
priključivanje na TV uređaj
– Ruter ili modem sa dostupnim portom za
eternet
– Internet konekciju velike brzine
– Port za eternet (LAN) na poleđini TV uređaja
2. Povežite svoj eternet kabal na ruter i na port za
eternet na poleđini TV uređaja.
3. Konfigurišite TV uređaj pomoću menija Mreže
(Network).
Povezivanje na bežičnu mrežu
Za povezivanje na bežičnu mrežu:
1. Uvjerite se da imate:
– Ruter koji emituje bežični signal velike brzine
– Internet konekciju velike brzine
2. Konfigurišite TV uređaj pomoću menija Mreže
(Network).
Router
Ethernet
Port on the
back panel
or
TV set
TV set
Wireless Router
Built-in wireless
connection
Modem
Modem
Internet
Inicijalne postavke
Upotreba početnog ekrana
Kada po prvi put uključite TV uređaj, aktiviraće se opcija Inicijalne postavke, koja će Vas sprovesti kroz
inicijalni proces podešavanja. Pratite uputstva prikazana na ekranu kako bi ste kompletirali proces inicijalnog
podešavanja, koji uključuje izbor jezika, pretragu kanala i još mnogo toga. Prilikom svakog od koraka, možete
napraviti izbor ili preskočiti dati korak. Ukoliko preskočite korak, dato podešavanje možete obaviti naknadno,
iz menija za podešavanja.
Napomena: Ovo uputstvo je namjenjeno za opštu upotrebu. Cifre i slike u okviru ovog Korisničkog uputstva
prikazane su isključivo u ilustrativne svrhe i mogu se razlikovati od izgleda realnog proizvoda. Kod određenih
modela, određene opcije nisu dostupne.
Možete odabrati sve funkcije prikazane na početnom ekranu.
1. Pritisnite taster
za prikaz početnog ekrana.
2. Pritisnite tastere \u\\ za izbor ikonice sa liste ekrana.
3. Pritisnite taster OK za pristup svakoj od opcija.
4. Za napuštanje datog menija, pritisnite taster EXIT.
UPOZORENJE:
• Prije nego što počnete da koristite Smart TV uređaj, konfigurišite mrežna podešavanja.
• Zavisno mreže koju imate, može doći do usporenog reagovanja TV uređaja i/ili do prekida.
• Ukoliko se prilikom upotrebe aplikacije javi problem, kontaktirajte svog provajdera.
• Zavisno od uslova pod kojima dobijate usluge od provajdera, ažuriranja aplikacije, ili sama aplikacija,
mogu biti obustavljeni.
• Zavisno od propisa koji su na snazi u Vašoj zemlji, neke od aplikacija mogu biti ograničene ili u potpunosti
nepodržane.

20
BIH/
MNE
Početni ekran – Izvor
Izvor: Izaberite izvor ulaznog signala biranjem jednog od uređaja povezanih na TV uređaj putem različitih
portova.
Početni ekran – Smart
Smart: Za prikaz smart menija.
Početni ekran – Aplikacije
Sadrži mnoštvo korisnih i zabavnih aplikacija koje možete upotrebljavati. Preporuke ćete vidjeti nakon što
pristupite Apps Store internet prodavnici. Pritisnite tastere \ u\\ kako biste izvršili odabir i pritisnite
taster OK da pristupite.
UPOTREBA MENIJA
Funkcije menija
U ovom poglavlju se fokusiramo na meni za
podešavanje sistema Vašeg TV uređaja. Svaki meni
je detaljno prikazan kako bi Vam se omogućilo da iz
svog TV uređaja izvučete maksimum. Imajte u vidu
da postoji mogućnost da neke od funkcija ne budu
dostupne kod određenih izvora ulaznog signala. Za
pristup sistemskom meniju:
1. Pritisnite taster
na daljinskom upravljaču za
prikaz glavnog menija.
2. Pritisnite taster \ za odabir opcije Slika
(Picture), Zvuk (Sound), Kanal (Channel), Smart
TV, Mreža (Network), Sistem (System) ili Podrška
(Support), a zatim pritisnite taster OK ili u kako
biste pristupili podmeniju.
3. U podmeniju, pritisnite taster \ za odabir
opcije, pritisnite taster OK ili uza podešavanje
funkcija ili promjenu vrijednosti, pritisnite
taster OK da pristupite odgovarajućem
podmeniju ili da aktivirate podešavanje.
4. Za povratak u prethodni meni, pritisnite taster
. Da napustite meni, pritisnite taster EXIT.
Slika (Picture)
1. Pritisnite taster
za prikaz glavnog menija.
2. Pritisnite taster \ za odabir opcije Slika,
a zatim pritisnite taster OK ili u kako biste
pristupili podmeniju.
Predpodešavanje slike (Picture preset)
Za predpodešavanje slike koja najbolje odgovara
Vašem okruženju.
Pozadinsko osvjetljenje (Backlight)
Za podešavanje nivoa pozadinskog osvjetljenja slike.
Osvjetljenje (Brightness)
Za podešavanje stepena osvjetljenja slike.
Kontrast (Contrast)
Za podešavanje razlike između svijetlih i tamnih
površina na slici.
Zasićenost (Saturation)
Za podešavanje stepena intenzivnosti boja.
Nijanse (Tint)
Za podešavanje balansa između nivoa crvene i
zelene boje.
Oštrina (Sharpness)
Za podešavanje oštrine ivica na slici.
Temperatura boja (Color temperature)
Za podešavanje temperature boja na slici.
Režim ekrana (Screen mode)
Za odabir veličine slike.
Dinamički kontrast (Dynamic contrast)
Za automatsko podešavanje kontrasta.
Smanjenje šuma (Noise reduction)
Za umanjenje statičke i svih ostalih smetnji na slici.
ECO podešavanje (ECO setting)
Za konfiguraciju opcija za uštedu energije
Pagina se încarcă...
Pagina se încarcă...
Pagina se încarcă...
Pagina se încarcă...
Pagina se încarcă...
Pagina se încarcă...
Pagina se încarcă...
Pagina se încarcă...
Pagina se încarcă...
Pagina se încarcă...
Pagina se încarcă...
Pagina se încarcă...
Pagina se încarcă...
Pagina se încarcă...
Pagina se încarcă...
Pagina se încarcă...
Pagina se încarcă...
Pagina se încarcă...
Pagina se încarcă...
Pagina se încarcă...
Pagina se încarcă...
Pagina se încarcă...
Pagina se încarcă...
Pagina se încarcă...
Pagina se încarcă...
Pagina se încarcă...
Pagina se încarcă...
Pagina se încarcă...
Pagina se încarcă...
Pagina se încarcă...
Pagina se încarcă...
Pagina se încarcă...
Pagina se încarcă...
Pagina se încarcă...
Pagina se încarcă...
Pagina se încarcă...
Pagina se încarcă...
Pagina se încarcă...
Pagina se încarcă...
Pagina se încarcă...
Pagina se încarcă...
Pagina se încarcă...
Pagina se încarcă...
Pagina se încarcă...
Pagina se încarcă...
Pagina se încarcă...
Pagina se încarcă...
Pagina se încarcă...
Pagina se încarcă...
Pagina se încarcă...
Pagina se încarcă...
Pagina se încarcă...
Pagina se încarcă...
Pagina se încarcă...
Pagina se încarcă...
Pagina se încarcă...
Pagina se încarcă...
Pagina se încarcă...
Pagina se încarcă...
Pagina se încarcă...
Pagina se încarcă...
Pagina se încarcă...
Pagina se încarcă...
Pagina se încarcă...
Pagina se încarcă...
Pagina se încarcă...
Pagina se încarcă...
Pagina se încarcă...
Pagina se încarcă...
Pagina se încarcă...
Pagina se încarcă...
Pagina se încarcă...
Pagina se încarcă...
Pagina se încarcă...
Pagina se încarcă...
Pagina se încarcă...
Pagina se încarcă...
Pagina se încarcă...
Pagina se încarcă...
Pagina se încarcă...
Pagina se încarcă...
Pagina se încarcă...
Pagina se încarcă...
Pagina se încarcă...
Pagina se încarcă...
Pagina se încarcă...
Pagina se încarcă...
Pagina se încarcă...
Pagina se încarcă...
Pagina se încarcă...
Pagina se încarcă...
Pagina se încarcă...
Pagina se încarcă...
Pagina se încarcă...
Pagina se încarcă...
Pagina se încarcă...
Pagina se încarcă...
Pagina se încarcă...
Pagina se încarcă...
Pagina se încarcă...
Pagina se încarcă...
Pagina se încarcă...
Pagina se încarcă...
Pagina se încarcă...
Pagina se încarcă...
Pagina se încarcă...
Pagina se încarcă...
Pagina se încarcă...
Pagina se încarcă...
Pagina se încarcă...
Pagina se încarcă...
Pagina se încarcă...
Pagina se încarcă...
Pagina se încarcă...
-
 1
1
-
 2
2
-
 3
3
-
 4
4
-
 5
5
-
 6
6
-
 7
7
-
 8
8
-
 9
9
-
 10
10
-
 11
11
-
 12
12
-
 13
13
-
 14
14
-
 15
15
-
 16
16
-
 17
17
-
 18
18
-
 19
19
-
 20
20
-
 21
21
-
 22
22
-
 23
23
-
 24
24
-
 25
25
-
 26
26
-
 27
27
-
 28
28
-
 29
29
-
 30
30
-
 31
31
-
 32
32
-
 33
33
-
 34
34
-
 35
35
-
 36
36
-
 37
37
-
 38
38
-
 39
39
-
 40
40
-
 41
41
-
 42
42
-
 43
43
-
 44
44
-
 45
45
-
 46
46
-
 47
47
-
 48
48
-
 49
49
-
 50
50
-
 51
51
-
 52
52
-
 53
53
-
 54
54
-
 55
55
-
 56
56
-
 57
57
-
 58
58
-
 59
59
-
 60
60
-
 61
61
-
 62
62
-
 63
63
-
 64
64
-
 65
65
-
 66
66
-
 67
67
-
 68
68
-
 69
69
-
 70
70
-
 71
71
-
 72
72
-
 73
73
-
 74
74
-
 75
75
-
 76
76
-
 77
77
-
 78
78
-
 79
79
-
 80
80
-
 81
81
-
 82
82
-
 83
83
-
 84
84
-
 85
85
-
 86
86
-
 87
87
-
 88
88
-
 89
89
-
 90
90
-
 91
91
-
 92
92
-
 93
93
-
 94
94
-
 95
95
-
 96
96
-
 97
97
-
 98
98
-
 99
99
-
 100
100
-
 101
101
-
 102
102
-
 103
103
-
 104
104
-
 105
105
-
 106
106
-
 107
107
-
 108
108
-
 109
109
-
 110
110
-
 111
111
-
 112
112
-
 113
113
-
 114
114
-
 115
115
-
 116
116
-
 117
117
-
 118
118
-
 119
119
-
 120
120
-
 121
121
-
 122
122
-
 123
123
-
 124
124
-
 125
125
-
 126
126
-
 127
127
-
 128
128
-
 129
129
-
 130
130
-
 131
131
-
 132
132
-
 133
133
-
 134
134


Tesla 50T617SUS Manual de utilizare
- Categorie
- Televizoare LCD
- Tip
- Manual de utilizare
Lucrări înrudite
-
Tesla 32T320BHS Manual de utilizare
-
-
-
-
-
Tesla 43E625BFS Manual de utilizare
-
Tesla 55M613BUS Manual de utilizare
-
-
Tesla 32E325BH Manual de utilizare
