
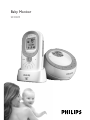
Baby Monitor
SCD489

2

3
1

4

SCD 489
ENGLISH 8
19
32
43
54
65
77
90
101
112
124
136
148
159
170
181

6
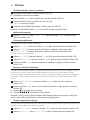
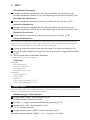
Introduction
Philips is dedicated to producing caring, reliable products that give parents the reassurance they
need. This Philips baby monitor provides round-the-clock support by ensuring you can always hear
your baby clearly without any distracting noise. The DECT technology guarantees zero interference
from other wireless appliances and a clear signal between the parent unit and baby unit.
Philips Baby Care: taking care together
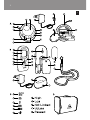
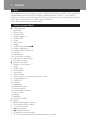
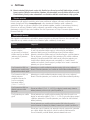
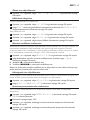
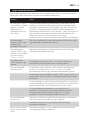
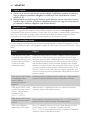
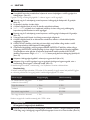
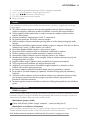
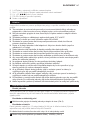
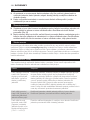
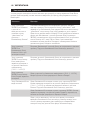
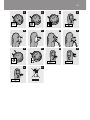
General description (Fig. 1)
Baby unit
1 On/off button
3
2 Temperature sensor
3 LINK light
4 Volume +/– buttons
5 PAGE button
6 Display
7 Nightlight
8 Adapter
9 Play/stop button
E
10 Lullaby button
K
11 Nightlight button
Q
12 Microphone
13 Small plug
14 Battery compartment lid
15 Socket for small plug
16 Battery compartment
B Parent unit
1 Sound level lights
2 Display
3 TALK button
4 MENU button
5 On/off button
3
6 LINK light
7 Recess for the belt clip or neck strap
8 Volume +/– buttons
9 OK button
10 Microphone
11 Loudspeaker
12 Battery compartment
13 Belt clip
14 Battery compartment lid
15 Neck strap
16 Adapter
17 Charger
18 POWER light
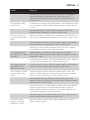
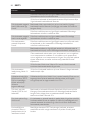
C Display
1
Y Room temperature indication
2
Q Night light indication
3
K Lullaby symbol
4
T Battery symbol
5
o Volume indication
6
R Microphone sensitivity indication
7
U Room temperature above temperature set in menu
ENGLISH

8 I Room temperature below temperature set in menu
9
O ‘No connection between units’ message
10
{ ‘Volume level’ message
11
S Message when lullaby is interrupted
D Travel bag
Important
Read these instructions for use carefully before you use the appliance and save them for future
reference.
This baby monitor is intended as an aid. It is not a substitute for responsible and proper adult
supervision and should not be used as such.
Check if the voltage that is indicated on the adapter corresponds to the local mains voltage
before you connect the appliance.
Use and store the appliance at a temperature between 10°C and 40°C.
The appliance is suitable for mains voltages ranging from 220 to 240V.
Do not expose the baby monitor to extreme cold or heat or to direct sunlight.
Make sure the baby unit and the cord are always out of reach of the baby (at least 1 metre/3
feet away).
Never place the baby unit inside the baby’s bed or playpen.
Never cover the baby monitor with a towel or blanket.
Never immerse any part of the baby monitor in water or any other liquid.
Never use the baby monitor in moist places or close to water.
Except for the battery compartments, do not open the housing of the baby unit and parent
unit in order to prevent electric shock.
Only use the adapter supplied to connect the baby unit to the mains.
Only use the charger supplied to charge the parent unit.
The adapters contain a transformer. Do not cut off the adapters to replace them with other
plugs, as this will cause a hazardous situation.
If the adapter of the baby unit is damaged, always have it replaced by one of the original type
in order to avoid a hazard.
If the charger or the adapter of the charger is damaged, always have the charger replaced by
one of the original type in order to avoid a hazard.
Always place batteries of the correct type in the baby monitor to avoid the risk of explosion.
Always use rechargeable batteries of the correct type for the parent unit.
Since continuous transmission is prohibited, you only hear your baby when it makes sounds.
Preparing for use
Baby unit
You can use the baby unit from the mains or on batteries. Even if you are going to use the unit from
the mains, we advise you to insert batteries. This guarantees automatic back-up in case of mains
failure.
Mains operation
1 Put the small plug in the baby unit and put the adapter in a wall socket. (Fig. 2)
Battery operation
The baby unit runs on four 1.5-volt R6 AA batteries (not included). We strongly advise you to use
Philips LR6 PowerLife batteries.
Make sure your hands and the unit are dry when you insert the batteries.
1 Turn the battery compartment to the left ( ¡ OPEN) with the palm of your hand. (Fig. 3)
,
,
,
,
,
,
,
,
,
,
,
,
,
,
,
,
,
,
ENGLISH 7

2 Remove the lid.
3 Insert four 1.5V AA batteries. (Fig. 4)
Place two batteries on top of each other and make sure the + and – poles of the batteries
point in the right direction.
4 Put the battery compartment lid back onto the unit and turn it to the right (CLOSE ™) with
the palm of your hand to close it. (Fig. 5)
Note: When the batteries are running low, the LINK light on the baby unit blinks.
Parent unit
Mains operation
1 Put the adapter of the charger in the wall socket and place the parent unit in the charger.
(Fig. 6)
The POWER light goes on.
Battery operation
The parent unit runs on two rechargeable 1.2-volt AAA NiMh batteries that are supplied with the
appliance.
Make sure your hands and the unit are dry when you insert the batteries.
1 Slide the battery compartment lid downwards to remove it. (Fig. 7)
2 Insert the two rechargeable batteries. (Fig. 8)
Make sure the + and – poles of the batteries point in the right direction.
3 Slide the battery compartment lid back onto the back of the parent unit until it locks into
position (‘click’). (Fig. 9)
4 Put the adapter in a wall socket and place the parent unit in the charger. (Fig. 6)
The POWER light goes on.
5 Leave the parent unit in the charger until the batteries are fully charged
Charging takes at least 16 hours.
Charging takes longer than 16 hours when the parent unit is switched on while charging. To
shorten the charging time, switch off the parent unit.
The POWER light stays on, even when the batteries are fully charged.
When the batteries are fully charged, the parent unit can be used cordlessly for at least 8
hours.
Note: The operating time of 8 hours is based on the assumption that the baby unit will be transmitting
25% of the time and is in standby mode for the rest of the time (when the baby does not make
any sound).
Note: When the parent unit batteries are charged for the rst time, the operating time will be less than
8 hours. The batteries only reach their full capacity after you have charged and discharged them four
times.
Note: When the battery symbol on the display is empty, the LINK light blinks and the parent unit beeps,
the batteries are running low. Place the parent unit in the charger.
Note: When the parent unit is not in the charger, the batteries gradually discharge, even when the parent
unit is switched off.
1
Place the parent unit and the baby unit in the same room to test the connection. (Fig. 10)
,
,
,
,
,
,
,
,
ENGLISH8

Make sure the the baby unit is at least 1 metre/3 feet away from the parent unit.
2 Press and hold the on/off 3 button on the baby unit for 2 seconds. (Fig. 11)
The nightlight lights up briey.
The display lights up and indicates the current room temperature.
O appears on the display and the connection light starts to blink red while the
baby unit tries to establish connection with the parent unit.
3 Press and hold the on/off button 3 on the parent unit for 2 seconds. (Fig. 12)
The sound level lights burn orange briey.
The display lights up and the battery symbol and the temperature indication appear on the
display.
The LINK light burns red briey and then starts to blink green while the parent unit tries to
establish connection with the baby unit.
The LINK light on the parent unit blinks green and the LINK light on the baby unit blinks red
until connection has been established. This will take up to 30 seconds. Both LINK lights then
burn green continously and the message O disappears from the baby
unit’s display. (Fig. 13)
4 Place the baby unit at least 1 metre/3 feet away from your baby. (Fig. 14)
5 Position the parent unit within the operating range of the baby unit. Make sure it is at least 1
metre/3 feet away from the baby unit. (Fig. 15)
For more information on the operating range, see section ‘Operating range’ below.
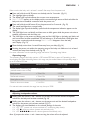
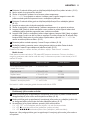
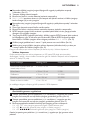
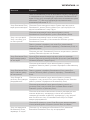
Operating range
The operating range of the baby monitor is 300 metres/900 feet in open air. Depending on the
surroundings and other disturbing factors, this range may be smaller. Indoors the operating range is
up to 50 metres/150 feet.
Dry materials Material thickness Loss of range
Wood, plaster, cardboard, glass
(without metal, wires or lead)
< 30cm/12in 0-10%
Brick, plywood < 30cm/12in 5-35%
Reinforced concrete < 30cm/12in 30-100%
Metal grilles or bars < 1cm /0.4in 90-100%
Metal or aluminium sheets < 1cm/0.4in 100%
For wet and moist materials, the range loss may be up to 100%.
Features
1 Briey press the volume + and – buttons on the baby unit until the desired loudspeaker
volume for the baby unit has been reached. (Fig. 16)
2 Briey press the volume + and – buttons on the parent unit until the desired loudspeaker
volume for the parent unit has been reached. (Fig. 17)
The displays give visual feedback on the volume settings of the units:
A : parent unit volume switched off / monitoring baby silently;
P : minimum volume (parent unit and baby unit);
}: maximum volume (parent unit and baby unit).
Note: If you press the volume + and – buttons too long, the volume will not be adjusted.
,
,
,
,
,
,
,
,
-
-
-
ENGLISH 9

Note: You only have to adjust the baby unit volume when you use the talk function (see below).
Note: If the volume is set to a high level, the units consume more power.
You can use the TALK button on the parent unit to talk to your baby (e.g to comfort your baby).
1 Press and hold the TALK button and talk clearly into the microphone. (Fig. 18)
2 Release the TALK button when you have nished talking.
Note: When you press the TALK button, you can no longer hear your baby.
Silent baby monitoring
1 Briey press the volume – button on the parent unit until the volume is switched off
completely. (Fig. 19)
The volume is completely switched off when all sound level lights are out.
As long as the baby unit does not detect a sound, all sound level lights on the parent unit are
out. (Fig. 20)
When the baby unit picks up a sound, one or more sound level lights on the parent unit go
on. The louder the sound, the more lights go on.
1 Briey press the nightlight button Q on the baby unit to switch on the nightlight. (Fig. 21)
Q appears on both displays.
2 Press the nightlight button Q again briey to switch off the nightlight. (Fig. 21)
The nightlight dims gradually before it goes out completely.
Q disappears from both displays.
Note: If you press the nightlight button Q too long, the nightlight will not go on or out.
Tip: Switch off the nightlight when you operate the baby unit on batteries. This saves power!
If you have misplaced the parent unit and its volume is switched off, you can use the PAGE button
on the baby unit to locate the parent unit.
1 Briey press the PAGE button on the baby unit (Fig. 22)
H appears on both displays.
The parent unit automatically resets to medium volume level and produces a paging alert
tone.
2 To stop the paging alert tone, press the PAGE button again briey or press any button on the
parent unit. (Fig. 22)
Note: If you press the PAGE button too long, the parent unit will not produce the paging alert tone.
Lullaby play function
1 Briey press the lullaby button K on the baby unit to select one of the ve lullabies available.
(Fig. 23)
2 Briey press the play/stop button E to play the selected lullaby. (Fig. 24)
3 Briey press the OK button on the parent unit to interrupt playing of the lullaby. Press the
OK button on the parent unit again to restart playing of the lullaby. (Fig. 25)
If you do not restart the lullaby within 60 seconds, the lullaby function will switch off
automatically.
,
,
,
,
,
,
,
,
ENGLISH10

4 Briey press the play/stop button E on the baby unit again to stop playing of the lullaby.
(Fig. 24)
Note: If you press the lullaby button K too long, no lullaby will be selected.
If the batteries of the parent unit are sufciently charged, you can take the unit with you inside and
outside the house if you attach the unit to your belt or waistband with the belt clip or if you hang it
round your neck with the neck strap. This allows you to monitor your baby while you are moving
around.
1 Insert the small pin on the back of the belt clip into the opening on the back of the parent
unit (1). Turn the belt clip to the left (2) until it locks into position (‘click’). (Fig. 26)
1 Turn the belt clip to the right (in the direction of ™) and take it out of the opening (2).
(Fig. 27)
1 Insert the small pin at the end of the neck strap into the opening on the back of the parent
unit (1). Turn the neck strap to the left (2) until it locks into position (‘click’). (Fig. 28)
1 Turn the neck strap to the right (in the direction of ™) and take it out of the opening (2).
(Fig. 29)
Reset function
This function allows you to reset the parent unit and baby unit to the default settings. You can use
this function if problems occur that cannot be solved by following the suggestions in chapter
‘Frequently asked questions’. You have to reset each unit separately.
1 Press and hold the on/off button 3 for 2 seconds to switch on the unit. (Fig. 30)
2 Press and hold the volume – button as soon as the connection light on the unit starts to
burn. (Fig. 31)
The unit has now been reset to the default factory settings.
Now do the same for the other unit.
Default settings
Parent unit
Loudspeaker volume: 1
Microphone sensitivity: 3
Sound alert: on
Temperature alert: on
Baby unit
Loudspeaker volume: 3
Nightlight: off
Lullaby: 1
’Temperature low’ alert: 14°C
’Temperature high’ alert: 30°C
,
-
-
-
-
-
-
-
-
-
ENGLISH 11

Menu options
Most functions can be operated on both the baby unit and the parent unit, but there are some
functions that can only be set via the menu options available on the parent unit.
Menu operation - general explanation
1 Press the MENU button to open the menu. (Fig. 32)
The rst menu option appears on the display.
2 Use the – and + buttons to select the desired menu option. (Fig. 33)
3 Press the OK button to conrm your selection. (Fig. 34)
J appears on the display.
4 Press the MENU button again to exit the menu. (Fig. 32)
Note: Always press the MENU button, the – and + buttons and the OK button briey.
1 Select K or L by pressing the – and + buttons and conrm by
pressing the OK button
Playing lullabies
To play or stop a lullaby:
1 Select åK by pressing the – and + buttons and conrm by pressing the OK button.
2 Select : to play the last played lullaby again or ( <| to stop playing
and conrm by pressing the OK button.
To select a different lullaby:
1 Select åK by pressing the – and + buttons and conrm by pressing the OK button.
2 Select ~ by pressing the – and + buttons and conrm by pressing the OK
button.
3 Select the desired lullaby by pressing the – and + buttons and conrm by pressing the OK
button.
You can set the microphone sensitivity of the baby unit to the desired level. When the microphone
sensitivity is set to maximum level, the baby unit picks up every sound, even the baby’s breathing. You
can only change the microphone sensitivity when a connection between the baby unit and the
parent unit has been established, i.e. when the LINK lights on the baby unit and the parent unit
burn green continuously.
1 Select ZR by pressing the – and + buttons and conrm by pressing the OK
button.
2 Select the desired microphone sensitivity level for the baby unit by pressing the – and +
buttons and conrm by pressing the OK button.
Sensitivity
∆ = minimum sensitivity level
Sensitivity ∆ ∆ ∆ ∆ ∆ = maximum sensitivity level
Note: When the microphone sensitivity of the baby unit is set to a high level, it picks up more sounds and
therefore transmits more often. As a result, the unit consumes more power.
,
,
,
,
ENGLISH12

If the sound alert is switched on, the parent unit beeps as soon as the fth sound level light starts to
burn orange while the volume is switched off..
1 Select X by pressing the – and + buttons and conrm by pressing the OK
button.
2 Select C or V and conrm by pressing the OK button.
Setting room temperature range
You can set the temperature range (minimum and maximum temperature) for your baby’s room.
1 Select B– – ° by pressing the – and + buttons and conrm by pressing
the OK button.
N appears on the display.
2 Conrm by pressing the OK button.
3 Set the desired minimum temperature by pressing the – and + buttons and conrm by
pressing the OK button.
4 Set the desired maximum temperature by pressing the – and + buttons and conrm by
pressing the OK button.
Note: When the maximum temperature selected is lower than the room temperature, the unit consumes
more power because the display will be on continuously. This is also the case when the minimum
temperature set is higher than the room temperature.
If the temperature alert is switched on, the parent unit beeps if the actual room temperature
exceeds the set maximum temperature or drops below the set minimum temperature. If no
temperature has been set, the temperature alert will go off when the room temperature drops
below 7°C or rises above 33°C.
1 Select B– – ° by pressing the – and + buttons and conrm by pressing
the OK button.
2 Select M by pressing the – and + buttons and conrm by pressing the OK
button.
3 Select C or V and conrm by pressing the OK button.
Cleaning and maintenance
Do not immerse the parent unit and the baby unit in water and do not clean them under the tap.
Do not use liquid cleaners or aerosol cleaners.
1 Unplug the baby unit, if it is connected to the mains, and take the parent unit out of the
charger.
2 Clean the parent unit and the baby unit with a damp cloth.
Make sure the parent unit is dry before you place it back in the charger.
3 Clean the charger with a dry cloth.
,
ENGLISH 13

Storage
When you are not going to use the baby monitor for some time, remove the batteries and
store the parent unit, the baby unit, the adapter of the baby unit and the charger in the travel
bag supplied.
You can also use the travel bag to store the baby monitor while you travel.
Do not throw away the appliance with the normal household waste at the end of its life, but
hand it in at an ofcial collection point for recycling. By doing this, you help to preserve the
environment. (Fig. 35)
Batteries contain substances that may pollute the environment. Do not throw empty
batteries away with the normal household waste, but hand them in at an ofcial collection
point. Always remove the batteries before discarding the appliance or handing it in at an
ofcial collection point.
If you need information or if you have a problem, please visit the Philips website at www.philips.com
or contact the Philips Customer Care Centre in your country (you nd its phone number in the
worldwide guarantee leaet). If there is no Customer Care Centre in your country, turn to your
local Philips dealer or contact the Service Department of Philips Domestic appliances and Personal
Care BV.
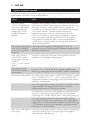
This chapter lists the questions most frequently asked about the appliance. If you cannot nd the
answer to your question, contact the Customer Care Centre in your country.
Question Answer
Why do the LINK lights
not blink and do the
displays not light up when
I press the on/off button
of the baby unit and the
parent unit?
Place the parent unit in the charger and put the adapter of the
charger in a wall socket. Then press the on/off button to check if the
parent unit works. Also check if the baby unit works by pressing the
on/off button. If it does not work, replace the batteries. Then try to
establish connection between the parent unit and baby unit. If the
LINK lights are still not on, move the parent unit closer to the baby
unit, but not closer than 1 metre/3 feet. If it is still not possible to
establish a connection, use the reset function to reset the units to
their default settings.
Why does the LINK light
on the parent unit blink
and why does the unit
beep at the same time?
The parent unit and the baby unit may be out of range of each other.
Move the parent unit closer to the baby unit.
Why does the LINK light
on the baby unit blink red
and why is the message
( O) shown
on the display?
The baby unit and the parent unit are out of range of each other.
Move the parent unit closer to the baby unit.
Why does the LINK light
on the baby unit blink
red?
If the message ( O) is not shown on the display, the
batteries of the baby unit are running low. Replace the batteries.
,
,
,
,
ENGLISH14

Question Answer
Why does the parent unit
beep?
If the parent unit beeps while the LINK light blinks red and the
message ( O) is shown on the display, the connection
with the baby unit is lost. Move the parent unit closer to the baby
unit.
If the parent unit beeps, the LINK light blinks red and the battery
symbol on the display is empty, the batteries are running low.
Recharge the batteries.
If you have switched off the volume while the sound alert is on, the
parent unit beeps whenever the fth sound level light starts to burn
orange because the baby unit has picked up a sound.
If you have set the room temperature on the parent unit and the
temperature alert is on, the parent unit beeps when the temperature
drops below the set level or below 7 °C or when the temperature
rises above the set level or above 33 °C.
Why does the appliance
produce a high-pitched
noise?
The units may be too close to each other. Make sure the parent unit
and the baby unit are at least 1 metre/3 feet away from each other.
The volume of the parent unit may be set too high. Decrease the
volume of the parent unit.
Why don’t I hear a sound/
Why can’t I hear my baby
cry?
The volume of the parent unit may be set too low or may be
switched off. Increase the volume of the parent unit.
The microphone sensitivity level may be set too. Set the microphone
sensitivity level to a higher level on the parent unit.
The baby unit and the parent unit may be out of range of each other.
Reduce the distance between the units.
Why does the parent unit
react too quickly to other
sounds?
The baby unit also picks up other sounds than those of your
baby. Move the baby unit closer to the baby (but observe the
minimum distance of 1 metre/3 feet).
The microphone sensitivity level may be set too high. Decrease the
microphone sensitivity level on the parent unit.
Why does the parent unit
react to baby’s crying
slowly?
The microphone sensitivity level on the parent unit may be set too
low. Increase the microphone sensitivity level on the parent unit.
Why do the batteries of
the baby unit run low
quickly?
The microphone sensitivity level may be set too high, which causes
the baby unit to transmit more often. Decrease the microphone
sensitivity level on the parent unit.
The volume on the baby unit may be set too high, which causes the
baby unit to consume a lot of energy. Decrease the volume on the
baby unit.
ENGLISH 15

Question Answer
You may have set a maximum room temperature that is lower than
the actual room temperature or a minimum room temperature that
is higher than the actual room temperature. This causes the display to
be lit all the time, which results in higher power consumption and
batteries that run low quickly.
Perhaps you have switched on the nightlight. If you want to use the
nightlight, we advise you to run the baby unit on mains power.
Why does the charging
time of the parent unit
exceed 16 hours?
The parent unit may be switched on during charging. Switch off the
parent unit during charging.
The specied operating
range of the baby monitor
is 300 metres/900 feet.
Why does my baby
monitor manage a much
smaller distance than that?
The specied range is only valid outdoors in open air. Inside your
house, the operating range is limited by the number type of walls
and/or ceilings in between. Inside the house, the operating range will
be up to 50 metres/150 feet.
Why is the
connection lost every
now and then? Why are
there sound interruptions?
The baby unit and the parent unit are probably close to the outer
limits of the operating range. Try a different location or decrease the
distance between the units. Please note that it takes about 30
seconds each time before a connection between the units is
established.
What happens during a
power failure?
If the parent unit is sufciently charged, it will continue to operate
during a power failure, both inside and outside the charger. If there
are batteries in the baby unit, it will automatically switch to battery-
operated use in case of power failure.
Is my baby monitor
secure from
eavesdropping and
interference?
The DECT technology of this baby monitor guarantees no
interference from other equipment and no eavesdropping.
Some buttons do not
seem to work when I
press them. What do I do
wrong?
You should press all buttons (except the on/off buttons and the TALK
button) briey. If you press them too long, they will not work.
The operating time of the
parent unit is supposed to
be at least 8 hours. Why
is the operating time of
my parent unit shorter?
When the parent unit batteries have been charged for the rst time,
the operating time will be less than 8 hours. The batteries only
reach their full capacity after you have charged and discharged
them at least four times.
The volume of the parent unit may be set too high, which causes the
parent unit to consume a lot of energy. Decrease the volume of the
parent unit
The microphone sensitivity level on the parent unit may be set too
high, which causes the parent unit to consume a lot of energy.
Decrease the microphone sensitivity level on the parent unit.
ENGLISH16

17
Усилията на Philips са съсредоточени върху производството на грижовни и надеждни изделия,
които създават увереност у родителите. Този бебефон Philips предлага денонощна подкрепа,
като гарантира, че можете винаги да чуете своето бебе ясно и без смущаващи шумове.
Технологията DECT гарантира нула смущения от други безжични уреди и ясен сигнал между
родителското и бебешкото устройства.
Philips - грижи за бебето, да се грижим заедно!
Устройство за бебето
1 Бутон вкл./изкл.
3
2 Температурен сензор
3 Индикатор LINK
4 Бутони +/– за сила на звука
5 Бутон PAGE
6 Дисплей
7 Нощна светлина
8 Адаптер
9 Бутон пускане/спиране
E
10 Бутон за приспивна песен
K
11 Бутон за нощна светлина
Q
12 Микрофон
13 Малък жак
14 Капак на отделението за батерии
15 Гнездо за малък жак
16 Отделение за батерията
B Родителско устройство
1 Лампи за нивото на звука
2 Дисплей
3 Бутон TALK
4 Бутон MENU
5 Бутон вкл./изкл.
3
6 Индикатор LINK
7 Процеп за клипс за колан или лента за врат
8 Бутони +/– за сила на звука
9 Бутон OK
10 Микрофон
11 Високоговорител
12 Отделение за батерията
13 Щипка за колан
14 Капак на отделението за батерии
15 Лента за врат
16 Адаптер
17 Зарядно устройство
18 Индикатор POWER
C Дисплей
1
Y Индикация за температурата в стаята
2
Q Индикация за нощна светлина
3
K Символ за приспивна песен
4
T Символ на батерия
5
o Индикация за сила на звука
6
R Индикация за чувствителността на микрофона

7 U Температура в стаята над температурата, зададена в менюто
8
I Температура в стаята под температурата, зададена в менюто
9
O Съобщение за липса на връзка между устройствата
10
{ Съобщение “Ниво на звука”
11
S Съобщение, когато приспивната песен прекъсне
D Чанта за носене
Преди да използвате уреда, прочетете внимателно това ръководство за експлоатация и го
запазете за справка в бъдеще.
Този бебефон е помощно средство. Той не може да е заместител на отговорния и
навременен родителски контрол и не трябва да се използва като такъв.
Преди да свържете уреда към мрежата, проверете дали посоченото върху адаптера
напрежение отговаря на напрежението на местната електрическа мрежа.
Използвайте и съхранявайте уреда при температури между 10°C и 40°C.
Този уред е подходящ за напрежение на мрежата от 220 до 240 V.
Не излагайте бебефона на твърде ниски или твърде високи температури и на директна
слънчева светлина.
Убедете се, че устройството за бебето и кабелът ще са винаги далече от достъпа на
бебето (поне на 1 метър от него).
Не слагайте устройството за бебето в бебешкото легло или кошарка.
Не покривайте бебефона с одеяла или кърпи.
Не потапяйте никоя част от бебефона във вода или друга течност.
Не използвайте бебефона на влажни места или в близост до вода.
С оглед избягване на електрически удар, не отваряйте корпусите на устройството за
бебето и на родителското устройство, с изключение на отделенията за батерии.
За свързване на устройството за бебето в мрежата използвайте само включения в
комплекта адаптер.
За зареждане на родителското устройство използвайте само включеното в комплекта
зарядно устройство.
В адаптера има трансформатор. Не отрязвайте адаптера, за да го замените с друг
щепсел, тъй като това носи опасност.
Ако адаптерът на устройството за бебето се повреди, винаги трябва да осигурявате
замяната му с такъв от оригиналния тип, за да се избегне опасност.
Ако зарядното устройство или адаптерът на зарядното устройство се повреди, винаги
трябва да осигурявате замяната му с такова от оригиналния тип, за да се избегне
опасност.
Поставяйте в бебефона само батерии от правилния тип, за да избегнете опасността от
експлозия. За родителското устройство използвайте само акумулаторни батерии от
правилния тип.
Тъй като непрекъснатото радиопредаване е забранено, ще чувате бебето само когато
то издава звуци.
Можете да използвате устройството за бебето със захранване от мрежата или с батерии.
Дори да възнамерявате да използвате устройството от мрежата, съветваме ви да поставите
батерии. Това ще осигури непрекъснатата му работа дори в случай на спиране на тока.
,
,
,
,
,
,
,
,
,
,
,
,
,
,
,
,
,
,
18

1 Поставете малкия жак в устройството за бебето и включете адаптера в контакта.
(фиг. 2)
Устройството за бебето работи с четири батерии R6 AA от 1,5 волта (не са приложени в
комплекта). Настоятелно ви препоръчваме да използвате батерии Philips LR6 PowerLife.
Внимавайте ръцете ви да са сухи при поставянето на батериите.
1 Завъртете отделението за батериите наляво ( ¡ OPEN) с дланта на ръката. (фиг. 3)
2 Отворете капака.
3 Поставете четири 1,5 V AA батерии. (фиг. 4)
Поставете двете батерии една върху друга и се убедете, че полюсите “+” и “-” на
батериите са правилно ориентирани.
4 Поставете на място капачето на отделението за батериите и го завъртете надясно
(CLOSE ™) с дланта на ръката, за да го затворите. (фиг. 5)
Забележка: Когато батериите са изтощени, индикаторът LINK на устройството за бебето
мига.
1 Включете адаптера на зарядното устройство в контакта и поставете родителското
устройство в зарядното устройство. (фиг. 6)
Светва индикаторът POWER.
Родителското устройство работи с две акумулаторни батерии AAA от 1,2 волта, които са
приложени към уреда.
Внимавайте ръцете ви да са сухи при поставянето на батериите.
1 Плъзнете надолу капачето на отделението на батериите, за да го извадите. (фиг. 7)
2 Поставете двете акумулаторни батерии. (фиг. 8)
Убедете се, че полюсите “+” и “-” на батериите са правилно ориентирани.
3 Поставете капачето на отделението на батериите отново на гърба на родителското
устройство, докато застане на място с щракване. (фиг. 9)
4 Включете адаптера в контакта и поставете родителското устройство в зарядното
устройство. (фиг. 6)
Светва индикаторът POWER.
5 Оставете родителското устройство в зарядното устройство, докато батериите бъдат
заредени напълно.
Зареждането е с продължителност най-малко 16 часа.
Зареждането е с продължителност над 16 часа, ако родителското устройство е
включено, докато се зарежда. За да съкратите времето на зареждане, изключете
родителското устройство.
Индикаторът POWER остава да свети дори когато батериите са напълно заредени.
Когато батериите са напълно заредени, родителското устройство може да се използва
безжично в продължение най-малко на 8 часа.
,
,
,
,
,
,
,
,
19

Забележка: Времето на работа 8 часа се базира на предположението, че устройството за
бебето ще предава през 25% от времето и е в режим готовност през останалото време
(когато бебето не издава никакъв звук).
Забележка: Когато батериите на родителското устройство се зареждат за пръв път,
времето на работа ще бъде под 8 часа. Батериите достигат пълния си капацитет едва след
като ги заредите и разредите четири пъти.
Забележка: Когато символът на батерия на дисплея е празен, индикаторът LINK мига, а
родителското устройство издава кратък звук, батериите са изтощени. Поставете
родителското устройство в зарядното устройство.
Забележка: Когато родителското устройство не е в зарядното устройство, батериите
постепенно се изтощават, дори родителското устройство да е изключено.
1
Оставете и родителското устройство и устройството за бебето в една стая, за да
изпробвате връзката. (фиг. 10)
Погрижете се устройството за бебето да е поне на 1 метър от родителското устройство.
2 Натиснете и задръжте бутона вкл./изкл. 3, за да включите устройството за бебето за
2 секунди. (фиг. 11)
Бутонът за нощна светлина светва кратко.
Дисплеят светва и показва температурата в стаята в момента.
O се появява на дисплея, а индикаторът за връзка започва да мига червено,
докато устройството за бебето се опитва да установи връзка с родителското
устройство.
3 Натиснете и задръжте бутона вкл./изкл. 3 на родителското устройство за 2 секунди.
(фиг. 12)
Индикаторът за ниво на звука светва за кратко оранжево.
Дисплеят светва и на него се появяват символът на батерия и индикацията за
температурата.
Индикаторът LINK светва за кратко в червено и започва да мига зелено, докато
родителското устройство се опитва да установи връзка с устройството за бебето.
Индикаторът LINK на родителското устройство мига зелено, а индикаторът LINK на
устройството за бебето мига червено, докато се установи връзка. Това ще трае до 30
секунди. След това и двата индикатора започват да светят зелено и съобщението
изчезва от дисплея на бебето. (фиг. 13)
4 Поставете устройството за бебето поне на 1 метър от родителското устройство.
(фиг. 14)
5 Поставете родителското устройство в рамките на радиуса на действие на устройството
за бебето. Погрижете се то да е поне на 1 метър от устройството за бебето. (фиг. 15)
За повече информация относно радиуса на действие вж. раздела “Радиус на действие” по-
долу.
Бебефонът е с радиус на действие на открито до 300 метра. В зависимост от околните
предмети и други препятствия радиусът на действие вероятно ще е по-малък. На закрито
радиусът на действие е до 50 метра.
,
,
,
,
,
,
,
20
Pagina se încarcă...
Pagina se încarcă...
Pagina se încarcă...
Pagina se încarcă...
Pagina se încarcă...
Pagina se încarcă...
Pagina se încarcă...
Pagina se încarcă...
Pagina se încarcă...
Pagina se încarcă...
Pagina se încarcă...
Pagina se încarcă...
Pagina se încarcă...
Pagina se încarcă...
Pagina se încarcă...
Pagina se încarcă...
Pagina se încarcă...
Pagina se încarcă...
Pagina se încarcă...
Pagina se încarcă...
Pagina se încarcă...
Pagina se încarcă...
Pagina se încarcă...
Pagina se încarcă...
Pagina se încarcă...
Pagina se încarcă...
Pagina se încarcă...
Pagina se încarcă...
Pagina se încarcă...
Pagina se încarcă...
Pagina se încarcă...
Pagina se încarcă...
Pagina se încarcă...
Pagina se încarcă...
Pagina se încarcă...
Pagina se încarcă...
Pagina se încarcă...
Pagina se încarcă...
Pagina se încarcă...
Pagina se încarcă...
Pagina se încarcă...
Pagina se încarcă...
Pagina se încarcă...
Pagina se încarcă...
Pagina se încarcă...
Pagina se încarcă...
Pagina se încarcă...
Pagina se încarcă...
Pagina se încarcă...
Pagina se încarcă...
Pagina se încarcă...
Pagina se încarcă...
Pagina se încarcă...
Pagina se încarcă...
Pagina se încarcă...
Pagina se încarcă...
Pagina se încarcă...
Pagina se încarcă...
Pagina se încarcă...
Pagina se încarcă...
Pagina se încarcă...
Pagina se încarcă...
Pagina se încarcă...
Pagina se încarcă...
Pagina se încarcă...
Pagina se încarcă...
Pagina se încarcă...
Pagina se încarcă...
Pagina se încarcă...
Pagina se încarcă...
Pagina se încarcă...
Pagina se încarcă...
Pagina se încarcă...
Pagina se încarcă...
Pagina se încarcă...
Pagina se încarcă...
Pagina se încarcă...
Pagina se încarcă...
Pagina se încarcă...
Pagina se încarcă...
Pagina se încarcă...
Pagina se încarcă...
Pagina se încarcă...
Pagina se încarcă...
Pagina se încarcă...
Pagina se încarcă...
Pagina se încarcă...
Pagina se încarcă...
Pagina se încarcă...
Pagina se încarcă...
Pagina se încarcă...
Pagina se încarcă...
Pagina se încarcă...
Pagina se încarcă...
Pagina se încarcă...
Pagina se încarcă...
Pagina se încarcă...
Pagina se încarcă...
Pagina se încarcă...
Pagina se încarcă...
Pagina se încarcă...
Pagina se încarcă...
Pagina se încarcă...
Pagina se încarcă...
Pagina se încarcă...
Pagina se încarcă...
Pagina se încarcă...
Pagina se încarcă...
Pagina se încarcă...
Pagina se încarcă...
Pagina se încarcă...
Pagina se încarcă...
Pagina se încarcă...
Pagina se încarcă...
Pagina se încarcă...
Pagina se încarcă...
Pagina se încarcă...
Pagina se încarcă...
Pagina se încarcă...
Pagina se încarcă...
Pagina se încarcă...
Pagina se încarcă...
Pagina se încarcă...
Pagina se încarcă...
Pagina se încarcă...
Pagina se încarcă...
Pagina se încarcă...
Pagina se încarcă...
Pagina se încarcă...
Pagina se încarcă...
Pagina se încarcă...
Pagina se încarcă...
Pagina se încarcă...
Pagina se încarcă...
Pagina se încarcă...
Pagina se încarcă...
Pagina se încarcă...
Pagina se încarcă...
Pagina se încarcă...
Pagina se încarcă...
Pagina se încarcă...
Pagina se încarcă...
Pagina se încarcă...
Pagina se încarcă...
Pagina se încarcă...
Pagina se încarcă...
Pagina se încarcă...
Pagina se încarcă...
Pagina se încarcă...
Pagina se încarcă...
Pagina se încarcă...
Pagina se încarcă...
Pagina se încarcă...
Pagina se încarcă...
Pagina se încarcă...
Pagina se încarcă...
Pagina se încarcă...
Pagina se încarcă...
Pagina se încarcă...
Pagina se încarcă...
Pagina se încarcă...
Pagina se încarcă...
Pagina se încarcă...
Pagina se încarcă...
Pagina se încarcă...
Pagina se încarcă...
Pagina se încarcă...
Pagina se încarcă...
Pagina se încarcă...
Pagina se încarcă...
Pagina se încarcă...
Pagina se încarcă...
Pagina se încarcă...
Pagina se încarcă...
Pagina se încarcă...
Pagina se încarcă...
-
 1
1
-
 2
2
-
 3
3
-
 4
4
-
 5
5
-
 6
6
-
 7
7
-
 8
8
-
 9
9
-
 10
10
-
 11
11
-
 12
12
-
 13
13
-
 14
14
-
 15
15
-
 16
16
-
 17
17
-
 18
18
-
 19
19
-
 20
20
-
 21
21
-
 22
22
-
 23
23
-
 24
24
-
 25
25
-
 26
26
-
 27
27
-
 28
28
-
 29
29
-
 30
30
-
 31
31
-
 32
32
-
 33
33
-
 34
34
-
 35
35
-
 36
36
-
 37
37
-
 38
38
-
 39
39
-
 40
40
-
 41
41
-
 42
42
-
 43
43
-
 44
44
-
 45
45
-
 46
46
-
 47
47
-
 48
48
-
 49
49
-
 50
50
-
 51
51
-
 52
52
-
 53
53
-
 54
54
-
 55
55
-
 56
56
-
 57
57
-
 58
58
-
 59
59
-
 60
60
-
 61
61
-
 62
62
-
 63
63
-
 64
64
-
 65
65
-
 66
66
-
 67
67
-
 68
68
-
 69
69
-
 70
70
-
 71
71
-
 72
72
-
 73
73
-
 74
74
-
 75
75
-
 76
76
-
 77
77
-
 78
78
-
 79
79
-
 80
80
-
 81
81
-
 82
82
-
 83
83
-
 84
84
-
 85
85
-
 86
86
-
 87
87
-
 88
88
-
 89
89
-
 90
90
-
 91
91
-
 92
92
-
 93
93
-
 94
94
-
 95
95
-
 96
96
-
 97
97
-
 98
98
-
 99
99
-
 100
100
-
 101
101
-
 102
102
-
 103
103
-
 104
104
-
 105
105
-
 106
106
-
 107
107
-
 108
108
-
 109
109
-
 110
110
-
 111
111
-
 112
112
-
 113
113
-
 114
114
-
 115
115
-
 116
116
-
 117
117
-
 118
118
-
 119
119
-
 120
120
-
 121
121
-
 122
122
-
 123
123
-
 124
124
-
 125
125
-
 126
126
-
 127
127
-
 128
128
-
 129
129
-
 130
130
-
 131
131
-
 132
132
-
 133
133
-
 134
134
-
 135
135
-
 136
136
-
 137
137
-
 138
138
-
 139
139
-
 140
140
-
 141
141
-
 142
142
-
 143
143
-
 144
144
-
 145
145
-
 146
146
-
 147
147
-
 148
148
-
 149
149
-
 150
150
-
 151
151
-
 152
152
-
 153
153
-
 154
154
-
 155
155
-
 156
156
-
 157
157
-
 158
158
-
 159
159
-
 160
160
-
 161
161
-
 162
162
-
 163
163
-
 164
164
-
 165
165
-
 166
166
-
 167
167
-
 168
168
-
 169
169
-
 170
170
-
 171
171
-
 172
172
-
 173
173
-
 174
174
-
 175
175
-
 176
176
-
 177
177
-
 178
178
-
 179
179
-
 180
180
-
 181
181
-
 182
182
-
 183
183
-
 184
184
-
 185
185
-
 186
186
-
 187
187
-
 188
188
-
 189
189
-
 190
190
-
 191
191
-
 192
192
-
 193
193
-
 194
194
-
 195
195
-
 196
196


Philips SCD489 Manual de utilizare
- Categorie
- Telefoane pentru copii
- Tip
- Manual de utilizare
în alte limbi
- slovenčina: Philips SCD489 Používateľská príručka
Lucrări înrudite
Alte documente
-
Avent SCD520/00 Manual de utilizare
-
Avent SCD525/00 Manual de utilizare
-
Avent SCD530/00 Manual de utilizare
-
-
 Philips AVENT SCD535/00 Manual de utilizare
-
Avent SCD498/00 Manual de utilizare
-
 Avent SCD731/52 Manual de utilizare
-
 Avent SCD711/52 Manual de utilizare
-
 Avent SCD570/00 Manual de utilizare
-
ANSMANN Sydney Fișa cu date


