Vonroc LM504DC Manual de utilizare
- Categorie
- Cositoare
- Tip
- Manual de utilizare

LAWNMOWER
LM504DC / S2_LM504DC
S4_LM504DC
EN
Original Instructions 07
DE
Übersetzung Der Originalbetriebsanleitung 17
NL
Vertaling van de oorspronkelijke gebruiksaanwijzing
29
FR
Traduction de la notice originale 41
ES
Traducción del manual original 53
IT
Traduzione delle istruzioni originali 66
SV
Översättning av bruksanvisning i original 77
DA
Oversættelse af den originale brugsanvisning 88
PL
Tłumaczenie instrukcji oryginalnej 98
RO
Traducere a instruciunilor originale 110

WWW.VONROC.COM2
A
7
19
20
15a
14
16
9 85
9
8
10
11
6
12
13
4
3
1
2
212019
17
18

WWW.VONROC.COM
B
C
3
2
1
14
5
1
14
11
15b 15a15a 15b
22

WWW.VONROC.COM4
F
H
D
E
G
4
6
4
10 12
10
16 12

WWW.VONROC.COM 5
I
K
30-40-50-60-70 mm
1
2
2
17
20
23
22
21
1
2
J
25
24
27
27
23
26

WWW.VONROC.COM6
O
L
N
M
29
26
24
25
30
31
32
33
2
1
2
28
3
1

EN
7
WWW.VONROC.COM
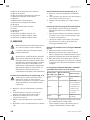
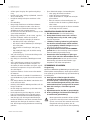
1. SAFETY INSTRUCTIONS
Read the enclosed safety warnings, the
additional safety warnings and the
instructions. Failure to follow the safety
warnings and the instructions may result in electric
shock, fire and/or serious injury. Save the safety
warnings and the instructions for future reference.
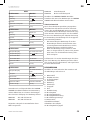
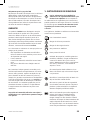
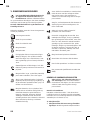
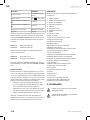
The following symbols are used in the user manual
or on the product:
Read the instructions!
Risk of personal injury.
Risk of electric shock.
Wear hearing protection.
Wear eye protection.
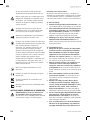
Caution: Do not touch rotating blades.
Sharp blade(s). Beware of severing toes or
fingers. Keep bystanders, especially
children and pets, at a distance greater
than 10m.
The lawn mower shall not be operated
without either the entire grass catcher or
the guard in place.
Do not use in the rain or leave the mower
outdoors while it is raining.
Switch off and remove safety key (isolator
switch) before adjusting, cleaning and befo-
re leaving the product unattended for any
period of time.
Use only batteries which are charged to the
same level. Never combine full and half-full
batteries. Always charge the two batteries
simultaneously. The equipment‘s operating
time depends on the battery with the lower
charge level. The two batteries must always
be fully charged before use. Close the
battery cover before use.
Wait until all machine components have
completely stopped before touching them.
The blades continue to rotate after the
machine is switched off, a rotating blade
can cause injury.
Make sure that bystanders are not injured
by foreign objects being thrown away.
Warning: Keep a safe distance to the
product when operating.
Carefully check the area where the tool is to
be used for wildlife and pets. Wildlife and
pets may be injured while the machine is in
operation. Thoroughly check the working
area and remove any stones, sticks, wires,
bones and foreign objects. When sing the
machine, ensure that no wildlife, pets or
small tree stumps are hidden in the dense
grass.
Only use the battery charger indoors.
Conforms to all relevant European
Directives.
Do not dispose of the product in unsuitable
containers.
The guaranteed sound power level
LWA = 96 dB(A)
GENERAL POWER TOOL SAFETY WARNINGS
WARNING! Read all safety warnings and all
instructions. Failure to follow the warnings
and instructions may result in electric
shock, fire and/or serious injury.
Save all warnings and instructions for future
reference.
The term “power tool” in the warnings refers
to your mains-operated (corded) power tool or
battery-operated (cordless) power tool.
1) Work area safety
a) Keep the work area clean and well lit. Cluttered
or dark areas invite accidents.
b) Do not operate power tools in explosive atmos-
pheres, such as in the presence of flammable
liquids, gases or dust. Power tools create

8
EN
WWW.VONROC.COM
sparks which may ignite the dust or fumes.
c) Keep children and bystanders away while oper-
ating a power tool. Distractions can cause you to
lose control.
2) Electrical safety
a) Power tool plugs must match the outlet. Never
modify the plug in any way. Do not use any
adapter plugs with earthed (grounded) power
tools. Unmodified plugs and matching outlets
will reduce risk of electric shock.
b) Avoid body contact with earthed or grounded
surfaces, such as pipes, radiators, ranges and
refrigerators. There is an increased risk of elec-
tric shock if your body is earthed or grounded.
c) Do not expose power tools to rain or wet condi-
tions. Water entering a power tool will increase
the risk of electric shock.
d) Do not abuse the cord. Never use the cord for
carrying, pulling or unplugging the power tool.
Keep cord away from heat, oil, sharp edges
or moving parts. Damaged or entangled cords
increase the risk of electric shock.
e) When operating a power tool outdoors, use an
extension cord suitable for outdoor use. Use of a
cord suitable for outdoor use reduces the risk of
electric shock.
f) If operating a power tool in a damp location is
unavoidable, use a residual current device (RCD)
protected supply. Use of an RCD reduces the risk
of electric shock.
3) Personal safety
a)
Stay alert, watch what you are doing and use
common sense when operating a power tool. Do
not use a power tool while you are tired or under
the influence of drugs, alcohol or medication.
A moment of inattention while operating power
tools may result in serious personal injury.
b) Use personal protective equipment. Always
wear eye protection. Protective equipment such
as dust mask, non-skid safety shoes, hard hat,
or hearing protection used for appropriate condi-
tions will reduce personal injuries.
c)
Prevent unintentional starting. Ensure the switch
is in the off-position before connecting to power
source and/or battery pack, picking up or carry-
ing the tool. Carrying power tools with your finger
on the switch or energising power tools that have
the switch on invites accidents.
d) Remove any adjusting key or wrench before
turning the power tool on. A wrench or a key left
attached to a rotating part of the power tool may
result in personal injury.
e) Do not overreach. Keep proper footing and
balance at all times. This enables better control
of the power tool in unexpected situations.
f) Dress properly. Do not wear loose clothing or
jewellery. Keep your hair, clothing and gloves
away from moving parts. Loose clothes, jewel-
lery or long hair can be caught in moving parts.
g) If devices are provided for the connection of
dust extraction and collection facilities, ensure
these are connected and properly used. Use of
dust collection can reduce dust related hazards.
h)
Do not let familiarity gained from frequent use of
tools allow you to become complacent and ignore
tool safety principles. A careless action can cause
severe injury within a fraction of a second.
4) Power tool use and care
a) Do not force the power tool. Use the correct
power tool for your application. The correct
power tool will do the job better and safer at the
rate for which it was designed.
b) Do not use the power tool if the switch does not
turn it on and off. Any power tool that cannot
be controlled with the switch is dangerous and
must be repaired.
c)
Disconnect the plug from the power source and/
or the battery pack from the power tool before
making any adjustments, changing accessories,
or storing power tools. Such preventive safety
measures reduce the risk of starting the power
tool accidentally.
d) Store idle power tools out of the reach of chil-
dren and do not allow persons unfamiliar with
the power tool or these instructions to operate
the power tool. Power tools are dangerous in the
hands of untrained users.
e) Maintain power tools. Check for misalignment or
binding of moving parts, breakage of parts and
any other condition that may affect the power
tool’s operation. If damaged, have the power
tool repaired before use. Many accidents are
caused by poorly maintained power tools.
f)
Keep cutting tools sharp and clean. Properly
maintained cutting tools with sharp cutting edges
are less likely to bind and are easier to control.
g) Use the power tool, accessories and tool bits
etc. in accordance with these instructions, tak-
ing into account the working conditions and the

EN
9
WWW.VONROC.COM
work to be performed. Use of the power tool for
operations different from those intended could
result in a hazardous situation.
h) Keep handles and grasping surfaces dry, clean
and free from oil and grease. Slippery handles
and grasping surfaces do not allow for safe
handling and control of the tool in unexpected
situations.
5) Battery tool use and care
a) Recharge only with the charger specified by
the manufacturer. A charger that is suitable for
one type of battery pack may create a risk of fire
when used with another battery pack.
b) Use power tools only with specifically design-
ated battery packs. Use of any other battery
packs may create a risk of injury and fire.
c)
When battery pack is not in use, keep it away
from other metal objects, like paper clips, coins,
keys, nails, screws or other small metal objects
that can make a connection from one terminal to
another. Shorting the battery terminals together
may cause burns or a fire.
d)
Under abusive conditions, liquid may be ejected
from the battery; avoid contact. If contact
accidentally occurs, flush with water. If liquid
contacts eyes, additionally seek medical help.
Liquid ejected from the battery may cause irrita-
tion or burns.
e) Do not use a battery pack or tool that is dam-
aged or modified. Damaged or modified batter-
ies may exhibit unpredictable behaviour resulting
in fire, explosion or risk of injury.
f)
Do not expose a battery pack or tool to fire
or excessive temperature. Exposure to fire or
temperature above 130 °C may cause explosion.
NOTE The temperature „130 °C“ can be replaced
by the temperature „265 °F“.
g)
Follow all charging instructions and do not
charge the battery pack or tool outside the
temperature range specified in the instructions.
Charging improperly or at temperatures outside
the specified range may damage the battery and
increase the risk of fire.
6) Service
a) Have your power tool serviced by a qualified
repair person using only identical replacement
parts. This will ensure that the safety of the
power tool is maintained.
b)
Never service damaged battery packs. Service
of battery packs should only be performed by the
manufacturer or authorized service providers.
ADDITIONAL SAFETY INSTRUCTION FOR
BATTERY LAWN MOWERS
• Never allow children or people unfamiliar with
these instructions to use the product. Local
regulations may restrict the age of the operator.
When not in use store the product out of reach of
children.
• Never allow children, persons with physical,
sensory or mental limitations or a lack of experi-
ence and/or knowledge and/or people unfamiliar
with these instructions to use the product. Local
regulations may re-strict the age of the operator.
• Children should be supervised to ensure that
they do not play with the product.
• Never work while people, especially children, or
pets are nearby.
• The user is responsible for accidents or hazards
occurring to other people or their property.
• Do not wear open rubber shoes or sandals when
using the product. Al-ways wear sturdy shoes
and long trousers. Do not use barefoot.
• Thoroughly inspect the area where the machine
is to be used and re-move all stones, sticks,
wires, bones and other foreign objects.
• Before using, always visually inspect to see that
the blades, blade bolts and cutter assembly are
not worn or damaged. Replace worn or damaged
blades and bolts in sets to preserve balance.
• Mow only in daylight or in good artificial light.
• Avoid mowing in bad weather conditions especi-
ally when there is a risk of lightning.
• Avoid operating the machine in wet grass, where
feasible.
• Walk, never run.
• Never operate the machine with defective guards
or shields, or without safety devices, for example
deflectors and/or grass catchers in place.
• We would advise you to wear ear protection for
your own convenience.
• Never operate the product when you are tired,
ill or under the influence of alcohol, drugs or
medicine.
• Working on banks can be dangerous:
− Do not mow on excessively steep slopes.
− Always be sure of your footing on slopes or
wet grass.
− Mow across the face of slopes never up and
down.

10
EN
WWW.VONROC.COM
− Exercise extreme caution when changing
direction on slopes.
• Use extreme caution when stepping back or
pulling the machine towards you.
• Never mow by pulling the mower towards you.
• Wait until the blades stop if the machine has to
be tilted for transportation when crossing surfa-
ces other than grass and when transporting the
machine to and from the area to be mowed.
• Do not tilt the machine when starting or swit-
ching on the motor.
• Switch on the motor according to the instructi-
ons with feet well away from rotating parts.
• Do not put hands or feet near or un-der rotating
parts.
• Always stand clear of the discharge zone when
operating the machine.
• Never pick up or carry the machine while the
motor is running.
• When storing, make sure that all 4 wheels of
the garden tool stand on the ground/floor.
• Only lift the garden tool with the carrying handle.
Use the carrying handle with care.
• Do not modify the machine. Unauthorized modi-
fications can impair the safety of your machine,
lead to increased noise and vibrations, and poor
performance.
• Remove the safety key (isolator switch):
– Whenever you leave the machine.
– Before clearing a blockage.
– Before checking, cleaning or working on the
machine.
– After striking a foreign object. Inspect the
machine for damage and change the blade
as necessary.
– If the machine starts to vibrate abnormally
(check immediately).
SAFETY WARNINGS FOR BATTERY
a) Do not open the battery. Danger of short-
circuiting.
b) Protect the battery against heat, e. g., against
continuous intense sunlight, fire, water, and
moisture. Danger of explosion.
c) In case of damage and improper use of the bat-
tery, vapours may be emitted. Ventilate the area
and seek medical help in case of complaints.
The vapours can irritate the respiratory system.
d) Use the battery only in conjunction with your
Vonroc product. This measure alone protects
the battery against dangerous overload.
e) The battery can be damaged by pointed objects
such as nails or screwdrivers or by force
applied externally. An internal short circuit can
occur and the battery can burn, smoke, explode
or overheat.
SAFETY WARNINGS FOR CHARGER
Intended use
Charge only CD801AA and CD803AA type recharge-
able Battery packs with the charger. Other types
of batteries may burst causing personal injury and
damage.
a) The appliance is not to be used by persons
(including children) with reduced physical,
sensory or mental capabilities, or lack of expe-
rience and knowledge, unless they have been
given supervision or instruction.
b) Children being supervised not to play with the
appliance.
c) Do not recharging non-rechargeable batteries!
d) During charging, batteries must be placed in
the well ventilated area!
This appliance can be used by children
aged from 8 years and above and persons
with reduced physical, sensory or mental
capabilities or lack of experience and
knowledge if they have been given
supervision or instruction concerning use of
the appliance in a safe way and understand
the hazards involved. Children shall not play
with the appliance. Cleaning and user
maintenance shall not be made by children
without supervision.
Electrical safety
Always check that the voltage of the power
supply corresponds to the voltage on the
rating plate.
• Do not use the machine if the mains cable or
the mains plug is damaged.
•
Only use extension cables that are suitable for
the power rating of the machine with a minimum
thickness of 1.5 mm
2
. If you use an extension
cable reel, always fully unroll the cable.

EN
11
WWW.VONROC.COM
2. MACHINE INFORMATION
Intended use
This product is designed for lawnmowing in do-
mestic environments. The lawn mower is intended
for private gardens at home. The lawn mower may
not be used to trim bushes, hedges or shrubs, to
cut scaling vegetation, planted roofs, or balco-
ny-grown grass, to clean (vacuum) dirt and debris
off walkways, or to chop up tree or hedge clip-
pings. Moreover, the lawn mower may not be used
as a power cultivator to level out high areas such
as molehills. The equipment is to be used only for
its prescribed purpose. Any other use is deemed to
be a case of misuse.
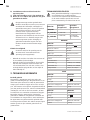
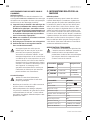
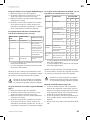
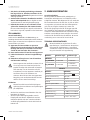
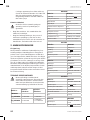
TECHNICAL SPECIFICATIONS
This manual has been drawn up for
different sets / article numbers. Check the
corresponding article number in below
specifications table for the correct
composition and contents of your set.
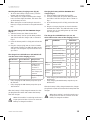
Model No. Batteries
included
Chargers
included
LM504DC - -
S2_LM504DC 2 x CD801AA 2 x CD802AA
S4_LM504DC 2 x CD803AA 2 x CD802AA
or 1 x CD820AA
MACHINE
Model No. LM504DC
Voltage 40V (2 x 20V)
No load speed 3400/min
Cutting width 330 mm
Cutting height 30/40/50/60/70mm
Grass box capacity 30 L
Weight 8.5 kg
Protection level IPX1
Sound pressure level (L
pa
) 71.4dB(A), K=2.35dB(A)
Sound power level (L
wa
) 91.4dB(A), K=2.35dB(A)
Vibration value <2.5m/s, K=1.5m/s
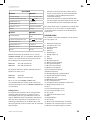
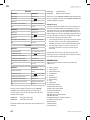
BATTERY
Model No. CD801AA
Battery Type Lithium-Ion
Voltage 20V
Capacity 2.0 Ah
Recommended charger CD802AA, CD820AA
Weight 0.3 kg
Model No. CD803AA
Battery Type Lithium-Ion
Voltage 20V
Capacity 4.0 Ah
Recommended charger CD802AA, CD820AA
Weight 0.65 kg
CHARGER
Model No. CD802AA
Charger input 220-240V, 50Hz 0.4A
Charger output 21V 2.5A
Charging time 2Ah battery 60 minutes
Charging time 4Ah battery 120 minutes
Recommended batteries CD801AA, CD803AA
Weight 0.36 kg
Model No. CD820AA
Charger input 220-240V, 50-60Hz,
200W
Charger output 21V 2.3A, <3.8A
Charging time 2Ah battery 45 minutes
Charging time 4Ah battery 85 minutes
Recommended batteries CD801AA, CD803AA
Weight 0.81 kg
Only use the following batteries of the VONROC
VPOWER 20V battery platform. Using any other
batteries could cause serious injury or damage the
tool.
CD801AA 20V, 2Ah Lithium-Ion
CD803AA 20V, 4Ah Lithium-Ion
The following chargers can be used to charge
these batteries.

12
EN
WWW.VONROC.COM
CD802AA Quick charger
CD820AA Dual quick charger
The batteries of the VONROC VPOWER 20V battery
platform are interchangeable with all the VONROC
VPOWER 20V battery platform tools.
Vibration level
The vibration emission level stated in this instruc-
tion manual has been measured in accordance
with a standardized test given in EN60335; it may
be used to compare one tool with another and as
a preliminary assessment of exposure to vibration
when using the tool for the applications mentioned.
• Using the tool for different applications, or with
different or poorly maintained accessories, may
significantly increase the exposure level.
• The times when the tool is switched off or when
it is running but not actually doing the job, may
significantly reduce the exposure level.
Protect yourself against the effects of vibration by
maintaining the tool and its accessories, keeping
your hands warm, and organizing your work
patterns.
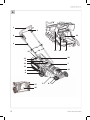
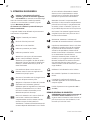
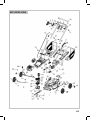
DESCRIPTION
The numbers in the text refer to the diagrams on
pages 2-6.
1. Upper handle
2. On/off switch
3. Safety button
4. Power cable
5. Machine
6. Cable holder
7. Carrying handle
8. Wheel
9. Wheel cover
10. Grass box basket
11. Grass box lid
12. Grass box cover
13. Grass level indicator
14. Lower handle
15A. Handle adjustment knob
15B. Bolt for knob
16. Grass box carrying handle
17. Height adjustment lever
18. Grass outlet
19. Battery compartment cover
20. Battery bay
21. Safety key (isolator switch)
22. Battery unlock button
23. Battery
24. Battery LED indicators button
25. Battery LED indicators
26. Charger
27. Charger LED indicators
28. Blade
29. Blade bolt
30. Charger
31. Green LED indicators
32. Amber LED indicators
33. Red LED indicators
3. ASSEMBLY
Before any work on the power tool, remove
the battery.
The battery must be charged before first
use.
Warning: Use only batteries which are
charged to the same level. Never combine
full and half-full batteries. Always charge
the two batteries simultaneously. The
equipment‘s operating time depends on the
battery with the lower charge level. The two
batteries must always be fully charged
before use.
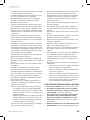
Inserting the battery into the machine (Fig. A, J)
Ensure that the exterior of the battery is
clean and dry before connecting to the
charger or machine. Close the battery cover
before use.
1. Open the battery compartment cover (19).
2. Insert the battery (23) into the battery bay (20)
as shown in Fig. J.
3. Push the battery further forward until it clicks
into place.
4. Repeat for the other battery (23).
5. Close the battery compartment cover (19).
Removing the battery from the machine (Fig. A, J)
1. Open the battery compartment cover (19).
2. Pull the battery (23) out of the battery bay (20)
as shown in Fig. J.
3. Repeat for the other battery (23).

EN
13
WWW.VONROC.COM
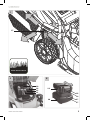
Checking the battery charging status (Fig. K)
• To check the battery charge status, push the
button (24) on battery shortly.
• The battery has 3 lights indicating the charge
level, the more lights that burn, the more char-
ge the battery has left.
• When the lights are not burning it means the
battery is empty and must be charged immedia-
tely.
Charging the battery with the CD802AA charger
(Fig. K)
1. Take the battery (23) from the machine.
2. Turn the battery (23) to upside down position
and slide it onto the charger (26) as shown in
Fig. K.
3. Push the battery until it is fully pushed into the
slot.
4. Plug the charger plug into an electrical outlet
and wait for a while. The LED indicators on the
charger (27) will lighten up and show the char-
ger status.
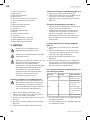
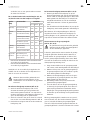
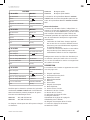
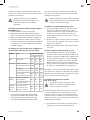
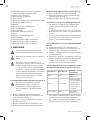
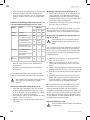
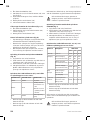
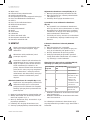
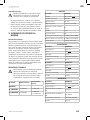
The charger has 2 LED indicators (27) which indi-
cate the status of the charging process:
Red LED Status Green LED status Charger status
Off Off No power
Off On
Standby mode:
- No battery is
inserted or,
- Battery inserted
but charging has
finished
On Off Battery charging in
progress
• Fully charging the 2Ah battery may take up to
60 minutes.
• Fully charging the 4Ah battery may take up to
120 minutes.
After the battery is fully charged remove the char-
ger plug from the outlet and remove the battery
from the charger.
When the machine is not being used over a
longer period of time it is best to store the
battery in charged condition.
Charging the battery with the CD820AA dual
charger (Fig. L)
1. Take the battery (26) from the machine.
2. Turn the battery (26) to upside down position
and slide it onto the charger (30) as shown in
Fig. L.
3. Push the battery until it is fully pushed into the
slot.
4. Plug the charger plug into an electrical outlet
and wait for a while. The LED indicators on the
charger (31, 32, 33) will lighten up and show
the charger status.
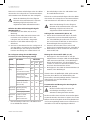
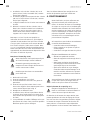
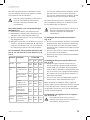
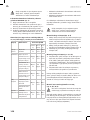
The charger has 6 LED indicators (31, 32, 33)
which indicate the status of the charging process:
Item Conditions LED colour
Red Amber Green
Stand by Power on On On On
Charging Started charging
(10-19V DC±0.5V DC) Blink Off Off
Halfway charging
(19-20V DC±0.5V DC) On Blink Off
Finished charging
(20-21V DC±0.5V DC) On On Blink
Fully
charged
Trickle charging
≤300±150mA On On On
Stop charging
High tem-
perature
High-temperature
protection of the
battery works
On On On
• Fully charging the 2Ah battery may take up to
45 minutes.
• Fully charging the 4Ah battery may take up to
85 minutes.
After the battery is fully charged remove the charger
plug from the outlet and remove the battery from the
charger.
When the machine is not being used over a
longer period of time it is best to store the
battery in charged condition.

14
EN
WWW.VONROC.COM
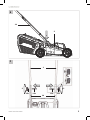
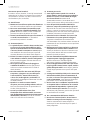
Assembling the lower handle (Fig. A, B)
1. Insert the lower handle (14) into the intended
hole of the lawn mower body, as shown on figu-
re B. Ensure the hole in the lower handle (14)
aligns with the hole in the lawn mower body.
2. Insert the screw in the hole and tighten by turn-
ing clockwise, as shown on figure B.
3. Repeat these steps for the other lower handle
(14).
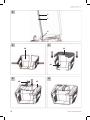
Assembling the upper handle (Fig. A, C, D)
1. Attach the upper handle (1) to the lower handle
(14), using the supplied bolts (15B) and handle
knobs (15A) as shown on figure C. Make sure
the safety switch (3) assembly is on the right
side when standing behind the lawn mower.
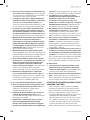
2. Fixate the cable to the handle by using the
cable holder (6), as shown on figure D.
Note: When handle knobs (15A) are loosened, the
upper handle (1) can be folded down for storing
the lawn mower. Ensure that the power cable is not
caught.
Assembling and mounting the grass box
(Fig. A, E, F, G, H)
The lawn mower shall not be operated
without either the entire grass catcher or
the guard in place.
It is possible to use the lawn mower with or without
grass box. Remember though that when cutting
without the grass box, the grass box lid (11) must
be lowered. Do not operate the mower with outlet
lid lifted.
1. Join the two halves of the grass box basket
(10), as shown on figure E.
2. Mount the grass box cover (12) onto the assem-
bled grass box basket (10), as shown on figure F.
3. Mount the Grass box carrying handle (16) onto
the grass box cover (12), as shown on figure G.
4. Figure H shows a correctly assembled grass box.
5. Lift the grass box lid (11) and attach the assem-
bled grass box onto the lawn mower. Ensure the
indents in the grass box align properly with the
holders of the lawn mower body.
Note: the grass box is fitted with a grass level
indicator (13), which shows the amount of mowed
grass. As long as the grass box is not full, the indi-
cator will be opened. When the grass box is full, the
indicator will close. In that case immediately stop
mowing and empty the grass box. This indicator is
only a rough guideline, of which the functionality
depends on the condition inside the grass basket.
Replacing the cutting blade (Fig. A, M)
Before any work on the power tool, remove
the battery.
When replacing the cutting blade, wear
protective gloves. Danger of injury when
touching the cutting blade.
Only use blades that are recommended by
the manufacturer.
1. Remove the grass box.
2. Turn the mower onto its side.
3. Firmly hold cutting blade using protective gloves.
4. Turn the cutting blade fixing screw counter-
clockwise to loosen it, as shown on figure M.
5. Replace or sharpen the cutting blade.
6. Install the cutting blade, use the above pro-
cedure in reversed order (holes in the cutting
blade must be seated on the spindle pins).
7. It is best to entrust sharpening or replacement
of cutting blade to a qualified person. Only
original parts should be used. All defects should
be repaired by service workshop authorized by
the manufacturer.
4. OPERATION
Before using, always visually inspect to see
that the blades, blade bolts and cutter
assembly are not worn or damaged. Please
remove the battery from the tool. Replace
worn or damaged blades and bolts in sets
to preserve balance.
If the machine starts to vibrate abnormally
(check immediately):
- inspect for damage,
- replace or repair any damaged parts,
- check for and tighten any loose parts.

EN
15
WWW.VONROC.COM
Immediately switch off the machine in the
following cases:
- whenever you leave the machine,
- before clearing blockages or unclogging
chute,
- before checking, cleaning or working on
the machine,
- after striking a foreign object. Inspect
the machine for damage and make re-
pairs before restarting and operating the
machine;
Be careful during adjustment of the
machine to prevent entrapment of the
fingers between moving blades and fixed
parts of the machine.
Adjusting the cutting height (Fig. A, I)
Switch off the equipment, wait for the blade
to stop and remove the battery. There is a
risk of injury.
Depending on the preferred cutting height, you
can adjust the heigh level in one of five positions.
Adjust the cutting height according to the needs of
your lawn. The cutting height depends on the kind
of lawn and its actual height. When mowing high
grass, start with the maximum cutting height and
make a second cut with a lower cutting height.
A higher cut height should always be selected for
the first cut of the season.
1. Pull the height adjustment lever (17) outwards
(away from the machine housing) as shown on
figure I.
2. Whilst holding the height adjustment lever (17)
in outwards position, push it forward or bac-
kward to the desired cutting height.
3. Release the lever (17) and ensure it engaged in
the slot properly.
NOTE: There are 5 cutting height levels available:
30mm, 40mm, 50mm, 60mm, 70mm.
Switching the machine on/off (Fig. A, N)
Before starting, put the product on a flat
surface free of high grass.
Clean the underside of the deck before
turning on the machine.
Keep your feet well away from the cutting
blade.
Do not tilt the product when starting the
motor.
1. Ensure the safety key (21) is inserted in the
designated spot underneath the battery cover
(19).
2. To start the machine, press and hold the safety
button (3) and press the on/off switch (2).
Whilst holding the on/off switch (2), you can
release pressure on the safety button (3).
3. To stop the machine, release the on/off switch
(2) and wait until cutting blade stops rotating.
Operating the mower (fig. A, O)
Always ensure that a safe distance
(provided by the length of the long handles)
is maintained between the user and the
mower housing.
Be especially careful when mowing and
changing direction on slopes and inclines.
Maintain a solid footing and wear sturdy,
non-slip footwear and long trousers. Always
mow along the incline (not up and down).
For safety reasons, the lawn mower may
not be used to mow inclines whose
gradient exceeds 15 degrees.
Use special caution when backing up and
pulling the lawn mower. Tripping hazard!
Before use
• Make sure that the lawn is clear of stones,
sticks, wire or other objects that could damage
the product or its product.
• Do not cut wet grass because it tends to stick
to the underbody of the product, preventing
the proper discharge of grass clippings, and it
could also cause you to slip and fall.
• Never cut off more than one-third of the total
length of the grass for a healthy lawn. In the
autumn, lawns should only be cut as long as
there is growth.
• Slowly push the product forward, do not force.
• Mow in slight overlapping rows. The most effec-
tive hat all the lawn is cut without missing any
spots, as shown on figure O.
• Circle around flower beds. When reaching a

16
EN
WWW.VONROC.COM
flower bed in the middle of the lawn, cut a row
or two around the circumference of the bed.
• Pay special attention when changing direction.
• Always mow along inclines (not up and down).
You can prevent the lawn mower from slipping
down by holding a position at an angle up-
wards.
• Select the cutting height according to the
length of the grass. Make several passes to
prevent that too much grass is cut at one time.
• Empty the grass box regularly.
Note: The operating time of the rechargeable
batteries and therefore the area in square meters
that can be covered with a single battery charge
is largely dependent on the state of the grass (e.g.
density, moisture, height, cutting height, etc.) and
the mowing speed (walking speed). To adjust the
area coverage to your individual requirements, it is
recommended that you mow the lawn more often,
with a higher cutting height and at an appropriate
speed. Frequently turning the equipment on and
off while mowing will also reduce the amount of
area that you can cover. If the operating time of
the rechargeable batteries (area coverage) is still
unsatisfactory in spite of the above measures, you
can remedy the problem by using rechargeable
batteries with a larger capacity (Ah).
After use
1. After use, switch the product off, disconnect the
safety key (21).
2. Remove the battery packs (23).
3. Check, clean and store the product as descri-
bed in chapter ‘maintenance’.
5. MAINTENANCE
Switch off the equipment, wait for the blade
to stop and remove the battery. There is a
risk of injury.
Cleaning
Your mower has been designed to operate over a
long period of time with minimum of maintenance.
Continuous satisfactory operation depends upon
proper mower care and regular cleaning.
• Keep the mower clean and dry.
• Regularly use a blunt scraper to remove grass
and dirt from the mower
• To clean the mower, use only mild soap and a
damp cloth. Never let any liquid get inside the
tool and never immerse any part of the tool
into liquid. Do not use any abrasive or solvent -
based cleaner.
Stop the blade(s) if the machine has to be tilted for
transportation when crossing surfaces other than
grass, and when transporting the machine to and
from the area to be used. Do not start the machine
when standing in front of the discharge opening.
Storage
Always allow the machine to cool down before sto-
ring. Replace worn or damaged parts for safety. Use
only genuine replacement parts and accessories.
1. Switch the product off, disconnect the safety key
(21) and remove the battery pack (23) before
storage.
2. Clean the product as described above.
3. Store the product and its accessories in a dark,
dry, frost-free, well-ventilated place. The ideal
storage temperature is between 10 °C and 30 °C.
4. Always store the product in a place that is inac-
cessible to children.
5. We recommend using the original package for
storage or covering the product with a suitable
cloth or enclosure to protect it against dust.
Transportation
1. Switch the product off, disconnect the safety
key (21) and remove the battery pack (23)
before transporting it anywhere.
2. Always transport the product by its transport
handle (7).
3. Protect the product from any heavy impact or
strong vibrations which may occur during trans-
portation in vehicles.
4. Secure the product to prevent it from slipping or
falling over, damage and injury.
ENVIRONMENT
Faulty and/or discarded electrical or
electronic apparatus have to be collected at
the appropriate recycling locations.

DE
17
WWW.VONROC.COM
Only for EC countries
Do not dispose of power tools into domestic waste.
According to the European Guideline 2012/19/EC
for Waste Electrical and Electronic Equipment
and its implementation into national right, power
tools that are no longer usable must be collected
separately and disposed of in an environmentally
friendly way.
WARRANTY
VONROC products are developed to the highest
quality standards and are guaranteed free of
defects in both materials and workmanship for the
period lawfully stipulated starting from the date of
original purchase. Should the product develop any
failure during this period due to defective material
and/or workmanship then contact VONROC directly.
The following circumstances are excluded from this
guarantee:
• Repairs and or alterations have been made
or attempted to the machine by unauthorized
service centers;
• Normal wear and tear;
• The tool has been abused, misused or
improperly maintained;
• Non-original spare parts have been used.
This constitutes the sole warranty made by compa-
ny either expressed or implied. There are no other
warranties expressed or implied which extend
beyond the face hereof, herein, including the im-
plied warranties of merchantability and fitness for a
particular purpose. In no event shall VONROC be
liable for any incidental or consequential damages.
The dealers remedies shall be limited to repair or
replacement of nonconforming units or parts.
The product and the user manual are subject to
change. Specifications can be changed without
further notice.
The product and the user manual are subject to
change. Specifications can be changed without
further notice.
1. SICHERHEITSANWEISUNGEN
Lesen Sie die beiliegenden Sicherheitsan-
weisungen, die zusatzlichen Sicherheitsan-
weisungen sowie diese Bedienungsanlei-
tung sorgfaltig durch. Bei Nichtbeachten der
Sicherheitsanweisungen und der Bedienungsanlei-
tung kann es zu einem Stromschlag, einem Brand
und/oder schweren Verletzungen kommen.
Bewahren Sie die Sicherheitsanweisungen und die
Bedienungsanleitung zur kunftigen Bezugnahme
sicher auf.
Folgende Symbole werden im Benutzerhandbuch
oder auf dem Produkt verwendet:
Bedienungsanleitung lesen!
Gefahr von Personenverletzungen.
Stromschlagrisiko.
Gehorschutz tragen.
Tragen Sie Augenschutz.
Vorsicht: Keine rotierenden Klingen
berühren. Scharfe Klinge(n). Gefahr des
Abtrennens von Zehen oder Fingern.
Zuschauer, insbesondere Kinder und
Haustiere in einem Abstand von mehr als
10 Metern halten.
Der Rasenmäher darf nicht ohne angebrach-
te Grasfangbox oder Schutzvorrichtung
betrieben werden.
Nicht im Regen verwenden oder den
Rasenmäher bei Regen draußen lassen.
Schalten Sie das Gerät aus und ziehen Sie
den Sicherheitsschlüssel (Trennschalter)
ab, bevor Sie es einstellen, reinigen oder für
längere Zeit unbeaufsichtigt lassen.

18
DE
WWW.VONROC.COM
Verwenden Sie nur Akkus, die auf den
gleichen Stand aufgeladen sind. Niemals
volle und halbvolle Akkus kombinieren.
Laden Sie immer beide Akkus gleichzeitig
auf. Die Betriebsdauer des Geräts hängt von
dem Akku mit dem niedrigeren Ladestand
ab. Beide Akkus müssen vor dem Gebrauch
immer vollständig aufgeladen werden.
Schließen Sie vor Gebrauch die Akkuabdec-
kung.
Warten Sie, bis alle Maschinenkomponen-
ten vollständig zum Stillstand gekommen
sind, bevor Sie sie berühren. Die Klingen
drehen sich auch nach dem Ausschalten
der Maschine weiter, eine rotierende Klinge
kann Verletzungen verursachen.
Stellen Sie sicher, dass Unbeteiligte nicht
durch umhergeschleuderte Fremdkörper
verletzt werden.
Warnung: Halten Sie beim Betrieb einen
Sicherheitsabstand zu dem Produkt ein.
Überprüfen Sie den Bereich, in dem das
Gerät eingesetzt werden soll, sorgfältig auf
Wildtiere und Haustiere. Wildtiere und
Haustiere können durch den Betrieb des
Geräts verletzt werden. Überprüfen Sie den
Arbeitsbereich gründlich und entfernen Sie
sämtliche Steine, Stöcke, Drähte, Knochen
und anderen Fremdkörper. Achten Sie beim
Einsatz des Geräts darauf, dass keine
Wildtiere, Haustiere oder kleine Baum-
stümpfe im dichten Gras versteckt sind.
Verwenden Sie das Akkuladegerät nur in
Innenräumen.
Erfüllt alle entsprechenden europäischen
Richtlinien.
Entsorgen Sie das Produkt nicht in hierfur
nicht vorgesehenen Abfallbehaltern.
Garantierter Schallleistungspegel LWA = 96
dB(A)
ALLGEMEINE SICHERHEITSHINWEISE
WARNUNG! Lesen Sie alle Sicherheitshin-
weise, Anweisungen, Bebilderungen und
technischen Daten, mit denen dieses
Elektro werk zeug versehen ist. Versäumnis-
se bei der Einhaltung der nachfolgenden
Anweisungen können elektrischen Schlag,
Brand und/oder schwere Verletzungen
verursachen.
Bewahren Sie alle Sicherheitshinweise und Anwei-
sungen für die Zukunft auf.
Der in den Sicherheitshinweisen verwendete Begriff
„Elektrowerkzeug“ bezieht sich auf netzbetriebene
Elektrowerkzeuge (mit Netzleitung) oder auf akku-
betriebene Elektrowerkzeuge (ohne Netzleitung).
1) Arbeitsplatzsicherheit
a) Halten Sie Ihren Arbeitsbereich sauber und gut
beleuchtet. Unordnung oder unbeleuchtete
Arbeitsbereiche können zu Unfällen führen.
b) Arbeiten Sie mit dem Elektrowerkzeug nicht in
explosionsgefährdeter Umgebung, in der sich
brennbare Flüssigkeiten, Gase oder Stäube be-
finden. Elektrowerkzeuge erzeugen Funken, die
den Staub oder die Dämpfe entzünden können.
c) Halten Sie Kinder und andere Personen während
der Benutzung des Elektrowerkzeugs fern. Bei
Ablenkung können Sie die Kontrolle über das
Elektrowerkzeug verlieren.
2) Elektrische Sicherheit
a)
Der Anschlussstecker des Elektrowerkzeugs
muss in die Steckdose passen. Der Stecker darf
in keiner Weise verändert werden. Verwenden
Sie keine Adapterstecker gemeinsam mit schutz-
geerdeten Elektrowerkzeugen. Unveränderte
Stecker und passende Steckdosen verringern
das Risiko eines elektrischen Schlages.
b) Vermeiden Sie Körperkontakt mit geerdeten
Oberflächen wie von Rohren, Heizungen, Herden
und Kühlschränken. Es besteht ein erhöhtes
Risiko durch elektrischen Schlag, wenn Ihr
Körper geerdet ist.
c) Halten Sie Elektrowerkzeuge von Regen oder
Nässe fern. Das Eindringen von Wasser in ein
Elektrowerkzeug erhöht das Risiko eines
elektrischen Schlages.
d) Zweckentfremden Sie die Anschlussleitung
nicht, um das Elektrowerkzeug zu tragen,
aufzuhängen oder um den Stecker aus der

DE
19
WWW.VONROC.COM
Steckdose zu ziehen. Halten Sie die Anschluss-
leitung fern von Hitze, Öl, scharfen Kanten oder
sich bewegenden Teilen. Beschädigte oder
verwickelte Anschlussleitungen erhöhen das
Risiko eines elektrischen Schlages.
e) Wenn Sie mit einem Elektrowerkzeug im Freien
arbeiten, verwenden Sie nur Verlängerungslei-
tungen, die auch für den Außenbereich geeignet
sind. Die Anwendung einer für den Außenbereich
geeigneten Verlängerungsleitung verringert das
Risiko eines elektrischen Schlages.
f)
Wenn der Betrieb des Elektrowerkzeugs in feuch-
ter Umgebung nicht vermeidbar ist, verwenden
Sie einen Fehlerstromschutzschalter. Der Einsatz
eines Fehlerstromschutzschalters vermindert das
Risiko eines elektrischen Schlages.
3) Sicherheit von Personen
a) Seien Sie aufmerksam, achten Sie darauf, was
Sie tun, und gehen Sie mit Vernunft an die
Arbeit mit einem Elektrowerkzeug. Benutzen
Sie kein Elektrowerkzeug, wenn Sie müde sind
oder unter dem Einfluss von Drogen, Alkohol
oder Medikamenten stehen. Ein Moment der
Unachtsamkeit beim Gebrauch des Elektrowerk-
zeugs kann zu ernsthaften Verletzungen führen.
b) Tragen Sie persönliche Schutzausrüstung und
immer eine Schutzbrille. Das Tragen persönlicher
Schutzausrüstung, wie Staubmaske, rutschfeste
Sicherheitsschuhe, Schutzhelm oder Gehör-
schutz, je nach Art und Einsatz des Elektrowerk-
zeugs, verringert das Risiko von Verletzungen.
c) Vermeiden Sie eine unbeabsichtigte Inbe-
triebnahme. Vergewissern Sie sich, dass das
Elektrowerkzeug ausgeschaltet ist, bevor Sie
es an die Stromversorgung und/oder den Akku
anschließen, es aufnehmen oder tragen. Wenn
Sie beim Tragen des Elektrowerkzeugs den Fin-
ger am Schalter haben oder das Elektrowerk-
zeug eingeschaltet an die Stromversorgung
anschließen, kann dies zu Unfällen führen.
d) Entfernen Sie Einstellwerkzeuge oder Schrau-
benschlüssel, bevor Sie das Elektrowerkzeug
einschalten. Ein Werkzeug oder Schlüssel, der
sich in einem drehenden Teil des Elektrowerk-
zeugs befindet, kann zu Verletzungen führen.
e) Vermeiden Sie eine abnormale Körperhaltung.
Sorgen Sie für einen sicheren Stand und halten
Sie jederzeit das Gleichgewicht. Dadurch kön-
nen Sie das Elektrowerkzeug in unerwarteten
Situationen besser kontrollieren.
f) Tragen Sie geeignete Kleidung. Tragen Sie
keine weite Kleidung oder Schmuck. Halten Sie
Haare und Kleidung fern von sich bewegenden
Teilen. Lockere Kleidung, Schmuck oder lange
Haare können von sich bewegenden Teilen
erfasst werden.
g) Wenn Staubabsaug- und -auffangeinrichtungen
montiert werden können, sind diese anzu-
schließen und richtig zu verwenden. Verwen-
dung einer Staubabsaugung kann Gefährdun-
gen durch Staub verringern.
h) Wiegen Sie sich nicht in falscher Sicherheit und
setzen Sie sich nicht über die Sicherheitsregeln
für Elektrowerkzeuge hinweg, auch wenn Sie
nach vielfachem Gebrauch mit dem Elektro-
werkzeug vertraut sind. Achtloses Handeln
kann binnen Sekundenbruchteilen zu schweren
Verletzungen führen.
4) Verwendung und Behandlung des Elektrowerk-
zeugs
a) Überlasten Sie das Elektrowerkzeug nicht. Ver-
wenden Sie für Ihre Arbeit das dafür bestimmte
Elektrowerkzeug. Mit dem passenden Elektro-
werkzeug arbeiten Sie besser und sicherer im
angegebenen Leistungsbereich.
b) Benutzen Sie kein Elektrowerkzeug, dessen
Schalter defekt ist. Ein Elektrowerkzeug, das
sich nicht mehr ein- oder ausschalten lässt, ist
gefährlich und muss repariert werden.
c) Ziehen Sie den Stecker aus der Steckdose und/
oder entfernen Sie einen abnehmbaren Akku,
bevor Sie Geräteeinstellungen vornehmen,
Einsatzwerkzeugteile wechseln oder das Elekt-
rowerkzeug weglegen. Diese Vorsichtsmaßnah-
me verhindert den unbeabsichtigten Start des
Elektrowerkzeugs.
d) Bewahren Sie unbenutzte Elektrowerkzeuge
außerhalb der Reichweite von Kindern auf. Las-
sen Sie keine Personen das Elektrowerkzeug
benutzen, die mit diesem nicht vertraut sind
oder diese Anweisungen nicht gelesen haben.
Elektrowerkzeuge sind gefährlich, wenn sie von
unerfahrenen Personen benutzt werden.
e) Pflegen Sie Elektrowerkzeuge und Einsatzwerk-
zeug mit Sorgfalt. Kontrollieren Sie, ob beweg-
liche Teile einwandfrei funktionieren und nicht
klemmen, ob Teile gebrochen oder so beschä-
digt sind, dass die Funktion des Elektrowerk-
zeugs beeinträchtigt ist. Lassen Sie beschädig-
te Teile vor dem Einsatz des Elektrowerkzeuges

20
DE
WWW.VONROC.COM
reparieren. Viele Unfälle haben ihre Ursache in
schlecht gewarteten Elektrowerkzeugen.
f) Halten Sie Schneidwerkzeuge scharf und
sauber. Sorgfältig gepflegte Schneidwerkzeuge
mit scharfen Schneidkanten verklemmen sich
weniger und sind leichter zu führen.
g) Verwenden Sie Elektrowerkzeug, Zubehör,
Einsatzwerkzeuge usw. entsprechend diesen
Anweisungen. Berücksichtigen Sie dabei die
Arbeitsbedingungen und die auszuführende
Tätigkeit. Der Gebrauch von Elektrowerkzeugen
für andere als die vorgesehenen Anwendungen
kann zu gefährlichen Situationen führen.
h) Halten Sie Griffe und Griffflächen trocken,
sauber und frei von Öl und Fett. Rutschige
Griffe und Griffflächen erlauben keine sichere
Bedienung und Kontrolle des Elektrowerkzeugs
in unvorhergesehenen Situationen.
5) Verwendung und Behandlung des Akkuwerk-
zeugs
a) Laden Sie die Akkus nur mit Ladegeräten auf,
die vom Hersteller empfohlen werden. Durch
ein Ladegerät, das für eine bestimmte Art von
Akkus geeignet ist, besteht Brandgefahr, wenn
es mit anderen Akkus verwendet wird.
b) Verwenden Sie nur die dafür vorgesehenen
Akkus in den Elektrowerkzeugen. Der Gebrauch
von anderen Akkus kann zu Verletzungen und
Brandgefahr führen.
c) Halten Sie den nicht benutzten Akku fern von
Büroklammern, Münzen, Schlüsseln, Nägeln,
Schrauben oder anderen kleinen Metallgegen-
ständen, die eine Überbrückung der Kontakte
verursachen könnten. Ein Kurzschluss zwischen
den Akkukontakten kann Verbrennungen oder
Feuer zur Folge haben.
d) Bei falscher Anwendung kann Flüssigkeit aus
dem Akku austreten. Vermeiden Sie den Kon-
takt damit. Bei zufälligem Kontakt mit Wasser
abspülen. Wenn die Flüssigkeit in die Augen
kommt, nehmen Sie zusätzlich ärztliche Hilfe in
Anspruch. Austretende Akkuflüssigkeit kann zu
Hautreizungen oder Verbrennungen führen.
e) Benutzen Sie keinen beschädigten oder verän-
derten Akku. Beschädigte oder veränderte Akkus
können sich unvorhersehbar verhalten und zu
Feuer, Explosion oder Verletzungsgefahr führen.
f) Setzen Sie einen Akku keinem Feuer oder zu ho-
hen Temperaturen aus. Feuer oder Temperaturen
über 130 °C können eine Explosion hervorrufen.
g) Befolgen Sie alle Anweisungen zum Laden und
laden Sie den Akku oder das Akkuwerkzeug
niemals außerhalb des in der Betriebsanleitung
angegebenen Temperaturbereichs. Falsches
Laden oder Laden außerhalb des zugelassenen
Temperaturbereichs kann den Akku zerstören
und die Brandgefahr erhöhen.
6) Service
a) Lassen Sie Ihr Elektrowerkzeug nur von qualifi-
ziertem Fachpersonal und nur mit Original-
Ersatzteilen reparieren. Damit wird sicherge-
stellt, dass die Sicherheit des Elektrowerkzeugs
erhalten bleibt.
b) Warten Sie niemals beschädigte Akkus. Sämt-
liche Wartung von Akkus sollte nur durch den
Hersteller oder bevollmächtigte Kundendienst-
stellen erfolgen.
ZUSÄTZLICHE SICHERHEITSANWEISUNGEN
FÜR AKKURASENMÄHER
• Niemals Kindern oder Personen, die nicht mit
diesen Anweisungen vertraut sind, den Umgang
mit diesem Produkt erlauben. Örtliche Vorschrif-
ten können das Alter des Betreibers einschrän-
ken. Das Produkt außerhalb der Reichweite von
Kindern lagern, wenn es nicht in Gebrauch ist.
• Erlauben Sie niemals Kindern, Personen mit
körperlichen, sensorischen oder geistigen Ein-
schränkungen oder einem Mangel an Erfahrung
und/oder Wissen und/oder Personen, die mit
dieser Anleitung nicht vertraut sind, das Pro-
dukt zu benutzen. Örtliche Vorschriften können
das Alter des Betreibers einschränken.
• Kinder müssen beaufsichtigt werden, um
sicherzustellen, dass sie nicht mit dem Produkt
spielen.
• Das Produkt nie verwenden, wenn Menschen,
insbesondere Kinder oder Haustiere, in der
Nähe sind.
• Der Benutzer ist verantwortlich für Unfälle oder
Gefahren, die für andere Menschen oder deren
Eigentum auftreten.
• Bei der Verwendung des Produkts keine offenen
Gummischuhe oder Sandalen tragen. Immer
festes Schuhwerk und lange Hosen tragen.
Nicht barfuß benutzen.
• Untersuchen Sie den Bereich, in dem die
Maschine eingesetzt werden soll, gründlich
und entfernen Sie alle Steine, Stöcke, Drähte,
Knochen und andere Fremdkörper.
Pagina se încarcă...
Pagina se încarcă...
Pagina se încarcă...
Pagina se încarcă...
Pagina se încarcă...
Pagina se încarcă...
Pagina se încarcă...
Pagina se încarcă...
Pagina se încarcă...
Pagina se încarcă...
Pagina se încarcă...
Pagina se încarcă...
Pagina se încarcă...
Pagina se încarcă...
Pagina se încarcă...
Pagina se încarcă...
Pagina se încarcă...
Pagina se încarcă...
Pagina se încarcă...
Pagina se încarcă...
Pagina se încarcă...
Pagina se încarcă...
Pagina se încarcă...
Pagina se încarcă...
Pagina se încarcă...
Pagina se încarcă...
Pagina se încarcă...
Pagina se încarcă...
Pagina se încarcă...
Pagina se încarcă...
Pagina se încarcă...
Pagina se încarcă...
Pagina se încarcă...
Pagina se încarcă...
Pagina se încarcă...
Pagina se încarcă...
Pagina se încarcă...
Pagina se încarcă...
Pagina se încarcă...
Pagina se încarcă...
Pagina se încarcă...
Pagina se încarcă...
Pagina se încarcă...
Pagina se încarcă...
Pagina se încarcă...
Pagina se încarcă...
Pagina se încarcă...
Pagina se încarcă...
Pagina se încarcă...
Pagina se încarcă...
Pagina se încarcă...
Pagina se încarcă...
Pagina se încarcă...
Pagina se încarcă...
Pagina se încarcă...
Pagina se încarcă...
Pagina se încarcă...
Pagina se încarcă...
Pagina se încarcă...
Pagina se încarcă...
Pagina se încarcă...
Pagina se încarcă...
Pagina se încarcă...
Pagina se încarcă...
Pagina se încarcă...
Pagina se încarcă...
Pagina se încarcă...
Pagina se încarcă...
Pagina se încarcă...
Pagina se încarcă...
Pagina se încarcă...
Pagina se încarcă...
Pagina se încarcă...
Pagina se încarcă...
Pagina se încarcă...
Pagina se încarcă...
Pagina se încarcă...
Pagina se încarcă...
Pagina se încarcă...
Pagina se încarcă...
Pagina se încarcă...
Pagina se încarcă...
Pagina se încarcă...
Pagina se încarcă...
Pagina se încarcă...
Pagina se încarcă...
Pagina se încarcă...
Pagina se încarcă...
Pagina se încarcă...
Pagina se încarcă...
Pagina se încarcă...
Pagina se încarcă...
Pagina se încarcă...
Pagina se încarcă...
Pagina se încarcă...
Pagina se încarcă...
Pagina se încarcă...
Pagina se încarcă...
Pagina se încarcă...
Pagina se încarcă...
Pagina se încarcă...
Pagina se încarcă...
Pagina se încarcă...
Pagina se încarcă...
Pagina se încarcă...
Pagina se încarcă...
Pagina se încarcă...
Pagina se încarcă...
-
 1
1
-
 2
2
-
 3
3
-
 4
4
-
 5
5
-
 6
6
-
 7
7
-
 8
8
-
 9
9
-
 10
10
-
 11
11
-
 12
12
-
 13
13
-
 14
14
-
 15
15
-
 16
16
-
 17
17
-
 18
18
-
 19
19
-
 20
20
-
 21
21
-
 22
22
-
 23
23
-
 24
24
-
 25
25
-
 26
26
-
 27
27
-
 28
28
-
 29
29
-
 30
30
-
 31
31
-
 32
32
-
 33
33
-
 34
34
-
 35
35
-
 36
36
-
 37
37
-
 38
38
-
 39
39
-
 40
40
-
 41
41
-
 42
42
-
 43
43
-
 44
44
-
 45
45
-
 46
46
-
 47
47
-
 48
48
-
 49
49
-
 50
50
-
 51
51
-
 52
52
-
 53
53
-
 54
54
-
 55
55
-
 56
56
-
 57
57
-
 58
58
-
 59
59
-
 60
60
-
 61
61
-
 62
62
-
 63
63
-
 64
64
-
 65
65
-
 66
66
-
 67
67
-
 68
68
-
 69
69
-
 70
70
-
 71
71
-
 72
72
-
 73
73
-
 74
74
-
 75
75
-
 76
76
-
 77
77
-
 78
78
-
 79
79
-
 80
80
-
 81
81
-
 82
82
-
 83
83
-
 84
84
-
 85
85
-
 86
86
-
 87
87
-
 88
88
-
 89
89
-
 90
90
-
 91
91
-
 92
92
-
 93
93
-
 94
94
-
 95
95
-
 96
96
-
 97
97
-
 98
98
-
 99
99
-
 100
100
-
 101
101
-
 102
102
-
 103
103
-
 104
104
-
 105
105
-
 106
106
-
 107
107
-
 108
108
-
 109
109
-
 110
110
-
 111
111
-
 112
112
-
 113
113
-
 114
114
-
 115
115
-
 116
116
-
 117
117
-
 118
118
-
 119
119
-
 120
120
-
 121
121
-
 122
122
-
 123
123
-
 124
124
-
 125
125
-
 126
126
-
 127
127
-
 128
128


Vonroc LM504DC Manual de utilizare
- Categorie
- Cositoare
- Tip
- Manual de utilizare
în alte limbi
- français: Vonroc LM504DC Manuel utilisateur
- polski: Vonroc LM504DC Instrukcja obsługi
- Deutsch: Vonroc LM504DC Benutzerhandbuch
- italiano: Vonroc LM504DC Manuale utente
- español: Vonroc LM504DC Manual de usuario
- dansk: Vonroc LM504DC Brugermanual
- Nederlands: Vonroc LM504DC Handleiding
Lucrări înrudite
-
Vonroc LM504DC Manual de utilizare
-
Vonroc CD820AA Instrucțiuni de utilizare
-
-
-
-
-
-
-
Vonroc SG503DC Manual de utilizare
-
Alte documente
-
Ryobi RY18LMX40A 40cm Cordless Brushless Lawn Mower Manual de utilizare
-
-
Skil F0150738 CORDLESS GRASS TRIMMER Instrucțiuni de utilizare
-
Vornado HT501DC Manual de utilizare
-
Crown CT29001HX Manual de utilizare
-
 JBM 60045 Manualul utilizatorului
-
Gardena 5033 Manual de utilizare
-
Gardena 5041 Manual de utilizare
-
-
 JBM 52598 Manualul utilizatorului

