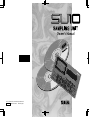
Yamaha SU10 Manualul proprietarului
- Categorie
- Sintetizator
- Tip
- Manualul proprietarului

Owner’s Manual
M.D.G., EMI Division, ©Yamaha Corporation 1995
VU37290 601CRIT15.2-02B0 Printed in Japan

FCC INFORMATION (U.S.A)
1. IMPORTANT NOTICE: DO NOT MODIFY THIS UNIT!
This product, when installed as indicated in the instructions contained in this manual, meets FCC
requirements. Modifications not expressly approved by Yamaha may void your authority, granted by
the FCC, to use the product.
2. IMPORTANT: When connecting this product to accessories and/or another product use only high
quality shielded cables. Cable/s supplied with this product MUST be used. Follow all installation
instructions. Failure to follow instructions could void your FCC authorization to use this product in
the USA.
3. NOTE: This product has been tested and found to comply with the requirements listed in FCC
Regulations, Part 15 for Class “B” digital devices. Compliance with these requirements provides a
reasonable level of assurance that your use of this product in a residential environment will not result
in harmful interference with other electronic devices. This equipment generates/uses radio frequen-
cies and, if not installed and used according to the instructions found in the user’s manual, may cause
interference harmful to the operation of other electronic devices. Compliance with FCC regulations
does not guarantee that interference will not occur in all installations. If this product is found to be the
source of interference, which can be determined by turning the unit “OFF” and “ON”, please try to
eliminate the problem by using one of the following measures:
Relocate either this product or the device that is being affected by the interference.
Utilize power outlets that are on different branch (circuit breaker or fuse) circuits or install AC line
filter/s.
In the case of radio or TV interference, relocate/reorient the antenna. If the antenna lead-in is 300
ohm ribbon lead, change the lead-in to co-axial type cable.
If these corrective measures do not produce satisfactory results, please contact the your local retailer
authorized to distribute this type of product.
If you can not locate the appropriate retailer, please contact Yamaha Corporation of America, Elec-
tronic Service Division, 6600 Orangethorpe Ave, Buena Park, CA 90620
* The above statements apply ONLY to those products distributed by Yamaha Corporation of America
or its subsidiaries.

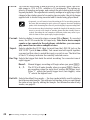
SPECIAL MESSAGE SECTION (USA)
PLEASE KEEP THIS MANUAL
92-BP
This product utilizes batteries or an external power supply
(adapter). DO NOT connect this product to any power supply
or adapter other than one described in the manual, on the name
plate, or specifically recommended by Yamaha.
WARNING: Do not place this product in a position where
anyone could walk on, trip over, or roll anything over power
or connecting cords of any kind. The use of an extension cord
is not recommended! IF you must use an extension cord, the
minimum wire size for a 25' cord (or less) is 18 AWG. NOTE:
The smaller the AWG number, the larger the current handling
capacity. For longer extension cords, consult a local electri-
cian.
This Product should be used only with the components sup-
plied or; a cart, rack, or stand that is recommended by Yamaha.
If a cart, etc., is used, please observe all safety markings and
instructions that accompany the accessory product.
SPECIFICATIONS SUBJECT TO CHANGE: The infor-
mation contained in this manual is believed to be correct at
the time of printing. However, Yamaha reserves the right to
change or modify any of the specifications without notice or
obligation to update existing units.
This product, either alone or in combination with an ampli-
fier and headphones or speaker/s, may be capable of produc-
ing sound levels that could cause permanent hearing loss. DO
NOT operate for long periods of time at a high volume level
or at a level that is uncomfortable. If you experience any hear-
ing loss or ringing in the ears, you should consult an audiolo-
gist. IMPORTANT: The louder the sound, the shorter the
time period before damage occurs.
Some Yamaha products may have benches and/or accessory
mounting fixtures that are either supplied with the product or
as optional accessories. Some of these items are designed to
be dealer assembled or installed. Please make sure that
benches are stable and any optional fixtures (where appli-
cable) are well secured BEFORE using. Benches supplied by
Yamaha are designed for seating only. No other uses are rec-
ommended.
NOTICE: Service charges incurred due to lack of knowl-
edge relating to how a function or effect works (when the
unit is operating as designed) are not covered by the
manufacturer’s warranty, and are therefore the owners respon-
sibility. Please study this manual carefully and consult your
dealer before requesting service.
ENVIRONMENTAL ISSUES: Yamaha strives to produce
products that are both user safe and environmentally friendly.
We sincerely believe that our products and the production
methods used to produce them, meet these goals. In keeping
with both the letter and the spirit of the law, we want you to
be aware of the following:
Battery Notice: This product MAY contain a small non-re-
chargeable battery which (if applicable) is soldered in place.
The average life span of this type of battery is approximately
five years. When replacement becomes necessary, contact a
qualified service representative to perform the replacement.
This Product may also use “household” type batteries. Some
of these may be rechargeable. Make sure that the battery be-
ing charged is a rechargeable type and that the charger is in-
tended for the battery being charged.
When installing batteries, do not mix old batteries with new,
or with batteries of a different type. Batteries MUST be in-
stalled correctly. Mismatches or incorrect installation may
result in overheating and battery case rupture.
Warning: Do not attempt to disassemble, or incinerate any
battery. Keep all batteries away from children. Dispose of
used batteries promptly and as regulated by the laws in your
area.
Note: Check with any retailer of household type batteries in
your area for battery disposal information.
Disposal Notice: Should this Product become damaged be-
yond repair, or for some reason its useful life is considered to
be at an end, please observe all local, state, and federal regu-
lations that relate to the disposal of products that contain lead,
batteries, plastics, etc. If your dealer is unable to assist you,
please contact Yamaha directly.
NAME PLATE LOCATION: The name plate is located on
the bottom of the product. The model number, serial number,
power requirements, etc., are located on this plate. You should
record the model number, serial number, and the date of pur-
chase in the spaces provided below and retain this manual as
a permanent record of your purchase.
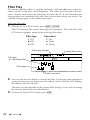
OUTPUT INPUT
LINE
OUT IN
MIDI
MIC INPUT
DC IN POWER
OFFON
Model
Serial No.
Purchase Date

i
●
Introduction
●
Introduction
The SU10 Stereo Digital Sampler is a compact, easy-to-use stereo phrase sampler
offering high sound quality, a unique ribbon controller, excellent loop capability,
and a host of other distinctive editing and performance features. The SU10 is ideal
for up-and-coming DJs, “desktop musicians,” and all others interested in experi-
encing the world of electronic digital sampling.
Sampling and playback features
■ Record up to 48 stereo samples within nonvolatile memory. Samples re-
main in memory even while power is off.
■ Excellent sound quality: Can record at a maximum sampling rate of 44.1kHz,
the same rate used by audio CDs.
■ Reverse play reproduces samples in reverse.
■ Scale play sets up a single sample at 12 different pitches along the pad
console.
■ Unique ribbon controller allows you to apply a dramatic filter or scratch
effect to your samples, or to crossfade your samples with realtime sound
from an external source.
■ Impressive editing features.
• Select any one of five loop patterns for each sample. Select arbitrary loop
start point and end point.
• Move or copy sample to a different location; split one sample into two;
trim off the leading and trailing parts of the sample.
• Select any one of three triggering modes for each sample.
■Create up to four
songs
, each consisting of any arbitrary sequence of sample
play.

●
Introduction
●
ii
Special “External” functions
■ Use your SU10 as an effects box for applying a realtime scratch or filter
effect to feed-through line input.
MIDI support
■ Drive your SU10 from a remote sequencer, keyboard, or computer; or use
your SU10 to drive a remote device.
■ Load selected samples to a synthesizer or other remote device using the
MIDI sample dump standard.
■ Back up all SU10 data to an external storage device, then reload at any
time.

Contents
1 About This Manual␣ ........................ 1
Notations .................................... 1
2 Precautions␣ .................................... 2
3 Basic Concepts␣ .............................. 3
What is the SU10? ...................... 3
Operating Modes ........................ 3
Samples ...................................... 4
How a Sample is Made .......... 4
Banks and Pads .......................... 5
External Modes .......................... 6
Songs .......................................... 6
MIDI ........................................... 6
4 Controls, Connectors, and LCD␣ .... 7
Top Panel .................................... 7
Rear Panel ................................ 10
Right Side ................................. 11
Screen Display.......................... 11
5 Supplying Power and Connecting
Up␣ ............................................... 13
Supplying Power ...................... 13
Using the adaptor ................. 13
Batteries ............................... 13
Connecting Up the SU10 ......... 14
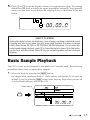
6 Playback␣ ....................................... 16
Preparation............................... 16
Basic Sample Playback............. 17
Special Play Features I ............. 18
HOLD .................................. 18
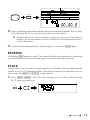
REVERSE............................ 19
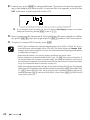
SCALE................................. 19
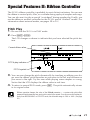
Special Features II:
Ribbon Controller .................. 21
Pitch Play ............................. 21
Filter Play............................. 22
Scratchpad............................ 24
Crossfade ............................. 25
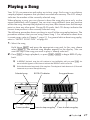
Playing a Song ......................... 27
External Performance Modes .. 29
External Scratch................... 29
External Filter ...................... 30
7 Recording Samples, and Creating
Songs␣ ......................................... 31
Sample Recording Overview .... 31
Connecting the Input Source .. 31
Entering REC Mode and
Selecting the Pad ................... 31
Setting the Recording
Parameters ............................. 32
Starting/Stopping the
Recording ............................... 35
Creating Songs ......................... 35
Procedure ............................. 36
8 Editing␣ ......................................... 38
Introduction ............................. 38
Editing Functions................ 38
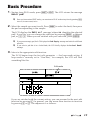
Basic Procedure ....................... 39
Edit Parameters and
Operations .............................. 41
LOOP MODE [LpMode]..... 41
SOUNDING MODE
[SdMode] ........................... 43
PAD VOLUME [PadVol] ..... 44
ALTERNATE GROUP
[AltGrp] ............................. 44
MIDI NOTE NUMBER
[Note#] ............................... 45
START POINT [StPnt] ........ 46
LOOP POINT [LpPnt]......... 47
END POINT [EdPnt] ........... 47
COPY [CopyTo ?].............. 48
MOVE [MoveTo ?] ............ 49
SPLIT [SpltTo ?]................ 50
COMPACT [Compct ?] ..... 52
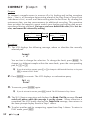
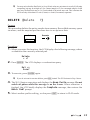
DELETE [Delete ?] ........... 53

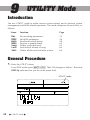
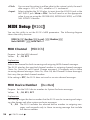
9 UTILITY Mode␣ ............................. 54
Introduction ............................. 54
General Procedure ................... 54
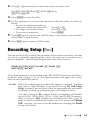
Recording Setup [Rec] ............. 55
MIDI Setup [MIDI] ................... 56
MIDI Channel [MIDICh] .... 56
MIDI Device Number
[DevNum] .......................... 56
Local Control [Local] .......... 57
Ribbon Number [RbnNum] . 57
Initialize Note Table
[NoteTbInit?] ..................... 57
Clear Note Table
[NoteTbClr?]...................... 58
Bulk Dump [Bulk] ................... 58
Receiving [Dump Rcv?] ...... 59
Sending [Dump Send?]........ 60
Interval [Intrvl] .................... 60
Sample Dump .......................... 62
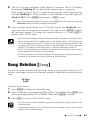
Song Deletion [Song] .............. 63
Lock [Lock] .............................. 64
Initialize [Init] .......................... 64
Deleting data only
[Init Data?]......................... 65
Deleting data and resetting
the system [Init All?] ......... 65
0 Troubleshooting␣ .......................... 67
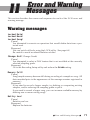
A Error and Warning Messages␣ ...... 71
Warning messages ................... 71
MIDI Errors .............................. 72
Memory-Related Errors ........... 73
B Specifications␣ ............................... 74
MIDI Implementation Chart␣ ............. 78
Index␣ .................................................. 80

●
About This Manual
●
1
1
About This Manual
The purpose of this manual is to help you quickly master the operation of your
SU10. Although compact, your SU10 offers a surprising array of playback, edit-
ing, and utility functions. You may need to refer to this manual fairly often in the
beginning, but the concepts and operating principles should soon become clear.
Before starting to use your SU10, please be certain to read through the precau-
tions on page 2 for information that will help you avoid data loss and equipment
damage.
Notations
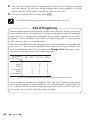
Button names are enclosed in a rectangular frame, as in [HOLD] or [EXIT].
The 12 central buttons are called
pads
. Each pad has two functions. The lower
function is indicated by the word PAD followed by the button number: for
example, [PAD 1], [PAD 10]. The upper function is indicated by an expression
such as [SHIFT]+[SONG 2], which means “hold down the [SHIFT] key while pressing
the [SONG2] button.”
In general a + sign between two button names means that you must hold
down the first button while pressing the second. For example, [REV]+[PAD 1],
[SHIFT]+[EDIT].
SU10 editing and utility operations are semi-interactive, with the lower left
area of the LCD displaying the necessary messages, prompts, and parameters.
Messages and parameter names that appear in this area are shown in a special
font, as in: Delete A1?.
Normal boldface is sometimes used to call attention to important passages.
The following icons are also used.
This icon header denotes critical advice that may help prevent acci-
dental data loss or equipment damage. Please read these sections care-
fully.
This icon calls attention to significant supplemental information.
▼
This mark appears within procedures to indicate a supplemental ex-
planation that is not part of the procedure itself.

2
●
Precautions
●
2
Precautions
PLEASE READ ALL PRECAUTIONS BEFORE USING YOUR SU10.
1. NEVER switch power off while the LCD is displaying the Keep PwrOn mes-
sage. This message indicates that the SU10 is writing to nonvolatile memory.
Switching power off at this time may result in loss of all data in the SU10. In
some cases this message may last for more than 10 seconds: this does not
indicate a problem.
2. Use the correct power adaptor.
Use only a Yamaha PA-3B or PA-1B power adaptor. Use of a different adaptor
type may result in electric shock or device damage.
3. Use 1.5V AA batteries only. Never mix old and new batteries. Never mix
battery types: be sure that batteries are either all alkaline or else all manga-
nese. Alkaline batteries are recommended
To prevent potential damage from battery leakage, remove the batteries if
you plan to leave the SU10 unused for an extended period.
4. Use the correct cables. Handle cables with care.
• When disconnecting a cable, grip firmly at the connector area and pull
straight out.
• Use only high-quality MIDI cables for your MIDI connections. Cable perfor-
mance degrades as length increases: avoid cables that are longer than 15m.
5. Handle the SU10 with care.
• Do not drop it or otherwise subject it to severe physical impact.
• Do not leave the SU10 in a location where it may be exposed to high tem-
peratures, high humidity, extreme dust, or extreme vibration.
6. Do not open the casing or attempt repairs.
The SU10 contains no user-serviceable parts. Please refer all maintenance to
qualified technicians. Opening of the case will void the warranty.
7. Clean with soft dry cloth only.
Do not attempt to clean the SU10 with detergents or solvents, as these may
damage the casing.

●
Overview and Basic Concepts
●
3
This chapter presents a very brief overview of basic concepts relevant to under-
standing and operation of the SU10.
What is the SU10?
The SU10 combines the functions of a digital stereo phrase sampler with a variety
of add-on features that significantly enhance its effectiveness in a performance
environment. In addition to basic recording, edit, and playback capabilities, this
compact unit includes special play functions, a touch-driven ribbon controller,
and two “external” modes that apply filter or scratch effects to realtime line or
microphone input.
Operating Modes
The SU10 has four operating modes: PLAY, REC (Recording), EDIT, and UTIL (Util-
ity).
PLAY: Use this mode to play samples and songs, or to apply a scratch or filter
effect to a realtime signal as it passes through the SU10. The SU10 always
starts from PLAY mode when power is switched on. You can always return
to PLAY mode from any other mode by pressing [EXIT] once or, in some
cases, twice. For full information about PLAY mode, see Chapter 6.
REC: This is the mode you use to record samples and create songs. You enter this
mode from PLAY mode by pressing [REC]. For details, see Chapter 7.
EDIT: Use this mode to set playback parameters for each sample. You can enter
this mode from PLAY mode by pressing [SHIFT]+[EDIT]. Refer to Chapter 8.
UTIL: This mode consists of seven utilities that you use to set parameters or ex-
ecute operations that are not sample-specific. You can use this mode, for
example, to reinitialize the system, adjust the system-wide pitch offset, or
set overwrite protection for banks and songs. You can enter this mode from
PLAY mode by pressing [SHIFT]+[UTIL]. See Chapter 9.
3
Basic Concepts

4
●
Overview and Basic Concepts
●
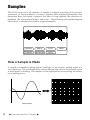
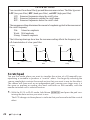
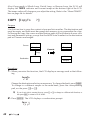
Samples
The SU10 stores up to 48 samples. A
sample
is a digital recording of an acoustic
waveform (or two waveforms, if stereo), together with playback parameters that
determine how the sound is played: the type of loop applied, the direction of
playback, the start and end points, and so on. The following conceptual diagram
shows how a sample exists within a typical sampler.
LpMode
SdMode
AltGrp
MIDI NOTE#
StPnt
LpPnt
EdPnt
How a Sample is Made
A sample is created by taking digital “readings” of an acoustic analog signal at a
very rapid rate. The resulting binary values indicate the state of the acoustic wave
at each point of reading. The sample can be replayed by reconverting the values
to an analog wave.
0 0
Analog wave SAMPLING

●
Overview and Basic Concepts
●
5
Note that the quality of the recording improves as the rate of reading — called the
sampling frequency
— increases. Although higher sampling frequencies give bet-
ter quality, they also consume more memory and therefore reduce available re-
cording time. The maximum sampling rate available on the SU10 is 44.1kHz,
identical to the rate offered by a conventional CD.
Because samples require considerable memory per unit of time, they are generally
kept quite short. The replay time of a sample can be extended to an arbitrary
length by setting up a loop, so that the sample repeats indefinitely.
The term sample is also used in a technical sense (its original sense) to refer to each “reading” of
the acoustic signal, as described above. Within this manual, however, the term always refers to
the entire recorded waveform together with its related parameters.
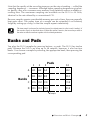
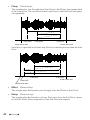
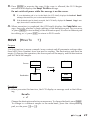
Banks and Pads
You play the SU10 samples by pressing buttons, or
pads
. The SU10 has twelve
pads. Because the SU10 can store up to 48 samples, however, it also has four
banks. You choose a sample by selecting the appropriate bank, then pressing the
corresponding pad.
Pads
Banks
A A1 A2 A3 A12
B1 B2 B3 B12
C1 C2 C3 C12
D1 D2 D3 D12
123 12
B
C
D
Sample

6
●
Overview and Basic Concepts
●
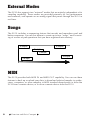
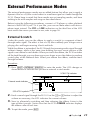
External Modes
The SU10 also supports two “external” modes that are entirely independent of its
sampling capability. These modes are provided primarily for live performance
environments, and operate on an analog signal that passes through the SU10 in
real time.
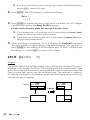
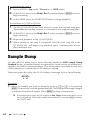
Songs
The SU10 includes a sequencing feature that records and reproduces pad and
button sequences. You use this feature to create up to four “songs,” each consist-
ing of a series of pad operations that you have registered into memory.
Sample
Time
Sample
Sample
Sample
Sample
Sample
MIDI
The SU10 provides both MIDI IN and MIDI OUT capability. You can use these
features to back up or reload your data; to download selected samples to synthe-
sizers, computers, or other samplers in MIDI standard dump format; to drive the
SU10 from a remote device; or to drive a remote device from the SU10.

●
Controls, Connectors, and LCD
●
7
4
Controls, Connectors,
and LCD
Top Panel
SAMPLING UNIT
REC TOP BWD STOP PLAY FWD
HOLD EXIT
REV SCRATCH
SHIFT BANK
–1 +1
ENTER
SONG 1
EDIT
SONG 4SONG 3SONG 2 UTILITY
EXTERNAL
FILTER
EXTERNAL
SCRATCH
PITCHCROSS
FADER
FILTER
SCALE
1
5
4326
1211
10
987
1
3
F
G
H
0 C
A
D
B
E
2
4
5
67
8
9
1 LCD (Liquid Crystal Display)
You refer to the LCD for all information about current operating status, and
during interactive input of all editing and utility parameters. A description of
the various indications appears on page 11 and 12.
2 Ribbon Controller
During playback, you can run your finger over the ribbon to apply a dramatic
scratch or filter effect or to vary the pitch or line/pad crossfade. During
exter-
nal scratch
and
external filter
play, you use the ribbon to apply realtime scratch-
ing or filtering to a straight audio signal as it feeds through the SU10. Finally,
you can use the ribbon during EDIT operation to change pad volume and
start, loop, and end point settings.
Use light pressure when rubbing your finger over the controller. Excessive force can cause the
ribbon to heat up, reducing its life. Also note that the ribbon may lose sensitivity after prolonged
uninterrupted use; if this occurs, allow the ribbon some time to recover.
3 Pads
Use to start or stop playback of a sample, to change the operating mode, or to
select various functions. Pad operation depends on whether the [SHIFT] button
is ON (pressed) or OFF (not pressed).

8
●
Controls, Connectors, and LCD
●
If [SHIFT] is OFF:
The pad starts or stops replay of the corresponding sample, or selects
the sample for recording or editing.
If [SHIFT] is ON:
• SONG1,…,4 Selects a song for creation or replay.
• EDIT Sets the SU10 into EDIT mode.
• UTILITY Sets the SU10 into UTILITY mode.
• SCALE, FILTER, Sets playback function to SCALE, FILTER,
CROSSFADER or CROSSFADER.
• PITCH Enables ribbon to control the pitch.
• EXTERNAL SCRATCH, Selects EXTERNAL SCRATCH or
EXTERNAL FILTER EXTERNAL FILTER play.
4 [REC]
Press to enter RECORDING mode.
5 [TOP]
Normal play: Returns song to start position.
SCRATCH play: [SCRATCH]+[TOP] returns scratch section to top of sample.
EDIT mode: Jumps to START POINT edit function.
6 [BWD]
Normal play: Moves song back to previous event.
SCRATCH play: [SCRATCH]+[BWD] shifts the scratch section back.
EDIT mode: Jumps to LOOP POINT edit function.
7 [STOP]
PLAY mode: Stops playback of song.
REC mode: Stops recording of sample or song.
8 [PLAY]
PLAY mode: Starts playback of song.
REC mode: Starts recording of sample or song.
9 [FWD]
PLAY mode: Advances song to next event.
EDIT mode: Jumps to END POINT edit function
SCRATCH play: [SCRATCH]+[FWD] shifts the scratch section forward.
0 [HOLD]
Activates HOLD function for sample replay, or REPEAT function for song re-
play. To set this function ON, hold down the pad and press [HOLD].

●
Controls, Connectors, and LCD
●
9
A [REV] (Reverse switch)
Use to play samples in reverse. To operate, hold down [REV] and press the
appropriate pad.
B [SHIFT]
Shifts the pad function. Leave shift off if using the pad to select a sample for
replay or recording. Hold [SHIFT] down when using a pad to select a song or
change the mode.
C [EXIT]
Press this button to return to normal PLAY mode from EDIT mode, UTILITY
mode, ribbon-scratch play, or other special playback feature. You also use this
button when you need to answer “No” to a prompt message.
D [SCRATCH]
Assigns scratch effect to any one of the samples. To operate, hold down
[SCRATCH] and press the pad for the sample you want to scratch.
E [BANK]
The SU10 provides four pad banks (Banks A to D), each capable of storing up
to 12 samples. Press the [BANK] button to change the bank setting (A→
B→C→D→A...) The LCD always indicates the currently selected bank.
F [ENTER]
Press to respond “Yes” to a prompt and execute the corresponding operation,
or to select one of the utilities within UTILITY mode.
The LCD will display a confirmation message before executing certain editing operations.
Press [ENTER] to proceed, or [EXIT] to cancel.
G [+1], [–1]
Use these buttons to change the digital volume during playback, to change
the gain during recording, or to change a parameter value during editing.
Press briefly for a single-unit change, or hold down for continuous change.
H [<], [>]
Press to move through editing functions or utilities.

10
●
Controls, Connectors, and LCD
●
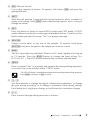
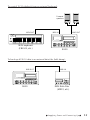
Rear Panel
OUTPUT INPUT
LINE
OUT IN
MIDI
MIC INPUT
DC IN POWER
OFFON
1
2
34
5
6
1 LINE OUTPUT miniphone jack
Outputs a stereo analog signal to powered speakers or other playback device.
2 LINE INPUT miniphone jack
Inputs an analog stereo signal from an external device such as a CD player.
3 MIDI IN/OUT
Standard MIDI connectors. You use these connectors to link your SU10 to
other MIDI devices.
4 MIC INPUT miniphone jack
Accepts input from a dynamic or powered condenser-type microphone.
5 DC IN power input
Receives power input from a PA-3B or PA-1B DC power adaptor.
CAUTION!
Use only a PA-3B or PA-1B adaptor. Use of a different adaptor type may result in
electric shock or device damage.
6 POWER switch
Switches the SU10 power ON or OFF.

●
Controls, Connectors, and LCD
●
11
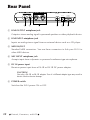
Right Side
MIN VOLUME MAX PHONES
12
1 VOLUME slider
Adjusts the output volume to the PHONES and LINE OUTPUT connectors.
2 Headphone jack
Stereo miniphone jack; connects to stereo headphones.
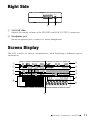
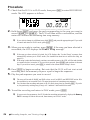
Screen Display
The LCD consists of various compartments, each displaying a different type of
information.
1
3
0
A
B
2
4
56
7
8
9

12
●
Controls, Connectors, and LCD
●
1 Current sampling grade
2 Current operating mode
PLAY = Sample/song playback
EDIT = Sample edit
UTIL = Utility setup
3 Loop mode of currently selected pad
4 Indicates whether the selected sample is STEREO or MONO.
5 Currently selected input source
6 Ribbon value (during playback or editing), or input level (during recording
setup)
7 Currently selected bank of pads
8 Selected effect or special play function (if any)
PCH: Ribbon-controlled pitch
EFCT: Scale, Filter, Crossfade, External Filter
SCH: Scratch, External Scratch
9 Currently selected song, and song REPEAT arrow.
Arrow appears only if song is playing in REPEAT mode.
0 Message/parameter display area.
During editing, the upper line displays the parameter name and the bottom
line displays the value. At other times, this area displays input prompts, status
information, and error messages.
A Indicators
MIDI: ON when MIDI message is coming in.
TIME: ON during recording.
TEMPO: ON during loop editing.
REC: ON when SU10 is recording (or standing by to record) a sample
or song.
B Meter display
During sample record: Recordable time (to nearest 0.1 sec.)
During song play: Song location (to nearest 0.1 sec.)
During song creation: Remaining song memory (16-bit words)
During loop edit: Loop tempo (estimated beats per minute)

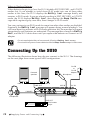
●
Supplying Power and Connecting Up
●
13
5
Supplying Power
and Connecting Up
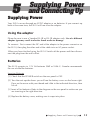
Supplying Power
Your SU10 can run through an AC/DC adaptor or on batteries. If you connect up
both at the same time, the SU10 will run from the adaptor.
Using the adaptor
Please be sure to use a Yamaha PA-3B or PA-1B adaptor only. Use of a different
adaptor type may result in electric shock or device damage.
To connect
: First connect the DC end of the adaptor to the power connector on
the SU10, then plug the other end of the cable into an AC power socket.
When you have finished
using the SU10
: Switch off the power and then discon-
nect the plug from the wall socket.
Batteries
The SU10 accepts six 1.5V AA batteries (R6P or SUM-3). Yamaha recommends
the use of alkaline batteries.
Inserting Batteries
[1] Check that the POWER switch on the rear panel is OFF.
[2] Turn the unit upside down: you will see the battery cover on the lower right.
Press on the arrow with your thumb and slide in the indicated direction, then
lift off.
[3] Insert all six batteries. Refer to the diagram on the rear panel to make sure you
are inserting in the right direction.
[4] Replace the battery cover, making sure it snaps into place.
Pagina se încarcă ...
Pagina se încarcă ...
Pagina se încarcă ...
Pagina se încarcă ...
Pagina se încarcă ...
Pagina se încarcă ...
Pagina se încarcă ...
Pagina se încarcă ...
Pagina se încarcă ...
Pagina se încarcă ...
Pagina se încarcă ...
Pagina se încarcă ...
Pagina se încarcă ...
Pagina se încarcă ...
Pagina se încarcă ...
Pagina se încarcă ...
Pagina se încarcă ...
Pagina se încarcă ...
Pagina se încarcă ...
Pagina se încarcă ...
Pagina se încarcă ...
Pagina se încarcă ...
Pagina se încarcă ...
Pagina se încarcă ...
Pagina se încarcă ...
Pagina se încarcă ...
Pagina se încarcă ...
Pagina se încarcă ...
Pagina se încarcă ...
Pagina se încarcă ...
Pagina se încarcă ...
Pagina se încarcă ...
Pagina se încarcă ...
Pagina se încarcă ...
Pagina se încarcă ...
Pagina se încarcă ...
Pagina se încarcă ...
Pagina se încarcă ...
Pagina se încarcă ...
Pagina se încarcă ...
Pagina se încarcă ...
Pagina se încarcă ...
Pagina se încarcă ...
Pagina se încarcă ...
Pagina se încarcă ...
Pagina se încarcă ...
Pagina se încarcă ...
Pagina se încarcă ...
Pagina se încarcă ...
Pagina se încarcă ...
Pagina se încarcă ...
Pagina se încarcă ...
Pagina se încarcă ...
Pagina se încarcă ...
Pagina se încarcă ...
Pagina se încarcă ...
Pagina se încarcă ...
Pagina se încarcă ...
Pagina se încarcă ...
Pagina se încarcă ...
Pagina se încarcă ...
Pagina se încarcă ...
Pagina se încarcă ...
Pagina se încarcă ...
Pagina se încarcă ...
Pagina se încarcă ...
Pagina se încarcă ...
Pagina se încarcă ...
Pagina se încarcă ...
-
 1
1
-
 2
2
-
 3
3
-
 4
4
-
 5
5
-
 6
6
-
 7
7
-
 8
8
-
 9
9
-
 10
10
-
 11
11
-
 12
12
-
 13
13
-
 14
14
-
 15
15
-
 16
16
-
 17
17
-
 18
18
-
 19
19
-
 20
20
-
 21
21
-
 22
22
-
 23
23
-
 24
24
-
 25
25
-
 26
26
-
 27
27
-
 28
28
-
 29
29
-
 30
30
-
 31
31
-
 32
32
-
 33
33
-
 34
34
-
 35
35
-
 36
36
-
 37
37
-
 38
38
-
 39
39
-
 40
40
-
 41
41
-
 42
42
-
 43
43
-
 44
44
-
 45
45
-
 46
46
-
 47
47
-
 48
48
-
 49
49
-
 50
50
-
 51
51
-
 52
52
-
 53
53
-
 54
54
-
 55
55
-
 56
56
-
 57
57
-
 58
58
-
 59
59
-
 60
60
-
 61
61
-
 62
62
-
 63
63
-
 64
64
-
 65
65
-
 66
66
-
 67
67
-
 68
68
-
 69
69
-
 70
70
-
 71
71
-
 72
72
-
 73
73
-
 74
74
-
 75
75
-
 76
76
-
 77
77
-
 78
78
-
 79
79
-
 80
80
-
 81
81
-
 82
82
-
 83
83
-
 84
84
-
 85
85
-
 86
86
-
 87
87
-
 88
88
-
 89
89


Yamaha SU10 Manualul proprietarului
- Categorie
- Sintetizator
- Tip
- Manualul proprietarului
în alte limbi
- Türkçe: Yamaha SU10 El kitabı
- français: Yamaha SU10 Le manuel du propriétaire
- čeština: Yamaha SU10 Návod k obsluze
- русский: Yamaha SU10 Инструкция по применению
- English: Yamaha SU10 Owner's manual
- suomi: Yamaha SU10 Omistajan opas
- polski: Yamaha SU10 Instrukcja obsługi
- Deutsch: Yamaha SU10 Bedienungsanleitung
- italiano: Yamaha SU10 Manuale del proprietario
- español: Yamaha SU10 El manual del propietario
- svenska: Yamaha SU10 Bruksanvisning
- dansk: Yamaha SU10 Brugervejledning
- português: Yamaha SU10 Manual do proprietário
- Nederlands: Yamaha SU10 de handleiding
Lucrări conexe
-
Yamaha SU700 Manual de utilizare
-
-
Yamaha ES6 Manual de utilizare
-
Yamaha MOTIF7 Manual de utilizare
-
-
-
-
-
-
