


COPYRIGHT ©2016 Hangzhou Hikvision Digital Technology Co., Ltd. or its subsidiaries. ALL RIGHTS RESERVED.
About this Manual
The Manual includes instructions for using and managing the product. Pictures, charts, images and all other information
hereinafter are for description and explanation only. The information contained in the Manual is subject to change, without
notice, due to firmware updates or other reasons. Please find the latest version in the ™ website (http://www.
ezvizlife.com).
Any and all information, including, among others, wordings, pictures, graphs are the properties of Hangzhou Hikvision
Digital Technology Co., Ltd. or its subsidiaries (hereinafter referred to be “Hikvision”). This user manual (hereinafter
referred to be “the Manual”) cannot be reproduced, changed, translated, or distributed, partially or wholly, by any means,
without the prior written permission of Hikvision. Unless otherwise stipulated, Hikvision does not make any warranties,
guarantees or representations, express or implied, regarding to the Manual.
Trademarks Acknowledgement
™, ™, and other Hikvision’s trademarks and logos are the properties of Hikvision in various jurisdictions.
Other trademarks and logos mentioned below are the properties of their respective owners.
Legal Disclaimer
TO THE MAXIMUM EXTENT PERMITTED BY APPLICABLE LAW, THE PRODUCT DESCRIBED, WITH ITS HARDWARE, SOFTWARE
AND FIRMWARE, IS PROVIDED “AS IS”, WITH ALL FAULTS AND ERRORS, AND HIKVISION MAKES NO WARRANTIES, EXPRESS
OR IMPLIED, INCLUDING WITHOUT LIMITATION, MERCHANTABILITY, SATISFACTORY QUALITY, FITNESS FOR A PARTICULAR
PURPOSE, AND NON-INFRINGEMENT OF THIRD PARTY. IN NO EVENT WILL HIKVISION, ITS DIRECTORS, OFFICERS,
EMPLOYEES, OR AGENTS BE LIABLE TO YOU FOR ANY SPECIAL, CONSEQUENTIAL, INCIDENTAL, OR INDIRECT DAMAGES,
INCLUDING, AMONG OTHERS, DAMAGES FOR LOSS OF BUSINESS PROFITS, BUSINESS INTERRUPTION, OR LOSS OF DATA
OR DOCUMENTATION, IN CONNECTION WITH THE USE OF THIS PRODUCT, EVEN IF HIKVISION HAS BEEN ADVISED OF
THE POSSIBILITY OF SUCH DAMAGES. TO THE MAXIMUM EXTENT PERMITTED BY APPLICABLE LAW, IN NO EVENT SHALL
HIKVISION’S TOTAL LIABILITY FOR ALL DAMAGES EXCEED THE PURCHASE PRICE THE PRODUCT.
HIKVISION does not undertake any liability for personal injury or property damage, as the result of product interruption or
service termination cause by: a) improper installation or usage other than as requested; b) the protection of national or
public interests; c) Force Majeure; d) yourself or the third party, including not limitation, using any third party’s products,
software, applications, and among others.
REGARDING TO THE PRODUCT WITH INTERNET ACCESS, THE USE OF PRODUCT SHALL BE WHOLLY AT YOUR OWN RISKS.
HIKVISION SHALL NOT TAKE ANY RESPONSIBILITES FOR ABNORMAL OPERATION, PRIVACY LEAKAGE OR OTHER DAMAGES
RESULTING FROM CYBER ATTACK, HACKER ATTACK, VIRUS INSPECTION, OR OTHER INTERNET SECURITY RISKS; HOWEVER,
HIKVISION WILL PROVIDE TIMELY TECHNICAL SUPPORT IF REQUIRED.
SURVEILLANCE LAWS VARY BY JURISDICTION. PLEASE CHECK ALL RELEVANT LAWS IN YOUR JURISDICTION BEFORE USING
THIS PRODUCT IN ORDER TO ENSURE THAT YOUR USE CONFORMS TO THE APPLICABLE LAW. YOU FUTHER AGREE THAT THIS
PRODUCT IS ONLY FOR CIVIL USE, AND HIKVISION SHALL NOT BE LIABLE IN THE EVENT THAT THIS PRODUCT IS USED WITH
ILLEGITIMATE PURPOSES, SUCH AS THIRD PARTY RIGHTS INFRINGEMENT, MEDICAL TREATMENT, SAFETY

Regulatory Information
This device complies with Part 15 of the FCC Rules. Operation is subject to the following two
conditions:
(1) This device may not cause harmful interference, and
(2) This device must accept any interference received, including interference that may cause undesired
operation.
Please take attention that changes or modification not expressly approved by the party responsible for compliance
could void the user’s authority to operate the equipment.
Note: This product has been tested and found to comply with the limits for a Class B digital device, pursuant to
Part 15 of the FCC Rules. These limits are designed to provide reasonable protection
against harmful interference in
a residential installation. This product generates, uses, and can radiate radio frequency energy and, if not installed and
used in accordance with the instructions, may cause harmful interference to radio communications. However, there is no
guarantee that interference will not occur in a particular installation. If this product does cause harmful interference to
radio or television reception, which can be determined by turning the equipment off and on, the user is encouraged to try
to correct the interference by one or more of the following measures:
—Reorient or relocate the receiving antenna.
—Increase the separation between the equipment and receiver.
—Connect the equipment into an outlet on a circuit different from that to which the receiver is connected.
—Consult the dealer or an experienced radio/TV technician for help.
This equipment should be installed and operated with a minimum distance 20cm between the radiator and your body.
EU Conformity Statement
This product and - if applicable - the supplied accessories too are marked with "CE" and comply
therefore with the applicable harmonized European standards listed under the Radio Equipment
Directive 2014/53/EU, the EMC Directive 2014/30/EU, the RoHS Directive 2011/65/EU.
2012/19/EU (WEEE directive): Products marked with this symbol cannot be disposed of as unsorted
municipal waste in the European Union. For proper recycling, return this product to your local supplier
upon the purchase of equivalent new equipment, or dispose of it at designated collection points. For
more information see: www.recyclethis.info.
EQUIPMENT OR OTHER SITUATIONS WHERE THE PRODUCT FAILURE COULD LEAD TO DEATH OR PERSONAL INJURY, OR
WEAPON OF MASS DESTRUCTION, CHEMINCAL AND BIOLOGICAL WEAPON, NUCLEAR EXPLOSION, AND ANY UNSAFE NUCLEAR
ENERGY USES OR ANTI-HUMANITY USAGES. YOU SHOULD UNDERTAKE ALL RESPONSIBILITIES FOR LOSSES OR DAMAGES
RESULTING FROM THE ABOVE USAGES WHATSOEVER.
IN THE EVENT OF ANY CONFLICTS BETWEEN THE ABOVE AND THE APPLICABLE LAW, THE LATER PREVAILS.

Industry Canada ICES-003 Compliance
This device meets the CAN ICES-3 (B)/NMB-3(B) standards requirements.
This device complies with Industry Canada licence-exempt RSS standard(s). Operation is subject to the following two
conditions:
(1) this device may not cause interference, and
(2) this device must accept any interference, including interference that may cause undesired operation of the device.
Le présent appareil est conforme aux CNR d'Industrie Canada applicables aux appareils radioexempts de licence.
L'exploitation est autorisée aux deux conditions suivantes :
(1) l'appareil ne doit pas produire de brouillage, et
(2) l'utilisateur de l'appareil doit accepter tout brouillage radioélectrique subi, même si le brouillage est susceptible d'en
compromettre le fonctionnement.
Under Industry Canada regulations, this radio transmitter may only operate using an antenna of a type and maximum (or
lesser) gain approved for the transmitter by Industry Canada. To reduce potential radio interference to other users, the
antenna type and its gain should be so chosen that the equivalent isotropically radiated power (e.i.r.p.) is not more than
that necessary for successful communication.
Conformément à la réglementation d'Industrie Canada, le présent émetteur radio peut fonctionner avec une antenne d'un
type et d'un gain maximal (ou inférieur) approuvé pour l'émetteur par Industrie Canada. Dans le but de réduire les risques
de brouillage radioélectrique à l'intention des autres utilisateurs, il faut choisir le type d'antenne et son gain de sorte
que la puissance isotrope rayonnée équivalente (p.i.r.e.) ne dépasse pas l'intensité nécessaire à l'établissement d'une
communication satisfaisante.
This equipment should be installed and operated with a minimum distance 20cm between the radiator and your body.
Cet équipement doit être installé et utilisé à une distance minimale de 20 cm entre le radiateur et votre corps.
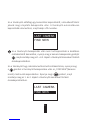
Safety Instruction
CAUTION: THE PRODUCT IS BUILT IN A REPLACEABLE BATTERY. RISK OF EXPLOSION IF
BATTERY IS REPLACED BY AN INCORRECT TYPE. DISPOSE OF USED BATTERIES ACCORDING
TO THE INSTRUCTIONS.
2006/66/EC (battery directive): This product contains a battery that cannot be disposed of as unsorted
municipal waste in the European Union. See the product documentation for specific battery information.
The battery is marked with this symbol, which may include lettering to indicate cadmium (Cd), lead (Pb),
or mercury (Hg). For proper recycling, return the battery to your supplier or to a designated collection
point. For more information see: www.recyclethis.info.

1
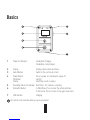
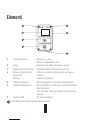
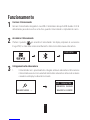
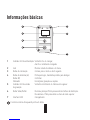
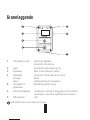
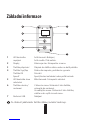
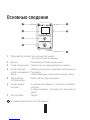
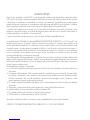
Basics
1
6
3
4
7
2
5
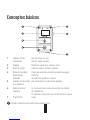
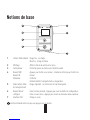
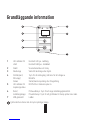
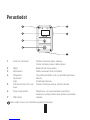
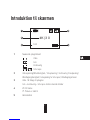
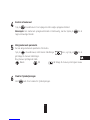
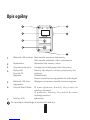
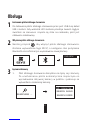
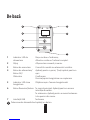
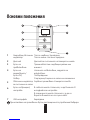
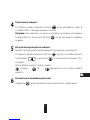
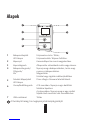
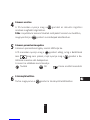
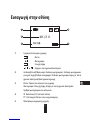
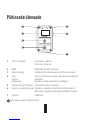
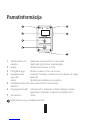
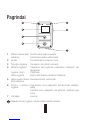
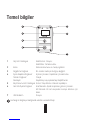
1Power LED Indicator Steady Red: Charging;
Steady Blue: Fully charged.
2Display Display camera status and menu.
3Switch Button Switch to the next mode or item.
4Power Button/
OK Button/
Shutter
Press to power on; Hold down to opwer off.
Confirm
Start/Stop record or capture
5Recording Status LED Indicator Red Flicker: The camera is recording.
6Return/Set Button In Main Menu: Press to enter the setting interface.
In Sub-menu: Press to return to the upper level menu.
7USB Interface Charging
The remote control vibrates when you press any button.

2
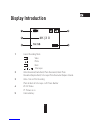
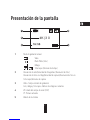
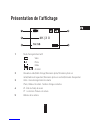
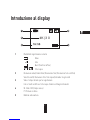
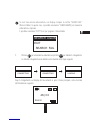
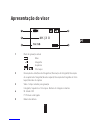
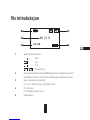
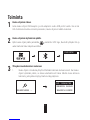
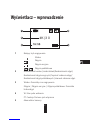
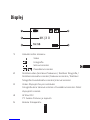
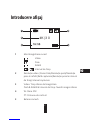
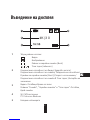
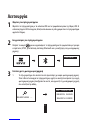
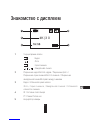
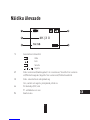
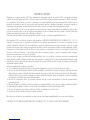
Display Introduction
1
2
3
4
5
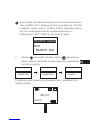
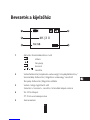
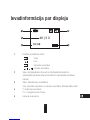
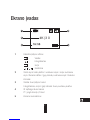
4K |3 0
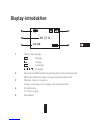
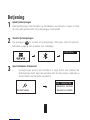
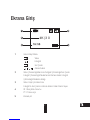
1Current Recording Mode
Video
Photo
Burst
Time Lapse
2Video Resolution|Frame Rate/ Photo Resolution/ Burst Photo
Resolution|Capture Rate/ Time Lapse Photo Resolution|Capture Interval
3Video: Time Left for Recording
Photo & Busrt & Time Lapse: Left Picture Number
4W: FOV Status
PT: Protune is on
5Camera battery
/
1H:58

3
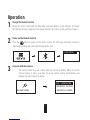
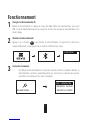
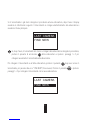
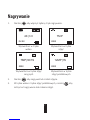
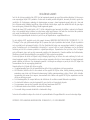
Operation
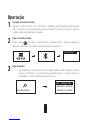
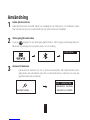
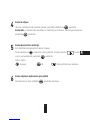
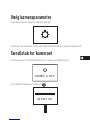
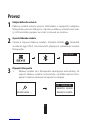
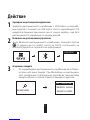
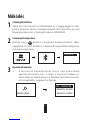
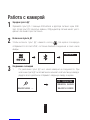
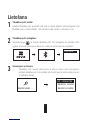
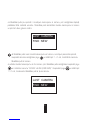
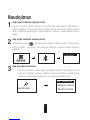
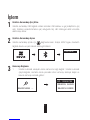
1Charge the Remote Control
Charge the remote control with the USB cable and power adapter via the USB port. The Power
LED Indicator turning steady blue from steady red when the remote control gets fully charged.
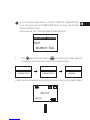
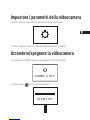
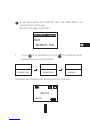
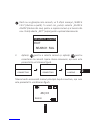
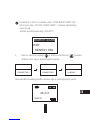
2Power on the Remote Control
Press the button to power on the remote control. The EZVIZ logo, bluetooth connection
status and searching new camera will be displayed in turn.
FIND NEW
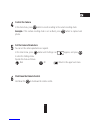
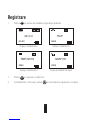
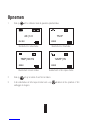
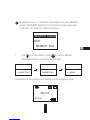
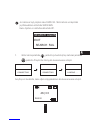
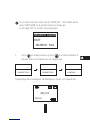
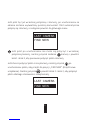
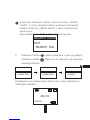
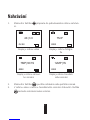
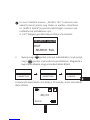
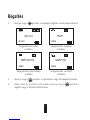
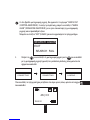
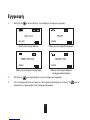
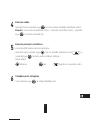
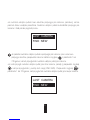
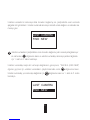
3Connect with the Camera
1. The remote control does not connect with any camera by default. When the remote
control startup, it starts searching the active camera nearby automatically and
displays the found camera on display.
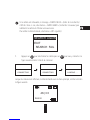
SEARCH AGAIN
SEARCH ENDS
EZ - 123456789
SEARCHING

4
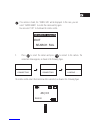
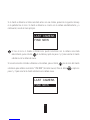
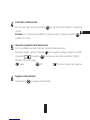
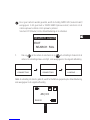
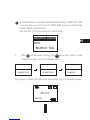
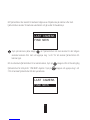
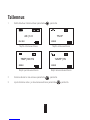
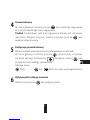
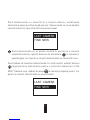
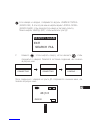
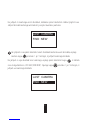
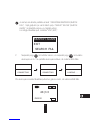
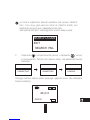
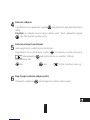
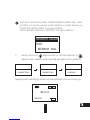
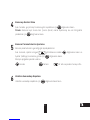
If no camera is found, the “SEARCH FAIL” will be displayed. In this case, you can
select “SEARCH AGAIN” to restart the camera and try again.
You can select “EXIT” to shut down the remote control.
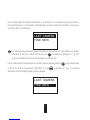
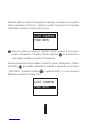
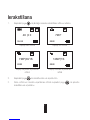
2. Press to select the camera and press to connect to the camera. The
connection status appears, as shown in the following figure.
CONNECTING CONNECTING LOADING
SEARCH AGAIN
EXIT
SEARCH FAIL
The remote control enters the main menu after connected, as shown in the following figure.
4K |3 0
0H:8 8

5
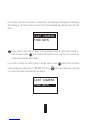
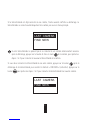
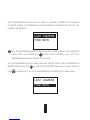
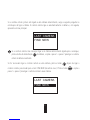
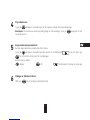
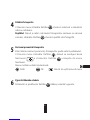
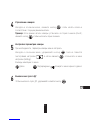
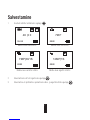
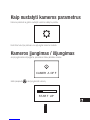
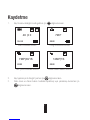
If the remote control has connected to a camera before, the following prompt appears on the display
after starting up. The remote control connects to the camera automatically, and then enters the main
menu.
If your remote control cannot connect to the previously connected camera after starting up,
press the power button of the camera, and repeat the step 1 and step 2 to connect the
remote control with the camera again.
If you need to connect the remote control to another camera, press button after the remote
control starting up to switch to the "FIND NEW" item. Press button, and repeat step 1 and step
2 to connect the remote control with the new camera.
LAST CAMERA
FIND NEW
LAST CAMERA
FIND NEW

6
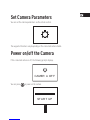
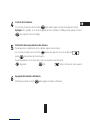
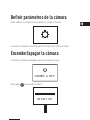
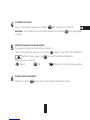
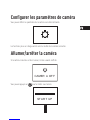
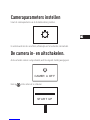
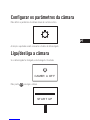
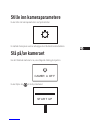
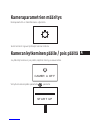
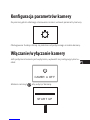
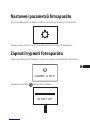
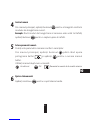
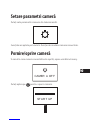
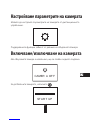
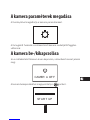
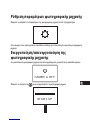
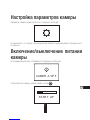
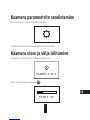
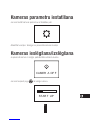
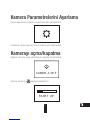
5Set the Camera Parameters
You can set the camera parameters as required.
In the main menu, press button until Settings icon appears, and press
to enter the Settings menu.
Operate the menu as follows:
Next OK Return to the upper level menu
4Control the Camera
In the main menu, press button to record according to the current recording mode.
Example: If the camera recording mode is set as Burst, press button to capture burst
photos.
6Shut Down the Remote Control
Hold down the to shut down the remote control.

7
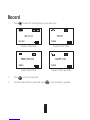
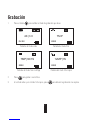
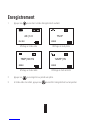
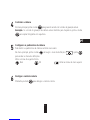
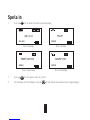
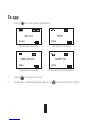
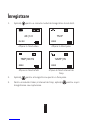
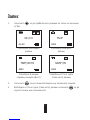
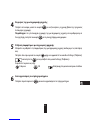
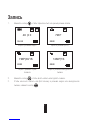
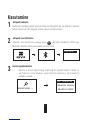
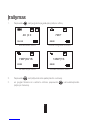
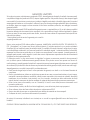
Record
2. Press to record or take photo.
3. For Video mode and Time Lapse mode, press to stop recording or capturing.
1. Press to switch the recording mode to your desired one.
4K |3 0
0H:88
7M P
8888
7MP|30/1S
8888
12MP|1S
8888
Display in Video Mode Display in Photo Mode
Display in Burst Mode Display in Time Lapse Mode


1
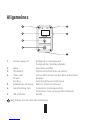
Allgemeines
1
6
3
4
7
2
5
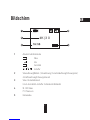
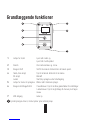
1Stromversorgungs-LED Durchgehend rot: Ladevorgang läuft
Durchgehend blau: Vollständig aufgeladen
2Anzeige Kamerastatus und Menü
3Umschalttaste Wechsel zum nächsten Modus oder Element
4Ein/Aus-Taste/
OK-Taste/
Verschluss
Zum Einschalten drücken; zum Ausschalten gedrückt halten
Bestätigen
Aufzeichnung/Erfassung starten/stoppen
5Aufnahmestatus LED-Anzeige Blinkt rot: Die Kamera zeichnet auf
6Zurück/Einstellung-Taste Im Hauptmenü: Einstellungen aufrufen
Im Untermenü: Zurück zur übergeordneten Menüebene
7USB-Schnittstelle Aufladen
Beim Betätigen einer Taste vibriert die Fernbedienung.

2
Bildschirm
1
2
3
4
5
4K |3 0
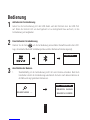
1Aktueller Aufnahmemodus
Video
Foto
Serienbild
Zeitraffer
2Videoauflösung|Bildrate / Fotoauflösung / Serienbildauflösung|Erfassungsrate /
Zeitrafferauflösung|Erfassungsintervall
3Video: Restaufnahmezeit
Foto & Serienbild & Zeitraffer: Verbleibende Bildanzahl
4W: FOV-Status
PT: Protune ein
5Kameraakku
/
1H:58

3
Bedienung
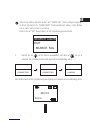
1Aufladen der Fernbedienung
Laden Sie die Fernbedienung mit dem USB-Kabel und dem Netzteil über den USB-Port
auf. Wenn die Kontroll-LED von durchgehend rot zu durchgehend blau wechselt, ist die
Fernbedienung voll aufgeladen.
2Einschalten der Fernbedienung
Drücken Sie die Taste , um die Fernbedienung einzuschalten Daraufhin werden das EZVIZ-
Logo, der aktuelle Bluetooth-Verbindungsstatus und der Kamerasuchmodus angezeigt.
FIND NEW
3Anschließen der Kamera
1. Standardmäßig ist die Fernbedienung nicht mit einer Kamera verbunden. Nach dem
Einschalten startet die Fernbedienung automatisch die Suche nach aktiven Kameras in
der Nähe und zeigt gefundene Kameras an.
SEARCH AGAIN
SEARCH ENDS
EZ - 123456789
SEARCHING

4
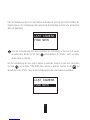
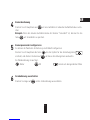
Sollte keine Kamera gefunden werden, wird "SEARCH FAIL" (Suche erfolglos) angezeigt.
In diesem Fall können Sie "SEARCH AGAIN" (Suche wiederholen) wählen, um die Kamera
neu zu starten und es erneut zu versuchen.
Drücken Sie auf "EXIT" (Ausschalten), um die Fernbedienung auszuschalten.
2. Drücken Sie auf , um die Kamera auszuwählen, und dann auf , um sie zu
verbinden. Der Verbindungsstatus wird angezeigt (siehe Abbildung unten).
CONNECTING CONNECTING LOADING
SEARCH AGAIN
EXIT
SEARCH FAIL
Anschließend wechselt die Fernbedienung selbstständig zum Hauptmenü (siehe Abbildung unten).
4K |3 0
0H:8 8

5
Falls die Fernbedienung bereits mit einer Kamera verbunden war, erscheint nach dem Einschalten der
folgende Hinweis. Die Fernbedienung stellt automatisch die Verbindung zur Kamera her und wechselt
dann zum Hauptmenü.
Falls die Fernbedienung nach dem Einschalten die Verbindung zur Kamera nicht wieder
herstellen kann, drücken Sie die Taste und wiederholen die Schritte 1 und 2, um beide
Geräte erneut zu verbinden.
Um die Fernbedienung mit einer anderen Kamera zu verbinden, drücken Sie nach dem Einschalten
die Taste , um zur Option "FIND NEW" (Neue suchen) zu wechseln. Drücken Sie auf und
wiederholen Sie die Schritte 1 und, um die Fernbedienung mit der neuen Kamera zu verbinden.
LAST CAMERA
FIND NEW
LAST CAMERA
FIND NEW

6
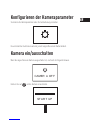
5Kameraparameter konfigurieren
Sie können die Parameter der Kamera je nach Bedarf konfigurieren.
Drücken Sie im Hauptmenü die Taste , bis das Symbol für das Einstellungsmenü
erscheint, und drücken Sie dann auf , um dieses Einstellungsmenü aufzurufen.
Die Menübedienung ist wie folgt:
Weiter OK Zurück zum übergeordneten Menü
4Kamerabedienung
Drücken Sie im Hauptmenü auf , um eine Aufnahme im aktuellen Aufnahmemodus zuma-
chen.
Beispiel: Wenn der aktuelle Aufnahmemodus der Kamera "Serienbild" ist, drücken Sie die
Taste , um Serienbilder zu speichern.
6Fernbedienung ausschalten
Drücken Sie lange auf , um die Fernbedienung auszuschalten.

7
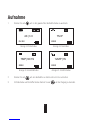
Aufnahme
2. Drücken Sie auf , um eine Aufnahme zu starten oder ein Foto zu machen.
3. Im Videomodus und Zeitraffermodus drücken Sie auf , um den Vorgang zu beenden.
1. Drücken Sie auf , um in den gewünschten Aufnahmemodus zu wechseln.
4K |3 0
0H:88
7M P
8888
7MP|30/1S
8888
12MP|1S
8888
Anzeige im Videomodus Anzeige im Fotomodus
Anzeige im Serienbildmodus Anzeige im Zeitraffermodus
Pagina se încarcă...
Pagina se încarcă...
Pagina se încarcă...
Pagina se încarcă...
Pagina se încarcă...
Pagina se încarcă...
Pagina se încarcă...
Pagina se încarcă...
Pagina se încarcă...
Pagina se încarcă...
Pagina se încarcă...
Pagina se încarcă...
Pagina se încarcă...
Pagina se încarcă...
Pagina se încarcă...
Pagina se încarcă...
Pagina se încarcă...
Pagina se încarcă...
Pagina se încarcă...
Pagina se încarcă...
Pagina se încarcă...
Pagina se încarcă...
Pagina se încarcă...
Pagina se încarcă...
Pagina se încarcă...
Pagina se încarcă...
Pagina se încarcă...
Pagina se încarcă...
Pagina se încarcă...
Pagina se încarcă...
Pagina se încarcă...
Pagina se încarcă...
Pagina se încarcă...
Pagina se încarcă...
Pagina se încarcă...
Pagina se încarcă...
Pagina se încarcă...
Pagina se încarcă...
Pagina se încarcă...
Pagina se încarcă...
Pagina se încarcă...
Pagina se încarcă...
Pagina se încarcă...
Pagina se încarcă...
Pagina se încarcă...
Pagina se încarcă...
Pagina se încarcă...
Pagina se încarcă...
Pagina se încarcă...
Pagina se încarcă...
Pagina se încarcă...
Pagina se încarcă...
Pagina se încarcă...
Pagina se încarcă...
Pagina se încarcă...
Pagina se încarcă...
Pagina se încarcă...
Pagina se încarcă...
Pagina se încarcă...
Pagina se încarcă...
Pagina se încarcă...
Pagina se încarcă...
Pagina se încarcă...
Pagina se încarcă...
Pagina se încarcă...
Pagina se încarcă...
Pagina se încarcă...
Pagina se încarcă...
Pagina se încarcă...
Pagina se încarcă...
Pagina se încarcă...
Pagina se încarcă...
Pagina se încarcă...
Pagina se încarcă...
Pagina se încarcă...
Pagina se încarcă...
Pagina se încarcă...
Pagina se încarcă...
Pagina se încarcă...
Pagina se încarcă...
Pagina se încarcă...
Pagina se încarcă...
Pagina se încarcă...
Pagina se încarcă...
Pagina se încarcă...
Pagina se încarcă...
Pagina se încarcă...
Pagina se încarcă...
Pagina se încarcă...
Pagina se încarcă...
Pagina se încarcă...
Pagina se încarcă...
Pagina se încarcă...
Pagina se încarcă...
Pagina se încarcă...
Pagina se încarcă...
Pagina se încarcă...
Pagina se încarcă...
Pagina se încarcă...
Pagina se încarcă...
Pagina se încarcă...
Pagina se încarcă...
Pagina se încarcă...
Pagina se încarcă...
Pagina se încarcă...
Pagina se încarcă...
Pagina se încarcă...
Pagina se încarcă...
Pagina se încarcă...
Pagina se încarcă...
Pagina se încarcă...
Pagina se încarcă...
Pagina se încarcă...
Pagina se încarcă...
Pagina se încarcă...
Pagina se încarcă...
Pagina se încarcă...
Pagina se încarcă...
Pagina se încarcă...
Pagina se încarcă...
Pagina se încarcă...
Pagina se încarcă...
Pagina se încarcă...
Pagina se încarcă...
Pagina se încarcă...
Pagina se încarcă...
Pagina se încarcă...
Pagina se încarcă...
Pagina se încarcă...
Pagina se încarcă...
Pagina se încarcă...
Pagina se încarcă...
Pagina se încarcă...
Pagina se încarcă...
Pagina se încarcă...
Pagina se încarcă...
Pagina se încarcă...
Pagina se încarcă...
Pagina se încarcă...
Pagina se încarcă...
Pagina se încarcă...
Pagina se încarcă...
Pagina se încarcă...
Pagina se încarcă...
Pagina se încarcă...
Pagina se încarcă...
Pagina se încarcă...
Pagina se încarcă...
Pagina se încarcă...
Pagina se încarcă...
Pagina se încarcă...
Pagina se încarcă...
Pagina se încarcă...
Pagina se încarcă...
Pagina se încarcă...
Pagina se încarcă...
Pagina se încarcă...
Pagina se încarcă...
Pagina se încarcă...
Pagina se încarcă...
Pagina se încarcă...
Pagina se încarcă...
Pagina se încarcă...
Pagina se încarcă...
Pagina se încarcă...
Pagina se încarcă...
Pagina se încarcă...
Pagina se încarcă...
Pagina se încarcă...
Pagina se încarcă...
Pagina se încarcă...
Pagina se încarcă...
Pagina se încarcă...
Pagina se încarcă...
Pagina se încarcă...
Pagina se încarcă...
Pagina se încarcă...
Pagina se încarcă...
Pagina se încarcă...
Pagina se încarcă...
Pagina se încarcă...
Pagina se încarcă...
Pagina se încarcă...
Pagina se încarcă...
-
 1
1
-
 2
2
-
 3
3
-
 4
4
-
 5
5
-
 6
6
-
 7
7
-
 8
8
-
 9
9
-
 10
10
-
 11
11
-
 12
12
-
 13
13
-
 14
14
-
 15
15
-
 16
16
-
 17
17
-
 18
18
-
 19
19
-
 20
20
-
 21
21
-
 22
22
-
 23
23
-
 24
24
-
 25
25
-
 26
26
-
 27
27
-
 28
28
-
 29
29
-
 30
30
-
 31
31
-
 32
32
-
 33
33
-
 34
34
-
 35
35
-
 36
36
-
 37
37
-
 38
38
-
 39
39
-
 40
40
-
 41
41
-
 42
42
-
 43
43
-
 44
44
-
 45
45
-
 46
46
-
 47
47
-
 48
48
-
 49
49
-
 50
50
-
 51
51
-
 52
52
-
 53
53
-
 54
54
-
 55
55
-
 56
56
-
 57
57
-
 58
58
-
 59
59
-
 60
60
-
 61
61
-
 62
62
-
 63
63
-
 64
64
-
 65
65
-
 66
66
-
 67
67
-
 68
68
-
 69
69
-
 70
70
-
 71
71
-
 72
72
-
 73
73
-
 74
74
-
 75
75
-
 76
76
-
 77
77
-
 78
78
-
 79
79
-
 80
80
-
 81
81
-
 82
82
-
 83
83
-
 84
84
-
 85
85
-
 86
86
-
 87
87
-
 88
88
-
 89
89
-
 90
90
-
 91
91
-
 92
92
-
 93
93
-
 94
94
-
 95
95
-
 96
96
-
 97
97
-
 98
98
-
 99
99
-
 100
100
-
 101
101
-
 102
102
-
 103
103
-
 104
104
-
 105
105
-
 106
106
-
 107
107
-
 108
108
-
 109
109
-
 110
110
-
 111
111
-
 112
112
-
 113
113
-
 114
114
-
 115
115
-
 116
116
-
 117
117
-
 118
118
-
 119
119
-
 120
120
-
 121
121
-
 122
122
-
 123
123
-
 124
124
-
 125
125
-
 126
126
-
 127
127
-
 128
128
-
 129
129
-
 130
130
-
 131
131
-
 132
132
-
 133
133
-
 134
134
-
 135
135
-
 136
136
-
 137
137
-
 138
138
-
 139
139
-
 140
140
-
 141
141
-
 142
142
-
 143
143
-
 144
144
-
 145
145
-
 146
146
-
 147
147
-
 148
148
-
 149
149
-
 150
150
-
 151
151
-
 152
152
-
 153
153
-
 154
154
-
 155
155
-
 156
156
-
 157
157
-
 158
158
-
 159
159
-
 160
160
-
 161
161
-
 162
162
-
 163
163
-
 164
164
-
 165
165
-
 166
166
-
 167
167
-
 168
168
-
 169
169
-
 170
170
-
 171
171
-
 172
172
-
 173
173
-
 174
174
-
 175
175
-
 176
176
-
 177
177
-
 178
178
-
 179
179
-
 180
180
-
 181
181
-
 182
182
-
 183
183
-
 184
184
-
 185
185
-
 186
186
-
 187
187
-
 188
188
-
 189
189
-
 190
190
-
 191
191
-
 192
192
-
 193
193
-
 194
194
-
 195
195
-
 196
196
-
 197
197
-
 198
198
-
 199
199
-
 200
200
-
 201
201
-
 202
202
-
 203
203
-
 204
204


Alte documente
-
Nedis SEC-SETDVR40 Manual de utilizare
-
Konig Electronic SEC-DVRWCA10 Manualul proprietarului
-
Yamaha DVD-S510 Manualul proprietarului
-
ELRO DVR151S Manualul proprietarului
-
LG LMG900EM.ASWCAW Manual de utilizare
-
Yamaha MCR-840 Manualul proprietarului
-
LG Série Velvet 5G Instrucțiuni de utilizare
-
BABYMOOV TWEESTY BOY A015022TWEESTY GIRL A015021 Manualul proprietarului