Philips HX6870/47 Manual de utilizare
- Categorie
- Periuțe de dinți electrice
- Tip
- Manual de utilizare
Acest manual este potrivit și pentru

ProtectiveClean
6100
EN: User manual
RU: Руководство пользователя
KZ: Пайдаланушы нұсқаулығы


1
2
11
4
3
5
6
7
8
9
10
1


English
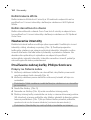
Important
Read this user manual carefully before you use the appliance and
save it for future reference.
Danger
-
Keep the charger away from water. Do not
place or store it over or near water
contained in a bathtub, washbasin, sink etc.
Do not immerse the charger in water or any
other liquid. After cleaning, make sure the
charger is completely dry before you
connect it to the mains.
Warning
-
The mains cord cannot be replaced. If the
mains cord is damaged, discard the charger.
-
Always have the charger replaced with one
of the original type in order to avoid a
hazard.
-
Do not use the charger outdoors or near
heated surfaces.
6
English

-
If the appliance is damaged in any way
(brush head, toothbrush handle or charger),
stop using it. This appliance contains no
serviceable parts. If the appliance is
damaged, contact the Consumer Care
Center in your country (see chapter
'Warranty and support').
-
This appliance can be used by children and
persons with reduced physical, sensory or
mental capabilities or lack of experience
and knowledge if they have been given
supervision or instruction concerning use of
the appliance in a safe way and understand
the hazards involved. Cleaning and user
maintenance shall not be made by children
without supervision.
-
Children shall not play with the appliance.
Caution
-
Do not clean the brush head, the handle or
the charger in the dishwasher.
-
If you have had oral or gum surgery in the
previous 2 months, consult your dentist
before you use the toothbrush.
7
English

-
Consult your dentist if excessive bleeding
occurs after using this toothbrush or if
bleeding continues to occur after 1 week of
use. Also consult your dentist if you
experience discomfort or pain when you use
the Philips Sonicare.
-
The Philips Sonicare toothbrush complies
with the safety standards for
electromagnetic devices. If you have a
pacemaker or other implanted device,
contact your physician or the device
manufacturer of the implanted device prior
to use.
-
If you have medical concerns, consult your
doctor before you use the Philips Sonicare.
-
This appliance has only been designed for
cleaning teeth, gums and tongue. Do not
use it for any other purpose. Stop using the
appliance and contact your doctor if you
experience any discomfort or pain.
8
English

-
The Philips Sonicare toothbrush is a
personal care device and is not intended for
use on multiple patients in a dental practice
or institution.
-
Stop using a brush head with crushed or
bent bristles. Replace the brush head every
3 months or sooner if signs of wear appear.
Do not use other brush heads than the ones
recommended by the manufacturer.
-
If your toothpaste contains peroxide, baking
soda or bicarbonate (common in whitening
toothpastes), thoroughly clean the brush
head with soap and water after each use.
This prevents possible cracking of the
plastic.
Electromagnetic fields (EMF)
This Philips appliance complies with all applicable standards and
regulations regarding exposure to electromagnetic fields.
Radio Equipment Directive
- Radio Equipment in this product operates at 13.56 MHz
- Maximum RF power transmitted by the Radio Equipment is
30.16dBm
Introduction
Congratulations on your purchase and welcome to Philips! To fully
benefit from the support that Philips offers, register your product at
www.philips.com/welcome.
9
English

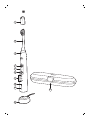
Your Philips Sonicare (Fig. 1)
1 Hygienic travel cap
2 Smart brush head(s)*
3 Handle
4 Power on/off button
5 Intensity light
6 Mode/intensity button
7 Mode light
8 Brush head replacement reminder light
9 Battery indication
10 Charging base
11 Travel case (specific types only)*
*Note: The content of the box may vary based on the model
purchased.
Brush heads
Your Philips Sonicare comes with one or more brush heads which are
designed to deliver superior results for your oral care needs.
Philips Sonicare BrushSync Technology
Your brush head(s) are enabled with BrushSync technology. This
technology enables 2 features with this toothbrush:
1 Brush head mode pairing (see 'Features and Accessories')
2 Brush head replacement reminder (see 'Features and Accessories')
This symbol indicates the brush head is equipped with BrushSync
technology. (Fig. 2)
Brushing modes
Your power toothbrush is equipped with 3 different modes to
accommodate all your oral care needs.
To change modes, press the mode/intensity button while the
toothbrush is off.
The following modes are available:
10
English

Clean mode
Clean is a 2-minute mode, recommended to be used with intensity
level 3. It gives you a thorough and complete clean and is
recommended to be used with the C2 Optimal Plaque Control brush
head.
White mode
White is a 2-minute 30-seconds mode, recommended to be used
with intensity level 3 and the W2 Optimal White brush head.
Gum Care mode
Gum Care is a 3-minute mode, recommended to be used with
intensity level 3 and the G2 Optimal Gum Care brush head.
Intensity settings
Your power toothbrush gives you the option to choose between 3
different intensity levels: low, medium and high. (Fig. 3) Based on the
brush head you attach, the intensity will be selected. The intensity
can be changed by pressing the mode/intensity button while
brushing. For optimal results it is recommended to use the
automatically selected intensity. The intensity cannot be changed as
long as the handle is powered off or paused.
Using your Philips Sonicare
Brushing instructions
1 Press the brush head onto the handle in such a way that the
bristles will face the front of the handle. (Fig. 4)
2 Firmly press the brush head down onto the metal shaft until it
stops.
Note: It is normal to see a slight gap between the brush head and
the handle.
3 Wet the bristles. (Fig. 5)
4 Apply a small amount of toothpaste on the bristles. (Fig. 6)
11
English

5 Place the toothbrush bristles against the teeth at a slight angle (45
degrees), pressing firmly to make the bristles reach the gumline or
slightly beneath the gumline. (Fig. 7) A change in vibration (and a
slight change in sound) alerts you when you apply too much
pressure while brushing.
Note: Keep the center of the brush in contact with the teeth at all
times.
6 Press the power on/off button to turn on the Philips Sonicare. (Fig.
8)
7 Gently keep the bristles placed on the teeth and in the gumline.
Brush your teeth with small back and forth motion so the bristles
reach between the teeth. (Fig. 9)
Note: The bristles should slightly flare. Do not scrub.
8 To clean the inside surfaces of the front teeth, tilt the brush handle
semi-upright and make several vertical overlapping brushing
strokes on each tooth. (Fig. 10)
9 To make sure you brush evenly throughout the mouth, divide the
mouth into 4 sections using the Quadpacer feature. (Fig. 11) The
quadpacer feature beeps after 30 seconds.
10 Brush for the full 2 minutes following the Quadpacer. (Fig. 12) After
2 minutes, the toothbrush will automatically shut off.
In white mode, after 2 minutes the handle will continue to brush
for 30 seconds so that you can brighten and polish your front
teeth.
In gum care mode, after 2 minutes the handle will continue to
brush for an additional minute so you can gently stimulate and
massage your gums.
- After you have completed the brushing cycle, you can spend
additional time brushing the chewing surfaces of your teeth and
areas where staining occurs. (Fig. 13)
Your Philips Sonicare toothbrush is safe to use on:
- Braces (brush heads wear out sooner when used on braces)
- Dental restorations (fillings, crowns, veneers)
12
English

Note: When the Philips Sonicare toothbrush is used in clinical studies,
it must be used in the Clean mode (for plaque and gum health claims)
or in White mode (for whitening claims) at high intensity with
EasyStart turned off.
Features
- EasyStart
- Brush head replacement reminder
- Pressure sensor
- Brush head mode pairing
- Quadpacer
Easy-start
This Philips Sonicare model comes with the EasyStart feature
deactivated. The EasyStart feature gently increases the power over
the first 14 brushings to help you get used to the brushing with the
Philips Sonicare. The EasyStart feature works in all modes.
To activate EasyStart see 'Activating or deactivating features'.
Brush head replacement reminder
Your Philips Sonicare is equipped with BrushSync technology that
tracks the wear of your brush head. (Fig. 14)
1 When attaching a new smart brush head for the first time the
brush head replacement reminder light blinks green three times.
This confirms you have a Philips brush head with BrushSync
technology.
2 Over time, based on the pressure you apply and the amount of
time used, the handle will track brush head wear in order to
determine the optimal time to change your brush head. This
feature gives you the guarantee for the best cleaning and care of
your teeth.
3 When the brush head replacement reminder light lights up amber,
you should replace your brush head.
To deactivate the brush head replacement reminder see 'Activating or
deactivating features'.
13
English

Pressure sensor
Your Philips Sonicare is equipped with an advanced sensor that
measures the pressure you apply while brushing. If you apply too
much pressure, the toothbrush will provide immediate feedback to
indicate that you need to reduce the pressure. This feedback is given
by a change in vibration and therefore brushing sensation.
To deactivate the pressure sensor see 'Activating or deactivating
features'.
Brush head mode pairing
An RFID chip inside the brush head communicates with the
toothbrush handle. When you attach a brush head, the handle
automatically recognizes the brush head and selects the right mode
and intensity level to optimize your brushing performance.
Quadpacer
The Quadpacer is an interval timer that has a short beep and pause
to remind you to brush the different sections of your mouth.
Depending on the brushing mode you have selected (see 'Brushing
modes'), the Quadpacer beeps at different intervals during the
brushing cycle.
Activating or deactivating features
You can activate or deactivate the following features of your
toothbrush:
- EasyStart
- Brush head replacement reminder
- Pressure sensor
To activate or deactivate these features, follow the instructions
below:
EasyStart
1 Put the handle on the plugged-in charger.
2 Press and hold the power on/off button while the handle remains
on the charger.
14
English

3 Keep the power on/off button pressed until you hear a single
short beep (after 2 seconds).
4 Release the power on/off button.
-
Triple tone of low-med-high means the EasyStart feature has
been activated. The brush head replacement light and battery
light will also blink green 3 times in unison to confirm activation.
-
Triple tone of high-med-low means the EasyStart feature has
been deactivated. The brush head replacement light and
battery light will also blink amber 3 times in unison to confirm
deactivation.
Note: To achieve clinical efficacy, EasyStart needs to be deactivated.
Brush head replacement reminder
1 Put the handle on the plugged-in charger.
2 Press and hold the power on/off button while the handle remains
on the charger.
3 Keep the power on/off button pressed until you hear a series of
two short beeps (after 4-5 seconds).
4 Release the power on/off button.
-
Triple tone of low-med-high means the Brush head
replacement reminder feature has been activated. The brush
head replacement light and battery light will also blink green 3
times in unison to confirm activation.
-
Triple tone of high-med-low means the Brush head
replacement reminder feature has been deactivated. The brush
head replacement light and battery light will also blink amber 3
times in unison to confirm deactivation.
Pressure sensor
1 Put the handle on the plugged-in charger.
2 Press and hold the power on/off button while the handle remains
on the charger.
3 Keep the power on/off button pressed until you hear a series of
three short beeps (after 6-7 seconds).
4 Release the power on/off button.
15
English

-
Triple tone of low-med-high means the pressure sensor feature
has been activated. The brush head replacement light and
battery light will also blink green 3 times in unison to confirm
activation.
-
Triple tone of high-med-low means the pressure sensor feature
has been deactivated. The brush head replacement light and
battery light will also blink amber 3 times in unison to confirm
deactivation.
If you continue holding the power on/off button after the three short
beeps, the activate/deactivate sequence repeats.
Battery status and charging
1 Put the plug of the charger in an electrical outlet.
2 Place the handle on the charger.
-
The charger will emit 2 short beeps to confirm that the handle is
placed properly.
-
The flashing light of the battery level indicator shows that the
toothbrush is charging.
-
When handle is fully charged on the charger, the battery light
shows solid green for 30 seconds and switches off.
Note: Your toothbrush comes pre-charged for first use. After first use,
charge for at least 24 hours.
Battery status (when handle is not on charger)
When removing the Philips Sonicare from the charger, the battery
light at the bottom of the toothbrush will indicate the status of the
battery life.
- Solid green LED: full battery
- Flashing green LED: medium battery
- Flashing amber LED and three beeps: low battery
- Flashing amber LED and two sets of five beeps: No brushing
sessions left (charge toothbrush)
16
English

Cleaning
Note: Do not clean the brush head, handle or travel case in the
dishwasher.
Toothbrush handle
1 Remove the brush head and rinse the metal shaft area with warm
water. Make sure you remove any residual toothpaste (Fig. 15).
Note: Do not push on the rubber seal on the metal shaft with
sharp objects, as this may cause damage.
2 Wipe the entire surface of the handle with a damp cloth.
Note: Do not use isopropyl rubbing alcohol, vinegar or bleach to
clean handle as this may cause discoloration.
Brush head
1 Rinse the brush head and bristles after each use (Fig. 16).
2 Remove the brush head from the handle and rinse the brush head
connection with warm water at least once a week.
Charger
1 Unplug the charger before you clean it.
2 Wipe the surface of the charger with a damp cloth.
Storage
If you are not going to use your Philips Sonicare for an extended
period of time, unplug the charger from the wall socket, clean it and
store it in a cool and dry place away from direct sunlight.
Locating the model number
Look on the bottom of the Philips Sonicare toothbrush handle for the
model number (HX684x/HX685x).
Recycling
- This symbol means that this product shall not be disposed of with
normal household waste (2012/19/EU) (Fig. 25).
17
English

- This symbol means that this product contains a built-in
rechargeable battery which shall not be disposed of with normal
household waste (Fig. 26) (2006/66/EC). Please take your product
to an official collection point or a Philips service center to have a
professional remove the rechargeable battery.
- Follow your country’s rules for the separate collection of electrical
and electronic products and rechargeable batteries. Correct
disposal helps prevent negative consequences for the
environment and human health.
Removing the rechargeable battery
Warning: Only remove the rechargeable battery when you discard the
appliance. Make sure the battery is completely empty when you
remove it.
To remove the rechargeable battery, you need a towel or cloth, a
hammer and a flat-head (standard) screwdriver. Observe basic safety
precautions when you follow the procedure outlined below. Be sure
to protect your eyes, hands, fingers, and the surface on which you
work.
1 To deplete the rechargeable battery of any charge, remove the
handle from the charger, turn on the Philips Sonicare and let it run
until it stops. Repeat this step until you can no longer turn on the
Philips Sonicare.
2 Remove and discard the brush head. Cover the entire handle with
a towel or cloth (Fig. 17).
3 Hold the top of the handle with one hand and strike the handle
housing 0.5 inch above the bottom end. Strike firmly with a
hammer on all 4 sides to eject the end cap (Fig. 18).
Note: You may have to hit on the end several times to break the
internal snap connections.
4 Remove the end cap from the toothbrush handle. If the end cap
does not release easily from the housing, repeat step 3 until the
end cap is released (Fig. 19).
18
English

5 Holding the handle upside down, press the shaft down on a hard
surface. If the internal components do not easily release from the
housing, repeat step 3 until the internal components are released
(Fig. 20).
6 Remove the rubber battery cover.
7 Wedge the screwdriver between the battery and the black frame
at the bottom of the internal components. Then pry the
screwdriver away from the battery to break the bottom of the
black frame (Fig. 21).
8 Insert the screwdriver between the bottom of the battery and the
black frame to break the metal tab connecting the battery to the
green printed circuit board. This will release the bottom end of the
battery from the frame (Fig. 22).
9 Grab the battery and pull it away from the internal components to
break the second metal battery tab (Fig. 23).
Caution: Be aware of the sharp edges of the battery tabs so as to
avoid injury to your fingers.
10 Cover the battery contacts with tape to prevent any electrical short
from residual battery charge. The rechargeable battery can now be
recycled and the rest of the product discarded appropriately (Fig.
24).
Warranty and support
If you need information or support, please visit
www.philips.com/support or read the international warranty leaflet.
Warranty restrictions
The terms of the international warranty do not cover the following:
- Brush heads.
- Damage caused by use of unauthorized replacement parts.
- Damage caused by misuse, abuse, neglect, alterations or
unauthorized repair.
- Normal wear and tear, including chips, scratches, abrasions,
discoloration or fading.
19
English

Čeština
Důležité
Před použitím přístroje si pečlivě přečtěte tuto uživatelskou příručku a
uschovejte ji pro budoucí použití.
Nebezpečí
-
Chraňte nabíječku před kontaktem svodou.
Nepokládejte a neuskladňujte nabíječku
vblízkosti vody, například u vany
snapuštěnou vodou, umyvadla, dřezu apod.
Neponořujte nabíječku do vody ani jiné
kapaliny. Před připojením nabíječky
knapájení se ujistěte, že je po čištění zcela
suchá.
Varování
-
Napájecí kabel nelze vyměnit. Pokud je
napájecí kabel poškozen, je nutné vyřadit
nabíječku zprovozu.
-
Nabíječku nechte vždy vyměnit za originální
typ, aby nevzniklo žádné riziko.
-
Nepoužívejte nabíječku venku aniblízko
horkých povrchů.
20
Čeština
Pagina se încarcă...
Pagina se încarcă...
Pagina se încarcă...
Pagina se încarcă...
Pagina se încarcă...
Pagina se încarcă...
Pagina se încarcă...
Pagina se încarcă...
Pagina se încarcă...
Pagina se încarcă...
Pagina se încarcă...
Pagina se încarcă...
Pagina se încarcă...
Pagina se încarcă...
Pagina se încarcă...
Pagina se încarcă...
Pagina se încarcă...
Pagina se încarcă...
Pagina se încarcă...
Pagina se încarcă...
Pagina se încarcă...
Pagina se încarcă...
Pagina se încarcă...
Pagina se încarcă...
Pagina se încarcă...
Pagina se încarcă...
Pagina se încarcă...
Pagina se încarcă...
Pagina se încarcă...
Pagina se încarcă...
Pagina se încarcă...
Pagina se încarcă...
Pagina se încarcă...
Pagina se încarcă...
Pagina se încarcă...
Pagina se încarcă...
Pagina se încarcă...
Pagina se încarcă...
Pagina se încarcă...
Pagina se încarcă...
Pagina se încarcă...
Pagina se încarcă...
Pagina se încarcă...
Pagina se încarcă...
Pagina se încarcă...
Pagina se încarcă...
Pagina se încarcă...
Pagina se încarcă...
Pagina se încarcă...
Pagina se încarcă...
Pagina se încarcă...
Pagina se încarcă...
Pagina se încarcă...
Pagina se încarcă...
Pagina se încarcă...
Pagina se încarcă...
Pagina se încarcă...
Pagina se încarcă...
Pagina se încarcă...
Pagina se încarcă...
Pagina se încarcă...
Pagina se încarcă...
Pagina se încarcă...
Pagina se încarcă...
Pagina se încarcă...
Pagina se încarcă...
Pagina se încarcă...
Pagina se încarcă...
Pagina se încarcă...
Pagina se încarcă...
Pagina se încarcă...
Pagina se încarcă...
Pagina se încarcă...
Pagina se încarcă...
Pagina se încarcă...
Pagina se încarcă...
Pagina se încarcă...
Pagina se încarcă...
Pagina se încarcă...
Pagina se încarcă...
Pagina se încarcă...
Pagina se încarcă...
Pagina se încarcă...
Pagina se încarcă...
Pagina se încarcă...
Pagina se încarcă...
Pagina se încarcă...
Pagina se încarcă...
Pagina se încarcă...
Pagina se încarcă...
Pagina se încarcă...
Pagina se încarcă...
Pagina se încarcă...
Pagina se încarcă...
Pagina se încarcă...
Pagina se încarcă...
Pagina se încarcă...
Pagina se încarcă...
Pagina se încarcă...
Pagina se încarcă...
Pagina se încarcă...
Pagina se încarcă...
Pagina se încarcă...
Pagina se încarcă...
Pagina se încarcă...
Pagina se încarcă...
Pagina se încarcă...
Pagina se încarcă...
Pagina se încarcă...
Pagina se încarcă...
Pagina se încarcă...
Pagina se încarcă...
Pagina se încarcă...
Pagina se încarcă...
Pagina se încarcă...
Pagina se încarcă...
Pagina se încarcă...
Pagina se încarcă...
Pagina se încarcă...
Pagina se încarcă...
Pagina se încarcă...
Pagina se încarcă...
Pagina se încarcă...
Pagina se încarcă...
Pagina se încarcă...
Pagina se încarcă...
Pagina se încarcă...
Pagina se încarcă...
Pagina se încarcă...
Pagina se încarcă...
Pagina se încarcă...
Pagina se încarcă...
Pagina se încarcă...
Pagina se încarcă...
Pagina se încarcă...
Pagina se încarcă...
Pagina se încarcă...
Pagina se încarcă...
Pagina se încarcă...
Pagina se încarcă...
Pagina se încarcă...
Pagina se încarcă...
Pagina se încarcă...
Pagina se încarcă...
Pagina se încarcă...
Pagina se încarcă...
Pagina se încarcă...
Pagina se încarcă...
Pagina se încarcă...
Pagina se încarcă...
Pagina se încarcă...
Pagina se încarcă...
Pagina se încarcă...
Pagina se încarcă...
Pagina se încarcă...
Pagina se încarcă...
Pagina se încarcă...
Pagina se încarcă...
Pagina se încarcă...
Pagina se încarcă...
Pagina se încarcă...
Pagina se încarcă...
Pagina se încarcă...
Pagina se încarcă...
Pagina se încarcă...
Pagina se încarcă...
Pagina se încarcă...
Pagina se încarcă...
Pagina se încarcă...
Pagina se încarcă...
Pagina se încarcă...
Pagina se încarcă...
Pagina se încarcă...
Pagina se încarcă...
Pagina se încarcă...
Pagina se încarcă...
Pagina se încarcă...
Pagina se încarcă...
Pagina se încarcă...
Pagina se încarcă...
Pagina se încarcă...
Pagina se încarcă...
Pagina se încarcă...
Pagina se încarcă...
Pagina se încarcă...
Pagina se încarcă...
Pagina se încarcă...
Pagina se încarcă...
Pagina se încarcă...
Pagina se încarcă...
Pagina se încarcă...
Pagina se încarcă...
Pagina se încarcă...
Pagina se încarcă...
Pagina se încarcă...
Pagina se încarcă...
Pagina se încarcă...
Pagina se încarcă...
Pagina se încarcă...
Pagina se încarcă...
Pagina se încarcă...
Pagina se încarcă...
Pagina se încarcă...
Pagina se încarcă...
Pagina se încarcă...
Pagina se încarcă...
Pagina se încarcă...
Pagina se încarcă...
Pagina se încarcă...
Pagina se încarcă...
Pagina se încarcă...
Pagina se încarcă...
Pagina se încarcă...
Pagina se încarcă...
Pagina se încarcă...
Pagina se încarcă...
Pagina se încarcă...
Pagina se încarcă...
Pagina se încarcă...
Pagina se încarcă...
Pagina se încarcă...
Pagina se încarcă...
Pagina se încarcă...
Pagina se încarcă...
-
 1
1
-
 2
2
-
 3
3
-
 4
4
-
 5
5
-
 6
6
-
 7
7
-
 8
8
-
 9
9
-
 10
10
-
 11
11
-
 12
12
-
 13
13
-
 14
14
-
 15
15
-
 16
16
-
 17
17
-
 18
18
-
 19
19
-
 20
20
-
 21
21
-
 22
22
-
 23
23
-
 24
24
-
 25
25
-
 26
26
-
 27
27
-
 28
28
-
 29
29
-
 30
30
-
 31
31
-
 32
32
-
 33
33
-
 34
34
-
 35
35
-
 36
36
-
 37
37
-
 38
38
-
 39
39
-
 40
40
-
 41
41
-
 42
42
-
 43
43
-
 44
44
-
 45
45
-
 46
46
-
 47
47
-
 48
48
-
 49
49
-
 50
50
-
 51
51
-
 52
52
-
 53
53
-
 54
54
-
 55
55
-
 56
56
-
 57
57
-
 58
58
-
 59
59
-
 60
60
-
 61
61
-
 62
62
-
 63
63
-
 64
64
-
 65
65
-
 66
66
-
 67
67
-
 68
68
-
 69
69
-
 70
70
-
 71
71
-
 72
72
-
 73
73
-
 74
74
-
 75
75
-
 76
76
-
 77
77
-
 78
78
-
 79
79
-
 80
80
-
 81
81
-
 82
82
-
 83
83
-
 84
84
-
 85
85
-
 86
86
-
 87
87
-
 88
88
-
 89
89
-
 90
90
-
 91
91
-
 92
92
-
 93
93
-
 94
94
-
 95
95
-
 96
96
-
 97
97
-
 98
98
-
 99
99
-
 100
100
-
 101
101
-
 102
102
-
 103
103
-
 104
104
-
 105
105
-
 106
106
-
 107
107
-
 108
108
-
 109
109
-
 110
110
-
 111
111
-
 112
112
-
 113
113
-
 114
114
-
 115
115
-
 116
116
-
 117
117
-
 118
118
-
 119
119
-
 120
120
-
 121
121
-
 122
122
-
 123
123
-
 124
124
-
 125
125
-
 126
126
-
 127
127
-
 128
128
-
 129
129
-
 130
130
-
 131
131
-
 132
132
-
 133
133
-
 134
134
-
 135
135
-
 136
136
-
 137
137
-
 138
138
-
 139
139
-
 140
140
-
 141
141
-
 142
142
-
 143
143
-
 144
144
-
 145
145
-
 146
146
-
 147
147
-
 148
148
-
 149
149
-
 150
150
-
 151
151
-
 152
152
-
 153
153
-
 154
154
-
 155
155
-
 156
156
-
 157
157
-
 158
158
-
 159
159
-
 160
160
-
 161
161
-
 162
162
-
 163
163
-
 164
164
-
 165
165
-
 166
166
-
 167
167
-
 168
168
-
 169
169
-
 170
170
-
 171
171
-
 172
172
-
 173
173
-
 174
174
-
 175
175
-
 176
176
-
 177
177
-
 178
178
-
 179
179
-
 180
180
-
 181
181
-
 182
182
-
 183
183
-
 184
184
-
 185
185
-
 186
186
-
 187
187
-
 188
188
-
 189
189
-
 190
190
-
 191
191
-
 192
192
-
 193
193
-
 194
194
-
 195
195
-
 196
196
-
 197
197
-
 198
198
-
 199
199
-
 200
200
-
 201
201
-
 202
202
-
 203
203
-
 204
204
-
 205
205
-
 206
206
-
 207
207
-
 208
208
-
 209
209
-
 210
210
-
 211
211
-
 212
212
-
 213
213
-
 214
214
-
 215
215
-
 216
216
-
 217
217
-
 218
218
-
 219
219
-
 220
220
-
 221
221
-
 222
222
-
 223
223
-
 224
224
-
 225
225
-
 226
226
-
 227
227
-
 228
228
-
 229
229
-
 230
230
-
 231
231
-
 232
232
-
 233
233
-
 234
234
-
 235
235
-
 236
236
-
 237
237
-
 238
238
-
 239
239
-
 240
240
-
 241
241
-
 242
242
-
 243
243
-
 244
244


Philips HX6870/47 Manual de utilizare
- Categorie
- Periuțe de dinți electrice
- Tip
- Manual de utilizare
- Acest manual este potrivit și pentru
în alte limbi
- slovenčina: Philips HX6870/47 Používateľská príručka
Lucrări înrudite
Alte documente
-
Sonicare HX9392/39 Manual de utilizare
-
-
-
Sonicare HX6857/35 Manual de utilizare
-
-
Sonicare HX6631/01 Manual de utilizare
-
Sonicare HX6971/33 Manual de utilizare
-
Sonicare HX6972/38 Manual de utilizare
-
-