
www.gorenje.com
www.gore
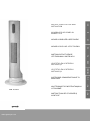
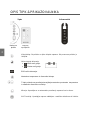
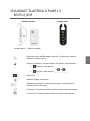
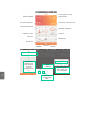
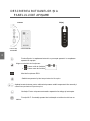
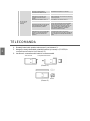
HW 2500L
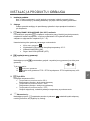
INSTRUCTIONS FOR USE AND
INSTALATION
NAVODILO ZA UPORABO IN
NAMESTITEV
NÁVOD K OBSLUZE A SESTAVENÍ
NÁVOD K OBSLUHE A ZOSTAVENIU
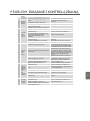
INSTRUKCJE DOTYCZĄCE
UŻYTKOWANIA I INSTALACJI
UPUTSTVO ZA UPOTREBU I
INSTALACIJU
UPUTSTVO ZA UPOTREBU I
INSTALACIJU
ІНСТРУКЦІЯ З ВИКОРИСТАННЯ ТА
МОНТАЖУ
ИНСТРУКЦИЯ ПО ЭКСПЛУАТАЦИИ И
УСТАНОВКЕ
INSTRUCȚIUNI DE UTILIZARE ȘI
MONTARE
EN
SL
CS
SK
PL
SRB
HR/BIH
UA
RU
RO

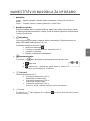
WARNINGS
The appliance may be used by children older than 8 years old, elderly persons
and persons with physical, sensory or mental disabilities or lacking
experience
and knowledge, if they are under supervision or taught about safe use of the
appliance and if they are aware of the potential dangers.
Children should not play with the appliance.
Children must not clean or perform maintenance on the appliance without
supervision.
Installation should be carried out in accordance with the valid regulations and
according to the instructions of the manufacturer.
Please do not try to fix any defects of the ceramic heater on your own. Call
the nearest authorised service provider.
In order to avoid overheating, do not cover the heater.
If the supply cord is damaged, it must be replaced by the manufacturer, its
service agent or similarly qualified persons in order to avoid a hazard.
Do not use this heater in the immediate surroundings of a bath, a shower or a
swimming pool.
Some parts of this product can become very hot and cause burns. Particular
attention has to be given where children and vulnerable people are present.
This heater is not equipped with a device to control the room temperature.
Do not use this heater in small rooms when they are occupied by persons not
capable of leaving the room on their own, unless constant supervision is
provided.
Do not cover the device, it may cause serious damage of the device or even
start a fire!
To disconnect heater, set controls to OFF, then remove plug from outlet.
EN

Dear buyer, thank you for purchasing our product.
PRIOR TO THE INSTALLATION AND FIRST USE OF THE CERAMIC HEATER, PLEASE
READ THESE INSTRUCTIONS CAREFULLY.
This ceramic heater has been manufactured in compliance with the relevant
standards and tested by the relevant authorities as indicated by the Safety
Certificate. Its technical characteristics are indicated on the label.
PRODUCT
FEATURES
PTC high-efficient ceramic heater: fine-tuned power according to environment
temperature; longer service life due to no oxidation.
High or low warm wind optional.
ECO energy saving function.
1-12 hours timer.
Automatically wing outlet, soft wind and heat evenly.
Temperature setting function (5℃~ 35℃)
Using shaded pole motor, tubular wind wheel, which made the device with high
thermal efficiency and low noise.
Tip-over safety protection, double over-heating protection (NTC and thermal fuse),
more safely.
Using low-noisy DC cooling fan.
Convenient operation with infrared remote control function.
Left-right oscillation with soft wind and heat evenly.
With Wi-Fi function, control the unit digitally and smartly.
E
N
EN

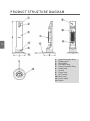
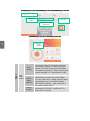
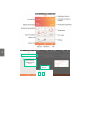
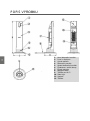
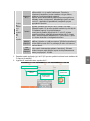
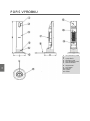
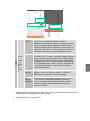
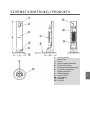
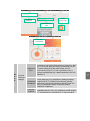
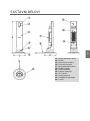
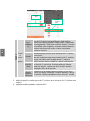
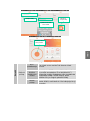
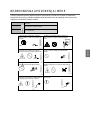
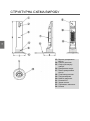
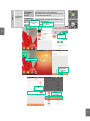
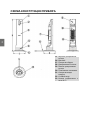
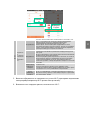
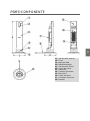
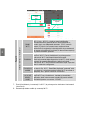
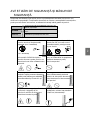
PRODUCT STRUCTURE DIAGRAM
1. Upper-Decoration Ring
2. Display panel
3. Wind outlet
4. Decoration strip
5. Lower-Decoration Ring
6. Plastic base
7. Air inlet
8. Power cord
9. Wi-Fi button
10. Back cover
11. Power switch
12. Button
EN

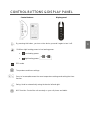
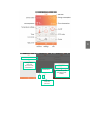
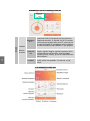
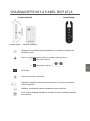
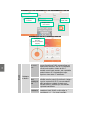
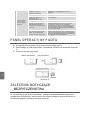
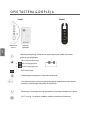
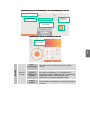
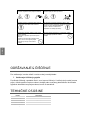
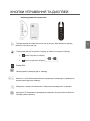
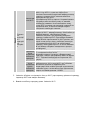
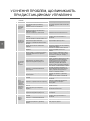
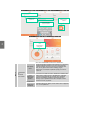
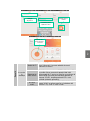
CONTROL BUTTONS & DISPLAY PANEL
Control buttons Display panel
By pressing this button, you turn on the device, pressed it again to turn it off.
Shift from high heating power to low heating power.
Low heating power.
High heating power.
ECO mode
Temperature and timer settings.
Press to increase/decrease the room temperature settings and setting the timer
function.
Swing: Used to automatically swing the device left and right.
Wi-Fi function: Control the unit remotely on your cell phone and tablet.
EN

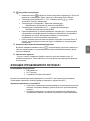
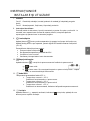
PRODUCT
INSTALLATION
AND
OPERATING
INSTRUCTIONS
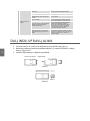
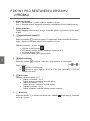
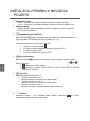
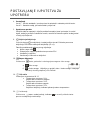
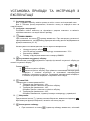
1.
Product installation
Step 1
:
Open the package, take the product out and take off the poly-bag.
Step 2
:
Set the machine up, install the base and fix screw on the smooth surface.
2.
Operating instruction
Connect the power cord with correct power supply and turn on the power switch
on the
back of the product.
3. Power ON/OFF:
By pressing key, the device start working. Press it again, device is turned off,
digital LCD display show shutdown function (10→0).
Default settings during first power:
Low heating power .
LED display show default temperature 25℃.
Fan ON.
Timer and swing OFF.
4. Adjusting heating power:
By pressing key shift from high heating power to low heating power.
Heating mode:
a) Low heating power.
b) High heating power: PTCL and PTCH are turned on. PTCH delay work
after 20 seconds.
5. ECO mode:
Default temperature 22℃:
1. Room temperature < 18℃,
Heater works with high heating power.
2. Room temperature > 18℃,
Heater works with low heating power.
3. Room temperature > 22℃,
Heater stops, indicator shows room temperature.
6. Swing:
By pressing button device oscillate, the indicator will be on, press again, to turn
it off.
7. Timer settings:
By pressing button, the timer indicator will be on, the LED light flickers.
Press key to set the timer.
Timer off range 1-12 hours.
If the value shows 0 in timer setting, the time indicator will be off, LED display
will show the current room temperature.
EN

8. Temperature settings:
By pressing button, enter into temperature settings, the temperature
indicator light will be on, the LED light will flicker.
Temperature range 5℃~ 35℃. Press key to set temperature.
Room temperature > Set temperature:
Ceramic heater and fan OFF.
Room temperature 2℃ lower < Set temperature:
Heating function and fan ON.
When setting the time and temperature at the same time, room temperature
and timing display interactively, interval is 30 seconds. When timing is not set,
only displays setting temperature.
If no operation to the keys after 5 seconds, then the LED indicator will show
the room temperature.
9. Continuous electric memory function:
Under standby mode, press the key. Unit will keep working at the same status as
last time setting, except the timing function.
10. Reduced brightness :
After 1 minute of normal operation the brightness of the display should be reduced to
1/3 of the normal brightness, solving the problem of LED lamp dazzling in night.
W
I
-F
I
FUNCTION
Necessary equipment:
Heater
Wi-Fi router
Android/iOS device.
If you want to use Wi-Fi function, you must connect the unit and your cell phone at the same
Wi-Fi for the first time.
Function of Wi-Fi:
Control the unit remotely by setting the power on/off, timer, power
high/low, swing…
Check the room temperature and setting temperature, energy
consumption on your Android/iOS device.
EN

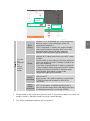
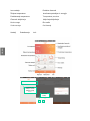
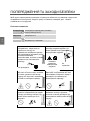
Step 1
Install
App
Android
device
Install the '*.apk' file, which is provided by
Lian.
Or please download from:
http://www.szlianchuang.com/en/index.asp
or scan QR code.
iOS
device
Search Apple Store by the key words:
”Lian heater” or scan QR code.
Windows
Phone
Not supported!
Open Play
Store.
Search for
»Lian Heater«.
Install
application
.
Open application.
Click
settings.
EN

Step 2
Connect
the
Android/i
OS
device
and the
heater
Wi-Fi
setting
Wi-Fi type: Currently only support 802.11
b/g ,802.11 n is unavailable yet. Since the general
wireless router is mixed with b/g/n mode, can
automatically adapt to it.
SSID & Password: Currently only support English
and normal keyboard character, Wi-Fi name and
password please do not set with Japanese,
Spanish, Korea and other special character.
Heater
Please ensure the heater is within the scope of the
effective Wi-Fi signal, and closer to the Wi-Fi router
is better.
Please switch on the heater, the first time when you
put on the product, the Wi-Fi indicator should be on
with a quick flashing.
If you have connected the Wi-Fi before, and the Wi-
Fi was changed. please long-press the Wi-Fi button
behind the product until the Wi-Fi indicator starts
quick flashing. And heater is under at the
configuration state at this moment.
Mobile
connecting
Please turn off the data network, turn on the Wi-Fi,
and connect it.
Open the app, click "add new device", input the Wi-
Fi SSID & password, and wait for 160s till it's
connected.
Other
mobile
connecting
Please make sure mobile phone is using the same
Wi-Fi as the heater. Install the app then open it,
user can find the device with a litte hand, then input
the default password for connecting:123456
1. Please switch on the heater and connect it to Wi-Fi (the first time when you put on the
product, the Wi-Fi indicator should be on with a quick flashing).
2. Turn off the mobile data network, turn on the Wi-Fi.
Change
language.
Chose English.
EN

Step 4
Long-
range
control
Wi-Fi
setting
Wi-Fi should connect to the internet. The
cloud server of Lian is rented from Amazon
cloud server. If the Wi-Fi cannot open the
website. Or the Wi-Fi can open the website
but unable to ping the IP. Please contact your
network manager or IT department for help.
Mobile
data
network
In the condition without Wi-Fi supply, the
mobile phone can still connect the heater.
First, turn off the Wi-Fi setting, open the data
network(please try to control the product
under 3G/4G network), after round 30s, it
can search out the device.
Mobile
control
Same as "Step 3". Considering the
unsteadiness of 3G/4G, it might has 1-2s
delay, which is normal.
Add the new
device.
Input the Wi-Fi SSID
& password.
Click next.
Wait for 160 s
till it's
connected.
EN

Change device
name and
password: Click
and hold for 5 s.
Delete device.
Change device
name and
password.
If required, type the
default password:
123456.
EN

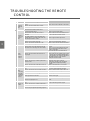
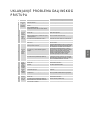
TROUBLESHOOTING THE REMOTE
CONTROL
Key words
Checking
Solution
1
Unable to
install the
APP
Please check the mobile phone storage
space.
If the storage space is not enough, please
delete some useless software or document.
Please check the mobile phone system
version.
Please close the background operating
program and restart the mobile phone.
2
Unable to
connect at
the first
time
Please double check the mobile phone is
correctly link to the Wi-Fi.
Please re-connect to the Wi-Fi.
Please double check the WI-FI signal is
effective.
Please put the product and mobile phone in
the place with stronger WI-FI signal.
Please double check the connecting WI-FI in
the setting interface is the same WI-FI the
mobile phone is connecting. And make sure
the WI-FI password is correct.
Please re-type the WI-FI password.
Please check the WI-FI SSID and password
did not use the special character.
Please change the special character to
English or normal keyboard character.
Please check the WI-FI indicator on the
heater is quick flickering or not.
Please re-long press the WI-FI button till it's
quick flickering.
3
Other
phones
unable to
connect
Please double check the mobile phone and
the heater are connecting is the same WI-FI.
Please close the mobile phone data
network.
Please re-connect the mobile phone WI-FI,
which should be the same WI-FI as the
heater is connecting.
Please check the Heater WI-FI indicator is
long bright.
If the WI-FI indicator is slow-flickering or
quick flickering, please re-connect it.
Please make sure one mobile phone is able
to connect, then use another mobile phone
to open the APP, you should see the device
with a little hand icon at side. And the
default password is 123456.
Please check the app's network permission is
shut off or not.
Please check the safety manager software,
whether the WI-FI APP's network
permission is shut off or not, And please
close the other background operating
program.
Please check the APP is the latest version or
not.
Please re-install the APP, and close the
other background operating programs.
4
After
connecting,
the mobile
is unable to
control the
product
Please check the WI-FI signal is effective or
not.
Please move the product and mobile phone
to the place with stronger WI-FI signal.
Please check the WI-FI is operating smoothly
or not.
Please re-start the WI-FI router, and try to
contact your network manager to reset it.
Please check the heater is plugged on or not.
Please plug on and check.
Please check the heater place, make sure the
WI-FI signal there is effective.
Please move the heater to somewhere with
effective WI-FI signal.
Please check the WI-FI indicator on the
heater is long bright or not.
Please re-connect the mobile phone to the
heater.
5
display not
correct
Please check the WI-FI signal is effective or
not.
Please put the product and mobile phone in
the place with stronger WI-FI signal.
Please check the app's network permission is
shut off or not.
Open the network permission.
Please log out the APP and close the
unnecessary background operating programs.
re-open the APP.
EN

6
Mobile phone is
unable to ensure the
long range
connection.
Please check the WI-FI is operating
smoothly or not.
Please re-start the WI-FI router, and try to
contact your network manager to reset it.
Please check the heater is plugged
on or not.
Please plug on and check.
Please check the heater place,
make sure the WI-FI signal there is
effective.
Please move the heater to somewhere with
effective WI-FI signal.
Please check the WI-FI indicator on
the heater is long bright or not.
Please re-connect the mobile phone and the
heater.
Please check whether the mobile
phone can surf the internet and open
the website smoothly or not.
The cloud server of Lian is rented from
Amazon cloud server (except for China main
land), IP address :54.77.205.224,Domain
name: www.iiWi-Fi.com. If the mobile phone
can open the website. But unable to open
THIS website. It might due to the mobile
phone setting. Please contact the
manufacturer of your mobile phone.
Please check the heater-connecting
WI-FI is effective or not, it should be
effective enough to achieve the
smooth internet surfing.
The cloud server of Lian is rented from
Amazon cloud server. If the Wi-Fi can open
the website but unable to ping the IP. Please
contact your network manager or IT
department for help, or consult with the
manufacturer of your route.
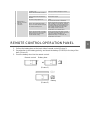
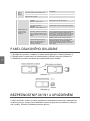
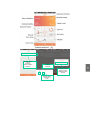
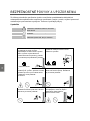
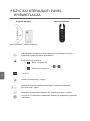
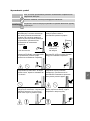
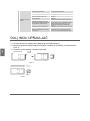
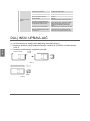
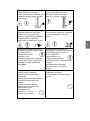
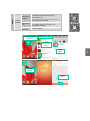
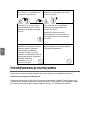
REMOTE CONTROL OPERATION PANEL
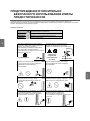
1. Pull out the battery door at the back side of remote control (Picture 1).
2. Pay attention to the battery polarity, and insert the battery (CR2032) to the tray of the
door (Picture 2).
3. Push the battery door into the remote control.
(Picture 1)
(Picture 2)
Remote control
Battery door
Battery
EN

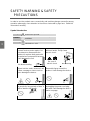
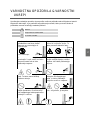
SAFETY WARNING & SAFETY
PRECAUTIONS
In order to use the product more conveniently and avoid any danger caused by wrong
operation please pay close attention to the notices instructed by sign here. Read the
instructions carefully.
Symbol introduction
Warning
Something that may result in severe damage
to the unit or your life.
Forbidden
Some actions that must be absolutely
prohibited.
Must Obay
The content or actions that must execute
absolutely as said.
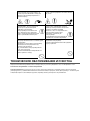
With any indication of malfunction,
contact service center repairs. Do
not attempt to disassemble the
product or replace faulty parts with
unauthorized components because
it will damage the unit.
Do not hand the plug or product
with wet hands. It may cause
electric shock.
Do not stick sticks, metal or other
object into the outlet, because it will
cause creepage or short circuit or
even damage the device.
Do not use pesticide or other
flammable spray around the
product. It will damage the device.
Do not face the wind outlet directly
to people for long periods of time. It
will be bad for their health.
Do not pull the wires when
unplugging the power cord plug,
because it will damage the wire or
make creepage.
禁止拆卸
注意触电
禁止触摸
No disassembling
Be care of
electric shock
No touching
EN

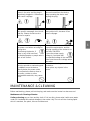
MAINTENANCE & CLEANING
Before maintaining, please pull out the plug, and make sure the heater has become cool.
Maintenance & Cleaning of heater
Surface cleaning: use a clean and dry cloth. If it is too dirty, please wipe it with some water
under 50℃ and add little neutral detergent, then make it dry. Do not use the cleaning liquid
which is mordant, like petrol, thinner and attenuant.
Make sure there is no abnormal
items in the wire, and the plug is
absolutely plugged in. Otherwise it
will cause creepage.
When there is unusual smell or
unusual sound from the device,
stop operating the device and
unplug the plug.
Do not use a broken power cord. It
can result in creepage, short circuit
and fire. Please contact service
center for repairs.
Do not fold the power cord or place
heavy object on it, because it can
cause creepage.
Power off the device and unplug
the power cord when not using for
a long time.
Avoid using the device, if
there is any child or animal
or disabled people or people who is
lack of self-control.
Use the power outlet that meets the
inspection requirements, and the
carrying capacity of the socket is no
less than 10A/220V.
Ensure the power supply
voltage is consistent with
the specified voltage in the machine.
Make sure the service voltage when
relocation.
Forbidden to use the device around
the tub, sprinkler or swimming pool.
Forbidden to use the device
directly below the power outlet.
Do not make the device close to
the walls, curtains or other
combustible materials, may cause
a fire.
To avoid overheating, do not cover
the device.
Never place any objects in the
device.
EN

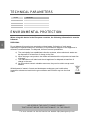
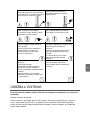
TECHNICAL PARAMETERS
ENVIRONMENTAL PROTECTION
When using this device in the European countries, the following information’s must be
followed:
DISPOSAL:
Do not dispose this product as unsorted municipal waste. Collection of such waste
separately for special treatment is necessary. It is prohibited to dispose of this appliance in
domestic household waste. For disposal, there are several possibilities:
a) The municipality has established collection systems, where electronic waste can
be disposed of at least free of charge to the user.
b) When buying a new product, the retailer will take back the old product at least free
of charge.
c) The manufacture will take back the old appliance for disposal at least free of
charge to the user.
d) As old products contain valuable resources, they can be sold to scrap metal
dealers.
Wild disposal of waste in forests and landscapes endangers your health when
hazardous substances leak into the ground-water and find their way into the food
chain.
Model
HW2500L
Voltage
220-240V~
Frequency
50 Hz
Power
2500 W
Noise level.
≤50 dB
Dimensions
ø278mm×848mm
WE RESERVE THE RIGHT TO MAKE CHANGES
THAT DO NOT IMPAIR THE FUNCTIONALITY OF THE DEVICE.
The user manual can also be found at our website http://www.gorenje.com.
EN

OPOZORILA
Aparat lahko uporabljajo otroci stari 8 let in starejši in osebe z
zmanjšanimi fizičnimi, čutnimi ali mentalnimi sposobnostmi ali s
pomanjkanjem izkušenj oz. znanjem, če so pod nadzorom ali poučeni
glede uporabe aparata na varen način in da razumejo možne nevarnosti.
Otroci se ne smejo igrati z aparatom.
Čiščenje in vzdrževanje aparata ne smejo izvajati otroci brez nadzora.
Namestitev mora biti izvedena v skladu z veljavnimi predpisi in po
navodilih proizvajalca.
Prosimo Vas, da morebitnih okvar na grelcu in vlažilcu ne
popravljate sami, ampak o njih obvestite najbližjo pooblaščeno
servisno službo.
V izogib pregrevanja ne prekrivajte grelca.
Grelec se ne sme nahajati neposredno zraven vtičnice.
Če je napajalni kabel poškodovan, ga mora zamenjati proizvajalec, njegov
serviser ali podobno visoko usposobljena oseba, v izogib nevarnosti
električnega udara.
Ne uporabljajte grelca v neposredni bližini kadi, prhe ali bazena.
Nekateri deli grelca lahko postanejo zelo vroči in povzročijo opekline.
Posvetite posebno pozornost otrokom ali osebam z zmanjšanimi fizičnimi,
čutnimi ali mentalnim sposobnostim kadar so prisotni v bližini grelnika.
Ta grelnik ni opremljen z krmiljem za nadzor sobne temperature.
Ne uporabljajte grelca v majhnih prostorih, v katerih bivajo osebe, ki niso
zmožne same zapustiti sobo, razen če se jim zagotovi stalni nadzor.
S
L
SL

Cenjeni kupec, zahvaljujemo se Vam za nakup našega izdelka.
PROSIMO, DA PRED VGRADNJO IN PRVO UPORABO
KERAMIČNEGA
GRELCA SKRBNO PREBERETE NAVODILA.
Keramični grelec je izdelan v skladu z veljavnimi standardi in uradno preizkušen, zanj
pa je bil
izdan varnostni certifikat. Njegove
osnovne tehnične lastnosti so navedene
na napisni tablici.
LASTNOSTI
PTC visoko učinkovit keramični grelec prilagaja moč glede na prostorsko
temperaturo in s tem daljša življenjsko dobo, ker med delovanjem ne povzroča
oksidacije.
Dve moči delovanja.
ECO funkcija varčevanja z energijo.
1 - 12 urni časovnik za izklop.
Samodejno nihanje, enakomerna porazdelitev toplote.
Funkcija nastavitve temperature (5 ℃ ~ 35 ℃).
Uporaba indukcijskega motorja brez ščetk in cevnega vetrnega kolesa naredi
napravo visoko toplotno učinkovito ter z nizko ravnjo hrupa.
Dvojna zaščita pregretja z NTC temperaturnim tipalom in varovalko.
Samodejna zatemnitev LED zaslona po eni minuti neuporabe, varčevanje z energijo
brez vpliva na Vaš spanec.
Tihi DC ventilatorji.
S priročnim infrardečim daljinskim upravljalnikom.
Z Wi-Fi funkcijo, nadzorujte in upravljajte grelec na poti preko spleta z Android/iOS
napravo.
SL

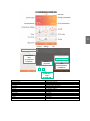
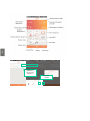
SESTAVNI DELI
1. Vrhnji dekorativni obroč
2. Zaslon
3. Izhod toplega zraka
4. Dekoracijski trak
5. Spodnji dekorativni obroč
6. Plastični podstavek
7. Dovod zraka
8. Napajalni kabel
9. Wi-Fi tipka
10. Zadnji pokrov
11. Stikalo za vklop
12. Tipke
SL

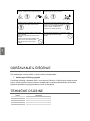
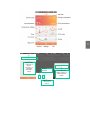
OPIS TIPK & PRIKAZOVALNIKA
Tipke Prikazovalnik
Vklop/Izklop: Ob pritisku na tipko vklopite napravo. Ob ponovnem pritisku jo
izklopite.
Izbira stopnje delovanja.
Nizka moč gretja.
Visoka moč gretja.
ECO način delovanja.
Nastavitve temperature in časovnika izklopa.
Ti tipki pritisnite za povečanje/zmanjšanje nastavitve prostorske temperature
in nastavitev časovnika za izklop.
Nihanje: Uporablja se za avtomatsko pomikanje naprave levo in desno.
Wi-Fi funkcija: Upravljajte napravo oddaljeno z mobilnim telefonom ali tablico.
Nadzorna
plošča
Daljinski
upravljalnik
SL
Pagina se încarcă...
Pagina se încarcă...
Pagina se încarcă...
Pagina se încarcă...
Pagina se încarcă...
Pagina se încarcă...
Pagina se încarcă...
Pagina se încarcă...
Pagina se încarcă...
Pagina se încarcă...
Pagina se încarcă...
Pagina se încarcă...
Pagina se încarcă...
Pagina se încarcă...
Pagina se încarcă...
Pagina se încarcă...
Pagina se încarcă...
Pagina se încarcă...
Pagina se încarcă...
Pagina se încarcă...
Pagina se încarcă...
Pagina se încarcă...
Pagina se încarcă...
Pagina se încarcă...
Pagina se încarcă...
Pagina se încarcă...
Pagina se încarcă...
Pagina se încarcă...
Pagina se încarcă...
Pagina se încarcă...
Pagina se încarcă...
Pagina se încarcă...
Pagina se încarcă...
Pagina se încarcă...
Pagina se încarcă...
Pagina se încarcă...
Pagina se încarcă...
Pagina se încarcă...
Pagina se încarcă...
Pagina se încarcă...
Pagina se încarcă...
Pagina se încarcă...
Pagina se încarcă...
Pagina se încarcă...
Pagina se încarcă...
Pagina se încarcă...
Pagina se încarcă...
Pagina se încarcă...
Pagina se încarcă...
Pagina se încarcă...
Pagina se încarcă...
Pagina se încarcă...
Pagina se încarcă...
Pagina se încarcă...
Pagina se încarcă...
Pagina se încarcă...
Pagina se încarcă...
Pagina se încarcă...
Pagina se încarcă...
Pagina se încarcă...
Pagina se încarcă...
Pagina se încarcă...
Pagina se încarcă...
Pagina se încarcă...
Pagina se încarcă...
Pagina se încarcă...
Pagina se încarcă...
Pagina se încarcă...
Pagina se încarcă...
Pagina se încarcă...
Pagina se încarcă...
Pagina se încarcă...
Pagina se încarcă...
Pagina se încarcă...
Pagina se încarcă...
Pagina se încarcă...
Pagina se încarcă...
Pagina se încarcă...
Pagina se încarcă...
Pagina se încarcă...
Pagina se încarcă...
Pagina se încarcă...
Pagina se încarcă...
Pagina se încarcă...
Pagina se încarcă...
Pagina se încarcă...
Pagina se încarcă...
Pagina se încarcă...
Pagina se încarcă...
Pagina se încarcă...
Pagina se încarcă...
Pagina se încarcă...
Pagina se încarcă...
Pagina se încarcă...
Pagina se încarcă...
Pagina se încarcă...
Pagina se încarcă...
Pagina se încarcă...
Pagina se încarcă...
Pagina se încarcă...
Pagina se încarcă...
Pagina se încarcă...
Pagina se încarcă...
Pagina se încarcă...
Pagina se încarcă...
Pagina se încarcă...
Pagina se încarcă...
Pagina se încarcă...
Pagina se încarcă...
Pagina se încarcă...
Pagina se încarcă...
Pagina se încarcă...
Pagina se încarcă...
Pagina se încarcă...
Pagina se încarcă...
Pagina se încarcă...
Pagina se încarcă...
Pagina se încarcă...
Pagina se încarcă...
Pagina se încarcă...
Pagina se încarcă...
Pagina se încarcă...
Pagina se încarcă...
Pagina se încarcă...
Pagina se încarcă...
Pagina se încarcă...
Pagina se încarcă...
Pagina se încarcă...
Pagina se încarcă...
Pagina se încarcă...
Pagina se încarcă...
-
 1
1
-
 2
2
-
 3
3
-
 4
4
-
 5
5
-
 6
6
-
 7
7
-
 8
8
-
 9
9
-
 10
10
-
 11
11
-
 12
12
-
 13
13
-
 14
14
-
 15
15
-
 16
16
-
 17
17
-
 18
18
-
 19
19
-
 20
20
-
 21
21
-
 22
22
-
 23
23
-
 24
24
-
 25
25
-
 26
26
-
 27
27
-
 28
28
-
 29
29
-
 30
30
-
 31
31
-
 32
32
-
 33
33
-
 34
34
-
 35
35
-
 36
36
-
 37
37
-
 38
38
-
 39
39
-
 40
40
-
 41
41
-
 42
42
-
 43
43
-
 44
44
-
 45
45
-
 46
46
-
 47
47
-
 48
48
-
 49
49
-
 50
50
-
 51
51
-
 52
52
-
 53
53
-
 54
54
-
 55
55
-
 56
56
-
 57
57
-
 58
58
-
 59
59
-
 60
60
-
 61
61
-
 62
62
-
 63
63
-
 64
64
-
 65
65
-
 66
66
-
 67
67
-
 68
68
-
 69
69
-
 70
70
-
 71
71
-
 72
72
-
 73
73
-
 74
74
-
 75
75
-
 76
76
-
 77
77
-
 78
78
-
 79
79
-
 80
80
-
 81
81
-
 82
82
-
 83
83
-
 84
84
-
 85
85
-
 86
86
-
 87
87
-
 88
88
-
 89
89
-
 90
90
-
 91
91
-
 92
92
-
 93
93
-
 94
94
-
 95
95
-
 96
96
-
 97
97
-
 98
98
-
 99
99
-
 100
100
-
 101
101
-
 102
102
-
 103
103
-
 104
104
-
 105
105
-
 106
106
-
 107
107
-
 108
108
-
 109
109
-
 110
110
-
 111
111
-
 112
112
-
 113
113
-
 114
114
-
 115
115
-
 116
116
-
 117
117
-
 118
118
-
 119
119
-
 120
120
-
 121
121
-
 122
122
-
 123
123
-
 124
124
-
 125
125
-
 126
126
-
 127
127
-
 128
128
-
 129
129
-
 130
130
-
 131
131
-
 132
132
-
 133
133
-
 134
134
-
 135
135
-
 136
136
-
 137
137
-
 138
138
-
 139
139
-
 140
140
-
 141
141
-
 142
142
-
 143
143
-
 144
144
-
 145
145
-
 146
146
-
 147
147
-
 148
148
-
 149
149
-
 150
150
-
 151
151


în alte limbi
- slovenčina: Gorenje HW2500L Návod na obsluhu
- polski: Gorenje HW2500L Instrukcja obsługi
Lucrări înrudite
Alte documente
-
 NEO TOOLS 90-038 Manualul proprietarului
-
Samsung AR09NXWSAURN Manual de utilizare
-
-
Camry Premium CR 7810 Instrucțiuni de utilizare
-
Camry CR 7814 Instrucțiuni de utilizare
-
Samsung AR12MSPXAWKNEU Manual de utilizare
-
 Somogyi Elektronic home FKF59201 Manual de utilizare
-
Mesko MS 7713 Instrucțiuni de utilizare
-
Adler AD 7807 Instrucțiuni de utilizare

