
a
b
4
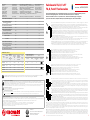
IT - La protezione da cantiere (a) o il volantino manuale (b) consentono di parzializzare la portata della valvola: ruotando in senso antiorario si apre la valvola mentre con rotazio-
ne oraria si ottiene la sua chiusura. Il volantino manuale chiuso a fondo o la protezione da cantiere con cappuccio chiuso a fondo consentono di superare abbondantemente
pressioni statiche di 10 bar con impianto spento. Si sconsiglia, in ogni caso, di eettuare prove di tenuta in pressione dell’impianto prima del collegamento dei corpi scaldanti
onde evitare, in caso di danneggiamenti accorsi al meccanismo, di provocare allagamenti.
EN - The protection cap (a) or the manual handwheel (b) allow to divide in parts the delivery of the valve. By rotating it counter clockwise the valve opens, while with a clockwise
rotation it closes. The fully closed manual handwheel or the fully closed protection cap allow to go generously over the static pressures of 10 bar with switched o system.
However, it is not recommended that pressure testing of the system is carried out prior to the tting of the radiators, or other heating elements, since ooding may occur in the
event of damage to the protection cap or to the handwheel.
FR - Le capuchon de chantier (a) ou le volant manuel (b) permettent de régler le débit dans le robinet : en tournant la partie rouge ou le volant dans le sens des contraire des
aiguille d’une montre on ouvre le robinet, alors que dans le sans des aiguilles d’une montre on ferme le robinet. Le volant manuel fermé à fond ou le capuchon de chantier fermé
à fond permettent de supporter une pressions statiques largement supérieure a 10 bar. On déconseille dans tous les cas de faire les essais d’étanchéité en pression de l’installation,
avant le raccordement des radiateurs, pour éviter de provoquer des inondations en cas de mécanisme endommagé.
DE - Mit Hilfe des Handrads (a) oder der Schutzkappe (b) lässt sich das Ventil schrittweise önen. Durch Drehen entgegen dem Uhrzeigersinn önet sich das Ventil, durch Drehen
im Uhrzei-gersinn schließt es. Ist die Schutzkappe ganz geschlossen oder das Handrad ganz geschlossen, lasst sich bei abgeschalteter Heizungsanlage der statische drucken über
den ganzen Bereich bis 10 bar einstellen. Es ist jedoch nicht ratsam, eine Druckprüfung der Anlage vor Anbringen der Heizkörper oder anderer Heizelemente durchzuführen,
da bei beschädigter Schutzkappe Wasser austreten kann.
NL - De kunststof beschermkop (a) of het kunststof handwiel (b) laat toe om het debiet door de radiatorkraan te regelen. Door het handwiel te draaien in tegenwijzerzin opent
men de kraan, terwijl men de kraan sluit door het handwiel te draaien in wijzerzin. Met de blauw/rode beschermkop in de volledig gesloten positie mag de statische groter zijn
dan 10bar wanneer de installatie is uitgeschakeld. Het is evenwel af te raden om dichtheidsproeven in de installatie uit te voeren voor het aansluiten van de verwarmingslichamen,
teneinde waterschade te vermijden wanneer er beschadiging van het mechanisme zou optreden.
ES - La protección de obra (a) o el volante manual (b) permiten actuar sobre el obturador de la válvula. Girando el volante en sentido antihorario se abre la válvula mientras con rotación horaria se cierra.
Con el tapón rojo de la protección de obra cerrado a fondo o con el volante cerrado a fondo, se pueden superar notablemente presiones estática superiores a 10 bar con la instalación parada. Se aconseja
no obstante efectuar siempre las pruebas se presión de la instalaciòn con los radiadores conectados.
PT - A protecçao de obra (a) ou o volante manual (b) permitem regular o caudal na válvula. Rodando no sentido anti-horário abre-se a válvula, enquanto que com a rotação horária obtém-se o seu fecho.
A protecção de obra com o manípulo totalmente fechado ou o volante manual totalmente fechado conseguem suportar pressões estáticas de 10 bar com a instalacão à pressão, antes da ligação aos
radiadores, para evitar fugas de água devido a eventuais danos ocorridos no mecanismo.
RU - Пластиковый маховичок позволяет регулировать диапазон открывания (пропускную способность) клапана. Eсли повернуть красный колпачок по часовой стрелке, то клапан закроется,
если против – откроется. B выключенном состоянии пластиковый маховичок при закрытом колпачке на дне позволяет выдерживать повышенный уровень статических нагрузок до 10 бар. В
любом случае, чтобы избежать повреждений механизма или разрыва/ протечки‚ не рекомендуется проводить испытания на герметичность установки под давлением до соединения радиаторов
RO - Protectia (a) sau rozeta manuala (b) permit divizarea debitului vanei: rotind in sens antiorar robinetul se deschide, iar in sens orar robinetul se inchide. Rozeta manuala inchisa total sau protectia cu
capac inchis total permit depasirea presiunilor statice de 10 bar cu instalatia oprita. Oricum, se recomanda sa efectuati probe de etanseitate la presiune a instalatiei inainte de racordarea corpurilor de
incalzire, pentru a evita producerea inundatiilor in cazul defectarii mecanismului
IT - Il bocchettone “autotenuta” Giacomini é fornito già dotato di un elemento di tenuta in materiale elastomerico che lo predispone al montaggio sul corpo scaldante senza
aggiunta di canapa, pasta o altri materiali di tenuta. Per un montaggio corretto e rapido si raccomanda di lubricare leggermente la lettatura prima di iniziare ad avvitare.
EN - The Giacomini self-sealing tail piece is provided with a sealing element made of elastomerico material, which prepares it for mounting on the radiator without addition of hemp, glue
or other sealing materials. For a correct and quick assembly, a small amount of lubricant should be placed on the thread before screwing.
FR - La douille « autoétanche » Giacomini est livré revêtu d’un produit d’étanchéité en matériaux élastomère qui permet de le monter sur le radiateur sans ajout de llasse, de patte ou
d’autre produit d’étanchéité. Pour un montage correcte et rapide il est recommandé de lubrier légèrement le let avant de commencer le vissage.
DE - Die „selbstdichtende“ Tülle von Giacomini ist mit einem Dichtelement aus Elastomer versehen, wodurch sie sich an Heizkörper montieren lasst, ohne auf Hanf, Kleber oder
andere dichtende Materialien zurückgreifen zu müssen. Für eine korrekte und schnelle Montage sollte man vor dem Festschrauben eiwas Schmiermittel (Öl) auf das Gewinde geben.
NL - Het puntstuk Giacomini is standaard uitgerust met een elastomeer afdichtingsmateriaal op de universele uitwendige schroefdraad. Hierdoor kan het punststuk direct in
het verwarmingslichaam geschroefd worden zonder gebruik van bijkomende bevestigingsmaterialen. Voor een snelle en correcte montage wordt aanbevolen om vooraf de
uitwendige schroefdraad van het puntstuk een weinig te smeren.
ES - El enlace con “autojunta” Giacomini viene suministrado con una junta de materil elastomerico que permite el montaje sin necesidad de estopada ni otros materiales adicionales.
Para un montaje correcto y rápido se recomienda lubricar ligeramente la rosca antes de iniciar el apriete.
PT - O ligador “auto-vedante” Giacomini é fornecido com um elemento de vedação em material elastómero, que o torna apto à montagem sobre radiadores sem recorrer a linho ou
outros materiais de vedação. Para uma montagem rápida e correcta, recomenda-se lubricar ligeiramente a rosca, antes de iniciar o aperto.
RU - Самоуплотняющийся патрубок Giacomini уже обеспечен эластомерным уплотнительным элементом, что позволяет ему быть установленным на радиатор без
дополнительных уплотнительных материалов: конопля, паста т д. Для правильного и быстрого монтажа рекомендуется до вкручивания слегка смазать резьбу.
RO - Racord olandez cu “autoetansare” Giacomini este furnizat deja dotat cu un element de etansare din elastomer, care il predispune montajului pe corpul de incalzire, fara a
nevoie de canepa, pasta sau alte materiale de etansare. Pentru un montaj corect si rapid, se recomanda sa lubrifiati usor filetul inainte de a incepe sa strangeti.
1
IT - Data la presenza dell’elemento di tenuta in materiale elastomerico, é suciente applicare una coppia di serraggio non superiore ai 25 Nm.
EN - Due to the sealing element made of elastomeric material, it is sucient to apply a tightening couple not higher than 25 Nm.
FR - Compte tenu de la présence du produit d’étanchéité, il n’est pas nécessaire d’appliquer un couple de serrage supérieur à 25 Nm.
DE - Aufgrund der Dichtung aus Elastomer muss das Anzugsmoment nicht über 25 Nm liegen.
NL - Door de aanwezigheid van het elastomeer afdichtingsmateriaal moet het aandraaimoment tot maximaal 25 Nm beperkt worden.
ES - Debido a la presencia de la junta de material elastomérico es suciente con no superar un par de apriete de 25 Nm.
PT - Dada a presença do elemento de vedação em material elastómero, é suciente aplicar uma força de aperto inferior a 25Nm.
RU - Учитывая наличие герметичного элемента из эластичного материала достаточно значение момента затяжки не более 25 Нм.
RO - Din cauza existentei elementului de etansare din elastomer, este sucient sa aplicati o cupla de strangere care sa nu depaseasca 25 Nm.
< 25 Nm
3
2
IT - La fase di avvitamento deve essere eseguita con specica chiave esagonale a brugola R73 (es. 9 mm o 12 mm a seconda dei modelli).
EN - The screwing phase shall be eected with the specic wrench R73 (9 mm or 12 mm according to the models).
FR - Le visage doit s’eecteur en utilisant une clef spécique six pans R73 (hexagone de 9 mm ou 12 mm suivant le modèle).
DE - Für das Anziehen der Tülle verwendet man einen Inbusschussel R73 (9 mm oder 12 mm je nach Modell).
NL - Het puntstuk dient met de geschikte zeskantsleutel R73K vastgeschroefd te worden (9 mm of 12 mm in functie van de maat van het puntstuk).
ES - La fase de apriete debe realizarse con llave kexagonal R73K (hex. 9 mm o 12 mm según el modelo).
PT - O aperto deve ser efectuado com a chave hexagonal R73K, especíca para o efeito, (9 mm ou 12 mm segundo os modelos).
RU - Монтаж должен осуществляться при помощи спциального шестигранного ключа R73K (например, на9 или 12мм в зависимости от модели).
RO - Faza de strangere trebuie efectuata cu o cheie speciala hexagonala imbus R73 (de ex. de 9 mm sau 12 mm in functie de model).
9 o 12 mm
R73
Misura valvola
Valve size
Dimension de la vanne
Grosse des Ventils
Afmeting kraan
Medida de la válvula
Medida da Válvula
Диаметр патрубка
(размер клапана)
Dimensiune robinet
Testa termostatica
Thermostatic head
Tète thermostatique
Thermostatkopfen
Thermostatisch element
Cabezal termostático
Cabeça Termostática
Термостатическая головка
Cap termostatic
Portata nominale qmNH in abbinamento alle teste
Thermostatiques Nominal ow qmNH with thermostatic head
Débit nominal qmNH en association aux têtes qmNH nominaler
Durchuss in Paarung mit Thermostatkopfen
Min debiet qmNH in combinatie met thermostatisch element
Caudad nominale qmNH con cabezal termostático
Caudal nominal qmNH com cabeças termostáticas
Номинальная проход qmNH через термостатические клапаны
Debit nominal qmNH in combinatie cu capetele termostatice
Autorità “a” dell’otturatore
Shutter authority “a”
Autorité “a” de l’obturateur
Autoritat des Schiebers “a”
Autoriteit “a” van de afsluiter
Autordad “a”
Autoridade do Obtuador “a”
Ки “a”
Autoritate obturator “a”
3/8” (R401TG, R402TG, R421TG, R422TG) R460 150 0,90
1/2” (R401TG, R421TG, R402TG, R422TG,
R415TG, R435TG, R401D, R402D) R460 150 0,90
3/4”
R401D, R402D, R401F, R421F, R402F, R422F) R460 240 0,88
3/8” (R401TG, R402TG, R421TG, R422TG) R468 150 0,91
1/2” (R401TG, R421TG, R402TG, R422TG,
R415TG, R435TG, R401D, R402D) R468 150 0,91
3/4”
R401D, R402D, R401F, R421F, R402F, R422F) R468 240 0,88
1/2” (R401VT, R415VT) R469 150 0,86
1/2” (R402VT) R469 160 0,84
3/8” (R401TG, R402TG, R421TG, R422TG) R470 150 0,83
1/2” (R401TG, R421TG, R402TG, R422TG,
R415TG, R435TG, R401D, R402D) R470 150 0,83
3/4”
R401D, R402D, R401F, R421F, R402F, R422F) R470 240 0,79
Avvertenza per la sicurezza - Safety Warning
L’installazione, la messa in servizio e la periodica manutenzione del prodotto devono essere eseguite da personale professionalmente abilitato, in accordo con i regolamenti nazionali e/o i requisiti locali.
L’installatore qualicato deve adottare tutti gli accorgimenti necessari, incluso l’utilizzo di Dispositivi di Protezione Individuale, per assicurare la propria incolumità e quella di terzi. L’errata installazione può causare
danni a persone, animali o cose nei confronti dei quali Giacomini S.p.A. non può essere considerata responsabile.
Installation, commissioning and periodical maintenance of the product must be carried out by qualified operators in compliance with national regulations and/or local standards. A qualified installer must take all required
measures, including use of Individual Protection Devices, for his and others’ safety. An improper installation may damage people, animals or objects towards which Giacomini S.p.A. may not be held liable.
Smaltimento imballo - Package Disposal
Scatole in cartone: raccolta dierenziata carta. Sacchetti in plastica e pluriball: raccolta dierenziata plastica.
Carton boxes: paper recycling. Plastic bags and bubble wrap: plastic recycling.
Smaltimento del prodotto - Product Disposal
Alla ne del suo ciclo di vita il prodotto non deve essere smaltito come riuto urbano. Può essere portato ad un centro speciale di riciclaggio gestito dall’autorità locale o ad un rivenditore che ore questo servizio.
Do not dispose of product as municipal waste at the end of its life cycle. Dispose of product at a special recycling platform managed by local authorities or at retailers providing this type of service.
Altre informazioni - Additional information
Per ulteriori informazioni consultare il sito www.giacomini.com o contattare il servizio tecnico: ' +39 0322 923372 6 +39 0322 923255 * [email protected]
Questa comunicazione ha valore indicativo. Giacomini S.p.A. si riserva il diritto di apportare in qualunque momento, senza preavviso, modiche per ragioni tecniche o commerciali agli articoli contenuti nella presente
comunicazione. Le informazioni contenute in questa comunicazione tecnica non esentano l’utilizzatore dal seguire scrupolosamente le normative e le norme di buona tecnica esistenti.
Giacomini S.p.A. Via per Alzo, 39 - 28017 San Maurizio d’Opaglio (NO) Italy
For more information, go to www.giacomini.com or contact our technical assistance service: ' +39 0322 923372 6 +39 0322 923255 * [email protected]
This document provides only general indications. Giacomini S.p.A. may change at any time, without notice and for technical or commercial reasons, the items included herewith.
The information included in this technical sheet do not exempt the user from strictly complying with the rules and good practice standards in force.
Giacomini S.p.A. Via per Alzo, 39 - 28017 San Maurizio d’Opaglio (NO) Italy
Per i diagrammi delle “caratteristiche idrauliche valvole-teste termostatiche”, fare riferimento alle schede tecniche dei prodotti specici (http://www.giacomini.com/EN215-IT).
For the “hydraulic features valve-thermostatic head” diagrams, please refer to the specic valves datasheet (http://www.giacomini.com/EN215-EN).
KEYMARK (EN215) certication
Product
code
Declared
hysteresis
CH
Inuence of
the declared
water
temperature
WH
Declared
response
time
ZH
Inuence of
the declared
dierential
pressure DH
Control
Accuracy
CAH
Complies with Directive RT2012
Certità con variation temporelle TELL
Factor VT Value VTH
Energy eciency
class Classication
R460X001 0,35 K 0,9 K 26 min. 0,4 K 0,6 K 0,56 0,6 0,5
R468X001 0,23 K 0,42 K 25 min. 0,15 K 0,2 K
R469X001 0,1 K 0,53 K 25 min. 0,15 K 0,2 K 0,28 0,3 0,31
R470X001 0,4 K 1,2 K 26 min. 0,55 K 0,6 K
Valvole termostatizzabili (attacco ferro) - Valves with thermostatic option (iron connection) - Vannes thermostatisable (jonction fer)-
Thermostatventile (Kupplung für Eisen) - Thermostatiseerbare radiatorkranen (universele schroefdraad) -
Válvulas termostatizable (Conexión rosca para tubo de hierro) - Válvulas Termostatizáveis (ligação em polegadas) -
Термостатические клапаны (с накидной гайкой и присоединтелным патрубком) - Robineti termostatizabili
Valvole serie TG, D, F e VT
TG, D, F and VT series valves
Istruzioni / Instruction
047U52668 / 047U57628 10/2022
028
1
Giacomini S.p.A.
Via per Alzo 39, 28017 San Maurizio d’Opaglio (NO) Italia
+39 0322 923372 - giacomini.com 4

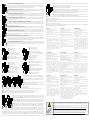
1b
1a IT - Montaggio delle teste termostatiche Giacomini sulla valvola. (1a) Nel caso di valvola con protezione da cantiere, dopo aver svitato in senso antiorario
il cappuccio rosso, sganciare la protezione da cantiere facendo leva sulla base mediante l’ausilio di un cacciavite. (1b) Nel caso di valvola con volantino manuale,
con l’ausilio di un piccolo cacciavite o punteruolo si proceda alla rimozione della parte superiore della manopola e successivamente del piolino di regolazione.
Mediante semplice rotazione antioraria si proceda poi all’asportazione del volantino ed inne si rimuova la canula.
EN - Assembly of Giacomini thermostatic heads to the valve. (1a) Unscrew the red cap fully counter clockwise and remove the protection cap by using a
screwdriver as a lever. (1b) By using a little screwdriver or a centre punch, remove the upper part of the handle and afterwards of the adjustment pip. Through a
counter clockwise rotation, proceed by removing the handwheel and at the end remove the cane.
FR - Montage de têtes thermostatiques Giacomini sur le robinet. (1a) Après avoir complètement ouvert le capuchon rouge dans le sens inverse des aiguilles
d’une montre, enlever le capuchon de chantier en faisant levier à la base du capuchon avec un tournevis. (1b) A l’aide d’un petit tournevis ou d’une pointe on enlèvera
supérieure la partie supérieure du volant ainsi que du clou de réglage. Par simple rotation dans le sens des aiguilles d’une montre on ôte le volant puis on enlève la bague.
DE - Montage des Giacomini Thermostatkopfs auf das Ventil. (1a) Drehen Sie die rote Kappe entgegen dem Uhrzeigersinn ganz ab. Danach wird mit
einem einen Schraubendreher die Schutzkappe abgehebelt. (1b) Wird mit einen kleinen Schraubendreher zunächst der Stift aus dem Oberteil gezogen und
anschließend das Plattchen abgenommen.
NL - Montage van de thermostatische regelelementen Giacomini op de radiatorkranen. (1a) Eerst dient het rode handwiel in tegenwijzerzin
losgeschoefd te worden. Nadien de basis van de kunstsof werfkap wegnemen met behulp van een schroevedraaier. (1b) Met behulp van een kleine
schroevedraaier, het bovenste dekseltje van het handwiel en nadien het metalen stiftje gedemonteerd te worden. Vervolgens het handwiel in tegenwijzerzin
losschroeven en de kunststof basis wegnemen.
ES - Montaje del cabezal termostático Giacomini sobre la válvula. (1a) Desenroscar el tapón rojo y quitar la base de plàstico con la ayuda de un
destornillador. (1b) Primero extraer la tapa frontal del volante con ayuda de un pequeño destornillado o punzón. Posteriormente extraer el pasador de
regulación. Con la simple rotación antihoraria del volante proceder a su extracción y nalmente quitar la base de plástico con ayuda de un destornillador.
PT - Montagem das cabeças termostáticas Giacomini na válvula. (1a) No caso de válvulas com proteção de obra, depois de desapertar a tampa vermelha
no sentido anti-horário, deve desencaixar a proteção de obra, fazendo alavanca sobre a base com uma chave de fendas. (1b) Com auxílio de uma pequena chave
de parafusos, procede-se à remoção da parte superior do manípulo e seguidamente da cavilha de regulação. Pela simples rotação anti-horária, procede-se à
remoção do volante e por m remove-se a “canula”.
RU - Монтаж термостатических головок Джакомини с клапаном Джакомини. (1a) Для монтажа термостатических головок Джакомини с
клапаном после поворота против часовой стрелки красного кожуха следует снять пластиковый маховичок при помощи отверти. (1b) Для монтажа
термостатических головок Джакомини с клапаном при помощи отвертки надо вначале сдвинуть верхнюю часть ручки, и затем регулировочный
фиксатор.Поворотом против часовой стрелки можно удалитр маховик, и затем регулировочный фиксатор.
RO - Montarea capurilor termostatice Giacomini pe supapă. (1a) In cazul unei supape cu protecție la construcție, după decuplarea capotei roșii în sens
invers acelor de ceasornic, desfaceți dispozitivul de protecție prin utilizarea acestuia cu ajutorul unei șurubelnițe. (1b) In cazul unui robinet cu rozeta manuala,
se scoate cu ajutorul unei surubelnite partea superioara a selectorului si apoi a dispozitivului de reglaj. Prin simpla rotire in sens antiorar, se scoate rozeta si apoi
se scoate si dispozitivul de xare.
6
IT - Per un ottimale funzionamento della testa termostatica il montaggio della valvola deve
avvenire con asse del volantino di protezione (a) o di manovra (b) in posizione orizzontale.
EN - In order to obtain the optimal function of the thermostatic head, the valve must be
installed with the axis of the protection cap (a) or the manual handwheel (b) in horizontal
position.
FR - Pour un fonctionnement optimal de la tête thermostatique, le robinet doit être monté
de telle manière que l’axe du volant soit en position horizontale.
DE - Für eine fehlerfreie Funktion des Thermostatkopfs sollte das Ventil nur in waagerechter
Position montiert werden.
NL - Voor een goede werking dient het thermostatisch regelelement steeds horizontaal gemonteerd te worden.
ES - Para que el funcionamiento de la cabeza termostática sea correcto, el montaje de la válvula debe efectuarse de forma que el eje del volante queden en posición horizontal.
PT - Para um ótimo funcionamento da cabeça termostática, a montagem da válvula deve ser efetuada com o eixo do volante/manípulo na posição horizontal.
RU - Для оптимальной работы термостатической головки клапан должен монтироваться в горизонтальном положении оси маховика.
RO - Pentru funcționarea optimă a capului termostatic, ansamblul supapă trebuie să e prevăzut cu mânerul (a) sau mânerul (b) în poziție orizontală.
IT - Aprire completamente la testa.
EN - Open fully the head.
FR - Ouvrir complètement la tête.
DE - Thermostatkopf ganz aufdrehen.
NL - Het thermostaatelement volledig openen.
ES - Abrir completamente el cabezal termostático.
PT - Abrir completamente a cabeça.
RU - Откройте полностыо термостатическую головку.
RO - Deschideți complet capul termostatic.
2
IT - Agganciare la testa alla valvola.
EN - Connect the head to the valve.
FR - En foncer la tête sur le robinet.
DE - Thermostatkopf an das Ventil anbringen.
NL - Het thermostaatelement op het kraanlichaam plaatsen.
ES - Acoplar el cabezal a la válvula, haciendo coincidir las
pestañas sobre los resaltes de la válvula.
PT - Encaixar a cabeça na válvula.
RU - Защелкните головку на клапане.
RO - Apucați capul la supapă.
3
IT - Chiudere completamente la testa.
EN - Close fully the head.
FR - Fermer complètement la tête.
DE - Thermostatkopf ganz zudrehen.
NL - Het thermostaatelement volledig sluiten.
ES - Cerrar completamente el cabezal termostático.
PT - Fechar completamente a cabeça.
RU - Полностыю закройте головку.
RO - Închideți capul termostat complet.
4
IT - Aprire la testa nella posizione desiderata.
EN - Open the head into the desired calibration position.
FR - Positionner la tête sur la position désirée.
DE - Thermostatkopf so weit aufdrehen, bis er sich in der
gewünschten.
NL - Het thermostaatelement op de gewenste positie instellen.
ES - Abrir el cabezal hasta la posición de la regulación deseada.
PT - Abrir a cabeça até à posição pretendida.
RU - Откройте головку до нужного уровня.
RO -Deschideți capul în poziția dorită.
5
8
IT - In caso di manutenzione é possibile sostituire l’anello O-Ring dell’asta svitando la calottina del vitone mediante l’ausilio di una chiave esagonale da 11
mm. Questa operazione può essere eettuata anche ad impianto funzionante.
EN - For maintenance purposes, it is possible to replace the O-Ring seal on the valve stem by unscrewing the small hexagonal retaining nut using an 11
mm spanner. This operation may be carried out without draining the system.
FR - Dans le cadre d’une maintenance de l’installation il est possible de changer le joint O-Ring situé sur l’axe du mécanisme. Pour cela on dévissera, à l’aide
d’une clef hexagonale de 11 mm, l’écrou situe sur l’axe. Cette opération est possible l’installation étant sous pression.
DE - Zu Wartungszwecken lässt sich der O-Ring auf der Spindel im Ventil ersetzen, indem man die kleine Sechskant-Überwurfmutter mit einem 11 mm.
Schraubenschussel löst. Dieser Vorgang ist möglich, ohne zuvor das Wasser aus der Anlage ablassen zu müssen.
NL - In geval van onderhoud kan de O-Ring rond de spindel vervangen worden door het messing moertje van het binnenwerk los te schroeven met
behulp van een sleutel 11 mm. Deze handeling kan eveneens worden uitgevoerd terwijl de installatie in bedrijf is.
ES - En mantenimiento es possible sustituir el anillo tórico del eje desatornillando el casquillo hexagonal roscando de la montura, mediante una llave de 11 mm. Esta operación puede
ser efectuada con la instalación en funcionamiento.
PT - Em caso de manutenção é possível substituir o O-Ring da haste, desapertando a calote do corpo da válvula com o auxílio da chave hexagonal de 11 mm. Esta operação pode ser
efetuada com a instalação em funcionamento.
RU - В случае необходимости проведения ремонтных работ, заменить уплотнительное кольцо можно, открутив гайку при помощи шестигранного ключа на 11мм. Эта операция
может быть осуществлена также при работе оборудования.
RO - In caz de intretinere a caloriferului, este posibil sa inchideti debitul prin robinetul de retur printr-o operatie similara celei de reglare. Este sucient sa va amintiti numarul de rotatii
efectuate inainte de faza de inchidere, astfel incat sa reluati totul de la faza de instalare.
7
IT - Per le valvole con volantino manuale, in caso di funzionamento in “manuale” la regolazione micrometrica può essere eettuata
togliendo la parte superiore della manopola e del piolino che andrà poi rimontato nella posizione corrispondente al numero rilevato
sullo specico diagramma di taratura. EN - In case of “manual” functioning, the micrometric adjustment can be eected by removing the
upper part of the handle and the pip, that shall be then re-assembled into the position corresponding to the number taken from the
specic calibration diagram. FR - En cas de fonctionnement « manuel » le réglage du débit pet être fait en enlevant délicatement la partie
supérieure de la tête manuel et en positionnant le clou de réglage sur la position déterminer a partir du diagramme d’équilibrage.
DE - Bei „Hand-„ Betrieb lasst sich die Einstellung durch Entfernen des Stiftes aus dem Oberteil errechen. Bei Wiedereinbau ist die
Position zu wählen, die dem Wert im entsprechenden Druckverlustdiagram entspricht. NL - In geval van “manuele bediening” kan een
voorinstelling gedaan worden door het wegnemen van het bovenste dekseltje van het handwiel en het metalen stiftje. Nadien wordt het
metalen stiftje teruggeplaatst in een positie die afgelezen wordt uit het drukverliesdiagramma. ES - En el caso de funcionamiento “manual”
la regulación micrométrica puede efectuarse retirando la tapa frontal del volante, extrayendo el pasador de regulaciòn y ubicándolo
en la posiciòn correspondiente según el diagrama de regulación. PT - Em caso de funcionamento “manual”, a regulação micrométrica pode ser efectuada tirando a parte superior
do manípulo e da cavilha que será posteriormente montada na posição correspondente ao número obtido sobre o diagrama de equilibragem. RU - При использовании клапана
в “ручном режиме” установка режимов может осуществляться путем изъятия верхней части ручки и регулировочного фиксатора, который потом будет вновь установлен в
соответствующую позицию под номером, соответствующем значению, обозначенному на шкале. RO - Pentru vane cu roată de mână manuală, în cazul funcționării manuale, reglarea
micrometrică se poate face prin scoaterea vârfului butonului și a știftului, care va apoi reasamblat în poziția corespunzătoare numărului de pe diagrama specică de calibrare.
IT - Dati tecnici
Attacco ferro 3/8” (tranne serie D), 1/2” , 3/4”
Pressione max d’esercizio per applicazioni manuali: PN16
Campo di temperatura: 5÷110 °C
Taratura min. in abbinamento a teste termostatiche R460, R468,
R469, R470: 8 °C in posizione *
Pressione max d’esercizio in abbinamento a teste termostatiche:
10 bar
Pressione dierenziale max: 1,4 bar (3/8”, 1/2”); 0,7 bar (3/4”)
Protezione da cantiere: la protezione da cantiere consente di
parzializzare la portata della valvola. Ruotando il cappuccio rosso
in senso antiorario si apre la valvola mentre con rotazione oraria
si ottiene la sua chiusura.
A rotazioni d’angolo del cappuccio rosso di 36° corrispondono
variazioni di temperatura pari a 1 °C. La protezione con cappuccio
chiuso a fondo consente di superare abbondantemente
pressioni statiche di 10 bar con impianto spento.
Si consiglia in ogni caso di eettuare prove di tenuta in pressione
dell’impianto solo dopo aver collegato i corpi scaldanti onde
evitare, in caso di danneggiamenti accorsi al meccanismo, di
provocare allagamenti.
EN - Technical data
Iron connection 3/8” (except for D-series), 1/2” , 3/4”
Max working pressure for manual applications: PN16
Temperature range: 5÷110 °C
Min calibration with thermostatic heads R460, R468, R469, R470:
8 °C in position *
Max working pressure with thermostatic heads: 10 bar
Max dierential pressure: 1,4 bar (3/8”, 1/2”); 0,7 bar (3/4”)
Protection cap: the protection cap allows to split the ow in
the valve.
By rotating the red cap anticlockwise the valve opens, by
rotating it clockwise the valve closes.
For every 36° rotation of the red cap there is a temperature
change of 1 °C.
The completely closed red cap allows to go over the static
pressures of 10 bar with the system o.
However it’s better to carry out a pressure seal test only after
the connection of the radiators, in order to avoid damages and
ooding.
FR - Données Techniques
Jonction fer 3/8” (l’exception série D), 1/2” , 3/4”
Pression max de service pour applications manuelles: PN16
Température max de service: 5÷110 °C
Etalonnage min en association aux têtes thermostatiques R460,
R468, R469, R470: 8 °C en position *
Pression max de service en association aux têtes
thermostatiques: 10 bar
Pression max diérentielle: 1,4 bar (3/8”, 1/2”); 0,7 bar (3/4”)
Capuchon de chantier: le capuchon de protection permet de
partialiser la portée de la vanne. En tournant le capuchon rouge
dans le sens inverse à celui des aiguilles d’une montre, la vanne
s’ouvre, alors que avec une rotation dans le sens des aiguilles d’une
montre, la vanne se ferme. Les rotations d’angle du capuchon
rouge de 36° correspondent à variations de température de 1 °C.
Le capuchon fermé à fond permet de dépasser abondamment
pressions statiques de 10 bar avec installation fermée. On conseille
dans tous les cas d’eectuer essais d’étanchéité en pression de
l’installation, seulement après avoir raccordé les radiateurs, an
d’éviter de provoquer inondations, en cas de endommagement
du mécanisme.
DE - Technische Daten
3/8” (außer Serie D), 1/2” , 3/4” Kupplung für Eisen
Max Betriebsdruck für manuellen Anwendungen: PN16
Max Betriebstemperatur: 5÷110 °C
Min Eichung in Paarung mit Thermostatkopfen R460, R468, R469,
R470: 8 °C in * Stellung
Max Betriebsdruck in Paarung mit Thermostatkopfen: 10 bar
Max Dierenzdruck: 1,4 bar (3/8”, 1/2”); 0,7 bar (3/4”)
Bauschutzkappe: die Bauschutzkappe erlaubt die Drosslung
des Durchusses eines Ventils. Das Ventil önet sich mit der
Drehung entgegen dem Uhrzeigersinn der roten Kappe.
Während es schließt sich mit der Drehung im Uhrzeigersinn.
Eine Drehung der roten Kappen von 36° entsprechen
einer Temperaturänderung von 1 °C. Der Schutz mit tief
geschlossene Kappe erlaubt statische Drucken von 10 bar
mit geschlossene Anlage reichlich zu übersteigen. Man ratet
auf jeden Fall Druckdichtigkeitsprüfungen der Anlagen nur
nach der Verbindung der Radiatoren durchzuführen, um
Überschwemmungen zu vermeiden, falls Beschädigungen an
der Einrichtung vorfallen sind.
NL - Technische gegevens
Universele schroefdraadaansluiting 3/8” (behalve serie D), 1/2”
, 3/4”
Maximale werkdruk bij manuele bediening: PN16
Maximale watertemperatuur: 5÷110 °C
Minimum ruimtetemperatuur in combinatie met thermostatisch
element R460, R468, R469, R470: 8 °C in positie *
Maximale werkdruk bij thermostatische bediening: PN10
Maximale dierentieeldruk: 1,4 bar (3/8”, 1/2”); 0,7 bar (3/4”)
De blauw/rode beschermkop laat toe om het debiet door de
radiatorkraan te regelen: door het rode handwiel te draaien in
tegenwijzerszin wordt de kraan geopend, door het handwiel te
draaien in wijzerszin wordt de kraan gesloten.
Het draaien van het handwiel over een hoek van 36° beïnvloedt
de ruimtetemperatuur met 1°C.
Met de blauw/rode beschermkop in de volledig gesloten positie
mag de statische groter zijn dan 10bar wanneer de installatie is
uitgeschakeld.
Het afpersen van de installatie dient steeds te gebeuren na de
aansluiting van de verwarmingslichamen aan het leidingnet.
ES - Datos técnicos
Conexiones rosca hierro: 3/8” (excepto de la serie D), 1/2” , 3/4”
Fluido: Agua caliente
Temperatura máx. de ejercicio: 5÷110 °C
Presión máxima de ejercicio con accionamiento manual: PN16
Temperatura mínima con cabezal termostático R460, R468, R469,
R470: 8 °C en posiciòn *
Presión máxima de ejercicio con cabezal termostático: 1MPa
(10 bar)
Presión diferencial máxima: 1,4 bar (3/8”, 1/2”); 0,7 bar (3/4”)
Protección de obra: El volante de protección de obra permite
accionar la válvula durante los trabajos de instalación. El
capuchón rojo actúa como volante de maniobra. Una
rotación del volante de 36º corresponde a una variación de
la temperatura de 1 °C. Con el volante de protección de obra
totalmente cerrado se pueden superar ampliamente presiones
estática de 10 bar con la instalación parada. No obstante, no es
aconsejable efectuar pruebas de presión de la instalación antes
de realizar las conexiones a los radiadores para evitar provocar
inundaciones en caso de daños producidos al mecanismo.
PT - Dados técnicos
Ligação 3/8” (exceto para série D), 1/2”, 3/4”
Pressão máxima de trabalho para aplicações manuais: PN16
Temperatura máxima de trabalho: 5÷110 °C
Equilibragem com ligação das cabeças termostáticas R460, R468,
R469, R470: 8 °C na posição *
Pressão máxima de trabalho c/ cabeças termostáticas: 10 bar
Pressão diferencial máxima: 1,4 bar (3/8”, 1/2”); 0,7 bar (3/4”)
Protecção de obra: a protecção de obra permite parcializar o
caudal da válvula. Rodando o manípulo vermelho no sentido
anti-horário abre-se a válvula enquanto que com a rotação
horária se obtém o fecho.
As rotações de ângulo do manípulo vermelho de 36°
correspondem variações de temperatura de cerca de 1 °C.
A protecção com o manípulo totalmente fechado permite
superar pressões estáticas de 10 bar com a instalação desligada.
Em qualquer caso, aconselha-se a efectuar os testes de pressão
da instalação depois de estarem ligados os radiadores de modo
a evitar, em caso de danos ocorridos no mecanismo da válvula,
saída de água e consequentes alagamentos.
RU - Технические данные
Диаметры патрубков 3/8” (кроме серии D), 1/2” , 3/4”
Максимальное рабочее давление клапанов с механической
регулировкой: PN16
Максимальная рабочая температура: 5÷110 °C
Минимальная температура настройки термостатических
головок R460, R468, R469, R470: 8 °C в положении *
Максимальное рабочее давление клапанов, регулируемых с
помощью термоголовки: 10 бар
Максимальное дифференциальное давление: 1,4 bar (3/8”,
1/2”); 0,7 bar (3/4”)
Защита клапана при запуске: защита клапана при запуске
позволяет поделить на части подачу воды в клапан. При
вращении красного колпачка против часовой стрелки,
клапан открывается, а при вращении по часовой стрелке
- закрывается. Положениям красного колпачка при его
вращении на угол в 36° соответствуют значения температуры
в 1 °С. Защита при колпачке, закрытом вовнутрь, позволяет
значительно превысить значения статических нагрузок
10 бар при выключенном оборудовании. Рекомендуется
каждый раз проводить испытания по герметичности системы
только после подсоединения отопительных приборов, чтобы
избежать в случае повреждений в клапане протечки.
RO - Date tehnice
Racord din otel 3/8” (cu exceptia seriei D), 1/2” , 3/4”
Presiune maxima de lucru pentru aplicatii manuale: PN16
Temperatura maxima de lucru: 5÷110 °C
Reglaj minim in combinatie cu capetele termostatice R460, R468,
R469, R470: 8 °C in pozitia *
Presiune maxima de lucru in combinatie cu capetele
termostatice: 10 bar
Presiune diferentiala maxima: 1,4 bar (3/8”, 1/2”); 0,7 bar (3/4”)
Protectie: protectia permite divizarea debitului robinetului.
Rotind capacul rosu in sens antiorar se deschide robinetul, iar in
sens orar se inchide robinetul.
La rotatii ale unghiului capacului rosu de 36° corespund variatii
de temperatura de 1° C.
Protectia cu capac inchis total permite depasirea presiunilor
statice de 10 bar cu instalatia oprita.
Oricum, se recomanda sa efectuati probe de etanseitate la
presiune a instalatiei inainte de racordarea corpurilor de incalzire,
pentru a evita producerea inundatiilor in cazul defectarii
mecanismului.
R400
Con testa termostatica installata sul corpo valvola, nel periodo estivo per evitare carichi eccessivi sulla guarnizione di tenuta del vitone termostatico con il conseguente rischio
di impuntamenti e bloccaggi, è opportuno posizionare la manopola della testa termostatica nella posizione di massima apertura, contraddistinta dal simbolo . In caso di
malfunzionamento del vitone è possibile sostituire l’anello O-Ring dell’asta, svitando la calotta mediante l’utilizzo di una chiave esagonale da 11 mm. Se il problema persiste
è inoltre possibile sostituire il vitone completo mediante l’utilizzo dell’apposita chiave R400.
La sostituzione del vitone con la chiave R400 non è possibile per le seguenti valvole: R421FX004, R422FX004, R401FX004, R402FX004, R401DX004, R402DX004.
With thermostatic head installed on the valve body, to avoid excessive loads on the seal gasket of the thermostatic bonnet (with the resulting risk of jamming and locking) during the
summer, it is recommended to place the handwheel of the thermostatic head in the fully open position, marked by the symbol . In case of malfunction of the valve it is possible to
replace the O-Ring, by unscrewing the nut using an hexagonal wrench 11 mm If the problem persists is also possible to replace the complete bonnet using the appropriate key R400.
The bonnet replacement with R400 key, is not possible for the following valves: R421FX004, R422FX004, R401FX004, R402FX004, R401DX004, R402DX004.
32
-
 1
1
-
 2
2


Giacomini R415TG Instrucțiuni de utilizare
- Tip
- Instrucțiuni de utilizare
în alte limbi
- français: Giacomini R415TG Mode d'emploi
- English: Giacomini R415TG Operating instructions
- italiano: Giacomini R415TG Istruzioni per l'uso
- español: Giacomini R415TG Instrucciones de operación
- português: Giacomini R415TG Instruções de operação
- Nederlands: Giacomini R415TG Handleiding