
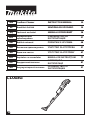
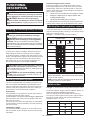
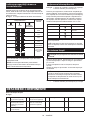
CL003G
EN Cordless Cleaner INSTRUCTION MANUAL 10
SL Brezžični čistilnik NAVODILA ZA UPORABO 19
SQ Pastruesi me bateri MANUALI I PËRDORIMIT 28
BG Акумулаторна
прахосмукачка РЪКОВОДСТВО ЗА
ЕКСПЛОАТАЦИЯ 37
HR Bežični usisavač PRIRUČNIK S UPUTAMA 48
МК Безжична правосмукалка УПАТСТВО ЗА УПОТРЕБА 57
SR Бежични чистач УПУТСТВО ЗА УПОТРЕБУ 67
RO Aspirator cu acumulator MANUAL DE INSTRUCŢIUNI 77
UK Бездротовий пилосос ІНСТРУКЦІЯ З
ЕКСПЛУАТАЦІЇ 87
RU Аккумуляторный пылесос РУКОВОДСТВО ПО
ЭКСПЛУАТАЦИИ 97

2
Fig.1
11
2
3
Fig.2
12
Fig.3
1
2
1
2
3
4
Fig.4
1
2
3
Fig.5
1
2
3
4
5
6
7
89
Fig.6

3
1
23
Fig.7
1
2
3
4
Fig.8
Fig.9
1
Fig.10
1
2
3
Fig.11
1
2
Fig.12
1
2
Fig.13
12
3
Fig.14

4
Fig.15
1
Fig.16
1
2
3
4
Fig.17
Fig.18
1
2
3
Fig.19
Fig.20
Fig.21
1
Fig.22

5
21
3
4
Fig.23
Fig.24
3
1
2
Fig.25
1
2
Fig.26
Fig.27
Fig.28
1
2
Fig.29

6
1
2
Fig.30
1
2
Fig.31
Fig.32
Fig.33
12
Fig.34
1
2
Fig.35
1
2
Fig.36
1
2
Fig.37

7
Fig.38
Fig.39
1
3
2
Fig.40
1
2
Fig.41
3
2
1
Fig.42
1
Fig.43

8
1
2
3
4
5
Fig.44
Fig.45
Fig.46
14
5
1
3
2
Fig.47
1
2
3
4
Fig.48
12
34
Fig.49

9
12
3
4
Fig.50
1
2
Fig.51
12
4
3
Fig.52

10 ENGLISH
ENGLISH (Original instructions)
WARNING
• This appliance can be used by children aged from 8 years and above and persons with reduced physical, sen-
sory or mental capabilities or lack of experience and knowledge if they have been given supervision or instruc-
tion concerning use of the appliance in a safe way and understand the hazards involved.
• Children shall not play with the appliance. Cleaning and user maintenance shall not be made by children with-
out supervision.
• See the chapter “SPECIFICATIONS” for the type reference of the battery.
• See the section “Installing or removing battery cartridge” for how to remove or install the battery.
• When disposing the battery cartridge, remove it from the tool and dispose of it in a safe place. Follow your local
regulations relating to disposal of battery.
• If the tool is not used for a long period of time, the battery must be removed from the tool.
• Do not short the battery cartridge.
• See the chapter “MAINTENANCE” for the appropriate details of precautions during user maintenance.
SPECIFICATIONS
Model: CL003G
Capacity 250 mL / 400 mL (country specic)
Continuous use
(with battery BL4025) 1 (Quiet mode) Approx. 80 min
2 (Normal speed mode) Approx. 40 min
3 (High speed mode) Approx. 25 min
4 (Max speed mode) Approx. 16 min
Overall length (with pipe, nozzle, and battery BL4025) 1,106 mm
Rated voltage D.C. 36 V - 40 V max
Net weight 1.9 - 2.6 kg
• Due to our continuing program of research and development, the specications herein are subject to change
without notice.
• Specications may dier from country to country.
• The weight does not include accessories but battery cartridge(s). The lightest and heaviest combination weight
of the appliance and battery cartridge(s) are shown in the table.
Applicable battery cartridge and charger
Battery cartridge BL4020* / BL4025* / BL4040* / BL4050F
* : Recommended battery
Charger DC40RA / DC40RB / DC40RC
• Some of the battery cartridges and chargers listed above may not be available depending on your region of
residence.
WARNING: Only use the battery cartridges and chargers listed above. Use of any other battery cartridges
and chargers may cause injury and/or re.

11 ENGLISH
Symbols
The followings show the symbols which may be used
for the equipment. Be sure that you understand their
meaning before use.
Read the instruction manual.
A representative battery applicable to this
product.
Ni-MH
Li-ion Only for EU countries
Due to the presence of hazardous com-
ponents in the equipment, waste electrical
and electronic equipment, accumulators
and batteries may have a negative impact
on the environment and human health.
Do not dispose of electrical and electronic
appliances or batteries with household
waste!
In accordance with the European Directive
on waste electrical and electronic equip-
ment and on accumulators and batteries
and waste accumulators and batteries,
as well as their adaptation to national law,
waste electrical equipment, batteries and
accumulators should be stored separately
and delivered to a separate collection point
for municipal waste, operating in accor-
dance with the regulations on environmen-
tal protection.
This is indicated by the symbol of the
crossed-out wheeled bin placed on the
equipment.
Intended use
The tool is intended for collecting dry dust.
SAFETY WARNINGS
Cordless cleaner safety warnings
WARNING: IMPORTANT! READ CAREFULLY
all safety warnings and all instructions BEFORE
USE. Failure to follow the warnings and instructions
may result in electric shock, re and/or serious injury.
1. Do not expose to rain. Store indoors.
2. Do not allow to be used as a toy. Close
attention is necessary when used by or near
children.
3. Use only as described in this manual. Use only
manufacturer's recommended attachments.
4. Do not use with damaged battery. If appliance
is not working as it should, has been dropped,
damaged, left outdoors, or dropped into water,
return it to a service center.
5. Do not handle appliance with wet hands.
6. Do not put any object into openings. Do not
use with any opening blocked; keep free of
dust, lint, hair, and anything that may reduce
air ow.
7. Keep hair, loose clothing, ngers, and all parts
of body away from openings and moving parts.
8.
Turn o all controls before removing the battery.
9. Use extra care when cleaning on stairs.
10. Do not use to pick up ammable or combusti-
ble liquids, such as gasoline, or use in areas
where they may be present.
11. Use only the charger supplied by the manufac-
turer to recharge.
12.
Do not pick up anything that is burning or smok-
ing, such as cigarettes, matches, or hot ashes.
13.
Do not use without dust bag and/or lters in place.
14. Do not charge the battery outdoors.
15. Recharge only with the charger specied by
the manufacturer. A charger that is suitable for
one type of battery pack may create a risk of re
when used with another battery pack.
16. Use appliances only with specically desig-
nated battery packs. Use of any other battery
packs may create a risk of injury and re.
17. When (the) battery pack is not in use, keep
it away from other metal objects, like paper
clips, coins, keys, nails, screws or other small
metal objects, that can make a connection
from one terminal to another.
18. Under abusive conditions, liquid may be
ejected from the battery; avoid contact. If con-
tact accidentally occurs, ush with water.
19. Do not use a battery pack or appliance that
is damaged or modied. Damaged or modied
batteries may exhibit unpredictable behaviour
resulting in re, explosion or risk of injury.
20.
Do not expose a battery pack or appliance to
re or excessive temperature. Exposure to re or
temperature above 130 °C may cause explosion.
21. Follow all charging instructions and do not
charge the battery pack or appliance outside
the temperature range specied in the instruc-
tions. Charging improperly or at temperatures
outside the specied range may damage the
battery and increase the risk of re.
SAVE THESE INSTRUCTIONS.
ADDITIONAL SAFETY RULES
This appliance is intended for household use.
1. Read this instruction manual and the charger
instruction manual carefully before use.
2. Do not pick up the following materials:
—
Hot materials such as lit cigarettes or spark/
metal dust generated by grinding/cutting metal
— Flammable materials such as gasoline,
thinner, benzine, kerosene or paint
— Explosive materials like nitroglycerin
— Ignitable materials such as Aluminum,
zinc, magnesium, titanium, phosphorus
or celluloid
— Wet dirt, water, oil or the like
— Hard pieces with sharp edges, such as
wood chips, metals, stones, glasses,
nails, pins or razors
— Powder to clot such as cement or toner
— Conductive dust such as metal or carbon
— Fine particle like concrete dust

12 ENGLISH
Such action may cause re, injury and/or prop-
erty damage.
3. Stop operation immediately if you notice any-
thing abnormal.
4. If you drop or strike the cleaner, check it care-
fully for cracks or damage before operation.
5. Do not bring close to stoves or other heat
sources.
6. Do not block the intake hole or vent holes.
SAVE THESE INSTRUCTIONS.
Important safety instructions for
battery cartridge
1. Before using battery cartridge, read all instruc-
tions and cautionary markings on (1) battery
charger, (2) battery, and (3) product using
battery.
2. Do not disassemble or tamper with the battery
cartridge. It may result in a re, excessive heat,
or explosion.
3. If operating time has become excessively
shorter, stop operating immediately. It may
result in a risk of overheating, possible burns
and even an explosion.
4. If electrolyte gets into your eyes, rinse them
out with clear water and seek medical atten-
tion right away. It may result in loss of your
eyesight.
5. Do not short the battery cartridge:
(1) Do not touch the terminals with any con-
ductive material.
(2) Avoid storing battery cartridge in a con-
tainer with other metal objects such as
nails, coins, etc.
(3) Do not expose battery cartridge to water
or rain.
A battery short can cause a large current
ow, overheating, possible burns and even a
breakdown.
6. Do not store and use the tool and battery car-
tridge in locations where the temperature may
reach or exceed 50 °C (122 °F).
7. Do not incinerate the battery cartridge even if
it is severely damaged or is completely worn
out. The battery cartridge can explode in a re.
8. Do not nail, cut, crush, throw, drop the battery
cartridge, or hit against a hard object to the
battery cartridge. Such conduct may result in a
re, excessive heat, or explosion.
9. Do not use a damaged battery.
10. The contained lithium-ion batteries are subject
to the Dangerous Goods Legislation require-
ments.
For commercial transports e.g. by third parties,
forwarding agents, special requirement on pack-
aging and labeling must be observed.
For preparation of the item being shipped, consult-
ing an expert for hazardous material is required.
Please also observe possibly more detailed
national regulations.
Tape or mask o open contacts and pack up the
battery in such a manner that it cannot move
around in the packaging.
11. When disposing the battery cartridge, remove
it from the tool and dispose of it in a safe
place. Follow your local regulations relating to
disposal of battery.
12. Use the batteries only with the products
specied by Makita. Installing the batteries to
non-compliant products may result in a re, exces-
sive heat, explosion, or leak of electrolyte.
13. If the tool is not used for a long period of time,
the battery must be removed from the tool.
14. During and after use, the battery cartridge may
take on heat which can cause burns or low
temperature burns. Pay attention to the han-
dling of hot battery cartridges.
15. Do not touch the terminal of the tool imme-
diately after use as it may get hot enough to
cause burns.
16. Do not allow chips, dust, or soil stuck into the
terminals, holes, and grooves of the battery
cartridge. It may cause heating, catching re,
burst and malfunction of the tool or battery car-
tridge, resulting in burns or personal injury.
17. Unless the tool supports the use near
high-voltage electrical power lines, do not use
the battery cartridge near a high-voltage elec-
trical power lines. It may result in a malfunction
or breakdown of the tool or battery cartridge.
18. Keep the battery away from children.
SAVE THESE INSTRUCTIONS.
CAUTION: Only use genuine Makita batteries.
Use of non-genuine Makita batteries, or batteries that
have been altered, may result in the battery bursting
causing res, personal injury and damage. It will
also void the Makita warranty for the Makita tool and
charger.
Tips for maintaining maximum
battery life
1. Charge the battery cartridge before completely
discharged. Always stop tool operation and
charge the battery cartridge when you notice
less tool power.
2. Never recharge a fully charged battery car-
tridge. Overcharging shortens the battery
service life.
3. Charge the battery cartridge with room tem-
perature at 10 °C - 40 °C (50 °F - 104 °F). Let
a hot battery cartridge cool down before
charging it.
4. When not using the battery cartridge, remove
it from the tool or the charger.
5. Charge the battery cartridge if you do not use
it for a long period (more than six months).

13 ENGLISH
FUNCTIONAL
DESCRIPTION
CAUTION: Always be sure that the tool is
switched o and the battery cartridge is removed
before adjusting or checking function on the tool.
CAUTION: Take care not to trap nger(s)
between cleaner and battery as shown in diagram
when loading battery. Trapping nger(s) may cause
injury.
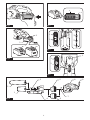
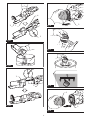
► Fig.1
Installing or removing battery cartridge
CAUTION: Always switch o the tool before
installing or removing of the battery cartridge.
CAUTION: Hold the tool and the battery car-
tridge rmly when installing or removing battery
cartridge. Failure to hold the tool and the battery
cartridge rmly may cause them to slip o your hands
and result in damage to the tool and battery cartridge
and a personal injury.
► Fig.2: 1. Red indicator 2. Button 3. Battery cartridge
To remove the battery cartridge, slide it from the tool
while sliding the button on the front of the cartridge.
To install the battery cartridge, align the tongue on the
battery cartridge with the groove in the housing and slip
it into place. Insert it all the way until it locks in place
with a little click. If you can see the red indicator as
shown in the gure, it is not locked completely.
CAUTION: Always install the battery cartridge
fully until the red indicator cannot be seen. If not,
it may accidentally fall out of the tool, causing injury to
you or someone around you.
CAUTION: Do not install the battery cartridge
forcibly. If the cartridge does not slide in easily, it is
not being inserted correctly.
Battery protection system
The tool is equipped with a tool/battery protection sys-
tem. This system automatically cuts o power to the
motor to extend tool and battery life. The tool will auto-
matically stop during operation if the tool or battery is
placed under one of the following conditions.
Overloaded:
The tool/battery is operated in a manner that causes it
to draw an abnormally high current.
In this situation, turn the tool o and stop the application
that caused the tool to become overloaded. Then turn
the tool on to restart.
If the tool does not start, the tool/battery is overheated.
In this situation, let the tool/battery cool before turning
the tool on again.
Low battery voltage:
The remaining battery capacity is too low and the tool
will not operate. In this situation, remove and recharge
the battery.
Protections against other causes:
Protection system is also designed for other causes
that could damage the tool and allows the tool to stop
automatically. Take all the following steps to clear the
causes, when the tool has been brought to a temporary
halt or stop in operation.
1.
Turn the tool o, and then turn it on again to restart.
2. Charge the battery(ies) or replace it/them with
recharged battery(ies).
3. Let the tool and battery(ies) cool down.
If no improvement can be found by restoring protection
system, then contact your local Makita Service Center.
Indicating the remaining battery capacity
Press the check button on the battery cartridge to indi-
cate the remaining battery capacity. The indicator lamps
light up for a few seconds.
► Fig.3: 1. Indicator lamps 2. Check button
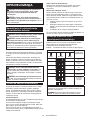
Indicator lamps Remaining
capacity
Lighted O Blinking
75% to 100%
50% to 75%
25% to 50%
0% to 25%
Charge the
battery.
The battery
may have
malfunctioned.
NOTE: Depending on the conditions of use and the
ambient temperature, the indication may dier slightly
from the actual capacity.
NOTE: The rst (far left) indicator lamp will blink when
the battery protection system works.
Switch action
► Fig.4:
1. Suction power change button 2. ON/OFF button
To start the cleaner, simply push the ON/OFF button. To
switch o, push the ON/OFF button again.
You can change the suction power of the cleaner in
four steps by pushing the suction power change button.
Each push on this button repeats the Quiet/Normal/
High/Max mode in a cycle.
Level Indication Mode
1Quiet mode
2
Normal speed mode
3High speed mode
4Max speed mode

14 ENGLISH
NOTE: You can change the suction power before
turning on the cleaner.
NOTE: The cleaner starts the operation with the
same suction power as the last operation.
Lighting up the lamp
CAUTION: Do not look in the light or see the
source of light directly.
To turn on the lamp, push the suction power change
button. The lamp goes o in approximately 10 seconds.
While the cleaner is running, the lamp turns on.
The lamp goes out approximately 10 seconds after
stopping operation.
NOTE: When the remaining battery capacity gets low,
the lamp starts blinking. The timing, at which the lamp
starts blinking depends on the temperature at work
place and the battery cartridge conditions.
► Fig.5: 1. Suction power change button 2. ON/OFF
button 3. Lamp
PARTS DESCRIPTION
Country specic
► Fig.6
1250 mL dust case
(Optional accessory) 2400 mL dust case
(Optional accessory) 3Mesh lter 4Cyclone body
5High performance
lter (Filter frame in
gray color) (Optional
accessory)
6HEPA lter (Filter frame
in white color) (Optional
accessory)
7Sponge sheet 8Cleaner body
9Hand strap (Country
specic) ------
ASSEMBLY
CAUTION: Always be sure that the tool is
switched o and the battery cartridge is removed
before carrying out any work on the tool.
NOTICE: Make sure all the attachments and
components are secured in place properly before
use.
Installing and removing cleaner
attachments
CAUTION: After installing attachments, check
if they are securely installed. If the attachments are
installed imperfectly, they may come o and cause
personal injury.
CAUTION: Be careful not to hit your hand on
the wall etc. when removing the attachments.
When using attachment with lock
function
To install attachment, insert it to the suction inlet of the cleaner
until it clicks. Make sure that the attachment is locked.
► Fig.7: 1. Suction inlet 2. Attachment with lock func-
tion 3. Hook
NOTICE: When installing the attachment with
lock function, be sure to align the release button
on the cleaner with the hook on the attachment. If
they are not aligned, the attachment will not be locked
and may come o from the cleaner.
To remove attachment, pull it o the cleaner while
pressing and holding the arms of the release button.
► Fig.8: 1. Release button 2. Arm of release button
3. Attachment with lock function 4. Suction
inlet
When using attachment without lock
function
NOTICE: To install attachment without lock func-
tion, insert it into the suction inlet of the cleaner
by twisting it as shown in the gure. To detach
attachment, release it from the cleaner by twist-
ing it as shown in the gure. Avoid twisting the
attachment in the direction opposite to the arrow
in the gure as it may loosen the cyclone unit.
► Fig.9

15 ENGLISH
OPERATION
CAUTION:
Do not move your face close to the
air vent when operating the cleaner. If foreign objects
are blown into eyes, it may result in personal injury.
NOTICE: Avoid using the cleaner in a horizontal
or upward facing position. It may otherwise cause
the mesh lter to become clogged.
NOTICE:
Always use the cleaner with lters installed.
Using the cleaner without lters may result in a motor malfunction.
NOTICE: Empty the dust case in the cyclone unit
when dust has accumulated. Continued use will
result in weakened suction force.
The cyclone unit helps reduce the amount of dust that
enters into the cleaner, enhancing the suction perfor-
mance with simple and easy dust disposing.
Cleaning (Suction)
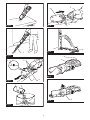
Nozzle
With 250 mL dust case only
Attach the nozzle to clean o tables, desks, furniture,
etc. The nozzle slips on easily.
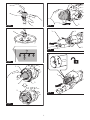
► Fig.10: 1. Nozzle
Nozzle + Extension wand (Straight pipe)
The extension wand ts in between the nozzle and the
cleaner itself. This arrangement is convenient for clean-
ing a oor in a standing position.
► Fig.11:
1. Cleaner body 2. Extension wand 3. Nozzle
Corner nozzle
Fit on the corner nozzle for cleaning corners and crev-
ices of a car or furniture.
► Fig.12: 1. Corner nozzle 2. Cleaner body
You can store the corner nozzle in the nozzle holder.
► Fig.13: 1. Nozzle holder 2. Corner nozzle
CAUTION: Be careful not to trap nger(s)
between the corner nozzle and the nozzle holder.
Trapping nger(s) may cause injury.
Corner nozzle + Extension wand
(Straight pipe)
In tight quarters where the cleaner itself cannot squeeze
in, or in high places hard to reach, use this arrangement.
► Fig.14:
1. Corner nozzle 2. Extension wand 3. Cleaner body
Cleaning without nozzle
With 250 mL dust case only
You can pick up powder and dust without nozzle.
► Fig.15
For picking up dust on a oor in a standing position, it is conve-
nient to attach the extension wand (straight pipe) to the cleaner.
► Fig.16: 1. Extension wand
Disposing of dust
CAUTION: Empty the dust case before it
becomes too full, or the suction force weakens.
CAUTION:
Be careful not to trap nger(s) between
the dust case and cyclone body when reassembling.
Dispose of accumulated dust as follows before it
exceeds the dust disposal line.
1. Point the cleaner head downwards, hold the dust
case rmly, and then pull it apart from the cyclone body
while pressing and holding the release buttons on both
sides of the dust case.
► Fig.17: 1. Dust disposal line 2. Dust case
3. Release buttons 4. Mesh lter
2. Empty the dust case and clean the adhered dust
o the mesh lter.
► Fig.18
3. Place the dust case back onto the cyclone body to
secure it in place with clicks.
► Fig.19:
1. Dust case 2. Release buttons 3. Cyclone body
CAUTION: The dust may y up when dis-
posed out of the dust case. Be careful not to let
the dust get into your eyes.
NOTICE: When the dust case becomes dirty,
remove and wash it with water. Dry the dust case
thoroughly before reassembly and use.
NOTICE:
Make sure all the attachments and com-
ponents are secured in place properly before use.
NOTICE: If the suction force does not recover
even after disposing of the dust and cleaning the
mesh lter, check whether dust has accumulated
inside the cyclone body or clogging has occurred.
MAINTENANCE
CAUTION: Always be sure that the tool is
switched o and the battery cartridge is removed
before attempting to perform inspection or
maintenance.
NOTICE: Never use gasoline, benzine, thinner,
alcohol or the like. Discoloration, deformation or
cracks may result.
To maintain product SAFETY and RELIABILITY,
repairs, any other maintenance or adjustment should
be performed by Makita Authorized or Factory Service
Centers, always using Makita replacement parts.
After use
CAUTION: Putting the cleaner against the
wall without any other support may cause the
cleaner to fall down, resulting in personal injury
or damage to the cleaner.
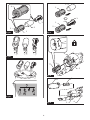
► Fig.20

16 ENGLISH
Regular maintenance
NOTICE: Clean the lters in the cyclone unit
when they become clogged. Continued use in the
clogged condition may result in heating or motor
malfunction.
NOTICE: Do not blow dust sticking on the
cleaner and lters by air duster. It brings dust into
the housing and causes failure.
Routine maintenance is required to restore normal
operating conditions.
Cleaner body
Wipe o the outside (cleaner body) of the cleaner using
a cloth dampened in soapy water, and clean out the
suction openings.
► Fig.21
Cyclone unit and lters
NOTICE: Dust o and clean out inside the
cyclone unit and lters, when suction perfor-
mance becomes less eective regardless of the
amount of dust collected in the dust case.
NOTICE: After washing lters, dry them thor-
oughly before use. Insuciently dried lters may
cause poor suction and shorten the service life of the
motor.
NOTICE: After cleaning lters and sponge sheet,
be sure to re-install them before use. If you use the
cleaner without lters and sponge sheet, dust comes
into the motor housing and causes malfunction.
Cyclone unit
1. Tap the cyclone unit several times with your hand
to remove dust adhering to the inner surface of the
cyclone unit and lter.
► Fig.22: 1. Cyclone unit
2. With the suction inlet pointing downwards, turn the
cyclone unit as shown in the gure aligning the pointer
on the cyclone unit with that on the cleaner body to
disengage the lock. Then detach the cyclone unit from
the cleaner body slowly and straightly.
► Fig.23: 1. Cyclone unit 2. Suction inlet 3. Pointers
4. Filter
NOTE: Dust may y out when the cyclone unit is
disassembled. It is recommended to place a garbage
bag underneath the cyclone unit.
3. Dust o inside the cyclone unit and lter.
► Fig.24
4. Place the cyclone unit back onto the cleaner body,
aligning the pointer on the cyclone unit with that on the
cleaner body. Then turn the cyclone unit as shown in
the gure until it is secured in place.
► Fig.25: 1. Cyclone unit 2. Cleaner body 3. Pointers
High performance lter
Optional accessory
1. Disassemble the cyclone unit from the cleaner
body.
2. Hold the mounting end of high performance lter
and pull it apart from the cleaner body.
► Fig.26: 1. High performance lter 2. Cleaner body
3. Wipe and shake dust o the high performance
lter by hand.
► Fig.27
4. Wash the high performance lter in soapy water
when it is clogged with dust and dirt. Dry it out thor-
oughly in the shade before use.
► Fig.28
NOTE: Avoid fastening the attachment end (rubber
sealing ring) of high performance lter when hanging
it up for drying.
5. Hold the mounting end of high performance lter
and squeeze it back into the cleaner body.
► Fig.29: 1. High performance lter 2. Cleaner body
HEPA lter
Optional accessory
NOTICE: Do not rub or scratch the HEPA lter
with hard objects such as a brush and a paddle.
1. Disassemble the cyclone unit from the cleaner
body.
2. Hold the mounting end of HEPA lter (covered with
high performance prelter) and pull it apart from the
cleaner body.
► Fig.30: 1. HEPA lter (covered with high perfor-
mance prelter) 2. Cleaner body
3. Disassemble the high performance prelter from
the HEPA lter by hand twisting.
► Fig.31: 1. High performance prelter 2. HEPA lter
4. Wipe and shake dust o the high performance
prelter and HEPA lter by hand.
► Fig.32
5. Wash the high performance prelter and HEPA
lter in soapy water. Rinse and dry them thoroughly in
the shade before use.
► Fig.33
NOTE: Avoid fastening the attachment end (rubber
sealing ring) of HEPA lter when hanging it up for
drying.
6. Attach the high performance prelter onto the
HEPA lter.
► Fig.34: 1. High performance prelter 2. HEPA lter
7. Hold the mounting end of HEPA lter (covered with
high performance prelter) and squeeze it back into the
cleaner body.
► Fig.35: 1. HEPA lter (covered with the high perfor-
mance prelter) 2. Cleaner body

17 ENGLISH
Sponge sheet
1.
Disassemble the cyclone unit from the cleaner body.
2. Hold the mounting end of lter and pull it apart
from the cleaner body.
► Fig.36: 1. Filter 2. Cleaner body
3. Pull the sponge sheet o from the suction
opening.
► Fig.37: 1. Sponge sheet 2. Suction opening
4. Wipe and shake dust o the sponge sheet by
hand.
► Fig.38
5. Wash the sponge sheet in soapy water when it is
clogged with dust and dirt. Dry it out thoroughly in the
shade before use.
► Fig.39
6. Place the sponge sheet back in the original
position. Make sure that the left and right edges of the
sponge sheet are secured with stoppers and no gap
between the sponge sheet and suction opening.
► Fig.40: 1. Sponge sheet 2. Stopper 3. Suction
opening
7. Hold the mounting end of lter and squeeze it
back into the cleaner body.
► Fig.41: 1. Filter 2. Cleaner body
Condition-based maintenance
NOTICE: Clean the mesh lter in the cyclone
unit when they become clogged. Continued use in
the clogged condition may result in heating or motor
malfunction.
Deep and spot cleaning needs to be carried out accord-
ing to your tool performance.
Mesh lter
Clean up the mesh lter placed in the cyclone unit when
no suggested improvement on suction performance has
been found after completing regular maintenance.
1. Hold the dust case rmly and pull it apart from the
cyclone body while pressing and holding the release
buttons on both sides of the dust case.
► Fig.42: 1. Dust case 2. Cyclone body 3. Release
buttons
2. Turn the mesh lter as shown in the gure to dis-
engage the lock. Then detach it from the cyclone body.
► Fig.43: 1. Mesh lter
3. Disassemble the mesh lter into three compo-
nents: prelter, tubular sponge lter and mesh pipe.
i Squeeze the guide stoppers on top of the mesh
pipe together.
ii Pass the guide stoppers down through the guide
hole on top of the prelter.
iii Pull the the prelter along the tubular sponge lter
and mesh pipe.
iv Remove the tubular sponge lter from the mesh
pipe.
► Fig.44: 1. Prelter 2. Tubular sponge lter 3. Mesh
pipe 4. Guide stoppers 5. Guide hole
4. Wipe and shake dust o the lters and mesh pipe
by hand.
► Fig.45
5. Wash the lters and mesh pipe in soapy water
when they are clogged with dust and dirt. Dry them out
thoroughly in the shade before use.
► Fig.46
6. Reassemble the mesh lter.
i Insert the tubular sponge lter into the prelter.
ii Insert the mesh pipe into the tubular sponge lter
and prelter, passing the guide stoppers on top of the
mesh pipe through the guide hole on top of the prelter.
iii Push the mesh pipe through the tubular sponge
lter and prelter until it lock in place with a click.
► Fig.47: 1. Prelter 2. Tubular sponge lter 3. Mesh
pipe 4. Guide stoppers 5. Guide hole
7. Attach the mesh lter back into the cyclone body
aligning the hooks on the mesh lter with the ports on
the suction outlet of the cyclone body. Turn the mesh
lter as shown in the gure until the hooks are locked
with a click. Make sure that the mesh lter is installed
securely.
► Fig.48: 1. Mesh lter 2. Cyclone body 3. Hook
4. Port
Air channels in cyclone unit
Incoming foreign substance may block the air channels
in the cyclone unit and laden air ows. Remove any
obstacles in the air path if the suction performance is
being aected remarkably.
1. Disassemble the cyclone unit into three compo-
nents: dust case, mesh lter and cyclone body.
► Fig.49: 1. Dust case 2. Mesh lter 3. Cyclone body
4. Cleaner body
2. Press and hold the guide stopper on the inlet pipe
down through the locking hole on the cyclone body
using the hand tool with a point. Then detach the inlet
pipe from the cyclone body.
► Fig.50: 1. Inlet pipe 2. Guide stopper 3. Cyclone
body 4. Locking hole
3. Clean o any substance found in the air channels.
Foreign substance is likely to get stuck around an
incoming air port.
► Fig.51: 1. Suction inlet 2. Incoming air port
4. Insert the inlet pipe back in place until it is securely
locked.
► Fig.52: 1. Inlet pipe 2. Cyclone body 3. O-ring
4. Flap valve
NOTICE: Be sure that the O-ring and ap valve
are securely in place before reassembly. Suction
performance can be aected if the cyclone unit is
operated without the O-ring and ap valve in place.
5. Reassemble the cyclone unit, and attach it onto
the cleaner body.

18 ENGLISH
Troubleshooting
Before asking for repairs, check the following points.
Symptom Area to be investigated Fixing method
Weak suction power Is dust case or inside cyclone unit full of
dust? Empty dust case or inside cyclone unit.
Are lters clogged? Dust down or wash high performance lter/HEPA
lter/sponge sheet/mesh lter.
Anything to block incoming air channels? Clean any dust and objects out of air openings and
channels.
Is battery cartridge discharged? Charge battery cartridge.
Not working Is battery cartridge discharged? Charge battery cartridge.
Noise and vibration Are lters clogged? Dust down or wash high performance lter/HEPA
lter/sponge sheet/mesh lter.
Anything to block openings or holes? Clean any dust and objects out of nozzles, pipes
and air openings.
Is suction inlet of nozzle or pipe closed? Uncover and open suction inlet of nozzle and pipe.
CAUTION: Do not attempt to repair the cleaner by yourself.
OPTIONAL
ACCESSORIES
CAUTION: These accessories or attachments
are recommended for use with your Makita tool
specied in this manual. The use of any other
accessories or attachments might present a risk of
injury to persons. Only use accessory or attachment
for its stated purpose.
If you need any assistance for more details regard-
ing these accessories, ask your local Makita Service
Center.
• Extension wand (Straight pipe)
• Nozzle
• Nozzle for carpet
• Shelf brush
• Corner nozzle
• Round brush
• Flexible hose
• High performance lter
• HEPA lter
• Seat nozzle
• Crevice nozzle
• Tool bag
• Makita genuine battery and charger
NOTE: Some items in the list may be included in the
tool package as standard accessories. They may
dier from country to country.

19 SLOVENŠČINA
SLOVENŠČINA (Originalna navodila)
OPOZORILO
• To napravo lahko na varen način, če razumejo vključena tveganja, uporabljajo otroci, stari 8 let in več ter osebe
z zmanjšanimi zičnimi, čutilnimi ali psihičnimi sposobnostmi ter s pomanjkanjem izkušenj in znanja, če so pod
ustreznim nadzorom ali so prejeli navodila v zvezi z uporabo naprave.
• Otroci se z napravo ne smejo igrati. Otroci brez nadzora ne smejo izvajati čiščenja in uporabniškega
vzdrževanja.
• Glejte poglavje „TEHNIČNI PODATKI“ za vrsto baterije.
• Za navodila o nameščanju ali odstranjevanju baterije glejte razdelek „Nameščanje ali odstranjevanje akumula-
torske baterije“.
• Ko želite akumulatorsko baterijo zavreči, jo vzemite iz orodja in odložite med odpadke na varno mesto.
Upoštevajte lokalne uredbe glede odlaganja baterije.
• Če orodja ne boste uporabljali dalj časa, morate odstraniti baterijo.
• Ne povzročite kratkega stika akumulatorske baterije.
• Za primerne podrobnosti o previdnostnih ukrepih med vzdrževanjem glejte poglavje „VZDRŽEVANJE“.
TEHNIČNI PODATKI
Model: CL003G
Zmogljivost 250 mL/400 mL (odvisno od države)
Neprekinjena uporaba
(z akumulatorjem BL4025) 1 (tihi način) Pribl. 80 min
2 (način z običajno hitrostjo) Pribl. 40 min
3 (način z visoko hitrostjo) Pribl. 25 min
4 (način z največjo hitrostjo) Pribl. 16 min
Celotna dolžina (s cevjo, šobo in baterijo BL4025) 1.106 mm
Nazivna napetost D.C. največ 36 V – 40 V
Neto teža 1,9 – 2,6 kg
• Ker nenehno opravljamo raziskave in razvijamo svoje izdelke, se lahko tehnični podatki v tem dokumentu
spremenijo brez obvestila.
• Tehnični podatki se lahko razlikujejo od države do države.
• Teža ne vključuje pripomočkov, vključuje pa akumulatorske baterije. Najlažja in najtežja kombinacija teže
naprave in akumulatorskih baterij sta prikazani v tabeli.
Uporabna akumulatorska baterija in polnilnik
Baterijski vložek BL4020* / BL4025* / BL4040* / BL4050F
* : Priporočeni akumulator
Polnilnik DC40RA / DC40RB / DC40RC
• Nekatere zgoraj navedene akumulatorske baterije in polnilniki morda v vaši državi prebivališča niso na voljo.
OPOZORILO: Uporabljajte le zgoraj navedene akumulatorske baterije in polnilnike. Uporaba drugih
akumulatorskih baterij in polnilnikov lahko povzroči telesne poškodbe in/ali požar.

20 SLOVENŠČINA
Simboli
Naslednji simboli se lahko uporabljajo v povezavi s
strojem. Pred uporabo izdelka se obvezno seznanite z
njihovim pomenom.
Preberite navodila za uporabo.
Vzorec baterije, ki se uporablja za ta
izdelek.
Ni-MH
Li-ion Samo za države EU
Zaradi prisotnosti nevarnih komponent v
opremi imajo lahko uporabljena električna in
elektronska oprema, akumulatorji in baterije
negativen vpliv na okolje in zdravje ljudi.
Električnih in elektronskih naprav ali baterij
ne odlagajte med gospodinjske odpadke!
Skladno z evropsko Direktivo o odpadni
električni in elektronski opremi, o akumula-
torjih in baterijah ter odpadnih akumulator-
jih in baterijah ter njeno uporabo v državnih
zakonih morate rabljeno električno in
elektronsko opremo, baterije in akumula-
torje zbirati ločeno ter dostaviti na posebno
zbiralno mesto za komunalne odpadke, ki
deluje skladno s predpisi za zaščito okolja.
To nakazuje simbol prečrtanega smetnjaka
s kolesi, ki je natisnjen na opremi.
Predvidena uporaba
Orodje je namenjeno za zbiranje suhega prahu.
VARNOSTNA OPOZORILA
Varnostna opozorila za brezžični
čistilnik
OPOZORILO: POMEMBNO! POZORNO
PREBERITE vsa varnostna opozorila in navodila
pred uporabo. Zaradi neupoštevanja opozoril in
navodil lahko pride do električnega šoka, požara in/ali
hudih telesnih poškodb.
1.
Ne izpostavljajte dežju. Hranite v notranjih prostorih.
2. Ne dovolite igranja z napravo. Potrebna je
posebna pozornost, kadar napravo uporabljajo
otroci ali se uporablja v njihovi bližini.
3. Uporabljajte le v skladu z opisi v tem priroč-
niku. Uporabljajte le priključke, ki jih priporoča
proizvajalec.
4.
Ne uporabljajte naprave s poškodovanim akumu-
latorjem. Če naprava ne deluje, kot bi morala, je
padla, je poškodovana, pozabljena na prostem ali
je padla v vodo, jo odnesite v servis.
5. Ne rokujte z napravo z mokrimi rokami.
6. Ne vstavljajte predmetov v odprtine. Ne upo-
rabljajte z zamašenimi odprtinami; odstranite
prah, vlakna, lase in vse, kar bi lahko zmanj-
šalo pretok zraka.
7. Las, ohlapnih oblačil, prstov in nobenih delov
telesa ne približujte odprtinam in premikajočim
se delom.
8. Preden odstranite akumulator, izklopite vse
upravljalne elemente.
9.
Med čiščenjem na stopnicah bodite izjemno previdni.
10. Ne uporabljajte za pobiranje vnetljivih ali gor-
ljivih tekočin, kot je bencin, in ne uporabljajte v
območjih, kjer so lahko prisotne.
11. Za polnjenje uporabljajte samo polnilnik, ki ga
dobavlja proizvajalec.
12. Ne pobirajte ničesar, kar gori ali iz česar se vije
dim, kot so cigarete, vžigalice ali vroč pepel.
13. Ne uporabljajte brez vrečke za prah in/ali
nameščenih ltrov.
14. Akumulatorja ne polnite na prostem.
15. Orodje polnite samo s polnilnikom, ki ga je
določil proizvajalec. Polnilnik, ki je primeren za
eno vrsto akumulatorskega sklopa, lahko pomeni
nevarnost požara, če ga uporabljate z drugim
akumulatorskim sklopom.
16. Naprave uporabljajte samo s predpisano vrsto
akumulatorskih sklopov. Pri uporabi drugih
akumulatorskih sklopov lahko pride do telesnih
poškodb in požara.
17. Ko akumulatorskega sklopa ne uporabljate,
ga ne hranite ob kovinskih predmetih, kot so
sponke za papir, kovanci, ključi, žeblji, vijaki ali
drugi manjši kovinski predmeti, ki lahko pove-
žejo oba terminala.
18. V neprimernih pogojih lahko iz akumulatorja
uhaja tekočina; izogibajte se stiku. Če pride do
nenamernega stika, sperite z vodo.
19. Ne uporabljajte akumulatorskega sklopa ali
naprave, ki je poškodovana ali spremenjena.
Delovanje poškodovanih ali spremenjenih baterij
je nepredvidljivo in lahko povzroči požar, eksplo-
zijo ali telesne poškodbe.
20. Akumulatorskega sklopa oziroma naprave
ne izpostavljajte ognju ali previsoki tempera-
turi. Izpostavljenost ognju ali temperaturam nad
130 °C lahko povzroči eksplozijo.
21.
Upoštevajte vsa navodila glede polnjenja in
akumulatorskega sklopa oziroma naprave ne
polnite zunaj določenega temperaturnega raz-
pona. Nepravilno polnjenje ali polnjenje pri tempe-
raturah zunaj določenega razpona lahko povzroči
poškodbe baterije in poveča nevarnost požara.
SHRANITE TA NAVODILA.
DODATNA VARNOSTNA
PRAVILA
Ta naprava je namenjena le za domačo uporabo.
1. Pred uporabo pozorno preberite ta navodila za
uporabo in navodila za uporabo polnilnika.
2. Ne pobirajte naslednjih materialov:
— vročega materiala, kot so prižgane ciga-
rete ali iskre/kovinski prah, ki nastane
zaradi brušenja/rezanja kovin
— vnetljivih materialov, kot je bencin,
razredčilo, kerozin ali barva
— eksplozivnih materialov, npr. nitroglicerin
— vnetljivih materialov, kot je aluminij, cink,
magnezij, titan, fosfor ali celuloid
— mokre zemlje, vode olja ipd.
Pagina se încarcă...
Pagina se încarcă...
Pagina se încarcă...
Pagina se încarcă...
Pagina se încarcă...
Pagina se încarcă...
Pagina se încarcă...
Pagina se încarcă...
Pagina se încarcă...
Pagina se încarcă...
Pagina se încarcă...
Pagina se încarcă...
Pagina se încarcă...
Pagina se încarcă...
Pagina se încarcă...
Pagina se încarcă...
Pagina se încarcă...
Pagina se încarcă...
Pagina se încarcă...
Pagina se încarcă...
Pagina se încarcă...
Pagina se încarcă...
Pagina se încarcă...
Pagina se încarcă...
Pagina se încarcă...
Pagina se încarcă...
Pagina se încarcă...
Pagina se încarcă...
Pagina se încarcă...
Pagina se încarcă...
Pagina se încarcă...
Pagina se încarcă...
Pagina se încarcă...
Pagina se încarcă...
Pagina se încarcă...
Pagina se încarcă...
Pagina se încarcă...
Pagina se încarcă...
Pagina se încarcă...
Pagina se încarcă...
Pagina se încarcă...
Pagina se încarcă...
Pagina se încarcă...
Pagina se încarcă...
Pagina se încarcă...
Pagina se încarcă...
Pagina se încarcă...
Pagina se încarcă...
Pagina se încarcă...
Pagina se încarcă...
Pagina se încarcă...
Pagina se încarcă...
Pagina se încarcă...
Pagina se încarcă...
Pagina se încarcă...
Pagina se încarcă...
Pagina se încarcă...
Pagina se încarcă...
Pagina se încarcă...
Pagina se încarcă...
Pagina se încarcă...
Pagina se încarcă...
Pagina se încarcă...
Pagina se încarcă...
Pagina se încarcă...
Pagina se încarcă...
Pagina se încarcă...
Pagina se încarcă...
Pagina se încarcă...
Pagina se încarcă...
Pagina se încarcă...
Pagina se încarcă...
Pagina se încarcă...
Pagina se încarcă...
Pagina se încarcă...
Pagina se încarcă...
Pagina se încarcă...
Pagina se încarcă...
Pagina se încarcă...
Pagina se încarcă...
Pagina se încarcă...
Pagina se încarcă...
Pagina se încarcă...
Pagina se încarcă...
Pagina se încarcă...
Pagina se încarcă...
Pagina se încarcă...
Pagina se încarcă...
-
 1
1
-
 2
2
-
 3
3
-
 4
4
-
 5
5
-
 6
6
-
 7
7
-
 8
8
-
 9
9
-
 10
10
-
 11
11
-
 12
12
-
 13
13
-
 14
14
-
 15
15
-
 16
16
-
 17
17
-
 18
18
-
 19
19
-
 20
20
-
 21
21
-
 22
22
-
 23
23
-
 24
24
-
 25
25
-
 26
26
-
 27
27
-
 28
28
-
 29
29
-
 30
30
-
 31
31
-
 32
32
-
 33
33
-
 34
34
-
 35
35
-
 36
36
-
 37
37
-
 38
38
-
 39
39
-
 40
40
-
 41
41
-
 42
42
-
 43
43
-
 44
44
-
 45
45
-
 46
46
-
 47
47
-
 48
48
-
 49
49
-
 50
50
-
 51
51
-
 52
52
-
 53
53
-
 54
54
-
 55
55
-
 56
56
-
 57
57
-
 58
58
-
 59
59
-
 60
60
-
 61
61
-
 62
62
-
 63
63
-
 64
64
-
 65
65
-
 66
66
-
 67
67
-
 68
68
-
 69
69
-
 70
70
-
 71
71
-
 72
72
-
 73
73
-
 74
74
-
 75
75
-
 76
76
-
 77
77
-
 78
78
-
 79
79
-
 80
80
-
 81
81
-
 82
82
-
 83
83
-
 84
84
-
 85
85
-
 86
86
-
 87
87
-
 88
88
-
 89
89
-
 90
90
-
 91
91
-
 92
92
-
 93
93
-
 94
94
-
 95
95
-
 96
96
-
 97
97
-
 98
98
-
 99
99
-
 100
100
-
 101
101
-
 102
102
-
 103
103
-
 104
104
-
 105
105
-
 106
106
-
 107
107
-
 108
108


Lucrări înrudite
-
Makita VC008G Manual de utilizare
-
Makita VC001GL Manual de utilizare
-
Makita CL114FD Manual de utilizare
-
Makita CL108FD Manual de utilizare
-
-
Makita DCL284F Manual de utilizare
-
-
-
Makita DVC867L Manual de utilizare
-