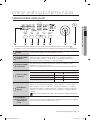
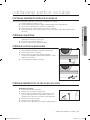
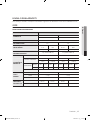
Samsung WF-B1062 Manualul utilizatorului
- Categorie
- Mașini de spălat
- Tip
- Manualul utilizatorului

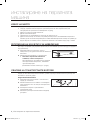
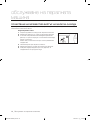
Washing Machine
user manual
imagine the possibilities
Thank you for purchasing a Samsung product.
To receive a more complete service,
please register your product at
www.samsung.com/global/register
WF-J1462(V/S/C/R)
WF-J1262(V/S/C/R)
WF-J1062(V/S/C/R)
WF-J862(V/S/C/R)
WF-B1462(V/S/C/R)
WF-B1262(V/S/C/R)
WF-B1062(V/S/C/R)
WF-B862(V/S/C/R)
WF-R1262(V/S/C/R)
WF-R1062(V/S/C/R)
WF-R862(V/S/C/R)
WF-F1262(V/S/C/R)
WF-F1062(V/S/C/R)
WF-F862(V/S/C/R)
WF-S1062(V/S/C/R)
WF-S862(V/S/C/R)
WF-B1262-02349R_EN.indd 1 2007-06-01 ø¿¿¸ 9:03:14

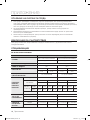
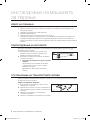
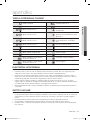
2_ Safety information
safety information
Congratulations on your purchase of this Samsung washing machine. These
Owner’s Instructions contain valuable information on the installation, use, and
care of this appliance. Please take the time to read these instructions so that
you can take full advantage of the washing machine’s features and enjoy this
appliance for many years to come.
IMPORTANT SAFETY SYMBOLS AND PRECAUTIONS
What the icons and signs in this user manual means:
WARNING
Hazards or unsafe practices that may result in severe personal injury or
death.
CAUTION
Hazards or unsafe practices that may result in minor personal injury or
property damage.
CAUTION
To reduce the risk of fire, explosion, electric shock, or personal injury when
using your washer, follow these basic safety precautions:
BEFORE USING THE APPLIANCE
Packing materials can be dangerous to children; keep all packing material (plastic bags,
polystyrene, etc.) well out of the reach of children.
The appliance is designed for home use only.
Make sure that water and electrical connections are made by qualified technicians,
observing the manufacturer’s instructions (see “Installing the Washing Machine”) and local
safety regulations.
All packaging and shipping bolts must be removed before the appliance is used. Serious
damage may occur if they are not removed. See “Removing the shipping bolts”.
Before washing clothes for the first time, you must run a complete cycle without clothes.
See “Washing for the first time”.
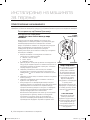
SAFETY INSTRUCTIONS
Before cleaning or carrying out maintenance, unplug the appliance from the electrical outlet
or set the (On/Off ) button to Off.
Make sure that the pockets of all clothing to be washed are empty.
Hard, sharp objects, such as coins, safety pins, nails, screws, or stones can cause
extensive damage to the appliance.
Always unplug the appliance and turn off the water after use.
Before you open the door of the appliance, check that the water has drained. Do not open
the door if you can still see water.
Pets and small children may climb into the appliance. Check the appliance before each use.
CAUTION
WARNING
WF-B1262-02349R_EN.indd 2 2007-06-01 ø¿¿¸ 9:03:14

Safety information _3
The glass door becomes very hot during the washing cycle. Keep children away from the
appliance while it is in use.
Do not attempt to repair the appliance yourself. Repairs made by inexperienced or
unqualified persons may cause injury and/or make more serious repairs to the appliance
necessary.
If the plug (power supply cord) is damaged, it must be replaced by the manufacturer or its
service agent or a similar qualified person in order to avoid a hazard.
This appliance should only be serviced by an authorized service center, and only genuine
spare parts should be used.
This appliance is not intended for use by young children or infirm persons unless theyhave
been adequately supervised by a responsible person to ensure that they can use the
appliance safely. Young children should be supervised to ensure that they do not play with
the appliance.
This appliance has to be connected to the plug endurable to proper power consumption.
This appliance has to be positioned so that the plug is accessible after installation.
Do not use processed water containing oil, cream or lotion, which is usually found in skin-
care shops or massage clinics.
• Otherwise this will cause the packing to be deformed, which causes a malfunction or
water leak.
A stainless washing tube does not usually rust. However if some metal such as a hair pin is
left in the tube for an extended time, the tube could rust.
• Do not leave water or bleach containing chlorine in the tube for an extended period of
time.
• Do not regularly use or leave water containing iron in the tube for an extended period of
time.
• If rust starts appearing on the surface of the tube, apply a cleansing agent (neutral) to
the surface and use a sponge or soft cloth to clean it. (Under no circumstances use a
metal brush)
For washing machines with ventilation openings in the base, that a carpet must not
obstruct the openings.
Use the new hose-sets and old hose-sets should not be reused.
This marking shown on the product or its literature, indicates that it should not be disposed
with other household wastes at the end of its working life. To prevent possible harm to
the environment or human health from uncontrolled waste disposal, please separate this
from other types of wastes and recycle it responsibly to promote the sustainable reuse of
material resources.
Household users should contact either the retailer where they purchased this product,
or their local government office, for details of where and how they can take this item for
environmentally safe recycling. Business users should contact their supplier and check
the terms and conditions of the purchase contract. This product should not be mixed with
other commercial wastes for disposal.
WF-B1262-02349R_EN.indd 3 2007-06-01 ø¿¿¸ 9:03:15

4_ Contents
contents
INSTALLING THE WASHING
MACHINE
5
5 Unpacking the Washing Machine
5 Overview of the washing machine
6 Selecting a location
6 Adjusting the leveling feet
6 Removing the shipping bolts
7 Connecting the water supply hose
7 Positioning the drain hose
8 Plugging in the machine
WASHING A LOAD OF LAUNDRY
9
9 Overview of the control panel
10 Washing for the first time
10 Putting detergent in the washing machine
11 Washing clothes manually
11 Selecting options
12 Washing tips and hints
MAINTAINING THE WASHING
MACHINE
13
13 Repairing a frozen washing machine
13 Cleaning the exterior
13 Cleaning the debris filter
13 Cleaning the water hose mesh filter
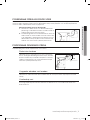
TROUBLESHOOTING
14
14 Problems and solutions
14 Understanding error messages
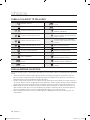
PROGRAMME CHART
15
15 Programme chart
APPENDIX
16
16 Fabric care chart
16 Electrical warnings
16 Protecting the environment
17 Declaration of conformity
17 Specification
WF-B1262-02349R_EN.indd 4 2007-06-01 ø¿¿¸ 9:03:15

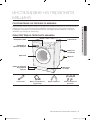
Installing the washing machine _5
installing the washing machine
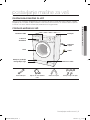
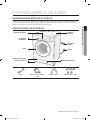
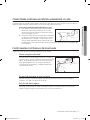
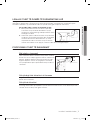
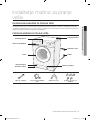
UNPACKING THE WASHING MACHINE
Unpack your washing machine and inspect it for shipping damage. Also make sure that you have received
all of the items shown below. If the washing machine was damaged during shipping or you do not have all
of the items, contact your Samsung dealer immediately.
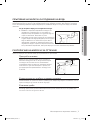
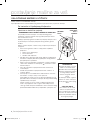
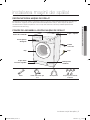
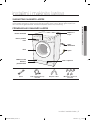
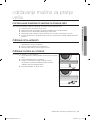
OVERVIEW OF THE WASHING MACHINE
Wrench Cold water supply hose Hose guide Bolt hole covers
01 Installing the washing machine
Control panel
Detergent drawer
Door
Base cover
Adjustable feet
Debris filter
Plug
Drain Hose
Cover top
WF-B1262-02349R_EN.indd 5 2007-06-01 ø¿¿¸ 9:03:16

6_ Installing the washing machine
SELECTING A LOCATION
Before you install the washing machine, select a location with the following characteristics:
• A hard, level surface (if the surface is uneven, see “Adjusting the leveling feet,” below)
• Away from direct sunlight.
• Adequate ventilation
• Room temperature that will not fall below 0˚C
• Away from sources of heat such as coal or gas Make sure that the washing machine does
not stand on its power cord. Ventilation openings must not be obstructed by carpeting when
the washing machine is installed on a carpeted floor.
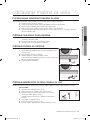
ADJUSTING THE LEVELING FEET
If the floor is uneven, adjust the feet (do not insert pieces of wood or any other objects under the
feet):
1. Loosen the leg bolt by turning it with your hand
until it is at the desired height.
2. Tighten the locking nut by turning it with the
wrench.
• Place the washer on a sturdy, flat surface.
If the washer is placed on an uneven or weak
surface, noise or vibration occurs.
(Only a 1 degrees angle is allowed.)
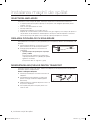
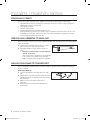
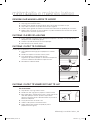
REMOVING THE SHIPPING BOLTS
Before using the washing machine, you must remove all of the shipping bolts from the back of
the unit.
To remove the bolts:
1. Loosen all bolts with the wrench before removing
them.
2. Take each bolt head and pull it through the wide
part of the hole. Repeat for each bolt.
3. Fill the holes with the supplied plastic covers.
4. Keep the shipping bolts for future use.
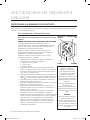
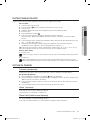
installing the washing machine
o
C
rp
m
Mi
n
Fuzzy control
Temp Spin Delay Start Function
Door open
Powe
r
Spin
Check
Remaining Ti
me
Delay Star
t
Rins
e
Wa
sh
Pre-wash
Eco
Speed
y
Wo
ol
Delicate
Synthetic
Co
tton
START
PAUS
E
12:00
WF-B1262-02349R_EN.indd 6 2007-06-01 ø¿¿¸ 9:03:17

Installing the washing machine _7
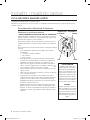
CONNECTING THE WATER SUPPLY HOSE
The water supply hose must be connected to the washing machine at one end and to the water faucet at
the other. Do not stretch the water supply hose. If the hose is too short and you do not wish to move the
water faucet, replace the hose with a longer, high pressure hose.
To connect the water supply hose:
1. Take the L-shaped arm fitting for the cold water
supply hose and connect to the cold water supply
intake on the back of the machine. Tighten by hand.
2. Connect the other end of the cold water supply hose
to your sink’s cold water faucet and tighten it by hand.
If necessary, you can reposition the water supply hose
at the washing machine end by loosening the fitting,
rotating the hose, and retightening the fitting.
POSITIONING THE DRAIN HOSE
The end of the drain hose may be positioned in three ways:
Over the edge of a sink
The drain hose must be placed at a height of between
60 and 90 cm. To keep the drain hose spout bent, use
the supplied plastic hose guide. Secure the guide to the
wall with a hook or to the faucet with a piece of string to
prevent the drain hose from moving.
ln a sink drain pipe branch
The drain pipe branch must be above the sink siphon so that the end of the hose is at least 60 cm
above the ground.
ln a drain pipe
Samsung recommends that you use a 65 cm high vertical pipe; it must be no shorter than 60 cm
and no longer than 90 cm.
01 Installing the washing machine
WF-B1262-02349R_EN.indd 7 2007-06-01 ø¿¿¸ 9:03:18

8_ Installing the washing machine
PLUGGING IN THE MACHINE
You MUST ground the plug of the washing machine.
Check with a licensed electrician before using the machine to make sure it is properly grounded.
For U.K. Users.
Wiring lnstructions
- WARNING THIS APPLIANCE MUST BE EARTHED.
This appliance must be earthed. In the event of an electrical
short circuit, earthing reduces the risk of electric shock
providing an escape wire for the electric current.
The appliance is equipped with a mains lead which includes
an earth wire for connecting to the earth terminal of your mains
plug.
The plug must be plugged into a socket that is properly
installed and earthed.
* The wires in this mains lead are coloured in accordance with
the following code:
• Green and yellow : Earth
• Blue : Neutral
• Brown : Live
• AS the colours of the wires in the mains lead of this
appliance may not correspond with the coloured markings
indentifying the terminals in your plug, proceed as follows.
• Connect the green and yellow wire to the terminal in the
plug marked with the letter E or the earth symbol ( ) or
coloured green or green-and-yellow.
• Connect the blue wire to the terminal marked with the letter
N or coloured black.
• Connect the brown wire to the terminal marked with the
letter L or coloured red.
* Consult a qualified electrician or service technician if in
doubt about any of these instructions.
The manufacturer of this washing machine will not accept
any liability for damage to persons or material for non
observance of these requirements.
There are no user serviceable parts inside the washing
machine and if the mains lead of this appliance is damaged,
it must only be replaced by qualified service personnel
approved by the manufacturer because special tools are
required.
installing the washing machine
GREEN AND
YELLOW
BLUE
13 AMP FUSE
BROWN
WARNING
Ensure that the plug and
power cord are not damaged
before use. If you have any
reason to remove the moulded
plug from this appliance,
immediately remove the fuse
and dispose of the plug.
Do not connect the plug to
a mains socket under any
circumstances as there is a
danger of electric shock.
CIRCUITS
Your washing machine should
be operated on a separate
circuit from other appliances.
Failure to do this may cause
the circuit breaker to trip or
the fuse to blow.
WF-B1262-02349R_EN.indd 8 2007-06-01 ø¿¿¸ 9:03:19

Washing a load of laundry _9
washing a load of laundry
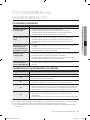
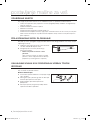
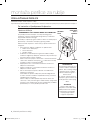
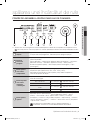
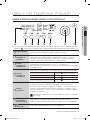
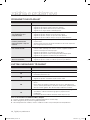
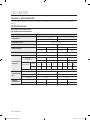
OVERVIEW OF THE CONTROL PANEL
This is a general manual. The INLAY system may be different from that of the product you purchased.
For
A
, see item 4 below to select the right specifications that match your product.
Display panel
Displays wash cycle and error messages.
During execution of the program, the program indicator blinks.
Program Select
button
Press the button repeatedly to select one of the six available wash program.
Cotton → Baby Cotton → Synthetics → Handwash → Wool → Quickwash
→ Rinse+Spin → Spin
Temperature
selection button
Press the button repeatedly to cycle through the available water temperature
options (cold wash, 30˚C, 40˚C , 60˚C and 95˚C).
When pressing this button during washing, you can see the selected
temperature in the display panel.
Spin selection
button
Press the button repeatedly to cycle through the available spin speed options.
WF-J1462/B1462
no spin ( ), 400, 800, 1400 rpm
WF-J1262/B1262/R1262/F1262
no spin ( ), 400, 800, 1200 rpm
WF-J1062/B1062/R1062/F1062/S1062
no spin ( ), 400, 800, 1000 rpm
WF-J862/B862/R862/F862/S862
no spin ( ), 400, 800, 800+ rpm
Option button
Press the button repeatedly to cycle through the available partial wash
options. Rinse Hold
→ Rinse
+
→ Rinse Hold+Rinse
+
→ Prewash →
Prewash+Rinse Hold
→ Prewash+Rinse
+
→ Prewash+Rinse Hold+Rinse
+
Prewash is only available when washing cotton, synthetic or Baby Cotton.
Delay Start
selection button
Press this button repeatedly to rotate between the retarded start options
available. (from 3 Hours to 24 Hours, in 1 hour increments)
02 Washing a load of laundry
5
4
3
2
1
1
2
3
4
6
7
8
5
A
6
WF-B1262-02349R_EN.indd 9 2007-06-01 ø¿¿¸ 9:03:20

10_ Washing a load of laundry
Start/Pause
button
Press to pause and restart programs.
(On/Off) button
Press once to turn the washing machine on, press again to turn the washing
machine off.
If the washing machine power is left on for longer than 10 minutes without
any buttons being touched, the power automatically turns off.
What is the “Child Lock” function?
• If you press the “Child Lock” button (Spin+Option button) longer than 2 sec during operation, this
function is selected.
• If once this function is selected, no change can be done until the end of laundry.
• Press the “Child Lock” button (Spin+Option button) longer than 2 sec to cancel the function.
WM STOPS THE CURRENT STEP OF THE CYCLE OR DOES NOT
PROCEED TO THE NEXT STEP OF WASHING (INDICATION OF
REMAIN TIME ON LED DISPLAY MAY INCREASE).
Your new washing machine is equipped with Fuzzy Logic system, which not only sets the optimum level of
water and other parameters of washing, but also controls the washing process as well as makes necessary
corrections in order to provide better washing results. In the above- mentioned matter, the Fuzzy Logic
system has detected deviations in washing cycle such as: high quantity of detergent at the end of the
cycle, high vibration level while spinning, etc.You can adjust existing wash programs, i.e. change wash
temperature and spin speed. After detection of such abnormalities, the washing machine is suspending
the normal course of program in order to normalize these parameters and continue the cycle. Fuzzy logic
system makes 7 attempts to eliminate such deviations. If it is impossible to normalize the above mentioned
deviations by Fuzzy Logic system, you will see the corresponding indication on LED lamps. (see chapter
“Troubleshooting”) The operation of Washing machine that corresponds to above- mentioned scheme is
considered to be normal.
WASHING FOR THE FIRST TIME
Before washing clothes for the first time, you must run a complete cycle without clothes.
To do this:
1. Press the (On/Off ) button.
2. Pour a little detergent in the detergent drawer .
3. Turn on the water supply to the washing machine.
4. Press the Temperature button repeatedly until 40˚C is displayed.
5. Press the Start/Pause button.
• This will remove any water from the manufacturer’s test run remaining in the machine.
PUTTING DETERGENT IN THE WASHING MACHINE
1. Pull out the detergent drawer.
2. Add laundry detergent into compartment .
3. Add softener into compartment (if you desire).
4. Add prewash detergent into compartment (if you desire).
washing a load of laundry
7
8
WF-B1262-02349R_EN.indd 10 2007-06-01 ø¿¿¸ 9:03:22

Washing a load of laundry _11
WASHING CLOTHES MANUALLY
You can wash clothes manually without using the Fuzzy Logic feature.
To do so:
1. Turn on the water at the water source sink.
2. Press the (On/Off ) button on the washing machine.
3. Open the door.
4. Load the articles one at a time loosely into the drum, without overfilling.
5. Close the door.
6. Put the detergent in the detergent drawer .
7. Repeatedly press the Program button to select the cycle you prefer:
Cotton, Baby Cotton, Synthetics, and Quickwash...
8. Press the Spin button to select the spin speed (No Spin, 400, 800,...,No Spin,...)
9. Repeatedly press the Option button to select the cycle you prefer (Prewash, Rinse
+
, Rinse
hold, ... )
10. Press the Temperature button to select the temperature (cold water , 30˚C, 40˚C, 60˚C, 95˚C).
11. Press the Start/Pause button and the machine will begin the cycle.
When the cycle is finished:
1. Open the door.
The door will not open until 3 minutes after the machine stops or the power turns off.
2. Remove laundry.
The Slow rotation of drum is not fail of the machine after the last spin of Cotton, Baby
Cotton or Quickwash course. That is a function to remove laundry easily.
SELECTING OPTIONS
Prewash
Prewash is only available when washing cotton, Baby Cotton, synthetics, delicate clothes.
To use prewash:
1. Load the prewash detergent into compartment of
the detergent drawer.
2. Select “Cotton”, ”Baby Cotton” or ”Synthetic” with the Program select button.
3. Press the Option button until the “Prewash” indicator lights up on the control panel.
4. Press Start/Pause to begin the cycle.
Rinse
+
Your machine will run through an additional rinsing cycle.
The washing duration will be prolonged accordingly.
Rinse Hold
The laundry remains soaking in the final rinse water.
Before the laundry can be unloaded, the “Spin” program must be run.
02 Washing a load of laundry
WF-B1262-02349R_EN.indd 11 2007-06-01 ø¿¿¸ 9:03:23

12_ Washing a load of laundry
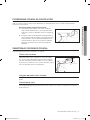
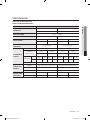
WASHING TIPS AND HINTS
Sorting your laundry: Sort your laundry according to the following characteristics:
• Type of fabric care label symbol: Sort laundry into cottons, mixed fibers, synthetics, silks,
wools and rayon.
• Colour: Divide whites and colours. Wash new, coloured items separately.
• Size: Placing items of different sizes in the same load will improve the washing action.
• Sensitivity: Wash delicate items separately, using the Wool wash program for pure new
wool, curtains and silk articles. Check the labels on the items you are washing or refer to the
fabric care chart in the appendix.
Emptying pockets: Coins, safety pins and similar items can damage linen, the washing
machine drum, and the water tank.
Securing fasteners: Close zippers and fasten buttons or hooks; loose belts or ribbons should
be tied together.
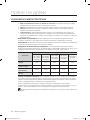
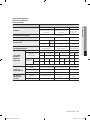
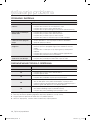
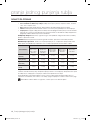
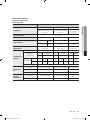
Determining load capacity: Do not overload the washing machine or your laundry may not
wash properly. Use the chart below to determine the load capacity for the type of laundry you are
washing.
Fabfic Type
Load Capacity
WF-J1462/
WF-J1262/
WF-J1062/
WF-J862
WF-B1462/
WF-B1262/
WF-B1062/
WF-B862
WF-R1262/
WF-R1062/
WF-R862
WF-F1262/
WF-F1062/
WF-F862
WF-S1062/
WF-S862
Cotton
7.0 kg 6.0 kg 5.2 kg 4.5 kg 3.5 kg
Baby Cotton
7.0 kg 6.0 kg 5.2 kg 4.5 kg 3.5 kg
Synthetics
3.0 kg 3.0 kg 2.5 kg 2.5 kg 2.0 kg
Wool
2.0 kg 2.0 kg 1.5 kg 1.5 kg 1.0 kg
Detergent tips: The type of detergent you should use is based on the type of fabric (Cotton,
Synthetic, Wool items) colour, wash temperature, degree and type of soiling. Always use “low
suds” laundry soap, which is designed for automatic washing machines.
When determining the detergent quantity, it’s necessary to consider recommendations of the
detergent manufacturer, indicated on the package, as well as weight, type of laundry, it’s fouling
factor and water hardness in your region.
Keep detergents and additives in a safe, dry place out of the reach of children.
washing a load of laundry
WF-B1262-02349R_EN.indd 12 2007-06-01 ø¿¿¸ 9:03:23

Maintaining the washing machine _13
maintaining the washing
machine
REPAIRING A FROZEN WASHING MACHINE
If the temperature drops below freezing and your washing machine is frozen:
1. Unplug the washing machine.
2. Pour warm water on the source faucet to loosen the water supply hose.
3. Remove the water supply hose and soak it in warm water.
4. Pour warm water into the washing machine drum and let it sit for 10 minutes.
5. Reconnect the water supply hose to the water faucet and check if the water supply and drain
operations are normal.
CLEANING THE EXTERIOR
1. Wipe the washing machine surfaces, including the control panel, with a soft cloth and non-
abrasive household detergents.
2. Use a soft cloth to dry the surfaces.
3. Do not pour water on the washing machine.
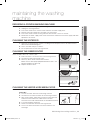
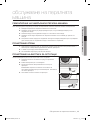
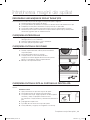
CLEANING THE DEBRIS FILTER
Clean the debris filter 2 or 3 times a year.
1.
Remove the base cover from the front of the washing machine.
2. Unscrew the filter cap and take it out.
3. Wash any dirt or other material from the filter.
Make sure the drain pump propeller behind the filter is not
blocked. Replace the filter cap.
4. Replace the base cover.
CLEANING THE WATER HOSE MESH FILTER
You should clean the water hose mesh filter at least one time per year, or when the lamps on your machine flickers:
To do this:
1. Turn off the water source to the washing machine.
2. Unscrew the hose from the back of the washing machine.
3. With a pair of pliers, gently pull out the mesh filter from the
end of the hose and rinse it under water until clean.
Also clean the inside and outside of the threaded connector.
4. Push the filter back into place.
5. Screw the hose back onto the washing machine.
6. Turn on the faucet and make sure the connections are
watertight.
03 Maintaining the washing machine
WF-B1262-02349R_EN.indd 13 2007-06-01 ø¿¿¸ 9:03:24

14_ Troubleshooting
troubleshooting
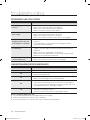
PROBLEMS AND SOLUTIONS
PROBLEM SOLUTION
The washing machine will
not start
• Make sure the door is firmly closed.
• Make sure the washing machine is plugged in.
• Make sure the water source faucet is turned on.
• Make sure to press the Start/Pause button.
No water or insufficient
water supply
• Make sure the water source faucet is turned on.
• Make sure the water source hose is not frozen.
• Make sure the water intake hose is not bent.
• Make sure the filter on the water intake hose is not clogged.
Detergent remains in the
detergent drawer after the
wash program is complete
• Make sure the washing machine is running with sufficient water
pressure.
• Put the detergents in the inner parts of the detergent drawer
(away from the outside edges).
Washing machine vibrates
or is too noisy
• Make sure the washing machine is set on a level surface. If the
surface is not level, adjust the washing machine feet to level the
appliance.
• Make sure that the shipping bolts are removed.
• Make sure the washing machine is not touching any other object.
• Make sure the laundry load is balanced.
The washing machine does
not drain and/or spin
• Make sure the drain hose is not squashed or bent.
• Make sure the water hose mesh filter is not clogged.
UNDERSTANDING ERROR MESSAGES
ERROR CODE SOLUTION
dE
• Close the door.
4E
• Make sure the source water faucet is turned on.
• Check the water pressure.
5E
• Clean the debris filter.
• Make sure the drainage hose is installed correctly.
UE
• Laundry load is unbalanced; loosen any tangled laundry.
• If only one item of clothing needs washing, such as a bathrobe or
jeans, the final spin result might be unsatisfactory and an “UE” error
message will be shown in the display window.
LE
• Check the end of the drain hose is too low. (Make sure the holder of
drain hose in the back is intact)
• Check the end of the drain hose is submerged in water.
Before contacting After-Sales serv
1. Try to remedy the problem (See “Troubleshooting” on this page).
2. Restart the programme to see if the fault is repeated.
3. If the malfunction persists, call after-sales service and describe the problem.
WF-B1262-02349R_EN.indd 14 2007-06-01 ø¿¿¸ 9:03:25

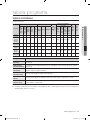
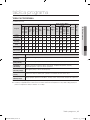
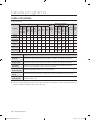
Programme chart _15
programme chart
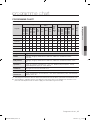
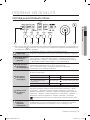
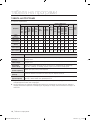
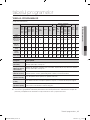
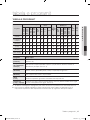
PROGRAMME CHART
( user option)
Program
Max load (kg)
Detergent And Ad-
ditives
Tem-
pera-
ture
(MAX)
˚C
Spin speed (MAX) rpm
Delay
start
Cycle
Time
(min)
WF-
J1462/
J1262/
J1062/
J862
WF-
B1462/
B1262/
B1062/
B862
WF-
R1262/
R1062/
R862
WF-
F1262/
F1062/
F862
WF-
S1062/
S862
Pre-
wash
Wash
Soft-
ener
WF-
J1462/
B1462
WF-
J1262/
B1262/
R1262/
F1262
WF-
J1062/
B1062/
R1062/
F1062/
S1062
WF-
J862/
B862/
R862/
F862/
S862
Cotton
7.0 6.0 5.2 4.5 3.5
yes
95 1400 1200 1000 800+
126
Baby Cotton
7.0 6.0 5.2 4.5 3.5
yes
60 1400 1200 1000 800+
98
Synthetics
3.0 3.0 2.5 2.5 2.0
yes
60 800 800 800 800
73
Wool
2.0 2.0 1.5 1.5 1.0 yes
40 400 400 400 400
42
Handwash
2.0 2.0 1.5 1.5 1.0 yes
40 400 400 400 400
37
Quickwash
3.0 3.0 2.0 2.0 1.5 yes
60 1400 1200 1000 800+
28
Program Type of wash
Cotton
Averagely or lightly soiled cottons, bed linen, table linen, underwear, towels,
shirts,etc.
Baby Cotton
Averagely or lightly soiled cottons, bed linen, table linen, underwear, towels, shirts,
etc.
Synthetics
Lightly or averagely soiled blouses, shirts, etc. Made of polyester(Diolen, Trevira),
polyamide(perlon, Nylon) or similar blends.
Handwash
Very light wash course like hand wash.
Wool
Only machine washable wollens with pure new wool label.
Quickwash
Lightly soiled cottons or linen blouses, shirts, dark coloured terry cloth, coloured linen
articles, jeans, etc.
1. The programme duration data has been measured under the conditions specified in Standard IEC 456.
2. Consumption in individual homes may differ from the values given in the table due to variations in the
pressure and temperature of the water supply, the load and the type of laundry.
05 Programme chart
WF-B1262-02349R_EN.indd 15 2007-06-01 ø¿¿¸ 9:03:25

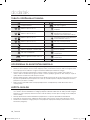
16_ Appendix
appendix
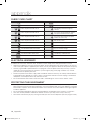
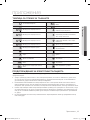
FABRIC CARE CHART
Resistant material Can be ironed at 100˚C max
Delicate fabric Do not iron
Item may be washed at 95˚C
Can be dry cleaned using any
solvent
Item may be washed at 60˚C
Dry clean with perchloride, lighter
fuel, pure alcohol or R113 only
Item may be washed at 40°C.
Dry clean with aviation fuel, pure
alcohol or R113 only
Item may be washed at 30°C. Do not dry clean
Item may be hand washed Dry flat
Dry clean only Can be hung to dry
Can be bleached in cold water Dry on clothes hanger
Do not bleach Tumble dry, normal heat
Can be ironed at 200˚C max Tumble dry, reduced heat
Can be ironed at 150˚C max Do not tumble dry
ELECTRICAL WARNINGS
To reduce the risk of fire, electrical shock, and other injuries, keep these safety precautions in mind:
• Operate the appliance only from the type of power source indicated on the marking label. If you are not
sure of the type of power supplied to your home, consult your appliance dealer or local power company.
• Use only a grounded or polarized outlet. This plug will fit into the power outlet only one way. If you are
unable to insert the plug fully into the outlet, try reversing the plug. If the plug still doesn’t fit, contact
your electrician to replace your outlet.
• Protect the power cord. Power supply cords should be routed so that they are unlikely to be walked on
or pinched by items placed on or against them. Pay particular attention to cords at plugs, convenience
receptacles, and the point where they exit from the unit.
• Do not overload the wall outlet or extension cords. Overloading can result in fire or electric shock.
PROTECTING THE ENVIRONMENT
• This appliance is manufactured from recyclable materials. If you decide to dispose of this appliance,
please observe local waste disposal regulations. Cut off the power cord so that the appliance cannot be
connected to a power source. Remove the door so that animals and small children cannot get trapped
inside the appliance.
• Do not exceed the detergent quantities recommended in the detergent manu-facturers’ instructions.
• Use stain removal products and bleaches before the wash cycle only when strictly necessary.
•
Save water and electricity by only washing full loads (the exact amount depends upon the program used).
WF-B1262-02349R_EN.indd 16 2007-06-01 ø¿¿¸ 9:03:32

Appendix _17
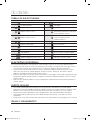
DECLARATION OF CONFORMITY
This appliance complies with European safety standards, EC directive 93/68 and EN Standard 60335.
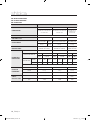
SPECIFICATION
WF-J1462/J1262/J1062/J862
WF-B1462/B1262/B1062/B862
TYPE FRONT LOADING WASHER
DIMENSION
WF-J1462/J1262/J1062/J862 WF-B1462/B1262/B1062/B862
W598mm x D600mm x H844mm W598mm x D550mm x H844mm
WATER PRESSURE
50 kPa ~ 800 kPa
WATER VOLUME
68 ℓ 59 ℓ
NET WEIGHT
WF-J1462/
J1262
WF-J1062/
J862
WF-B1462/
B1262
WF-B1062/
B862
74 kg 71 kg 71 kg 70 kg
WASH AND SPIN CAPACITY
7 kg (DRY LAUNDRY) 6 kg (DRY LAUNDRY)
POWER
CONSUMPTION
MODEL WF-J1462/J1262/J1062/J862 WF-B1462/B1262/B1062/B862
WASHING AND
HEATING
220 V 2000 W 220 V 2000 W
240 V 2400 W 240 V 2400 W
SPIN
MODEL
WF-
J1462
WF-
J1262
WF-
J1062
WF-
J862
WF-
B1462
WF-
B1262
WF-
B1062
WF-
B862
230 V 700 W 360 W 320 W 270 W 580 W 530 W 500 W 430 W
PUMPING 34 W
PACKAGE Wt
MODEL WF-J1462/J1262/J1062/J862 WF-B1462/B1262/B1062/B862
PAPER
2.5 kg 2.5 kg
PLASTIC 1.0 kg 1.0 kg
SPIN
REVOLUTION
MODEL
WF-J1462/
B1462
WF-J1262/
B1262
WF-J1062/
B1062
WF-J862/B862
rpm 1400 1200 1000 800
06 Appendix
WF-B1262-02349R_EN.indd 17 2007-06-01 ø¿¿¸ 9:03:33

18_ Appendix
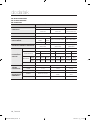
WF-R1262/R1062/R862
WF-F1262/F1062/F862
WF-S1062/S862
TYPE FRONT LOADING WASHER
DIMENSION
WF-R1262/R1062/R862 WF-F1262/F1062/F862 WF-S1062/S862
W598mm x D450mm x
H844mm
W598mm x D404mm x
H844mm
W598mm x
D340mm x
H844mm
WATER PRESSURE
50 kPa ~ 800 kPa
WATER VOLUME
49 ℓ 48 ℓ 43 ℓ
NET WEIGHT
WF-R1262/
R1062
WF-
R862
WF-F1262/F1062/F862 WF-S1062/S862
65 kg 64 kg 61 kg 51 kg
WASH AND SPIN CAPACITY
5.2 kg
(DRY LAUNDRY)
4.5 kg
(DRY LAUNDRY)
3.5 kg
(DRY LAUNDRY)
POWER
CONSUMPTION
MODEL WF-R1262/R1062/R862 WF-F1262/F1062/F862 WF-S1062/S862
WASHING AND
HEATING
220 V 1900 W 220 V 1800 W 220 V
1800
W
240 V 2200 W 240 V 2100 W 240 V
2100
W
SPIN
MODEL
WF-
R1262
WF-
R1062
WF-
R862
WF-
F1262
WF-
F1062
WF-
F862
WF-
S1062
WF-
S862
230 V 550 W 500 W 430 W 270 W 230 W 180 W 230 W 180 W
PUMPING 34 W
PACKAGE Wt
MODEL WF-R1262/R1062/R862 WF-F1262/F1062/F862 WF-S1062/S862
PAPER
2.1 kg 1.9 kg 1.8 kg
PLASTIC 0.9 kg 0.8 kg 0.8 kg
SPIN
REVOLUTION
MODEL WF-R1262/F1262 WF-R1062/F1062/S1062
WF-R862/F862/
S862
rpm 1200 1000 800
appendix
WF-B1262-02349R_EN.indd 18 2007-06-01 ø¿¿¸ 9:03:33

memo
WF-B1262-02349R_EN.indd 19 2007-06-01 ø¿¿¸ 9:03:33

Contact SAMSUNG WORLD WIDE
If you have any questions or comments relating to Samsung products,
please contact the SAMSUNG customer care center.
Code No. DC68-02349R_EN
WF-B1262-02349R_EN.indd 20 2007-06-01 ø¿¿¸ 9:03:33
Pagina se încarcă...
Pagina se încarcă...
Pagina se încarcă...
Pagina se încarcă...
Pagina se încarcă...
Pagina se încarcă...
Pagina se încarcă...
Pagina se încarcă...
Pagina se încarcă...
Pagina se încarcă...
Pagina se încarcă...
Pagina se încarcă...
Pagina se încarcă...
Pagina se încarcă...
Pagina se încarcă...
Pagina se încarcă...
Pagina se încarcă...
Pagina se încarcă...
Pagina se încarcă...
Pagina se încarcă...
Pagina se încarcă...
Pagina se încarcă...
Pagina se încarcă...
Pagina se încarcă...
Pagina se încarcă...
Pagina se încarcă...
Pagina se încarcă...
Pagina se încarcă...
Pagina se încarcă...
Pagina se încarcă...
Pagina se încarcă...
Pagina se încarcă...
Pagina se încarcă...
Pagina se încarcă...
Pagina se încarcă...
Pagina se încarcă...
Pagina se încarcă...
Pagina se încarcă...
Pagina se încarcă...
Pagina se încarcă...
Pagina se încarcă...
Pagina se încarcă...
Pagina se încarcă...
Pagina se încarcă...
Pagina se încarcă...
Pagina se încarcă...
Pagina se încarcă...
Pagina se încarcă...
Pagina se încarcă...
Pagina se încarcă...
Pagina se încarcă...
Pagina se încarcă...
Pagina se încarcă...
Pagina se încarcă...
Pagina se încarcă...
Pagina se încarcă...
Pagina se încarcă...
Pagina se încarcă...
Pagina se încarcă...
Pagina se încarcă...
Pagina se încarcă...
Pagina se încarcă...
Pagina se încarcă...
Pagina se încarcă...
Pagina se încarcă...
Pagina se încarcă...
Pagina se încarcă...
Pagina se încarcă...
Pagina se încarcă...
Pagina se încarcă...
Pagina se încarcă...
Pagina se încarcă...
Pagina se încarcă...
Pagina se încarcă...
Pagina se încarcă...
Pagina se încarcă...
Pagina se încarcă...
Pagina se încarcă...
Pagina se încarcă...
Pagina se încarcă...
Pagina se încarcă...
Pagina se încarcă...
Pagina se încarcă...
Pagina se încarcă...
Pagina se încarcă...
Pagina se încarcă...
Pagina se încarcă...
Pagina se încarcă...
Pagina se încarcă...
Pagina se încarcă...
Pagina se încarcă...
Pagina se încarcă...
Pagina se încarcă...
Pagina se încarcă...
Pagina se încarcă...
Pagina se încarcă...
Pagina se încarcă...
Pagina se încarcă...
Pagina se încarcă...
Pagina se încarcă...
Pagina se încarcă...
Pagina se încarcă...
Pagina se încarcă...
Pagina se încarcă...
Pagina se încarcă...
Pagina se încarcă...
Pagina se încarcă...
Pagina se încarcă...
Pagina se încarcă...
Pagina se încarcă...
Pagina se încarcă...
Pagina se încarcă...
Pagina se încarcă...
Pagina se încarcă...
Pagina se încarcă...
Pagina se încarcă...
Pagina se încarcă...
Pagina se încarcă...
Pagina se încarcă...
Pagina se încarcă...
Pagina se încarcă...
Pagina se încarcă...
Pagina se încarcă...
Pagina se încarcă...
Pagina se încarcă...
Pagina se încarcă...
Pagina se încarcă...
Pagina se încarcă...
Pagina se încarcă...
Pagina se încarcă...
Pagina se încarcă...
Pagina se încarcă...
Pagina se încarcă...
Pagina se încarcă...
Pagina se încarcă...
Pagina se încarcă...
Pagina se încarcă...
Pagina se încarcă...
Pagina se încarcă...
Pagina se încarcă...
-
 1
1
-
 2
2
-
 3
3
-
 4
4
-
 5
5
-
 6
6
-
 7
7
-
 8
8
-
 9
9
-
 10
10
-
 11
11
-
 12
12
-
 13
13
-
 14
14
-
 15
15
-
 16
16
-
 17
17
-
 18
18
-
 19
19
-
 20
20
-
 21
21
-
 22
22
-
 23
23
-
 24
24
-
 25
25
-
 26
26
-
 27
27
-
 28
28
-
 29
29
-
 30
30
-
 31
31
-
 32
32
-
 33
33
-
 34
34
-
 35
35
-
 36
36
-
 37
37
-
 38
38
-
 39
39
-
 40
40
-
 41
41
-
 42
42
-
 43
43
-
 44
44
-
 45
45
-
 46
46
-
 47
47
-
 48
48
-
 49
49
-
 50
50
-
 51
51
-
 52
52
-
 53
53
-
 54
54
-
 55
55
-
 56
56
-
 57
57
-
 58
58
-
 59
59
-
 60
60
-
 61
61
-
 62
62
-
 63
63
-
 64
64
-
 65
65
-
 66
66
-
 67
67
-
 68
68
-
 69
69
-
 70
70
-
 71
71
-
 72
72
-
 73
73
-
 74
74
-
 75
75
-
 76
76
-
 77
77
-
 78
78
-
 79
79
-
 80
80
-
 81
81
-
 82
82
-
 83
83
-
 84
84
-
 85
85
-
 86
86
-
 87
87
-
 88
88
-
 89
89
-
 90
90
-
 91
91
-
 92
92
-
 93
93
-
 94
94
-
 95
95
-
 96
96
-
 97
97
-
 98
98
-
 99
99
-
 100
100
-
 101
101
-
 102
102
-
 103
103
-
 104
104
-
 105
105
-
 106
106
-
 107
107
-
 108
108
-
 109
109
-
 110
110
-
 111
111
-
 112
112
-
 113
113
-
 114
114
-
 115
115
-
 116
116
-
 117
117
-
 118
118
-
 119
119
-
 120
120
-
 121
121
-
 122
122
-
 123
123
-
 124
124
-
 125
125
-
 126
126
-
 127
127
-
 128
128
-
 129
129
-
 130
130
-
 131
131
-
 132
132
-
 133
133
-
 134
134
-
 135
135
-
 136
136
-
 137
137
-
 138
138
-
 139
139
-
 140
140
-
 141
141
-
 142
142
-
 143
143
-
 144
144
-
 145
145
-
 146
146
-
 147
147
-
 148
148
-
 149
149
-
 150
150
-
 151
151
-
 152
152
-
 153
153
-
 154
154
-
 155
155
-
 156
156
-
 157
157
-
 158
158
-
 159
159
-
 160
160


Samsung WF-B1062 Manualul utilizatorului
- Categorie
- Mașini de spălat
- Tip
- Manualul utilizatorului

