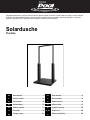
Steinbach Solar Shower Manualul proprietarului
- Tip
- Manualul proprietarului

Originalbetriebsanleitung / Original owner's manual / Notice originale / Istruzioni originali / Manual original / Původní návod k
používání / Eredeti használati utasítás / Izvirna navodila / Pôvodný návod na použitie / Instrukcja oryginalna / Instrucțiuni
originale / Originalne upute / Оригинална инструкция / Orijinal kullanım talimatları
Solardusche
The Gate
de
Solardusche................................................... 4
fr
Douche solaire.............................................22
es
Ducha solar.................................................. 40
hu
Szolárzuhany................................................58
sk
Solárna sprcha.............................................76
ro
Duș solar...................................................... 94
bg
Соларен душ............................................. 112
en
Solar shower................................................ 13
it
Doccia solare............................................... 31
cs
Solární sprcha..............................................49
sl
Solarna prha.................................................67
pl
Prysznic solarny.......................................... 85
hr/bs
Solarni tuš.................................................. 103
tr
Güneş enerjili duş......................................122

7
8
9
14
15
11
12
1
3
4
5
6
13
2
10
2

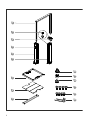
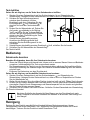
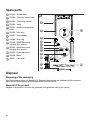
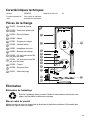
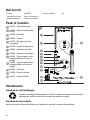
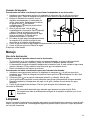
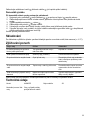
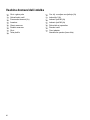
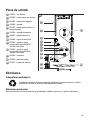
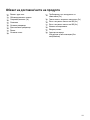
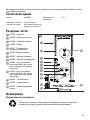
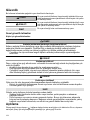
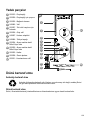
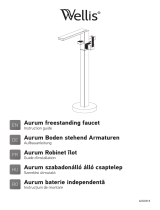
Lieferumfang/Produktteile
1
Rahmen mit Duschkopf
2
Entlüftungsventil
3
Verbindungselement (2x)
4
Armatur
5
Haupttank
6
Zusatztank
7
Rahmen
8
Bodenplatte
9
Leitung inkl. Schraubwerkzeug (2x)
10
Innensechskant-Schraubenschlüssel (2x)
11
Innensechskant-Schraube M6 (4x)
12
Innensechskant-Schraube M8 (4x)
13
Entleerungskappe
14
Einlassventil
15
Schlauchadapter
Betriebsanleitung (ohne Abbildung)
3

Inhaltsverzeichnis
Übersicht...................................................................................................................................................2
Lieferumfang/Produktteile.......................................................................................................................3
Allgemeines.............................................................................................................................................. 5
Zeichenerklärung..................................................................................................................................... 5
Sicherheit..................................................................................................................................................6
Beschreibung........................................................................................................................................... 7
Vorbereitung............................................................................................................................................. 7
Standplatz und Anschlüsse vorbereiten.............................................................................................. 7
Installation................................................................................................................................................ 7
Solardusche zusammensetzen............................................................................................................7
Tank befüllen........................................................................................................................................9
Bedienung.................................................................................................................................................9
Solardusche benutzen.........................................................................................................................9
Reinigung..................................................................................................................................................9
Demontage..............................................................................................................................................10
Tank entleeren................................................................................................................................... 10
Produkt abbauen............................................................................................................................... 10
Lagerung.................................................................................................................................................10
Fehlersuche............................................................................................................................................ 10
Technische Daten...................................................................................................................................11
Ersatzteile................................................................................................................................................11
Entsorgung............................................................................................................................................. 11
4
DRAFT R7_20211109

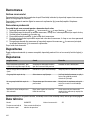
Allgemeines
Betriebsanleitung lesen und aufbewahren
Diese Betriebsanleitung gehört zu dieser Solardusche (im Folgenden auch
„Produkt“ genannt). Sie enthält wichtige Information zur Inbetriebnahme und Bedienung.
Lesen Sie die Betriebsanleitung, insbesondere die Sicherheitshinweise, sorgfältig durch,
bevor Sie das Produkt einsetzen. Die Nichtbeachtung dieser Betriebsanleitung kann zu
schweren Verletzungen oder Schäden am Produkt führen.
Bewahren Sie die Betriebssanleitung für die weitere Nutzung auf. Wenn Sie das Produkt an Dritte
weitergeben, geben Sie unbedingt diese Betriebsanleitung mit.
Bestimmungsgemäßer Gebrauch
Dieses Produkt ist ausschließlich zum Duschen im Freien bestimmt.
Es ist ausschließlich für den Privatgebrauch bestimmt und nicht für den gewerblichen Bereich geeignet.
Verwenden Sie das Produkt nur wie in dieser Betriebsanleitung beschrieben. Jede andere Verwendung
gilt als nicht bestimmungsgemäß und kann zu Sachschäden oder sogar zu Personenschäden führen.
Das Produkt ist kein Kinderspielzeug.
Der Hersteller oder Händler übernimmt keine Haftung für Schäden, die durch nicht
bestimmungsgemäßen oder falschen Gebrauch entstanden sind.
Benutzen Sie das Produkt nur, wenn es fest am geeigneten Standplatz verschraubt ist.
Sinkt die Außentemperatur unter 10° Celsius, muss der Tank entleert, die Dusche abgebaut und an
einem trockenen frostsicheren Ort gelagert werden.
Vorhersehbare Fehlanwendung
Verwenden Sie das Produkt niemals als Klettergerüst oder Träger für Wäscheleinen oder Hängematten.
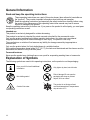
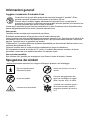
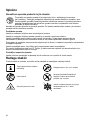
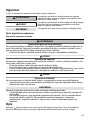
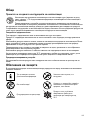
Zeichenerklärung
Die folgenden Symbole werden in dieser Betriebsanleitung, auf dem Produkt oder auf der Verpackung
verwendet.
Hier finden Sie nützliche
Zusatzinformationen.
Nur von Hand anziehen, nicht mit
Werkzeug.
Kein Trinkwasser!
Beschädigungsgefahr! Verpackung
nicht mit scharfen oder spitzen
Gegenständen z.B. Messer öffnen.
Warnung vor heißem Wasser.
Das Produkt ist nicht frostsicher und
muss bei Temperaturen unter 10°C
abgebaut werden.
5

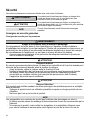
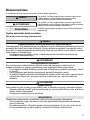
Sicherheit
Die folgenden Signalworte werden in dieser Betriebsanleitung verwendet.
WARNUNG! Dieses Signalsymbol/-wort bezeichnet eine Gefährdung mit
einem mittleren Risikograd, die, wenn sie nicht vermieden
wird, den Tod oder eine schwere Verletzung zur Folge haben
kann.
VORSICHT! Dieses Signalsymbol/-wort bezeichnet eine Gefährdung mit
einem niedrigen Risikograd, die, wenn sie nicht vermieden
wird, eine geringfügige oder mäßige Verletzung zur Folge
haben kann.
HINWEIS! Dieses Signalwort warnt vor möglichen Sachschäden.
Allgemeine Sicherheitshinweise
Sicherheitshinweise für Personen
WARNUNG!
Erstickungsgefahr durch Verpackungsmaterial!
Verfangen des Kopfes in Verpackungsfolie oder Verschlucken von sonstigem
Verpackungsmaterial kann zum Tod durch Ersticken führen. Speziell für Kinder sowie geistig
beeinträchtigte Menschen, die die Risiken durch Mangel an Wissen und Erfahrung nicht
abschätzen können, besteht hierfür erhöhtes Gefahrenpotential.
-Stellen Sie sicher, dass Kinder sowie geistig beeinträchtigte Menschen nicht mit dem
Verpackungsmaterial spielen.
VORSICHT!
Verbrühungsgefahr!
Bei intensiver Sonneneinstrahlung heizt sich der Tank auf und abhängig von der
Armaturstellung kann sehr heißes Wasser am Duschkopf austreten.
-Stellen Sie die Armatur vor dem Duschen zwischen kalt und heiß.
-Überprüfen Sie die Wassertemperatur bevor Sie sich unter den Duschkopf stellen.
-Lassen Sie Kinder sowie Personen mit verringerten physischen, sensorischen oder
mentalen Fähigkeiten (z.B.: Betrunkene) niemals unbeaufsichtigt in die Nähe des
Produktes.
VORSICHT!
Infektionsgefahr!
Wenn das Produkt länger nicht benutzt wird, können sich im Tank Bakterien vermehren.
-Entleeren Sie das Produkt vor absehbarer oder nach längerer Nichtbenutzung.
-Trinken Sie das Wasser aus dem Produkt nicht.
HINWEIS!
Unsachgemäßer Umgang mit dem Produkt kann zu Schäden am Produkt führen.
-Verwenden Sie nur Ersatzteile und Zubehörteile, die vom Hersteller geliefert oder
empfohlen werden.
-Öffnen Sie das Produkt nicht, sondern überlassen Sie die Reparatur Fachkräften.
Wenden Sie sich dazu an die Serviceadresse auf der Rückseite der Anleitung. Bei
eigenständig durchgeführten Reparaturen, unsachgemäßem Anschluss oder falscher
Bedienung sind Haftungs- und Gewährleistungsansprüche ausgeschlossen.
6

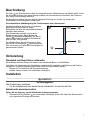
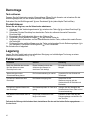
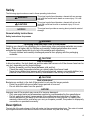
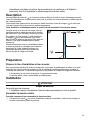
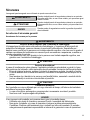
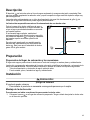
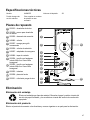
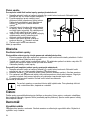
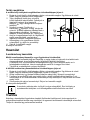
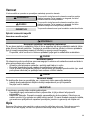
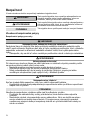
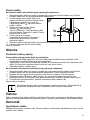
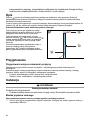
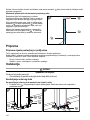
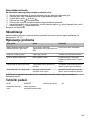
Beschreibung
Der Tank
5
der Solardusche wird über den angeschlossenen Gartenschlauch mit Wasser gefüllt. Durch
die Sonneneinstrahlung wird dieses Wasser erwärmt, da die mattschwarze Oberfläche des Tanks nur
sehr wenig Sonnenenergie reflektiert.
Die Solardusche verfügt über eine direkte Kaltwasser-Zuleitung zur Armatur
4
, sodass das
Duschwasser perfekt temperiert werden kann.
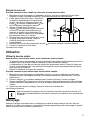
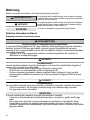
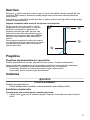
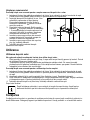
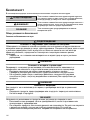
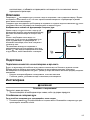
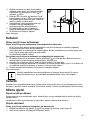
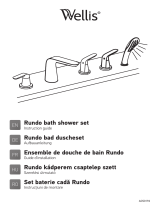
Die schematische Abbildung zeigt die Funktionsweise einer Solardusche:
Der gesamte Körper der Dusche ist mit Wasser
gefüllt und funktioniert ähnlich einem
Elektroboiler, bei dem sich das erwärmte Wasser
ebenfalls oben sammelt.
Wird Warmwasser benötigt, so wird durch
Betätigung der Armatur
4
am Boden des
Tankes
5
Kaltwasser eingelassen und das im
oberen Bereich bereits erwärmte Warmwasser
wird aus dem Tank gepresst.
Ein allfälliger Druck durch Erwärmung im Tank
kann durch den Duschkopf
1
somit entweichen.
Dies verursacht ein Tropfen des Duschkopfes bei
geschlossener Armatur.
Vorbereitung
Standplatz und Anschlüsse vorbereiten
Am sichersten steht die Dusche auf ebenen und rutschfesten Beton- und Holzböden.
Gute Wahl und Vorbereitung des Standplatzes vereinfacht die Installation und Bedienung der Dusche
maßgeblich. Folgende Anforderungen müssen erfüllt sein oder bedacht werden:
- Wasser Zu- und Ableitung, die Sonneneinstrahlung
-Stabiler, ebener, wasser- und rutschfester Untergrund
Installation
VORSICHT!
Verletzungsgefahr!
Das Produkt kann umstürzen.
-Für die Installation ist eine zweite Person erforderlich, die das Produkt hält.
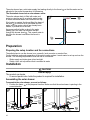
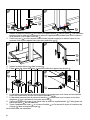
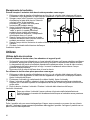
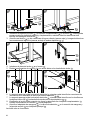
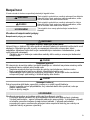
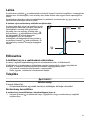
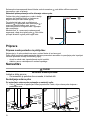
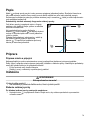
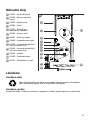
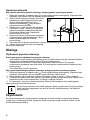
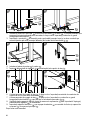
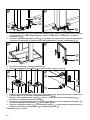
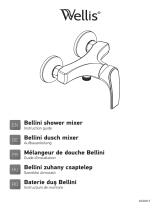
Solardusche zusammensetzen
Gehen Sie wie folgt vor, um die Solardusche zusammenzusetzen:
1. Platzieren Sie den Rahmen
7
am vorbereiteten Standplatz. Achten Sie darauf die Solardusche in
die vorgesehene Richtung auszurichten.
1
5
4
1
7

2
5
12
6
7
3
1
9
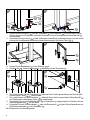
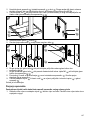
2. Setzen Sie den Haupttank
5
und den Zusatztank
6
in den Rahmen
7
ein. Eine zweite Person
hält den Haupt- bzw Zusatztank, während Sie diesen mit zwei Innensechskant-Schrauben M8
12
verschrauben.
3. Schrauben Sie eine Leitung
9
auf die Heißwasser-Anschlüsse (rote Markierungen) und die zweite
Leitung auf die Kaltwasser-Anschlüsse (blaue Markierungen) der beiden Tanks
5
6
.
4
8
7
5
1
3
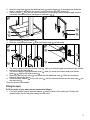
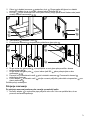
4. Setzen Sie die Bodenplatte
8
in den Rahmen
7
ein.
5. Schieben Sie die Verbindungselemente
3
beidseitig auf den Duschkopf
1
.
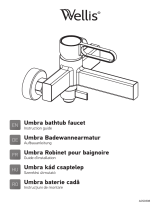
6
1
5
11
7
13
15
14
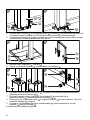
6. Die zweite Person hält den Duschkopf
1
, während Sie die Leitungsanschlüsse des Duschkopfes
mit den beiden Tanks
5
6
verschrauben.
7. Die zweite Person hält den Duschkopf
1
, während Sie mit den Innensechskant-Schrauben M6
11
den Duschkopf mit den beiden Tanks
5
6
verschrauben.
8. Kontrollieren Sie ob das Entlüftungsventil
2
im Zusatztank
6
eingeschraubt ist. Schieben Sie die
Verbindungselemente
3
auf die Tanks.
9. Schrauben Sie den Schlauchadapter
15
oder das Einlassventil
14
auf den Schlauchanschluss und
die Entleerungskappe
13
in den Haupttank
5
.
Die Solardusche ist zusammengesetzt.
8

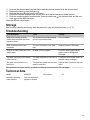
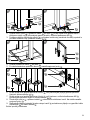
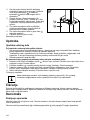
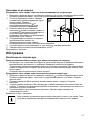
Tank befüllen
Gehen Sie wie folgt vor, um die Tanks Ihrer Solardusche zu befüllen:
1. Stecken Sie einen Gartenschlauch auf den Schlauchadapter
15
und Wasserhahn der
Wasserleitung. Verlegen Sie den Gartenschlauch so, dass er nicht zur Stolperfalle wird.
2. Schieben Sie das Verbindungselement,
zwischen dem Zusatztank und dem
Duschkopf, nach oben. Schrauben Sie das
Entlüftungsventil
2
vom Zusatztank
6
ab,
damit die Luft aus dem Tank entweichen
kann.
3. Drehen Sie den Wasserhahn auf. Drehen Sie
die Armatur
4
vollständig in die Stellung
"heiß" und öffnen Sie sie. In dieser Stellung
wird der Tank am schnellsten befüllt. Wasser
strömt in den Tank. Die Befüllung der Tanks
dauert ca. 5 Minuten.
4. Sobald Wasser gleichmäßig aus dem
Anschluss des Entlüftungsventils läuft,
schrauben Sie das Entlüftungsventil in den
Zusatztank.
5. Sobald Wasser gleichmäßig aus dem Duschkopf
1
läuft, schließen Sie die Armatur.
6. Schließen Sie den Wasserhahn der Wasserleitung.
Der Tank ist befüllt.
Bedienung
Solardusche benutzen
Beachten Sie folgendes, bevor Sie Ihre Solardusche benutzen:
-Wenn das Produkt länger nicht benutzt wird, können sich im warmen Wasser Keime und Bakterien
vermehren, Infektionsgefahr! Der Tank muss entleert werden.
-Die Wassertemperatur im Tank ist von der Sonneneinstrahlung abhängig. Bei bewölktem Wetter
dauert die Erwärmung des Wassers länger. Bei intensiver Sonneneinstrahlung kann das Wasser
sehr heiß sein.
-Entfernen Sie Hindernisse aus dem Duschbereich.
Gehen Sie wie folgt vor, um Ihre befüllte Solardusche zu benutzen:
1. Stecken Sie einen Gartenschlauch auf den Schlauchadapter
15
und Wasserhahn der
Wasserleitung. Verlegen Sie den Gartenschlauch so, dass er nicht zur Stolperfalle wird. Drehen
Sie den Wasserhahn auf.
2. Stellen Sie die Armatur
4
in die mittlere Position (zwischen heiß und kalt). Öffnen Sie die Armatur.
3. Drehen Sie die Armatur entweder nach links oder rechts, um Ihre gewünschte Wassertemperatur
einzustellen. Regeln Sie die Wassermenge und Wassertemperatur mit der Armatur und genießen
Sie die Dusche mit dem warmen Wasser.
4. Schließen Sie die Armatur nach dem Duschen. Schließen Sie den Wasserhahn der Wasserleitung.
Die Dusche ist beendet.
Nach dem Schließen der Armatur läuft das Wasser aus dem Duschkopf noch nach.
Dieser Umstand ist durch das Aufheizen des Wassers im drucklosen Tank bedingt und
kein Mangel!
Reinigung
Reinigen Sie das Produkt ausschließlich mit handelsüblichem Badezimmerreiniger, klarem
Leitungswasser und einem fusselfreiem Tuch. Aggressive Reinigungsmittel können das Produkt
beschädigen. Trocknen Sie das Produkt mit einem fusselfreien Tuch.
8
2
6
9

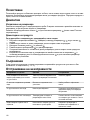
Demontage
Tank entleeren
Trennen Sie die Solardusche von der Wasserleitung. Öffnen Sie die Armatur und schrauben Sie die
Entleerungskappe ab, um das Wasser aus dem Tank abzulassen.
Schrauben Sie das Entlüftungsventil
2
vom Zusatztank
6
ab (siehe Kapitel Tank befüllen).
Produkt abbauen
Gehen Sie wie folgt vor, um die Solardusche abzubauen.
1. Schieben Sie die Verbindungselemente
3
, zwischen den Tanks
5
6
und dem Duschkopf
1
,
nach oben.
2. Schrauben Sie den Duschkopf von den beiden Tanks ab, während die zweite Person den
Duschkopf hält.
3. Entnehmen Sie die Bodenplatte
8
aus dem Rahmen
7
.
4. Schrauben Sie die beiden Leitungen
9
von den beiden Tanks ab.
5. Entfernen Sie die Schrauben von den Standfüßen der beiden Tanks, während die zweite Person
die Tanks hält.
6. Entleeren Sie das restliche Wasser aus den Tanks und schrauben Sie die Entleerungskappe
13
in
den Haupttank, sowie das Entlüftungsventil
2
in den Zusatztank.
Die Solardusche ist abgebaut.
Lagerung
Lagern Sie das Produkt nach einer gründlichen Reinigung und vollständigen Trocknung an einem
trockenen und frostfreien Ort (= +5 °C).
Fehlersuche
Fehlerbild Ursache Behebung
Nach dem Schließen der Armatur
läuft das Wasser aus dem
Duschkopf noch nach.
Dieser Umstand ist durch das
Aufheizen des Wassers im
drucklosen Tank bedingt.
Es handelt sich dabei um keinen
Mangel!
Wasser dringt aus einer
Schraubverbindung hervor.
Die Schraubverbindung ist undicht. Umwickeln Sie das Gewinde mit
Teflonband.
Es fließt kein Wasser aus dem
Duschkopf.
Die Wasserversorgung fehlt. Überprüfen Sie die
Wasserversorgung und den
Gartenschlauch auf Schäden und
Blockaden.
Es fließt kein warmes Wasser aus
dem Duschkopf.
Die Wassertemperatur im Tank ist zu
gering.
Verlegen Sie den Standplatz der
Solardusche auf einen Platz mit viel
Sonneneinstrahlung.
Das Wasser riecht seltsam oder ist
verfärbt.
Die gefüllte Solardusche wurde
länger nicht benutzt.
Entleeren Sie den Tank über die
Entleerungskappe und befüllen Sie
den Tank neu.
Falls sich die Störung nicht beheben lässt, kontaktieren Sie den auf der letzten Seite angegebenen
Kundendienst.
10

Technische Daten
Modell: 049095PP Tankvolumen: 35 l
Maximaler
Betriebswasserdruck:
5 bar, ev. Druckminderer
verwenden
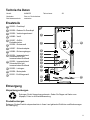
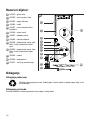
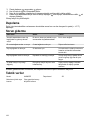
Ersatzteile
1
050010 - Duschkopf
2
050009 - Rahmen für Duschkopf
3
050002 - Verbindungselement
4
049982 - Ventil
5
050007 - Griff für
Einhebelmischer
6
050006 - Einlassventil
7
049907 - Schlauchadapter
8
049986 - Entleerungskappe
9
050004 - Innensechskant-
Schraube M6x4 inkl.
Innensechskant-Schlüssel
10
050005 - Innensechskant-
Schraube M8x4 inkl.
Innensechskant-Schlüssel
11
050003 - Leitungen
12
050008 - Bodenplatte
13
050011 - Entlüftungsventil
Entsorgung
Verpackung entsorgen
Entsorgen Sie die Verpackung sortenrein. Geben Sie Pappe und Karton zum
Altpapier, Folien in die Wertstoffsammlung.
Produkt entsorgen
Entsorgen Sie das Produkt entsprechend der in Ihrem Land geltenden Richtlinien und Bestimmungen
zur Entsorgung.
A
13
1
2
3
5
6
7
8
11
9
10
12
4
11

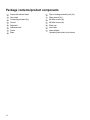
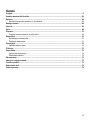
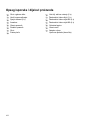
Package contents/product components
1
Frame with shower head
2
Vent valve
3
Connecting element (2x)
4
Faucet
5
Main tank
6
Additional tank
7
Frame
8
Base
9
Pipe, including assembly tool (2x)
10
Allen wrench (2x)
11
M6 Allen screw (4x)
12
M8 Allen screw (4x)
13
Drain cap
14
Inlet valve
15
Hose adapter
Operating instructions (not shown)
12

Contents
Overview................................................................................................................................................... 2
Package contents/product components..............................................................................................12
General Information............................................................................................................................... 14
Read and keep the operating instructions......................................................................................... 14
Explanation of Symbols.........................................................................................................................14
Safety.......................................................................................................................................................15
Description..............................................................................................................................................15
Preparation............................................................................................................................................. 16
Preparing the setup location and the connections.............................................................................16
Installation.............................................................................................................................................. 16
Assembling the solar shower.............................................................................................................16
Filling the tank....................................................................................................................................17
Operation................................................................................................................................................ 18
Using the solar shower...................................................................................................................... 18
Cleaning.................................................................................................................................................. 18
Disassembly........................................................................................................................................... 18
Draining the tank................................................................................................................................18
Dismantling the product.....................................................................................................................18
Storage....................................................................................................................................................19
Troubleshooting..................................................................................................................................... 19
Technical data.........................................................................................................................................19
Spare parts..............................................................................................................................................20
Disposal.................................................................................................................................................. 20
13

General Information
Read and keep the operating instructions
These operating instructions are a part of this solar shower (also referred to hereinafter as
the "product"). They contain important information about start-up and operation.
Read the operating instructions and especially the safety instructions carefully before using
the product. Non-observance of this operating instructions manual may lead to severe
injuries or damage to the product.
Keep the operating instructions for further use. If you pass on the product to a third party, you must pass
on operating instructions as well.
Intended use
This product is exclusively designed for outdoor showering.
This product is exclusively intended for private use and not suited for the commercial sector.
Only use the product as described in these operating instructions. Any other use is considered
inappropriate and may lead to material damage or even injury. The product is not a toy.
The manufacturer or retailer will not assume any liability for damage caused by inappropriate or
incorrect use.
Only use the product when it is firmly bolted down at a suitable location.
If the outdoor temperature drops below 50 °F (10 °C), the tank must be drained and the shower must be
dismantled and stored in a dry, frost-free place.
Foreseeable misuse
Never use the product as a climbing frame or as a post for suspending washing lines or hammocks.
Explanation of Symbols
The following symbols are used in this operating instructions, on the product or on the packaging.
Here you will find useful additional
information. Only tighten by hand, not with tools.
Not drinking water!
Risk of damage! Do not open the
packaging with sharp or pointed
objects, such as cutters.
Caution! Hot water.
The product is not frost-proof and
must be disassembled if temperatures
drop to below 10°C.
14

Safety
The following signal words are used in these operating instructions.
WARNING! This signal symbol/word denotes a hazard with an average
risk level that could lead to death or severe injury if it is not
avoided.
CAUTION! This signal symbol/word denotes a hazard with a low risk
level that could lead to mild or moderate injury if it is not
avoided.
NOTICE! This signal word provides a warning about potential material
damage.
General safety instructions
Safety instructions for persons
WARNING!
Packaging materials pose a risk of suffocation!
Catching your head in the packaging foil or swallowing other packaging materials can cause
death. There is a higher risk for children and mentally challenged persons who cannot
estimate the hazard potential due to lack of knowledge and experience.
-Prevent children and mentally challenged persons from playing with the packaging
materials.
CAUTION!
Risk of scalding!
In direct sunshine, the tank heats up and the water that comes out of the shower head can be
very hot, depending on the faucet settings.
-Before showering, set the faucet between cold and hot.
-Check the water temperature before you stand under the shower head.
-Never leave children and persons with reduced physical, sensory or mental abilities (e.g.
persons under the influence of alcohol) unattended in the vicinity of the product.
CAUTION!
Risk of infection!
Bacteria can multiply in the tank if the product is not used for longer periods.
-Drain the product before and after longer periods of non-use.
-Do not drink the water from the product.
NOTICE!
Improper use of the product may cause it to become damaged.
-Only use spare parts and accessories supplied or recommended by the manufacturer.
-Do not open the product. Leave repairs to a qualified service technician. Contact the
service address on the back of the instruction manual for this purpose. All liability and
warranty claims will be void when you carry out repairs yourself, the product is improperly
connection or operated incorrectly.
Description
The tank
5
of the solar shower is filled with water via the connected garden hose. This water is heated
by sunlight because the matt black surface of the tank reflects very little solar energy.
15

The solar shower has a cold water supply line leading directly to the faucet
4
so that the water can be
adjusted to the perfect temperature for showering.
The illustration shows how a solar shower works:
The entire shower body is filled with water and
works in a similar way to an electric water heater
in which the heated water also collects at the top.
If hot water is needed, the faucet
4
at the base of
the tank
5
is turned to let in cold water and the
water in the top region, which has already been
heated, is pushed out of the tank.
Any pressure that builds up due to the water
heating up in the tank can therefore escape
through the shower head
1
. This causes water to
drip from the shower head when the faucet is
closed.
Preparation
Preparing the setup location and the connections
The safest place to use the shower is on a smooth, level concrete or wooden floor.
Careful selection and good preparation of the setup location makes it much easier to set up and use the
shower. The following requirements must be met or considered:
- Water supply and drain pipes, direct sunlight
-Stable, level, anti-slip surface that is resistant to water
Installation
CAUTION!
Risk of injury!
The product can topple.
-A second person who holds the product is required for installation.
Assembling the solar shower
To assemble the solar shower, proceed as follows:
1. Position the frame
7
at the prepared location. Make sure that the solar shower is pointing in the
correct direction.
2
5
12
6
7
3
1
9
1
5
4
1
16

2. Insert the main tank
5
and the additional tank
6
into the frame
7
. A second person holds the
main or additional tank while you screw it in place with two M8 Allen screws
12
.
3. Screw one pipe
9
onto the hot water connections (red markings) and the second pipe onto the
cold water connections (blue markings) on both tanks
5
6
.
4
8
7
5
1
3
4. Insert the base
8
into the frame
7
.
5. Slide the connecting elements
3
onto the shower head
1
on both sides.
6
1
5
11
7
13
15
14
6. The second person holds the shower head
1
, while you screw the pipe connections of the shower
head onto the two tanks
5
6
.
7. The second person holds the shower head
1
while you screw the shower head onto the two
tanks
5
6
with the M6 Allen screws
11
.
8. Make sure that the vent valve
2
is screwed into the additional tank
6
. Slide the connecting
elements
3
onto the tanks.
9. Screw the hose adapter
15
or the inlet valve
14
onto the hose connection and the drain cap
13
into
the main tank
5
.
The solar shower is assembled.
Filling the tank
To fill the tanks of your solar shower, proceed as follows:
1. Connect a garden hose to the hose adapter
15
and the faucet of the water pipe. Position the
garden hose in such a way that nobody can trip over it.
17

2. Slide the connecting element between the
additional tank and the shower head upward.
Unscrew the vent valve
2
from the additional
tank
6
so that air can escape from the tank.
3. Turn on the water supply faucet. Turn the
faucet
4
all the way to the "hot" position and
open it. In this position, the tank fills fastest.
Water flows into the tank. It takes approx. 5
minutes for the tanks to fill.
4. As soon as water runs steadily out of the
connection for the vent valve, screw the vent
valve into the addition tank.
5. As soon as water runs uniformly out of the
shower head
1
, close the faucet.
6. Turn off the faucet of the water pipe.
The tank is filled.
Operation
Using the solar shower
Observe the following before using your solar shower:
- Bacteria can multiply in warm water if the product is not used for longer periods. Risk of infection!
The tank must be drained.
-The water temperature in the tank depends on the level of sunshine. In cloudy weather, the water
will take longer to heat up. The water can become very hot in the case of intense sunlight.
-Remove obstacles from the showering area.
To use your filled solar shower, proceed as follows:
1. Connect a garden hose to the hose adapter
15
and the faucet of the water pipe. Position the
garden hose so that no one can trip over it. Turn on the water supply faucet.
2. Turn the faucet
4
to the center position (between hot and cold). Open the shower faucet.
3. Turn the faucet left or right to set your desired water temperature. Use the faucet to control the
water temperature and quantity, and enjoy showering in warm water.
4. After showering, close the shower faucet. Turn off the faucet of the water pipe.
The shower is finished.
Water is still coming out of the shower head even after the faucet has been closed. This
is caused by the water heating up in the unpressurized tank and is not a defect!
Cleaning
Only clean the product with a standard bathroom cleaner, clear tap water and a lint-free cloth.
Aggressive cleaning agents can damage the product. Dry the product with a lint-free cloth.
Disassembly
Draining the tank
Disconnect the solar shower from the water pipe. Open the faucet and unscrew the drain cap to drain
the water from the tank.
Unscrew the vent valve
2
from the additional tank
6
(see section "Filling the tank").
Dismantling the product
To dismantle the solar shower, proceed as follows.
1. Slide the connecting elements
3
between the tanks
5
6
and the shower head
1
upward.
8
2
6
18

2. Unscrew the shower head from both tanks while the second person holds the shower head.
3. Remove the base
8
from the frame
7
.
4. Unscrew the two pipes
9
from the two tanks.
5. Remove the screws from the base of each tank while the second person holds the tank.
6. Drain the remaining water from the tanks. Screw the drain cap
13
into the main tank and the vent
valve
2
into the additional tank.
The solar shower is dismantled.
Storage
After thorough cleaning and drying, store the product in a dry and frost-free place (= +5 °C).
Troubleshooting
Fault description Cause Remedy
Water is still coming out of the
shower head even after the faucet
has been closed.
This is caused by the water heating
up in the unpressurized tank.
It is not a defect!
Water is leaking from a screw
connection.
The screw connection is not water-
tight.
Wrap the thread in Teflon tape.
There is no water coming out of the
shower head.
No water is being supplied. Check the water supply and the
garden hose for damage and
blockages.
The water coming out of the shower
head is not hot.
The water temperature in the tank is
too low.
Position the solar shower base in an
area with plenty of sunlight.
The water has a bad smell or is
discolored.
The filled solar shower has not been
used for some time.
Drain the tank via the drain cap and
refill it.
If the problem cannot be solved, contact the customer service listed on the last page.
Technical data
Model: 049095PP Tank volume: 35 l
Maximum operating
water pressure:
5 bar, use a pressure
regulator if required
19

Spare parts
1
050010 - Shower head
2
050009 - Frame for shower head
3
050002 - Connecting element
4
049982 - Valve
5
050007 - Handle for single-lever
mixer
6
050006 - Inlet valve
7
049907 - Hose adapter
8
049986 - Drain cap
9
050004 - M6x4 Allen screw,
including Allen wrench
10
050005 - M8x4 Allen screw,
including Allen wrench
11
050003 - Pipes and hoses
12
050008 - Base
13
050011 - Vent valve
Disposal
Disposing of the packaging
Sort the packaging before you dispose of it. Dispose of paperboard and cardboard with the recycled
paper service and wrappings with the appropriate collection service.
Disposal of the product
Dispose of the product in line with the guidelines and regulations valid in your country.
A
13
1
2
3
5
6
7
8
11
9
10
12
4
20
Pagina se încarcă...
Pagina se încarcă...
Pagina se încarcă...
Pagina se încarcă...
Pagina se încarcă...
Pagina se încarcă...
Pagina se încarcă...
Pagina se încarcă...
Pagina se încarcă...
Pagina se încarcă...
Pagina se încarcă...
Pagina se încarcă...
Pagina se încarcă...
Pagina se încarcă...
Pagina se încarcă...
Pagina se încarcă...
Pagina se încarcă...
Pagina se încarcă...
Pagina se încarcă...
Pagina se încarcă...
Pagina se încarcă...
Pagina se încarcă...
Pagina se încarcă...
Pagina se încarcă...
Pagina se încarcă...
Pagina se încarcă...
Pagina se încarcă...
Pagina se încarcă...
Pagina se încarcă...
Pagina se încarcă...
Pagina se încarcă...
Pagina se încarcă...
Pagina se încarcă...
Pagina se încarcă...
Pagina se încarcă...
Pagina se încarcă...
Pagina se încarcă...
Pagina se încarcă...
Pagina se încarcă...
Pagina se încarcă...
Pagina se încarcă...
Pagina se încarcă...
Pagina se încarcă...
Pagina se încarcă...
Pagina se încarcă...
Pagina se încarcă...
Pagina se încarcă...
Pagina se încarcă...
Pagina se încarcă...
Pagina se încarcă...
Pagina se încarcă...
Pagina se încarcă...
Pagina se încarcă...
Pagina se încarcă...
Pagina se încarcă...
Pagina se încarcă...
Pagina se încarcă...
Pagina se încarcă...
Pagina se încarcă...
Pagina se încarcă...
Pagina se încarcă...
Pagina se încarcă...
Pagina se încarcă...
Pagina se încarcă...
Pagina se încarcă...
Pagina se încarcă...
Pagina se încarcă...
Pagina se încarcă...
Pagina se încarcă...
Pagina se încarcă...
Pagina se încarcă...
Pagina se încarcă...
Pagina se încarcă...
Pagina se încarcă...
Pagina se încarcă...
Pagina se încarcă...
Pagina se încarcă...
Pagina se încarcă...
Pagina se încarcă...
Pagina se încarcă...
Pagina se încarcă...
Pagina se încarcă...
Pagina se încarcă...
Pagina se încarcă...
Pagina se încarcă...
Pagina se încarcă...
Pagina se încarcă...
Pagina se încarcă...
Pagina se încarcă...
Pagina se încarcă...
Pagina se încarcă...
Pagina se încarcă...
Pagina se încarcă...
Pagina se încarcă...
Pagina se încarcă...
Pagina se încarcă...
Pagina se încarcă...
Pagina se încarcă...
Pagina se încarcă...
Pagina se încarcă...
Pagina se încarcă...
Pagina se încarcă...
Pagina se încarcă...
Pagina se încarcă...
Pagina se încarcă...
Pagina se încarcă...
Pagina se încarcă...
Pagina se încarcă...
Pagina se încarcă...
Pagina se încarcă...
-
 1
1
-
 2
2
-
 3
3
-
 4
4
-
 5
5
-
 6
6
-
 7
7
-
 8
8
-
 9
9
-
 10
10
-
 11
11
-
 12
12
-
 13
13
-
 14
14
-
 15
15
-
 16
16
-
 17
17
-
 18
18
-
 19
19
-
 20
20
-
 21
21
-
 22
22
-
 23
23
-
 24
24
-
 25
25
-
 26
26
-
 27
27
-
 28
28
-
 29
29
-
 30
30
-
 31
31
-
 32
32
-
 33
33
-
 34
34
-
 35
35
-
 36
36
-
 37
37
-
 38
38
-
 39
39
-
 40
40
-
 41
41
-
 42
42
-
 43
43
-
 44
44
-
 45
45
-
 46
46
-
 47
47
-
 48
48
-
 49
49
-
 50
50
-
 51
51
-
 52
52
-
 53
53
-
 54
54
-
 55
55
-
 56
56
-
 57
57
-
 58
58
-
 59
59
-
 60
60
-
 61
61
-
 62
62
-
 63
63
-
 64
64
-
 65
65
-
 66
66
-
 67
67
-
 68
68
-
 69
69
-
 70
70
-
 71
71
-
 72
72
-
 73
73
-
 74
74
-
 75
75
-
 76
76
-
 77
77
-
 78
78
-
 79
79
-
 80
80
-
 81
81
-
 82
82
-
 83
83
-
 84
84
-
 85
85
-
 86
86
-
 87
87
-
 88
88
-
 89
89
-
 90
90
-
 91
91
-
 92
92
-
 93
93
-
 94
94
-
 95
95
-
 96
96
-
 97
97
-
 98
98
-
 99
99
-
 100
100
-
 101
101
-
 102
102
-
 103
103
-
 104
104
-
 105
105
-
 106
106
-
 107
107
-
 108
108
-
 109
109
-
 110
110
-
 111
111
-
 112
112
-
 113
113
-
 114
114
-
 115
115
-
 116
116
-
 117
117
-
 118
118
-
 119
119
-
 120
120
-
 121
121
-
 122
122
-
 123
123
-
 124
124
-
 125
125
-
 126
126
-
 127
127
-
 128
128
-
 129
129
-
 130
130


Steinbach Solar Shower Manualul proprietarului
- Tip
- Manualul proprietarului
în alte limbi
- Türkçe: Steinbach Solar Shower El kitabı
- français: Steinbach Solar Shower Le manuel du propriétaire
- slovenčina: Steinbach Solar Shower Návod na obsluhu
- italiano: Steinbach Solar Shower Manuale del proprietario
Lucrări înrudite
Alte documente
-
Bestway 58696 Manualul proprietarului
-
kamody STEINBACH Jump on pool shower Manual de utilizare
-
 Wellis Terra shower faucet Manual de utilizare
-
 Wellis Aura shower head Manual de utilizare
-
 Wellis Aurum freestanding faucet Manual de utilizare
-
 Wellis Rundo faucet set Manual de utilizare
-
 Wellis Bellini shower faucet Manual de utilizare
-
 Wellis Umbra bathtub faucet Manual de utilizare
-
Dolmar HP351 Manualul proprietarului
-
Dometic Kampa Geyser Instrucțiuni de utilizare


