
HP6375, HP6373, HP6371

2

3
1

4

HP6375, HP6373, HP6371
ENGLISH 6
15
24
33
POLSKI 43
53
62
72

6
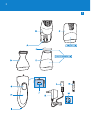
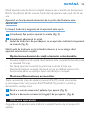
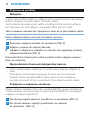
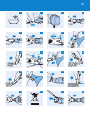
General description (Fig. 1)
Setting selector
B Precision comb
C Epilating head (HP6375 only)
D Precision trimmer
E Micro shaver (HP6375/HP6373 only)
F Protection cap of micro shaver (HP6375/HP6373 only)
G On/off slide
H Handle
I Socket for appliance plug
J Setting indicator
K Adapter
L Appliance plug
M Charging light
N Cleaning brush
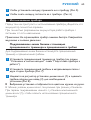
Important
Read this user manual carefully before you use the appliance and save it
for future reference.
Danger
Make sure the adapter does not get wet.
Warning
Check if the voltage indicated on the adapter and on the appliance
corresponds to the local mains voltage before you connect the
appliance.
The adapter contains a transformer. Do not cut off the adapter to
replace it with another plug, as this causes a hazardous situation.
This appliance is not intended for use by persons (including children)
with reduced physical, sensory or mental capabilities, or lack of
experience and knowledge, unless they have been given supervision
or instruction concerning use of the appliance by a person
responsible for their safety.
Children should be supervised to ensure that they do not play with
the appliance.
-
-
-
-
-
ENGLISH

Caution
Use, charge and store the appliance at a temperature between 15°C
and 35°C.
Only use the adapter supplied to charge the appliance.
If the adapter is damaged, always have it replaced with one of the
original type in order to avoid a hazard.
Do not use the appliance when one of the attachments or combs is
damaged or broken as this may cause injury.
Be careful with hot water. Always check if the water is not too hot, to
prevent your hands from getting burnt.
This appliance is only intended for shaving and trimming the bikini
line. Do not use it for another purpose.
Never try to trim your eyelashes.
HP6375 only:When you use the epilating head, keep the running
appliance away from your scalp hair, eyebrows, eyelashes, clothes,
threads, cords, brushes etc. to prevent damage and injuries.
If the appliance is subjected to a major change in temperature,
pressure or humidity, let the appliance acclimatise for 30 minutes
before you use it.
Compliance with standards
This Philips appliance complies with all standards regarding
electromagnetic elds (EMF). If handled properly and according to the
instructions in this user manual, the appliance is safe to use based on
scientic evidence available today.
This appliance complies with the internationally approved safety
regulations and can be safely used in the bath or shower and cleaned
under the tap (Fig. 2).
Noise level: Lc = 76 dB [A].
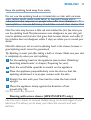
Preparing for use
Charging
Charge the appliance for at least 10 hours before you use it for the rst
time and after a long period of disuse.
When the appliance is fully charged, it has a cordless operating time of up
to 60 minutes. Do not charge the appliance for more than 24 hours.
-
-
-
-
-
-
-
-
-
-
-
-
ENGLISH 7

The appliance does not run from the mains when the battery is empty.
Make sure the appliance is switched off during charging.
1 Insert the appliance plug into the appliance (Fig. 3).
2 Put the adapter in the wall socket.
The charging light on the adapter goes on to indicate that the
appliance is charging (Fig. 4).
Note: The charging light does not change colour and does not go out when
the appliance is fully charged.
Optimising the lifetime of the rechargeable battery
Remove the adapter from the wall socket when the battery is fully
charged (which takes 10 hours).
Do not leave the appliance plugged into the wall socket for more
than 24 hours.
Discharge the battery completely twice a year by letting the motor
run until it stops. Then fully recharge the battery.
All attachments (epilating head (HP6375 only), precision trimmer
and micro shaver (HP6375/HP6373 only) can be attached and detached
in the same way.
1 To attach the attachment, push it onto the appliance (Fig. 5).
2 To detach the attachment, pull it off the appliance. (Fig. 6)
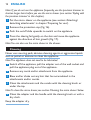
Using the appliance
Make sure that the appliance is fully charged before you start to use it.
It is not possible to run the appliance from the mains when the battery is
empty.
Note: Do not move the appliance too fast. Make smooth and gentle
movements.
,
-
-
-
ENGLISH8

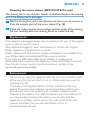
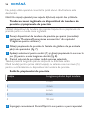
precision comb
Use the precision trimmer with the precision comb to trim your bikini
line.
1 Put the precision trimmer on the appliance (see section ‘Attaching/
detaching attachments’ in chapter ‘Preparing for use’).
2 Slide the precision comb into the guiding grooves on both sides of
the appliance (Fig. 7).
3 Press the setting selector (1) and slide the comb upwards or
downwards (2) to set the desired setting (Fig. 8).
The coloured circle on the handle shows the selected setting.
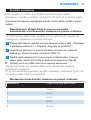
The table shows which hair lengths you achieve with the different settings.
When you trim for the rst time, start at the highest setting (5) to
familiarise yourself with the precision trimmer.
Settings of precision comb
Setting Hair length after trimming
1 2mm
2 4mm
3 6mm
4 8mm
5 10mm
4 Push the on/off slide upwards to switch on the appliance.
5 Move the precision trimmer with the precision comb slowly
through the hair (Fig. 9).
To trim in the most effective way, move the appliance against the
direction of hair growth.
Since all hair does not grow in the same direction, you need to move
the appliance in different directions (upward, downward or across).
,
-
-
ENGLISH 9

Make sure that the at part of the comb is always fully in contact with
the skin to obtain an even result.
To make trimming easier, stretch the skin with your free hand during
trimming (Fig. 10).
6 Regularly remove cut hair from the comb.
If a lot of hair has accumulated in the comb, remove the comb from the
appliance and blow and/or shake the hair out of it.
Styling with precision trimmer
Use the precision trimmer without the precision comb to style your bikini
line.
1 Put the precision trimmer (without precision comb) on the
appliance (see section ‘Attaching/detaching attachments’ in chapter
‘Preparing for use’) (Fig. 5).
Trimming without the precision comb results in a hair length of
approx. 0.6mm.
2 If necessary, remove the precision comb from the precision
trimmer. (Fig. 11)
3 Push the on/off slide upwards to switch on the appliance.
4 Move the appliance towards the desired contour of your bikini line.
Touch the hair lightly with the precision trimmer. (Fig. 12)
The trimmer can be applied:
1 with the trimmer teeth pointing straight towards the skin. (Fig. 13)
2 with the at part of the trimmer pointing straight towards the
skin (Fig. 14)
You can be as creative as you like when you style your bikini line. You can
even draw and cut out a template, for instance a heart shape, which you
can use to create a personal style.
Note: We advise you not to use the precision trimmer in the shower, because
an even trimming result cannot be guaranteed.
Epilating with epilating head (HP6375 only)
Use the epilating head to epilate your bikini line.
-
-
,
ENGLISH10

Keep the epilating head away from water.
Do not use the epilating head on irritated skin or skin with varicose
veins, rashes, spots, moles (with hairs) or wounds. People with a
reduced immune response or people who suffer from diabetes mellitus,
haemophilia or immunodeciency should also consult their doctor rst.
Note: Your skin may become a little red and irritated the rst few times you
use the epilating head. This phenomenon soon disappears as your skin gets
used to epilation and the hairs that grow back become thinner and softer. If
the irritation does not disappear within 3 days, we advise you to consult your
doctor.
Note: We advise you not to use the epilating head in the shower, because a
good epilating result cannot be guaranteed.
Tip: Epilating is easier just after taking a bath or shower. Make sure your skin
is completely dry when you start epilating.
1 Put the epilating head on the appliance (see section ‘Attaching/
detaching attachments’ in chapter ‘Preparing for use’).
2 Push the on/off slide upwards to switch on the appliance.
3 Place the appliance perpendicularly onto the skin so that the
epilating attachment is in proper contact with the skin.
4 Stretch the skin with your free hand to make the hairs stand
upright.
5 Move the appliance slowly against the direction of hair
growth (Fig. 15).
Do not exert any pressure.
Use the micro shaver to remove stubble along contoured edges of your
bikini line. This allows you to keep your bikini line smooth and well-
dened.
ENGLISH 11

Note: If you do not use the appliance frequently, use the precision trimmer to
shorten longer hairs before you use the micro shaver (see section ‘Styling with
the precision trimmer’ in this chapter).
1 Put the micro shaver on the appliance (see section ‘Attaching/
detaching attachments’ in chapter ‘Preparing for use’).
2 Remove the protection cap (Fig. 16).
3 Push the on/off slide upwards to switch on the appliance.
4 Press the shaving foil gently on the skin and move the appliance
against the direction of hair growth (Fig. 17).
Note: You can also use the micro shaver in the shower.
Cleaning
Never use scouring pads, abrasive cleaning agents or aggressive liquids
such as petrol or acetone to clean the appliance.
Note: The appliance does not need to be lubricated.
1 Switch off the appliance, pull the adapter out of the wall socket and
pull the appliance plug out of the appliance.
2 Remove any comb and/or attachment from the appliance.
3 Blow and/or shake out any hair that has accumulated in the
attachments and/or combs.
4 Clean the attachments and the combs with the cleaning brush or
under the tap.
Note: To clean the micro shaver, see section ‘Cleaning the micro shaver’ below.
5 Clean the adapter and the handle with the cleaning brush or with a
dry cloth.
Keep the adapter dry.
ENGLISH12

The shaving foil is very delicate. Handle it carefully. Replace the shaving
unit if the shaving foil is damaged.
1 Pull the shaving foil unit in the direction of the arrow to remove it
from the bottom part of the micro shaver (Fig. 18).
2 Clean the cutter and its surroundings and the inside of the shaving
foil unit carefully with the cleaning brush or under the tap.
If the adapter is damaged, always have it replaced with one of the original
type in order to avoid a hazard.
Only replace damaged or worn attachments or combs with original
Philips replacement attachments or combs
Philips replacement attachments, combs and adapters are available from
your Philips dealer and authorised Philips service centres.
If you have any difculties obtaining an adapter or replacement
attachments and combs for the appliance, contact the Philips Customer
Care Centre in your country (you nd its phone number in the
worldwide guarantee leaet).
Environment
Do not throw away the appliance with the normal household waste
at the end of its life, but hand it in at an ofcial collection point for
recycling (Fig. 19).
The built-in rechargeable battery contains substances that may
pollute the environment. Always remove the battery before you
discard and hand in the appliance at an ofcial collection point.
Dispose of the battery at an ofcial collection point for batteries. If
you have trouble removing the battery, you can also take the
appliance to a Philips service centre. The staff of this centre will
remove the battery for you and will dispose of it in an
environmentally safe way.
-
-
ENGLISH 13

1 Remove the adapter from the wall socket and pull the appliance
plug out of the appliance.
2 Let the appliance run until the motor stops.
3 If there is an attachment on the handle, remove the attachment.
4 Pry the inner part out of the housing with a screwdriver. (Fig. 20)
5 Pull the inner part out of the appliance (Fig. 21).
6 Remove the rechargeable battery from the inner part with a
screwdriver. (Fig. 22)
7 Cut the wires close to the battery with a pair of household
scissors.
Do not connect the appliance to the mains again after you have
removed the rechargeable battery.
Guarantee & service
If you need information or if you have a problem, please visit the Philips
website at www.philips.com or contact the Philips Customer Care
Centre in your country (you nd its phone number in the worldwide
guarantee leaet). If there is no Customer Care Centre in your country,
go to your local Philips dealer or contact the Service Department of
Philips Domestic Appliances and Personal Care BV.
ENGLISH14

15
Všeobecný popis (Obr. 1)
Volič nastavení
B Hřeben pro přesné úpravy
C Epilační hlavice (pouze model HP6375)
D Přesný zastřihovač
E Holicí mikrostrojek (pouze model HP6375/HP6373)
F Ochranný kryt holicího mikrostrojku (pouze model HP6375/HP6373)
G Posuvný spínač/vypínač
H Rukojeť
I Zásuvka pro přístrojovou zástrčku
J Indikátor nastavení
K Adaptér
L Přístrojová zástrčka
M Indikace nabíjení
N Čisticí kartáč
Před použitím přístroje si důkladně přečtěte tuto uživatelskou příručku a
uschovejte ji pro budoucí použití.
Dbejte na to, aby adaptér nenavlhnul.
Výstraha
Zkontrolujte, zda napětí uvedené na adaptéru a na přístroji odpovídá
napětí sítě. Teprve pak připojte přístroj k napájení.
Adaptér obsahuje transformátor. Proto tento adaptér nikdy
nenahrazujte jinou zástrčkou, protože by mohla vzniknout
nebezpečná situace.
Osoby (včetně dětí) s omezenými fyzickými, smyslovými nebo
duševními schopnostmi nebo nedostatkem zkušeností a znalostí by
neměly s přístrojem manipulovat, pokud nebyly o používání přístroje
předem poučeny nebo nejsou pod dohledem osoby zodpovědné za
jejich bezpečnost.
Dohlédněte na to, aby si s přístrojem nehrály děti.
-
-
-
-
-

Přístroj používejte, nabíjejte a uchovávejte při teplotě mezi 15 °C a
35 °C.
K nabíjení přístroje používejte pouze dodaný adaptér.
Pokud byl poškozen adaptér, musí být vždy nahrazen originálním
typem, abyste předešli možnému nebezpečí.
Přístroj nepoužívejte, pokud je některý z jeho nástavců či hřebenů
poškozen nebo rozbit, aby nedošlo ke zranění.
Při použití horké vody buďte opatrní. Vždy předem zkontrolujte, zda
není voda příliš horká, abyste si neopařili ruce.
Tento přístroj je určen pouze pro holení a stříhání oblasti třísel.
Nepoužívejte ho k jiným účelům.
Nezkoušejte zastřihovat řasy.
Pouze model HP6375: Jestliže používáte epilační hlavici, držte zapnutý
přístroj v bezpečné vzdálenosti od vlasů, obočí, řas, oděvů, nití, kabelů,
kartáčů apod., předejdete tak poškození nebo zranění.
Pokud je přístroj vystaven velkým změnám teploty, tlaku nebo vlhkosti,
počkejte před použitím 30 minut, aby se přístroj adaptoval.
Soulad s normami
Tento přístroj společnosti Philips odpovídá všem normám týkajícím se
elektromagnetických polí (EMP). Pokud je správně používán v souladu
s pokyny uvedenými v této uživatelské příručce, je jeho použití podle
dosud dostupných vědeckých poznatků bezpečné.
Tento přístroj odpovídá mezinárodním bezpečnostním předpisům a
lze jej bez obav používat ve vaně nebo ve sprše a čistit pod tekoucí
vodou (Obr. 2).
Hladina hluku: Lc = 76 dB [A].
Před prvním použitím nebo po dlouhé době nepoužívání nabíjejte přístroj
po dobu alespoň 10 hodin.
Při plném nabití přístroj pracuje bez připojení k síti až 60 minut.
Nenabíjejte přístroj déle než 24 hodin.
-
-
-
-
-
-
-
-
-
-
-
-
16

Přístroj nefunguje na napájení z elektrické sítě, je-li akumulátor vybitý.
Dbejte na to, aby byl přístroj při nabíjení vypnutý.
1 Zasuňte zástrčku síťového přívodu do přístroje (Obr. 3).
2 Zasuňte adaptér do zásuvky.
Kontrolka nabíjení na adaptéru se rozsvítí na znamení, že se přístroj
nabíjí (Obr. 4).
Poznámka: Kontrolka nabíjení po úplném nabití přístroje nezmění barvu ani
nezhasne.
Po úplném nabití akumulátoru (po 10 hodinách) vyjměte adaptér ze
síťové zásuvky.
Nenechávejte přístroj připojený do sítě déle než 24 hodin.
Dvakrát ročně akumulátor zcela vybijte tak, že necháte přístroj
v provozu, dokud se motor nezastaví. Pak akumulátor plně nabijte.
Nástavce (epilační hlavice (pouze model HP6375), přesný zastřihovač a
holicí mikrostrojek (pouze model HP6375/HP6373) lze nasadit a sejmout
stejným způsobem.
1 Chcete-li nástavec nasadit, přitlačte jej na přístroj (Obr. 5).
2 Chcete-li nástavec sejmout, stáhněte jej z přístroje. (Obr. 6)
Než začnete přístroj používat, ujistěte se, že je plně nabitý.
Není možné používat přístroj napájený ze sítě, je-li akumulátor vybitý.
Poznámka: Nepohybujte přístrojem příliš rychle. Pracujte plynulými a jemnými
pohyby.
,
-
-
-
17

Přesný zastřihovač s hřebenem pro přesné úpravy lze použít
k zastřihování oblasti třísel.
1 Nasaďte přesný zastřihovač na přístroj (viz část ‚Nasazení a sejmutí
nástavců‘ v kapitole ‚Příprava k použití‘).
2 Nasuňte hřeben pro přesné úpravy do vodicích drážek po obou
stranách přístroje (Obr. 7).
3 Stisknutím voliče nastavení (1) a posunutím hřebenu nahoru nebo
dolů (2) zvolte požadované nastavení (Obr. 8).
Barevný kruh na rukojeti ukazuje zvolené nastavení.
Tabulka ukazuje, jaké délky chloupků dosáhnete pomocí různých nastavení.
Pokud s přístrojem pracujete poprvé, začněte s nejvyšším nastavením (5),
abyste si práci s přesným zastřihovačem vyzkoušeli.
Nastavení Délka chloupků po zastřihnutí
1 2 mm
2 4 mm
3 6 mm
4 8 mm
5 10 mm
4 Zapněte přístroj posunutím vypínače směrem vzhůru.
5 Pohybujte přesným zastřihovačem s hřebenem pro přesné úpravy v
ochlupení zvolna (Obr. 9).
Nejúčinnější je stříhání proti směru růstu chloupků.
Protože všechny chloupky nerostou ve stejném směru, je třeba
přístrojem pohybovat různými směry (nahoru, dolů nebo napříč).
,
-
-
18

Dbejte na to, aby plochá část hřebene byla zcela v kontaktu
s pokožkou. To zajišťuje rovnoměrný výsledek zastřihnutí.
Zastřihování usnadníte, když budete během zastřihování napínat
pokožku volnou rukou (Obr. 10).
6 Hřeben přístroje pravidelně čistěte od ostříhaných chloupků.
Pokud se v hřebenu nahromadí větší množství chloupků, sejměte hřeben
z přístroje a chloupky z něj vytřepte a vyfoukejte.
Přesný zastřihovač bez hřebene pro přesné úpravy lze použít k úpravě
oblasti třísel.
1 Nasaďte přesný zastřihovač na přístroj (bez hřebene pro přesné
úpravy) (viz část ‚Nasazení a sejmutí nástavců‘ v kapitole ‚Příprava
k použití‘) (Obr. 5).
Výsledkem zastřihování bez hřebene pro přesné úpravy je délka
chloupků přibližně 0,6 mm.
2 V případě potřeby sejměte hřeben pro přesné úpravy z přesného
zastřihovače. (Obr. 11)
3 Zapněte přístroj posunutím vypínače směrem vzhůru.
4 Pohybujte přístrojem tak, abyste dosáhli požadovaného konturování
oblasti třísel. Přesným zastřihovačem se jemně dotýkejte
chloupků. (Obr. 12)
Zastřihovač může být použit:
1 se zuby zatřihovače namířenými přímo směrem k pokožce, (Obr. 13)
2 s plochou částí zastřihovače namířenou směrem k pokožce (Obr. 14).
Při úpravě oblasti třísel můžete být tvůrčí. Můžete si dokonce nakreslit a
vystřihnout šablonu, například ve tvaru srdce, a tu pak použít pro
vytvoření osobního stylu.
Poznámka: Nedoporučujeme používat přesný zastřihovač ve sprše, neboť
nemůže být zaručen přesný výsledek zastřihování.
Epilační hlavici použijte k epilaci linie třísel.
-
-
,
19

Chraňte epilační hlavici před kontaktem s vodou.
Nepoužívejte přístroj, pokud je pokožka podrážděná nebo pokud máte
varikózní žilky, pupínky nebo mateřská znaménka (s chloupky), případně
zranění.Osoby se zhoršeným imunitním systémem nebo osoby, které
trpí cukrovkou, hemolií nebo sníženou imunitou, by se rovněž měly
nejdříve poradit se svým lékařem.
Poznámka: Po několika prvních použitích epilátoru může pokožka mírně
zčervenat a jevit určité podráždění. Tento jev zakrátko zmizí, jakmile si
pokožka na epilaci zvykne, a dorůstající chloupky budou tenčí a jemnější.
Kdyby podráždění pokožky do tří dnů nezmizelo, poraďte se s lékařem.
Poznámka: Nedoporučujeme používat epilační hlavici ve sprše, neboť
nemůže být zaručen dobrý výsledek epilace.
Tip: Epilace je snazší po vykoupání nebo po osprchování. Dbejte však na to,
aby byla pokožka na začátku epilace zcela suchá.
1 Nasaďte epilační hlavici na přístroj (viz část ‚Nasazení a sejmutí
nástavců‘ v kapitole ‚Příprava k použití‘).
2 Zapněte přístroj posunutím vypínače směrem vzhůru.
3 Přístroj držte kolmo k pokožce, aby byl epilační nástavec
v náležitém kontaktu s pokožkou.
4 Volnou rukou napínejte pokožku tak, aby se chloupky napřimovaly.
5 Přístrojem pohybujte pomalu proti směru růstu chloupků (Obr. 15).
Na přístroj netlačte.
Holicím mikrostrojkem odstraňujte strniště okolo linie třísel. Díky tomu
budou vaše linie třísel hladké s přesně tvarovanými obrysy.
Poznámka: Pokud nepoužíváte přístroj často, před použitím holicího
mikrostrojku zkraťte delší chloupky přesným zastřihovačem (viz část ‚Úprava
přesným zastřihovačem‘ v této kapitole).
20
Pagina se încarcă...
Pagina se încarcă...
Pagina se încarcă...
Pagina se încarcă...
Pagina se încarcă...
Pagina se încarcă...
Pagina se încarcă...
Pagina se încarcă...
Pagina se încarcă...
Pagina se încarcă...
Pagina se încarcă...
Pagina se încarcă...
Pagina se încarcă...
Pagina se încarcă...
Pagina se încarcă...
Pagina se încarcă...
Pagina se încarcă...
Pagina se încarcă...
Pagina se încarcă...
Pagina se încarcă...
Pagina se încarcă...
Pagina se încarcă...
Pagina se încarcă...
Pagina se încarcă...
Pagina se încarcă...
Pagina se încarcă...
Pagina se încarcă...
Pagina se încarcă...
Pagina se încarcă...
Pagina se încarcă...
Pagina se încarcă...
Pagina se încarcă...
Pagina se încarcă...
Pagina se încarcă...
Pagina se încarcă...
Pagina se încarcă...
Pagina se încarcă...
Pagina se încarcă...
Pagina se încarcă...
Pagina se încarcă...
Pagina se încarcă...
Pagina se încarcă...
Pagina se încarcă...
Pagina se încarcă...
Pagina se încarcă...
Pagina se încarcă...
Pagina se încarcă...
Pagina se încarcă...
Pagina se încarcă...
Pagina se încarcă...
Pagina se încarcă...
Pagina se încarcă...
Pagina se încarcă...
Pagina se încarcă...
Pagina se încarcă...
Pagina se încarcă...
Pagina se încarcă...
Pagina se încarcă...
Pagina se încarcă...
Pagina se încarcă...
Pagina se încarcă...
Pagina se încarcă...
Pagina se încarcă...
Pagina se încarcă...
-
 1
1
-
 2
2
-
 3
3
-
 4
4
-
 5
5
-
 6
6
-
 7
7
-
 8
8
-
 9
9
-
 10
10
-
 11
11
-
 12
12
-
 13
13
-
 14
14
-
 15
15
-
 16
16
-
 17
17
-
 18
18
-
 19
19
-
 20
20
-
 21
21
-
 22
22
-
 23
23
-
 24
24
-
 25
25
-
 26
26
-
 27
27
-
 28
28
-
 29
29
-
 30
30
-
 31
31
-
 32
32
-
 33
33
-
 34
34
-
 35
35
-
 36
36
-
 37
37
-
 38
38
-
 39
39
-
 40
40
-
 41
41
-
 42
42
-
 43
43
-
 44
44
-
 45
45
-
 46
46
-
 47
47
-
 48
48
-
 49
49
-
 50
50
-
 51
51
-
 52
52
-
 53
53
-
 54
54
-
 55
55
-
 56
56
-
 57
57
-
 58
58
-
 59
59
-
 60
60
-
 61
61
-
 62
62
-
 63
63
-
 64
64
-
 65
65
-
 66
66
-
 67
67
-
 68
68
-
 69
69
-
 70
70
-
 71
71
-
 72
72
-
 73
73
-
 74
74
-
 75
75
-
 76
76
-
 77
77
-
 78
78
-
 79
79
-
 80
80
-
 81
81
-
 82
82
-
 83
83
-
 84
84


Philips HP6371/00 Manual de utilizare
- Categorie
- Aparate de bărbierit
- Tip
- Manual de utilizare
în alte limbi
- slovenčina: Philips HP6371/00 Používateľská príručka
- polski: Philips HP6371/00 Instrukcja obsługi
Lucrări înrudite
-
Philips HP6379/00 Manual de utilizare
-
Philips HP6375/00 Product Datasheet
-
Philips HP6409/02 Manual de utilizare
-
Philips HP6492/00 Manual de utilizare
-
Philips HP6373/00 Product Datasheet
-
Philips HP6371/00 Product Datasheet
-
-
-
Philips HP6583/02 Manual de utilizare
-
Philips HP6492/11 Manual de utilizare