
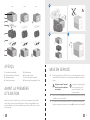
VENTA ORIGINAL
LUFTBEFEUCHTER / AIR HUMIDIFIER
LW15 / LW25 / LW45
DE BEDIENUNGSANLEITUNG
EN INSTRUCTIONS FOR USE
FR MODE D‘EMPLOI
ES MANUAL DE INSTRUCCIONES
IT ISTRUZIONI PER L’USO
NL GEBRUIKSAANWIJZING
DK BRUGSANVISNING
SE BRUKSANVISNING
NO BRUKSANVISNING
FI KÄYTTÖOHJE
LV LIETOŠANAS INSTRUKCIJA
LT NAUDOJIMO INSTRUKCIJA
PL INSTRUKCJA OBSŁUGI
HU KEZELÉSI ÚTMUTATÓ
CZ NÁVOD K POUŽITÍ
SK NÁVOD NA OBSLUHU
SR UPUTSTVO ZA UPOTREBU
HR KORISNIČKE UPUTE
SL NAVODILA ZA UPORABO
RO INSTRUCȚIUNI DE UTILIZARE
RU ИНСТРУКЦИЯ ПО
ЭКСПЛУАТАЦИИ
UA ІНСТРУКЦІЯ ЗЕКСПЛУАТАЦІЇ
KZ ПАЙДАЛАНУШЫ
НҰСҚАУЛЫҒЫ
KR 사용 설명서
MY MANUAL OPERASI
JP 取扱説明書
CN 操作说明书

2 3DE DE
VIELEN DANK!
Wir sind überzeugt, dass dieses Venta-Modell Ihre Erwartungen über-
treffen wird, und wünschen Ihnen viel Freude damit.
Bitte registrieren Sie Ihr Venta-Gerät: www.venta-air.com
Bitte lesen Sie diese Bedienungsanleitung vollständig durch, be-
wahren Sie sie zur späteren Verwendung auf und beachten Sie alle
Sicherheitshinweise sowie die bestimmungsgemäße Verwendung.
Die aktuellste Version der Bedienungsanleitung finden Sie auf unserer
Website www.venta-air.com
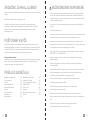
SEHR GEEHRTER KUNDE
Der Venta Original Luftbefeuchter unterstützt die gesunde Luftfeuchtigkeit sowie die
natürliche Reduzierung von Schadstoffen in der Luft – genial einfach und ganz ohne
großen technischen Aufwand. Er arbeitet nur mit Wasser und ohne zusätzliche Be-
feuchtermatten oder Filter nach dem anerkannt besten Prinzip der Kaltverdunstung.
So funktioniert das Venta Prinzip
Die Raumluft wird über einen Lüfter in den mit Wasser befüllten Luftbefeuchter gelei-
tet, in dem ausgeklügelt angeordnete Plattenstapel rotieren. Über deren Flächen wird
hygienisch sauberes Wasser in den Raum verdunstet.
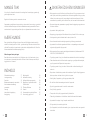
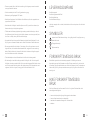
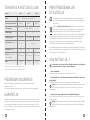
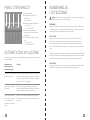
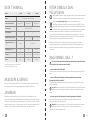
INHALTSVERZEICHNIS
Sicherheitshinweise 4
Lieferumfang 7
Symbole 7
Bestimmungsgemäße Verwendung 7
Nicht bestimmungs gemässe Verwen-
dung 7
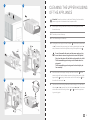
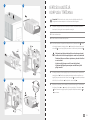
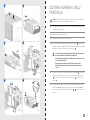
Übersicht 8
Vor der ersten Benutzung 8
Inbetriebnahme 9
Bedienfeld 10
Automatische Abschaltung 10
Wartung und Reinigung 11
Reinigung vom Geräte-Oberteil 13
Technische Daten 14
Zubehör & Service 14
Garantie 14
Recycling und Entsorgung 15
Was ist, wenn …? 15
DE
AT
CH

4 5DE DE
∙Dieses Gerät ist für den Gebrauch durch Kinder ab 8 Jahren
und Personen mit eingeschränkten körperlichen, sensori-
schen oder mentalen Fähigkeiten oder mit mangelhafter
Erfahrung und Kenntnissen geeignet, sofern sie beaufsich-
tigt werden oder hinsichtlich der sicheren Verwendung des
Gerätes unterwiesen wurden und die bestehenden Gefahren
verstanden haben.
∙Bedienungsanleitung vor Inbetriebnahme vollständig durch-
lesen und zum späteren Nachschlagen gut aufbewahren.
∙Das Gerät ist kein Spielzeug für Kinder.
∙Reinigung und Benutzerpflege darf nicht von Kindern unter
8 Jahren bzw. ohne Aufsicht durchgeführt werden.
∙Das Gerät und dessen Steckernetzteil von Kindern unter
8 Jahren fernhalten.
∙Unsachgemäße Verwendung kann das Gerät beschädigen
und Körperverletzungen verursachen.
∙Das Gerät nur an geeignete Netzsteckdosen anschließen –
Netzspannung gemäß den Typenschildangaben am Gerät.
∙Dieses Gerät darf nur mit folgenden Steckernetztei-
len betrieben werden: „Model Nr. BI13-240050-Cd /
FJSW1982400500“.
∙Das Gerät nie in Betrieb nehmen, wenn vom Steckernetzteil
das Netzkabel oder der Netzstecker beschädigt ist.
∙Ziehen Sie vor jedem Reinigungs- oder Wartungseingriff
sowie zum Umstellen oder Transportieren des Gerätes das
Steckernetzteil aus der Steckdose.
∙Das Gerät nie in Betrieb nehmen, wenn dieser heruntergefal-
len ist oder auf eine andere Art beschädigt wurde.
! SICHERHEITSHINWEISE ∙Reparaturen an Elektrogeräten dürfen nur von Fachkräften
durchgeführt werden. Durch unsachgemäße Reparaturen
können erhebliche Gefahren für den Benutzer entstehen.
∙Setzen Sie sich keinesfalls auf das Gerät und legen Sie kei-
ne Gegenstände darauf.
∙Stecken Sie keine Fremdgegenstände in das Gerät.
∙Geräte-Oberteil nie in Wasser oder andere Flüssigkeiten
tauchen.
∙Das Gerät nie überfüllen.
∙Das Gerät nie mit vollem Behälter transportieren oder kippen.
∙Niemals das Steckernetzteil am Netzkabel oder mit nassen
Händen aus der Steckdose ziehen.
∙Das Gerät darf nur in komplett zusammengebautem
Zustand in Betrieb genommen werden.
∙Das Gerät nur auf eine ebene, trockene Fläche stellen.
∙Das Gerät so aufstellen, dass es nicht umgestoßen werden
kann und dass niemand über das Gerät oder das Kabel
stolpern kann.
∙Halten Sie zu Gegenständen und Wänden einen Mindestab-
∙Maximale Aufstellungshöhe: 2000 Meter
∙Niemals die Lüftungsschlitze abdecken oder blockieren, um
eine Überhitzung/Beschädigung des Gerätes zu verhindern.
∙Eine dauerhafte relative Raumluftfeuchte von mehr als
logischen Organismen ermöglichen.
∙Ein direktes Austreten von Wasser aus dem Gerät, in
Form von Tropfen, Dampf, Nebel oder Kalkniederschlag ist
aufgrund seiner Beschaffenheit und der Kaltverdunstungs-
technologie bei sachgemäßer Verwendung nicht möglich.

6 7DE DE
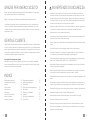
LIEFERUMFANG
1 × Venta-Gerät
1 × Flasche Hygienemittel 50ml
1 × Kurzanleitung
1 × Sicherheitshinweise
Falls Teile fehlen oder beschädigt sind, wenden Sie sich bitte an unseren Service-
Partner oder an Ihren lokalen Händler.
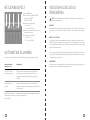
SYMBOLE
! Sicherheitshinweise: Aufmerksam lesen und befolgen, um Personen- und
Sachschäden zu vermeiden.
i Ergänzende Informationen
Hilfreiche Tipps
BESTIMMUNGSGEMÄSSE
VERWENDUNG
Dieses Venta-Gerät ist ein Haushaltsgerät zur Luftbefeuchtung von Innenräumen.
Das Gerät ist nicht für den Außenbereich geeignet. Jegliche anderweitige Verwen-
dung oder Veränderung des Gerätes wird als unsachgemäße Verwendung betrach-
tet. Der Hersteller haftet nicht für Schäden oder Verletzungen infolge einer unsach-
gemäßen Verwendung.
NICHT BESTIMMUNGS-
GEMÄSSE VERWENDUNG
Ein nicht bestimmungsgemäßer Gebrauch kann Gesundheit und Leben gefährden.
Dazu zählt der Einsatz unter folgenden Bedingungen:
• In Räumen mit explosionsgefährdeten und/oder aggressiven Atmosphären
• In Räumen mit hoher Lösemittelkonzentration
• In der Nähe von Schwimmbädern oder nassen Geländen
• Im Freien
∙Das Gerät darf nur mit dem dafür vorgesehenen Original-
Venta-Zubehör betrieben werden. Für Schäden durch frem-
des Zubehör übernimmt Venta-Luftwäscher GmbH keine
Gewähr.
∙Sofern das Gerät mehrere Tage nicht verwendet, ausge-
schaltet oder für einen längeren Zeitraum eingelagert
wird, ist die Wasserwanne vollständig zu entleeren, von
Schmutzrückständen zu reinigen und zu trocknen, um einer
Geruchsentwicklung oder der Entwicklung biologischer
Organismen in ruhendem Wasser bzw. Wasserrückständen
zu verhindern.
∙Ziehen Sie das Steckernetzteil aus der Steckdose, wenn Sie
das Gerät nicht gebrauchen.
∙Lassen Sie nicht zu, dass der Bereich um das Gerät feucht
oder nass wird. Wenn Feuchtigkeit auftritt, drehen Sie die
Geräteleistung herunter. Wenn die Ausgangsleistung des
Gerätes nicht herunter gedreht werden kann, verwenden Sie
das Gerät mit Unterbrechungen. Achten Sie darauf, dass
keine saugfähigen Materialien, wie z. B. Teppiche, Vorhänge,
Gardinen oder Tischdecken, feucht werden.

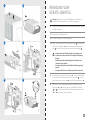
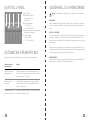
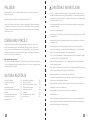
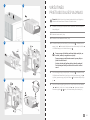
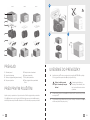
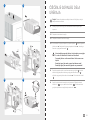
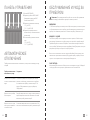
8 9DE DE
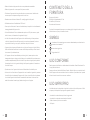
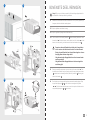
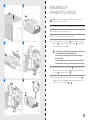
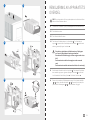
1
2
4
5
6
7
8
3
LW45 LW25 LW15
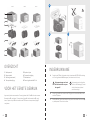
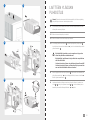
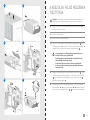
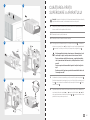
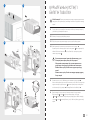
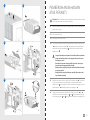
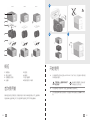
1 Bedienfeld
2 Geräte-Oberteil
3 Steckernetzteil (montiert)
4 Transportsicherung
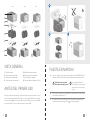
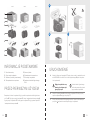
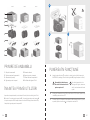
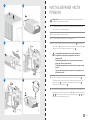
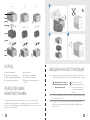
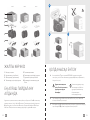
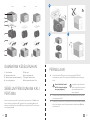
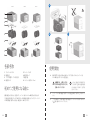
VOR DER ERSTEN BENUTZUNG
8 aus Karton entneh-
men. Oberteil 2 abnehmen. Transportsicherung 4 aus Oberteil 2 entfernen. Platten-
stapel 5 aus Unterteil 7 nehmen und Transportsicherung 6 entfernen.
5 Plattenstapel
6 Transportsicherung
7 Geräte-Unterteil
8
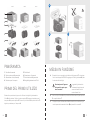
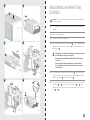
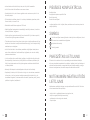
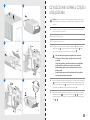
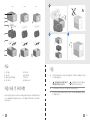
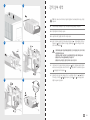
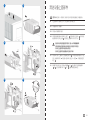
ÜBERSICHT
AUnterteil 7 mit Leitungswasser bis maximal WATERLINE-Markierung befüllen
8 zugeben (gesamter Flascheninhalt).
! Das Gerät darf niemals mit
aufgesetztem Oberteil be-
füllt werden!
i Die Zugabe des Hygiene mittels
ist sehr wichtig, weil dadurch
die Luft optimal befeuchtet
wird.
BPlattenstapel 57 einlegen und Oberteil 2 auf Unterteil 7 setzen.
CNetzstecker vom Steckernetzteil 3 an Stromnetz anschließen und Gerät
durch kurzes Drücken auf Taste im Bedienfeld 1 einschalten.
INBETRIEBNAHME
A
B C
!

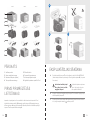
10 11DE DE
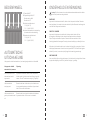
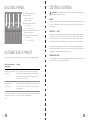
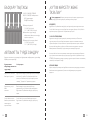
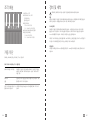
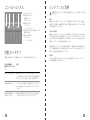
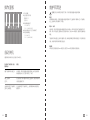
12 3 4 51 Taste EIN / AUS
2 Betriebsanzeige EIN / AUS
Dauerleuchten: EIN
Kein Leuchten: AUS
3 Anzeige Lüfterstufe
1 - 2 (bei LW 15),
1 - 2 - 3 (bei LW 25/45)
4 Anzeige automatische Abschaltung
(siehe Automatische Abschaltung)
5 Auswahltaste Lüfterstufe
1 - 2 (bei LW 15),
1 - 2 - 3 (bei LW 25/45)
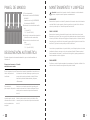
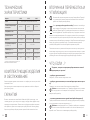
BEDIENFELD WARTUNG UND REINIGUNG
! Achtung: Bei allen Reinigungs- und Wartungsarbeiten Steckernetzteil aus der
Steckdose ziehen!
TÄGLICH
Gerät ausschalten mit Taste 1, Steckernetzteil aus der Steckdose ziehen. Oberteil
abnehmen, frisches Wasser ins Unterteil füllen. Oberteil aufsetzen. Mit Taste 1 Gerät
einschalten.
ALLE 10-14 TAGE
Gerät ausschalten und Steckernetzteil aus der Steckdose ziehen. Verschmutztes
Wasser ausgießen. Ablagerungen im Unterteil abbürsten und ausspülen. Platten-
stapel mit Wasser abspülen. Geräte unterteil wieder mit Wasser befüllen.
Venta-Hygienemittel zugeben. Dosierung siehe Skalierung auf Flaschenrückseite.
Sämtliche Rückstände im Unterteil und am Plattenstapel (weiße, grün-gelbliche oder
braune Ablagerungen) beeinträchtigen NICHT die Funktion des Gerätes. Durch die
Zugabe vom Hygienemittel ist ein einwandfreier hygienischer Betrieb gewährleistet.
HALBJÄHRLICH
Zur halbjährlichen Reinigung empfehlen wir den Venta-Reiniger. Bitte beachten Sie
die Gebrauchsanweisung, die dem Venta-Reiniger beigefügt ist.
Das Gerät schaltet
automatisch ab wenn:
Was tun
zu wenig Wasser im
Geräte unterteil ist.
Gerät ausschalten, Steckernetzteil aus der Steckdose
ziehen, Wasser nachfüllen und mit Taste 1 wieder in
Betrieb setzen. Siehe auch „Wartung und Reinigung“,
„Täglich“
Geräteoberteil
geöffnet wurde.
Geräteoberteil wieder schließen durch Drücken auf
die äußeren Enden der Verriegelungstasten. Gerät mit
Taste 1 aus- und wieder einschalten.
Oberteil nicht oder nicht
richtig auf Unterteil sitzt.
Oberteil auf Unterteil setzen. Gerät mit Taste 1 aus-
und wieder einschalten.
AUTOMATISCHE ABSCHALTUNG
Das Gerät verfügt über eine automatische Abschaltung, welches durch die Anzeige
4 signalisiert wird.

12 13DE DE
1
6
5
3
4
2
1
3
4
2
3
4
2
1
1
3
5 6
2
4
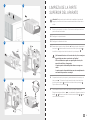
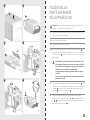
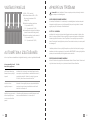
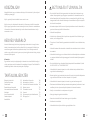
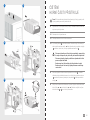
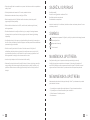
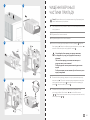
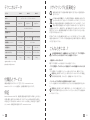
REINIGUNG VOM
GERÄTE-OBERTEIL
! Achtung! Sicherstellen, dass bei allen Maßnahmen das Gerät ausge-
schaltet und das Steckernetzteil aus der Steckdose gezogen ist!
01 Oberteil von Unterteil abnehmen. Auf Verriegelungstasten drücken, so dass
die Enden hochstehen.
02 Seitenteile nach außen wegklappen.
03 Gerippte Seitenflügel nach außen wegklappen.
04 Stecker vom Steckernetzteil aus Antriebseinheit ziehen 1. Antriebseinheit
nach oben herausnehmen 2. Kabel vom Steckernetzteil aus Halterung
lösen 3 und durch Öffnung des Oberteils nach unten herausziehen 4.
!
∙Antriebseinheit und Steckernetzteil nicht zerlegen, nicht
ins Wasser tauchen und nicht mit Flüssigkeit in Berührung
bringen!
∙Antriebseinheit mit Ventilatorflügel und Getriebe nur mit
trockenem Tuch reinigen!
∙Zerlegtes Oberteil kann unter fließendem Wasser gereinigt
werden!
∙Zerlegtes Oberteil muss vor Montage absolut trocken sein!
05 Antriebseinheit seitenrichtig in Oberteil setzen 1. Stecker vom Steckernetz-
teil von unten durch Öffnung des Oberteils nach oben ziehen 2 und in An-
triebseinheit stecken, bis er einrastet 3. Kabel in Halterung befestigen 4.
06 Äußere Enden der Verriegelungstasten müssen hochstehen. Gerippte
Seiten flügel 1 und 2 nach oben klappen, anschließend die Seitenteile
3 und 4. Durch Drücken auf die äußeren Enden der Verriegelungstasten
5 und 6 Oberteil wieder richtig verschließen.

14 15DE DE
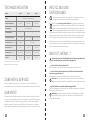
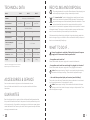
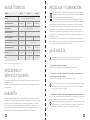
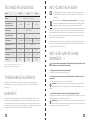
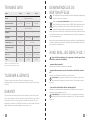
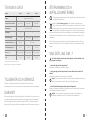
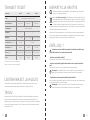
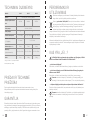
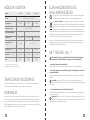
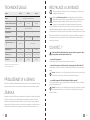
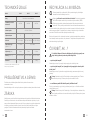
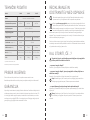
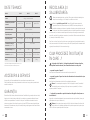
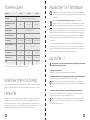
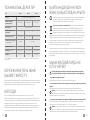
TECHNISCHE DATEN
Modell LW 15 LW 25 LW 45
Farben Weiß-Grau / Anthrazit-Metallic
Raumgrößeneignung* bis 25 m² bis 40 m² bis 55 m²
Netzspannung 100- 240 V, 50/60 Hz
Leistungsstufen 2 3
Geräuschentwicklung 22 / 32 dB(A) 24 / 34 / 44 dB(A) 24 / 35 / 45 dB(A)
Stromverbrauch (Stufe 1-3) 3 / 4 Watt 3 / 5 / 8 Watt
Wasserinhalt (Max.) 5 Liter 7 Liter 10 Liter
Abmessungen (L×B×H) 26 × 28 × 31 30 × 30 × 33 45 × 30 × 33
Gewicht 3 kg 3,8 kg 5,8 kg
Änderungen und Irrtümer vorbehalten
ZUBEHÖR & SERVICE
Zubehör kann telefonisch oder online auf www.venta-air.com bestellt werden.
Kontaktdaten unserer Service-Partner finden Sie auf der Rückseite dieser Anleitung.
GARANTIE
Aufgrund der hohen Qualität garantiert die Venta-Luftwäscher GmbH für die Dauer
von zwei Jahren ab Kaufdatum, dass dieses Produkt bei sachgemäßer Verwendung
keine Defekte aufweist. Sollte doch einmal ein Material- oder Verarbeitungsfehler
auftreten, wenden Sie sich bitte an das VENTA-Service-Team oder Ihren Händler.
Zudem gelten die allgemeinen Garantiebedingungen von Venta: www.venta-air.com
RECYCLING UND
ENTSORGUNG
Das Verpackungsmaterial ist wiederverwertbar. Die Verpackung bitte um-
weltgerecht entsorgen und der Wertstoffsammlung zuführen.
Das Symbol „durchgestrichene Mülltonne“ erfordert die separate Entsor-
gung von Elektro- und Elektronik-Altgeräten (WEEE). Solche Geräte können
gefährliche und umweltgefährdende Stoffe enthalten. Diese Produkte sind
an einer ausgewiesenen Sammelstelle für das Recycling von elektrischen
und elektronischen Geräten zu entsorgen und dürfen nicht im unsortierten Hausmüll
entsorgt werden. Dadurch tragen Sie zum Schutz der Ressourcen und der Umwelt
bei. Für weitere Informationen wenden Sie sich bitte an die örtlichen Behörden.
Kinder dürfen auf keinen Fall mit Kunststoffbeuteln und Verpackungsmaterial spie-
len, da Verletzungs- bzw. Erstickungsgefahr besteht. Solches Material sicher lagern
oder auf umweltfreundliche Weise entsorgen.
WAS IST, WENN …?
! Sicherstellen, dass bei allen Maßnahmen das Gerät ausgeschaltet und
das Steckernetzteil aus der Steckdose gezogen ist!
... sich das Gerät nicht einschalten lässt?
Bitte überprüfen, ob das Steckernetzteil am Stromnetz angeschlossen ist.
... sich das Gerät nicht einschalten lässt, obwohl das Steckernetzteil am
Stromnetz angeschlossen ist?
Bitte überprüfen, ob das Steckernetzteil fest in der Antriebseinheit steckt.
iMaßnahme: Oberteil abnehmen. Korrekten Sitz überprüfen (siehe Anleitung
Reinigung vom Geräte-Oberteil). Anschließend Gerät wieder in Betrieb nehmen.
... am Bedienfeld die runde blaue Betriebsanzeige blinkt?
Das Gerät hat automatisch abgeschaltet, weil der Motor überlastet ist (z. Bsp.durch
Eindringen von Fremdkörpern o. ä.).
iMaßnahme: Oberteil abnehmen. Überprüfen, ob Plattenstapel im Unterteil
sowie Ventilatorflügel im Oberteil frei beweglich sind. Anschließend Gerät
wieder in Betrieb nehmen.

16 17EN EN
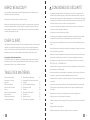
THANK YOU!
We are confident that this Venta model will exceed your expectations and hope that
you enjoy it.
Please register your Venta appliance here: www.venta-air.com
Please read these operating instructions in its entirety, keep it for future reference
and observe all safety instructions for the proper use of the appliance. You can find
the current version of the operating instructions on our website www.venta-air.com
DEAR CUSTOMER,
The Venta Original Air Humidifier creates healthy humidity and naturally reduces
harmful substances in the air. It is incredibly simple to use and requires no complex
technical knowledge. Simply fill with water – no need for humidifier mats or filters.
The humidifier uses the proven cold evaporation principle.
Here’s how the Venta principle works
A fan directs the ambient air into the water-filled humidifier, where it flows through
specially arrayed disk stacks. Hygienically clean air evaporates from their surfaces
into the room.
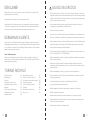
TABLE OF CONTENTS
Safety Instructions 17
Scope of delivery 19
Symbols 19
Intended use 19
Improper use 19
Overview 20
Before the first use 20
Putting into operation 21
Control panel 22
Automatic switch off 22
Maintenance and cleaning 23
Cleaning the upper housing
of the appliance 25
Technical data 26
Accessories & Service 26
Guarantee 26
Recycling and disposal 27
What to do if … 27
• This appliance is suitable for use by children over the age of 8 years and people
with restricted physical, sensory, or mental capacities or lack of experience and
knowledge, providing they are supervised or have received instructions on the safe
use of the appliance and understand the existing hazards.
• Read the operating instructions completely before putting the appliance into op-
eration and keep them for later reference.
• The appliance is not a toy for children.
• Cleaning and user maintenance may not be performed by children under the age of
8 years or without supervision.
• Keep the appliance and its power supply unit out of the reach of children under the
age of 8 years.
• Improper use can damage the appliance and cause physical injuries.
• Plug the appliance into suitable power outlets only – the mains voltage must cor-
respond to the nameplate data on the appliance.
• This appliance can only be operated with the power supply units “Model No. BI13-
240050-Cd / FJSW1982400500”.
• Never use the appliance if it has a damaged power supply unit or cable, or after it
has malfunctioned or if it has been dropped or damaged in any other way.
• Unplug the power supply unit from the power outlet before every cleaning or main-
tenance operation or transportation of the appliance.
• Never use the appliance if it has been dropped or damaged in any other way.
• Electrical appliances should only be repaired by professional specialists. Amateur
repairs could result in considerable danger to the user.
• Do not sit on the appliance and do not place any objects on it.
• Do not put any foreign objects into the appliance.
• Do not immerse the upper housing in water or any other liquid.
• Never overfill the appliance.
• Never transport or tilt the appliance when the tank is full.
• Never unplug the appliance by pulling on the cable or pulling the power supply unit
out with wet hands.
! SAFETY INSTRUCTIONS

18 19EN EN
SCOPE OF DELIVERY
1 x Venta appliance
1 ×
1 x quick-start guide
1 x safety instruction sheet
If any parts are missing or damaged, please contact our service partner or your local
retailer.
SYMBOLS
! Please read and follow the Safety Instructions carefully to prevent injuries or
damage to property.
i Additional information
Helpful tips
INTENDED USE
This Venta appliance is a domestic appliance for humidifying the air in interior
rooms.
The appliance is not suitable for outdoor areas. Any other use or modification of the
appliance is considered to be improper use. Venta is not liable for damage or injuries
resulting from improper use.
IMPROPER USE
Using the appliance for something other than the intended purpose can endanger
health and lives. This includes use under the following conditions:
• in rooms or locations where there is risk of explosion and/or where there is an
aggressive atmosphere.
• in rooms where there is a high concentration of solvents.
• in the vicinity of swimming pools or other wet areas.
• outdoors.
• The appliance should only be operated when it is completely assembled.
• Place the appliance on a stable surface which is flat and dry.
• Set up the device so that it cannot be knocked over, and so that no one can trip
over it or its cable.
•
• Maximum installation altitude: 2000 metres
• Never cover or block the vents to prevent overheating/damage to the appliance.
•
enable the formation of biological organisms.
• The design of the appliance and the cold evaporation technology make it impos-
sible for water to leak directly from it in the form of droplets, vapour, mist or lime
deposits, providing you use it correctly.
• Only operate the appliance with original Venta accessories designed for the pur-
pose. Venta Luftwäscher GmbH does not accept any liability for damage caused
by the use of third-party accessories.
• If you do not use the appliance for several days or put it into storage for a longer
period, empty the water tray completely, clean it and dry thoroughly to prevent
odours or biological organisms from developing in standing water or water resi-
dues.
• Unplug the power supply unit from the power outlet when the appliance is not in
use.
• Ensure the area surrounding the appliance does not become damp or wet. If mois-
ture leaks out, switch to a lower setting. If it is not possible to switch to a lower
setting, use the appliance with interruptions. Make sure no absorbent material
such as carpets, curtains, net curtains or tablecloths get damp.

20 21EN EN
1
2
4
5
6
7
8
3
LW45 LW25 LW15
1 Control panel
2 Upper housing
3 Power supply unit (assembled)
4 Transport protection
BEFORE THE FIRST USE
8
from the carton. Remove upper housing 2. Remove transport protection 4 from
upper housing 2. Remove disk stack 5 from lower housing 7 and remove transport
protection 6.
5 Disk stack
6 Transport protection
7 Lower housing
8
OVERVIEW
AFill lower housing 7 with tap water up to maximum WATERLINE marking and
8 (complete content of bottle).
! Never fill the appliance
before taking off the upper
housing!
i Adding the hygiene additive is
very important, because this
optimally humidifies the air.
BInsert disk stack 57 and place upper housing 2 onto
lower housing 7.
CPlug in the power supply unit 3 to the mains and switch on the appliance by
briefly pressing down the button on the control panel 1.
PUTTING INTO OPERATION
A
B C
!

22 23EN EN
12 3 4 51 ON / OFF button
2 Operation display ON / OFF
Continuously lit: ON
Not lit: OFF
3 Fan setting display
1 - 2 (LW 15),
1 - 2 - 3 (LW 25/45)
4 4 Automatic switch-off display (see
“Automatic switch off”)
5 Fan setting selector button
1 - 2 (LW 15),
1 - 2 - 3 (LW 25/45)
CONTROL PANEL
The appliance will shut
off automatically if:
What can you do if
there is not enough water
in the lower housing?
Switch off appliance, disconnect power supply unit,
refill water and restart operation with button 1. See
also „Maintenance and cleaning“, „Daily“
the upper housing
has been opened?
Close the upper housing correctly by pressing down on
the outer ends of the locking latches. Switch appliance
off and on again with the power button 1.
the upper housing is not
placed atop or correctly
fitted to the lower hous-
ing?
Place upper housing correctly on lower housing.
Switch appliance off and on again with the power but-
ton 1.
AUTOMATIC SWITCH OFF
The appliance has an automatic switch-off feature that is indicated by the display 4 .
MAINTENANCE AND
CLEANING
! Caution: Unplug the power supply unit from the power outlet for any cleaning
and maintenance work!
DAILY
Switch off appliance with button 1, unplug power supply unit from the power outlet.
Remove upper housing and fill fresh water into the lower housing. Replace upper
housing on to lower housing. Switch on the appliance with button 1.
EVERY 10-14 DAYS
Switch off the appliance and unplug the power supply unit from the power outlet.
Pour out dirty water. Brush scaling from the inside of the lower housing and rinse
out. Rinse the disk stack with water. Refill the lower housing with fresh water.
Add Venta hygiene additive. For dosage, refer to the table on the back of the bottle.
All residues in the lower housing and on the disk stack (white, green-yellowish or
brownish deposits) do NOT impair the function of the appliance. Using the Venta
hygiene additive guarantees problem-free, hygienic operation.
EVERY SIX MONTHS
For the six-monthly cleaning, we recommend the Venta Cleaner. Please note the
instruction manual included with the Venta Cleaner.

24 25EN EN
1
6
5
3
4
2
1
3
4
2
3
4
2
1
1
3
5 6
2
4
CLEANING THE UPPER HOUSING
OF THE APPLIANCE
! Attention! Ensure the appliance is switched off during all actions and the
power supply unit is disconnected from the power outlet!
01 Detach upper housing from lower housing. Press locking buttons so that
the ends stand up.
02 Fold side parts out of the way.
03 Fold ribbed wings out of the way.
04 Unplug the power supply unit from the motor 1. Lift the motor upwards and
out 2. Disconnect the power supply unit cable by releasing the bracket 3
and pull downward and out through the opening of the upper housing 4.
!
∙Do not disassemble the motor and the power supply unit, im-
merse them in water or bring them into contact with liquids!
∙Only clean the motor with fan blades and gear with a dry cloth!
∙The disassembled upper housing can be cleaned under run-
ning water!
∙The disassembled upper housing must be absolutely dry be-
fore assembly!
05 Insert the motor into the upper housing from the correct side 1. Pull the
power supply unit from the bottom upwards and through the opening of the
upper housing 2 and plug it into the motor until it clicks into place 3. Affix
the cable with the bracket 4.
06 The outer ends of the locking buttons must be standing up. Fold the ribbed
side wings 1 and 2 upwards, then the side elements 3 and 4. Press down
on the outer ends of the locking latches 5 and 6 to close the upper hous-
ing correctly again.

26 27EN EN
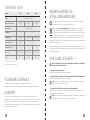
TECHNICAL DATA
Model LW 15 LW 25 LW 45
Colours White-grey / anthracite-metallic
For room sizes* up to 40 m² up to 55 m²
Mains voltage 100- 240 V, 50/60 Hz
Power settings 2 3
Noise emission
Power consumption
(settings 1–3) 3 / 4 watts 3 / 5 / 8 watts
Water content (max.) 5 litres 7 litres 10 litres
Dimensions (LxWxH) 26 × 28 × 31 cm 30 × 30 × 33 cm 45 × 30 × 33 cm
Weight 3 kg 3.8 kg 5.8 kg
* based on a ceiling height of max. 2.5 metres
May be subject to modifications and errors
ACCESSORIES & SERVICE
You can order accessories by phone or online at www.venta-air.com
You can find the contact details of our service partners on the back of these
instructions.
GUARANTEE
Due to the high quality of our products, Venta-Luftwäscher GmbH guarantees that
this product will remain defect-free for two years as from the purchase date, provid-
ed it is used correctly. If a material or processing error should occur anyway, please
contact the Venta Service Team or your retailer. Venta‘s general warranty conditions
also apply: www.venta-air.com
RECYCLING AND DISPOSAL
The packaging material is recyclable. Please dispose of the packaging in an
eco-friendly way using the recycling scheme at your location.
The “crossed-out bin” symbol indicates that you must dispose of waste
electrical and electronic equipment (WEEE) separately. Such equipment
may contain dangerous and environmentally hazardous substances. These
products should be disposed of at an appropriate collecting point for
recycling electrical and electronic equipment and may not be disposed of in unsort-
ed household waste. This way you can help to protect resources and the environ-
ment. For more information, please contact your local authorities.
Children must not be allowed to play with plastic bags and packaging material as
there is a danger of injury or suffocation. Store such materials safely or dispose of
them in an environmentally friendly way.
WHAT TO DO IF …
! Ensure the appliance is switched off during all actions and the power
supply unit is disconnected from the power outlet!
… the appliance won’t switch on?
Please check whether the power supply unit is connected to the mains.
… the appliance won’t switch on even though it is plugged in to the mains?
Please check whether the power supply unit is firmly plugged into the motor.
iAction: Remove upper housing. Check for correct positioning (see cleaning
instructions for the upper housing). Then switch the appliance on again.
... the round blue operation display on the control panel is blinking?
The appliance has switched off automatically, because the motor is overstrained
(e.g. through the intrusion of foreign objects or similar).
iAction: Remove upper housing. Check whether the disk stack in the lower
housing as well as fan blades in the upper housing are freely movable. Then
switch the appliance on again.

28 29FR FR
Nous sommes convaincus que ce modèle Venta dépassera vos attentes et vous
souhaitons d’en profiter pleinement.
Veuillez lire ce mode d‘emploi dans son intégralité, le conserver pour pouvoir vous
y reporter ultérieurement et respecter toutes les consignes de sécurité ainsi que
l‘usage auquel il est destiné. Vous trouverez la dernière version du mode d’emploi
sur notre site www.venta-air.com
CHER CLIENT,
Votre humidificateur Venta Original favorise une humidité saine et réduit de manière
naturelle les polluants en suspension dans l’air grâce à une technique géniale et
simple. Il fonctionne sans nattes d’humidification ni filtres supplémentaires, mais
uniquement avec de l’eau selon la méthode reconnue de l’évaporation à froid.
Le principe de fonctionnement Venta
Un ventilateur conduit l’air intérieur vers l’humidificateur rempli d’eau dans lequel
tournent des piles de disques ingénieusement disposées. L’eau propre s’évapore
ensuite dans la pièce via les surfaces des disques.
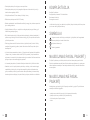
TABLE DES MATIÈRES
Consignes de sécurité 29
Contenu de la livraison 31
Symboles 31
Utilisation conforme 31
Utilisation non conforme 31
Aperçu 32
Avant la première utilisation 32
Mise en service 33
Panneau de commande 34
Coupure automatique 34
Maintenance et nettoyage 35
Nettoyage de la partie supérieure de
l‘appareil 37
Caractéristiques techniques 38
Accessoires et SAV 38
Garantie 38
Recyclage et élimination 39
Que faire, si…? 39
¡Muchas gracias! 40
Indicaciones de seguridad 41
•
personnes aux facultés physiques, sensorielles ou mentales réduites, ou par des
personnes qui ne disposent pas d’une expérience ou de connaissances suffisantes
s’ils sont sous surveillance ou qu’ils ont été informés des règles de sécurité à l’utili-
sation de l’appareil et s’ils ont compris les risques encourus.
• Lire ce mode d‘emploi intégralement avant la mise en service et le conserver en
lieu sûr pour toute consultation ultérieure.
• Cet appareil n’est pas un jouet pour enfants.
• Le nettoyage et les opérations d’entretien réservées aux utilisateurs sont interdits
• Tenir l’appareil et son adaptateur secteur hors de portée des enfants de moins de
8 ans.
• Une utilisation non conforme est susceptible d’endommager l’appareil et de provo-
quer des blessures corporelles.
• Raccorder l’appareil uniquement à des prises de courant appropriées – tension du
réseau conformément aux indications sur la plaque signalétique de l’appareil.
• -
• Ne jamais utiliser l’appareil lorsque le câble de raccordement ou la fiche de l’adap-
tateur secteur sont endommagés.
• Avant toute opération de nettoyage ou de maintenance ainsi que pour déplacer ou
transporter l’appareil, débrancher l’adaptateur secteur de la prise.
• Ne jamais utiliser l’appareil si ce dernier a chuté ou s’il a été endommagé de toute
autre façon.
• La réparation des appareils électriques est strictement réservée aux spécialistes.
Toute réparation non conforme peut entraîner des risques considérables pour
l’utilisateur.
• Ne s’asseoir en aucun cas sur l’appareil et ne poser aucun objet dessus.
• Ne pas insérer de corps étranger dans l’appareil.
• Ne jamais immerger la partie supérieure de l‘appareil dans l’eau ni dans tout autre
liquide.
• Ne jamais remplir trop l’appareil.
• Ne jamais transporter ou basculer l’appareil avec la cuve remplie.
! CONSIGNES DE SÉCURITÉ

30 31FR FR
CONTENU DE LA LIVRAISON
1 × appareil Venta
1 ×
1 x mode d’emploi
1 × consignes de sécurité
Si des pièces manquent ou sont endommagées, veuillez vous adresser à notre par-
tenaire SAV ou à votre revendeur local.
SYMBOLES
!
les blessures corporelles et les dommages matériels.
i Renseignements complémentaires
Conseils utiles
UTILISATION CONFORME
Cet appareil Venta est un appareil ménager destiné à l’humidification des pièces.
Cet appareil ne convient pas à une utilisation en extérieur. Toute autre utilisation ou
toute modification de l’appareil est considérée comme utilisation non conforme. Le
fabricant décline toute responsabilité en cas de dommages ou de blessures résul-
tant d’une utilisation non conforme.
UTILISATION NON CONFORME
Un emploi non conforme peut entraîner un risque pour la santé et la vie, ce qui est le
•
•
•
• en extérieur.
• Ne jamais débrancher l’adaptateur secteur de la prise de courant en tirant sur le
câble de raccordement ou avec des mains mouillées.
• Ne mettre l’appareil en marche que lorsqu’il est entièrement assemblé.
• Poser l’appareil uniquement sur une surface plane et sèche.
• Installer l’appareil de sorte que personne ne puisse trébucher sur le câble ou l’ap-
pareil, ni le renverser.
•
•
• Ne jamais recouvrir ni bloquer les fentes d’aération afin d’empêcher toute sur-
chauffe ou tout endommagement de l’appareil.
•
entraîner le développement de microorganismes biologiques.
• Si l’usage est conforme, toute fuite directe d’eau hors de l’appareil, que ce soit
sous la forme de gouttes, de vapeur, de brouillard ou de dépôts de calcaire, est
impossible en raison de sa conception et de la technologie d’évaporation à froid.
• L’appareil ne doit être utilisé qu’avec les accessoires Venta d’origine prévus à cet
effet. La société Venta-Luftwäscher GmbH décline toute responsabilité pour les
dommages dus à des accessoires d’autres marques.
• Si l’appareil est mis à l’arrêt et non utilisé pendant quelques jours, ou stocké pen-
dant une période prolongée, vider le bac à eau entièrement, le nettoyer et le laisser
sécher afin d’empêcher la formation d’odeurs ou le développement de microorga-
nismes biologiques dans l’eau stagnante restante.
• Débrancher l’adaptateur secteur de la prise de courant lorsque l’appareil n’est pas
utilisé.
• Éviter que l’espace autour de l’appareil devienne humide ou mouillé. En présence
d’humidité, réduire la puissance de l’appareil. S’il est impossible de réduire la
puissance de sortie de l’appareil, utiliser l’appareil par intermittence. Veiller à ce
qu’aucun matériau absorbant, tel que tapis, rideaux, voilages ou nappes, ne prenne
l’humidité.

32 33FR FR
1
2
4
5
6
7
8
3
LW45 LW25 LW15
1 Panneau de commande
2 Partie supérieure de l‘appareil
3 Adaptateur secteur
4 Fixation de transport
AVANT LA PREMIÈRE
UTILISATION
8 du
carton. Retirer la partie supérieure 2. Retirer la fixation de transport 4 de la partie
supérieure 2. Retirer la pile de disques 5 de la partie inférieure 7 et retirer la fixation
de transport 6.
5 Pile de disques
6 Fixation de transport
7 Partie inférieure de l‘appareil
8
APERÇU
ARemplir la partie inférieure 7 avec de l‘eau du robinet au maximum jusqu‘au
8 (tout le contenu du
flacon).
! Ne jamais remplir l’appareil
lorsque la partie supérieure
est en place!
i L‘adjonction d‘agent hygiénique
est très importante car elle
permet d’humidifier l‘air de
manière optimale.
BInsérer la pile de disques 5 dans la partie inférieure 7 et placer la partie supé-
rieure 2 sur la partie inférieure 7.
C3 sur le réseau électrique et allumer
l‘appareil en appuyant brièvement sur le bouton du panneau de commande 1.
MISE EN SERVICE
A
B C
!

34 35FR FR
12 3 4 51 Bouton marche/arrêt
2 Témoin de fonctionnement marche/
arrêt
3 Témoin niveau de ventilation
1 - 2 (pour LW 15),
1 - 2 - 3 (pour LW 25/45)
4 Témoin de la coupure automatique
(voir Coupure automatique)
5 Bouton de sélection du niveau de
ventilation
1 - 2 (pour LW 15),
1 - 2 - 3 (pour LW 25/45)
PANNEAU DE COMMANDE
L’appareil s’éteint
automatiquement quand:
Ce que vous devez faire
Il n’y a pas assez d’eau
dans la partie inférieure de
l’appareil.
Éteindre l’appareil, retirer l’adaptateur secteur de la
prise de courant, faire l’appoint d’eau, puis rallumer
avec le bouton 1
La partie supérieure de
l’appareil a été ouverte.
Refermer la partie supérieure de l’appareil en appuyant
sur les extrémités extérieures des boutons de verrouil-
lage. Éteindre et rallumer l‘appareil à l‘aide du bouton 1.
La partie supérieure de
l’appareil n’est pas posée
ou pas bien posée sur la
partie inférieure.
Remettre la partie supérieure de l’appareil sur la partie
inférieure. Éteindre et rallumer l‘appareil à l‘aide du
bouton 1.
COUPURE AUTOMATIQUE
L’appareil dispose d’un dispositif de coupure automatique signalé par le témoin 4.
MAINTENANCE ET
NETTOYAGE
! Attention: débrancher l’adaptateur secteur de la prise de courant avant toute
QUOTIDIENNEMENT
Éteindre l’appareil avec le bouton 1, retirer l’adaptateur secteur de la prise de cou-
rant. Retirer la partie supérieure, remplir la partie inférieure d’eau fraîche. Remettre
la partie supérieure en place. Allumer l’appareil avec le bouton 1.
TOUS LES 10 À 14 JOURS
Éteindre l’appareil et retirer l’adaptateur secteur de la prise de courant. Vider
l‘eau sale. Brosser les dépôts dans la partie inférieure et rincer. Rincer la pile de
disques à l‘eau. Remplir de nouveau de l‘eau dans la partie inférieure de l‘appareil.
L’ensemble des résidus dans la partie inférieure et sur la pile de disques (dépôts
blancs, vert-jaunes ou bruns) NE compromettent PAS le fonctionnement de l’appa-
reil. L’adjonction d’agent hygiénique Venta garantit un fonctionnement irréprochable
sur le plan hygiénique.
UNE FOIS PAR SEMESTRE
Pour le nettoyage semestriel, nous recommandons le nettoyant Venta. Veuillez res-
pecter la notice d‘emploi jointe au nettoyant Venta.

36 37FR FR
1
6
5
3
4
2
1
3
4
2
3
4
2
1
1
3
5 6
2
4
NETTOYAGE DE LA PARTIE
SUPÉRIEURE DE L‘APPAREIL
! Attention! Avant toute opération, s‘assurer que l‘appareil est éteint et que
01 Retirer la partie supérieure de la partie inférieure. Appuyer sur les boutons
de verrouillage de façon à ce que les extrémités extérieures se dressent
vers le haut.
02 Rabattre les habillages latéraux vers l’extérieur.
03 Rabattre les ailes nervurées vers l’extérieur.
04 Débrancher la fiche de l’adaptateur secteur de l’unité d’entraînement 1. Re-
tirer l‘unité d‘entraînement par le haut 2. Détacher le câble de l’adaptateur
secteur du support 3 et l’extraire par le bas à travers l‘ouverture de la partie
supérieure 4.
!
∙Ne pas désassembler l‘unité d‘entraînement ni l’adaptateur
secteur, ne pas les immerger dans l‘eau et ne pas les mettre
en contact avec un liquide!
∙Nettoyer l‘unité d‘entraînement, à savoir les pales du ventila-
teur et le réducteur, uniquement avec un chiffon sec!
∙La partie supérieure démontée peut être nettoyée à l‘eau cou-
rante!
∙La partie supérieure démontée doit être absolument sèche
avant le montage!
05 Placer l‘unité d‘entraînement dans le bon sens dans la partie supérieure 1
. Guider la fiche de l’adaptateur secteur vers le haut à travers l‘ouverture de
la partie supérieure 2 et la brancher dans l‘unité d‘entraînement jusqu‘à
entendre un déclic 3. Fixer le câble dans le support 4.
06 Les extrémités des boutons de verrouillage doivent être relevées. Rabat-
tre les ailes nervurées 1 et 2 vers le haut, puis les habillages latéraux
3 et 4. Refermer correctement la partie supérieure en appuyant sur les
extrémités des boutons de verrouillage 5 et 6.

38 39FR FR
CARACTÉRISTIQUES
TECHNIQUES
Modèle LW 15 LW 25 LW 45
Couleurs
Pour des pièces*
Tension du réseau 100- 240 V, 50/60 Hz
Niveaux de puissance 2 3
Niveau sonore
Consommation électrique
(niveau 1–3)
Contenance du bac à eau (max.)
Dimensions (L×l×h) 26 × 28 × 31 cm 30 × 30 × 33 cm 45 × 30 × 33 cm
Poids
* pour une hauteur de pièce de max. 2,5 m
Sous réserve de modifications et d’erreurs
ACCESSOIRES ET SAV
Les accessoires peuvent être commandés par téléphone ou sur www.venta-air.com
Vous trouverez les coordonnées de contact de notre partenaire SAV au dos de ce
mode d’emploi.
GARANTIE
En raison de la grande qualité de nos produits, Venta-Luftwäscher GmbH garantit
que ce produit est sans défauts pendant deux ans à compter de la date d‘achat s‘il
est utilisé correctement. Dans le cas improbable où il présenterait un vice matériel
ou de fabrication, veuillez contacter l‘équipe de service Venta ou votre revendeur. En
RECYCLAGE ET ÉLIMINATION
Le matériau d’emballage est recyclable. Veuillez éliminer les emballages
dans le respect de l’environnement et procéder à leur tri sélectif.
Le symbole de «poubelle barrée» requiert l’élimination séparée des
déchets d’équipements électriques et électroniques (DEEE). De tels appa-
reils peuvent contenir des substances dangereuses et polluantes. Ces
produits doivent être rapportés dans un centre de collecte approprié pour le
recyclage des appareils électriques et électroniques et ne doivent pas être éliminés
avec les ordures ménagères non triées. Vous contribuez ainsi à la protection des
ressources et de l’environnement. Pour toute information complémentaire, veuillez
vous adresser aux autorités locales.
Les enfants ne doivent en aucun cas jouer avec des sacs en plastique et matériaux
d’emballage du fait du risque de blessures et d’asphyxie. Stocker ce type de maté-
riaux de manière sûre ou les éliminer de manière écologique.
QUE FAIRE, SI…?
! Avant toute opération, s‘assurer que l‘appareil est éteint et que l’adap-
tateur secteur est débranché de la prise de courant!
… l’appareil ne s’allume pas?
Vérifier si l’adaptateur secteur est bien branché sur le réseau électrique.
… l’appareil ne s’allume pas bien que l’adaptateur secteur soit branché sur le
réseau électrique?
Vérifier si l’adaptateur secteur est bien branché sur l’unité d’entraînement.
iMesure: retirer la partie supérieure de l’appareil. Vérifier qu’elle est bien
ajustée (voir les instructions de nettoyage de la partie supérieure de l’appareil).
Remettre ensuite l’appareil en service.
... le témoin de fonctionnement rond et bleu clignote sur le panneau de com-
mande?
L’appareil s’est éteint automatiquement en raison d’une surcharge du moteur (par ex.
en cas de pénétration de corps étrangers, etc.).
iMesure: retirer la partie supérieure de l’appareil. Vérifier si la pile de disques
dans la partie inférieure et les pales du ventilateur dans la partie supérieure
peuvent se déplacer librement. Remettre ensuite l’appareil en service.
Pagina se încarcă...
Pagina se încarcă...
Pagina se încarcă...
Pagina se încarcă...
Pagina se încarcă...
Pagina se încarcă...
Pagina se încarcă...
Pagina se încarcă...
Pagina se încarcă...
Pagina se încarcă...
Pagina se încarcă...
Pagina se încarcă...
Pagina se încarcă...
Pagina se încarcă...
Pagina se încarcă...
Pagina se încarcă...
Pagina se încarcă...
Pagina se încarcă...
Pagina se încarcă...
Pagina se încarcă...
Pagina se încarcă...
Pagina se încarcă...
Pagina se încarcă...
Pagina se încarcă...
Pagina se încarcă...
Pagina se încarcă...
Pagina se încarcă...
Pagina se încarcă...
Pagina se încarcă...
Pagina se încarcă...
Pagina se încarcă...
Pagina se încarcă...
Pagina se încarcă...
Pagina se încarcă...
Pagina se încarcă...
Pagina se încarcă...
Pagina se încarcă...
Pagina se încarcă...
Pagina se încarcă...
Pagina se încarcă...
Pagina se încarcă...
Pagina se încarcă...
Pagina se încarcă...
Pagina se încarcă...
Pagina se încarcă...
Pagina se încarcă...
Pagina se încarcă...
Pagina se încarcă...
Pagina se încarcă...
Pagina se încarcă...
Pagina se încarcă...
Pagina se încarcă...
Pagina se încarcă...
Pagina se încarcă...
Pagina se încarcă...
Pagina se încarcă...
Pagina se încarcă...
Pagina se încarcă...
Pagina se încarcă...
Pagina se încarcă...
Pagina se încarcă...
Pagina se încarcă...
Pagina se încarcă...
Pagina se încarcă...
Pagina se încarcă...
Pagina se încarcă...
Pagina se încarcă...
Pagina se încarcă...
Pagina se încarcă...
Pagina se încarcă...
Pagina se încarcă...
Pagina se încarcă...
Pagina se încarcă...
Pagina se încarcă...
Pagina se încarcă...
Pagina se încarcă...
Pagina se încarcă...
Pagina se încarcă...
Pagina se încarcă...
Pagina se încarcă...
Pagina se încarcă...
Pagina se încarcă...
Pagina se încarcă...
Pagina se încarcă...
Pagina se încarcă...
Pagina se încarcă...
Pagina se încarcă...
Pagina se încarcă...
Pagina se încarcă...
Pagina se încarcă...
Pagina se încarcă...
Pagina se încarcă...
Pagina se încarcă...
Pagina se încarcă...
Pagina se încarcă...
Pagina se încarcă...
Pagina se încarcă...
Pagina se încarcă...
Pagina se încarcă...
Pagina se încarcă...
Pagina se încarcă...
Pagina se încarcă...
Pagina se încarcă...
Pagina se încarcă...
Pagina se încarcă...
Pagina se încarcă...
Pagina se încarcă...
Pagina se încarcă...
Pagina se încarcă...
Pagina se încarcă...
Pagina se încarcă...
Pagina se încarcă...
Pagina se încarcă...
Pagina se încarcă...
Pagina se încarcă...
Pagina se încarcă...
Pagina se încarcă...
Pagina se încarcă...
Pagina se încarcă...
Pagina se încarcă...
Pagina se încarcă...
Pagina se încarcă...
Pagina se încarcă...
Pagina se încarcă...
Pagina se încarcă...
Pagina se încarcă...
Pagina se încarcă...
Pagina se încarcă...
Pagina se încarcă...
Pagina se încarcă...
Pagina se încarcă...
Pagina se încarcă...
Pagina se încarcă...
Pagina se încarcă...
Pagina se încarcă...
Pagina se încarcă...
Pagina se încarcă...
Pagina se încarcă...
Pagina se încarcă...
Pagina se încarcă...
Pagina se încarcă...
Pagina se încarcă...
Pagina se încarcă...
Pagina se încarcă...
Pagina se încarcă...
-
 1
1
-
 2
2
-
 3
3
-
 4
4
-
 5
5
-
 6
6
-
 7
7
-
 8
8
-
 9
9
-
 10
10
-
 11
11
-
 12
12
-
 13
13
-
 14
14
-
 15
15
-
 16
16
-
 17
17
-
 18
18
-
 19
19
-
 20
20
-
 21
21
-
 22
22
-
 23
23
-
 24
24
-
 25
25
-
 26
26
-
 27
27
-
 28
28
-
 29
29
-
 30
30
-
 31
31
-
 32
32
-
 33
33
-
 34
34
-
 35
35
-
 36
36
-
 37
37
-
 38
38
-
 39
39
-
 40
40
-
 41
41
-
 42
42
-
 43
43
-
 44
44
-
 45
45
-
 46
46
-
 47
47
-
 48
48
-
 49
49
-
 50
50
-
 51
51
-
 52
52
-
 53
53
-
 54
54
-
 55
55
-
 56
56
-
 57
57
-
 58
58
-
 59
59
-
 60
60
-
 61
61
-
 62
62
-
 63
63
-
 64
64
-
 65
65
-
 66
66
-
 67
67
-
 68
68
-
 69
69
-
 70
70
-
 71
71
-
 72
72
-
 73
73
-
 74
74
-
 75
75
-
 76
76
-
 77
77
-
 78
78
-
 79
79
-
 80
80
-
 81
81
-
 82
82
-
 83
83
-
 84
84
-
 85
85
-
 86
86
-
 87
87
-
 88
88
-
 89
89
-
 90
90
-
 91
91
-
 92
92
-
 93
93
-
 94
94
-
 95
95
-
 96
96
-
 97
97
-
 98
98
-
 99
99
-
 100
100
-
 101
101
-
 102
102
-
 103
103
-
 104
104
-
 105
105
-
 106
106
-
 107
107
-
 108
108
-
 109
109
-
 110
110
-
 111
111
-
 112
112
-
 113
113
-
 114
114
-
 115
115
-
 116
116
-
 117
117
-
 118
118
-
 119
119
-
 120
120
-
 121
121
-
 122
122
-
 123
123
-
 124
124
-
 125
125
-
 126
126
-
 127
127
-
 128
128
-
 129
129
-
 130
130
-
 131
131
-
 132
132
-
 133
133
-
 134
134
-
 135
135
-
 136
136
-
 137
137
-
 138
138
-
 139
139
-
 140
140
-
 141
141
-
 142
142
-
 143
143
-
 144
144
-
 145
145
-
 146
146
-
 147
147
-
 148
148
-
 149
149
-
 150
150
-
 151
151
-
 152
152
-
 153
153
-
 154
154
-
 155
155
-
 156
156
-
 157
157
-
 158
158
-
 159
159
-
 160
160
-
 161
161
-
 162
162
-
 163
163
-
 164
164
-
 165
165


în alte limbi
- slovenčina: Venta LW15 Používateľská príručka
- dansk: Venta LW15 Brugermanual
Lucrări înrudite
Alte documente
-
Maestro MR902 Manualul proprietarului
-
Silvercrest SHBS 5 A1 Operating Instructions Manual
-
-
Yamaha NS-PA40 White Manual de utilizare
-
Silvercrest 102827 Operating Instructions Manual
-
Taurus Italica 12 Manualul proprietarului
-
-
Silvercrest SE 32 A1 Operation and Safety Notes