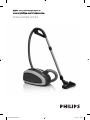
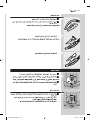
Philips FC9302/02 Manual de utilizare
- Categorie
- Aspiratoare
- Tip
- Manual de utilizare

FC9306, FC9304, FC9302
4222.003.3433.3.indd 1 31-05-10 10:03

2
4222.003.3433.3.indd 2 31-05-10 10:03

3
1
4
3
5
21
25
23
24
26
27
28
29
30
6
2
14
7
22
13
16
8
11
12
9
10
18
19
17
15
20
1
4222.003.3433.3.indd 3 31-05-10 10:03

4
4222.003.3433.3.indd 4 31-05-10 10:03

6
18
31
43
55
67
79
92
104
116
129
141
154
166
178
190
212
223
4222.003.3433.3.indd 5 31-05-10 10:03

6
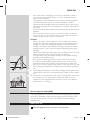
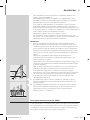
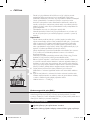
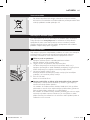
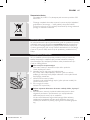
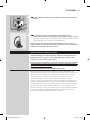
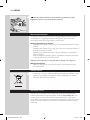
Congratulations on your purchase and welcome to Philips! To fully benet
from the support that Philips offers, register your product at www.philips.
com/welcome.
This vacuum cleaner’s extremely efcient motor produces less noise than
other types and yields a high performance at a low power consumption.
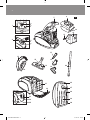
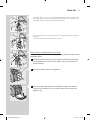
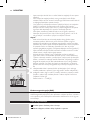
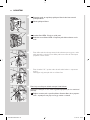
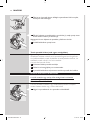
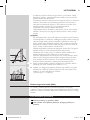
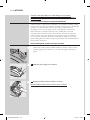
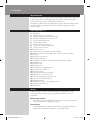
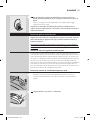
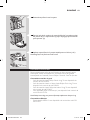
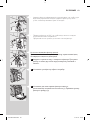
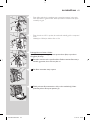
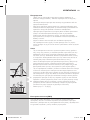
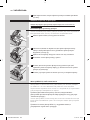
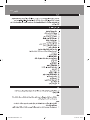
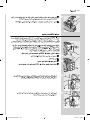
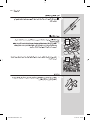
On/off button
Suction power selection wheel
Cord rewind button
Dustbag-full indicator
Hose release buttons
Hose connection opening
Cover release tab
Motor protection lter holder
Dustbag holder
Dustbag
Removable strip (specic types only)
Reusable dustbag (specic types only)
Handgrip
Accessory holder
SilentStar nozzle
Rocker switch for carpet/hard oor settings
Crevice tool
Small brush
Small nozzle
2-piece telescopic tube
HEPA 13 washable lter
Filter cover
Mains plug
Parking slot
Release button of lter cover
Storage grip
Swivel wheel
Parking/storage ridge
Type plate
Rear wheels
Read this user manual carefully before you use the appliance and save it for
future reference.
- Never suck up water or any other liquid. Never suck up ammable
substances and do not suck up ashes until they are cold.
- Check if the voltage indicated on the appliance corresponds to the
local mains voltage before you connect the appliance.
- Do not use the appliance if the plug, the mains cord or the appliance
itself is damaged.
4222.003.3433.3.indd 6 31-05-10 10:03

- If the mains cord is damaged, you must have it replaced by Philips, a
service centre authorised by Philips or similarly qualied persons in
order to avoid a hazard.
- This appliance is not intended for use by persons (including children)
with reduced physical, sensory or mental capabilities, or lack of
experience and knowledge, unless they have been given supervision or
instruction concerning use of the appliance by a person responsible for
their safety.
- Children should be supervised to ensure that they do not play with the
appliance.
- Do not point the hose, the tube or any other accessory at the eyes
or ears nor put it in your mouth when it is connected to the vacuum
cleaner and the vacuum cleaner is switched on.
- When you use the vacuum cleaner to vacuum ashes, ne sand, lime,
cement dust and similar substances, the pores of the dustbag become
clogged. As a result, the dustbag-full indicator will indicate that the
dustbag is full. Replace the disposable dustbag or empty the reusable
dustbag, even if it is not full yet (see chapter ‘Replacing/emptying the
dustbag’).
- Never use the appliance without the motor protection lter. This could
damage the motor and shorten the life of the appliance.
- Only use Philips s-bag ` synthetic dustbags or the reusable dustbag
provided (some countries only).
- During vacuum cleaning, especially in rooms with low air humidity,
your vacuum cleaner builds up static electricity. As a result you can
experience electric shocks when you touch the tube or other steel
parts of your vacuum cleaner. These shocks are not harmful to you and
do not damage the appliance. To reduce this inconvenience we advise
you:
to discharge the appliance by frequently holding the tube against other
metal objects in the room (for example legs of a table or chair, radiator
etc.);
to raise the air humidity level in the room by placing water in the room.
For example, you can hang containers lled with water from your
radiators or place bowls lled with water on or near your radiators.
- Noise level: Lc = 72 dB [A]
This Philips appliance complies with all standards regarding electromagnetic
elds (EMF). If handled properly and according to the instructions in this
user manual, the appliance is safe to use based on scientic evidence
available today.
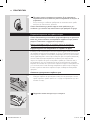
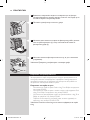
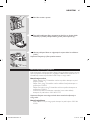
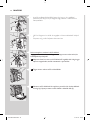
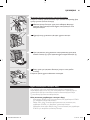
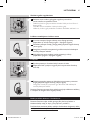
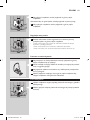
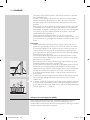
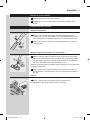
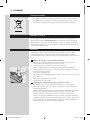
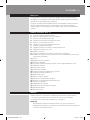
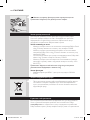
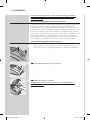
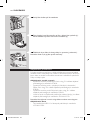
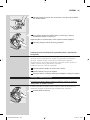
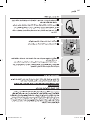
1 Take the appliance and its accessories out of the box.
7
4222.003.3433.3.indd 7 31-05-10 10:03

2 Remove any sticker, protective foil or plastic from the appliance.
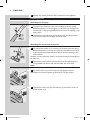
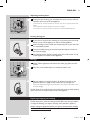
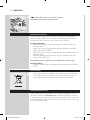
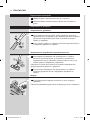
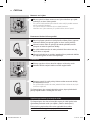
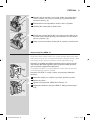
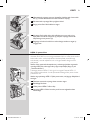
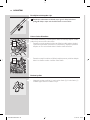
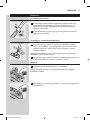
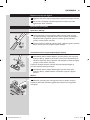
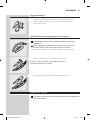
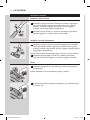
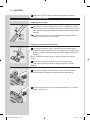
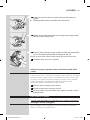
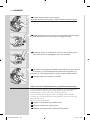
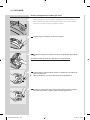
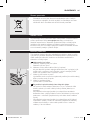
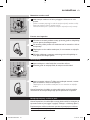
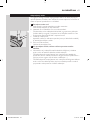
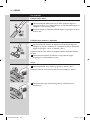
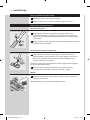
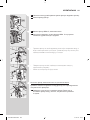
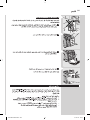
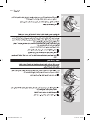
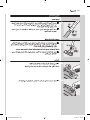
1 To connect the telescopic tube to the handgrip, press the spring-
loaded lock button on the handgrip (1) and insert the handgrip into
the tube (2). Fit the spring-loaded lock button into the opening in the
tube (‘click’).
2 To disconnect the tube from the handgrip, press the spring-loaded
lock button and pull the handgrip out of the tube.
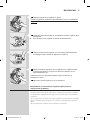
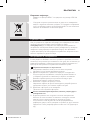
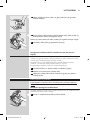
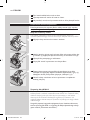
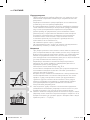
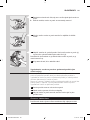
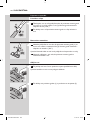
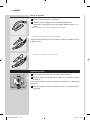
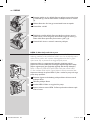
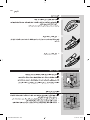
1 To connect the nozzle or an accessory to the tube, press the spring-
loaded lock button (1) on the tube and insert the tube into the oor
nozzle (2). Fit the spring-loaded lock button into the opening in the
nozzle (‘click’).
Note: You can also connect the nozzle or accessories directly to the handgrip in
the same way.
2 To disconnect the nozzle or an accessory from the tube, press the
spring-loaded lock button and pull the nozzle out of the tube.
1 To connect the hose, push it rmly into the appliance (‘click’).
Note: Make sure that the projection of the hose ts into the recesses.
2 To disconnect the hose, push the buttons (1) and pull the hose out
of the appliance (2).
8
4222.003.3433.3.indd 8 31-05-10 10:03

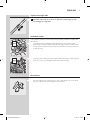
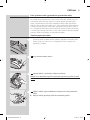
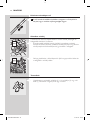
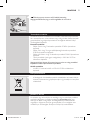
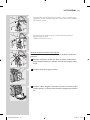
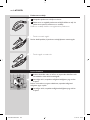
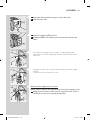
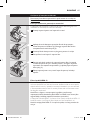
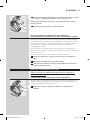
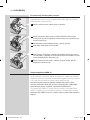
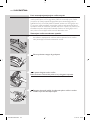
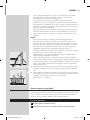
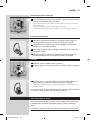
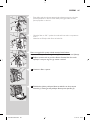
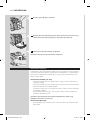
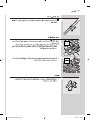
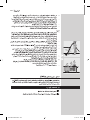
1 Move the tube lock up or down to adjust the tube length so that
the handgrip is at hip level.
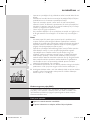
The SilentStar nozzle is a low-noise, multi-purpose nozzle for carpets and
hard oors.
- Use the hard oor setting to clean hard oors (for instance tiled,
parqueted, laminated and linoleumed ooring): push the rocker switch
on top of the nozzle with your foot to make the brush strip come out
of the housing.
- Use the carpet setting to clean carpets: push the rocker switch again to
make the brush strip disappear into the nozzle housing.
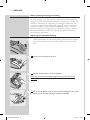
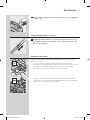
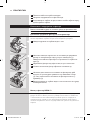
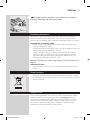
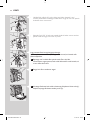
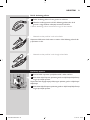
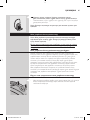
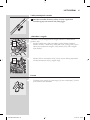
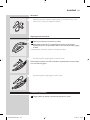
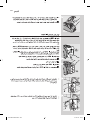
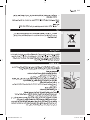
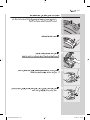
- You can connect the crevice tool (1), the small nozzle (2) or the small
brush (3) directly to the handgrip or to the tube.
9
4222.003.3433.3.indd 9 31-05-10 10:03

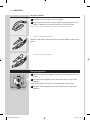
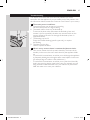
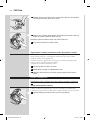
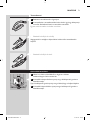
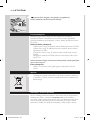
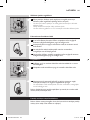
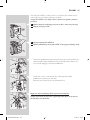
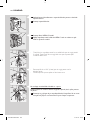
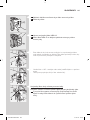
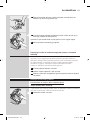
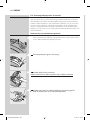
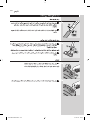
1 Snap the accessory holder onto the handgrip.
2 Store accessories in the accessory holder by pushing them into the
holder. To detach the accessories, pull them out of the holder.
You can store two accessories at a time in the accessory holder.
- Crevice tool and small nozzle.
Note: The small nozzle must be placed in the accessory holder as shown in the
picture.
- Crevice tool and small brush.
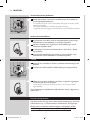
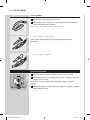
1 Pull the cord out of the appliance and put the mains plug in the wall
socket.
2 To switch on the appliance, press the on/off button on top of the
appliance.
Tip: To avoid bending your back, press the on/off button with your foot.
3 To switch off the appliance, press the on/off button on top of the
appliance.
10
4222.003.3433.3.indd 10 31-05-10 10:03

1 During vacuum cleaning, you can adjust the suction power with the
selection wheel on top of the appliance.
- Use maximum suction power to vacuum very dirty carpets and hard
oors.
- Use moderate suction power to vacuum carpets.
- Use minimum suction power to vacuum curtains, tablecloths etc.
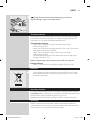
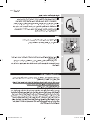
1 If you want to stop vacuum cleaning for a moment, press the on/off
button on top of the appliance to switch off the appliance
2 Insert the ridge on the nozzle into the parking slot to park the tube
in a convenient position.
3 To ensure stable parking of the telescopic tube, adjust the tube to
the shortest length.
4 To continue vacuum cleaning, simply press the on/off button on top
of the appliance to switch on the appliance.
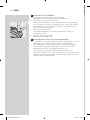
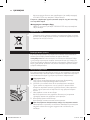
1 Switch off the appliance and remove the mains plug from the wall
socket.
2 Press the cord rewind button to rewind the mains cord.
3 Put the appliance in upright position. To attach the nozzle to the
appliance, insert the ridge on the nozzle into the storage slot.
- To ensure stable parking of the telescopic tube, adjust the tube to the
shortest length.
Tip: We advise you to wrap the hose around the tube to ensure stable parking
and to save even more space when you store the appliance.
Tip: We advise you to clean the motor protection lter every time you replace
or empty the dustbag (see chapter ‘Cleaning and maintenance of lters’).
Always unplug the appliance before you replace the disposable dustbag
or empty the reusable dustbag.
11
4222.003.3433.3.indd 11 31-05-10 10:04

In some cases, the dustbag full indicator can indicate that the dustbag is
full, even though it is not. This may occur if the pores of the dustbag are
clogged (e.g. when you have vacuumed ashes, ne sand, lime, cement dust
and similar substances) or if something is blocking the nozzle, tube and/
or hose. If the pores of the dustbag are clogged, you have to replace the
disposable dustbag or empty the reusable dustbag, even if it is not full
yet. If the dustbag is not clogged but not full either, something is blocking
the nozzle, tube and/or hose. In this case, do not replace the dustbag
but remove the obstruction.
- Replace the dustbag as soon as the dustbag-full indicator has changed
colour permanently, i.e. even when the nozzle is not placed on the
oor.
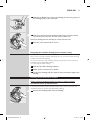
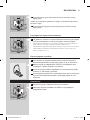
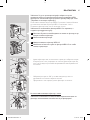
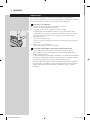
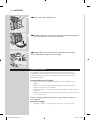
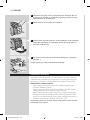
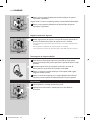
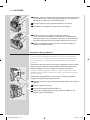
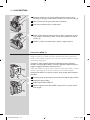
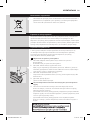
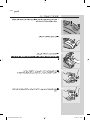
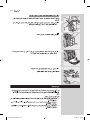
1 Pull the cover upwards to open it.
2 Lift the dustbag holder out of the appliance.
Make sure you hold the dustbag upright when you lift it out of the
appliance.
3 Pull at the cardboard tag to remove the full dustbag from the holder.
, When you do this, the dustbag is sealed automatically.
12
4222.003.3433.3.indd 12 31-05-10 10:04

4 Slide the cardboard front of the new dustbag into the two grooves of
the dustbag holder as far as possible.
5 First insert the front of the dustbag holder into the vacuum cleaner
(1) and then press the back into the vacuum cleaner (2).
Note: If no dustbag has been inserted, you cannot close the cover.
6 Push the cover downwards to close it.
In some countries, this vacuum cleaner also comes with a reusable dustbag
that can be used and emptied repeatedly. You can use the reusable dustbag
instead of disposable dustbags.
To remove and insert the reusable dustbag, simply follow the instructions
in ‘Replacing the disposable dustbag’.
To empty the reusable dustbag:
1 Slide the clip off the dustbag sideways.
2 Shake out the contents into a dustbin.
3 To close the dustbag, slide the clip back onto the bottom edge of the
dustbag.
Always unplug the appliance before you clean or replace the lters.
Clean the permanent motor protection lter every time you empty the
reusable dustbag or replace the disposable dustbag.
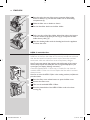
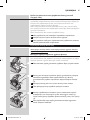
1 Remove the dustbag holder with the dustbag.
13
4222.003.3433.3.indd 13 31-05-10 10:04

2 Press the tab at the top of the motor protection lter holder
down to release it (1). Lift the lter holder out of the dustbag
compartment (2).
3 Shake the lter over a dustbin to clean it.
4 Put the clean lter back into the lter holder.
5 Fit the two lugs of the lter holder behind the ridge at the bottom
to ensure that it ts properly at the top (1). Then press the lter
holder home (‘click’) (2).
6 Place the dustbag holder with the dustbag back into the appliance
and close the cover.
HEPA 13 washable lter is able to remove 99.95% of all particles down to
0.0003mm in size from the outlet air. This not only includes normal house
dust, but also harmful microscopic vermin such as dust mites and their
excrements, which are well-known causes of respiratory allergies.
Note: To guarantee optimal dust retention and performance of the vacuum
cleaner, always replace the HEPA lter with an original Philips lter of the
correct type (see chapter ‘Ordering accessories’).
Clean the washable HEPA 13 lter every 6 months. You can clean the
washable HEPA 13 lter max. 4 times. Replace the lter after it has been
cleaned 4 times.
Note: Do not clean the HEPA 13 lter in the washing machine, but follow the
procedure below.
1 Press the lter cover release button to open the lter cover.
2 Remove the lter cover.
3 Take out the washable HEPA 13 lter.
4 Rinse the pleated side of the HEPA 13 lter under a hot slow-
running tap.
14
4222.003.3433.3.indd 14 31-05-10 10:04

- Hold the lter in such a way that the pleated side points upwards and
the water ows parallel to the pleats. Hold the lter at an angle so that
the water washes away the dirt inside the pleats.
- Turn the lter 180° and let the water ow along the pleats in opposite
direction.
- Continue this process until the lter is clean.
Never clean the washable lter with a brush.
Note: Cleaning does not restore the original colour of the lter, but does restore
its ltration power.
5 Carefully shake the water from the surface of the lter. Let the lter
dry completely for at least 2 hours before you put it back into the
vacuum cleaner.
6 Put the dry lter back into the appliance.
7 Fit the two lugs of the lter cover behind the ridge at the bottom
of the vacuum cleaner (1). Then push the lter cover towards the
appliance (2).
15
4222.003.3433.3.indd 15 31-05-10 10:04

8 Press the lter cover home to lock it (‘click’).
Note: Make sure the lter is properly closed.
For purchasing dustbags, lters or other accessories for this appliance,
please visit www.philips.com, consult the worldwide guarantee leaet or
contact the Philips Consumer Care Centre in your country.
- Philips Classic s-bag ` synthetic dustbags are available under type
number FC8021.
- Philips Clinic s-bag ` high ltration synthetic dustbags are available
under type number FC8022.
- Philips Anti-odour s-bag ` synthetic dustbags are available under type
number FC8023.
- Reusable dustbags (some countries only) are available under code
number 4322 004 93370.
Note: Please visit www.s-bag.com for more information about the s-bag.
- HEPA 13 washable lters are available under code number 4322 004
93350.
- Do not throw away the appliance with the normal household waste
at the end of its life, but hand it in at an ofcial collection point for
recycling. By doing this, you help to preserve the environment.
If you need service or information or if you have a problem, please visit
the Philips website at www.philips.com or contact the Philips Consumer
Care Centre in your country (you nd its phone number in the worldwide
guarantee leaet). If there is no Consumer Care Centre in your country, go
to your local Philips dealer.
16
4222.003.3433.3.indd 16 31-05-10 10:04

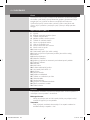
This chapter summarises the most common problems you could
encounter with the appliance. If you are unable to solve the problem with
the information below, contact the Consumer Care Centre in your country.
1 The suction power is insufcient.
A The suction power may be set to a low setting.
- Set the suction power to a higher setting.
B The nozzle, tube or hose may be blocked up.
- To remove the obstruction, disconnect the blocked-up item and
connect it (as far as possible) the other way around. Switch on the
vacuum cleaner to force the air through the blocked-up item in
opposite direction.
C The dustbag may be full.
- Empty the reusable dustbag (specic types only) or replace
the dustbag.
D The lters may be dirty.
- Clean or replace the lters.
2 When I use my vacuum cleaner I sometimes feel electric shocks.
A Your vacuum cleaner has built up static electricity. The lower the air
humidity in the rooms, the more static electricity the appliance builds
up.
- To reduce this inconvenience, we advise you to discharge the appliance
by frequently holding the tube against other metal objects in the room
(for example legs of a table or chair, radiator etc.).
- To reduce this inconvenience, we advise you to raise the air humidity
level in the room by placing water in the room. For example, you can
hang containers lled with water from your radiators or place bowls
lled with water on or near your radiators.
17
4222.003.3433.3.indd 17 31-05-10 10:04

18
Поздравления за вашата покупка и добре дошли във Philips! За
да се възползвате изцяло от предлаганата от Philips поддръжка,
регистрирайте продукта си на www.philips.com/welcome.
Изключително ефективният мотор на прахосмукачката е по-безшумен
от други видове и има високи работни показатели при ниско
потребление на енергия.
Бутон за вкл./изкл.
Диск за избор на силата на засмукване
Бутон за навиване на кабела
Индикатор за пълна торба за прах
Бутони за освобождаване на маркуча
Отвор за свързване на маркуча
Палец за освобождаване на капака
Държач на предпазния филтър на двигателя
Държач на торбата за прах
Торба за прах
Подвижен панел (само за определени модели)
Сменяема торба за прах (само за определени модели)
Ръкохватка
Гнездо за принадлежности
Накрайник SilentStar
Превключвател за килими/твърди подови повърхности
Тесен накрайник
Малка четка
Малък накрайник
Телескопична тръба от 2 части
Миещ се филтър HEPA 13
Капак на филтъра
Мрежов щепсел
Гнездо за прибиране
Бутон за освобождаване на капака на филтъра
Дръжка за прибиране
Шарнирно колелце
Гребен за прибиране
Табелка с данни
Задни колелца
Преди да използвате уреда, прочетете внимателно това ръководство
за експлоатация и го запазете за справка в бъдеще.
- Никога не всмуквайте вода или друга течност. Не всмуквайте
запалими вещества и не всмуквайте пепел, преди да е изстинала.
- Преди да свържете уреда към мрежата, проверете дали
посоченото върху уреда напрежение отговаря на напрежението
на местната електрическа мрежа.
4222.003.3433.3.indd 18 31-05-10 10:04

- Не използвайте уреда, ако щепселът, мрежовият кабелът или
самият уред са повредени.
- Ако захранващият кабел се повреди, той трябва винаги да се
подменя от Philips, упълномощен сервиз на Philips или подобни
квалифицирани лица, за да се избегне опасност.
- Този уред не е предназначен за ползване от хора с намалени
физически усещания или умствени недостатъци или без опит и
познания, включително деца, ако са оставени без наблюдение и не
са инструктирани от страна на отговарящо за тяхната безопасност
лице относно начина на използване на уреда.
- Наглеждайте децата, за да не си играят с уреда.
- Не насочвайте маркуча, тръбата или друг аксесоар към очите
или ушите, и не ги поставяйте в устата си, когато са свързани към
прахосмукачката, а прахосмукачката е включена.
- Когато използвате прахосмукачката за засмукване на пепел,
фин пясък, варов или циментов прах и др. подобни, порите на
торбата за прах се запушват. В резултат на това индикаторът за
пълна торба за прах ще покаже, че торбата е пълна. Подменете
еднократната торба или изпразнете многократната, дори тя все
още да не е пълна (вж. глава “Подмяна/изпразване на торбата за
прах”).
- Никога не използвайте уреда без филтъра за защита на
електромотора. Това може да повреди електромотора и да
съкрати живота на уреда.
- Използвайте само синтетични торбички за прах Philips s-bag ` или
торбата за многократно използване, включена в комплекта (само
за някои държави).
- При чистене с прахосмукачка, особено в стаи с ниска влажност
на въздуха, във вашата прахосмукачка се натрупва статично
електричество. В резултат на това може да усетите удари с
електрически ток, когато докосвате тръбата или други стоманени
части на прахосмукачката. Тези удари не са болезнени за вас
и не увреждат уреда. за да намалите това неудобство, ние
препоръчваме следното:
да разреждате уреда с често допиране на тръбата до други
метални предмети в стаята (например крака на маса или стол,
радиатор и др.);
да повишавате нивото на влажност на въздуха, като поставите
вода в стаята. Можете например да окачите съдове с вода на
радиаторите или да ги поставите близо до радиаторите.
- Ниво на шум: Lc = 72 dB [A]
Този уред Philips е в съответствие с всички стандарти по отношение
на електромагнитните излъчвания (EMF). Ако се употребява правилно
и съобразно напътствията в Ръководството, уредът е безопасен за
използване според наличните досега научни факти.
19
4222.003.3433.3.indd 19 31-05-10 10:04

1 Извадете уреда и принадлежностите му от кутията.
2 Свалете всякакви лепенки, защитно фолио или пластмаси от
уреда.
1 За да свържете телескопичната тръба с дръжката, натиснете
пружинния бутон на дръжката (1) и вмъкнете дръжката в тръбата
(2). Нагласете пружинния бутон така, че да влезе в отвора в
тръбата (с щракване).
2 За да откачите тръбата от дръжката, натиснете пружинния бутон
и издърпайте дръжката от тръбата.
1 За да свържете накрайника или принадлежност с тръбата,
натиснете пружинния бутон (1) на тръбата и я вмъкнете в
накрайника за под (2). Нагласете пружинния бутон така, че да
влезе в отвора на накрайника (с щракване).
Забележка: По същия начин можете да свържете накрайника или
принадлежностите директно с дръжката.
2 За да откачите накрайника или принадлежност от тръбата,
натиснете пружинния бутон и издърпайте накрайника от
тръбата.
1 За да присъедините маркуча, натиснете го силно в уреда (с
щракване).
Забележка: Внимавайте издатината на маркуча да пасне в жлебовете.
20
4222.003.3433.3.indd 20 31-05-10 10:04
Pagina se încarcă...
Pagina se încarcă...
Pagina se încarcă...
Pagina se încarcă...
Pagina se încarcă...
Pagina se încarcă...
Pagina se încarcă...
Pagina se încarcă...
Pagina se încarcă...
Pagina se încarcă...
Pagina se încarcă...
Pagina se încarcă...
Pagina se încarcă...
Pagina se încarcă...
Pagina se încarcă...
Pagina se încarcă...
Pagina se încarcă...
Pagina se încarcă...
Pagina se încarcă...
Pagina se încarcă...
Pagina se încarcă...
Pagina se încarcă...
Pagina se încarcă...
Pagina se încarcă...
Pagina se încarcă...
Pagina se încarcă...
Pagina se încarcă...
Pagina se încarcă...
Pagina se încarcă...
Pagina se încarcă...
Pagina se încarcă...
Pagina se încarcă...
Pagina se încarcă...
Pagina se încarcă...
Pagina se încarcă...
Pagina se încarcă...
Pagina se încarcă...
Pagina se încarcă...
Pagina se încarcă...
Pagina se încarcă...
Pagina se încarcă...
Pagina se încarcă...
Pagina se încarcă...
Pagina se încarcă...
Pagina se încarcă...
Pagina se încarcă...
Pagina se încarcă...
Pagina se încarcă...
Pagina se încarcă...
Pagina se încarcă...
Pagina se încarcă...
Pagina se încarcă...
Pagina se încarcă...
Pagina se încarcă...
Pagina se încarcă...
Pagina se încarcă...
Pagina se încarcă...
Pagina se încarcă...
Pagina se încarcă...
Pagina se încarcă...
Pagina se încarcă...
Pagina se încarcă...
Pagina se încarcă...
Pagina se încarcă...
Pagina se încarcă...
Pagina se încarcă...
Pagina se încarcă...
Pagina se încarcă...
Pagina se încarcă...
Pagina se încarcă...
Pagina se încarcă...
Pagina se încarcă...
Pagina se încarcă...
Pagina se încarcă...
Pagina se încarcă...
Pagina se încarcă...
Pagina se încarcă...
Pagina se încarcă...
Pagina se încarcă...
Pagina se încarcă...
Pagina se încarcă...
Pagina se încarcă...
Pagina se încarcă...
Pagina se încarcă...
Pagina se încarcă...
Pagina se încarcă...
Pagina se încarcă...
Pagina se încarcă...
Pagina se încarcă...
Pagina se încarcă...
Pagina se încarcă...
Pagina se încarcă...
Pagina se încarcă...
Pagina se încarcă...
Pagina se încarcă...
Pagina se încarcă...
Pagina se încarcă...
Pagina se încarcă...
Pagina se încarcă...
Pagina se încarcă...
Pagina se încarcă...
Pagina se încarcă...
Pagina se încarcă...
Pagina se încarcă...
Pagina se încarcă...
Pagina se încarcă...
Pagina se încarcă...
Pagina se încarcă...
Pagina se încarcă...
Pagina se încarcă...
Pagina se încarcă...
Pagina se încarcă...
Pagina se încarcă...
Pagina se încarcă...
Pagina se încarcă...
Pagina se încarcă...
Pagina se încarcă...
Pagina se încarcă...
Pagina se încarcă...
Pagina se încarcă...
Pagina se încarcă...
Pagina se încarcă...
Pagina se încarcă...
Pagina se încarcă...
Pagina se încarcă...
Pagina se încarcă...
Pagina se încarcă...
Pagina se încarcă...
Pagina se încarcă...
Pagina se încarcă...
Pagina se încarcă...
Pagina se încarcă...
Pagina se încarcă...
Pagina se încarcă...
Pagina se încarcă...
Pagina se încarcă...
Pagina se încarcă...
Pagina se încarcă...
Pagina se încarcă...
Pagina se încarcă...
Pagina se încarcă...
Pagina se încarcă...
Pagina se încarcă...
Pagina se încarcă...
Pagina se încarcă...
Pagina se încarcă...
Pagina se încarcă...
Pagina se încarcă...
Pagina se încarcă...
Pagina se încarcă...
Pagina se încarcă...
Pagina se încarcă...
Pagina se încarcă...
Pagina se încarcă...
Pagina se încarcă...
Pagina se încarcă...
Pagina se încarcă...
Pagina se încarcă...
Pagina se încarcă...
Pagina se încarcă...
Pagina se încarcă...
Pagina se încarcă...
Pagina se încarcă...
Pagina se încarcă...
Pagina se încarcă...
Pagina se încarcă...
Pagina se încarcă...
Pagina se încarcă...
Pagina se încarcă...
Pagina se încarcă...
Pagina se încarcă...
Pagina se încarcă...
Pagina se încarcă...
Pagina se încarcă...
Pagina se încarcă...
Pagina se încarcă...
Pagina se încarcă...
Pagina se încarcă...
Pagina se încarcă...
Pagina se încarcă...
Pagina se încarcă...
Pagina se încarcă...
Pagina se încarcă...
Pagina se încarcă...
Pagina se încarcă...
Pagina se încarcă...
Pagina se încarcă...
Pagina se încarcă...
Pagina se încarcă...
Pagina se încarcă...
Pagina se încarcă...
Pagina se încarcă...
Pagina se încarcă...
Pagina se încarcă...
Pagina se încarcă...
Pagina se încarcă...
Pagina se încarcă...
Pagina se încarcă...
Pagina se încarcă...
Pagina se încarcă...
Pagina se încarcă...
Pagina se încarcă...
Pagina se încarcă...
Pagina se încarcă...
Pagina se încarcă...
Pagina se încarcă...
-
 1
1
-
 2
2
-
 3
3
-
 4
4
-
 5
5
-
 6
6
-
 7
7
-
 8
8
-
 9
9
-
 10
10
-
 11
11
-
 12
12
-
 13
13
-
 14
14
-
 15
15
-
 16
16
-
 17
17
-
 18
18
-
 19
19
-
 20
20
-
 21
21
-
 22
22
-
 23
23
-
 24
24
-
 25
25
-
 26
26
-
 27
27
-
 28
28
-
 29
29
-
 30
30
-
 31
31
-
 32
32
-
 33
33
-
 34
34
-
 35
35
-
 36
36
-
 37
37
-
 38
38
-
 39
39
-
 40
40
-
 41
41
-
 42
42
-
 43
43
-
 44
44
-
 45
45
-
 46
46
-
 47
47
-
 48
48
-
 49
49
-
 50
50
-
 51
51
-
 52
52
-
 53
53
-
 54
54
-
 55
55
-
 56
56
-
 57
57
-
 58
58
-
 59
59
-
 60
60
-
 61
61
-
 62
62
-
 63
63
-
 64
64
-
 65
65
-
 66
66
-
 67
67
-
 68
68
-
 69
69
-
 70
70
-
 71
71
-
 72
72
-
 73
73
-
 74
74
-
 75
75
-
 76
76
-
 77
77
-
 78
78
-
 79
79
-
 80
80
-
 81
81
-
 82
82
-
 83
83
-
 84
84
-
 85
85
-
 86
86
-
 87
87
-
 88
88
-
 89
89
-
 90
90
-
 91
91
-
 92
92
-
 93
93
-
 94
94
-
 95
95
-
 96
96
-
 97
97
-
 98
98
-
 99
99
-
 100
100
-
 101
101
-
 102
102
-
 103
103
-
 104
104
-
 105
105
-
 106
106
-
 107
107
-
 108
108
-
 109
109
-
 110
110
-
 111
111
-
 112
112
-
 113
113
-
 114
114
-
 115
115
-
 116
116
-
 117
117
-
 118
118
-
 119
119
-
 120
120
-
 121
121
-
 122
122
-
 123
123
-
 124
124
-
 125
125
-
 126
126
-
 127
127
-
 128
128
-
 129
129
-
 130
130
-
 131
131
-
 132
132
-
 133
133
-
 134
134
-
 135
135
-
 136
136
-
 137
137
-
 138
138
-
 139
139
-
 140
140
-
 141
141
-
 142
142
-
 143
143
-
 144
144
-
 145
145
-
 146
146
-
 147
147
-
 148
148
-
 149
149
-
 150
150
-
 151
151
-
 152
152
-
 153
153
-
 154
154
-
 155
155
-
 156
156
-
 157
157
-
 158
158
-
 159
159
-
 160
160
-
 161
161
-
 162
162
-
 163
163
-
 164
164
-
 165
165
-
 166
166
-
 167
167
-
 168
168
-
 169
169
-
 170
170
-
 171
171
-
 172
172
-
 173
173
-
 174
174
-
 175
175
-
 176
176
-
 177
177
-
 178
178
-
 179
179
-
 180
180
-
 181
181
-
 182
182
-
 183
183
-
 184
184
-
 185
185
-
 186
186
-
 187
187
-
 188
188
-
 189
189
-
 190
190
-
 191
191
-
 192
192
-
 193
193
-
 194
194
-
 195
195
-
 196
196
-
 197
197
-
 198
198
-
 199
199
-
 200
200
-
 201
201
-
 202
202
-
 203
203
-
 204
204
-
 205
205
-
 206
206
-
 207
207
-
 208
208
-
 209
209
-
 210
210
-
 211
211
-
 212
212
-
 213
213
-
 214
214
-
 215
215
-
 216
216
-
 217
217
-
 218
218
-
 219
219
-
 220
220
-
 221
221
-
 222
222
-
 223
223
-
 224
224
-
 225
225
-
 226
226


Philips FC9302/02 Manual de utilizare
- Categorie
- Aspiratoare
- Tip
- Manual de utilizare
în alte limbi
- slovenčina: Philips FC9302/02 Používateľská príručka
- eesti: Philips FC9302/02 Kasutusjuhend
Lucrări înrudite
-
Philips FC9304 Manual de utilizare
-
-
Philips FC8442/01 Manual de utilizare
-
-
Philips FC9310/02 Manual de utilizare
-
Philips FC9166/01 Manual de utilizare
-
-
Philips FC9081 Manual de utilizare
-
-