
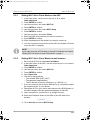
ASC G Wi-Fi kit
EN 3 Operating manual
DE 13 Bedienungsanleitung
FR 24 Notice d’utilisation
ES 35 Instrucciones de uso
PT 46 Manual de instruções
IT 57 Istruzioni per l’uso
NL 68 Gebruiksaanwijzing
DA 79 Betjeningsvejledning
SV 90 Bruksanvisning
NO 100 Bruksanvisning
FI 111 Käyttöohje
RU 122 Инструкция по эксплуатации
PL 133 Instrukcja obsługi
SK 144 Návod na obsluhu
CS 155 Návod k obsluze
HU 165 Használati utasítás
HR 176 Upute za uporabu
TR 187 Kullanma Kılavuzu
SL 198 Navodilo za uporabo
RO 209 Instrucţiuni de operare
BG 220 Инструкция за експлоатация
SR 231 Uputstvo za rukovanje
EL 241 Οδηγίες χειρισμού
ET 253 Kasutusjuhend
LT 274 Naudotojo vadovas
LV 263 Ekspluatācijas rokasgrāmata
UK 284 Посібник з експлуатації
MK 296 Упатство за употреба
AR 307 ﻝﻳﻐﺷﺗﻟﺍ ﻝﻳﻟﺩ
HE 316 הלעפה תוארוה
JA 326
取扱説明書
ZH-CN 336
使用说明书
ZH-TW 346
使用說明書
KO 356
사용설명서
PT-BR 366 Manual de instruções
ES-MX 377 Instrucciones de uso
FR-CA 388 Notice d’utilisation
WaecoWiFiKit_OPM_4445103184_EMEA36_202x-xx-xx.book Seite 1 Freitag, 30. April 2021 1:50 13

© 2021 Dometic Group. The visual appearance of the contents of this manual is protected by copyright and
design law. The underlying technical design and the products contained herein may be protected by design,
patent or be patent pending. The trademarks mentioned in this manual belong to Dometic Sweden AB. All
rights are reserved.
WaecoWiFiKit_OPM_4445103184_EMEA36_202x-xx-xx.book Seite 2 Freitag, 30. April 2021 1:50 13

EN
3
ASC G Wi-Fi kit Hotline
Please read these instructions carefully and follow all instructions, guidelines, and warnings included in this product manual in order to ensure that you install, use, and
maintain the product properly at all times. These instructions MUST stay with this product.
By using the product, you hereby confirm that you have read all instructions, guidelines, and warnings carefully and that you understand and agree to abide by the terms
and conditions as set forth herein. You agree to use this product only for the intended purpose and application and in accordance with the instructions, guidelines, and
warnings as set forth in this product manual as well as in accordance with all applicable laws and regulations. A failure to read and follow the instructions and warnings
set forth herein may result in an injury to yourself and others, damage to your product or damage to other property in the vicinity. This product manual, including the
instructions, guidelines, and warnings, and related documentation, may be subject to changes and updates. For up-to-date product information, please visit
dometic.com.
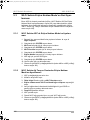
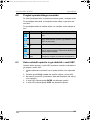
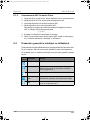
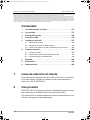
Contents
1 Hotline . . . . . . . . . . . . . . . . . . . . . . . . . . . . . . . . . . . . . . . . . . . . . .3
2 Intended use . . . . . . . . . . . . . . . . . . . . . . . . . . . . . . . . . . . . . . . . .3
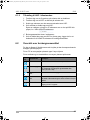
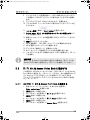
3 Technical description. . . . . . . . . . . . . . . . . . . . . . . . . . . . . . . . . .4
4 Connecting to ASC. . . . . . . . . . . . . . . . . . . . . . . . . . . . . . . . . . . .4
5 Setting up the Wi-Fi kit. . . . . . . . . . . . . . . . . . . . . . . . . . . . . . . . .5
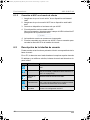
5.1 Overview. . . . . . . . . . . . . . . . . . . . . . . . . . . . . . . . . . . . . . . . . . . . . 5
5.2 Setting Wi-Fi kit to Client Mode . . . . . . . . . . . . . . . . . . . . . . . . . . . 5
5.3 Setting Wi-Fi kit back to Access Point Mode . . . . . . . . . . . . . . . . . 7
6 Operating . . . . . . . . . . . . . . . . . . . . . . . . . . . . . . . . . . . . . . . . . . .8
6.1 Connecting to the ASC. . . . . . . . . . . . . . . . . . . . . . . . . . . . . . . . . . 8
6.2 Overview of the user interface . . . . . . . . . . . . . . . . . . . . . . . . . . . . 9
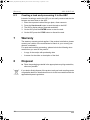
6.3 Creating a task and processing it in the ASC. . . . . . . . . . . . . . . . 10
7 Warranty . . . . . . . . . . . . . . . . . . . . . . . . . . . . . . . . . . . . . . . . . . .10
8 Disposal . . . . . . . . . . . . . . . . . . . . . . . . . . . . . . . . . . . . . . . . . . .10
9 Technical data . . . . . . . . . . . . . . . . . . . . . . . . . . . . . . . . . . . . . .11
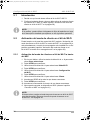
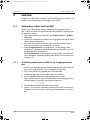
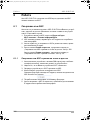
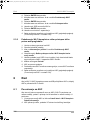
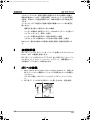
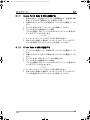
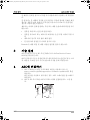
1Hotline
If you need more information on the ASC G Wi-Fi kit that is not contained
in this manual, please contact the hotline (tel.: +49 (0) 2572 879-0).
2 Intended use
The ASC G Wi-Fi kit is for commercial use. It is designed to be plugged
into an WAECO AirConServiceCenter (ASC) only.
With this Wi-Fi kit it is possible to connect to an AirConServiceCenter via
a browser and exchange data.
The ASC G Wi-Fi kit shall only be connected and operated by personnel
who have the expertise required for servicing air conditioning systems.
WaecoWiFiKit_OPM_4445103184_EMEA36_202x-xx-xx.book Seite 3 Freitag, 30. April 2021 1:50 13

EN
Technical description ASC G Wi-Fi kit
4
This product is only suitable for the intended purpose and application in
accordance with these instructions.
This manual provides information that is necessary for proper installation
and/or operation of the product. Poor installation and/or improper operat-
ing or maintenance will result in unsatisfactory performance and a possi-
ble failure.
The manufacturer accepts no liability for any injury or damage to the prod-
uct resulting from:
• Incorrect assembly or connection, including excess voltage
• Incorrect maintenance or use of spare parts other than original spare
parts provided by the manufacturer
• Alterations to the product without express permission from the manu-
facturer
• Use for purposes other than those described in this manual
Dometic reserves the right to change product appearance and product
specifications.
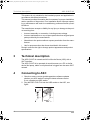
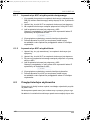
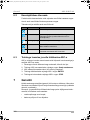
3 Technical description
The ASC G Wi-Fi kit extends an AirConServiceCenter (ASC) with a
Wi-Fi interface.
The ASC G Wi-Fi kit is operated via a web browser on a PC or similar
device like laptop, tablet or cell phone that is logged into the same Wi-Fi
network.
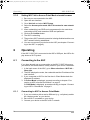
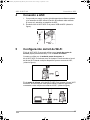
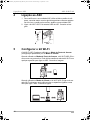
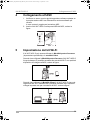
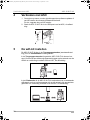
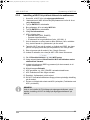
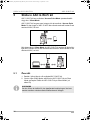
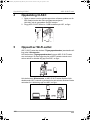
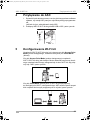
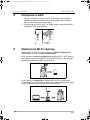
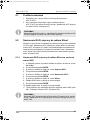
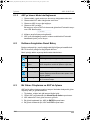
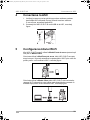
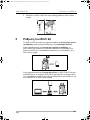
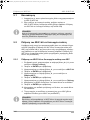
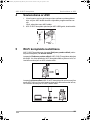
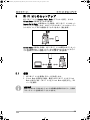
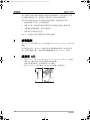
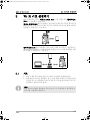
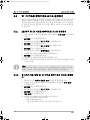
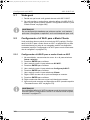
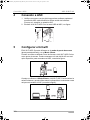
4 Connecting to ASC
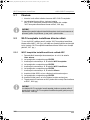
1. Check on waeco.com/en-gb/uk/support/asc-software-updates
whether your ASC station is using the latest software version.
If not, upgrade your ASC station.
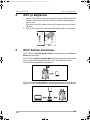
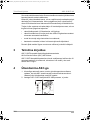
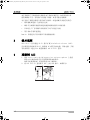
2. Plug the ASC G Wi-Fi kit into the USB socket on the ASC, see
figure:
1. 2.
WaecoWiFiKit_OPM_4445103184_EMEA36_202x-xx-xx.book Seite 4 Freitag, 30. April 2021 1:50 13

EN
5
ASC G Wi-Fi kit Setting up the Wi-Fi kit
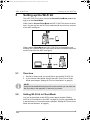
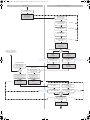
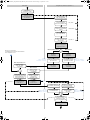
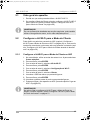
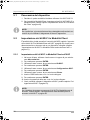
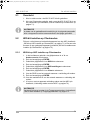
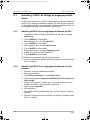
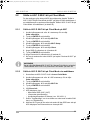
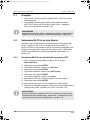
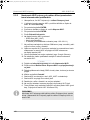
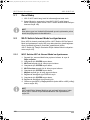
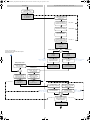
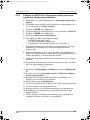
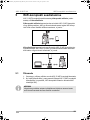
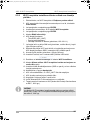
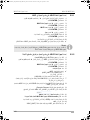
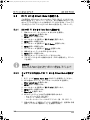
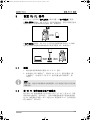
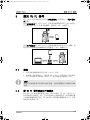
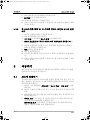
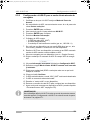
5 Setting up the Wi-Fi kit
The ASC G Wi-Fi kit can be used in the Access Point Mode (default set-
ting) or in the Client Mode.
When used in Access Point Mode the ASC G Wi-Fi kit serves as a hot
spot. You can log into the Wi-Fi kit‘s network with any device to connect
to the ASC, see figure:
When used in Client Mode the ASC G Wi-Fi kit is connected to your
existing Wi-Fi network and you can use all devices connected to this net-
work to connect to the ASC, see figure:
5.1 Overview
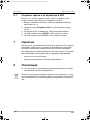
1. Decide in which mode you would like to use the ASC G Wi-Fi kit.
2. If you choose Client Mode, first set the ASC G Wi-Fi kit to Client
Mode (see chapter “Setting Wi-Fi kit to Client Mode” on page 5)
I
5.2 Setting Wi-Fi kit to Client Mode
You can do this either at the ASC‘s control panel (chapter “Setting
Wi-Fi kit to Client Mode on the ASC” on page 6) or more comfortable via
a web browser on a connected device (chapter “Setting Wi-Fi kit to Client
Mode via web browser” on page 6).
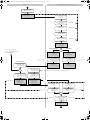
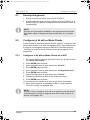
NOTE
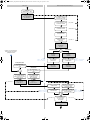
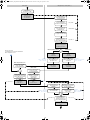
Instead of the detailed description in the next sections you can also use
the flow chart in the appendix, if that suits you better.
WaecoWiFiKit_OPM_4445103184_EMEA36_202x-xx-xx.book Seite 5 Freitag, 30. April 2021 1:50 13

EN
Setting up the Wi-Fi kit ASC G Wi-Fi kit
6
5.2.1 Setting Wi-Fi kit to Client Mode on the ASC
1. In the basic menu, use the cursor keys or to select
Other selections.
2. Press ENTER to confirm.
3. Use the cursor key to select Wi-Fi kit.
4. Press ENTER to confirm.
5. Use the cursor key to select Wi-Fi Setup.
6. Press ENTER to confirm.
7. Use the cursor key to select Client.
8. Enter the SSID of the network you want to connect to.
9. Press ENTER to confirm.
10. Enter the password of the network you want to connect to.
✔ You can now connect your device to the ASC (see chapter “Connect-
ing to the ASC” on page 8).
I
5.2.2 Setting Wi-Fi kit to Client Mode via web browser
1. Be sure that Wi-Fi kit is in Access Point Mode.
2. In the basic menu of the ASC, use the cursor keys or to select
Other selections.
3. Press ENTER to confirm.
4. Use the cursor key to select Wi-Fi kit.
5. Press ENTER to confirm.
6. Select Show info.
✔ The ASC‘s display shows:
– The network SSID (ASC_UNIT)
– The password (administrator)
– The IP address of the user interface (e. g. 192.168.1.1)
7. If you use a device with an active SIM card (e. g. cell phone) enable
the “airplane mode” on your device.
8. Reactivate Wi-Fi on your device and connect to the SSID shown on
the ASC‘s display using the password displayed on the ASC.
9. Open a browser on your device (e. g. Google Chrome).
10. Enter the IP address shown on the ASC in the URL field of the
browser:
11. Go to Unit info and select Wi-Fi Setup.
NOTE
If you want to set the Wi-Fi kit back in Access Point Mode see chapter
“Setting Wi-Fi kit back to Access Point Mode” on page 7.
WaecoWiFiKit_OPM_4445103184_EMEA36_202x-xx-xx.book Seite 6 Freitag, 30. April 2021 1:50 13

EN
7
ASC G Wi-Fi kit Setting up the Wi-Fi kit
12. Select the Client mode: Wi-Fi kit connects to an existing network
option.
13. Insert credentials (SSID and password) of the network you want to
connect to.
14. Click on the Confirm button.
✔ The ASC is rebooting and the “ASC_UNIT” network is being disabled.
✔ The ASC connects to the selected network.
15. Disable the “airplane mode” on your device.
16. Set back the Wi-Fi network connection to the original one on your
device.
✔ You can now connect your device to the ASC (see chapter “Connect-
ing to the ASC” on page 8).
I
5.3 Setting Wi-Fi kit back to Access Point Mode
You can do this either at the ASC‘s control panel (chapter “Setting
Wi-Fi kit to Access Point Mode on the ASC” on page 7) or more comfort-
able via a web browser on a connected device (chapter “Setting Wi-Fi kit
to Access Point Mode via web browser” on page 8).
5.3.1 Setting Wi-Fi kit to Access Point Mode on the ASC
1. In the basic menu, use the cursor keys or to select
Other selections:
2. Press ENTER to confirm.
3. Use the cursor key to select Wi-Fi kit.
4. Press ENTER to confirm.
5. Use the cursor key to select Wi-Fi Setup.
6. Press ENTER to confirm.
7. Use the cursor key to select Access Point.
8. Enter a new SSID for the ASC‘s network:
9. Press ENTER to confirm.
10. Enter a new password and remember it.
✔ You can now connect your device to the ASC (see chapter “Connect-
ing to the ASC” on page 8).
NOTE
If you want to set the Wi-Fi kit back in Access Point Mode see chapter
“Setting Wi-Fi kit back to Access Point Mode” on page 7.
WaecoWiFiKit_OPM_4445103184_EMEA36_202x-xx-xx.book Seite 7 Freitag, 30. April 2021 1:50 13

EN
Operating ASC G Wi-Fi kit
8
5.3.2 Setting Wi-Fi kit to Access Point Mode via web browser
1. Be sure you are connected to the ASC.
2. Open the user interface.
3. Go to Unit info and select Wi-Fi Setup.
4. Select the Access point mode: Wi-Fi kit creates its own network
option.
5. Insert credentials (new SSID and new password) to be used when
connecting to ASC and remember SSID and password.
6. Click on the Confirm button.
✔ The ASC is rebooting.
✔ The previous Wi-Fi network connection is being disabled and the new
Wi-Fi network is being established.
✔ You can now connect your device to the ASC (see chapter “Connect-
ing to the ASC” on page 8).
6 Operating
If the ASC G Wi-Fi kit is connected to the ASC‘s USB port, the ASC‘s dis-
play shows a Wi-Fi symbol.
6.1 Connecting to the ASC
If you have already set up a connection to the ASC G Wi-Fi kit once on
your device, the access data is usually stored in your device. Otherwise:
1. In the basic menu of the ASC, go to Other selections > Wi-Fi kit >
Show info.
✔ The ASC displays the mode, the credentials and the IP address of the
user interface.
2. If you connected to ASC for the first time in Client Mode check the
displayed IP address.
3. If Access Mode is displayed, proceed according to chapter “Con-
necting to ASC in Access Point Mode” on page 8.
If Client Mode is displayed, proceed according to chapter “Connect-
ing to ASC in Client Mode” on page 9
6.1.1 Connecting to ASC in Access Point Mode
1. If you use a device with an active SIM card (e. g. cell phone) enable
the “airplane mode” on your device.
2. Be sure Wi-Fi is enabled on your device.
3. Connect your device to the ASC‘s Wi-Fi network.
WaecoWiFiKit_OPM_4445103184_EMEA36_202x-xx-xx.book Seite 8 Freitag, 30. April 2021 1:50 13

EN
9
ASC G Wi-Fi kit Operating
4. If your device is connected to the ASC:
Open a browser and enter the IP address shown on the ASC‘s dis-
play in the URL field of the browser:
✔ The user interface is shown in the browser.
5. If you connected for the first time to ASC set a bookmark to remem-
ber the IP address of the user interface.
6.1.2 Connecting to ASC in Client Mode
1. Ensure that the “airplane mode” on your device is disabled.
2. Be sure Wi-Fi is enabled on your device.
3. Connect your device to the same network as the ASC.
4. If your device is connected to the ASC:
Open a browser and enter the IP address shown on the ASC‘s dis-
play in the URL field of the browser:
✔ The user interface is shown in the browser.
5. If you connected for the first time to ASC set a bookmark to remem-
ber the IP address of the user interface.
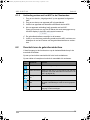
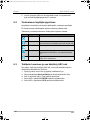
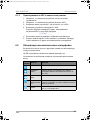
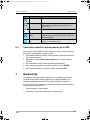
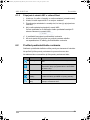
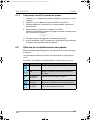
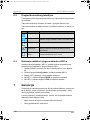
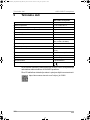
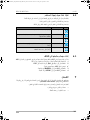
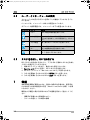
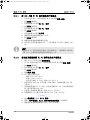
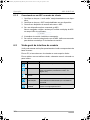
6.2 Overview of the user interface
You can access the functions by pressing the corresponding button of the
menu bar.
On a PC the menu bar is placed on the upper right corner.
On a tablet and on a cell phone the menu bar is placed at the bottom.
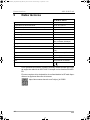
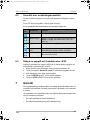
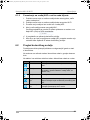
Icon Command Function
Sensors Shows the ASC‘s current operating values.
Send task Creates a task and sends it to the ASC (chapter
“Creating a task and processing it in the ASC” on
page 10).
Task history Shows all finished tasks.
Maintenance
counters
Shows the ASC‘s current meter readings and the
total meter readings since the unit was produced.
Unit info Shows the data of the ASC.
Access to Wi-Fi setup.
WaecoWiFiKit_OPM_4445103184_EMEA36_202x-xx-xx.book Seite 9 Freitag, 30. April 2021 1:50 13

EN
Warranty ASC G Wi-Fi kit
10
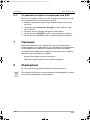
6.3 Creating a task and processing it in the ASC
Instead of creating a task in the ASC you can easily create a task via the
browser and send them to the ASC.
1. Enter the requested values like type plate, client name etc.
2. Press the Send to unit button to send the task to the ASC.
✔ The ASC‘s display shows “New task available”.
3. On the ASC press the ENTER button to start the task.
4. On the ASC press the STOP button to discard the task.
7Warranty
The statutory warranty period applies. If the product is defective, please
contact your retailer or the manufacturer's branch in your country (see
dometic.com/dealer).
For repair and warranty processing, please include the following docu-
ments when you send in the product:
• A copy of the receipt with purchasing date
• A reason for the claim or description of the fault
8Disposal
➤ Place the packaging material in the appropriate recycling waste bins,
wherever possible.
M
If you wish to finally dispose of the product, ask your local recycling center
or specialist dealer for details about how to do this in accordance with the
applicable disposal regulations.
WaecoWiFiKit_OPM_4445103184_EMEA36_202x-xx-xx.book Seite 10 Freitag, 30. April 2021 1:50 13

EN
11
ASC G Wi-Fi kit Technical data
9 Technical data
Hereby, Dometic Germany GmbH declares that the radio equipment type
ASC G Wi-Fi kit is in compliance with Directive 2014/53/EU.
The full text of the EU declaration of conformity is available at the follow-
ing internet address:
https://documents.dometic.com/?object_id=70962
ASC G Wi-Fi kit
Reference number: 8885200311
Operating temperature: +5 °C to +50 °C
Dimensions (width x height x depth): 80 mm x 33.5 mm x 23 mm
Weight: 25 g
Operating voltage: 5 V
Average operating current: 180 mA
Communication standard: Wi-Fi
Protocol: 802.11 b/g/n
(802.11n up to 150 Mbps)
Frequency range: 2.4 GHz – 2.5 GHz
RF output power at the antenna: 20 dBm
Channel: 1 (2.412 GHz center fre-
quency)
Safety: WPA2-Personal (WPA2-PSK)
Antenna type: PCB integrated
Interface: 1x USB 2.0 port
LEDs: 1x power / activity
Certification:
WaecoWiFiKit_OPM_4445103184_EMEA36_202x-xx-xx.book Seite 11 Freitag, 30. April 2021 1:50 13

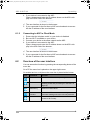
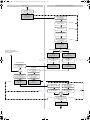
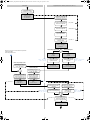
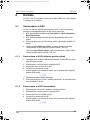
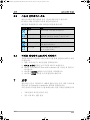
n
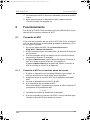
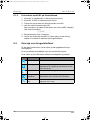
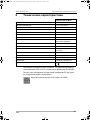
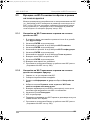
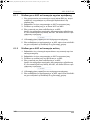
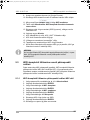
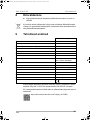
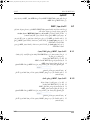
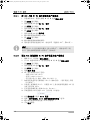
Basic menu:
Other Menus o Wi-Fi
WiFi setup mode
SSID: ASC_Unit
PW: administrator
IP: 192.168.1.1
Client mode
SSID: my_network
PW: ---
IP: 172.20.10.3
Example:
SSID: “ASC_new”
PW: “123new”
Web page:
ASC
“192.168.0.1” “172.20.10.3”
“ASC_UNIT”
“administrator”
“192.168.1.1”
Example:
IP = “172.20.10.3”
Press the “0” button on
the keypad and check
the IP that the network
assigned to the ASC
Access mode
SSID: ASC_new
PW: 123new
IP: 192.168.0.1
IP = “192.168.0.1”
Press the “0” button on
the keypad to verify that the
ASC established the new
network and copy the IP
ASC is rebooting.
The “ASC_UNIT” network
is being disabled
Start here if you use the
ASC WiFi kit‘s default setting
Access Point Mode
ASC is rebooting.
The “ASC_UNIT” network
is being disabled
ASC unit Browser (PC, cell phone, tablet, …)
Activate “airplane
mode” to disable
mobile connections
Re-activate WiFi and
connect to the SSID shown
on the ASC display
Enter password shown
on the ASC display
Open a browser,
e.g. Google Chrome
Enter the IP shown on
the ASC in the URL field
of the browser
Web page:
Setup mode
Please select
Access Point Mode Client Mode
Access point mode
Client mode
Web page:
Insert
credentials
Choose a new SSID and a
new PW for the network
you want to create
Web page:
Notice: ASC
will reboot!
Example:
SSID = “ASC_new”
PW = “123new”
Web page:
Insert
credentials
Enter the SSID and PW of
the network you want to
connect to
Web page:
Notice: ASC
will reboot!
Example:
SSID = “my_network”
PW = “123456”
Example:
SSID = “my_network”
PW = “123456”
Disable “airplane mode”
to enable mobile
connections again
Ensure “airplane mode”
is enabled
Connect your device to
the same WiFi network
as the ASC
Connect your device
to the ASC‘s WiFi network
Open a browser and enter
the IP shown on the ASC
display in the URL field of
the browser
WaecoWiFiKit_OPM_4445103184_EMEA36_202x-xx-xx.book Seite 12 Freitag, 30. April 2021 1:50 13

DE
13
ASC G Wi-Fi kit Hotline
Lesen und befolgen Sie bitte alle Anweisungen, Richtlinien und Warnhinweise in diesem Produkthandbuch sorgfältig, um sicherzustellen, dass Sie das Produkt ord-
nungsgemäß installieren und stets ordnungsgemäß betreiben und warten. Diese Anleitung MUSS bei dem Produkt verbleiben.
Durch die Verwendung des Produktes bestätigen Sie hiermit, dass Sie alle Anweisungen, Richtlinien und Warnhinweise sorgfältig gelesen haben und dass Sie die hierin
dargelegten Bestimmungen verstanden haben und ihnen zustimmen. Sie erklären sich damit einverstanden, dieses Produkt nur für den angegebenen Verwendungs-
zweck und gemäß den Anweisungen, Richtlinien und Warnhinweisen dieses Produkthandbuchs sowie gemäß allen geltenden Gesetzen und Vorschriften zu verwen-
den. Eine Nichtbeachtung der hierin enthaltenen Anweisungen und Warnhinweise kann zu einer Verletzung Ihrer selbst und anderer Personen, zu Schäden an Ihrem
Produkt oder zu Schäden an anderem Eigentum in der Umgebung führen. Dieses Produkthandbuch, einschließlich der Anweisungen, Richtlinien und Warnhinweise,
sowie die zugehörige Dokumentation können Änderungen und Aktualisierungen unterliegen. Aktuelle Produktinformationen finden Sie unter dometic.com.
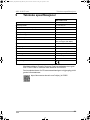
Inhalt
1 Hotline . . . . . . . . . . . . . . . . . . . . . . . . . . . . . . . . . . . . . . . . . . . . .13
2 Bestimmungsgemäßer Gebrauch. . . . . . . . . . . . . . . . . . . . . . .13
3 Technische Beschreibung. . . . . . . . . . . . . . . . . . . . . . . . . . . . .14
4 Verbinden mit dem ASC. . . . . . . . . . . . . . . . . . . . . . . . . . . . . . .14
5 Einrichten des WLAN-Kits. . . . . . . . . . . . . . . . . . . . . . . . . . . . .15
5.1 Übersicht . . . . . . . . . . . . . . . . . . . . . . . . . . . . . . . . . . . . . . . . . . . 16
5.2 Einstellen des WLAN-Kits auf den Client-Modus . . . . . . . . . . . . . 16
5.3 Zurücksetzen des WLAN-Kits auf den Zugangspunkt-Modus . . . 18
6 Bedienung. . . . . . . . . . . . . . . . . . . . . . . . . . . . . . . . . . . . . . . . . .19
6.1 Verbinden mit dem ASC. . . . . . . . . . . . . . . . . . . . . . . . . . . . . . . . 19
6.2 Überblick zur Benutzeroberfläche . . . . . . . . . . . . . . . . . . . . . . . . 20
6.3 Erstellen einer Aufgabe und deren Verarbeitung im ASC . . . . . . 21
7 Gewährleistung. . . . . . . . . . . . . . . . . . . . . . . . . . . . . . . . . . . . . .21
8 Entsorgung . . . . . . . . . . . . . . . . . . . . . . . . . . . . . . . . . . . . . . . . .21
9 Technische Daten. . . . . . . . . . . . . . . . . . . . . . . . . . . . . . . . . . . .22
1Hotline
Wenn Sie weitere Informationen zum ASC G WLAN -Kit benötigen, die
nicht in diesem Handbuch enthalten sind, wenden Sie sich bitte an die
Hotline (Tel.: +49 (0) 2572 879-0).
2 Bestimmungsgemäßer Gebrauch
Das ASC G WLAN-Kit ist für die kommerzielle Nutzung bestimmt. Es ist
ausschließlich für den Anschluss an ein WAECO AirConServiceCenter
(ASC) vorgesehen.
Mit diesem WLAN-Kit ist es möglich, sich über einen Browser mit einem
AirConServiceCenter zu verbinden und Daten auszutauschen.
WaecoWiFiKit_OPM_4445103184_EMEA36_202x-xx-xx.book Seite 13 Freitag, 30. April 2021 1:50 13

DE
Technische Beschreibung ASC G Wi-Fi kit
14
Das ASC G WLAN-Kit darf nur von Personal angeschlossen und bedient
werden, das über die für die Wartung von Klimaanlagen erforderlichen
Fachkenntnisse verfügt.
Dieses Produkt ist nur für den angegebenen Verwendungszweck und die
Anwendung gemäß dieser Anleitung geeignet.
Dieses Handbuch enthält Informationen, die für die ordnungsgemäße
Installation und den ordnungsgemäßen Betrieb des Produkts erforderlich
sind. Installationsfehler und/oder ein nicht ordnungsgemäßer Betrieb
oder nicht ordnungsgemäße Wartung haben eine unzureichende Leis-
tung und u. U. einen Ausfall des Geräts zur Folge.
Der Hersteller übernimmt keine Haftung für Verletzungen oder Schäden
am Produkt, die durch Folgendes entstehen:
• Unsachgemäße Montage oder falscher Anschluss, einschließlich
Überspannung
• Unsachgemäße Wartung oder Verwendung von anderen als den vom
Hersteller gelieferten Original-Ersatzteilen
• Veränderungen am Produkt ohne ausdrückliche Genehmigung des
Herstellers
• Verwendung für andere als die in der Anleitung beschriebenen Zwe-
cke
Dometic behält sich das Recht vor, das Erscheinungsbild des Produkts
und dessen technische Daten zu ändern.
3 Technische Beschreibung
Das ASC G WLAN-Kit erweitert ein AirConServiceCenter (ASC) um eine
WLAN-Schnittstelle.
Das ASC G WLAN-Kit wird über einen Webbrowser auf einem PC oder
einem ähnlichen Gerät wie einem Laptop, Tablet oder Mobiltelefon
bedient, das am selben WLAN-Netzwerk angemeldet ist.
4 Verbinden mit dem ASC
1. Prüfen Sie auf waeco.com/en-gb/uk/support/asc-software-updates,
ob Ihre ASC-Station die neueste Softwareversion verwendet.
Ist dies nicht der Fall, aktualisieren Sie Ihre ASC-Station.
WaecoWiFiKit_OPM_4445103184_EMEA36_202x-xx-xx.book Seite 14 Freitag, 30. April 2021 1:50 13

DE
15
ASC G Wi-Fi kit Einrichten des WLAN-Kits
2. Schließen Sie das ASC G WLAN-Kit an den USB-Anschluss des
ASC an, siehe Abbildung:
5 Einrichten des WLAN-Kits
Das ASC G WLAN-Kit kann im Zugangspunkt-Modus (Standardeinstel-
lung) oder im Client-Modus verwendet werden.
Bei Verwendung im Zugangspunkt-Modus dient das ASC G WLAN-Kit
als Hotspot. Sie können sich mit jedem beliebigen Gerät am Netzwerk
des WLAN-Kits anmelden, um eine Verbindung mit dem ASC herzustel-
len, siehe Abbildung:
Bei Verwendung im Client-Modus ist das ASC G WLAN-Kit mit Ihrem
bestehenden WLAN-Netzwerk verbunden und Sie können alle mit die-
sem Netzwerk verbundenen Geräte verwenden, um eine Verbindung mit
dem ASC herzustellen, siehe Abbildung:
1. 2.
WaecoWiFiKit_OPM_4445103184_EMEA36_202x-xx-xx.book Seite 15 Freitag, 30. April 2021 1:50 13

DE
Einrichten des WLAN-Kits ASC G Wi-Fi kit
16
5.1 Übersicht
1. Entscheiden Sie, in welchem Modus Sie das ASC G WLAN-Kit ver-
wenden möchten.
2. Wenn Sie den Client-Modus wählen, stellen Sie zunächst das
ASC G WLAN-Kit auf den Client-Modus ein (siehe Kapitel „Einstel-
len des WLAN-Kits auf den Client-Modus“ auf Seite 16).
I
5.2 Einstellen des WLAN-Kits auf den Client-Modus
Sie können diese Einstellung entweder über das Bedienfeld des ASC
(Kapitel „Einstellen des WLAN-Kits auf den Client-Modus auf dem ASC“
auf Seite 16) oder bequemer über einen Webbrowser auf einem verbun-
denen Gerät (Kapitel „Einstellen des WLAN-Kits auf den Client-Modus
über den Webbrowser“ auf Seite 17) vornehmen.
5.2.1 Einstellen des WLAN-Kits auf den Client-Modus auf dem
ASC
1. Wählen Sie im Grundmenü mit den Pfeiltasten oder
Andere Auswahlen aus.
2. Zur Bestätigung ENTER drücken.
3. Wählen Sie mit der Pfeiltaste WL-AN -Kit aus.
4. Zur Bestätigung ENTER drücken.
5. Wählen Sie mit der Pfeiltaste WL-AN -Einrichtung aus.
6. Zur Bestätigung ENTER drücken.
7. Wählen Sie mit der Pfeiltaste Client aus.
8. Geben Sie die SSID des Netzwerks ein, mit dem Sie sich verbinden
möchten.
9. Zur Bestätigung ENTER drücken.
10. Geben Sie das Kennwort des Netzwerks ein, mit dem Sie sich ver-
binden möchten.
✔ Sie können nun Ihr Gerät mit dem ASC verbinden (siehe Kapitel „Ver-
binden mit dem ASC“ auf Seite 19).
I
HINWEIS
Anstelle der detaillierten Beschreibung in den nächsten Abschnitten
können Sie nach Belieben auch das Flussdiagramm im Anhang ver-
wenden.
HINWEIS
Wenn Sie das WLAN-Kit wieder in den Zugangspunkt-Modus zurück-
setzen möchten, siehe Kapitel „Zurücksetzen des WLAN-Kits auf den
Zugangspunkt-Modus“ auf Seite 18.
WaecoWiFiKit_OPM_4445103184_EMEA36_202x-xx-xx.book Seite 16 Freitag, 30. April 2021 1:50 13

DE
17
ASC G Wi-Fi kit Einrichten des WLAN-Kits
5.2.2 Einstellen des WLAN-Kits auf den Client-Modus über den
Webbrowser
1. Stellen Sie sicher, dass sich das WLAN-Kit im Zugangspunkt-
Modus befindet.
2. Wählen Sie im Grundmenü des ASC mit den Pfeiltasten oder
Andere Auswahlen aus.
3. Zur Bestätigung ENTER drücken.
4. Wählen Sie mit der Pfeiltaste WL-AN -Kit aus.
5. Zur Bestätigung ENTER drücken.
6. Wählen Sie Info anzeigen aus.
✔ Das Display des ASC zeigt Folgendes an:
– Die SSID des Netzwerks (ASC_EINHEIT)
– Das Kennwort (Administrator)
– Die IP-Adresse der Benutzeroberfläche (z. B. 192.168.1.1)
7. Wenn Sie ein Gerät mit einer aktiven SIM-Karte verwenden (z. B. ein
Mobiltelefon), aktivieren Sie den „Flugzeugmodus“ auf Ihrem Gerät.
8. Aktivieren Sie WLAN wieder auf Ihrem Gerät und verbinden Sie sich
mit der SSID, die auf dem Display des ASC angezeigt wird, unter
Verwendung des auf dem ASC angezeigten Kennworts.
9. Öffnen Sie einen Browser auf Ihrem Gerät (z. B. Google Chrome).
10. Geben Sie die auf dem ASC angezeigte IP-Adresse in das URL-Feld
des Browsers ein:
11. Gehen Sie zu Einheiteninfo und wählen Sie WLAN-Einrichtung.
12. Wählen Sie die Option Client-Modus: Das WLAN-Kit verbindet
sich mit einem bestehenden Netzwerk.
13. Geben Sie die Zugangsdaten (SSID und Kennwort) des Netzwerks
ein, mit dem Sie sich verbinden möchten.
14. Klicken Sie auf die Schaltfläche Bestätigen.
✔ Das ASC startet neu und das Netzwerk „ASC_EINHEIT“ wird deakti-
viert.
✔ Das ASC verbindet sich mit dem ausgewählten Netzwerk.
15. Deaktivieren Sie den „Flugzeugmodus“ auf Ihrem Gerät.
16. Stellen Sie die WLAN-Netzwerkverbindung auf die ursprüngliche
Verbindung auf Ihrem Gerät zurück.
✔ Sie können nun Ihr Gerät mit dem ASC verbinden (siehe Kapitel „Ver-
binden mit dem ASC“ auf Seite 19).
I
HINWEIS
Wenn Sie das WLAN-Kit wieder in den Zugangspunkt-Modus zurück-
setzen möchten, siehe Kapitel „Zurücksetzen des WLAN-Kits auf den
Zugangspunkt-Modus“ auf Seite 18.
WaecoWiFiKit_OPM_4445103184_EMEA36_202x-xx-xx.book Seite 17 Freitag, 30. April 2021 1:50 13

DE
Einrichten des WLAN-Kits ASC G Wi-Fi kit
18
5.3 Zurücksetzen des WLAN-Kits auf den Zugangs-
punkt-Modus
Sie können diese Einstellung entweder über das Bedienfeld des ASC
(Kapitel „Einstellen des WLAN-Kits auf den Zugangspunkt-Modus auf
dem ASC“ auf Seite 18) oder bequemer über einen Webbrowser auf
einem verbundenen Gerät (Kapitel „Einstellen des WLAN-Kits auf den
Zugangspunkt-Modus über den Webbrowser“ auf Seite 18) vornehmen.
5.3.1 Einstellen des WLAN-Kits auf den Zugangspunkt-Modus
auf dem ASC
1. Wählen Sie im Grundmenü mit den Pfeiltasten oder
Andere Auswahlen aus:
2. Zur Bestätigung ENTER drücken.
3. Wählen Sie mit der Pfeiltaste WL-AN -Kit aus.
4. Zur Bestätigung ENTER drücken.
5. Wählen Sie mit der Pfeiltaste WL-AN -Einrichtung aus.
6. Zur Bestätigung ENTER drücken.
7. Wählen Sie mit der Pfeiltaste Zugangs punkt aus.
8. Geben Sie eine neue SSID für das Netzwerk des ASC ein:
9. Zur Bestätigung ENTER drücken.
10. Geben Sie ein neues Kennwort ein und merken Sie es sich.
✔ Sie können nun Ihr Gerät mit dem ASC verbinden (siehe Kapitel „Ver-
binden mit dem ASC“ auf Seite 19).
5.3.2 Einstellen des WLAN-Kits auf den Zugangspunkt-Modus
über den Webbrowser
1. Stellen Sie sicher, dass Sie mit dem ASC verbunden sind.
2. Öffnen Sie die Benutzeroberfläche.
3. Gehen Sie zu Einheiteninfo und wählen Sie WLAN-Einrichtung.
4. Wählen Sie die Option Zugangspunkt-Modus: Das WLAN-Kit
erstellt ein eigenes Netzwerk.
5. Geben Sie die Zugangsdaten (neue SSID und neues Kennwort) ein,
die für die Verbindung mit dem ASC verwendet werden sollen, und
merken Sie sich SSID und Kennwort.
6. Klicken Sie auf die Schaltfläche Bestätigen.
✔ Das ASC wird neu gestartet.
✔ Die vorherige WLAN-Netzwerkverbindung wird deaktiviert und das
neue WLAN-Netzwerk wird erstellt.
✔ Sie können nun Ihr Gerät mit dem ASC verbinden (siehe Kapitel „Ver-
binden mit dem ASC“ auf Seite 19).
WaecoWiFiKit_OPM_4445103184_EMEA36_202x-xx-xx.book Seite 18 Freitag, 30. April 2021 1:50 13

DE
19
ASC G Wi-Fi kit Bedienung
6 Bedienung
Wenn das ASC G WLAN-Kit an den USB-Anschluss des ASC ange-
schlossen ist, wird auf dem Display des ASC ein WLAN-Symbol ange-
zeigt.
6.1 Verbinden mit dem ASC
Wenn Sie bereits einmal eine Verbindung mit dem ASC G WLAN-Kit auf
Ihrem Gerät eingerichtet haben, werden die Zugangsdaten normaler-
weise in Ihrem Gerät gespeichert. Andernfalls:
1. Gehen Sie im Grundmenü des ASC zu Andere Auswahlen >
WL-AN -Kit > Info anzeigen.
✔ Das ASC zeigt den Modus, die Zugangsdaten und die IP-Adresse der
Benutzeroberfläche an.
2. Wenn Sie sich zum ersten Mal im Client-Modus mit dem ASC ver-
bunden haben, überprüfen Sie die angezeigte IP-Adresse.
3. Wenn Zugang modus angezeigt wird, gehen Sie gemäß Kapitel
„Verbinden mit dem ASC im Zugangspunkt-Modus“ auf Seite 19 vor.
Wenn Client -Modus angezeigt wird, gehen Sie gemäß Kapitel „Ver-
binden mit dem ASC im Client-Modus“ auf Seite 19 vor.
6.1.1 Verbinden mit dem ASC im Zugangspunkt-Modus
1. Wenn Sie ein Gerät mit einer aktiven SIM-Karte verwenden (z. B. ein
Mobiltelefon), aktivieren Sie den „Flugzeugmodus“ auf Ihrem Gerät.
2. Stellen Sie sicher, dass WLAN auf Ihrem Gerät aktiviert ist.
3. Verbinden Sie Ihr Gerät mit dem WLAN-Netzwerk des ASC.
4. Wenn Ihr Gerät mit dem ASC verbunden ist:
Öffnen Sie einen Browser und geben Sie die auf dem ASC-Display
angezeigte IP in das URL-Feld des Browsers ein:
✔ Die Benutzeroberfläche wird im Browser angezeigt.
5. Wenn Sie sich zum ersten Mal mit dem ASC verbunden haben, set-
zen Sie ein Lesezeichen, um sich die IP-Adresse der Benutzerober-
fläche zu merken.
6.1.2 Verbinden mit dem ASC im Client-Modus
1. Stellen Sie sicher, dass der„Flugzeugmodus“ auf Ihrem Gerät deakti-
viert ist.
2. Stellen Sie sicher, dass WLAN auf Ihrem Gerät aktiviert ist.
3. Verbinden Sie Ihr Gerät mit demselben WLAN-Netzwerk wie das
ASC.
WaecoWiFiKit_OPM_4445103184_EMEA36_202x-xx-xx.book Seite 19 Freitag, 30. April 2021 1:50 13

DE
Bedienung ASC G Wi-Fi kit
20
4. Wenn Ihr Gerät mit dem ASC verbunden ist:
Öffnen Sie einen Browser und geben Sie die auf dem ASC-Display
angezeigte IP in das URL-Feld des Browsers ein:
✔ Die Benutzeroberfläche wird im Browser angezeigt.
5. Wenn Sie sich zum ersten Mal mit dem ASC verbunden haben, set-
zen Sie ein Lesezeichen, um sich die IP-Adresse der Benutzerober-
fläche zu merken.
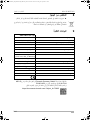
6.2 Überblick zur Benutzeroberfläche
Sie können auf die Funktionen zugreifen, indem Sie die entsprechende
Taste in der Menüleiste drücken.
Auf einem PC befindet sich die Menüleiste in der oberen rechten Ecke.
Auf einem Tablet und einem Mobiltelefon befindet sich die Menüleiste am
unteren Rand.
Sym-
bol
Befehl Funktion
Sensoren Zeigt die aktuellen Betriebswerte des ASC an.
Aufgabe senden Erstellt eine Aufgabe und sendet sie an das ASC
(Kapitel „Erstellen einer Aufgabe und deren Verar-
beitung im ASC“ auf Seite 21).
Aufgabenverlauf Zeigt alle abgeschlossenen Aufgaben an.
Wartungszähler Zeigt die aktuellen Zählerstände des ASC und die
Gesamtzählerstände seit Herstellung des Geräts
an.
Einheiteninfo Zeigt die Daten der ASC an.
Zugang zur WLAN-Einrichtung.
WaecoWiFiKit_OPM_4445103184_EMEA36_202x-xx-xx.book Seite 20 Freitag, 30. April 2021 1:50 13
Pagina se încarcă...
Pagina se încarcă...
Pagina se încarcă...
Pagina se încarcă...
Pagina se încarcă...
Pagina se încarcă...
Pagina se încarcă...
Pagina se încarcă...
Pagina se încarcă...
Pagina se încarcă...
Pagina se încarcă...
Pagina se încarcă...
Pagina se încarcă...
Pagina se încarcă...
Pagina se încarcă...
Pagina se încarcă...
Pagina se încarcă...
Pagina se încarcă...
Pagina se încarcă...
Pagina se încarcă...
Pagina se încarcă...
Pagina se încarcă...
Pagina se încarcă...
Pagina se încarcă...
Pagina se încarcă...
Pagina se încarcă...
Pagina se încarcă...
Pagina se încarcă...
Pagina se încarcă...
Pagina se încarcă...
Pagina se încarcă...
Pagina se încarcă...
Pagina se încarcă...
Pagina se încarcă...
Pagina se încarcă...
Pagina se încarcă...
Pagina se încarcă...
Pagina se încarcă...
Pagina se încarcă...
Pagina se încarcă...
Pagina se încarcă...
Pagina se încarcă...
Pagina se încarcă...
Pagina se încarcă...
Pagina se încarcă...
Pagina se încarcă...
Pagina se încarcă...
Pagina se încarcă...
Pagina se încarcă...
Pagina se încarcă...
Pagina se încarcă...
Pagina se încarcă...
Pagina se încarcă...
Pagina se încarcă...
Pagina se încarcă...
Pagina se încarcă...
Pagina se încarcă...
Pagina se încarcă...
Pagina se încarcă...
Pagina se încarcă...
Pagina se încarcă...
Pagina se încarcă...
Pagina se încarcă...
Pagina se încarcă...
Pagina se încarcă...
Pagina se încarcă...
Pagina se încarcă...
Pagina se încarcă...
Pagina se încarcă...
Pagina se încarcă...
Pagina se încarcă...
Pagina se încarcă...
Pagina se încarcă...
Pagina se încarcă...
Pagina se încarcă...
Pagina se încarcă...
Pagina se încarcă...
Pagina se încarcă...
Pagina se încarcă...
Pagina se încarcă...
Pagina se încarcă...
Pagina se încarcă...
Pagina se încarcă...
Pagina se încarcă...
Pagina se încarcă...
Pagina se încarcă...
Pagina se încarcă...
Pagina se încarcă...
Pagina se încarcă...
Pagina se încarcă...
Pagina se încarcă...
Pagina se încarcă...
Pagina se încarcă...
Pagina se încarcă...
Pagina se încarcă...
Pagina se încarcă...
Pagina se încarcă...
Pagina se încarcă...
Pagina se încarcă...
Pagina se încarcă...
Pagina se încarcă...
Pagina se încarcă...
Pagina se încarcă...
Pagina se încarcă...
Pagina se încarcă...
Pagina se încarcă...
Pagina se încarcă...
Pagina se încarcă...
Pagina se încarcă...
Pagina se încarcă...
Pagina se încarcă...
Pagina se încarcă...
Pagina se încarcă...
Pagina se încarcă...
Pagina se încarcă...
Pagina se încarcă...
Pagina se încarcă...
Pagina se încarcă...
Pagina se încarcă...
Pagina se încarcă...
Pagina se încarcă...
Pagina se încarcă...
Pagina se încarcă...
Pagina se încarcă...
Pagina se încarcă...
Pagina se încarcă...
Pagina se încarcă...
Pagina se încarcă...
Pagina se încarcă...
Pagina se încarcă...
Pagina se încarcă...
Pagina se încarcă...
Pagina se încarcă...
Pagina se încarcă...
Pagina se încarcă...
Pagina se încarcă...
Pagina se încarcă...
Pagina se încarcă...
Pagina se încarcă...
Pagina se încarcă...
Pagina se încarcă...
Pagina se încarcă...
Pagina se încarcă...
Pagina se încarcă...
Pagina se încarcă...
Pagina se încarcă...
Pagina se încarcă...
Pagina se încarcă...
Pagina se încarcă...
Pagina se încarcă...
Pagina se încarcă...
Pagina se încarcă...
Pagina se încarcă...
Pagina se încarcă...
Pagina se încarcă...
Pagina se încarcă...
Pagina se încarcă...
Pagina se încarcă...
Pagina se încarcă...
Pagina se încarcă...
Pagina se încarcă...
Pagina se încarcă...
Pagina se încarcă...
Pagina se încarcă...
Pagina se încarcă...
Pagina se încarcă...
Pagina se încarcă...
Pagina se încarcă...
Pagina se încarcă...
Pagina se încarcă...
Pagina se încarcă...
Pagina se încarcă...
Pagina se încarcă...
Pagina se încarcă...
Pagina se încarcă...
Pagina se încarcă...
Pagina se încarcă...
Pagina se încarcă...
Pagina se încarcă...
Pagina se încarcă...
Pagina se încarcă...
Pagina se încarcă...
Pagina se încarcă...
Pagina se încarcă...
Pagina se încarcă...
Pagina se încarcă...
Pagina se încarcă...
Pagina se încarcă...
Pagina se încarcă...
Pagina se încarcă...
Pagina se încarcă...
Pagina se încarcă...
Pagina se încarcă...
Pagina se încarcă...
Pagina se încarcă...
Pagina se încarcă...
Pagina se încarcă...
Pagina se încarcă...
Pagina se încarcă...
Pagina se încarcă...
Pagina se încarcă...
Pagina se încarcă...
Pagina se încarcă...
Pagina se încarcă...
Pagina se încarcă...
Pagina se încarcă...
Pagina se încarcă...
Pagina se încarcă...
Pagina se încarcă...
Pagina se încarcă...
Pagina se încarcă...
Pagina se încarcă...
Pagina se încarcă...
Pagina se încarcă...
Pagina se încarcă...
Pagina se încarcă...
Pagina se încarcă...
Pagina se încarcă...
Pagina se încarcă...
Pagina se încarcă...
Pagina se încarcă...
Pagina se încarcă...
Pagina se încarcă...
Pagina se încarcă...
Pagina se încarcă...
Pagina se încarcă...
Pagina se încarcă...
Pagina se încarcă...
Pagina se încarcă...
Pagina se încarcă...
Pagina se încarcă...
Pagina se încarcă...
Pagina se încarcă...
Pagina se încarcă...
Pagina se încarcă...
Pagina se încarcă...
Pagina se încarcă...
Pagina se încarcă...
Pagina se încarcă...
Pagina se încarcă...
Pagina se încarcă...
Pagina se încarcă...
Pagina se încarcă...
Pagina se încarcă...
Pagina se încarcă...
Pagina se încarcă...
Pagina se încarcă...
Pagina se încarcă...
Pagina se încarcă...
Pagina se încarcă...
Pagina se încarcă...
Pagina se încarcă...
Pagina se încarcă...
Pagina se încarcă...
Pagina se încarcă...
Pagina se încarcă...
Pagina se încarcă...
Pagina se încarcă...
Pagina se încarcă...
Pagina se încarcă...
Pagina se încarcă...
Pagina se încarcă...
Pagina se încarcă...
Pagina se încarcă...
Pagina se încarcă...
Pagina se încarcă...
Pagina se încarcă...
Pagina se încarcă...
Pagina se încarcă...
Pagina se încarcă...
Pagina se încarcă...
Pagina se încarcă...
Pagina se încarcă...
Pagina se încarcă...
Pagina se încarcă...
Pagina se încarcă...
Pagina se încarcă...
Pagina se încarcă...
Pagina se încarcă...
Pagina se încarcă...
Pagina se încarcă...
Pagina se încarcă...
Pagina se încarcă...
Pagina se încarcă...
Pagina se încarcă...
Pagina se încarcă...
Pagina se încarcă...
Pagina se încarcă...
Pagina se încarcă...
Pagina se încarcă...
Pagina se încarcă...
Pagina se încarcă...
Pagina se încarcă...
Pagina se încarcă...
Pagina se încarcă...
Pagina se încarcă...
Pagina se încarcă...
Pagina se încarcă...
Pagina se încarcă...
Pagina se încarcă...
Pagina se încarcă...
Pagina se încarcă...
Pagina se încarcă...
Pagina se încarcă...
Pagina se încarcă...
Pagina se încarcă...
Pagina se încarcă...
Pagina se încarcă...
Pagina se încarcă...
Pagina se încarcă...
Pagina se încarcă...
Pagina se încarcă...
Pagina se încarcă...
Pagina se încarcă...
Pagina se încarcă...
Pagina se încarcă...
Pagina se încarcă...
Pagina se încarcă...
Pagina se încarcă...
Pagina se încarcă...
Pagina se încarcă...
Pagina se încarcă...
Pagina se încarcă...
Pagina se încarcă...
Pagina se încarcă...
Pagina se încarcă...
Pagina se încarcă...
Pagina se încarcă...
Pagina se încarcă...
Pagina se încarcă...
Pagina se încarcă...
Pagina se încarcă...
Pagina se încarcă...
Pagina se încarcă...
Pagina se încarcă...
Pagina se încarcă...
Pagina se încarcă...
Pagina se încarcă...
Pagina se încarcă...
Pagina se încarcă...
Pagina se încarcă...
Pagina se încarcă...
Pagina se încarcă...
Pagina se încarcă...
Pagina se încarcă...
Pagina se încarcă...
Pagina se încarcă...
Pagina se încarcă...
Pagina se încarcă...
Pagina se încarcă...
Pagina se încarcă...
Pagina se încarcă...
Pagina se încarcă...
Pagina se încarcă...
Pagina se încarcă...
Pagina se încarcă...
Pagina se încarcă...
Pagina se încarcă...
Pagina se încarcă...
Pagina se încarcă...
Pagina se încarcă...
Pagina se încarcă...
Pagina se încarcă...
Pagina se încarcă...
Pagina se încarcă...
Pagina se încarcă...
Pagina se încarcă...
Pagina se încarcă...
Pagina se încarcă...
Pagina se încarcă...
Pagina se încarcă...
Pagina se încarcă...
Pagina se încarcă...
Pagina se încarcă...
Pagina se încarcă...
Pagina se încarcă...
Pagina se încarcă...
Pagina se încarcă...
Pagina se încarcă...
Pagina se încarcă...
-
 1
1
-
 2
2
-
 3
3
-
 4
4
-
 5
5
-
 6
6
-
 7
7
-
 8
8
-
 9
9
-
 10
10
-
 11
11
-
 12
12
-
 13
13
-
 14
14
-
 15
15
-
 16
16
-
 17
17
-
 18
18
-
 19
19
-
 20
20
-
 21
21
-
 22
22
-
 23
23
-
 24
24
-
 25
25
-
 26
26
-
 27
27
-
 28
28
-
 29
29
-
 30
30
-
 31
31
-
 32
32
-
 33
33
-
 34
34
-
 35
35
-
 36
36
-
 37
37
-
 38
38
-
 39
39
-
 40
40
-
 41
41
-
 42
42
-
 43
43
-
 44
44
-
 45
45
-
 46
46
-
 47
47
-
 48
48
-
 49
49
-
 50
50
-
 51
51
-
 52
52
-
 53
53
-
 54
54
-
 55
55
-
 56
56
-
 57
57
-
 58
58
-
 59
59
-
 60
60
-
 61
61
-
 62
62
-
 63
63
-
 64
64
-
 65
65
-
 66
66
-
 67
67
-
 68
68
-
 69
69
-
 70
70
-
 71
71
-
 72
72
-
 73
73
-
 74
74
-
 75
75
-
 76
76
-
 77
77
-
 78
78
-
 79
79
-
 80
80
-
 81
81
-
 82
82
-
 83
83
-
 84
84
-
 85
85
-
 86
86
-
 87
87
-
 88
88
-
 89
89
-
 90
90
-
 91
91
-
 92
92
-
 93
93
-
 94
94
-
 95
95
-
 96
96
-
 97
97
-
 98
98
-
 99
99
-
 100
100
-
 101
101
-
 102
102
-
 103
103
-
 104
104
-
 105
105
-
 106
106
-
 107
107
-
 108
108
-
 109
109
-
 110
110
-
 111
111
-
 112
112
-
 113
113
-
 114
114
-
 115
115
-
 116
116
-
 117
117
-
 118
118
-
 119
119
-
 120
120
-
 121
121
-
 122
122
-
 123
123
-
 124
124
-
 125
125
-
 126
126
-
 127
127
-
 128
128
-
 129
129
-
 130
130
-
 131
131
-
 132
132
-
 133
133
-
 134
134
-
 135
135
-
 136
136
-
 137
137
-
 138
138
-
 139
139
-
 140
140
-
 141
141
-
 142
142
-
 143
143
-
 144
144
-
 145
145
-
 146
146
-
 147
147
-
 148
148
-
 149
149
-
 150
150
-
 151
151
-
 152
152
-
 153
153
-
 154
154
-
 155
155
-
 156
156
-
 157
157
-
 158
158
-
 159
159
-
 160
160
-
 161
161
-
 162
162
-
 163
163
-
 164
164
-
 165
165
-
 166
166
-
 167
167
-
 168
168
-
 169
169
-
 170
170
-
 171
171
-
 172
172
-
 173
173
-
 174
174
-
 175
175
-
 176
176
-
 177
177
-
 178
178
-
 179
179
-
 180
180
-
 181
181
-
 182
182
-
 183
183
-
 184
184
-
 185
185
-
 186
186
-
 187
187
-
 188
188
-
 189
189
-
 190
190
-
 191
191
-
 192
192
-
 193
193
-
 194
194
-
 195
195
-
 196
196
-
 197
197
-
 198
198
-
 199
199
-
 200
200
-
 201
201
-
 202
202
-
 203
203
-
 204
204
-
 205
205
-
 206
206
-
 207
207
-
 208
208
-
 209
209
-
 210
210
-
 211
211
-
 212
212
-
 213
213
-
 214
214
-
 215
215
-
 216
216
-
 217
217
-
 218
218
-
 219
219
-
 220
220
-
 221
221
-
 222
222
-
 223
223
-
 224
224
-
 225
225
-
 226
226
-
 227
227
-
 228
228
-
 229
229
-
 230
230
-
 231
231
-
 232
232
-
 233
233
-
 234
234
-
 235
235
-
 236
236
-
 237
237
-
 238
238
-
 239
239
-
 240
240
-
 241
241
-
 242
242
-
 243
243
-
 244
244
-
 245
245
-
 246
246
-
 247
247
-
 248
248
-
 249
249
-
 250
250
-
 251
251
-
 252
252
-
 253
253
-
 254
254
-
 255
255
-
 256
256
-
 257
257
-
 258
258
-
 259
259
-
 260
260
-
 261
261
-
 262
262
-
 263
263
-
 264
264
-
 265
265
-
 266
266
-
 267
267
-
 268
268
-
 269
269
-
 270
270
-
 271
271
-
 272
272
-
 273
273
-
 274
274
-
 275
275
-
 276
276
-
 277
277
-
 278
278
-
 279
279
-
 280
280
-
 281
281
-
 282
282
-
 283
283
-
 284
284
-
 285
285
-
 286
286
-
 287
287
-
 288
288
-
 289
289
-
 290
290
-
 291
291
-
 292
292
-
 293
293
-
 294
294
-
 295
295
-
 296
296
-
 297
297
-
 298
298
-
 299
299
-
 300
300
-
 301
301
-
 302
302
-
 303
303
-
 304
304
-
 305
305
-
 306
306
-
 307
307
-
 308
308
-
 309
309
-
 310
310
-
 311
311
-
 312
312
-
 313
313
-
 314
314
-
 315
315
-
 316
316
-
 317
317
-
 318
318
-
 319
319
-
 320
320
-
 321
321
-
 322
322
-
 323
323
-
 324
324
-
 325
325
-
 326
326
-
 327
327
-
 328
328
-
 329
329
-
 330
330
-
 331
331
-
 332
332
-
 333
333
-
 334
334
-
 335
335
-
 336
336
-
 337
337
-
 338
338
-
 339
339
-
 340
340
-
 341
341
-
 342
342
-
 343
343
-
 344
344
-
 345
345
-
 346
346
-
 347
347
-
 348
348
-
 349
349
-
 350
350
-
 351
351
-
 352
352
-
 353
353
-
 354
354
-
 355
355
-
 356
356
-
 357
357
-
 358
358
-
 359
359
-
 360
360
-
 361
361
-
 362
362
-
 363
363
-
 364
364
-
 365
365
-
 366
366
-
 367
367
-
 368
368
-
 369
369
-
 370
370
-
 371
371
-
 372
372
-
 373
373
-
 374
374
-
 375
375
-
 376
376
-
 377
377
-
 378
378
-
 379
379
-
 380
380
-
 381
381
-
 382
382
-
 383
383
-
 384
384
-
 385
385
-
 386
386
-
 387
387
-
 388
388
-
 389
389
-
 390
390
-
 391
391
-
 392
392
-
 393
393
-
 394
394
-
 395
395
-
 396
396
-
 397
397
-
 398
398
-
 399
399
-
 400
400


Dometic Waeco ASC G Wi-Fi kit Instrucțiuni de utilizare
- Tip
- Instrucțiuni de utilizare
- Acest manual este potrivit și pentru
Lucrări înrudite
-
Dometic Waeco ASC 5500 G RPA 2020 Instrucțiuni de utilizare
-
Dometic Waeco ASC 5300 G Instrucțiuni de utilizare
-
Dometic ASC 5100 G Instrucțiuni de utilizare
-
Dometic RM10.5(S)(T), RMS10.5(X)(S)(T) Ghid de instalare
-
-
-
-
Alte documente
-
Waeco ASC G Wi-Fi kit Instrucțiuni de utilizare
-
Samsung HT-D7500W Manual de utilizare
-
Samsung HT-D6750WK Manual de utilizare
-
-
-
-
Teltonika RUT850 Manualul utilizatorului
-
Teltonika RUTX11 Manualul utilizatorului
-
RAVAK Waterfall - Chrome bathtub pilar tap Ghid de instalare