
HR2870

2

3
1

4

HR2870
ENGLISH 6
17
29
40
51
62
73
86
97
108
120
131
144
155
166
177

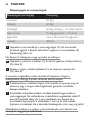
6
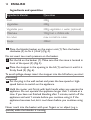
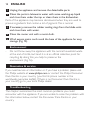
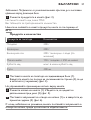
Introduction
Congratulations on your purchase and welcome to Philips! To fully benet
from the support that Philips offers, register your product at www.philips.
com/welcome.
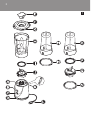
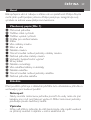
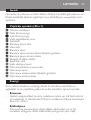
General description (Fig. 1)
A Motor unit
B Low-speed button
C High-speed button
D Cord storage groove
E Stopper
F Blender beaker lid
G Sieve in lid
H Blender beaker
I Sealing ring of blender beaker blade unit
J Blender beaker blade unit
K Built-in safety lock
L Mains cord
M Smoothie beaker
N Chopper/smoothie beaker lid
O Chopper beaker
P Sealing ring of chopper blade unit
Q Chopper blade unit
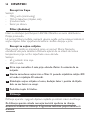
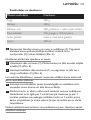
Important
Read this user manual carefully before you use the appliance and save it
for future reference.
Danger
Never immerse the motor unit in water or any other liquid, nor rinse
it under the tap. Only use a moist cloth to clean the motor unit.
Warning
Check if the voltage indicated on the appliance corresponds to the
local mains voltage before you connect the appliance.
-
-
ENGLISH

Do not use the appliance if the plug, the mains cord or other parts
are damaged.
If the mains cord is damaged, you must have it replaced by Philips, a
service centre authorised by Philips or similarly qualied persons in
order to avoid a hazard.
Do not touch the blades, especially when the appliance is plugged in.
The blades are very sharp.
Make sure the blade unit is securely fastened to the blender beaker
before you assemble the blender beaker onto the motor unit.
Never reach into the blender beaker with your ngers or an object
while the appliance is running.
This appliance is not intended for use by persons (including children)
with reduced physical, sensory or mental capabilities, or lack of
experience and knowledge, unless they have been given supervision
or instruction concerning use of the appliance by a person
responsible for their safety.
Children should be supervised to ensure that they do not play with
the appliance.
Never let the appliance run unattended.
If the blades get stuck, unplug the appliance before you remove the
ingredients that block the blades.
Never use the blender beaker, chopper beaker or mill beaker to
switch the appliance on and off.
To avoid a hazardous situation due to inadvertent resetting of the
thermal cut-out, never connect this appliance to a timer switch.
Caution
Always unplug the appliance before you assemble, disassemble or
make adjustments to any of the parts.
Never use any accessories or parts from other manufacturers or that
Philips does not specically recommend. If you use such accessories
or parts, your guarantee becomes invalid.
Do not exceed the maximum level indicated on the blender beaker,
smoothie beaker and chopper beaker.
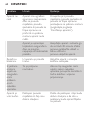
Do not exceed the maximum quantities and processing times
indicated in the table.
-
-
-
-
-
-
-
-
-
-
-
-
-
-
-
ENGLISH 7

If food sticks to the wall of the blender beaker, switch off the
appliance and unplug it. Then use a spatula to remove the food from
the wall.
Always make sure the lid is properly assembled on the blender
beaker before you switch on the appliance.
Never ll the blender beaker with ingredients hotter than 80ºC/
175°C.
Unplug the appliance immediately after use.
Always unplug the appliance before you clean it.
Avoid touching the cutting edges of the blade units when you clean
them. They are very sharp and you could easily cut your ngers on
them.
This appliance is intended for household use only.
Noise level: Lc = 86 dB(A).
This Philips appliance complies with all standards regarding
electromagnetic elds (EMF). If handled properly and according to the
instructions in this user manual, the appliance is safe to use based on
scientic evidence available today.
Safety features
Built-in safety lock
This feature ensures that you can only switch on the appliance if you have
properly assembled the blender beaker, chopper beaker or smoothie
beaker on the motor unit. If the blender beaker, chopper beaker or
smoothie beaker is correctly assembled, the built-in safety lock will be
unlocked.
The appliance is equipped with a thermal cut-out that automatically cuts
off the power supply to the appliance if it overheats.
If the appliance suddenly stops running:
1 Unplug the appliance.
2 Let the appliance cool down for 30 minutes.
-
-
-
-
-
-
-
-
ENGLISH8

3 Put the plug in the wall socket.
4 Switch on the appliance again.
Note: Contact your Philips dealer or an authorised Philips service centre if the
thermal cut-out is activated too often.
1
Clean all detachable parts (see chapter ‘Cleaning’).
Blender
The blender is intended for:
Blending uids, e.g. dairy products, sauces, fruit juices, soups, mixed
drinks, shakes.
Mixing soft ingredients, e.g. pancake batter.
Pureeing cooked ingredients, e.g. cooked beans or ingredients for
baby food.
Do not touch the sharp blades. If the blades get stuck, unplug the
appliance and remove the ingredients that block the blades with a
spatula.
1 Insert the blender blade unit into the bottom of the blender beaker
(1). Turn the blade unit clockwise (2) to x it (Fig. 2).
Note: Make sure the sealing ring is placed properly on the blade unit.
2 Put the ingredients in the beaker (Fig. 3).
Do not ll the beaker beyond the MAX indication.
See the table for the recommended quantities.
Never ll the beaker with ingredients that are hotter than 80°C.
-
-
-
ENGLISH 9

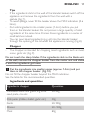
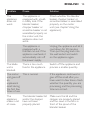
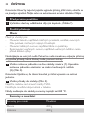
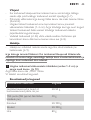
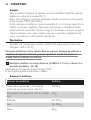
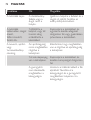
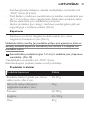
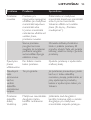
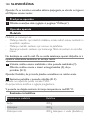
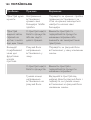
Ingredients and quantities
Ingredients blender Quantities
Fruit 200g
Vegetables 200g
Vegetable juice 200g vegetables + water (optional)
Milkshake 150g fruit + 250ml milk
Ice cubes max. 6 small ice cubes
Soups 400ml
3 Place the blender beaker on the motor unit (1). Turn the beaker
clockwise (2) to x it (‘click’) (Fig. 4).
Do not exert too much pressure on the beaker.
4 Put the lid on the beaker (1). Make sure that the sieve is located in
front of the spout (2) (Fig. 5).
5 Place the stopper in the opening in the lid (1) and turn it until it is
rmly xed (2) (Fig. 6).
To avoid spillage, always insert the stopper into the lid before you start
processing.
6 Put the plug in the wall socket and press the low-speed or high-
speed button to switch on the appliance.
7 Hold the motor unit rmly with both hands when you operate the
appliance. Do not operate the appliance longer than 1 minute at a
time. If you have not nished blending after 1 minute, switch off the
appliance and wait 1 minute before you continue using it. If the
appliance becomes hot, let it cool down before you continue using
it.
Never reach into the beaker with your ngers or an object (e.g. a
spatula) while the blender is running.
ENGLISH10

If the ingredients stick to the wall of the blender beaker, switch off the
appliance and remove the ingredients from the wall with a
spatula (Fig. 7).
To avoid spillage, never ll the beaker above the MAX indication (0.6
litres).
Cut solid ingredients into smaller pieces (1-2cm) before you put
them in the blender beaker. Do not process a large quantity of solid
ingredients at the same time. Process these ingredients in a series of
small batches instead.
You can pour liquid ingredients (e.g. oil) into the blender beaker
through the opening in the lid while the appliance is running (Fig. 8).
The chopper is intended for chopping moist ingredients such as meat,
onion, garlic etc (Fig. 9).
Do not touch the sharp blades. If the ingredients stick to the blade unit
or the wall, remove the chopper beaker from the motor unit and shake
it until the ingredients get loose.
1 Cut the ingredients into smaller pieces (approx. 1-2cm) and put
them in the chopper beaker. (Fig. 10)
Do not ll the chopper beaker beyond the MAX indication.
See the table for the recommended quantities.
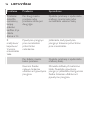
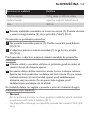
Ingredients and quantities
Ingredients chopper Quantities
Presoaked seeds and grains, e.g. lotus
seed, paste, rice etc.
20-50g
Chili paste (chillies, shallot, garlic etc.) 50g
Garlic 20-100g
Onions 20 -100g
Meat 80g
-
-
-
-
-
ENGLISH 11

2 Place the chopper blade unit (which has four blades) on the
chopper beaker (1).Turn the chopper blade unit anticlockwise (2)
to x it (Fig. 11).
Note: Make sure the sealing ring is placed properly on the blade unit.
3 Turn the assembled chopper upside down and place it on the
motor unit (1). Turn the chopper clockwise (2) to x it
(‘click’) (Fig. 12).
4 Put the plug in the wall socket and press the low-speed or high-
speed button to switch on the appliance (Fig. 13).
Hold the motor unit rmly with both hands when you operate the
appliance.
Never use the chopper for more than 30 seconds without interruption.
If the appliance shakes because the food is not evenly distributed,
switch off the appliance and remove the blade unit. Distribute the
ingredients evenly in the beaker and reattach the blade unit. Then
switch on the appliance again.
You can use the chopper beaker as a storage container. Simply turn it
upside down and put a plastic lid on it (Fig. 14).
You can use the smoothie beaker to prepare any smoothie you like.
1 Put the ingredients in the smoothie beaker.
2 Follow steps 2 and 3 of section ‘Chopper’. Use the chopper blade
unit.
3 Press the low-speed or high-speed button until you have obtained a
smooth substance.
4 You can use the lid to take your smoothie wherever you
like (Fig. 14).
-
-
ENGLISH12

Ingredients:
100g fruit (frozen)
150ml uid (milk, juice)
2 ice cubes
Sugar to taste
Filter (optional)
Filters are available under type number HR2938. Contact your Philips
dealer.
With the lter you can make delicious fresh fruit juices, cocktails or soy
milk. The lter prevents pips and skins from ending up in your drink.
Soy milk recipe
This recipe can only be prepared with the lter. Do not process more
than one batch in a row. Let the appliance cool down to room
temperature before you continue processing.
Ingredients:
65g dried soy beans
400ml water
1 Soak the soy beans for 4 hours before you process them. Set them
aside to drain.
2 Put the soaked soy beans in the lter. Pour 400ml water into the
blender beaker and blend for 30 seconds.
3 Bring the soy milk to the boil, then add sugar to taste and leave to
simmer until all the sugar has melted.
4 Serve hot or cold.
Cleaning
Cleaning the appliance and its parts is easiest immediately after use.
Never use scouring pads, abrasive cleaning agents or aggressive liquids
such as petrol or acetone to clean the appliance.
Never immerse the motor unit in water or clean it in the dishwasher.
-
-
-
-
-
-
ENGLISH 13

1 Unplug the appliance and remove the detachable parts.
2 Clean the parts in lukewarm water with some washing-up liquid
and rinse them under the tap or clean them in the dishwasher.
Parts of the appliance may become discoloured when they are used to
process ingredients that contain a lot of pigment. This is normal.
3 If necessary, remove the rubber sealing rings from the blade units
and rinse them with water.
4 Clean the motor unit with a moist cloth.
5 Wind excess mains cord round the base of the appliance for easy
storage (Fig. 15).
Environment
Do not throw away the appliance with the normal household waste
at the end of its life, but hand it in at an ofcial collection point for
recycling. By doing this, you help to preserve the
environment (Fig. 16).
Guarantee & service
If you need service or information or if you have a problem, please visit
the Philips website at www.philips.com or contact the Philips Consumer
Care Centre in your country (you nd its phone number in the
worldwide guarantee leaet). If there is no Consumer Care Centre in
your country, go to your local Philips dealer.
This chapter summarises the most common problems you could
encounter with the appliance. If you are unable to solve the problem with
the information below, contact the Consumer Care Centre in your
country.
-
ENGLISH14

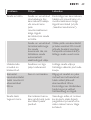
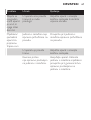
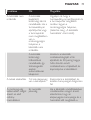
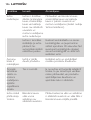
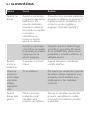
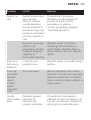
Problem Cause Solution
The
appliance
does not
work
The appliance is
equipped with a built-
in safety lock. If the
blender beaker,
chopper beaker or
smoothie beaker is not
assembled properly on
the motor unit, the
appliance does not
work.
Check whether the blender
beaker, chopper beaker or
smoothie beaker is assembled
properly on the motor
unit (see chapter ‘Using the
appliance’).
The appliance is
equipped with a
thermal cut-out. If the
appliance overheats, it
automatically cuts off
the power supply.
Unplug the appliance and let it
cool down for 30 minutes.
Then put the plug back into
the wall socket and switch
on the appliance again.
The blade
unit is
blocked.
There is too much
food in the appliance.
Switch off the appliance and
process a smaller quantity.
The motor
unit gives off
an
unpleasant
smell during
the rst few
times of use.
This is normal. If the appliance continues to
give off this smell after you
have used it a few times, check
whether the quantity you are
processing and the processing
time are correct.
The
appliance
makes a lot
of noise.
The blender beaker lid
and/or the stopper
have not been
properly placed.
Make sure the lid and the
stopper are properly placed
and the sieve in the lid is in
front of the spout of the
blender beaker.
ENGLISH 15

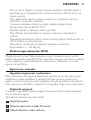
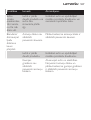
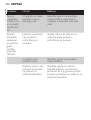
Problem Cause Solution
The
appliance
smells, feels
hot to the
touch, emits
smoke, etc.
There is too much
food in the appliance
or the appliance has
been operating too
long.
Switch off the appliance and
process a smaller quantity or
reduce the operating time.
The
blender/
chopper/
smoothie
beaker leaks.
The blade unit is not
properly attached to
the beaker.
Make sure the blade unit is
properly attached to the
beaker.
There is too much
food in the appliance.
Switch off the appliance and
process a smaller quantity.
The rubber ring is
not placed properly on
the blade unit.
Unplug the appliance. Remove
the blade unit and make sure
the rubber ring is placed
properly on the blade unit.
ENGLISH16

17
Поздравления за вашата покупка и добре дошли във Philips! За да се
възползвате изцяло от предлаганата от Philips поддръжка,
регистрирайте продукта си на www.philips.com/welcome.
A Задвижващ блок
B Бутон за ниска скорост
C Бутон за висока скорост
D Канал за прибиране на кабела
E Запушалка
F Капак на каната на пасатора
G Цедка в капака
H Кана на пасатора
I Уплътнителен пръстен на режещия блок на каната на пасатора
J Режещ блок на каната на пасатора
K Вградена защитна блокировка
L Захранващ кабел
M Кана за шейк
N Капак на каната на кълцащата приставка/каната за шейк
O Кана на кълцащата приставка
P Уплътнителен пръстен на режещия блок на кълцащата приставка
Q Режещ блок на кълцащата приставка
Преди да използвате уреда, прочетете внимателно това
ръководство за експлоатация и го запазете за справка в бъдеще.
Не потапяйте задвижващия блок във вода или друга течност и не
го изплаквайте под крана на чешмата. Почиствайте задвижващия
блок само с влажна кърпа.
-

Преди да свържете уреда към мрежата, проверете дали
посоченото върху уреда напрежение отговаря на напрежението
на местната електрическа мрежа.
Не използвайте уреда, ако щепселът, захранващият кабел или
други части са повредени.
Ако захранващият кабел се повреди, той трябва винаги да се
подменя от Philips, упълномощен сервиз на Philips или подобни
квалифицирани лица, за да се избегне опасност.
Не се допирайте до ножовете, особено когато уредът е включен
в контакта. Ножовете са много остри!
Убедете се, че режещият блок е здраво затегнат към каната на
пасатора, преди да монтирате каната към задвижващия блок.
Никога на бъркайте в каната на пасатора с пръсти или някакъв
предмет по време на работа на уреда.
Този уред не е предназначен за ползване от хора (включително
деца) с намалени физически усещания или умствени недостатъци
или без опит и познания, ако са оставени без наблюдение и не са
инструктирани от страна на отговарящо за тяхната безопасност
лице относно начина на използване на уреда.
Наглеждайте децата, за да не си играят с уреда.
Никога не оставяйте уреда да работи без наблюдение.
Ако ножовете заседнат, изключете уреда от контакта, преди да
отстранявате продуктите, блокирали ножовете.
Никога не използвайте каната на пасатора, каната на кълцащата
приставка или каната на мелачката за включване и изключване на
уреда.
За да се избегне евентуална опасност вследствие на спонтанно
превключване на термичния прекъсвач, никога не свързвайте
този уред към таймерен ключ.
Винаги изключвайте уреда от контакта, преди да пристъпите към
сглобяване, разглобяване или наместване на някоя от частите.
Никога не използвайте аксесоари или части от други
производители или такива, които не са специално препоръчвани
-
-
-
-
-
-
-
-
-
-
-
-
-
-
18

от Philips. При използване на такива аксесоари или части вашата
гаранция става невалидна.
Не превишавайте максималното ниво, обозначено на каната на
пасатора, каната за шейк и каната на кълцащата приставка.
Не превишавайте максималните количества и времена за
обработване, посочени в таблицата.
Ако продуктите полепнат по стената на каната на пасатора,
изключете уреда и извадете щепсела от контакта. След това
отстранете с лопатка продуктите от стената.
Винаги проверявайте дали капакът е добре монтиран на каната
на пасатора, преди да включите уреда.
Никога не сипвайте в каната на пасатора продукти, които са по-
горещи от 80°C.
Веднага след употреба изваждайте щепсела от контакта.
Винаги изключвайте уреда от контакта, преди да пристъпите към
почистване.
Избягвайте да допирате режещите ръбове на ножовете, когато
ги почиствате. Те са много остри и лесно можете да порежете
пръстите си.
Този уред е предназначен само за битови цели.
Ниво на шума: Lc= 86 dB(A)
Този уред Philips е в съответствие с всички стандарти по отношение
на електромагнитните излъчвания (EMF). Ако се употребява
правилно и съобразно напътствията в Ръководството, уредът е
безопасен за използване според наличните досега научни факти.
Тази функция гарантира, че ще можете да включвате уреда само
когато каната на пасатора, каната на кълцащата приставка или каната
за шейк са монтирани правилно на задвижващия блок. Ако каната на
пасатора, каната на кълцащата приставка или каната за шейк са
монтирани правилно, вградената защитна блокировка ще се отключи.
-
-
-
-
-
-
-
-
-
-
19

Този уред е с термичен прекъсвач, който автоматично изключва
електрозахранването му в случай на прегряване.
Ако уредът внезапно спре да работи:
1 Изключете уреда от контакта.
2 Оставете уреда да се охлажда 30 минути.
3 Включете щепсела в контакта.
4 Отново включете уреда.
Забележка: Обърнете се към вашия дилър на Philips или упълномощен
сервизен център на Philips, ако термичният прекъсвач се задейства
прекалено често.
1
Почистете подвижните части (вж. раздел “Почистване”).
Пасаторът е предназначен за:
Разбъркване на течности, напр. млечни продукти, сосове, плодови
сокове, супи, коктейли, шейкове.
Разбъркване на меки продукти, напр. тесто за палачинки.
Приготвяне на пюре от сварени продукти, напр. варен боб или
продукти за бебешки храни.
Не се докосвайте до острите ножове. Ако ножовете заседнат,
изключете уреда от контакта, след което отстранете с лопатка
продуктите, които са блокирали ножовете.
1 Монтирайте режещия блок на дъното на каната на пасатора (1).
Завъртете режещия блок по посока на часовниковата стрелка
(2), за да го затегнете (фиг. 2).
-
-
-
20
Pagina se încarcă...
Pagina se încarcă...
Pagina se încarcă...
Pagina se încarcă...
Pagina se încarcă...
Pagina se încarcă...
Pagina se încarcă...
Pagina se încarcă...
Pagina se încarcă...
Pagina se încarcă...
Pagina se încarcă...
Pagina se încarcă...
Pagina se încarcă...
Pagina se încarcă...
Pagina se încarcă...
Pagina se încarcă...
Pagina se încarcă...
Pagina se încarcă...
Pagina se încarcă...
Pagina se încarcă...
Pagina se încarcă...
Pagina se încarcă...
Pagina se încarcă...
Pagina se încarcă...
Pagina se încarcă...
Pagina se încarcă...
Pagina se încarcă...
Pagina se încarcă...
Pagina se încarcă...
Pagina se încarcă...
Pagina se încarcă...
Pagina se încarcă...
Pagina se încarcă...
Pagina se încarcă...
Pagina se încarcă...
Pagina se încarcă...
Pagina se încarcă...
Pagina se încarcă...
Pagina se încarcă...
Pagina se încarcă...
Pagina se încarcă...
Pagina se încarcă...
Pagina se încarcă...
Pagina se încarcă...
Pagina se încarcă...
Pagina se încarcă...
Pagina se încarcă...
Pagina se încarcă...
Pagina se încarcă...
Pagina se încarcă...
Pagina se încarcă...
Pagina se încarcă...
Pagina se încarcă...
Pagina se încarcă...
Pagina se încarcă...
Pagina se încarcă...
Pagina se încarcă...
Pagina se încarcă...
Pagina se încarcă...
Pagina se încarcă...
Pagina se încarcă...
Pagina se încarcă...
Pagina se încarcă...
Pagina se încarcă...
Pagina se încarcă...
Pagina se încarcă...
Pagina se încarcă...
Pagina se încarcă...
Pagina se încarcă...
Pagina se încarcă...
Pagina se încarcă...
Pagina se încarcă...
Pagina se încarcă...
Pagina se încarcă...
Pagina se încarcă...
Pagina se încarcă...
Pagina se încarcă...
Pagina se încarcă...
Pagina se încarcă...
Pagina se încarcă...
Pagina se încarcă...
Pagina se încarcă...
Pagina se încarcă...
Pagina se încarcă...
Pagina se încarcă...
Pagina se încarcă...
Pagina se încarcă...
Pagina se încarcă...
Pagina se încarcă...
Pagina se încarcă...
Pagina se încarcă...
Pagina se încarcă...
Pagina se încarcă...
Pagina se încarcă...
Pagina se încarcă...
Pagina se încarcă...
Pagina se încarcă...
Pagina se încarcă...
Pagina se încarcă...
Pagina se încarcă...
Pagina se încarcă...
Pagina se încarcă...
Pagina se încarcă...
Pagina se încarcă...
Pagina se încarcă...
Pagina se încarcă...
Pagina se încarcă...
Pagina se încarcă...
Pagina se încarcă...
Pagina se încarcă...
Pagina se încarcă...
Pagina se încarcă...
Pagina se încarcă...
Pagina se încarcă...
Pagina se încarcă...
Pagina se încarcă...
Pagina se încarcă...
Pagina se încarcă...
Pagina se încarcă...
Pagina se încarcă...
Pagina se încarcă...
Pagina se încarcă...
Pagina se încarcă...
Pagina se încarcă...
Pagina se încarcă...
Pagina se încarcă...
Pagina se încarcă...
Pagina se încarcă...
Pagina se încarcă...
Pagina se încarcă...
Pagina se încarcă...
Pagina se încarcă...
Pagina se încarcă...
Pagina se încarcă...
Pagina se încarcă...
Pagina se încarcă...
Pagina se încarcă...
Pagina se încarcă...
Pagina se încarcă...
Pagina se încarcă...
Pagina se încarcă...
Pagina se încarcă...
Pagina se încarcă...
Pagina se încarcă...
Pagina se încarcă...
Pagina se încarcă...
Pagina se încarcă...
Pagina se încarcă...
Pagina se încarcă...
Pagina se încarcă...
Pagina se încarcă...
Pagina se încarcă...
Pagina se încarcă...
Pagina se încarcă...
Pagina se încarcă...
Pagina se încarcă...
Pagina se încarcă...
Pagina se încarcă...
Pagina se încarcă...
Pagina se încarcă...
Pagina se încarcă...
Pagina se încarcă...
Pagina se încarcă...
Pagina se încarcă...
Pagina se încarcă...
Pagina se încarcă...
Pagina se încarcă...
Pagina se încarcă...
Pagina se încarcă...
Pagina se încarcă...
Pagina se încarcă...
Pagina se încarcă...
-
 1
1
-
 2
2
-
 3
3
-
 4
4
-
 5
5
-
 6
6
-
 7
7
-
 8
8
-
 9
9
-
 10
10
-
 11
11
-
 12
12
-
 13
13
-
 14
14
-
 15
15
-
 16
16
-
 17
17
-
 18
18
-
 19
19
-
 20
20
-
 21
21
-
 22
22
-
 23
23
-
 24
24
-
 25
25
-
 26
26
-
 27
27
-
 28
28
-
 29
29
-
 30
30
-
 31
31
-
 32
32
-
 33
33
-
 34
34
-
 35
35
-
 36
36
-
 37
37
-
 38
38
-
 39
39
-
 40
40
-
 41
41
-
 42
42
-
 43
43
-
 44
44
-
 45
45
-
 46
46
-
 47
47
-
 48
48
-
 49
49
-
 50
50
-
 51
51
-
 52
52
-
 53
53
-
 54
54
-
 55
55
-
 56
56
-
 57
57
-
 58
58
-
 59
59
-
 60
60
-
 61
61
-
 62
62
-
 63
63
-
 64
64
-
 65
65
-
 66
66
-
 67
67
-
 68
68
-
 69
69
-
 70
70
-
 71
71
-
 72
72
-
 73
73
-
 74
74
-
 75
75
-
 76
76
-
 77
77
-
 78
78
-
 79
79
-
 80
80
-
 81
81
-
 82
82
-
 83
83
-
 84
84
-
 85
85
-
 86
86
-
 87
87
-
 88
88
-
 89
89
-
 90
90
-
 91
91
-
 92
92
-
 93
93
-
 94
94
-
 95
95
-
 96
96
-
 97
97
-
 98
98
-
 99
99
-
 100
100
-
 101
101
-
 102
102
-
 103
103
-
 104
104
-
 105
105
-
 106
106
-
 107
107
-
 108
108
-
 109
109
-
 110
110
-
 111
111
-
 112
112
-
 113
113
-
 114
114
-
 115
115
-
 116
116
-
 117
117
-
 118
118
-
 119
119
-
 120
120
-
 121
121
-
 122
122
-
 123
123
-
 124
124
-
 125
125
-
 126
126
-
 127
127
-
 128
128
-
 129
129
-
 130
130
-
 131
131
-
 132
132
-
 133
133
-
 134
134
-
 135
135
-
 136
136
-
 137
137
-
 138
138
-
 139
139
-
 140
140
-
 141
141
-
 142
142
-
 143
143
-
 144
144
-
 145
145
-
 146
146
-
 147
147
-
 148
148
-
 149
149
-
 150
150
-
 151
151
-
 152
152
-
 153
153
-
 154
154
-
 155
155
-
 156
156
-
 157
157
-
 158
158
-
 159
159
-
 160
160
-
 161
161
-
 162
162
-
 163
163
-
 164
164
-
 165
165
-
 166
166
-
 167
167
-
 168
168
-
 169
169
-
 170
170
-
 171
171
-
 172
172
-
 173
173
-
 174
174
-
 175
175
-
 176
176
-
 177
177
-
 178
178
-
 179
179
-
 180
180
-
 181
181
-
 182
182
-
 183
183
-
 184
184
-
 185
185
-
 186
186
-
 187
187
-
 188
188
-
 189
189
-
 190
190
-
 191
191
-
 192
192


Philips HR2870/00 Manual de utilizare
- Categorie
- Blenderele
- Tip
- Manual de utilizare
în alte limbi
- slovenčina: Philips HR2870/00 Používateľská príručka
- eesti: Philips HR2870/00 Kasutusjuhend
Lucrări înrudite
-
Philips HR2084/30 Informații importante
-
Philips HR2874/00 Manual de utilizare
-
Philips HR2167/41 Informații importante
-
Philips HR2102/90 Informații importante
-
Philips HR2067/08 Informații importante
-
Philips HR1846/00 Manual de utilizare
-
Philips HR2106/00 Informații importante
-
Philips HR1650 Manual de utilizare
-
Philips HR2027/73 Informații importante
-