Beko CWB 6441 XN Manualul proprietarului
- Categorie
- Hote pentru aragaz
- Tip
- Manualul proprietarului

CWB 6441
CWB 9441
Instructions Manual
Bedienungsanleitung
Manuel d’Instructions
Kullanim Kilavuku
Naudojimosi instrukcija
Gebruiksaanwijzing
Brugsvejledning
Εγχειρίδιο οδηγιών
Manual de Instruções
Instrukcja Obslugi
Libret de Instrucţiuni
Priročnik za uporabo
Felhasználói Kézikönyv
Manual de instrucciones
Инструкции Ръководство

2
2
INDEX
RECOMMENDATIONS AND SUGGESTIONS ......................................................................................................................................................................................................................... 5
WARNINGS - COMPONENTS ............................................................................................................................................................................................................................................................6
INSTALLATION.............................................................................................................................................................................................................................................................................................. 7
USE - MAINTENANCE..............................................................................................................................................................................................................................................................................8
INHALTSVERZEICHNIS
EMPFEHLUNGEN UND HINWEISE ................................................................................................................................................................................................................................................ 9
HINWEIS - KOMPONENTEN..............................................................................................................................................................................................................................................................10
MONTAGE.....................................................................................................................................................................................................................................................................................................11
BEDIENUNG - WARTUNG .................................................................................................................................................................................................................................................................12
SOMMAIRE
CONSEILS ET SUGGESTIONS........................................................................................................................................................................................................................................................13
ATTENTION - COMPOSANTS ..........................................................................................................................................................................................................................................................14
INSTALLATION............................................................................................................................................................................................................................................................................................15
UTILISATION - ENTRETIEN.................................................................................................................................................................................................................................................................16
УКАЗАТЕЛЬ
СОВЕТЫ И РЕКОМЕНДАЦИИ.......................................................................................................................................................................................................................................................17
ПРАВИЛА ТЕХНИКИ БЕЗОПАСНОСТИ - ПРИНАДЛЕЖНОСТИ...........................................................................................................................................................................18
УСТАНОВКА................................................................................................................................................................................................................................................................................................19
ЭКСПЛУАТАЦИЯ - ТЕХНИЧЕСКОЕ ОБСЛУЖИВАНИЕ ..............................................................................................................................................................................................20
IÇERIKLER
TAVSIYELER VE ÖNERILER .............................................................................................................................................................................................................................................................21
UYARILAR - PARÇALARI......................................................................................................................................................................................................................................................................22
MONTAJ..........................................................................................................................................................................................................................................................................................................23
KULLANIM - BAKIMI VE TEMİZLENMESİ....................................................................................................................................................................................................................................24
TURINYS
PATARIMAI IR NUORODOS...............................................................................................................................................................................................................................................................25
ĮSPĖJIMAI - DALYS ...................................................................................................................................................................................................................................................................................26
MONTAVIMAS.............................................................................................................................................................................................................................................................................................27
NAUDOJIMAS - VALYMAS IR PRIEŽIŪRA.................................................................................................................................................................................................................................28
INHOUDSOPGAVE
ADVIEZEN EN SUGGESTIES............................................................................................................................................................................................................................................................29
AANWIJZINGEN - ONDERDELEN..................................................................................................................................................................................................................................................30
INSTALLATIE ................................................................................................................................................................................................................................................................................................31
GEBRUIK - ONDERHOUD...................................................................................................................................................................................................................................................................32
EN
DE
FR
RU
TR
LT
NL

3
3
INDHOLD
RÅD OG ANVISNINGER .......................................................................................................................................................................................................................................................................33
VIGTIGE ANVISNINGER - KOMPONENTER ...........................................................................................................................................................................................................................34
INSTALLATION............................................................................................................................................................................................................................................................................................35
BRUG - VEDLIGEHOLDELSE............................................................................................................................................................................................................................................................36
ΠΕΡΙΕΧΟΜΕΝΑ
ΣΥΜΒΟΥΛΕΣ ΚΑΙ ΣΥΣΤΑΣΕΙΣ...........................................................................................................................................................................................................................................................37
ΠΡΟΕΙΔΟΠΟΙΗΣΕΙΣ - ΕΞΑΡΤΗΜΑΤΑ...........................................................................................................................................................................................................................................38
ΕΓΚΑΤΑΣΤΑΣΗ............................................................................................................................................................................................................................................................................................39
ΧΡΗΣΗ - ΣΥΝΤΗΡΗΣΗ ...........................................................................................................................................................................................................................................................................40
ÍNDICE
CONSELHOS E SUGESTÕES .........................................................................................................................................................................................................................................................41
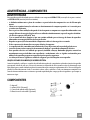
ADVERTÊNCIAS - COMPONENTES............................................................................................................................................................................................................................................42
INSTALAÇÃO...............................................................................................................................................................................................................................................................................................43
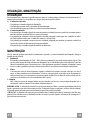
UTILIZAÇÃO - MANUTENÇÃO..........................................................................................................................................................................................................................................................44
SPIS TRESCI
UWAGI I SUGESTIE.................................................................................................................................................................................................................................................................................45
OSTRZEŻENIA - CZĘŚCI SKŁADOWE........................................................................................................................................................................................................................................46
MONTAŻ.........................................................................................................................................................................................................................................................................................................47
UŻYTKOWANIE – KONSERWACJA.............................................................................................................................................................................................................................................48
CUPRINS
RECOMANDĂRI ŞI SUGESTII...........................................................................................................................................................................................................................................................49
ATENŢIE! - CONŢINE.............................................................................................................................................................................................................................................................................50
INSTALAREA................................................................................................................................................................................................................................................................................................51
UTILIZARE - INTRETINERE.................................................................................................................................................................................................................................................................52
KAZALO
PRIPOROČILA IN NASVETI ................................................................................................................................................................................................................................................................53
OPOZORILA - SESTAVNI DELI.........................................................................................................................................................................................................................................................54
NAMESTITEV...............................................................................................................................................................................................................................................................................................55
UPORABA - VZDRŽEVANJE..............................................................................................................................................................................................................................................................56
MUTATÓUJJ
TANÁCSOK ÉS JAVASLATOK .........................................................................................................................................................................................................................................................57
TUDNIVALÓK - ALKATRÉSZEK.......................................................................................................................................................................................................................................................58
FELSZERELÉS ...........................................................................................................................................................................................................................................................................................59
HASZNÁLAT - KARBANTARTÁS ....................................................................................................................................................................................................................................................60
DK
GR
PT
PL
RO
SI
HU

4
4
ÍNDICE
CONSEJOS Y SUGERENCIAS ........................................................................................................................................................................................................................................................61
ADVERTENCIAS - COMPONENTES............................................................................................................................................................................................................................................62
INSTALACIÓN..............................................................................................................................................................................................................................................................................................63
USO - MANTENIMIENTO......................................................................................................................................................................................................................................................................64
ИНДЕКС
СЪВЕТИ И ТРИКОВЕ............................................................................................................................................................................................................................................................................65
ПРЕДУПРЕЖДЕНИЯ - ЕЛЕМЕНТИ............................................................................................................................................................................................................................................66
ИНСТАЛАЦИЯ...........................................................................................................................................................................................................................................................................................67
ИЗПОЛЗВАЙТЕ - ПОДДРЪЖКА....................................................................................................................................................................................................................................................68
ES
BG

EN
5
5
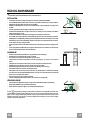
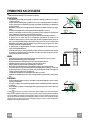
RECOMMENDATIONS AND SUGGESTIONS
The Instructions for Use apply to several versions of this appliance. Accordingly, you may find descriptions of
individual features that do not apply to your specific appliance.
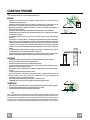
INSTALLATION
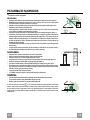
• The manufacturer will not be held liable for any damages resulting from incorrect or improper installation.
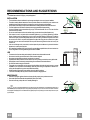
• The minimum safety distance between the cooker top and the extractor hood is 650 mm (some models can be
installed at a lower height, please refer to the paragraphs on working dimensions and installation).
• Check that the mains voltage corresponds to that indicated on the rating plate fixed to the inside of the hood.
• For Class I appliances, check that the domestic power supply guarantees adequate earthing.
Connect the extractor to the exhaust flue through a pipe of minimum diameter 120 mm. The route of the flue
must be as short as possible.
• Do not connect the extractor hood to exhaust ducts carrying combustion fumes (boilers, fireplaces, etc.).
• If the extractor is used in conjunction with non-electrical appliances (e.g. gas burning appliances), a sufficient
degree of aeration must be guaranteed in the room in order to prevent the backflow of exhaust gas. The kitchen
must have an opening communicating directly with the open air in order to guarantee the entry of clean air. When
the cooker hood is used in conjunction with appliances supplied with energy other than electric, the negative
pressure in the room must not exceed 0,04 mbar to prevent fumes being drawn back into the room by the
cooker hood.
• In the event of damage to the power cable, it must be replaced by the manufacturer or by the technical service
department, in order to prevent any risks.
• If the instructions for installation for the gas hob specify a greater distance specified above, this has to be taken into
account. Regulations concerning the discharge of air have to be fulfilled.
USE
• The extractor hood has been designed exclusively for domestic use to eliminate kitchen smells.
• Never use the hood for purposes other than for which it has been designed.
• Never leave high naked flames under the hood when it is in operation.
• Adjust the flame intensity to direct it onto the bottom of the pan only, making sure that it does not engulf the sides.
• Deep fat fryers must be continuously monitored during use: overheated oil can burst into flames.
• Do not flambè under the range hood; risk of fire
• This appliance is not intended for use by persons (including children) with reduced physical, sensory or mental
capabilities, or lack of experience and knowledge, unless they have been given supervision or instruction con-
cerning use of the appliance by a person responsible for their safety.
• Children should be supervised to ensure that they do not play with the appliance.
• “ CAUTION: Accessible parts may become hot when used with cooking appliances.”.
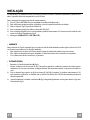
MAINTENANCE
• Switch off or unplug the appliance from the mains supply before carrying out any maintenance work.
• Clean and/or replace the Filters after the specified time period (Fire hazard).
• Clean the hood using a damp cloth and a neutral liquid detergent.
The symbol on the product or on its packaging indicates that this product may not be treated as household waste. Instead it shall be handed over to the applicable collection point for the recycling of
electrical and electronic equipment. By ensuring this product is disposed of correctly, you will help prevent potential negative consequences for the environment and human health, which could otherwise be
caused by inappropriate waste handling o f this product. For more d etailed information about recycling of this product, please contact your local city office, your household waste disposal service or the shop where
you purchased t he product
.
2°

EN
6
6
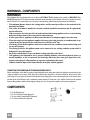
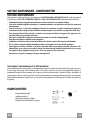
WARNINGS - COMPONENTS
WARNINGS
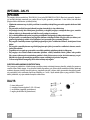
This appliance has been designed for use as either an EXTRACTION (ducting to the outside) or RECIRCULA-
TION (filtering) hood. The measurements contained on the drawings in this booklet refer to two models of cooker
hood. Therefore, it is essential that you refer to the correct drawing when taking measurements for installation.
- The minimum distance between the cooking surface and the metal grease filters on the underside of the
hood must be 650mm.
- This cooker hood must be installed in accordance with the installation instructions and all requirements
must be adhered to.
- If the room where the cooker hood is to be used contains a fuel burning appliance such as a central heating
boiler then its flue must be of the room sealed or balance flue type.
- If other types of flue or appliances are fitted ensure that there is an adequate supply of air to the room.
- When the range hood and appliance supplied with energy other than electricity are simultaneously in op-
eration, the negative pressure in the room must not exceed 4 Pa (4x10
-5
bar).
- The ducting system for this appliance must not be connected to any ventilation system which is being used
for any other purpose.
- The ducting system for this appliance must not be connected to any existing ventilation system which is
being used for any other purpose.
- Do not leave naked flames or carry out flambè cooking under this cooker hood.
- This appliance is not intended for use by persons (including children) with reduced physical, sensory or
mental capabilities, or lack of experience and knowledge, unless they have been given supervision or in-
struction concerning use of the appliance by a person responsible for their safety.
- Children should be supervised to ensure that they do not play with the appliance
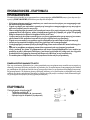
CONNECTING THE POWER CABLE TO THE MAINS POWER SUPPLY
Before installation, check that the mains voltage indicated on the rating plate inside the appliance corresponds to the
voltage available in your home. If the Hood is not fitted with a plug have a licensed electrician, fit the power cable
with a plug of a type approved for the load indicated on the rating plate; when connecting directly to the mains, insert
an omni polar circuit breaker with a minimum contact aperture of 3mm and a size suitable for the load in question
between the appliance and the mains supply, making sure it is of a type that complies with current regulations.
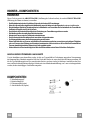
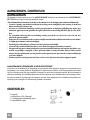
COMPONENTS
- 2 No Wall Brackets C
- 1 No 150-120mm Ducting Spigot G
- 1 No Air Outlet Connection H (Optional)
- 2 No Charcoal Filters L (Optional)

EN
7
7
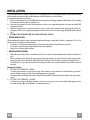
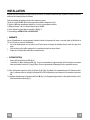
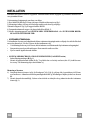
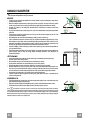
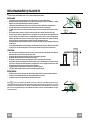
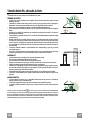
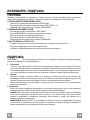
INSTALLATION
The cooker hood must be installed centrally over a cooking appliance. The minimum distance between the cooking
surface and the metal grease filters on the underside of the hood must be at least 650mm.
To install the hood proceed as follows:
1) Drill six 8mm diameter holes at X1-X2-J and insert the plastic rawl plugs supplied as illustrated in fig. 2 ensuring
the brackets are fitted as shown in the blow up.
2) Secure the two brackets C to the wall inserting two of the screws supplied through the two holes on line X1-X2
as illustrated in fig. 2.
3) Slide the canopy down the wall to locate the key hole over the washer then secure the canopy to the wall by in-
serting two of the screws supplied through the two outer holes in the rim of the canopy J1 and J2 as illustrated in
fig. 3.
4) EXTRACTION OR RECIRCULATION INSTALLATION:
• EXTRACTION (DUCTED)
When installing the ducted version, connect the hood to the chimney using either a flexible or rigid pipe ø 150 or 120
mm, the choice of which is left to the installer.
• To install a ø 120 mm air exhaust connection, insert the reducer flange 9 on the hood body outlet.
• Fix the pipe in position using sufficient pipe clamps (not supplied).
• Remove any activated charcoal filters.
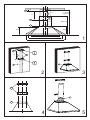
• RECIRCULATION (FILTERED)
• When the hood is fitted in the recirculation mode the Air Outlet Connection H should be fitted as illustrated in
fig. 6.
• Fit the (optional) charcoal filters by repeating the following operation on each side of the motor housing. Place
the two key hole slots in the filter L and turn the filter clockwise to lock the filter in position as illustrated in fig. 7.
WARNING: It is a possible fire hazard if the metal grease filters are not cleaned and the charcoal filters replaced
regularly.
Fitting The Chimney
5) FITTING THE CHIMNEY UPPER
To fit the upper chimney A, place the top edge of the chimney over the bracket C as illustrated in fig. 8 and se-
cure the chimney using two of the 2.9mm self tapping screws provided.
The distance H in the height between the fixing holes X1 and X2 is determined by the height of the upper chim-
ney A.
6) FITTING THE CHIMNEY LOWER
To fit the lower chimney B, apply slight force to the two rear edges to increase the width of the apperture, then
sleeve the chimney B over the chimney A as illustrated in fig. 9.

EN
8
8
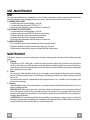
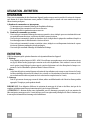
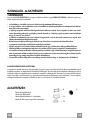
USE - MAINTENANCE
USE
The cooker hood functions are controlled by a series of slider or push button switches mounted on the front of the
hood and control the worktop lighting and fan motor speeds. This cooker hood will not remove steam.
1) SLIDER SWITCHES
- A switch controls the worktop lighting - ON/OFF.
- A switch controls the fan speeds - OFF/ON-1-2-3.
- The red neon lamp illuminates when the motor is switched ON .
2) PUSH BUTTON SWITCHES
- A switch controls the worktop lighting - ON/OFF.
- A button switches the motor OFF/ON at the low speed setting.
- A button switches the motor to the medium speed setting.
- A button switches the motor to the high speed setting.
- The red neon lamp illuminates when the motor is switched ON.
3) SPEED SETTINGS
- 1/Low should be selected when simmering or when using only one pan.
- 2/Medium should be selected for cooking when using up to four pans.
- 3/High should be selected when frying or cooking food with a strong odour.
MAINTENANCE
N.B. Before carring out any kind of maintenance, cleaning or replacing lamps, disconnect the hood from the mains
supply.
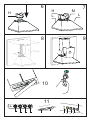
1. Lighting
Comprises two (28W - 40W) bulbs. To replace the bulbs, proceed as follows (fig.10): Remove one of the pins at
the sides of the lamp cover. Slide the glass towards the side from which the pin has been removed until the op-
posite edge has been freed, then pull gently downwards. Replace the bults and fit the glass again by repeating the
above operations in reverse order.
2. Filters
- The metal grease filter should be cleaned every two months or more frequently if the hood is used consistently
and can be cleaned in a dishwasher or by hand using a mild detergent or liquid soap. When replacing, ensure that
they are dry.
- The charcoal filter cannot be washed and should be replaced at least every 2 months or more frequently if the
hood is used consistently.
3. Cleaning
When cleaning the hood, it is recommended to use a damp cloth and mild liquid household cleaner. Never use
abrasive cleaning materials.
IMPORTANT: When using a gas hob in connection with the cooker hood never leave the burners of the hob
uncovered while the hood is in use or when the pans have been removed. It is very important to follow all in-
structions for cleaning the hood and filters. There could be a possible fire hazard if the filters are not replaced ac-
cording to these instructions.
ATTENTION: The manufacturer declines all responsibility for any damage or injury caused as a result of not
following the instructions for installation, for maintenance and replacement times of filters indicated (in order to
avoid a possible risk of fire when the filters are saturated with grease).

DE
9
9
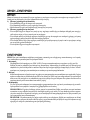
EMPFEHLUNGEN UND HINWEISE
Diese Gebrauchsanleitung gilt für mehrere Geräte-Ausführungen. Es ist möglich, dass einzelne Ausstattungsmerkmale
beschrieben sind, die nicht auf Ihr Gerät zutreffen.
MONTAGE
• Der Hersteller haftet nicht für Schäden, die auf eine fehlerhafte und unsachgemäße Montage zurückzuführen sind.
• Der minimale Sicherheitsabstand zwischen Kochmulde und Haube muss 650 mm betragen (einige Modelle können an
einer geringeren Höhe installiert werden, beziehen Sie sich dazu auf den Absatz Raumbedarf und Installation).
• Prüfen, ob die Netzspannung mit dem Wert auf dem im Haubeninneren angebrachten Schild übereinstimmt.
• Bei Geräten der Klasse I ist sicherzustellen, dass die elektrische Anlage des Wohnhauses über eine vorschriftsmäßige
Erdung verfügt.
• Das Anschlussrohr der Haube zur Luftaustrittsöffnung muss einen Durchmesser von 120 mm oder darüber aufweisen.
Der Rohrverlauf muss so kurz wie möglich sein.
• Die Haube darf an keine Entlüftungsschächte angeschlossen werden, in die Verbrennungsgase (Heizkessel, Kamine
usw.) geleitet werden.
• Werden im Raum außer der Dunstabzugshaube andere, nicht elektrisch betriebene (z.B. gasbetriebene) Geräte verwen-
det, muss für eine ausreichende Belüftung gesorgt werden. Sollte die Küche diesbezüglich nicht entsprechen, ist an einer
Aussenwand eine Öffnung anzubringen, die Frischluftzufuhr gewährleistet. Der Gebrauch ist dann sachgemäß und sicher,
wenn der max. Unterdruck des Raums nicht mehr als 0,04 mbar beträgt.
• Ein schadhaftes Kabel muss vom Hersteller oder vom technischen Kundendienst ausgewechselt werden, damit jedes
Risiko vermieden wird.
• Wenn die Anweisungen für die Installation für die Gaskochgeräts einen größeren Abstand oben angegeben, muss dies
berücksichtigt werden. Vorschriften über die Entlastung der Luft müssen erfüllt sein.
BEDIENUNG
• Die Dunstabzugshaube ist ausschließlich zum Einsatz im privaten Haushalt und zur Beseitigung von Küchengerüchen
vorgesehen.
• Unsachgemäßer Einsatz der Haube ist zu unterlassen.
• Große Flammen bei eingeschalteter Haube niemals unbedeckt lassen.
• Die Intensivität der Flamme ist so zu regulieren, dass sie den Topfboden nicht überragt.
• Frittiergeräte müssen während des Gebrauchs stets beaufsichtigt werden: überhitztes Öl kann sich entzünden.
• Keine flambierten Speisen unter der Abzugshaube zubereiten: Brandgefahr.
• Dieses Gerät darf nicht von Personen, auch Kindern, mit verminderten psychischen, sensorischen und geistigern Fähigkei-
ten, oder von Personen ohne Erfahrung und Kenntnisse benutzt werden, sofern sie nicht von für ihre Sicherheit verantwort-
lichen Personen beaufsichtigt und beim Gebrauch des Geräts angeleitet werden.
• Kinder dürfen sich nicht unbeaufsichtigt in der Nähe des Geräts aufhalten und auf keinen Fall mit dem Gerät spielen.
• “ACHTUNG: Die zugänglichen Teile können sehr heiß werden, wenn sie mit Kochgeräten eingesetzt werden.”.
WARTUNG
• Bevor Wartungsarbeiten durchgeführt werden, muss die Stromzufuhr zur Haube unterbrochen werden, indem der
Stecker gezogen oder der Hauptschalter abgeschaltet wird.
• Bei der Filterwartung müssen die vom Hersteller empfohlenen Zeiträume zum Austauschen der Filter genauestens
eingehalten werden (Brandgefahr).
• Zur Reinigung der Haubenflächen Wir empfehlen ein feuchtes Tuch und ein mildes Flüssigreinigungsmittel.
Das Symbol auf dem Produkt oder seiner Verpackung weist darauf hin, dass dieses Produkt nicht als normaler Haushaltsabfall zu
behandeln ist, sondern an einem Sammelpunkt für das Recycling von elektrischen und elektronischen Geräten abgegeben werden muss.
Durch Ihren Beitrag zum korrekten Entsorgen dieses Produkts schützen Sie die Umwelt und die Gesundheit Ihrer Mitmenschen. Umwelt
und Gesundheit werden durch falsches Entsorgen gefährdet. Weitere Informationen über das Recycling dieses Produkts erhalten Sie von
Ihrem Rathaus, Ihrer Müllabfuhr oder dem Geschäft, in dem Sie das Produkt gekauft haben.
2°

DE
1
10
HINWEIS - KOMPONENTEN
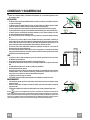
HINWEISE
Dieses Gerät ist sowohl als ABLUFTHAUBE (Abführung der Luft nach außen), als auch als UMLUFTHAUBE
(Filtrierung der Dünste im Innern) verwendbar.
- Der Mindestabstand zwischen Kochfeld und Unterseite der Haube soll 650 mm betragen.
- Wenn die Luft nach Außen abgeführt wird (Abluftbetrieb), muss die Haube nach den folgenden Anweisungen installiert werden.
- Bei gleichzeitigem Betrieb der Dunstabzugshaube im Abluftbetrieb und Feuerstätten darf im Aufstellraum der Feuerstätte der
Unterdruck nicht größer als 4 Pa (4x10
-5
bar) sein.
- Das Abluftrohr der Haube darf keinesfalls an den Rauchabzug von Feuerstätten angeschlossen werden.
- Die Abluftvorschriften der zuständigen Behörden beachten.
- Niemals eine Flamme unter der Dunsthaube unbedeckt lassen.
- Das Gerät entspricht der Schutzklasse II und muss daher nicht geerdet werden.
- Vor Wartungsarbeiten muss das Gerät spannungslos gemacht werden.
- Dieses Gerät darf nicht von Personen, auch Kindern, mit verminderten psychischen, sensorischen und geistigern Fähigkeiten,
oder von Personen ohne Erfahrung und Kenntnisse benutzt werden, sofern sie nicht von für ihre Sicherheit verantwortlichen
Personen beaufsichtigt und beim Gebrauch des Geräts angeleitet werden.
- Kinder dürfen sich nicht unbeaufsichtigt in der Nähe des Geräts aufhalten und auf keinen Fall mit dem Gerät spielen.
ANSCHLUSS DES STROMKABELS AN DAS NETZ
Vor der Installation muss kontrolliert werden, ob die am Typenschild im Geräteinnern angegebene Netzspannung
der Spannung Ihres Haushalts entspricht. Falls das Gerät ohne Stecker ist, muss das Kabel mit einem genormten, für
die am Typenschild angegebene Last ausreichenden Stecker versehen werden; bei direktem Anschluss an das Netz
muss ein korrekt dimensionierter allpoliger Schalter mit einer Mindestkontaktöffnung von 3 mm zwischengeschaltet
werden, der den einschlägigen Vorschriften entspricht.
KOMPONENTEN
- 2 Wandhalterungen C
- 1 Reduzierflansch G
- 1 Filterstutzen H (Option)
- 2 Aktivkohlefilter L (Option)

DE
1
11
MONTAGE
Die Haube muss mittig über dem Kochfeld installiert werden. Der Mindestabstand zwischen Kochfeld und
Unterseite der Haube soll 650 mm betragen.
Für die Installation wie folgt vorgehen:
1) 6 Löcher (X1-X2-J) mit 8 mm Durchmesser nach den Maßangaben der Abb.1 ausführen.
2) Die für die jeweilige Montage mitgelieferten Schrauben und Dübel verwenden.
3) Die Wandhalterungen C (Abb. 2) mittels der Bohrungen X1-X2 an der Wand befestigen.
4) Die Haube mittels der externen Bohrlöcher J1 und J2 (Abb. 3) an der Wand befestigen.
5) Montage als ABLUFTHAUBE oder UMLUFTHAUBE:
ABLUFTBETRIEB
Bei Abluftbetrieb kann die Haube vom Installateur wahlweise mittels Rohr oder Schlauch (ø 150 oder 120 mm) an
den Auslass angeschlossen werden.
- Bei Verwendung eines Anschlussrohres ø 120 den Reduzierflansch 9 am Haubenausgang anbringen.
- Das Rohr mit passenden Rohrschellen fixieren. Das hierzu erforderliche Material wird nicht mitgeliefert.
- Eventuell vorhandene Aktivkohlefilter ausbauen.
UMLUFTBETRIEB (OPTION)
- Den Filterstutzen H einbauen (Abb. 6).
- Den Aktivkohlefilter L (Abb.7) einlegen und durch Drehen im Uhrzeigersinn (um zirka 10°) einrasten lassen.
Zum Ausbauen in umgekehrter Reihenfolge vorgehen.
Montage der Kamine:
6) Befestigen Sie das obere Kaminteil A (Abb. 8) mit den vier beiliegenden, selbstschneidenden Schrauben Ø 2,9
mm an den Halterungen C (Abb.2/Abb.8). Der Abstand zwischen den Bohrlöchern X1 und X2 hängt von der
Höhe des oberen Kaminteils H ab.
7) Um das untere Kaminteil B (Abb. 9) anzubringen die beiden Seitenteile leicht auseinanderbiegen und dann an
der Haube einsetzen (Abb. 9).

DE
1
12
BEDIENUNG - WARTUNG
BEDIENUNG
Die Dunsthaube ist, je nach Modellart, mit verschiedenen Schiebeschaltern oder Drucktasten an der Haubenfront
ausgestattet, mit denen die Arbeitsflächenbeleuchtung und die Motorgeschwindigkeit geschaltet werden .
1) Schiebeschaltung
Ein Schalter schaltet die Beleuchtung ein.
Ein Schalter steuert die drei Gebläsestufen.
Eine Kontrolllampe zeigt den Motorbetrieb an.
2) Drucktastenschaltung
Ein Schalter schaltet die Beleuchtung ein
Ein Schalter schaltet den Motor ein und aus ( niedrigste Stufe).
Ein Schalter schaltet die mittlere Stufe ein.
Ein Schalter schaltet die höchste Stufe ein.
Die rote Kontrolllampe zeigt an, wenn der Motor eingeschaltet ist.
3) Geschwindigkeitsstufen
1 / niedrig bei Benutzung einer Kochplatte
2 / mittel beim Gebrauch bis zu vier Kochplatten
3 / hoch beim Braten oder bei starkem Kochdunst
WARTUNG
N.B. Vor sämtlichen Wartungs- und Reparaturarbeiten bzw. vor Auswechseln der Lampen muss die Stromzufuhr
zum Gerät unterbrochen werden.
1. Beleuchtung
Die Beleuchtung besteht aus zwei Lampen zu (28W - 40W). Beim Austausch einer Lampe ist wie folgt vorzu-
gehen (Abb.10): einen der Stifte an der Lampenabdeckungsseite entfernen. Dann das Glas auf die Seite ohne
Stift schieben, bis das gegenüberliegende Ende frei liegt und etwas senken. Die Lampen austauschen und die
Glasabdeckung in umgekehrter Reihenfolge wieder montieren.
2. Filter
Je nach Einsatzhäufigkeit müssen die Metallfettfilter in angebrachten Zeitabständen (maximal alle 2 Monate)
demontiert und mit warmem Seifenwasser bzw. im Geschirrspüler gereinigt und trocken wieder montiert wer-
den (Aktivkohlefilter dürfen keinesfalls gewaschen werden, sondern sind alle 2 Monate auszuwechseln).
3. Pflege
Zur Außenreinigung der Haube ein mit Alkohol oder zweckentsprechenden, handelsüblichen Reinigungsmit-
teln angefeuchtetes Tuch verwenden. Scheuermittel sind zu vermeiden.
WICHTIG: Offene Flammen schädigen die Filter; deshalb wird davon abgeraten, Gaskochstellen ohne Kochtopf
brennen zu lassen. Die Maßnahmen zur Reinigung der Haube bzw. der Filter und das Auswechseln der Filter haben
verbindlich gemäß unseren Vorschriften und in regelmäßigen Zeitabständen zu erfolgen, um Brandgefahr zu ver-
meiden.
ACHTUNG: Die Herstellerfirma übernimmt keine Haftung für Schäden, die durch unterlassene Wartung des Fett-
filters (alle zwei Monate auswaschen), unterlassenes Auswechseln des Aktivkohlefilters und Nichtbeachtung der
obengenannten Anleitungen zur Montage und zum Elektronanschluss entstehen.

FR
1
13
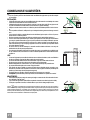
CONSEILS ET SUGGESTIONS
La présente notice d'emploi vaut pour plusieurs versions de l'appareil. Elle peut contenir des descriptions d'accessoires ne
figurant pas dans votre appareil.
INSTALLATION
• Le fabricant décline toute responsabilité en cas de dommage dû à une installation non correcte ou non conforme aux règles
de l’art.
• La distance minimale de sécurité entre le plan de cuisson et la hotte doit être de 650 mm au moins (certains modèles
peuvent être installés à une hauteur inférieure : se reporter aux paragraphes « Encombrement » et « Installation »).
• Vérifier que la tension du secteur correspond à la valeur qui figure sur la plaquette apposée à l’intérieur de la hotte.
• Pour les Appareils appartenant à la Ière Classe, veiller à ce que la mise à la terre de l’installation électrique domestique ait été
effectuée conformément aux normes en vigueur.
• Connecter la hotte à la sortie d’air aspiré à l’aide d’une tuyauterie d’un diamètre égal ou supérieur à 120 mm. Le parcours de
la tuyauterie doit être le plus court possible.
• Ne pas connecter la hotte à des conduites d’évacuation de fumées issues d’une combustion tel que (Chaudière, chemi-
née, etc…).
• Si vous utilisez des appareils qui ne fonctionnent pas à l’électricité dans la pièce ou est installée la hotte (par exemple: des
appareils fonctionnant au gaz), vous devez prévoir une aération suffisante du milieu. Si la cuisine en est dépourvue, prati-
quez une ouverture qui communique avec l’extérieur pour garantir l’infiltration de l’air pur. Pour un emploi correct et sans ris-
que, la dépression maximum dans la pièce ne doit pas dépasser 0,04 mbar.
• En cas d’endommagement du cordon d’alimentation, faites-le remplacer par le constructeur ou par le service après-vente,
afin de prévenir tout risque.
• Si les instructions de montage pour la plaque de cuisson au gaz spécifient une plus grande distance indiquée ci-dessus,
cela doit être pris en compte. Règlement concernant l'évacuation d'air doivent être remplies..
UTILISATION
• La hotte a été conçue exclusivement pour l’usage domestique, dans le but d’éliminer les odeurs de la cuisine.
• Ne jamais utiliser abusivement la hotte.
• Ne pas laisser les flammes libres à forte intensité quand la hotte est en service.
• Toujours régler les flammes de manière à éviter toute sortie latérale de ces dernières par rapport au fond des marmites.
• Contrôler les friteuses lors de l’utilisation car l’huile surchauffée pourrait s’enflammer.
• Ne pas préparer d’aliments flambés sous la hotte de cuisine : risque d’incendie
• Cet appareil ne doit pas être utilisé par des personnes (y compris les enfants) ayant des capacités psychiques, sensorielles
ou mentales réduites, ni par des personnes n’ayant pas l’expérience et la connaissance de ce type d’appareils, à moins
d'être sous le contrôle et la formation de personnes responsables de leur sécurité.
• Les enfants doivent être surveillés pour s'assurer qu'ils ne jouent pas avec l'appareil.
• « ATTENTION : Les parties accessibles peuvent devenir très chaudes si utilisées avec des appareils de cuisson. »
ENTRETIEN
• Avant de procéder à toute opération d’entretien, débrancher la hotte en retirant la fiche ou en actionnant l’interrupteur général.
• Effectuer un entretien scrupuleux et en temps dû des Filtres, à la cadence conseillée (Risque d’incendie).
• Pour le nettoyage des surfaces de la hotte, il suffit d’utiliser un chiffon humide et détersif liquide neutre.
Le symbole sur le produit ou son emballage indique que ce produit ne peut être traité comme déchet ménager. Il doit plutôt être remis
au point de ramassage concerné, se chargeant du recyclage du matériel électrique et électronique. En vous assurant que ce produit est
éliminé correctement, vous favorisez la prévention des conséquences négatives pour l’environnement et la santé humaine qui, sinon, seraient
le résultat d’un traitement inapproprié des déchets de ce produit. Pour obtenir plus de détails sur le recyclage de ce produit, veuillez prendre
contact avec le bureau municipal de votre région, votre service d’élimination des déchets ménagers ou le magasin où vous avez acheté le
produit.
2°

FR
1
14
ATTENTION - COMPOSANTS
ATTENTION
Cet appareil a été conçu pour être employé en version ASPIRANTE (évacuation de l'air vers l'extérieur) ou en ver-
sion RECYCLAGE (air conduite vers l'intérieur).
- La distance minimum entre le plan de cuisson et la partie inférieure de la hotte doit être au moins de
650mm.
- Il faut prévoir une aération convenable de la pièce lorsque la hotte et les appareils alimentés avec énergie
différente de celle éléctrique sont utilisés en même temps; la pression négative de la pièce ne doit pas dépas-
ser 4Pa (4x10
-5
bar).
- L'air recueillie ne doit pas être dirigée dans un conduit utilisé pour la décharge des fumées des appareils
alimentés avec énergie différente de celle éléctrique.
- Respecter les prescriptions des autorités compétentes relatives à la décharge de l'air à evacuer.
- Eviter la présence de flammes libres dans l'espace au dessous de la hotte.
- La hotte a été construite avec isolement en classe II, donc il n'y a pas besoin de la relier à la terre.
- Avant d'effectuer toutes les opérations d'entretien, débrancher l'appareil de l'alimentation éléctrique.
- Cet appareil ne doit pas être utilisé par des personnes (y compris les enfants) ayant des capacités psychi-
ques, sensorielles ou mentales réduites, ni par des personnes n’ayant pas l’expérience et la connaissance de
ce type d’appareils, à moins d'être sous le contrôle et la formation de personnes responsables de leur sécu-
rité.
- Les enfants doivent être surveillés pour s'assurer qu'ils ne jouent pas avec l'appareil.
BRANCHEMENT DU CÂBLE ÉLECTRIQUE AU RÉSEAU
Avant l’installation, vérifier que la tension du réseau indiquée sur la plaquette se trouvant à l’intérieur de l’appareil
correspond à la tension électrique de votre habitation. Si la hotte n’est pas munie de fiche électrique, monter une fiche
à norme sur le câble d’alimentation qui soit adaptée à la tension indiquée sur la plaquette des caractéristiques. En cas
de branchement électrique direct sur le réseau, il faudra placer un interrupteur omnipolaire entre l’appareil et le réseau
ayant une ouverture minimum entre les contacts de 3 mm, et adapté à la tension et répondant aux normes en vigueur.
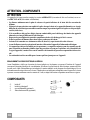
COMPOSANTS
- 2 brides C
- 1 bride de réduction G
- 1 raccord filtrant H (optionnel)
- 2 filtres charbon actif L (optionnel)

FR
1
15
INSTALLATION
La hotte doit être assemblée au centre du plan de cuisson. La distance minimum entre le plan de cuisson et la surface
inférieure de la hotte doit être de 650mm.
Pour l'assemblage de la hotte procéder de la manière suivante:
1)Faire n°6 trous (X1-X2-J) de 8mm respectant les chiffres indiqués à la fig. 1.
2) Pour les différents assemblages utiliser les vis et les vis tamponnées fournies..
3) Bloquer l'étrier C (fig. 2) à la paroi dans les trous X1-X2.
4) Fixer la hotte à la paroi dans les trous J1 et J2 (fig. 3) .
5) Assemblage ASPIRANTE ou FILTRANT.
• ASPIRANTE
En cas d’installation en version aspirante, brancher la hotte à la tuyauterie de sortie via un tube rigide ou flexible de ø
150 ou 120 mm, au choix de l’installateur.
• En cas de branchement avec un tube de ø120 mm, insérer le flasque de réduction 9 sur la sortie du corps de la
hotte.
• Fixer le tube par des colliers appropriés. Le matériau nécessaire n’est pas fourni.
• Retirer les éventuels filtres anti-odeur au charbon actif.
• FILTRANT (OPTION)
- Insérer le Raccord Sortie Air H (fig. 6).
- Assembler les filtres charbon actif L (fig. 7) en les centrant dans le support moteur M et les bloquer en tournant
dans sens horaire (environ 10°) jusqu'à l'arret. Pour les opérations de démontage faire les opérations inverses.
6) Fixer la cheminée supérieure A (fig. 8) à l'étrier C (fig. 2/fig. 8) utilisant 4 vis autotaraudeuses de Ø 2,9mm en dota-
tion. La distance entre les alésages de fixation X1 et X2 est déterminée par la hauteur de la cheminée supérieure
H.
7) Appliquer frontalement la cheminée inférieure B (fig. 9) en élargissant légèrement les deux parties latérales et l'in-
sérer ensuite dans la hotte (fig. 9).

FR
1
16
UTILISATION - ENTRETIEN
UTILISATION
Nous vous recommandons de faire fonctionner l'appareil quelque temps avant de procéder à la cuisson de n'importe
quel aliment, de le laisser fonctionner encore pendant 15 minutes après la cuisson et de toute manière tant que les
odeurs n'auront pas disparu.
1) Bandeau de commandes avec interrupteurs
- Un interrupteur qui commande l'allumage de l'installation d'éclairage.
- Un interrupteur pour commuter les trois vitesses d'exercice.
- Un voyant général de signalisation moteur en service.
2) Bandeau de commandes avec touches
- Une touche qui commande l'allumage du moteur en première vitesse, indiquée pour une circulation d'air conti-
nue particulièrement silencieuse, en présence de faibles vapeurs de cuisson.
- Une touche qui commande le moteur en deuxième vitesse, indiquée dans la plupart des conditions d'emploi vu
l'excellent rapport entre le débit d'air traité et le niveau de bruit.
- Une touche qui commande le moteur en troisième vitesse, indiquée en cas d'importantes émissions de vapeurs
de cuisson, également pendant des périodes prolongées.
- Une touche qui commande l'allumage de l'installation d'éclairage.
ENTRETIEN
N.B. Pour n'importe quelle opération d'entretien et de réparation débranchez l'appareil.
1. Eclairage
Il est constitué par deux lampes de (28W - 40W). Pour effectuer un remplacement, suivre les instructions suivan-
tes (fig.10): Retirer l'un des goujons qui se trouvent sur les côtés du plafonnier. Faire coulisser le verre sur le côté
sans le goujon, jusqu'à dégager la pointe opposée, puis tirer légèrement vers le bas. Remplacer les lampes et re-
monter le verre en effectuant les opérations décrites ci-dessus à rebours.
2. Filtres
A des intervalles plus ou moins fréquents en fonction de leur utilisation, mais en tout cas une fois tous les 2 mois,
les filtres métalliques doivent être lavés dans le lave-vaisselle ou à la main dans de l'eau tiède savonneuse (les fil-
tres au charbon actif ne doivent jamais etre lavés et doivent être remplacés tous les 2 mois).
3. Nettoyage
Pour ce qui concerne le nettoyage externe de la hotte, utiliser un chiffon humide et de l'alcool ou d'autres produits
appropriés. N'employez pas de produits abrasifs.
IMPORTANT: Il est obligatoire d'effectuer les opérations de nettoyage de la hotte et des filtres, ainsi que de les
remplacer périodiquement selon nos instructions pour éviter les risques d'incendie.
ATTENTION: Le fabricant décline toute résponsabilité pour les dommages provoqués par le non entretien des
filtres anti-graisse (nettoyage tous les 2 mois) ainsi que par le non replacement périodiques des filtres à charbon et par
le non respect des instructions de montage et de branchement.

RU
1
17
СОВЕТЫ И РЕКОМЕНДАЦИИ
Настоящее руководство по эксплуатации составлено для разных моделей прибора. Возможно, вы встретите в
нем описание отдельных комплектующих, не относящихся к модели Вашего прибора.
УСТАНОВКА
• Производитель отклоняет всякую ответственность за повреждения, вызванные неправильной и несоответст-
вующей правилам установкой.
• Минимальное безопасное расстояние между плитой и вытяжкой должно быть 650 мм (некоторые модели
могут быть установлены на меньшей высоте, см. разделы, посвященные габаритным размерам и установке
прибора).
• Проверить соответствие напряжения сети указанному на табличке, закрепленной внутри
вытяжки.
• Для приборов класса I проверить, чтобы электрическая проводка в доме обеспечивала правильное заземле-
ние.
• Соединить вытяжку с дымоходом трубкой диаметром, равным или больше 120 мм. Длина трубки должна быть
как можно меньше.
• Не соединять вытяжку с выпускными трубами дымов от процессов горения (котлы, камины и проч.).
• В случае если в
помещении используются как вытяжка, так и приборы, не работающие на электроэнергии
(например, газовые приборы), необходимо должным образом проветривать помещение. Если на кухне нет ок-
на, сделать отверстие наружу из помещения, чтобы через него поступал свежий воздух. Для правильного и
безопасного использования прибора максимальное разрежение в помещении не должно превышать 0,04 ба
-
ра.
• В случае повреждения кабеля питания он должен быть заменен изготовителем или службой технического
содействия во избежание возникновения опасных ситуаций.
• Если в инструкциях по установке газовой плиты сказано, что рас-стояние до вытяжки должно быть больше
указанного выше, сле-дует придерживаться предписанных размеров. Соблюдайте пра-вила отведения отра-
ботанного
воздуха.
ЭКСПЛУАТАЦИЯ
• Вытяжка спроектирована исключительно для бытового применения для уничтожения запахов от готовки.
• Никогда не допускать несоответствующего пользования вытяжкой.
• Не оставлять открытое и сильное пламя под находящейся в работе вытяжкой.
• Обязательно регулировать пламя, чтобы оно не выходило за дно кастрюль.
• Следить за работой фритюрниц: сильно нагретое масло может воспламениться.
• Не
готовьте блюда фламбе под кухонной вытяжкой; опасность возникновения пожара.
• Запрещается пользоваться прибором людям (и детям) с ограниченными психическими, сенсорными и умст-
венными способностями, а также лицам, не обладающим опытом и необходимыми знаниями, без контроля и
предварительного обучения пользованием прибора со стороны ответственных за их безопасность лиц.
• Дети должны находиться
под надзором взрослых и не играть с прибором.
• ВНИМАНИЕ! Детали, доступные для контакта, могут сильно нагреваться в случае пользования вытяжкой
одновременно с приборами для приготовления пищи.
УХОД
• Прежде чем приступать к любой операции по уходу, отсоединить вытяжку от сети, вынув электрическую вилку
или выключив главный выключатель.
• Производить тщательный и своевременный уход за фильтрами в рекомендуемые интервалы времени
(Опасность пожара).
• Для уборки поверхностей вытяжки пользоваться влажной тряпкой и жидким нейтральным мылом.
Символ на изделии или на его упаковке указывает, что оно не подлежит утилизации в качестве бытовых отходов. Вместо этого его
следует сдать в соответствующий пункт приемки электронного и электрооборудования для последующей утилизации. Соблюдая правила
утилизации изделия, Вы поможете предотвратить причинение окружающей среде и здоровью людей потенциального ущерба, который
возможен, в противном случае, вследствие неподобающего обращения с подобными отходами. За более подробной информацией об
утилизации этого изделия просьба обращаться к местным властям, в службу по вывозу и утилизации отходов или в магазин, в котором Вы
приобрели изделие.
2°

RU
1
18
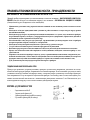
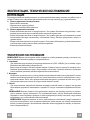
ПРАВИЛА ТЕХНИКИ БЕЗОПАСНОСТИ - ПРИНАДЛЕЖНОСТИ
ПРАВИЛА ТЕХНИКИ БЕЗОПАСНОСТИ
Данный прибор спроектирован для использования в качестве вытяжки с ВЫТЯЖНОЙ ВЕНТИЛЯ-
ЦИЕЙ (отводом воздуха из помещения наружу) или вытяжки с РЕЖИМОМ РЕЦИРКУЛЯЦИИ
(очищением воздуха с возвратом в то же помещение).
- Минимальное расстояние между варочной панелью и нижней частью вытяжки должно составлять не менее
650 мм.
- Необходимо соблюдать приведенные ниже указания по работе вытяжки с отводом воздуха наружу (режим
вытяжной вентиляции).
- Необходимо предусмотреть надлежащую вентиляцию помещения в тех случаях, когда вытяжка и приборы,
потребляющие энергию, отличную от электрической, используются одновременно; отрицательное
давление в
помещении не должно превышать 4 Па (4х10
-5
бар).
- Нельзя выполнять отвод воздуха через дымоходы, предназначенные для вывода паров и газов от приборов,
которые потребляют энергию, отличную от электрической.
- Необходимо соблюдать нормы коммунальных служб по отводу удаляемого воздуха.
- Следует избегать наличия открытого пламени в пространстве под вытяжкой.
- В вытяжке предусмотрена степень изоляции класса II, поэтому нет необходимости
выполнять заземление.
- Прежде чем выполнять какие-либо операции по техобслуживанию, необходимо отключить прибор от элек-
трической сети.
- Запрещается пользоваться прибором людям (и детям) с ограниченными психическими, сенсорными и умст-
венными способностями, а также лицам, не обладающим опытом и необходимыми знаниями, без контроля и
предварительного обучения пользованием прибора со стороны ответственных
за их безопасность лиц.
- Дети должны находиться под надзором взрослых и не играть с прибором.
ПОДКЛЮЧЕНИЕ КАБЕЛЯ ПИТАНИЯ К СЕТИ
Прежде чем произвести установку вытяжки, проверьте соответствие напряжения, указанного на специ-
альной табличке внутри прибора, напряжению сети вашей квартиры. Если на вытяжке отсутствует вилка,
установите на кабеле питания стандартную вилку, соответствующую указанному на табличке характери-
стик напряжению. В случае прямого подключения прибора к сети между
ним и сетью необходимо уста-
новить многополюсный выключатель с минимальным разведением контактов 3 мм. Выключатель дол-
жен выдерживать нагрузку сети и соответствовать действующим нормам.
ПРИНАДЛЕЖНОСТИ
- 2 крепежные скобы C
- 1 переходной фланец G
- 1 фильтрующий штуцер H (по заказу)
- 2 угольных фильтра L (по заказу)

RU
1
19
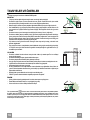
УСТАНОВКА
Вытяжка должна быть установлена над центром варочной панели. Минимальное расстояние между ва-
рочной панелью и нижней частью вытяжки должно составлять не менее 650 мм.
Для монтажа вытяжки необходимо выполнить описанные ниже действия.
1) Просверлить 6 отверстий (X1-X2-J) Ø 8 мм, соблюдая размеры, указанные на Рис. 1.
2) Для монтажа воспользоваться винтами и дюбелями, поставляемыми в комплекте.
3)
Закрепить скобы C (Рис. 2) на стене в отверстиях X1-X2.
4) Закрепить вытяжку на стене во внешних отверстиях J1 и J2 (Рис. 3).
5) Смонтировать исполнение с ВЫТЯЖНОЙ ВЕНТИЛЯЦИЕЙ или РЕЖИМОМ РЕЦИРКУЛЯ-
ЦИИ
• ВЫТЯЖНАЯ ВЕНТИЛЯЦИЯ
Для установки исполнения с вытяжной вентиляцией подсоединить вытяжку к отводящим трубам посред-
ством жесткой или гибкой трубы
ø150 или 120 мм (на усмотрение лица, выполняющего установку).
• При подсоединении посредством трубы ø120 мм вставить переходной фланец 9 в выпускное отвер-
стие корпуса вытяжки.
• Закрепить трубу соответствующими трубными зажимами. Необходимые для этого детали не входят в
комплект поставки.
• Снять, если имеются, угольные фильтры, предотвращающие появление запахов.
• ИСПОЛНЕНИЕ С РЕЖИМОМ
РЕЦИРКУЛЯЦИИ (ПО ЗАКАЗУ)
- Вставить фильтрующий штуцер H (Рис. 6).
- Установить угольные фильтры L (Рис. 7) и закрепить их, повернув по часовой стрелке (около 10°) до
щелчка. Для демонтажа выполнить указанные действия в обратной последовательности.
Монтаж дымоходов
6) Закрепить верхний дымоход A (Рис. 8) на скобах C (Рис. 2/Рис. 8), пользуясь 4 самонарезающими
винтами Ø2,9 мм, поставляемыми в
комплекте. Расстояние между крепежными отверстиями X1 и X2
определяется высотой верхнего дымохода H.
7) Приложить спереди нижний дымоход B (Рис. 9), раздвинув немного две боковые стороны, и вставить
его затем в вытяжку (Рис. 9).

RU
2
20
ЭКСПЛУАТАЦИЯ - ТЕХНИЧЕСКОЕ ОБСЛУЖИВАНИЕ
КСПЛУАТАЦИЯ
Рекомендуется включать прибор незадолго до начала приготовления пищи и оставлять его работать еще в
течение 15 минут после завершения приготовления или до тех пор, пока не будут устранены запахи.
1) Панель управления с выключателями
- Выключатель освещения.
- Переключатель скоростей работы
- Сигнальная лампочка работы двигателя
2) Панель управления с кнопками
- Кнопка включения двигателя
на первой скорости. Этот режим обеспечивает воздухообмен с пони-
женным шумом и используется при небольшом количестве паров и дыма.
- Кнопка включения двигателя на второй скорости. Этот режим пригоден для большинства условий
использования благодаря оптимальному соотношению между объемом пропускаемого воздуха и
уровнем шумов.
- Кнопка включения двигателя на третьей скорости. Этот
режим обеспечивает удаление максимально-
го объема паров и дыма, даже в течение длительного времени.
- Кнопка включения освещения.
ТЕХНИЧЕСКОЕ ОБСЛУЖИВАНИЕ
ВНИМАНИЕ! Прежде чем выполнять любые операции по техобслуживанию, ремонту или замене лам-
почек, необходимо отключить прибор от электрической сети.
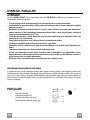
1. Освещение
Для освещения предусмотрено две лампочки мощностью по (28W - 40W)Вт. Для их замены следует
выполнить описанные ниже действия (Рис.10).
Вынуть один из штырей с боковой стороны плафона. Сдвинуть стекло в сторону
без штыря до осво-
бождения противоположного конца, затем потянуть слегка книзу. Заменить лампочки и установить
стекло, выполнив указанные действия в обратной последовательности.
2. Фильтры
Необходимо достаточно часто (с учетом режима использования вытяжки), но не реже раза в 2 месяца,
снимать металлические фильтры и мыть их в теплой мыльной воде или же непосредственно
в посу-
домоечной машине. После этого фильтры необходимо высушить и установить на свое место (уголь-
ные фильтры никогда не моются; их следует менять каждые 2 месяца).
3. Чистка
Для чистки внешних поверхностей вытяжки пользоваться мягкой тканью со спиртом или другими
подходящими средствами, имеющимися в продаже. Не следует пользоваться абразивными состава-
ми.
ВНИМАНИЕ! Наличие открытого огня представляет опасность для фильтров, поэтому не рекомен-
дуется оставлять горелку включенной без установленной сверху посуды. Необходимо выполнять
операции по чистке вытяжки и фильтров, а также периодическую замену последних, следуя нашим
инструкциям с тем, чтобы избежать опасности пожара.
ВНИМАНИЕ! Фирма-изготовитель не несет ответственности за возможный
ущерб, возникший в
результате недостаточного ухода за жировым фильтром (мойка каждые два месяца), невыполнения
замены угольного фильтра и несоблюдения описанных выше инструкций по монтажу и подключе-
нию к электрической сети.
Pagina se încarcă...
Pagina se încarcă...
Pagina se încarcă...
Pagina se încarcă...
Pagina se încarcă...
Pagina se încarcă...
Pagina se încarcă...
Pagina se încarcă...
Pagina se încarcă...
Pagina se încarcă...
Pagina se încarcă...
Pagina se încarcă...
Pagina se încarcă...
Pagina se încarcă...
Pagina se încarcă...
Pagina se încarcă...
Pagina se încarcă...
Pagina se încarcă...
Pagina se încarcă...
Pagina se încarcă...
Pagina se încarcă...
Pagina se încarcă...
Pagina se încarcă...
Pagina se încarcă...
Pagina se încarcă...
Pagina se încarcă...
Pagina se încarcă...
Pagina se încarcă...
Pagina se încarcă...
Pagina se încarcă...
Pagina se încarcă...
Pagina se încarcă...
Pagina se încarcă...
Pagina se încarcă...
Pagina se încarcă...
Pagina se încarcă...
Pagina se încarcă...
Pagina se încarcă...
Pagina se încarcă...
Pagina se încarcă...
Pagina se încarcă...
Pagina se încarcă...
Pagina se încarcă...
Pagina se încarcă...
Pagina se încarcă...
Pagina se încarcă...
Pagina se încarcă...
Pagina se încarcă...
Pagina se încarcă...
Pagina se încarcă...
Pagina se încarcă...
Pagina se încarcă...
-
 1
1
-
 2
2
-
 3
3
-
 4
4
-
 5
5
-
 6
6
-
 7
7
-
 8
8
-
 9
9
-
 10
10
-
 11
11
-
 12
12
-
 13
13
-
 14
14
-
 15
15
-
 16
16
-
 17
17
-
 18
18
-
 19
19
-
 20
20
-
 21
21
-
 22
22
-
 23
23
-
 24
24
-
 25
25
-
 26
26
-
 27
27
-
 28
28
-
 29
29
-
 30
30
-
 31
31
-
 32
32
-
 33
33
-
 34
34
-
 35
35
-
 36
36
-
 37
37
-
 38
38
-
 39
39
-
 40
40
-
 41
41
-
 42
42
-
 43
43
-
 44
44
-
 45
45
-
 46
46
-
 47
47
-
 48
48
-
 49
49
-
 50
50
-
 51
51
-
 52
52
-
 53
53
-
 54
54
-
 55
55
-
 56
56
-
 57
57
-
 58
58
-
 59
59
-
 60
60
-
 61
61
-
 62
62
-
 63
63
-
 64
64
-
 65
65
-
 66
66
-
 67
67
-
 68
68
-
 69
69
-
 70
70
-
 71
71
-
 72
72


Beko CWB 6441 XN Manualul proprietarului
- Categorie
- Hote pentru aragaz
- Tip
- Manualul proprietarului
în alte limbi
- português: Beko CWB 6441 XN Manual do proprietário