Indesit XWA 71251 WWG EU Manualul utilizatorului
- Categorie
- Mașini de spălat
- Tip
- Manualul utilizatorului

GB
1
Contents
Installation, 2-3
Unpacking and levelling
Connecting the electricity and water supplies
The first wash cycle
Technical data
Care and maintenance, 4
Cutting off the water or electricity supply
Cleaning the washing machine
Cleaning the detergent dispenser drawer
Caring for the door and drum of your appliance
Cleaning the pump
Checking the water inlet hose
Precautions and tips, 5
General safety
Load balancing system
Disposal
Description of the washing machine
and starting a wash cycle, 6-7
Control panel
Indicator lights
Starting a wash cycle
Wash cycles, 8
Push & Wash
Table of wash cycles
Personalisation, 9
Setting the temperature
Setting the spin speed
Functions
Detergents and laundry, 10
Detergent dispenser drawer
Bleach cycle
Preparing the laundry
Garments requiring special care
Troubleshooting, 11
Service, 12
Instructions for use
WASHING MACHINE
XWA 71251
English,1
GB
ES
Español,13
PL
Polski,25
RO
Română,37

2
GB
Levelling the machine correctly will provide
it with stability, help to avoid vibrations and
excessive noise and prevent it from shifting
while it is operating. If it is placed on carpet or
a rug, adjust the feet in such a way as to allow
a sufficient ventilation space underneath the
washing machine.
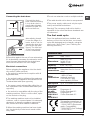
Connecting the electricity and water
supplies
Connecting the water inlet hose
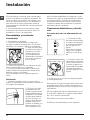
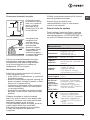
1. Connect the inlet
hose by screwing it
to a cold water tap
using a 3/4 gas thre-
aded connection (see
figure).
Before performing the
connection, allow the
water to run freely un-
til it is perfectly clear.
2. Connect the inlet
hose to the washing
machine by screwing
it onto the correspon-
ding water inlet of the
appliance, which is
situated on the top
right-hand side of the
rear part of the ap-
pliance (see figure).
3. Make sure that the hose is not folded over
or bent.
! The water pressure at the tap must fall within
the range of values indicated in the Technical
data table (see next page).
! If the inlet hose is not long enough, contact a
specialised shop or an authorised technician.
! Never use second-hand hoses.
! Use the ones supplied with the machine.
Installation
! This instruction manual should be kept in a
safe place for future reference. If the washing
machine is sold, transferred or moved, make
sure that the instruction manual remains with
the machine so that the new owner is able to
familiarise himself/herself with its operation
and features.
! Read these instructions carefully: they con-
tain vital information relating to the safe instal-
lation and operation of the appliance.
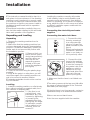
Unpacking and levelling
Unpacking
1. Remove the washing machine from its
packaging.
2. Make sure that the washing machine has
not been damaged during the transportation
process. If it has been damaged, contact the
retailer and do not proceed any further with
the installation process.
3. Remove the 4 pro-
tective screws (used
during transportation)
and the rubber wa-
sher with the cor-
responding spacer,
located on the rear
part of the appliance
(see figure).
4. Close off the holes using the plastic plugs
provided.
5. Keep all the parts in a safe place: you will
need them again if the washing machine ne-
eds to be moved to another location.
! Packaging materials should not be used as
toys for children.
Levelling
1. Install the washing machine on a flat sturdy
floor, without resting it up against walls, furni-
ture cabinets or anything else.
2. If the floor is not
perfectly level, com-
pensate for any une-
venness by tightening
or loosening the
adjustable front feet
(see figure); the angle
of inclination, measu-
red in relation to the
worktop, must not
exceed 2°.

GB
3
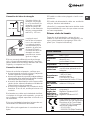
Connecting the drain hose
Connect the drain
hose, without bending
it, to a drain duct or
a wall drain situated
between 65 and 100
cm from the floor;
alternatively, placed
it over the edge of a
basin, sink or tub, fa-
stening the duct sup-
plied to the tap (see
figure). The free end
of the hose should
not be underwater.
! We advise against the use of hose extensions;
if it is absolutely necessary, the extension must
have the same diameter as the original hose
and must not exceed 150 cm in length.
Electrical connections
Before plugging the appliance into the electri-
city socket, make sure that:
• the socket is earthed and complies with all
applicable laws;
• the socket is able to withstand the maximum
power load of the appliance as indicated in the
Technical data table (see opposite);
• the power supply voltage falls within the va-
lues indicated in the Technical data table (see
opposite);
• the socket is compatible with the plug of the
washing machine. If this is not the case, repla-
ce the socket or the plug.
! The washing machine must not be installed
outdoors, even in covered areas. It is extremely
dangerous to leave the appliance exposed to
rain, storms and other weather conditions.
! When the washing machine has been instal-
led, the electricity socket must remain within
easy reach.
65 - 100 cm
! Do not use extension cords or multiple sockets.
! The cable should not be bent or compressed.
! The power supply cable must only be repla-
ced by authorised technicians.
Warning! The company shall not be held re-
sponsible in the event that these standards are
not observed.
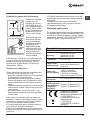
The first wash cycle
Once the appliance has been installed, and
before you use it for the first time, run a wash
cycle with detergent and no laundry, using the
wash cycle “Auto Clean” (see “Cleaning the
washing machine”).
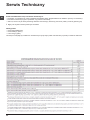
Technical data
Model
XWA 71251
Dimensions
width 59.5 cm
height 85 cm
depth 54 cm
Capacity
from 1 to 7 kg
Electrical
connections
please refer to the technical
data plate fixed to the ma-
chine
Water
connections
maximum pressure
1 MPa (10 bar)
minimum pressure
0.05 MPa (0.5 bar)
drum capacity 52 litres
Spin speed
up to 1200 rotations per minute
Test wash
cycles in
accordan-
ce with
directives
1061/2010
and
1015/2010
Programme 8:
Cotton Standard 60°.
Programme 9:
Cotton Standard 40°.
This appliance conforms to
the following EC Directives:
- 2004/108/EC (Electroma-
gnetic Compatibility)
- 2006/95/EC (Low Voltage)
- 2012/19/EU

4
GB
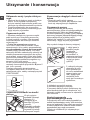
Care and maintenance
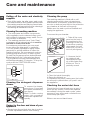
Cleaning the pump
The washing machine is fitted with a self-
cleaning pump which does not require any
maintenance. Sometimes, small items (such
as coins or buttons) may fall into the protective
pre-chamber at the base of the pump.
! Make sure the wash cycle has finished and
unplug the appliance.
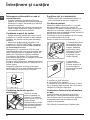
To access the pre-chamber:
1. Take off the cover
panel on the front of
the machine by first
pressing it in the cen-
tre and then pushing
downwards on both
sides until you can re-
move it (see figures).
2. Unscrew the lid
by rotating it anti-
clockwise (see figu-
re): a little water may
trickle out. This is
perfectly normal.
3. Clean the inside thoroughly.
4. Screw the lid back on.
5. Reposition the panel, making sure the hooks
are securely in place before you push it onto
the appliance.
Checking the water inlet hose
Check the inlet hose at least once a year. If
there are any cracks, it should be replaced
immediately: during the wash cycles, water
pressure is very strong and a cracked hose
could easily split open.
! Never use second-hand hoses.
Cutting off the water and electricity
supplies
• Turn off the water tap after every wash cycle.
This will limit wear on the hydraulic system inside
the washing machine and help to prevent leaks.
• Unplug the washing machine when cleaning it
and during all maintenance work.
Cleaning the washing machine
• The outer parts and rubber components
of the appliance can be cleaned using a soft
cloth soaked in lukewarm soapy water. Do not
use solvents or abrasives.
• The washing machine has a “Auto Clean”
programme for its internal parts that must be
run with no load in the drum.
For maximum performance you may want
to use either the detergent (i.e. a quantity
10% the quantity specified for lightly-soiled
garments) or special additives to clean the
washing machine. We recommend running a
cleaning programme every 40 wash cycles.
To start the programme press buttons A and
B simultaneously for 5 seconds (see figure).
The programme will start automatically and
will last approximately 70 minutes. To stop the
cycle press the START/PAUSE button.
Cleaning the detergent dispenser
drawer
To remove the drawer,
press lever (1) and pull
the drawer outwards (2)
(see figure).
Wash it under running
water; this procedure
should be repeated fre-
quently.
Caring for the door and drum of your
appliance
• Always leave the porthole door ajar in order to
prevent unpleasant odours from forming.
2
1
1
2
3
A
B

GB
5
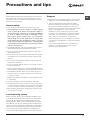
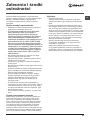
Precautions and tips
! This washing machine was designed and constructed in
accordance with international safety regulations. The fol-
lowing information is provided for safety reasons and must
therefore be read carefully.
General safety
• This appliance was designed for domestic use only.
• This appliance can be used by children aged
from 8 years and above and persons with re-
duced physical, sensory or mental capabilities
or lack of experience and knowledge if they
have been given supervision or instruction
concerning use of the appliance in a safe way
and understand the hazards involved. Children
shall not play with the appliance. Cleaning and
user maintenance shall not be made by children
without supervision.
• The washing machine must only be used by adults, in accor-
dance with the instructions provided in this manual.
• Do not touch the machine when barefoot or with wet or
damp hands or feet.
• Do not pull on the power supply cable when unplugging
the appliance from the electricity socket. Hold the plug
and pull.
• Do not open the detergent dispenser drawer while the
machine is in operation.
• Do not touch the drained water as it may reach extreme-
ly high temperatures.
• Never force the porthole door. This could damage the safety
lock mechanism designed to prevent accidental opening.
• If the appliance breaks down, do not under any circum-
stances access the internal mechanisms in an attempt
to repair it yourself.
• Always keep children well away from the appliance while
it is operating.
• The door can become quite hot during the wash cycle.
• If the appliance has to be moved, work in a group of two
or three people and handle it with the utmost care. Never
try to do this alone, because the appliance is very heavy.
• Before loading laundry into the washing machine, make
sure the drum is empty.
Load balancing system
Before every spin cycle, to avoid excessive vibrations and
to distribute the load in a uniform manner, the drum rotates
continuously at a speed which is slightly greater than the
washing rotation speed. If, after several attempts, the load is
not balanced correctly, the machine spins at a reduced spin
speed. If the load is excessively unbalanced, the washing ma-
chine performs the distribution process instead of spinning.
To encourage improved load distribution and balance, we
recommend small and large garments are mixed in the load.
Disposal
• Disposing of the packaging materials: observe local
regulations so that the packaging may be re-used.
• The European Directive 2012/19/EU on Waste
Electrical and Electronic Equipment, requires that
old household electrical appliances must not be
disposed of in the normal unsorted municipal waste
stream. Old appliances must be collected
separately in order to optimise the recovery and
recycling of the materials they contain and reduce
the impact on human health and the environment.
The crossed out “wheeled bin” symbol on the
product reminds you of your obligation, that when
you dispose of the appliance it must be separately
collected.
Consumers should contact their local authority or
retailer for information concerning the correct
disposal of their old appliance.

6
GB
Detergent dispenser drawer: used to dispense
detergents and washing additives (see “Detergents and
laundry”).
ON/OFF button: switches the washing machine on and off.
PUSH & WASH button: (see “Wash cycles”).
WASH CYCLE knob: programmes the wash cycles. Du-
ring the wash cycle, the knob does not move.
FUNCTION buttons with indicator light: used to select the
available functions. The indicator light corresponding to the
selected function will remain lit.
TEMPERATURE button: sets the temperature or the cold
wash cycle (see “Personalisation”).
SPIN button: sets the spin speed or exclude the spin cycle
completely (see “Personalisation”).
DELAY TIMER button: delays the start of the wash cycle
by up to 9 hours.
Press the button repeatedly until the indicator light corre-
sponding to the desired delay time turns on.
When the button is pressed for the fourth time, the option
will be deactivated.
N.B.: once the START/PAUSE button has been pressed,
the delay time can only be modified by decreasing it until
the set programme is launched.
! This option is available on all programmes.
WASH CYCLE PROGRESS
indicator light
s: used to
monitor the progress of the wash cycle.
The illuminated indicator light shows which phase is in
progress.
DOOR LOCKED indicator light: indicates whether the
door may be opened or not (see next page).
START/PAUSE button with indicator light: starts or tem-
porarily interrupts the wash cycles.
N.B. To pause the wash cycle in progress, press this
button; the corresponding indicator light will flash orange,
while the indicator light for the current wash cycle phase
will remain lit in a fixed manner. If the DOOR LOCKED
indicator light is switched off, the door may be opened
(wait approximately 3 minutes).
To start the wash cycle from the point at which it was inter-
rupted, press this button again.
Standby mode
This washing machine, in compliance with new energy sa-
ving regulations, is fitted with an automatic standby system
which is enabled after about 30 minutes if no activity is
detected. Press the ON-OFF button briefly and wait for the
machine to start up again.
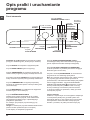
Description of the washing
machine and starting a wash cycle
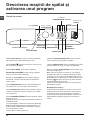
Control panel
WASH CYCLE PROGRESS
indicator lights
DOOR
LOCKED
indicator light
START/PAUSE
button with indicator
light
Detergent dispenser drawer
ON/OFF
button
WASH CYCLE
knob
DELAY TIMER
button
TEMPERATURE
button
SPIN
button
FUNCTION
buttons with
indicator lights
PUSH & WASH
button

GB
7
Indicator lights
The indicator lights provide important information.
This is what they can tell you:
Delayed start
If the DELAY TIMER function has been activated (see “Per-
sonalisation”), after the wash cycle has been started the
indicator light corresponding to the selected delay period
will begin to flash:
As time passes, the remaining delay will be displayed and
the corresponding indicator light will flash:
The set programme will start once the selected time delay
has expired.
Wash cycle phase indicator lights
Once the desired wash cycle has been selected and has be-
gun, the indicator lights switch on one by one to indicate which
phase of the cycle is currently in progress.
Function buttons and corresponding indicator lights
When a function is selected, the corresponding indicator
light will illuminate.
If the selected function is not compatible with the program-
med wash cycle, the corresponding indicator light will flash
and the function will not be activated.
If the selected option is not compatible with another
previously selected option, the indicator light will flash
accompanied by a buzzer (3 beeps), and only the latter
option will be activated; the indicator light corresponding to
the activated option will turn on
Door locked indicator light
When the indicator light is on, the porthole door is locked
to prevent it from being opened; make sure the indicator
light is off before opening the door (wait approximately 3
minutes).
To open the door during a running wash cycle, press the
START/PAUSE button; the door may be opened once the
DOOR LOCKED indicator light turns off.
Starting a wash cycle
Rapid programming
1. LOAD THE LAUNDRY. Open the porthole door.
Load the laundry, making sure you do not exceed
the maximum load value indicated in the table of
programmes and wash cycles on the following page.
2. ADD THE DETERGENT. Pull out the detergent
dispenser drawer and pour the detergent into the
relevant compartments as described in “Detergents and
laundry”.
3. CLOSE THE DOOR.
4. Press the “PUSH & WASH” button to start the wash
programme.
Traditional programming
1. Turn the washing machine on by pressing the ON/OFF
button. All the indicator lights will turn on for a few secon-
ds, then only the indicator lights relative to the selected
programme settings will remain lit and the START/PAUSE
indicator light will flash.
2. Load the laundry and close the door.
3. Set the WASH CYCLE knob to the desired programme.
4. Set the washing temperature (see “Personalisation”).
5. Set the spin speed (see “Personalisation”).
6. Measure out the detergent and washing additives (see
“Detergents and laundry”).
7. Select the desired functions.
8. Start the wash cycle by pressing the START/PAUSE
button and the corresponding indicator light will remain lit
in a fixed manner in green. To cancel the set wash cycle,
pause the machine by pressing the START/PAUSE button
and select a new cycle.
9. At the end of the wash cycle the END indicator light
will switch on. The door can be opened once the DOOR
LOCK indicator light turns off (wait approximately 3 mi-
nutes). Take out your laundry and leave the appliance door
ajar to make sure the drum dries completely. Switch the
washing machine off by pressing the ON/OFF button.
Wash
Rinse
Spin
Drain
End of wash cycle
END

8
GB
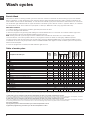
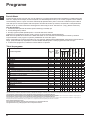
Wash cycles
Table of wash cycles
Push & Wash
This function allows for starting a wash cycle even when the machine is switched off without having to press the ON/OFF
button in advance, or after switching on the machine, without having activated any button and/or selector (otherwise, the
Push & Wash function will be deactivated). To start the Push & Wash cycle press and hold the relative button for 2 seconds.
The lit indicator light indicates that the cycle has started. This wash cycle is ideal for cotton or synthetic fabrics, as it washes
at a temperature of 30° and a maximum spin speed of 1200 rpm. Maximum load 3,5 kg. (Cycle duration 50’).
How does it work?
1. Load the laundry (cotton and/or synthetic garments) and close the door.
2. Pour the detergent and additives.
3. Start the programme by pressing and holding the Push & Wash button for 2 seconds. The relative indicator light turns
green and the door will lock (the DOOR LOCKED symbol turns on).
N.B.: starting the wash cycle through the Push & Wash button activates an automatic non-customisable cycle
recommended for cotton and synthetic fabrics. This programme does not allow for setting any additional options.
To open the door while an automatic cycle is under way, press the START/PAUSE button; if the DOOR LOCKED symbol
is switched off the door may be opened. Press the START/PAUSE button again to restart the wash cycle from the point at
which it was interrupted.
4. Once the programme is finished, the END indicator light turns on.
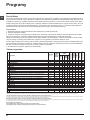
The length of cycle shown on the display or in this booklet is an estimation only and is calculated assuming standard working conditions. The actual duration can vary accor-
ding to factors such as water temperature and pressure, the amount of detergent used, the amount and type of load inserted, load balancing and any wash options selected.
1) Test wash cycle in compliance with directive 1061/2010: set wash cycle 8 with a temperature of 60°C.
This cycle is designed for cotton loads with a normal soil level and is the most efficient in terms of both electricity and water consumption; it should
be used for garments which can be washed at 60°C. The actual washing temperature may differ from the indicated value.
2) Test wash cycle in compliance with directive 1061/2010: set wash cycle 9 with a temperature of 40°C.
This cycle is designed for cotton loads with a normal soil level and is the most efficient in terms of both electricity and water consumption; it should
be used for garments which can be washed at 40°C. The actual washing temperature may differ from the indicated value.
For all Test Institutes:
2) Long wash cycle for cottons: set wash cycle 9 with a temperature of 40°C.
3) Synthetic program along: set wash cycle 10 with a temperature of 40°C.
Wash cycles
Description of the wash cycle
Max.
temp.
(°C)
Max.
speed
(rpm)
Detergents
Max. load (kg)
Residual
dampness %
Energy
consumption
kWh
Total water lt
Cycle duration
Prewash
Wash
Fabric
softener
Bleach
Special
1
Sport
30° 600 -
- 3,5 - - - 55’
2
Dark
30° 800 -
- 4 - - - 70’
3
Anti-odour (Cotton)
60° 1000 -
- 3,5 - - - 110’
3
Anti-odour (Synthetic)
40° 1000 -
- 3,5 - - - 100’
4
Delicate
30° 0 -
- 1 - - - 80’
5
Wool: for wool, cashmere, etc. 40° 800 -
- 1,5 - - - 70’
6
Duvet: for down-stuffed garments. 30° 1000 -
- 2 - - - 110’
Standard
7
Cottons with Pre-wash: extremely soiled whites. 90° 1200
- 7 53 2,15 77 170’
8
Cotton Standard 60° (1): heavily soiled whites and resistant colours.
60°
(Max. 90°)
1200 -
- 7 53 1,13 52,5 180’
9
Cotton Standard 40° (2): lightly soiled whites and delicate colours.
40° 1200 -
- 7 53 1,00 75 170’
10
Synthetic: heavily soiled resistant colours. 60° 800 -
- 3,5 46 0,79 46 110’
10
Synthetic (3): lightly soiled resistant colours. 40° 800 -
- 3,5 46 0,56 46 100’
11
Coloured
40° 1200 -
- 7 53 0,89 70 100’
Eco & Rapid
12
Cotton Standard 20°: lightly soiled whites and delicate colours. 20° 1200 -
- 7 - - - 170’
13
20’ Refresh
20° 800 -
- 1,5 - - - 20’
14
Rapid 60’
60° 1000 -
- 7 - - - 60’
Partials
Rinse/Bleach - 1200 - -
7 - - - 50’
Spin + Drain - 1200 - - - - 7 - - - 25’

GB
9
Setting the temperature
Press the TEMPERATURE button to set the wash temperature (see Table of wash cycles).
The temperature may be lowered, or even set to a cold wash . The washing machine will automatically prevent you from
selecting a temperature which is higher than the maximum value set for each wash cycle.
! Exception: if the 8 programme is selected, the temperature can be increased up to a value of 90°C.
Setting the spin speed
Press the SPIN SPEED button to set the spin speed for the selected wash cycle.
The maximum spin speeds available for each wash cycle are as follows:
Wash cycles Maximum spin speed
Cottons 1200 rpm
Synthetics 800 rpm
Wool 800 rpm
The spin speed may be lowered, or the spin cycle can be excluded altogether by selecting the symbol .
The washing machine will automatically prevent you from selecting a spin speed which is higher than the maximum speed
set for each wash cycle.
Functions
The various wash functions available with this washing machine will help to achieve the desired results, every time.
To activate the functions:
1. Press the button corresponding to the desired function;
2. the function is enabled when the corresponding indicator light is illuminated.
Note: If the indicator light flashes rapidly, this signals that this particular function may not be selected in conjunction with the
selected wash cycle.
Stain removal
This option allows for selecting the type of dirt so as to optimally adjust the cycle for removing the stains. The following types
of dirt can be selected:
- Food, for stains caused by foodstuffs and beverages, for example.
- Work, for grease and ink stains, for example.
- Outdoor, for mud and grass stains, for example.
! The wash cycle duration varies according to the type of selected dirt.
! It cannot be used in conjunction with wash cycles 1-2-3-4-5-6-7-11-12-13-14- - .
Fast Forward
During a wash programme and under certain conditions, pressing this button allows for ending the wash programme after
only 20’ if necessary, by performing a brief rinse cycle followed by a spin cycle at maximum 800 rpm or lower, if reduced
manually during the programme customisation phase. In this case, washing and rinsing performance will be reduced. After
pressing the button, the relative indicator light turns on together with the indicator light of the rinse phase. If the selected
temperature is equal to 40° and/or the button is pressed during the initial phase of the programme, the “Fast Forward” option
lasts longer so that the detergent can dissolve properly and avoid damaging the fabrics. In this case, the rinse phase indica-
tor light flashes while the wash indicator light remains fixed until the necessary activation conditions are fulfilled. If less than
20’ remain of the wash programme, the option will be disabled.
! It cannot be used in conjunction with wash cycles 2-4-5-6-13-14- - .
Easy iron
By selecting this function, the wash and spin cycles will be modified in order to reduce the formation of creases. At the end
of the cycle the washing machine will perform slow rotations of the drum, while the EASY IRON and START/PAUSE indicator
lights will flash and the END led will remain lit in a fixed manner. To end the cycle, press the START/PAUSE button or the
EASY IRON button.
! It cannot be used in conjunction with wash cycles 1-3-5-13-14- - .
Extra Rinse
By selecting this option, the efficiency of the rinse is increased and optimal detergent removal is guaranteed. It is particularly
useful for sensitive skin.
! It cannot be used in conjunction with wash cycles 2-4-13-14- .
Personalisation

10
GB
Detergents and laundry
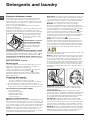
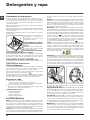
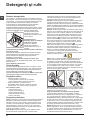
Detergent dispenser drawer
Successful washing results also depend on the correct
dose of detergent: adding too much detergent will not
necessarily result in a more efficient wash, and may in fact
cause build up on the inside of your appliance and contri-
bute to environmental pollution.
! Do not use hand washing detergents because these
create too much foam.
! Use powder detergent for white cotton garments, for pre-
washing, and for washing at temperatures over 60°C.
! Follow the instructions given on the detergent packaging.
Open the detergent dispen-
ser drawer and pour in the
detergent or washing additi-
ve, as follows.
Compartment 1: Pre-wa-
sh detergent (powder)
Before pouring in the deter-
gent, make sure that extra
compartment 4 has been
removed.
Compartment 2: Washing detergent (powder or liquid)
If liquid detergent is used, it is recommended that the remo-
vable plastic partition A (supplied) be used for proper dosage.
If powder detergent is used, place the partition into slot B.
Compartment 3: Additives (fabric softeners, etc.)
The fabric softener must not exceed the “max” level indica-
ted on the central pin.
Extra compartment 4: Bleach
Bleach cycle
Insert the additional compartment 4 (provided) into com-
partment 1. In pouring the bleach do not exceed the
“max” level indicated on the central pin.
Perform bleaching by pouring the bleach into additional
compartment 4 and set the programme .
! Traditional bleach should be used on resistant white
fabrics, and delicate bleach for coloured and synthetics
fabrics and for wool.
Preparing the laundry
• Divide the laundry according to:
- the type of fabric/the symbol on the label
- the colours: separate coloured garments from whites.
• Empty all garment pockets and check the buttons.
• Do not exceed the values listed in the “Table of wash
cycles”, which refer to the weight of the laundry when dry.
How much does your laundry weigh?
1 sheet 400-500 g
1 pillow case 150-200 g
1 tablecloth 400-500 g
1 bathrobe 900-1.200 g
1 towel 150-250 g
Garments requiring special care
Sport (programme 1) is designed for washing lightly soiled
sports clothing (tracksuits, shorts, etc.); for best results, we
recommend not exceeding the maximum load indicated
in the “Table of wash cycles”. We recommend using liquid
detergent, and adding the amount suitable for a half-load.
Dark: use cycle 2 to wash dark-coloured garments. This
programme is designed to maintain dark colours over
time. We recommend using a liquid detergent for the best
results when washing dark-coloured garments.
Anti-odour: use programme 3 for washing garments with
bad odours (e.g. smoke, sweat, fried food). The program-
me is designed to remove bad odours while preserving the
fabric fibres. Synthetics fabrics or mixed loads should be
washed at 40°, and resistant cotton fabrics at 60°.
Delicate: use programme 4 to wash very delicate
garments. It is advisable to turn the garments inside out
before washing them. For best results, use liquid detergent
on delicate garments. For washing Silk items and Curtains,
select the relevant cycle and activate the option (in
this case it will also be possible to enable the “Extra Rinse”
option); the machine will end the cycle with the laundry
soaked and the indicator light will flash. To drain the water
so that the laundry can be removed, press the START/
PAUSE button ro the option .
Wool: the wool wash cycle of this machine has been
tested and approved by The Woolmark Company for the
washing of wool containing garments labelled as “hand
wash” provided that the garments are washed according
to the instructions on the garment label and those issued
by the manufacturer of this washing machine. (M1126)
In UK, Eire, Hong Kong and India the Woolmark trade mark
is a Certification trade mark.
Duvet: to wash single duvets (the weight of which should
not exceed 2 kg), cushions or clothes padded with goose
down such as puffa jackets, use the special wash cycle
number 6. We recommend that duvets are placed in the
drum with their edges folded inwards (see figure) and that
no more than ¾ of the total volume of the drum is used.
To achieve the best results, we recommend that a liquid
detergent is used and placed inside the detergent dispen-
ser drawer.
Coloured: use this cycle 11 to wash bright coloured
clothes. The programme is designed to maintain bright
colours over time.
Cotton Standard 20° (programme 12) ideal for lightly
soiled cotton loads. The effective performance levels achieved
at cold temperatures, which are comparable to washing at
40°, are guaranteed by a mechanical action which operates
at varying speed, with repeated and frequent peaks.
20’ Refresh (programme 13) ideal for refreshing and
washing lightly soiled garments in a few minutes. It lasts
just 20 minutes and therefore saves both time and energy.
It can be used to wash different types of fabrics together
(except for wool and silk), with a maximum load of 1.5 kg.
Rapid 60’ (programme 14) is designed to wash moderately
soiled resistant cotton garments at 60° in an hour, with good
washing performance. For synthetic or mixed garments, we
recommend lowering the temperature down to 40°.
1
2
3
4
A
B

GB
11
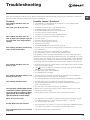
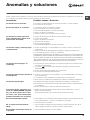
Troubleshooting
Your washing machine could fail to work. Before contacting the Technical Assistance Centre (see “Assistance”), make sure
that the problem cannot be solved easily using the following list.
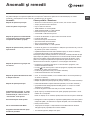
Problem:
The washing machine does not
switch on.
The wash cycle does not start.
The washing machine does not
take in water (the indicator light for
the first wash cycle stage flashes
rapidly).
The washing machine continuously
takes in and drains water.
The washing machine does not
drain or spin.
The washing machine vibrates a lot
during the spin cycle.
The washing machine leaks.
The “Functions” indicator lights and the
“start/pause” indicator light flash, while
one of the “phase in progress” indicator
lights and the “door locked” indicator
light will remain lit in a fixed manner.
There is too much foam.
Push & Wash does not activate.
The programme lasts a lot less that
expected.
Possible causes / Solutions:
• The appliance is not plugged into the socket fully, or is not making contact.
• There is no power in the house.
• The washing machine door is not closed properly.
• The ON/OFF button has not been pressed.
• The START/PAUSE button has not been pressed.
• The water tap has not been opened.
• A delayed start has been set (see “Personalisation”).
• The water inlet hose is not connected to the tap.
• The hose is bent.
• The water tap has not been opened.
• There is no water supply in the house.
• The pressure is too low.
• The START/PAUSE button has not been pressed.
• The drain hose is not fitted at a height between 65 and 100 cm from the floor
(see “Installation”).
• The free end of the hose is under water (see “Installation”).
• The wall drainage system is not fitted with a breather pipe.
If the problem persists even after these checks, turn off the water tap, switch
the appliance off and contact the Assistance Service. If the dwelling is on one of
the upper floors of a building, there may be problems relating to water drainage,
causing the washing machine to fill with water and drain continuously. Special
anti-draining valves are available in shops and help to avoid this inconvenience.
• The wash cycle does not include draining: some wash cycles require the drain
phase to be started manually.
• The function is enabled: to complete the wash cycle, press the START/
PAUSE button (“Personalisation”).
• The drain hose is bent (see “Installation”).
• The drainage duct is clogged.
• The drum was not unlocked correctly during installation (see “Installation”).
• The washing machine is not level (see “Installation”).
• The washing machine is trapped between cabinets and walls (see “Installation”).
• The water inlet hose is not screwed on properly (see “Installation”).
• The detergent dispenser drawer is blocked (for cleaning instructions, see
“Care and maintenance”).
• The drain hose is not fixed properly (see “Installation”).
• Switch off the machine and unplug it, wait for approximately 1 minute and
then switch it back on again.
If the problem persists, contact the Technical Assistance Service.
• The detergent is not suitable for machine washing (it should display the text
“for washing machines” or “hand and machine wash”, or the like).
• Too much detergent was used.
• After switching on the machine a control other than Push & Wash was activa-
ted. Switch the machine off and press the Push & Wash button.
• The “Fast Forward” option was activated.

12
GB
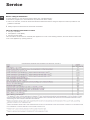
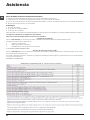
Service
Before calling for Assistance:
• Check whether you can solve the problem alone (see “Troubleshooting”);
• Restart the programme to check whether the problem has been solved;
• If this is not the case, contact an authorised Technical Assistance Centre using the telephone number provided on the
guarantee certificate.
! Always request the assistance of authorised technicians.
Have the following information to hand:
• the type of problem;
• the appliance model (Mod.);
• the serial number (S/N).
This information can be found on the data plate applied to the rear of the washing machine, and can also be found on the
front of the appliance by opening the door.

ES
13
Español
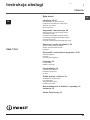
Sumario
Instalación, 14-15
Desembalaje y nivelación
Conexiones hidráulicas y eléctricas
Primer ciclo de lavado
Datos técnicos
Mantenimiento y cuidados, 16
Interrumpir el agua y la corriente eléctrica
Limpiar la lavadora
Limpiar el cajón de detergentes
Cuidar la puerta y el cesto
Limpiar la bomba
Controlar el tubo de alimentación de agua
Precauciones y consejos, 17
Seguridad general
Sistema de equilibrado de la carga
Eliminaciones
Descripción de la lavadora y comienzo
de un programa, 18-19
Panel de control
Pilotos
Poner en marcha un programa
Programas, 20
Push & Wash
Tabla de programas
Personalizaciones, 21
Seleccionar la temperatura
Seleccionar el centrifugado
Funciones
Detergentes y ropa, 22
Contenedor de detergentes
Ciclo de blanqueo
Preparar la ropa
Prendas especiales
Anomalías y soluciones, 23
Asistencia, 24
ES
XWA 71251
Manual de instrucciones
LAVADORA

14
ES
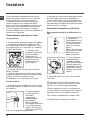
Instalación
! Es importante conservar este manual para
poder consultarlo en cualquier momento. En
caso de venta, de cesión o de traslado, veri-
fique que permanezca junto con la lavadora
para informar al nuevo propietario sobre el
funcionamiento y brindar las correspondientes
advertencias.
! Lea atentamente las instrucciones: ellas
contienen importante información sobre la
instalación, el uso y la seguridad.
Desembalaje y nivelación
Desembalaje
1. Desembale la lavadora.
2. Controle que la lavadora no haya sufri-
do daños durante el transporte. Si estuviera
dañada no la conecte y llame al revendedor.
3. Quite los 4 tornillos
de protección para el
transporte y la aran-
dela de goma con
el correspondiente
distanciador ubicados
en la parte posterior
(ver la figura).
4. Cubra los orificios con los tapones de plá-
stico suministrados con el aparato.
5. Conserve todas las piezas: cuando la la-
vadora deba ser transportada nuevamente,
deberán volver a colocarse.
! Los embalajes no son juguetes para los
niños.
Nivelación
1. Instale la lavadora sobre un piso plano y
rígido, sin apoyarla en las paredes, muebles ni
en ningún otro aparato.
2. Si el piso no está
perfectamente hori-
zontal, compense las
irregularidades desen-
roscando o enroscan-
do las patas delante-
ras (ver la figura); el
ángulo de inclinación
medido sobre la su-
perficie de trabajo, no
debe superar los 2º.
Una cuidadosa nive-
lación brinda estabilidad a la máquina y evita
vibraciones, ruidos y desplazamientos durante
el funcionamiento. Cuando se instala sobre
moquetas o alfombras, regule los pies para
conservar debajo de la lavadora un espacio
suficiente para la ventilación.
Conexiones hidráulicas y eléctri-
cas
Conexión del tubo de alimentación de
agua
1. Conectar el tubo
de tubo enroscándolo
a un grifo de agua fría
con la boca roscada
de 3/4 gas (ver la
figura).
Antes de conectarlo,
haga correr el agua
hasta que esté límpi-
da.
2. Conecte el tubo de
alimentación a la lava-
dora enroscándolo en
la toma de agua cor-
respondiente ubicada
en la parte posterior
derecha (arriba) (ver la
figura).
3. Controle que en el tubo no hayan pliegues
ni estrangulaciones.
! La presión de agua del grifo debe estar com-
prendida dentro de los valores contenidos en
la tabla de Datos técnicos (ver la página corre-
spondiente).
! Si la longitud del tubo de alimentación no es
la suficiente, diríjase a un negocio especializa-
do o a un técnico autorizado.
! No utilice nunca tubos ya usados.
! Utilice los suministrados con la máquina.

ES
15
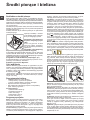
Conexión del tubo de desagüe
Conecte el tubo de
desagüe, sin plegar-
lo, a un conducto de
desagüe o a una de-
sagüe de pared ubi-
cados a una distancia
del piso comprendida
entre 65 y 100 cm.;
o apóyelo en el
borde de un lavama-
nos o de una bañe-
ra, uniendo la guía
suministrada con el
aparato, al grifo (ver
la figura). El extre-
mo libre del tubo de
desagüe no debe
permanecer sumer-
gido en el agua.
! No se aconseja utilizar tubos de prolonga-
ción, si fuera indispensable hacerlo, la prolon-
gación debe tener el mismo diámetro del tubo
original y no superar los 150 cm.
Conexión eléctrica
Antes de enchufar el aparato, verifique que:
• la toma tenga la conexión a tierra y haya sido
hecha según las normas legales;
• la toma sea capaz de soportar la carga máxima
de potencia de la máquina indicada en la tabla
de Datos técnicos (ver al costado);
• la tensión de alimentación esté comprendida
dentro de los valores indicados en la tabla de
Datos técnicos (ver al costado);
• la toma sea compatible con el enchufe de la
lavadora. Si no es así, sustituya la toma o el
enchufe.
! La lavadora no debe ser instalada al aire libre,
ni siquiera si el lugar está reparado, ya que es
muy peligroso dejarla expuesta a la lluvia o a
las tormentas.
! Una vez instalada la lavadora, la toma de cor-
riente debe ser fácilmente accesible.
! No utilice prolongaciones ni conexiones múl-
tiples.
65 - 100 cm
! El cable no debe estar plegado ni sufrir com-
presiones.
! El cable de alimentación debe ser sustituido
sólo por técnicos autorizados.
¡Atención! La empresa fabricante declina toda
responsabilidad en caso de que estas normas
no sean respetadas.
Primer ciclo de lavado
Después de la instalación y antes del uso,
realice un ciclo de lavado con detergente y sin
ropa, seleccionando el programa “Auto Lim-
pieza” (ver “Limpiar la lavadora”).
Datos técnicos
Modelo
XWA 71251
Dimensio-
nes
ancho 59.5 cm
altura 85 cm
profundidad 54 cm
Capacidad
de 1 a 7 kg
Conexiones
eléctricas
ver la placa de característi-
cas técnicas aplicada en la
máquina
Conexiones
hídricas
presión máxima
1 MPa (10 bar)
presión mínima
0,05 MPa (0,5 bar)
capacidad del cesto 52 litros
Velocidad
de centrifu-
gado
máxima 1200 r.p.m.
Programas
de control
según las
directivas
1061/2010 y
1015/2010
programa 8;
Algodón Standard 60ºC.
programa 9;
Algodón Standard 40ºC.
Esta máquina cumple con lo
establecido por las siguientes
Directivas de la Comunidad:
- 2004/108/CE (Compatibili-
dad Electromagnética)
- 2012/19/EU
- 2006/95/CE (Baja Tensión)

16
ES
Mantenimiento y cuidados
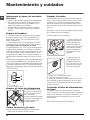
Limpiar la bomba
La lavadora posee una bomba autolimpiante
que no necesita mantenimiento. Pero puede
suceder que objetos pequeños (monedas,
botones) caigan en la precámara que prote-
ge la bomba, situada en la parte inferior de la
misma.
! Verifique que el ciclo de lavado haya termina-
do y desenchufe la máquina.
Para acceder a la precámara:
1. quite el panel de
cobertura delantero
de la máquina pre-
sionando hacia el
centro, luego empuje
hacia abajo desde
ambos costados y
extráigalo (ver las
figuras).
2. desenrosque la
tapa girándola en
sentido antihorario
(ver la figura): es nor-
mal que se vuelque
un poco de agua;
3. limpie con cuidado el interior;
4. vuelva a enroscar la tapa;
5. vuelva a montar el panel verificando, antes
de empujarlo hacia la máquina, que los gan-
chos se hayan introducido en las correspon-
dientes ranuras.
Controlar el tubo de alimentación
de agua
Controle el tubo de alimentación al menos
una vez al año. Si presenta grietas o rajaduras
debe ser sustituido: durante los lavados, las
fuertes presiones podrían provocar roturas
imprevistas.
! No utilice nunca tubos ya usados.
Interrumpir el agua y la corriente
eléctrica
• Cierre el grifo de agua después de cada lavado.
De este modo se limita el desgaste de la
instalación hidráulica de la lavadora y se
elimina el peligro de pérdidas.
• Desenchufe la máquina cuando la debe
limpiar y durante los trabajos de manteni-
miento.
Limpiar la lavadora
• La parte externa y las partes de goma se
pueden limpiar con un paño embebido en
agua tibia y jabón. No use solventes ni pro-
ductos abrasivos.
• La lavadora posee un programa de “Auto
Limpieza” de su interior que se debe realizar
sin ningún tipo de carga en el cesto.
El detergente (en un 10% de la cantidad acon-
sejada para prendas poco sucias) o algunos
aditivos específicos para la limpieza de la ropa
se podrán utilizar como coadyuvantes en el
programa de lavado. Se aconseja efectuar el
programa de limpieza cada 40 ciclos de lava-
do.
Para activar el programa pulse simultáneamente
los botones A y B durante 5 segundos (ver la fi-
gura). El programa comenzará automáticamente
y tendrá una duración de 70 minutos aproxima-
damente. Para detener el ciclo presione el botón
START/PAUSE.
Limpiar el cajón de detergentes
Para extraer el cajón,
presione la palanca (1)
y tire hacia afuera (2)
(ver la figura).
Lávelo debajo del agua
corriente, esta limpieza
se debe realizar fre-
cuentemente.
Cuidar la puerta y el cesto
• Deje siempre semicerrada la puerta para
evitar que se formen malos olores.
1
2
3
2
1
A
B

ES
17
Precauciones y consejos
! La lavadora fue proyectada y fabricada en conformidad
con las normas internacionales de seguridad. Estas adver-
tencias se suministran por razones de seguridad y deben
ser leídas atentamente.
Seguridad general
• Este aparato ha sido fabricado para un uso de tipo
doméstico exclusivamente.
• Este aparato puede ser utilizado por niños de
8 años o más y por personas con capacidades
físicas, sensoriales o mentales disminuidas o
con experiencia y conocimientos insuficientes
siempre que sean supervisados o que hayan
recibido una adecuada formación sobre el uso
del aparato en forma segura y conozcan los
peligros derivados del mismo. Los niños no
deben jugar con el aparato. El mantenimiento
y la limpieza no deben ser realizados por niños
sin supervisión.
• La lavadora debe ser utilizada sólo por personas adul-
tas y siguiendo las instrucciones contenidas en este
manual.
• No toque la máquina con los pies desnudos ni con las
manos o los pies mojados o húmedos.
• No desenchufe la máquina tirando el cable, sino toman-
do el enchufe.
• No abra el cajón de detergentes mientras la máquina
está en funcionamiento.
• No toque el agua de descarga ya que puede alcanzar
temperaturas elevadas.
• En ningún caso fuerce la puerta: podría dañarse el
mecanismo de seguridad que la protege de aperturas
accidentales.
• En caso de avería, no acceda nunca a los mecanismos
internos para intentar una reparación.
• Controle siempre que los niños no se acerquen a la
máquina cuando está en funcionamiento.
• Durante el lavado, la puerta tiende a calentarse.
• Si debe ser trasladada, deberán intervenir dos o más
personas, procediendo con el máximo cuidado. La
máquina no debe ser desplazada nunca por una sola
persona ya que es muy pesada.
• Antes de introducir la ropa controle que el cesto esté
vacío.
Sistema de equilibrado de la carga
Antes de cada centrifugado, para evitar vibraciones exce-
sivas y para distribuir la carga de modo uniforme, el cesto
realiza rotaciones a una velocidad ligeramente superior a la
del lavado. Si después de varios intentos, la carga todavía
no está correctamente equilibrada, la máquina realiza el
centrifugado a una velocidad inferior a la prevista. Cuan-
do existe un excesivo desequilibrio, la lavadora realiza la
distribución antes que el centrifugado. Para obtener una
mejor distribución de la carga y su correcto equilibrado, se
aconseja mezclar prendas grandes y pequeñas.
Eliminaciones
• Eliminación del material de embalaje:
respete las normas locales, de ese modo, los embalajes
podrán volver a ser utilizados.
• La norma Europea 2012/19/EU sobre la eliminación de
aparatos eléctricos y electrónicos, indica que los elec-
trodomésticos no deben ser eliminados de la misma
manera que los desechos sólidos urbanos.
Los aparatos en desuso se deben recoger separada-
mente para optimizar el porcentaje de recuperación y
reciclaje de los materiales que los componen e impedir
potenciales daños para la salud y el medio ambiente. El
símbolo de la papelera tachada se encuentra en todos
los productos para recordar la obligación de recolección
separada. Para mayor información sobre la correcta eli-
minación de los electrodomésticos, los poseedores de
los mismos podrán dirigirse al servicio público respon-
sable o a los revendedores.

18
ES
Contenedor de detergentes: para cargar detergentes
y aditivos (ver “Detergentes y ropa”).
Botón de ON/OFF: para encender y apagar la lavadora.
Botón PUSH & WASH: (ver “Programas”).
Mando de PROGRAMAS: para elegir los programas.
Durante el funcionamiento del programa el mando no se
mueve.
Botones con pilotos de FUNCIÓN: para seleccionar las
funciones disponibles. El piloto correspondiente a la fun-
ción seleccionada permanecerá encendido.
Botón TEMPERATURA: para seleccionar la temperatura
o el lavado en frío (ver “Personalizaciones”).
Botón CENTRIFUGADO: para seleccionar el centrifuga-
do o excluirlo (ver “Personalizaciones”).
Botón COMIENZO RETRASADO
Retrasa la puesta en marcha de la máquina hasta 9 horas.
Presione varias veces el botón hasta hacer encender el
piloto correspondiente al retraso deseado. La cuarta vez
que se presione el botón, la opción se desactivará.
Nota: Una vez presionado el botón START/PAUSE, se
puede modificar el valor del retraso sólo disminuyéndolo
hasta que se ponga en marcha el programa seleccionado.
! Se puede utilizar con todos los programas.
Pilotos DE AVANCE DEL CICLO: para seguir el estado
de avance del programa de lavado.
El piloto encendido indica la fase en curso.
Piloto PUERTA BLOQUEADA: para saber si la puerta se
puede abrir (ver la página correspondiente).
Botón con piloto START/PAUSE: se utiliza para poner en
marcha los programas o interrumpirlos momentáneamente.
Nota: Presione este botón para poner en pausa el lavado
en curso, el piloto correspondiente centelleará con color
anaranjado mientras que el de la fase en curso permane-
cerá encendido en forma fija. Si el piloto PUERTA BLO-
QUEADA está apagado, se podrá abrir la puerta (espere
3 minutos aproximadamente).
Para que el lavado se reanude a partir del momento en el
cual fue interrumpido, presione nuevamente este botón.
Modalidad de stand by
Esta lavadora está en conformidad con las nuevas norma-
tivas vinculadas al ahorro energético. Está dotada de un
sistema de auto-apagado (stand by) que, en caso de no
funcionamiento, se activa aproximadamente 30 minutos.
Presionar brevemente el botón ON-OFF y esperar que la
máquina se active.
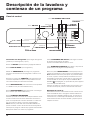
Descripción de la lavadora y
comienzo de un programa
Botón con
piloto
START/PAUSE
Panel de control
Pilotos DE AVANCE DEL CICLO
Botón ON/OFF
Botón
COMIENZO
RETRASADO
Contenedor de detergentes
Mando de
PROGRAMAS
Botones con pilotos
FUNCIÓN
Piloto PUERTA
BLOQUEADA
Botón
TEMPERATURA
Botón
CENTRIFUGADO
Botón
PUSH & WASH

ES
19
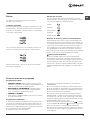
Pilotos
Los pilotos suministran información importante.
He aquí lo que nos dicen:
Comienzo retrasado
Si se ha activado la función “Comienzo retrasado” (ver “Per-
sonalizaciones”), después de haber puesto en marcha el
programa, comenzará a centellear el piloto correspondien-
te al retraso seleccionado:
Con el transcurrir del tiempo se visualizará el retraso resi-
dual con el centelleo de la luz testigo correspondiente:
Una vez transcurrido el tiempo de retraso seleccionado,
comenzará el programa.
Pilotos fase en curso
Una vez seleccionado y puesto en marcha el ciclo de
lavado deseado, las luces testigo se encenderán progresi-
vamente para indicar su estado de avance:
Botones de función y pilotos correspondientes
Seleccionando una función, el piloto correspondiente se
iluminará. Si la función seleccionada no es compatible con
el programa elegido, el piloto correspondiente centelleará
y la función no se activará. Si la opción seleccionada no
es compatible con otra opción elegida anteriormente, la
incompatibilidad se indicará con el centelleo del piloto y
una señal sonora (3 sonidos) y se activará sólo la segunda
opción, el piloto de la opción activada se iluminará.
Piloto puerta bloqueada
El piloto encendido indica que la puerta está bloquea-
da impidiendo su apertura; para poder abrir la puerta es
necesario que dicho piloto esté apagado (espere 3 minutos
aproximadamente). Para abrir la puerta mientras un ciclo
está en curso, presione el botón START/PAUSE; si el piloto
PUERTA BLOQUEADA está apagado, será posible abrir la
puerta.
Poner en marcha un programa
Programación rápida
1. CARGAR LA ROPA. Abra la puerta. Cargue la ropa,
cuidando no superar la cantidad de carga indicada en la
tabla de programas de la página siguiente.
2. DOSIFICAR EL DETERGENTE. Extraiga el cajón y
vierta el detergente en las cubetas correspondientes
como se explica en “Detergentes y ropa”.
3. CERRAR LA PUERTA.
4. Pulsar el botón “PUSH & WASH” para poner en marcha
el programa de lavado.
Programación tradicional
1. Encienda la lavadora pulsando el botón ON-OFF. Todos
los pilotos se encenderán durante algunos segundos, lue-
go permanecerán encendidos sólo los pilotos correspon-
dientes a las configuraciones para el programa selecciona-
do y centelleará el piloto START/PAUSE.
2. Cargue la ropa y cierre la puerta.
Lavado
Aclarado
Centrifugado
Descarga
Fin del Lavado
END
3. Seleccione el programa deseado con el mando de
PROGRAMAS.
4. Fije la temperatura de lavado (ver “Personalizaciones”).
5. Fije la velocidad de centrifugado (ver “Personalizaciones”).
6. Vierta detergente y aditivos (ver “Detergentes y ropa”).
7. Seleccione las funciones deseadas.
8. Ponga en marcha el programa presionando el botón
START/PAUSE y el piloto correspondiente permanecerá
encendido, fijo y de color verde. Para anular el ciclo selec-
cionado ponga en pausa la máquina presionando el botón
START/PAUSE y elija un nuevo ciclo.
9. Al final del programa se iluminará el piloto . Cuando
el piloto PUERTA BLOQUEADA se apague, será posible
abrir la puerta (espere 3 minutos aproximadamente).
Extraiga la ropa y deje la puerta semicerrada para permitir
que el cesto se seque. Apague la lavadora presionando el
botón ON/OFF.

20
ES
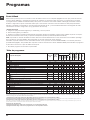
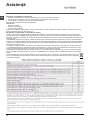
Programas
Tabla de programas
Push & Wash
Esta función permite poner en marcha un ciclo de lavado incluso con la máquina apagada sin tener que presionar anterior-
mente el botón ON/OFF o, después de encender la máquina, sin accionar ningún otro botón y/o mando (de lo contrario
el programa Push & Wash será desactivado). Para poner en marcha el ciclo Push & Wash mantenga presionado el botón
durante 2 segundos. El piloto encendido indica que el ciclo está en marcha. El ciclo de lavado es ideal para prendas de
algodón y sintéticas, funcionando a una temperatura de lavado de 30° y una velocidad máxima de centrifugado de 1200
revoluciones al minuto. Carga máx. 3,5 kg. (Duración del ciclo 50’).
¿Cómo funciona?
1. Cargue la ropa (prendas de algodón y/o sintéticas) y cierre la puerta.
2. Vierta el detergente y los aditivos.
3. Ponga en marcha el programa manteniendo presionado durante 2 segundos el botón Push & Wash. El piloto correspon-
diente se iluminará de color verde y la puerta se bloqueará (símbolo puerta bloqueada encendido).
N.B.: La puesta en marcha del lavado a través del botón Push & Wash activa un ciclo automático recomendado para algo-
dón y sintéticos no personalizable. Este programa no permite seleccionar otras opciones.
Para abrir la puerta mientras el ciclo automático está en curso, presione el botón START/PAUSE; si el símbolo puerta blo-
queada está apagado, será posible abrir la puerta. Presione nuevamente el botón START/PAUSE para reanudar el programa
a partir del momento en el que se había interrumpido.
4. Al final del programa se iluminará el piloto END.
La duración del ciclo que se indica en el visor o en el manual es una estimación calculada en base a condiciones estándar. El tiempo efectivo puede variar en función
de numerosos factores como la temperatura y la presión del agua de entrada, la temperatura ambiente, la cantidad de detergente, la cantidad y el tipo de carga, el equili-
brado de la carga y las opciones adicionales seleccionadas.
1) Programa de control según la directiva 1061/2010: seleccione el programa 8 con una temperatura de 60ºC.
Este ciclo es adecuado para limpiar una carga de algodón normalmente sucia, es el más eficiente en lo que se refiere al consumo combinado con la energía y la cantidad de agua y se usa con
prendas lavables a 60ºC. La temperatura efectiva de lavado puede diferir de la indicada.
2) Programa de control según la directiva 1061/2010: seleccione el programa 9 con una temperatura de 40ºC.
Este ciclo es adecuado para limpiar una carga de algodón normalmente sucia, es el más eficiente en lo que se refiere al consumo combinado con la energía y la cantidad de agua y se usa con
prendas lavables a 40ºC . La temperatura efectiva de lavado puede diferir de la indicada.
Para todos los Test Institutes:
2) Programa algodón largo: seleccione el programa 9 con una temperatura de 40ºC.
3) Programa sintético largo: seleccione el programa 10 con una temperatura de 40ºC.
Programas
Descripción del Programa
Temp. max.
(°C)
Velocidad
máx.
(r.p.m.)
Detergentes
Carga máx. (Kg.)
Humedad resi-
dual (%)
Consumo de
energía (kWh)
Agua total (lt)
Duración del
ciclo
Pre-
lavado
Lavado
Suavi-
zante
Blanque-
ador
Programas Especiales
1
Sport
30° 600 -
- 3,5 - - - 55’
2
Oscuro
30° 800 -
- 4 - - - 70’
3
Antiolor (Algodón)
60° 1000 -
- 3,5 - - - 110’
3
Antiolor (Sintético)
40° 1000 -
- 3,5 - - - 100’
4
Delicados
30° 0 -
- 1 - - - 80’
5
Lana: para lana, cachemira, etc. 40° 800 -
- 1,5 - - - 70’
6
Plumones: para prendas rellenas con plumas de ánsar. 30° 1000 -
- 2 - - - 110’
Standard
7
Prelavado Algodón: blancos sumamente sucios. 90° 1200
- 7 53 2,15 77 170’
8
Algodón Standard 60° (1): blancos y colores resistentes muy sucios.
60°
(Max. 90°)
1200 -
- 7 53 1,13 52,5 180’
9
Algodón Standard 40° (2): blancos poco sucios y colores delicados.
40° 1200 -
- 7 53 1,00 75 170’
10
Sintético: colores resistentes muy sucios. 60° 800 -
- 3,5 46 0,79 46 110’
10
Sintético: colores resistentes poco sucios. 40° 800 -
- 3,5 46 0,56 46 100’
11
De color
40° 1200 -
- 7 53 0,89 70 100’
Eco & Rápido
12
Algodón Standard 20°: blancos poco sucios y colores delicados. 20° 1200 -
- 7 - - - 170’
13
20’ Refresh
20° 800 -
- 1,5 - - - 20’
14
Rápido 60’
60° 1000 -
- 7 - - - 60’
Programas Parciales
Aclarado/Blanqueador - 1200 - -
7 - - - 50’
Centrifugado + Descarga - 1200 - - - - 7 - - - 25’
Pagina se încarcă...
Pagina se încarcă...
Pagina se încarcă...
Pagina se încarcă...
Pagina se încarcă...
Pagina se încarcă...
Pagina se încarcă...
Pagina se încarcă...
Pagina se încarcă...
Pagina se încarcă...
Pagina se încarcă...
Pagina se încarcă...
Pagina se încarcă...
Pagina se încarcă...
Pagina se încarcă...
Pagina se încarcă...
Pagina se încarcă...
Pagina se încarcă...
Pagina se încarcă...
Pagina se încarcă...
Pagina se încarcă...
Pagina se încarcă...
Pagina se încarcă...
Pagina se încarcă...
Pagina se încarcă...
Pagina se încarcă...
Pagina se încarcă...
Pagina se încarcă...
-
 1
1
-
 2
2
-
 3
3
-
 4
4
-
 5
5
-
 6
6
-
 7
7
-
 8
8
-
 9
9
-
 10
10
-
 11
11
-
 12
12
-
 13
13
-
 14
14
-
 15
15
-
 16
16
-
 17
17
-
 18
18
-
 19
19
-
 20
20
-
 21
21
-
 22
22
-
 23
23
-
 24
24
-
 25
25
-
 26
26
-
 27
27
-
 28
28
-
 29
29
-
 30
30
-
 31
31
-
 32
32
-
 33
33
-
 34
34
-
 35
35
-
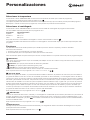
 36
36
-
 37
37
-
 38
38
-
 39
39
-
 40
40
-
 41
41
-
 42
42
-
 43
43
-
 44
44
-
 45
45
-
 46
46
-
 47
47
-
 48
48


Indesit XWA 71251 WWG EU Manualul utilizatorului
- Categorie
- Mașini de spălat
- Tip
- Manualul utilizatorului
în alte limbi
- English: Indesit XWA 71251 WWG EU User guide
- polski: Indesit XWA 71251 WWG EU instrukcja
- español: Indesit XWA 71251 WWG EU Guía del usuario