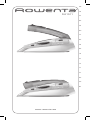
Rowenta DA1511 Manual de utilizare
- Categorie
- Fiare de călcat
- Tip
- Manual de utilizare

EN
FR
CS
HU
SK
HR
SL
RO
SR
BG
TR
ET
LV
LT
PL
RU
UK
BS
www.rowenta.com
DA1511

ON
OFF
120V 240V
00
0
0
0
0
0
0
0
0
0
0
0
0
0
0
0
4
5
3
2
1
6
7
8
9

3
EN
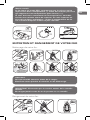
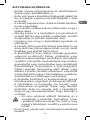
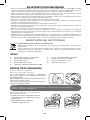
SAFETY INSTRUCTIONS
• Please read these instructions carefully
and keep them for further references.
• Never leave the appliance unattended
when it is connected to a power source; if
it has not cooled down for approximately
1 hour.
• The iron must be used and rested on a flat,
stable, heat-resistant surface.
• When you place the iron on the iron rest,
make sure that the surface on which you
place it is stable.
• Always unplug your appliance: before
filling, or rinsing the water tank, before
cleaning it, after each use.
• Children must be supervised to ensure
that they do not play with the appliance.
• Keep the iron and its cord out of reach of
children less than 8 years of age when it is
energized or cooling down.
• This appliance can be used by children
aged from 8 years and above and persons
with reduced physical, sensory or mental
capabilities, or lack of experience and
knowledge, if they have been given
supervision or instruction concerning
use of the appliance in a save way and
understand the hazards involved.
• Cleaning and user maintenance shall not
be made by children without supervision.
• The appliance must not be used if it has
fallen to the floor, shows evident of
damage, leaks or fails to function correctly.
Never dismantle you appliance. To avoid
any danger, have it inspected in an
approved service centre.
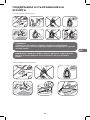
• The surfaces which are marked with
this sign and the soleplate are very
hot during the use of the appliances.
Don’t touch these surfaces before the
iron is cooled down.
• The iron is not intended for regular use.

4
IMPORTANT RECOMMANDATIONS
• The voltage of your electrical installation must correspond to that of the iron
(220-240V). Always plug your iron into an earth socket. Connecting to the
wrong voltage may cause irreversible damage to the iron and will invalidate
the guarantee.
• If you are using a mains extension lead, ensure that it is corrected rated (16A)
with an earth, and is fully extended.
• If the electric power cord is damaged, it must be replaced by an Approved
Service Centre in order to prevent any danger.
• Do not unplug your appliance by pulling on the cord.
• Never immerse your steam iron in water or any other liquid. Never hold it under
the water tap.
• Never touch the electric cord with the soleplate of the iron.
• Your appliance gives off steam, which may cause burns, especially when you are
ironing close to the edge of your ironing board.
• Never direct the steam towards people or animals.
• For your saftey, this appliance conforms to the applicable standards and
regulations (Low Voltage, Electromagnetic Compatibility, Environmental
Directives).
• This product has been designed for domestic use only. Any commercial use,
inappropriate use or failure to comply with the instructions, the manufacturer
accepts no responsibility and the guarantee will not apply.
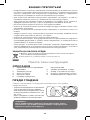
ENVIRONMENT PROTECTION FIRST !
i Your appliance contains valuable materials which can be recovered
or recycled.
Leave it at a local civic waste collection point.
Keep these instructions
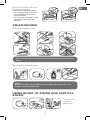
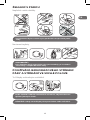
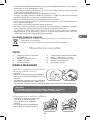
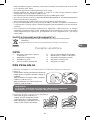
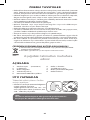
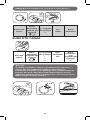
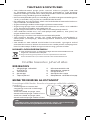
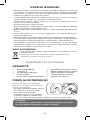
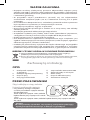
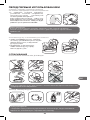
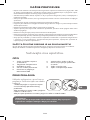
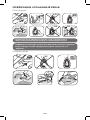
DESCRIPTION
1. Voltage selector(120/240 V)
2. Temperature control
3. Steam switch
4. High precision tip
5. Microsteam200 soleplate
6. Handle water tank
7. Water filling inlet
8. Burst of steam button
9. Handle release
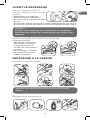
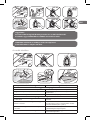
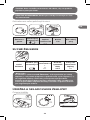
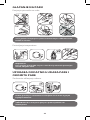
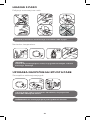
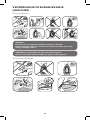
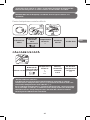
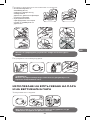
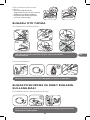
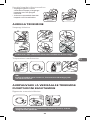
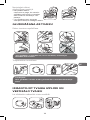
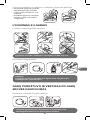
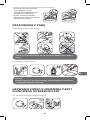
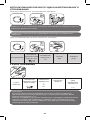
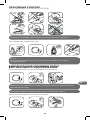
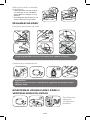
BEFORE IRONING
Remove the sticker on the
soleplate. Adjust the voltage
selector.
• Adjust the iron to correct voltage
for your location, using a sharp
object.
If the voltage selected is 120 V,
the iron will operate at 110 to 127 V.
If it is set at 240 V, the iron will operate at 220 to 240 V.
Note!
If necessary, check that you are using an adapter which
meets the safety requirements of the country you are in.
120V 240V

5
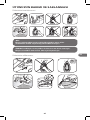
EN
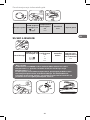
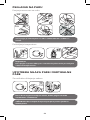
Put the handle into the
ironing position.
• Press the release button
on the`rear side and raise
the handle until it locks
into position.
• For storing proceed in the
same way to close the
handle.
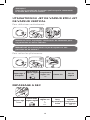
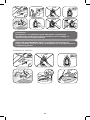
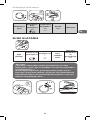
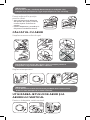
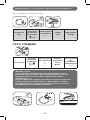
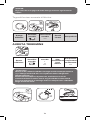
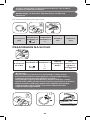
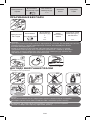
STEAM IRONING
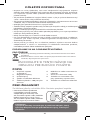
Filling the water tank.
ON
OFF
110V 220V
ON
OFF
ON
OFF
120V 240V
NO
OK
ON
OFF
110V 220V
00
0
0
0
0
0
0
0
0
0
0
0
0
0
0
0
NO
Your iron has been designed to operate using untreated tap
water.
Setting the temperature.
2 min
ON
OFF
ON
OFF
110V 220V
Note !
Your iron will only produce steam when the control is set
within the coloured zone.
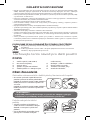
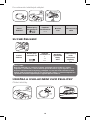
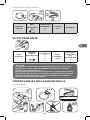
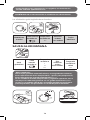
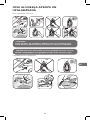
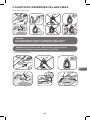
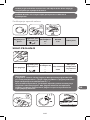
USING BURST OF STEAM AND VERTICAL
STEAM
To remove
creases
vertically.
ON
OFF
110V 220V
ON
OFF
120V 240V
00
ON
OFF
120V 240V
00

6
Hold the iron a few centimeters away from the garment to
avoid burning delicate fabrics.
To remove difficult creases.
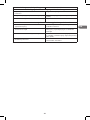
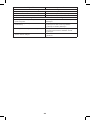
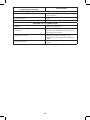
Steam
ironing
Steam
control set to
Temperature
set to
•••
Cotton
Linen
Burst
of steam
DRY IRONING
Dry
ironing
Steam control
set to
Temperature
set to
•
••
•••
Silk,
Synthetics
Wool
Burst of steam
Temperature
at setting
•••
Our advice :
With the iron in DRY mode, start by ironing fabrics at a low
temperature (•) before moving on to those requiring a higher
temperature (•••).
If you turn the temperature control down, wait for
approximately one minute before ironing again. If you
are ironing fabrics made from mixed fibres : set the iron
temperature to the correct level for the most delicate fibre.
ON
OFF
110V 220V
00
MAX
ON
OFF
110V 220V
00
ON
OFF
IMPORTANT Never direct the steam at people or animals !

7
EN
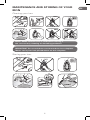
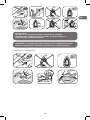
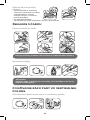
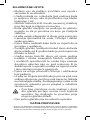
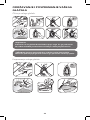
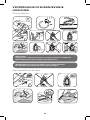
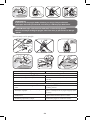
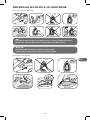
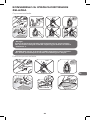
MAINTENANCE AND STORING OF YOUR
IRON
Cleaning your iron.
ON
OFF
110V 220V
10 min
ON
OFF
NO
ON
OFF
110V 220V
NO
NO
Note ! Make sure the iron is cold before storing it.
Do not use any cleaning or descaling products.!
IMPORTANT Do not wind the cord around the hot soleplate.
Never store your iron placed down on the soleplate.
Storing your iron.
ON
OFF
10 min
NO
ON
OFF
120V 240V
00
ON
OFF
110V 240V
0
0
ON
OFF
110V 220V

8
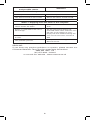
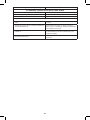
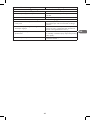
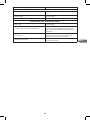
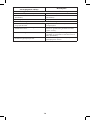
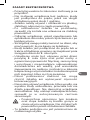
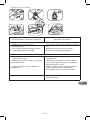
Problems
and possible causes Solutions
Your iron produces little or no steam
• The temperature selected is too low. Set the temperature control on •••
• The steam control is set on OFF. Switch the steam control to ON.
• There is no water in the tank. Fill the water tank.
Water is dripping from the holes in the soleplate
• You have been using the burst of
steam button too often.
Wait a few seconds between each
shot.
• Steam is used before the iron is
hot enough.
Set the thermostat within the
coloured steam zone and wait until
the iron is hot (approx. 2 min.).
Empty the tank before storing the
iron and set the steam control to
OFF
• The iron is stored with water in
th tank.
• The problem persists. Take your iron to an Approved
Service Centre.
HELPLINE:
if you have any product problems or queries, please contact our
Customer Relations Team first for expert help and advice:
0845 602 1454 - UK
(01) 677 4003 - Ireland
or consult our website - www.rowenta.co.uk

9
FR
CONSIGNES DE SÉCURITÉ
• Merci de lire attentivement ces consignes
et de les conserver.
• Ne laissez jamais l’appareil sans surveillance
lorsqu’il est raccordé à l’alimentation
électrique ; tant qu’il n’a pas refroidi environ
1 heure.
• Le fer doit être utilisé et posé sur une
surface plane, stable et résistante à la
chaleur.
• Lorsque vous posez le fer sur le repose-fer,
assurez-vous que la surface sur laquelle
vous le posez est stable.
• Débranchez toujours votre appareil : avant
de le remplir ou de rincer le réservoir, avant
de le nettoyer, après chaque utilisation.
• Il convient de surveiller les enfants
pour s’assurer qu’ils ne jouent pas avec
l’appareil.
• Maintenir le fer et le cordon hors de portée
des enfants de moins de 8 ans lorsqu’il est
branché ou qu’il refroidit.
• Cet appareil peut être utilisé par des
enfants âgés de 8 ans ou plus et des
personnes dont les capacités physiques,
sensorielles ou mentales sont réduites, ou
des personnes dénuées d’expérience et de
connaissance, s’ils ont pu bénéficier d’une
surveillance ou d’instructions préalables
concernant la manière d’utiliser l’appareil
en toute sécurité et qu’ils comprennent les
dangers potentiels.
• Les enfants ne doivent pas effectuer le
nettoyage et l’entretien sans surveillance.
• Ne pas utiliser l’appareil s’il est tombé au
sol, présente des dommages apparents,
fuit ou ne fonctionne pas correctement.
Ne jamais démonter l’appareil. Faites-le
examiner dans un centre service agréé, afin
d’éviter tout danger.

10
• Les surfaces marquées par ce signe
et la semelle sont très chaudes lors
de l’utilisation de l’appareil. Ne pas
toucher ces surfaces tant que le fer n’a
pas refroidi.
• Ce fer de voyage n’est pas prévu pour un
usage intensif.
RECOMMANDATIONS
IMPORTANTES
• La tension de votre installation électrique doit correspondre à celle du fer (220-
240 V). Ce fer doit être toujours branché sur une prise de courant avec terre.
Toute erreur de branchement peut endommager le fer de manière irréversible et
annulera la garantie.
• Si vous utilisez une rallonge, vérifiez qu’elle est de type bipolaire (16 A) avec
conducteur de terre, et qu’elle est entièrement dépliée.
• Si le cordon électrique est endommagé, faites-le remplacer par un centre service
agréé afin d’éviter tout danger.
• Ne débranchez pas l’appareil en tirant sur le cordon.
• Ne plongez jamais le fer à vapeur dans l’eau ou tout autre liquide. Ne le mettez
jamais sous le robinet.
• Ne touchez jamais le cordon électrique avec la semelle du fer.
• Votre appareil émet de la vapeur, qui peut occasionner des brûlures, en particulier
lorsque vous repassez sur un angle de votre table à repasser.
• Ne dirigez jamais la vapeur sur des personnes ou des animaux.
• Pour votre sécurité, cet appareil est conforme aux normes et réglementations
applicables (Directives Basse tension, Compatibilité électromagnétique,
Environnement).
• Ce produit a été conçu pour un usage domestique uniquement. Pour
tout usage commercial, inapproprié ou contraire aux instructions, le
fabricant décline toute responsabilité et la garantie n’est plus valable.
ROTECTION DE L’ENVIRONNEMENT !
i
Votre appareil contient de nombreux matériaux valorisables ou
recyclables.
Confiez celui-ci dans un point de collecte ou à défaut dans un centre
service agréé pour que son traitement soit effectué.
Conservez ces instructions
DESCRIPTION
1. Sélecteur de tension
(120/240V)
2. Contrôle de la température
3. Curseur vapeur
4. Pointe haute précision
5. Semelle Microsteam200
6. Poignée réservoir d’eau
7. Orifice de remplissage
d’eau
8. Touche jet de vapeur
9. Déclenchement de la
poignée

11
FR
AVANT LE REPASSAGE
Retirez l’autocollant de la
semelle. Réglez le sélecteur de
tension.
• Réglez le fer sur la tension
correspondant à l’endroit où
vous trouvez, en utilisant un objet
pointu.
Si la tension choisie est de 120 V, le fer fonctionnera de 110 à 127 V.
Si la tension choisie est de 240 V, le fer fonctionnera de 220 à 240 V.
Mettez la poignée en position de repassage.
• Pressez le bouton
déclencheur situé sur la
face arrière et soulevez
la poignée jusqu’à ce
qu’elle soit verrouillée en
position.
• Pour le ranger, procédez
de la même façon pour
replier la poignée.
REPASSAGE A LA VAPEUR
Remplir le réservoir d’eau.
Votre fer a été conçu pour fonctionner avec de l’eau du
robinet.
Réglage de la température.
2 min
ON
OFF
ON
OFF
110V 220V
120V 240V
Attention !
Vérifiez si nécessaire que vous utilisez bien un adaptateur
convenant aux normes de sécurité du pays dans lequel vous
séjournez.
ON
OFF
120V 240V
00
ON
OFF
120V 240V
00
ON
OFF
110V 220V
ON
OFF
NON
ON
OFF
110V 220V
00
0
0
0
0
0
0
0
0
0
0
0
0
0
0
0
NON
ON
OFF
120V 240V
OK

12
Attention !
Votre fer ne produit de la vapeur que lorsque la commande
se trouve dans la zone colorée.
UTILISATION DU JET DE VAPEUR ETDU JET
DE VAPEUR VERTICAL
Pour défroisser verticalement.
ON
OFF
110V 220V
Maintenez le fer à quelques centimètres du vêtement pour
ne pas brûler les tissus délicats.
IMPORTANT N’orientez jamais le jet de vapeur sur une
personne ou un animal !
Pour retirer les plis tenaces.
MAX
ON
OFF
110V 220V
00
Repassage à
la vapeur
Commande
vapeur réglée
sur
Température
réglée sur
•••
Coton Lin Jet de
vapeur
REPASSAGE A SEC
ON
OFF
Repassage
à sec
Commande
vapeur réglée
sur
Température
réglée sur
•
••
•••
Soie,
Synthétique
Laine
Jet de
vapeur
Température
au réglage
•••

13
FR
Notre conseil:
Le fer étant en mode SEC, commencez par les tissus qui se
repassent à basse température (•) avant de terminer par ceux
qui supportent une température plus élevée (•••).
Si vous baissez la commande de la température, attendez
environ une minute avant de repasser. Si vous repassez un
tissu fait de fibres mélangées : réglez la température du fer
sur le niveau adapté à la fibre la plus délicate.
ON
OFF
110V 220V
00
ENTRETIEN ET RANGEMENT DE VOTRE FER
Nettoyage de votre fer.
NON
ON
OFF
110V 220V
10 min
ON
OFF
ON
OFF
110V 220V
NON NON
Rangement de votre fer.
ON
OFF
10 min
NON
Attention!
Laissez refroidir votre fer avant de le ranger.
N’utilisez aucun produit d’entretien ou de détartrage.
IMPORTANT N’enroulez pas le cordon autour de la semelle
chaude.
Ne rangez jamais votre fer en le posant sur sa semelle.

14
ON
OFF
120V 240V
00
ON
OFF
110V 240V
0
0
ON
OFF
110V 220V
Problèmes
et causes possibles Solutions
Votre fer produit peu ou pas de vapeur
• La température choisie est trop
basse.
Placez la commande de
température sur •••
• La commande vapeur est réglée
sur la position OFF.
Déplacez le curseur de la commande
vapeur sur la position ON.
• Il n’y a pas d’eau dans le
réservoir.
Remplissez le réservoir d’eau.
L’eau coule par les trous de la semelle
• Vous utilisez la touche jet de
vapeur trop souvent.
Attendez quelques secondes entre
chaque utilisation.
• La vapeur est utilisée
avant que le fer ne soit
suffisamment chaud.
Mettez le thermostat sur la zone
vapeur colorée et attendez que le fer
soit chaud (environ 2 min.).
• Le fer est rangé avec de l’eau
dans le réservoir.
Videz le réservoir avant de ranger le
fer et placez la commande vapeur
dans la position OFF.
• Le problème persiste. Apportez votre fer dans un Centre
Service Agréé

15
CS
BEZPEČNOSTNÍ POKYNY
•Přečtěte si prosím pozorně tyto pokyny a
uchovejte je pro pozdější použití.
•Je-li spotřebič připojený do elektrické sítě
nebo pokud nevychladl (přibližně hodina),
nenechávejte jej bez dozoru.
•Žehličku lze používat a odkládat výhradně na
rovný, stabilní a žáruvzdorný povrch.
•Pokud žehličku během používání odložíte,
ujistěte se, že je odkládací plocha stabilní.
•Spotřebič vždy odpojte z elektrické sítě: před
plněním nebo vyplachováním nádržky na vodu,
před čištěním a po každém použití.
•Je nutné dohlédnout na to, aby si se spotřebičem
nehrály děti.
•Pokud je žehlička připojená do elektrické sítě
nebo chladne, udržujte ji i její napájecí kabel
mimo dosah dětí mladších osmi let.
•Tento spotřebič mohou používat děti starší osmi
let a osoby se sníženými tělesnými, smyslovými
nebo mentálními schopnostmi, jsou-li pod
dohledem odpovědné osoby nebo pokud byly
poučeny o jeho bezpečném použití a chápou
potenciální rizika s ním spojená.
•Dětem by nemělo být dovoleno čistit spotřebič
nebo provádět jeho uživatelskou údržbu,
nejsou-li pod dohledem odpovědné osoby.
•Spotřebič nesmí být použit po pádu na podlahu,
pokud je zjevně poškozen, uniká z něj voda nebo
nefunguje správně. Spotřebič nikdy
nerozebírejte. Chcete-li se vyvarovat
bezpečnostním rizikům, nechte jej zkontrolovat
v autorizovaném servisním středisku.
•Povrchy označené tímto symbolem a
žehlicí deska jsou během použití spotřebiče
velmi horké. Nedotýkejte se jich proto, dokud
žehlička nevychladne.
•Tato cestovní žehlička není určena pro pravidelné
používání.

16
DŮLEŽITÁ DOPORUČENÍ
•Napětí vaší elektrické sítě musí odpovídat napětí, na které je dimenzovaná žehlička (220-
240V). Žehličku připojte výhradně do uzemněné zásuvky. Připojení do sítě s odlišným
napětím může způsobit nevratné poškození žehličky a je důvodem pro zánik záruky.
•Pokud používáte prodlužovací kabel, přesvědčte se, že má správnou hodnotu proudu (16A)
a je uzemněn a nezkroucen.
•Pokud je poškozený napájecí kabel žehličky, je nutné nechat jej vyměnit v autorizovaném
servisním středisku, aby nedošlo k ohrožení osob.
•Spotřebič neodpojujte tahem za jeho napájecí kabel.
•Parní žehličku nikdy nenořte do vody nebo jiné kapaliny. Nikdy ji neplňte přímo z
vodovodního kohoutku.
•Napájecího kabelu se nikdy nedotýkejte žehlicí deskou žehličky.
•Spotřebič produkuje páru, která může způsobit popáleniny, zejména pokud žehlíte blízko
okraje žehlicího prkna.
•Zabraňte úniku páry směrem k osobám nebo zvířatům.
•V zájmu vaší bezpečnosti vyhovuje tento spotřebič všem souvisejícím normám a regulacím
(Směrnice o nízkonapěťových zařízeních, o elektromagnetické kompatibilitě a životním
prostředí).
•Tento produkt byl zkonstruován pouze pro použití v domácnosti. Komerční využití,
nevhodné použití nebo nedodržení pokynů je důvodem k zániku garance a výrobce neručí
za škody tímto způsobené.
PODÍLEJME SE NA OCHRANĚ ŽIVOTNÍHO PROSTŘEDÍ!
i Váš přístroj obsahuje četné materiály, které lze zhodnocovat nebo
recyklovat.
Svěřte jej sběrně surovin nebo v krajním případě smluvnímu servisnímu
středisku, aby byl patřičně zpracován.
Uschovejte tento návod pro další použití
POPIS
1. Volič napětí (120/240 V)
2. Nastavení teploty
3. Spínač páry
4. Špička na přesné žehlení
5. Žehlící plocha s 200 parnými
mikrootvory
6. Rukojeť s vodní nádržkou
7. Plnící hrdlo na vodu
8. Tlačítko rozstřiku páry
9. Uvolnění držadla
PŘED ŽEHLENÍM
Odstraňte ochrannou folii z žehlící plochy Nastavte volič napětí.
•Nastavte správné napětí dle místa
použití pomocí ostrého předmětu.
Pokud je zvolené napětí 120V, žehlička
bude pracovat v rozmezí napětí 110
až 127V.
Pokud je zvolené napětí 240V, žehlička
bude pracovat v rozmezí napětí 220
až 240V.
UPOZORNĚNÍ !
V případě potřeby zkontrolujte, či používáte adapter splňující
bezpečností požadavky země, kde žehličku používáte.
Položte rukojeť do žehlící
polohy
•Stlačte uvolňovací tlačítko na
zadní straně a zvedněte rukojeť
dokud se nezajistí v příslušné
poloze.
•Pro uskladnění proveďte stejný
postup na uzavření rukojeti.
120V 240V
ON
OFF
120V 240V
00
ON
OFF
120V 240V
00

17
CS
ŽEHLENÍ S PÁROU
Naplnění vodní nádržky.
ON
OFF
110V 220V
ON
OFF
ON
OFF
120V 240V
NE
OK
ON
OFF
110V 220V
00
0
0
0
0
0
0
0
0
0
0
0
0
0
0
0
NE
Vaše žehlička byla navržena pro používání neupravené pitné
vody.
Nastavení teploty.
2 min
ON
OFF
ON
OFF
110V 220V
UPOZORNĚNÍ !
Vaše žehlička bude vypouštět páru pouze tehdy, je-li ovladač
nastavený v rozpětí barevné zóny.
POUŽÍVÁNÍ JEDNORÁZOVÉHO STŘÍKÁNÍ
PÁRY A STŘÍKÁNÍ VE SVISLÉ POLOZE
To Záhyby odstraňujte vertikálně.
ON
OFF
110V 220V
Držte žehličku několik centimetrů od oděvu, abyste zabránili
spálení jemných látek.
DŮLEŽITÉ: nikdy nesměřujte páru proti lidem nebo zvířatům.

18
Pro odstranění obtížných záhybů.
MAX
ON
OFF
110V 220V
00
Parní
žehlení
Řízení páry
nastavte na
Teplotu
nastavte na
•••
Bavlna
Len
Jednorázový
střik
SUCHÉ ŽEHLENÍ
ON
OFF
Suché
žehlení
Řízení páry
nastavte na
Teplotu
nastavte na
•
••
•••
Hedvábí,
syntetické
látky
Vlna
Jednorázový
střik
Nastavení
teploty
•••
Naše rada:
Když je žehlička v suchém režimu, začněte žehlit látku na nízké
teplotě (•) před tím, než nastavíte požadovanou vyšší teplotu (•••).
Pokud stáhnete řízení teploty, počkejte asi minutu než začnete znovu
žehlit. Pokud žehlíte materiál ze smíšených vláken: nastavte teplotu na
správnou úroveň odpovídající nejjemnějšímu vláknu.
ÚDRŽBA A USKLADNĚNÍ VAŠÍ ŽEHLIČKY
Čištění žehličky.
ON
OFF
110V 220V
00

19
CS
NE
ON
OFF
110V 220V
10 min
ON
OFF
ON
OFF
110V 220V
NE NE
Upozornění !
Ujistěte se, že je žehlička před uskladněním studená
Nepoužívejte zádné čistící prostředky ani prostředky na
odstraňování vodního kamene.
DŮLEŽITÉ: neovíjejte přívodní kabel kolem horké žehlicí plochy.
Nikdy neukládejte vaši žehličku položenou na žehlicí plochu.
Uskladnění vaší žehličky.
ON
OFF
10 min
NE
ON
OFF
120V 240V
00
ON
OFF
110V 240V
00
ON
OFF
110V 220V

20
Problémy a možné příčiny Řešení
Ze žehličky vychází málo páry nebo žádná
•Nastavená teplota je příliš nízká. Nastavte teplotní volič na •••
•Řízení páry je vypnuté (OFF). Zapněte ovládání páry na ON.
•V nádržce není voda. aplňte vodní nádržku.
Z otvorů na žehlicí ploše vytéká voda
•Používali jste příliš často tlačítko stříkání
páry.
Mezi jednotlivými střiky počkejte několik
vteřin.
•Použili jste páru dříve, než byla žehlička
dostatečně horká.
Nastavte termostat v rámci barevné
parní zóny a počkejte, dokud se žehlička
neohřeje (asi 2 min).
•Žehlička byla uskladněna s vodou v
nádržce.
Nádržku před uskladněním žehličky
vyprázdněte a nastavte řízení páry na
vypnuto (OFF).
•Problém přetrvává. Zaneste vaši žehličku do autorizovaného
servisu.
Pagina se încarcă ...
Pagina se încarcă ...
Pagina se încarcă ...
Pagina se încarcă ...
Pagina se încarcă ...
Pagina se încarcă ...
Pagina se încarcă ...
Pagina se încarcă ...
Pagina se încarcă ...
Pagina se încarcă ...
Pagina se încarcă ...
Pagina se încarcă ...
Pagina se încarcă ...
Pagina se încarcă ...
Pagina se încarcă ...
Pagina se încarcă ...
Pagina se încarcă ...
Pagina se încarcă ...
Pagina se încarcă ...
Pagina se încarcă ...
Pagina se încarcă ...
Pagina se încarcă ...
Pagina se încarcă ...
Pagina se încarcă ...
Pagina se încarcă ...
Pagina se încarcă ...
Pagina se încarcă ...
Pagina se încarcă ...
Pagina se încarcă ...
Pagina se încarcă ...
Pagina se încarcă ...
Pagina se încarcă ...
Pagina se încarcă ...
Pagina se încarcă ...
Pagina se încarcă ...
Pagina se încarcă ...
Pagina se încarcă ...
Pagina se încarcă ...
Pagina se încarcă ...
Pagina se încarcă ...
Pagina se încarcă ...
Pagina se încarcă ...
Pagina se încarcă ...
Pagina se încarcă ...
Pagina se încarcă ...
Pagina se încarcă ...
Pagina se încarcă ...
Pagina se încarcă ...
Pagina se încarcă ...
Pagina se încarcă ...
Pagina se încarcă ...
Pagina se încarcă ...
Pagina se încarcă ...
Pagina se încarcă ...
Pagina se încarcă ...
Pagina se încarcă ...
Pagina se încarcă ...
Pagina se încarcă ...
Pagina se încarcă ...
Pagina se încarcă ...
Pagina se încarcă ...
Pagina se încarcă ...
Pagina se încarcă ...
Pagina se încarcă ...
Pagina se încarcă ...
Pagina se încarcă ...
Pagina se încarcă ...
Pagina se încarcă ...
Pagina se încarcă ...
Pagina se încarcă ...
Pagina se încarcă ...
Pagina se încarcă ...
Pagina se încarcă ...
Pagina se încarcă ...
Pagina se încarcă ...
Pagina se încarcă ...
Pagina se încarcă ...
Pagina se încarcă ...
Pagina se încarcă ...
Pagina se încarcă ...
Pagina se încarcă ...
Pagina se încarcă ...
Pagina se încarcă ...
Pagina se încarcă ...
Pagina se încarcă ...
Pagina se încarcă ...
Pagina se încarcă ...
Pagina se încarcă ...
-
 1
1
-
 2
2
-
 3
3
-
 4
4
-
 5
5
-
 6
6
-
 7
7
-
 8
8
-
 9
9
-
 10
10
-
 11
11
-
 12
12
-
 13
13
-
 14
14
-
 15
15
-
 16
16
-
 17
17
-
 18
18
-
 19
19
-
 20
20
-
 21
21
-
 22
22
-
 23
23
-
 24
24
-
 25
25
-
 26
26
-
 27
27
-
 28
28
-
 29
29
-
 30
30
-
 31
31
-
 32
32
-
 33
33
-
 34
34
-
 35
35
-
 36
36
-
 37
37
-
 38
38
-
 39
39
-
 40
40
-
 41
41
-
 42
42
-
 43
43
-
 44
44
-
 45
45
-
 46
46
-
 47
47
-
 48
48
-
 49
49
-
 50
50
-
 51
51
-
 52
52
-
 53
53
-
 54
54
-
 55
55
-
 56
56
-
 57
57
-
 58
58
-
 59
59
-
 60
60
-
 61
61
-
 62
62
-
 63
63
-
 64
64
-
 65
65
-
 66
66
-
 67
67
-
 68
68
-
 69
69
-
 70
70
-
 71
71
-
 72
72
-
 73
73
-
 74
74
-
 75
75
-
 76
76
-
 77
77
-
 78
78
-
 79
79
-
 80
80
-
 81
81
-
 82
82
-
 83
83
-
 84
84
-
 85
85
-
 86
86
-
 87
87
-
 88
88
-
 89
89
-
 90
90
-
 91
91
-
 92
92
-
 93
93
-
 94
94
-
 95
95
-
 96
96
-
 97
97
-
 98
98
-
 99
99
-
 100
100
-
 101
101
-
 102
102
-
 103
103
-
 104
104
-
 105
105
-
 106
106
-
 107
107
-
 108
108


Rowenta DA1511 Manual de utilizare
- Categorie
- Fiare de călcat
- Tip
- Manual de utilizare
în alte limbi
- Türkçe: Rowenta DA1511 Kullanım kılavuzu
- slovenčina: Rowenta DA1511 Používateľská príručka
- eesti: Rowenta DA1511 Kasutusjuhend