Taurus 948893 Automatic Vacuum Cleaner Manual de utilizare
- Tip
- Manual de utilizare

Català
Automatic vacuum-cleaner
Robot aspirador
Aspirateur robot
Robot Aspirapolvere
Robot aspirador
Robot aspirador
HOMELAND
Downloaded by: pm-capetown on 19-09-2022 12:35 CEST

A
B
D E F G
I
I
I
KK
L
MN
O
S
R
AN
C
AL
AJ
AI
AK
AR
AM
Downloaded by: pm-capetown on 19-09-2022 12:35 CEST

Downloaded by: pm-capetown on 19-09-2022 12:35 CEST

English
Robot Vacuum cleaner
HOMELAND
Dear customer,
Many thanks for choosing to purchase a
TAURUS brand product.
Thanks to its technology, design and operation
and the fact that it exceeds the strictest quality
standards, a fully satisfactory use and long pro-
duct life can be assured.
Read these instructions carefully before swit-
ching on the appliance and keep them for future
reference. Failure to follow and observe these
instructions could lead to an accident.
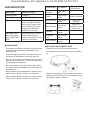
USE AND CARE:
- Do not use the appliance if its accessories are
not properly tted.
- Do not use the appliance to gather up water or
any other liquid.
- Do not use the appliance if the on/off switch
does not work.
- Respect the MAX level indicator.
- Remove the batteries from the appliance if you
are not going to use it for some time.
- Store this appliance out of reach of children
and/or persons with physical, sensory or
reduced mental or lack of experience and
knowledge.
- Do not work on areas where there are metal
objects, such as nails and/or screws.
- Never vacuum hot or sharp objects (cigarette
butts, ashes, nails, etc.).
- Do not open the battery/ies under any circum-
stances whatsoever.
- When the battery/ies is not in use, keep it away
from other metal objects like paper clips, coins,
keys, screws ... that could connect a terminal
to another.
- Do not shortcircuit the battery terminals as this
may cause an explosion or re.
- The battery/ies should be stored at a tempera-
ture of below 40ºC.
- Recharge the battery/ies only with the charger
supplied by the manufacturer. A charger that
is suitable for one type of battery may cause
explosion or re hazard when used with other
battery/ies.
- Use the device only with the battery/ies for
which has been specically designed. The use
of any other battery/ies s can cause an explo-
sion or re hazard.
SERVICE:
- Make sure that the appliance is serviced only
by specialist personnel, and that only original
spare parts or accessories are used to replace
existing parts/accessories.
- CAUTION: There is a risk of re if the
appliance’s cleaning is not done according to
these instructions.
- Any misuse or failure to follow the instruc-
tions for use renders the guarantee and the
manufacturer’s liability null and void.
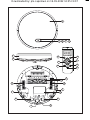
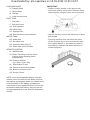
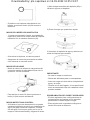
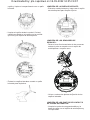
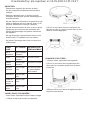
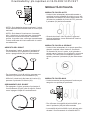
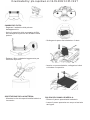
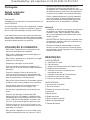
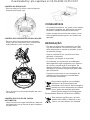
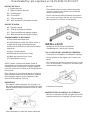
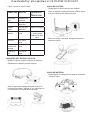
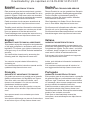
DESCRIPTION
TOP VIEW
A Robot vacuum cleaner top cover
B Antiscratch band
C Front impact infrared sensor
D Operation button
E Red light xed or blinking error
F Operating light
G Charge light indicator.
H Selfcleaning brush
BOTTOM VIEW
I Antifall sensors
J Side brushes
K Load contact points
L Swivel wheels
M Right wheel
N Left wheel
O Main rotative brush
R Power interuptor
S Battery cover
Downloaded by: pm-capetown on 19-09-2022 12:35 CEST

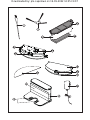
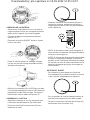
CHARGING BASE
U Charging base
V Sensor base
W Charger
X Load contact points
DUST TANK
Y Dust tank
Z Dust tank cover
AA Textile prelter
AB HEPA Filter
AC Sponge Filter
AD Dust container removal button
WATER TANK
AE Water tank
AF Microber mop
AG Hermetic water tank lid
AH Water tank removal button
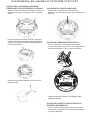
REMOTE CONTROL
AI MODE button
AJ Button Cleaning mode Go Home
(returns to the charging station
automatically)
AK Direction buttons
(up / down / right / left)
AL Start button or stop
AM Button to select the schedule
AN Button to select the time
AR Suction Power
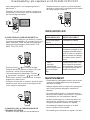
NOTA: Insert 2 AAA batteries before using the
remote control for the rst time. Make sure that
the positive and negative poles are located in the
correct direction in the battery compartment.
If the model of your appliance does not have the
accessories described above, they can also be
bought separately from the Technical Assistance
Service.
IMPORTANT:
- Cables or other objects on the ground can
hinder the mobility of the robot. Remove these
objects before using the robot vacuum cleaner.
- Use the vacuum cleaner the robot only on short
pile carpets.
- Furniture less than 8cm can block the robot.
Lift the furniture if you need to clean this area.
- Put a safety barrier on the stairs to prevent it
from falling in case the fall arrest sensors do
not work properly.
Downloaded by: pm-capetown on 19-09-2022 12:35 CEST

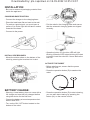
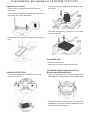
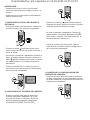
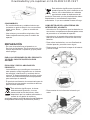
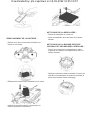
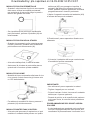
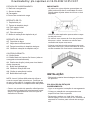
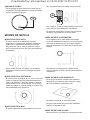
INSTALLATION
- Be sure to remove all packaging material from
inside the appliance.
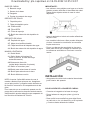
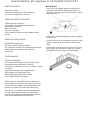
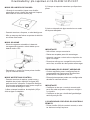
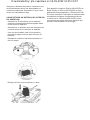
CHARGING BASE POSITION:
- Connect the charger to the charging base.
- Place the load base at and next to the wall.
- To receive a good signal, you must leave a
radius of 1m to the right and left and 2 meters
forward of the base.
- Connect to the power.
INSTALL SIDE BRUSHES:
- Mount the side brushes on the bottom of the
robot by pressing the brushes into its slot.
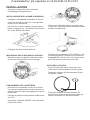
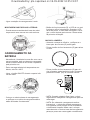
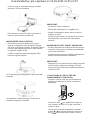
BATTERY CHARGE:
- Warning: A new battery does not come with a
full charge and must be fully charged before
using the device for the rst time.
- Charge the battery at room temperature bet-
ween 4 and 40ºC.
- Turn on the ON / OFF button located on the
bottom of the robot.
- Put the robot in the charging base and ensure
that the automatic charging poles are aligned
correctly.
- Operation button (D): the blue LED will light
blinking. When the LED stops blinking the robot
is loaded. Load the robot for 4 hours before the
rst use.
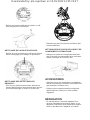
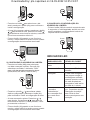
ACTIVATE THE ROBOT
- Before starting use, ensure that the power
switch (R) is on.
- Press the operation button (D) to awaken the
robot.
- Press the operation button (D) to start cleaning,
you can also start cleaning by pressing the
button (AL) on the remote control.
Downloaded by: pm-capetown on 19-09-2022 12:35 CEST

NOTE: If the battery is about to run out, the robot
will return to the charging base automatically to
recharge.
NOTE: If the load base is inaccessible, the robot
can not be recharged, it will return to the initial
situation and the cleaning system will end. In this
case, place the robot manually in the charging
base so that it can be recharged correctly.
PAUSE THE ROBOT
- To stop the robot press the operation button (D)
or press the on / off button (AL) on the remote
control.
- To resume the cleaning cycle, press the opera-
tion button (D) again.
- For the robot to return to the charging base (U)
press the Go Home button (AJ).
POWER OFF THE ROBOT
- To turn off the robot press the operation button
(D) next until the operation indicator goes off.
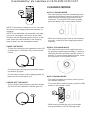
CLEANING MODES
AUTO CLEANING MODE
- The robot starts to vacuum automatically and
combines the different cleaning modes in one
optimizing the cleaning of your home to the
maximum. To use the AUTO cleaning mode,
press the button (AI) on the remote control.
- When the cleaning cycle ends or if the battery
runs out, it returns to the charging base auto-
matically.
SPIRAL CLEANING MODE
- The robot starts vacuum at a particular point
by spiraling outward approximately (1 meter) in
diameter and then spiraling inward to where it
started. To use the spiral cleaning mode, press
the (AI) button on the remote control.
MAX CLEANING MODE
- The robot increases its suction power to provi-
de a deeper cleaning.
- To use the MAX cleaning mode, press the (AR)
button on the remote control.
- MAX cleaning mode can only be activated
during operation in AUTO cleaning mode.
Downloaded by: pm-capetown on 19-09-2022 12:35 CEST

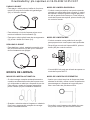
EDGE CLEANING MODES
- Once the robot nishes cleaning the open areas
of your oor, use the perimeter mode to make
sure it has been cleaned along the walls and
around the legs of the furniture.
- If you prefer a faster cleaning of the edges,
press the button (AI) on the remote control.
SMALL ROOM CLEANING MODE
- When it is necessary to clean a specic room,
press the room cleaning mode button on the
remote control (AI).
- When the cleaning is nished, the robot will
stop.
- Make sure to close the doors of the room while
using this mode.
GO HOME MODE
- Mode of return to the charging base automati-
cally when the robot detects that only 15% of
the battery is left.
- To activate the Go Home mode, press the (AJ)
button on the remote control.
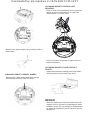
WATER TANK ICONTROL MODE
- At the end of the suction process, you can
change the dust deposit through the water
tank (AE) to continue cleaning. The water tank
works by dripping so the mop will moisten and
mop the oor.
- Open the hermetic lid of the tank (AG) and
introduce water into the tank.
- Put the mop that is fastened securely.
- Enter the water tank and select the cleaning
mode you need.
IMPORTANT:
- Do not use the mop outdoors.
- Remove the carpets to avoid damaging them.
- Before loading the robot, remove the water tank
and the mop.
- During scrubbing, if the oor surface is too
smooth, the robot wheels may slip.
Downloaded by: pm-capetown on 19-09-2022 12:35 CEST

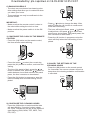
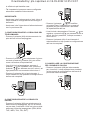
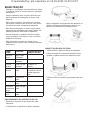
CLEANING SCHEDULE
- The robot vacuum cleaner has cleaning sche-
dule settings that allow you to customize when
you clean your home.
- These settings can only be conrmed via the
remote control.
IMPORTANT:
- Make sure that the remote control is close to
the robot while setting the clock or time.
- Make sure that the power switch is in the ON
position.
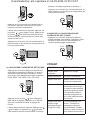
1) CONFIGURE THE CLOCK OF THE REMOTE
CONTROL
- Press the (AN) button on the remote control,
the time selector starts blinking.
- Press the button to select the current day,
press the (AL) button to conrm, and enter the
setting.
- The hour (Hr) starts to ash, press the /
button to set the time, press the / button to
switch between hours and minutes, with each
press, the time increases or decreases 1.
- Press the (AL) button in progress or stop the
robot will beep when the time setting is com-
pleted.
2) CONFIGURE THE CLEANING HOURS
- Press the (AM) button to select and the date
will start ashing. If you don’t select a date,
the “SUN” indicator for the day of the week will
start ashing (SUN, MON, TUE, WED, THU,
FRI, SAT).
- Press / button to change the date. After
setting, press the (AL) button to conrm and
enter the time setting.
- The hour will begin to ash, press / button
to adjust time, and press / to switch bet-
ween hours and minutes. With each press, the
time increases or decreases 1.
- Press the (AL) button in progress or stop the
robot will beep when the time setting is com-
pleted.
3) CANCEL THE SETTINGS OF THE
CLEANING HOURS
- Press the (AM) button on the remote control
for 4 seconds, the vacuum cleaner will emit a
beep when the cleaning schedule conrmation
is canceled.
4 sec.
Downloaded by: pm-capetown on 19-09-2022 12:35 CEST

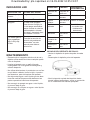
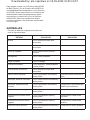
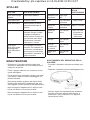
LED INDICATOR
LED LIGHT ROBOT STATUS
Flashing green Charging
Solid yellow Standby / Cleaning
Off Robot is off. To conserve
power, the light automati-
cally turns off when robot
is not docked to the char-
ging doc and has been
inactive for 1 minute.
Red light Flash/
Solide Red light/
Green light Flash/
Beep
Robot has an error. Refer
to the troubleshooting
section ”Anomalies” in this
manual for solutions
MAINTENANCE
- Disconnect the battery charger from the mains
and allow it to cool before undertaking any
cleaning task.
- Clean the equipment with a damp cloth with a
few drops of washingup liquid and then dry.
- Do not use solvents, or products with an acid or
base pH such as bleach, or abrasive products,
for cleaning the appliance.
- Do not let water or any other liquid get into the
air vents to avoid damage to the inner parts of
the appliance.
- Never submerge the appliance in water or any
other liquid or place it under running water.
- Never submerge the connector in water or any
other liquid or place it under running water.
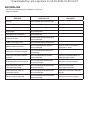
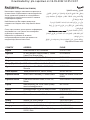
HOMELAND CLEANING REPLACEMENT
FREQUENCY
Dust Bin After each
use -
Filters Once every
week Every 2 months
Rolling Brush Once every
week
Every 6-12
months
Side Brushes Once every
month
Every 3-6
months(or when
visibly worn)
Sensors Once every
month -
Charging
Pins
Once every
month -
Swivel wheel Once every
month -
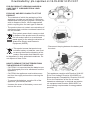
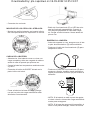
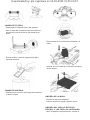
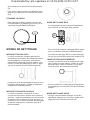
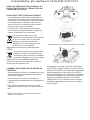
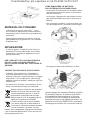
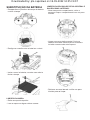
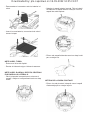
EMPTYING THE POWDER TANK:
- Empty the dust container after each use.
- Uncouple the dust container from the applian-
ce.
- Open the emptying lid of the tank where indica-
ted by the arrows and pour its contents into an
appropriate waste container.
Downloaded by: pm-capetown on 19-09-2022 12:35 CEST

CHANGE OF FILTERS:
- Disconnect the powder container from the
appliance.
- Open the lid of the lter compartment located in
the upper part of the dust tank.
- Extract the lter and shake lightly to expose the
dust.
CHANGE OF BATTERY:
- Unscrew the screw of the battery cover and
remove the cover.
- Disconnect the plug between the battery and
the robot.
- Insert the new battery, connect it to the robot
and close the lid.
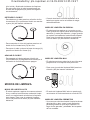
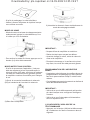
CLEANING MOP
- Remove the tank lid.
- Wash the mop with water and let it dry.
CLEANING ROBOT’S MAIN ROTATIVE
BRUSH AND SIDE BRUSHES:
- Open the compartment lid, remove the brush
and clean the compartment with a damp cloth.
- Clean the central rotating brush. Cut the hair
wrapped in the brush with the blade that inclu-
des the selfcleaning brush.
Downloaded by: pm-capetown on 19-09-2022 12:35 CEST

- Remove the side brushes using a damp cloth to
clean them.
CLEANING ROBOT’S SWIVEL WHEEL:
- Remove the castor wheel and then use the
selfcleaning brush to clean the dust.
CLEANING ROBOT’S ANTIFALLING
SENSORS:
- Para un buen funcionamiento de los sensores
extrae el polvo a menudo con el cepillo de
autolimpieza o un paño seco.
- Volver a colocar las piezas de jación de los
cepillos laterales.
CLEANING ROBOT’S LOAD CONTACT
POINTS:
- Clean the automatic loading poles and load it
with the cleaning cloth and a dry cloth.
REPAIR
- Take the appliance to an authorised technical
support service if product is damaged or other
problems arise. Do not attempt to disassemble
or repair the appliance yourself as this may be
dangerous.
Downloaded by: pm-capetown on 19-09-2022 12:35 CEST

FOR EU PRODUCT VERSIONS AND/OR IN
CASE THAT IT IS REQUESTED IN YOUR
COUNTRY:
ECOLOGY AND RECYCLABILITY OF THE
PRODUCT
- The materials of which the packaging of this
appliance consists are included in a collection,
classication and recycling system. Should you
wish to dispose of them, use the appropriate
public recycling bins for each type of material.
- The product does not contain concentrations of
substances that could be considered harmful to
the environment.
This symbol means that in case you wish
to dispose of the product once its working
life has ended; take it to an authorised
waste agent for the selective collection of
Waste from Electric and Electronic
Equipment (WEEE).
This symbol means that product may
include a battery or batteries; user must
to remove them before disposing of the
product. Remember that batteries must
be disposed of in duly authorised containers. Do
not dispose of them in re.
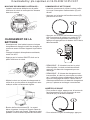
HOW TO REMOVE THE BATTERIES FROM
THE INTERIOR OF THE DEVICE:
- CAUTION: It is important that the batteries are
fully discharged prior to its withdrawal from the
apparatus.
- CAUTION: the appliance must be disconnec-
ted from the supply mains when removing the
batteries.
- To remove the batteries, once the life of the
appliance, proceed as follows:
- Unscrew the screw of the battery cover and
remove the cover.
- Disconnect the plug between the battery and
the robot.
This appliance complies with Directive 2014/35/
EU on Low Voltage, Directive 2014/30/EU on
Electromagnetic Compatibility, Directive 2011/65/
EU on the restrictions of the use of certain
hazardous substances in electrical and electro-
nic equipment and Directive 2009/125/EC on
the ecodesign requirements for energyrelated
products.
Downloaded by: pm-capetown on 19-09-2022 12:35 CEST

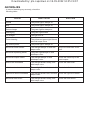
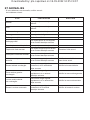
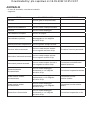
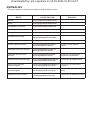
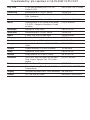
ANOMALIES
- In case of detecting any anomaly, check the
following table:
STATUS LIGHT COLOR SOLUTION
Normal The yellow light is always on
Stop The yellow light is always on
Return charger The green light is always on
Recharging The green light ickers
Full charger The light turn off
Focus cleaning The yellow and green light ickers
and with beeps voice
Big suction power The yellow light is always on
Abnormal bottom sensor The red light always on and with
beeps voice
Re-put the host bakc to the
oor.
Abnormal Impending switch The green light always on and
withbeeps voice
Abnormal bumper switch The red light always on and
withbeeps voice
Check the sensitivity of the
front bumper.
Side brush overloaded The red light ickers slowly, and
with beeps voice
Check the side brush.
Left drive wheel overloaded The red light ickers fast, and with
beeps voice
Check the left drive wheel.
Right drive wheel overloaded The red light ickers fast, and with
beeps voice
Check the right drive wheel.
Abnormal roller brush The red light ickers slowly, and
with beeps voice
Check the roller brush.
Downloaded by: pm-capetown on 19-09-2022 12:35 CEST

Español
Robot Aspirador
HOMELAND
Distinguido cliente:
Le agradecemos que se haya decidido por la
compra de un producto de la marca TAURUS.
Su tecnología, diseño y funcionalidad, junto con
el hecho de superar las más estrictas normas de
calidad le comportarán total satisfacción durante
mucho tiempo.
Leer atentamente este folleto de instrucciones
antes de poner el aparato en marcha y guardarlo
para posteriores consultas. La no observación
y cumplimiento de estas instrucciones pueden
comportar como resultado un accidente.
UTILIZACIÓN Y CUIDADOS:
- No usar el aparato si sus accesorios no están
debidamente acoplados.
- No usar el aparato para recoger agua ni cual-
quier otro líquido.
- No usar el aparato si su dispositivo de puesta
en marcha/paro no funciona.
- Respetar la indicación de nivel MAX.
- Retirar las pilas o baterías del aparato si no lo
va a usar en mucho tiempo.
- Guardar este aparato fuera del alcance de los
niños y/o personas con capacidades físicas,
sensoriales o mentales reducidas o falta de
experiencia y conocimiento.
- No actuar sobre áreas que contengan objetos
metálicos tales como clavos y/o tornillos.
- No aspirar nunca objetos incandescentes o
cortantes (colillas, cenizas, clavos…).
- No abrir la/s batería/s bajo ningún motivo.
- Cuando la/s batería/s no estén en uso, éstas
deben mantenerse alejadas de otros objetos
metálicos como clips para papeles, monedas,
llaves, tornillos... que pudieran establecer
conexión de un terminal a otro.
- Evite provocar un cortocircuito entre los ter-
minales de la batería, ya que existe riesgo de
explosión o incendio.
- Guardar la/s batería/s en lugares donde la
temperatura no supere los 40ºC.
- Recargue la/s batería/s solamente con el car-
gador suministrado por el fabricante. Un carga-
dor que es adecuado para un tipo de baterías,
puede ocasionar un peligro de explosión o
incendio cuando es usado con otra/s batería/s.
- Use el aparato solamente con la/s batería/s por
las que ha estado diseñado especícamente.
El uso de cualquier otra/s batería/s puede oca-
sionar un peligro de explosión o incendio.
SERVICIO:
- Cerciorarse que el servicio de mantenimiento
del aparato sea realizado por personal espe-
cializado, y que caso de precisar consumibles/
recambios, éstos sean originales.
- ADVERTENCIA: Existe el riesgo de incendio
en caso de que la limpieza del aparato no se
realice conforme a estas instrucciones.
- Toda utilización inadecuada, o en desacuerdo
con las instrucciones de uso, puede comportar
peligro, anulando la garantía y la responsabili-
dad del fabricante.
DESCRIPCIÓN
VISTA SUPERIOR
A Cubierta del robot aspirador
B Banda antiralladuras
C Sensor de infrarojos de impacto frontal
D Botón de funcionamiento
E Indicador luminoso rojo jo o parpadeante
de error
F Indicador luminoso de funcionamiento
G Indicador luminoso de carga.
H Cepillo de autolimpieza
VISTA INFERIOR
I Sensores de desnivel
J Cepillos laterales
K Puntos de contacto de carga
L Rueda pivotante
M Rueda derecha
N Rueda izquierda
O Cepillo rotativo central
R Interuptor de alimentación
S Tapa de la batería
Downloaded by: pm-capetown on 19-09-2022 12:35 CEST

BASE DE CARGA
U Base de carga
V Sensor de la base
W Cargador
X Puntos de contacto de carga
DEPÓSITO DE POLVO
Y Depósito polvo
Z Tapa del depósito polvo
AA Preltro téxtil
AB Filtro HEPA
AC Filtro de esponja
AD Botón de extracción del depósito de
polvo
DEPÓSITO DE AGUA
AE Depósito de agua
AF Mopa de microbra lavable
AG Tapa hermética del deposito de agua
AH Botón de extracción del depósito de agua
MANDO A DISTANCIA
AI Botón Modo
AJ Botón Modo de limpieza Go
Home (vuelve a la base de carga
automaticamente)
AK Botones de dirección
(arriba/ abajo/ derecha /izquierda)
AL Botón en marcha o paro
AM Botón para seleccionar el horario
AN Botón para seleccionar la hora
AR Botón Máxima succión
NOTA: Insertar 2 pilas AAA antes de usar el
mando a distancia por primera vez. Asegúrese
que el polo positivo y negativo están situados en
la dirección correcta en el compartimento de las
pilas.
En el caso de que su modelo de aparato no dis-
ponga de los accesorios descritos anteriormente,
éstos también pueden adquirirse por separado en
los Servicios de Asistencia Técnica
IMPORTANTE:
- Los cables o otros objetos que haya en el suelo
pueden pueden dicultar la movilidad del robot.
Retirar estos objetos antes de usar el robot
aspirador.
- Usar el aspirador el robot solo sobre alfombras
de pelo corto.
- Los muebles inferiores a 8cm pueden bloquear
el robot. Levantar los muebles si se necesita
limpiar esta zona.
- Poner una barrera de seguridad en las esca-
leras para evitar que se caiga en caso de que
los sensores anticaída no funcionen correcta-
mente.
INSTALACIÓN
- Asegurarse de retirar todo material de embala-
je del interior del aparato.
COLOCACIÓN DE LA BASE DE CARGA:
- Conectar el cargador a la base de carga.
- Poner la base de carga en plano y junto la
pared.
- Para recibir buena señal hay que dejar libres
un radio de un 1m a la derecha y a la izquierda
y 2 metros hacia delante de la base.
Downloaded by: pm-capetown on 19-09-2022 12:35 CEST

- Conectar a la corriente.
MONTAJE DE LOS CEPILLOS LATERALES:
- Montar los cepillos laterales en la parte inferior
del robot presionando los cepillos en su ranura.
CARGA DE LA BATERÍA
- Advertencia: Una batería nueva no viene con
carga completa y debe ser cargada al máximo
antes de usar el aparato por primera vez.
- Cargar la batería a temperatura ambiente entre
4 y 40ºC.
- Encender el botón de ON/OFF situado en la
parte inferior del robot.
- Poner el robot en la base de carga y asegu-
rar que los polos de carga automática están
alineados correctamente.
- Botón de funcionamiento (D): el LED de color
azul se iluminará parpadeando. Cuando el
LED deja de parpadear el robot está carga-
do. Cargar el robot durante 4 horas antes del
primer uso.
EMPEZAR LA LIMPIEZA
- Antes de empezar su uso, asegurar que el inte-
rruptor de alimentacion (R) está encendido.
- Presione el botón de funcionamiento (D) para
despertar el robot.
- Presione el botón de funcionamiento (D) para
empezar a limpiar, también puede empezar a
limpiar presionando el botón (AL) del mando a
distancia.
- NOTA: Si la batería se está a punto de agotar,
el robot volverá a la base de carga automática-
mente para recargarse.
- NOTA: Si la base de carga está inaccesible, el
robot no se podrá recargar, volverá a la situa-
Downloaded by: pm-capetown on 19-09-2022 12:35 CEST

ción inicial y nalizará el sistema de limpieza.
En este caso situe el robot manualmente en
la base de carga para que pueda recargarse
correctamente.
DETENER EL ROBOT
- Para detener el robot presione el botón de fun-
cionamiento (D) o presione el botón en marcha
o paro (AL) del mando a distancia.
- Para reanudar el ciclo de limpieza presione el
botón de funcionamiento (D) otra vez.
- Para que el robot vuelva a la base de carga (U)
presiona el botón Go Home (AJ).
APAGAR EL ROBOT
- Para apagar el robot presione el botón de
funcionamiento (D) seguidamente hasta que el
indicador de funcionamiento se apague.
MODOS DE LIMPIEZA
MODO DE LIMPIEZA AUTO
- El robot empieza a aspirar de manera automá-
tica y combina los diferentes modos de limpie-
za en uno optimizando al máximo la limpieza
de tu hogar. Para usar el modo de limpieza
en AUTO presione el botón (AI) del mando a
distancia.
- Cuando termina el ciclo de limpieza o si la
batería se agota vuelve a la base de carga
automáticamente.
MODO DE LIMPIEZA EN ESPIRAL
- El robot empieza aspirar en un punto en con-
creto girando en espiral hacia afuera aproxima-
damente (1 metro) de diámetro y luego girando
en espiral hacia adentro hasta donde empezó.
Para usar el modo de limpieza en espiral pre-
sione el botón (AI) del mando a distancia.
MODO DE LIMPIEZA MAX
- El robot aumenta su potencia de succión para
proporcionar una limpieza más profunda.
- Para usar el modo de limpieza MAX presione
el botón (AR) del mando a distancia.
- El modo de limpieza MAX solo se puede acti-
var durante el funcionamiento en modo AUTO.
MODO DE LIMPIEZA PERÍMETRO
- Una vez que robot termina de limpiar las áreas
abiertas de su piso, usa el modo perímetro
para asegurarse de que haya limpiado a lo
largo de las paredes y alrededor de las patas
de los muebles.
Downloaded by: pm-capetown on 19-09-2022 12:35 CEST

- Si preere una limpieza más rápida de los
bordes, presione el botón (AI) del mando a
distancia.
MODO DE LIMPIEZA EN HABITACIÓN
- Cuando sea necesario limpiar una habitación
especíca, presione el botón modo de limpieza
habitación en el mando a distancia (AI).
- Al terminar la limpieza, el robot se parará.
- Asegurese de cerrar las puertas de la habita-
ción mientras se use este modo.
MODO DE GO HOME
- Modo de retorno a la base de carga automáti-
ca mente cuando el robot detecta que solo le
queda un 15% de la batería.
- Para activar el modo Go Home presione el
botón (AJ) del mando a distancia.
MODO WATER TANK ICONTROL
- Al nalizar el proceso de aspiración se puede
cambiar el depósito de polvo por el depósito de
agua (AE) para continuar limpiando. El depó-
sito de agua funciona por goteo por lo que la
mopa se irá humedeciendo y fregando el suelo.
1) Abrir la tapa hermética del depósito (AG) e
introducir agua en el depósito.
2) Poner la mopa que quede bien sujeta.
3) Introduce el depósito de agua y selecione el
modo de limpieza que necesite.
IMPORTANTE:
- No usar la mopa en exteriores.
- Retirar las alfombras para no estropearlas.
- Antes de cargar el robot retirar el depósito de
agua y la mopa.
- Durante el uso del fregado, si la supercie del
suelo es demasiado lisa, las ruedas del robot
pueden resbalar.
PROGRAMACIÓN DEL ROBOT ASPIRADOR
- El robot aspirador tiene conguraciones de
programación de limpieza que le permiten
personalizar cuando limpia su hogar.
- Estos ajustes solo se pueden conrgurar a
través del mando a distancia.
Downloaded by: pm-capetown on 19-09-2022 12:35 CEST

IMPORTANTE:
- Asegúrese de que el control remoto esté
cerca del robot mientras congura el reloj o el
horario.
- Asegurese que el interruptor de alimentación
está en posición ON.
1) CONFIGURA EL RELOJ DEL MANDO A
DISTANCIA
- Presione el botón (AN) del mando a distancia,
el selector de la hora empieza a parpadear.
- Presione el botón para seleccionar el día
actual, presione el botón (AL) para conrmar, y
entrar al ajuste.
- La hora (Hr) comienza a parpadear, presione el
botón / para ajustar el tiempo, presione el
botón / para cambiar entre horas y minutos,
con cada pulsación, el el tiempo aumenta o
disminuye 1.
- Presione el botón (AL) en marcha o paro el
robot emitirá un pitido cuando la conguración
de la hora esté completada.
2) CONFIGURAR EL HORARIO DE LIMPIEZA
- Presione el botón (AM) para la selección y
la fecha empezará a parpadear. Si no se-
lecciona una fecha, el indicador “SUN” del
día de la semana empezará a parpadear
(SUN,MON,TUE,WED,THU,FRI,SAT).
- Presione el botón / para cambiar la fecha.
Después del ajuste, presione el botón (AL) para
conrmar y entrar al ajuste de tiempo.
- La hora comenzará a parpadear. Presione /
para ajustar. y presione / para cambiar
entre horas y minutos. Con cada pulsación, el
tiempo aumenta o disminuye 1.
- Presione el botón (AL) en marcha o paro el
robot emitirá un pitido cuando la conguración
de la hora esté completada.
3) CANCELAR LA CONFIGURACIÓN DEL
HORARIO DE LIMPIEZA
- Presione el botón (AM) del mando a distancia
durante 4 segundos, el robot aspirador emitirá
un pitido cuando le conguración del horario de
limpieza esté cancelado.
4 sec.
Downloaded by: pm-capetown on 19-09-2022 12:35 CEST
Pagina se încarcă...
Pagina se încarcă...
Pagina se încarcă...
Pagina se încarcă...
Pagina se încarcă...
Pagina se încarcă...
Pagina se încarcă...
Pagina se încarcă...
Pagina se încarcă...
Pagina se încarcă...
Pagina se încarcă...
Pagina se încarcă...
Pagina se încarcă...
Pagina se încarcă...
Pagina se încarcă...
Pagina se încarcă...
Pagina se încarcă...
Pagina se încarcă...
Pagina se încarcă...
Pagina se încarcă...
Pagina se încarcă...
Pagina se încarcă...
Pagina se încarcă...
Pagina se încarcă...
Pagina se încarcă...
Pagina se încarcă...
Pagina se încarcă...
Pagina se încarcă...
Pagina se încarcă...
Pagina se încarcă...
Pagina se încarcă...
Pagina se încarcă...
Pagina se încarcă...
Pagina se încarcă...
Pagina se încarcă...
Pagina se încarcă...
Pagina se încarcă...
Pagina se încarcă...
Pagina se încarcă...
Pagina se încarcă...
Pagina se încarcă...
Pagina se încarcă...
Pagina se încarcă...
Pagina se încarcă...
Pagina se încarcă...
Pagina se încarcă...
Pagina se încarcă...
Pagina se încarcă...
Pagina se încarcă...
Pagina se încarcă...
Pagina se încarcă...
Pagina se încarcă...
Pagina se încarcă...
Pagina se încarcă...
Pagina se încarcă...
Pagina se încarcă...
-
 1
1
-
 2
2
-
 3
3
-
 4
4
-
 5
5
-
 6
6
-
 7
7
-
 8
8
-
 9
9
-
 10
10
-
 11
11
-
 12
12
-
 13
13
-
 14
14
-
 15
15
-
 16
16
-
 17
17
-
 18
18
-
 19
19
-
 20
20
-
 21
21
-
 22
22
-
 23
23
-
 24
24
-
 25
25
-
 26
26
-
 27
27
-
 28
28
-
 29
29
-
 30
30
-
 31
31
-
 32
32
-
 33
33
-
 34
34
-
 35
35
-
 36
36
-
 37
37
-
 38
38
-
 39
39
-
 40
40
-
 41
41
-
 42
42
-
 43
43
-
 44
44
-
 45
45
-
 46
46
-
 47
47
-
 48
48
-
 49
49
-
 50
50
-
 51
51
-
 52
52
-
 53
53
-
 54
54
-
 55
55
-
 56
56
-
 57
57
-
 58
58
-
 59
59
-
 60
60
-
 61
61
-
 62
62
-
 63
63
-
 64
64
-
 65
65
-
 66
66
-
 67
67
-
 68
68
-
 69
69
-
 70
70
-
 71
71
-
 72
72
-
 73
73
-
 74
74
-
 75
75
-
 76
76


Taurus 948893 Automatic Vacuum Cleaner Manual de utilizare
- Tip
- Manual de utilizare
în alte limbi
Lucrări înrudite
Alte documente
-
 JBM 54020 Manualul utilizatorului
-
Solac AA3400 Manualul proprietarului
-
Solac AA3400 ECOGENIC Manualul proprietarului
-
Beko VRR Manual de utilizare
-
Rowenta Aspirateur robot RR7675WH X-Plorer Manualul proprietarului
-
Rowenta RR6825 Manualul proprietarului
-
Rowenta RO7236EA Manualul proprietarului
-
 V-TAC VT-5555 Manual de utilizare
-
AEG X PERFORMANCE RX7 Manual de utilizare
-

