Sharp YC-PS201AE-S Manualul proprietarului
- Categorie
- Microunde
- Tip
- Manualul proprietarului

YC-PS201A
Microwave oven
User manual
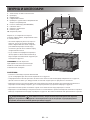
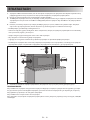
*Product images are for illustration purpose only. Actual product may vary.
HR
EN
SK
NO
ES
RO
FR
IT
CS
SR
HU
BG
SL
LT
DA
SV
PL
ET
LV
DE
UA
NL
EL
PT
FI


EN
EN – 1
EN – 1
Attention:
Your product
is marked with
this symbol.
It means that
used electrical
and electronic
products should
not be mixed
with general
household
waste. There
is a separate
collection
system for these
products.
For service and your warranty rights go to www.sharpconsumer.com/support/,
www.sharpconsumer.com/contact/, or contact the retailer where you purchased your product.
Declarations of conformity are available from www.sharpconsumer.com/documents-of-conformity/
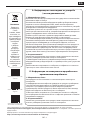
A. Information on Disposal for Users
(private households)
1. In the European Union
Attention: If you want to dispose of this equipment, please do not use the
ordinary dustbin!
Used electrical and electronic equipment must be treated separately and
in accordance with legislation that requires proper treatment, recovery and
recycling of used electrical and electronic equipment.
Following the implementation by member states, private households within
the EU states may return their used electrical and electronic equipment to
designated collection facilities free of charge*.
In some countries* your local retailer may also take back your old product
free of charge if you purchase a similar new one.
*) Please contact your local authority for further details.
If your used electrical or electronic equipment has batteries or
accumulators, please dispose of these separately beforehand according
to local requirements. By disposing of this product correctly you will help
ensure that the waste undergoes the necessary treatment, recovery and
recycling and thus prevent potential negative e ects on the environment
and human health which could otherwise arise due to inappropriate waste
handling.
2. In other Countries outside the EU
If you wish to discard this product, please contact your local authorities and
ask for the correct method of disposal.
For Switzerland: Used electrical or electronic equipment can be returned
free of charge to the dealer, even if you don't purchase a new product.
Further collection facilities are listed on the homepage of www.swico.ch or
www.sens.ch.
B. Information on Disposal for Business Users
1. In the European Union
If the product is used for business purposes and you want to discard it:
Please contact your SHARP dealer who will inform you about the take-back
of the product. You might be charged for the costs arising from take-back
and recycling. Small products (and small amounts) might be taken back by
your local collection facilities.
For Spain: Please contact the established collection system or your local
authority for take-back of your used products.
2. In other Countries outside the EU
If you wish to discard of this product, please contact your local authorities
and ask for the correct method of disposal.
www.sharpconsumer.com/
support/
www.sharpconsumer.com/
documents-of-conformity/
www.sharpconsumer.com/
contact/

EN – 2
EN – 2
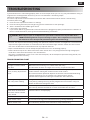
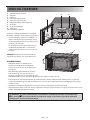
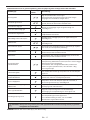
PRECAUTIONS TO AVOID POSSIBLE EXPOSURE TO MICROWAVE ENERGY
1. Do not attempt to operate this oven with the door open as this can result in harmful exposure to microwave
energy. It is important not to defeat or tamper with the safety interlocks.
2. Do not insert anything between the oven front face and the door or allow debris or cleaner residue to accumulate
on sealing surfaces.
3. Do not operate the oven if it is damaged. It is very important that the oven door closes properly and that there is
no damage to the door, hinges, latches or door seals and sealing surfaces.
4. Do not attempt to repair or adjust the oven.
CONTENTS
IMPORTANT SAFETY INSTRUCTIONS .............................................................................................................................................................. 3
INSTALLATION ....................................................................................................................................................................................................... 10
RADIO INTERFERENCE .......................................................................................................................................................................................11
GROUNDING (EARTHING) INSTRUCTIONS..................................................................................................................................................11
SPECIFICATIONS ................................................................................................................................................................................................... 11
OVEN AND ACCESSORIES .................................................................................................................................................................................12
CONTROL PANEL ..................................................................................................................................................................................................13
MICROWAVE POWER LEVELS ...........................................................................................................................................................................14
MICROWAVE COOKING .....................................................................................................................................................................................14
CLEANING AND CARE ........................................................................................................................................................................................15
SUITABLE OVENWARE ........................................................................................................................................................................................15
MICROWAVE COOKING ADVICE......................................................................................................................................................................17
DEFROSTING ADVICE .........................................................................................................................................................................................19
REHEATING ADVICE ............................................................................................................................................................................................20
TROUBLESHOOTING ........................................................................................................................................................................................... 21
BEFORE CALLING FOR ASSISTANCE ..............................................................................................................................................................22

EN
EN – 2EN – 2
PRECAUTIONS TO AVOID POSSIBLE EXPOSURE TO MICROWAVE ENERGY
1. Do not attempt to operate this oven with the door open as this can result in harmful exposure to microwave
energy. It is important not to defeat or tamper with the safety interlocks.
2. Do not insert anything between the oven front face and the door or allow debris or cleaner residue to accumulate
on sealing surfaces.
3. Do not operate the oven if it is damaged. It is very important that the oven door closes properly and that there is
no damage to the door, hinges, latches or door seals and sealing surfaces.
4. Do not attempt to repair or adjust the oven.
CONTENTS
IMPORTANT SAFETY INSTRUCTIONS .............................................................................................................................................................. 3
INSTALLATION ....................................................................................................................................................................................................... 10
RADIO INTERFERENCE .......................................................................................................................................................................................11
GROUNDING (EARTHING) INSTRUCTIONS..................................................................................................................................................11
SPECIFICATIONS ................................................................................................................................................................................................... 11
OVEN AND ACCESSORIES .................................................................................................................................................................................12
CONTROL PANEL ..................................................................................................................................................................................................13
MICROWAVE POWER LEVELS ...........................................................................................................................................................................14
MICROWAVE COOKING .....................................................................................................................................................................................14
CLEANING AND CARE ........................................................................................................................................................................................15
SUITABLE OVENWARE ........................................................................................................................................................................................15
MICROWAVE COOKING ADVICE......................................................................................................................................................................17
DEFROSTING ADVICE .........................................................................................................................................................................................19
REHEATING ADVICE ............................................................................................................................................................................................20
TROUBLESHOOTING ........................................................................................................................................................................................... 21
BEFORE CALLING FOR ASSISTANCE ..............................................................................................................................................................22
EN – 3
EN – 3
IMPORTANT SAFETY INSTRUCTIONS
READ CAREFULLY AND KEEP FOR FUTURE REFERENCE
To avoid the danger of re. The microwave oven should
not be left unattended during operation. Power levels
that are too high, or cooking times that are too long, may
overheat foods resulting in a re.
This oven is designed to be used on a countertop only. It is not
designed to be built into a kitchen unit. Do not place the oven
in a cabinet. The electrical outlet must be readily accessible so
that the unit can be unplugged easily in an emergency.
The AC power supply must be 230-240 V, 50 Hz, with a
minimum 10 A distribution line fuse, or a minimum 10A
distribution circuit breaker. A separate circuit serving only this
appliance should be provided.
Do not place the oven in areas where heat is generated. For
example, close to a conventional oven. Do not install the oven
in an area of high humidity or where moisture may collect. Do
not store or use the oven outdoors.
If smoke is observed, switch off or unplug the oven and
keep the door closed in order to sti e any ames.
Use only microwave-safe containers and utensils. Utensils
should be checked to ensure that they are suitable for use
in microwave ovens.
When heating food in plastic or paper containers, keep an
eye on the oven due to the possibility of ignition.
Clean the waveguide cover and the oven cavity. These
must be dry and free from grease. Built up grease may
overheat and begin to smoke or catch re.
Do not place ammable materials near the oven or ventilation
openings. Do not block the ventilation openings.

EN – 4
EN – 4
Remove all metallic seals, wire twists, etc., from food and food
packages. Arcing on metallic surfaces may cause a re.
Do not use the microwave oven to heat oil for deep frying. The
temperature cannot be controlled and the oil may catch re.
To make popcorn, use only special microwave popcorn makers.
Do not store food or any other items inside the oven.
Check the settings after you start the oven to ensure the oven
is operating as desired.
Do not leave the oven unattended while it is operating.
To avoid overheating and re, special care must be taken when
cooking or reheating foods with a high sugar or fat content,
for example, Sausage rolls, Pies or Christmas pudding. See the
corresponding hints in the user manual.
To avoid the possibility of injury. WARNING:
Do not operate the oven if it is damaged or malfunctioning.
Check the following before use:
a) Make sure the door closes properly and ensure it is not
misaligned or warped.
b) Check to make sure the hinges and safety door latches are
not broken or loose.
c) Ensure that the door seals and sealing surfaces have not
been damaged.
d) Make sure inside the oven cavity or on the door are no
dents.
e) Ensure that the power supply cord and plug are not
damaged.
If the door or door seals are damaged, the oven must not be
operated until it has been repaired by a competent person.
Never adjust, repair or modify the oven yourself. It is
hazardous for anyone other than a competent person to
carry out any service or repair operation which involves

EN
EN – 4EN – 4
Remove all metallic seals, wire twists, etc., from food and food
packages. Arcing on metallic surfaces may cause a re.
Do not use the microwave oven to heat oil for deep frying. The
temperature cannot be controlled and the oil may catch re.
To make popcorn, use only special microwave popcorn makers.
Do not store food or any other items inside the oven.
Check the settings after you start the oven to ensure the oven
is operating as desired.
Do not leave the oven unattended while it is operating.
To avoid overheating and re, special care must be taken when
cooking or reheating foods with a high sugar or fat content,
for example, Sausage rolls, Pies or Christmas pudding. See the
corresponding hints in the user manual.
To avoid the possibility of injury. WARNING:
Do not operate the oven if it is damaged or malfunctioning.
Check the following before use:
a) Make sure the door closes properly and ensure it is not
misaligned or warped.
b) Check to make sure the hinges and safety door latches are
not broken or loose.
c) Ensure that the door seals and sealing surfaces have not
been damaged.
d) Make sure inside the oven cavity or on the door are no
dents.
e) Ensure that the power supply cord and plug are not
damaged.
If the door or door seals are damaged, the oven must not be
operated until it has been repaired by a competent person.
Never adjust, repair or modify the oven yourself. It is
hazardous for anyone other than a competent person to
carry out any service or repair operation which involves
EN – 5
EN – 5
the removal of a cover which gives protection against
exposure to microwave energy.
Do not operate the oven with the door open or alter the door
safety latches in any way. Do not operate the oven if there is an
object between the door seals and sealing surfaces.
Do not allow grease or dirt to build up on the door seals
and adjacent parts. Clean the oven at regular intervals and
remove any food deposits.
Follow the instructions for “Care and Cleaning”. Failure
to maintain the oven in a clean condition could lead to a
deterioration of the surface that could adversely aff ect
the life of the appliance and possibly result in a hazardous
situation.
Individuals with PACEMAKERS should check with their doctor or
the manufacturer of the pacemaker for precautions regarding
microwave ovens.
To avoid the possibility of electric shock.
• Under no circumstances should you remove the outer
cabinet.
• Never spill or insert any objects into the door lock openings
or ventilation openings. In the event of a spill, turn o and
unplug the oven immediately, and call an authorised SHARP
service agent.
• Do not immerse the power supply cord or plug in water or
any other liquid.
• Do not let the power supply cord hang over the edge of a
table or work surface.
• Keep the power supply cord away from heated surfaces,
including the rear of the oven.
• Keep the appliance and its cord out of reach of children less
than 8 years.
• Do not attempt to replace the oven lamp yourself or allow

EN – 6
EN – 6
anyone who is not an electrician authorised by SHARP to do
so. If the oven lamp fails, please consult your dealer or an
authorised SHARP service agent.
• If the power supply cord is damaged, it must be replaced by
an authorised SHARP service agent.
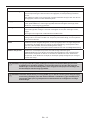
WARNING: Liquids and other foods must not be heated
in sealed containers since they are liable to explode.
Microwave heating of beverages can result in delayed
eruptive boiling; therefore, care must be taken when
handling the container. To avoid the possibility of
explosion and sudden boiling:
Never use sealed containers. Remove seals and lids before use.
Sealed containers can explode due to a build-up of pressure
even after the oven has been turned o . Take care when
microwaving liquids. Use a wide mouthed container to allow
bubbles to escape.
Never heat liquids in narrow necked containers such as
baby bottles, as this may result in the contents erupting
from the container when heated and cause burns.
To prevent sudden eruption of boiling liquid and possible
scalding:
1. Do not use excessive amount of time.
2. Stir liquid prior to heating/reheating.
3. It is advisable to insert a glass rod or similar (not metal) into
the liquid whilst reheating.
4. Let liquid stand for at least 20 seconds in the oven at the
end of cooking time to prevent delayed eruptive boiling.
Do not cook eggs in their shells, and whole hard-boiled
eggs should not be heated in microwave ovens since they
may explode even after microwave cooking has ended.
To cook or reheat eggs which have not been scrambled or

EN
EN – 6EN – 6
anyone who is not an electrician authorised by SHARP to do
so. If the oven lamp fails, please consult your dealer or an
authorised SHARP service agent.
• If the power supply cord is damaged, it must be replaced by
an authorised SHARP service agent.
WARNING: Liquids and other foods must not be heated
in sealed containers since they are liable to explode.
Microwave heating of beverages can result in delayed
eruptive boiling; therefore, care must be taken when
handling the container. To avoid the possibility of
explosion and sudden boiling:
Never use sealed containers. Remove seals and lids before use.
Sealed containers can explode due to a build-up of pressure
even after the oven has been turned o . Take care when
microwaving liquids. Use a wide mouthed container to allow
bubbles to escape.
Never heat liquids in narrow necked containers such as
baby bottles, as this may result in the contents erupting
from the container when heated and cause burns.
To prevent sudden eruption of boiling liquid and possible
scalding:
1. Do not use excessive amount of time.
2. Stir liquid prior to heating/reheating.
3. It is advisable to insert a glass rod or similar (not metal) into
the liquid whilst reheating.
4. Let liquid stand for at least 20 seconds in the oven at the
end of cooking time to prevent delayed eruptive boiling.
Do not cook eggs in their shells, and whole hard-boiled
eggs should not be heated in microwave ovens since they
may explode even after microwave cooking has ended.
To cook or reheat eggs which have not been scrambled or
EN – 7
EN – 7
mixed, pierce the yolks and the whites. Shell and slice hard
boiled eggs before reheating them in the microwave oven.
Pierce the skin of such foods as potatoes, sausages and fruit
before cooking, or they may explode.
WARNING: The contents of feeding bottles and baby
food jars must be stirred or shaken and the temperature
checked before consumption, in order to avoid burns. Use
pot holders or oven gloves when removing food from the
oven to prevent burns. To avoid the possibility of burns:
• Always open containers, popcorn makers, oven cooking
bags, etc., away from the face and hands to avoid steam
burns and eruption of boiling. To avoid burns, always test
food temperature and stir before serving and pay special
attention to the temperature of food and drink given to
babies, children or the elderly. Accessible parts may become
hot during use. Young children should be kept away.
• Temperature of the container is not a true indication of the
temperature of the food or drink; always check the food
temperature.
• Always stand back from the oven door when opening it to
avoid burns from escaping steam and heat.
• Slice stu ed baked foods after heating to release steam and
avoid burns.
• Keep children away from the door to prevent them burning
themselves.
WARNING: Only allow children aged from 8 years and
above to use the oven without supervision when adequate
instructions have been given so that the child is able to
use the oven in a safe way and understands the hazards of
improper use.
When the appliance is operated in the GRILL, MIX GRILL,
CONVECTION, MIX CONVECTION and AUTO MENU mode

EN – 8
EN – 8
(mode applicable to model), children should only use the
oven under adult supervision due to the temperature
generated.
This appliance is not intended for use by persons
(including children) with reduced physical, sensory or
mental capabilities, or lack of experience and knowledge,
unless they have been given supervision or instruction
concerning use of the appliance by a person responsible
for their safety.
Children should be supervised to ensure that they do not
play with the appliance. Cleaning by children should be
monitored.
Models with Electronic touch panel are enabled with a
child lock mode.
Do not lean or swing on the oven door. Do not play with the
oven or use it as a toy.
Children should be taught all important safety instructions:
use of pot holders, careful removal of food coverings - paying
special attention to packaging (e.g., self-heating materials)
designed to make food crisp, as they may be extra hot.
Other warnings
Never modify the oven in any way.
Do not move the oven while it is in operation.
This appliance is intended to be used in household. This oven
is for home food preparation and may only be used for cooking
food and beverages. Drying of food or clothing and heating
of warming pads, slippers, sponges, damp cloth and similar
may lead to risk of injury, ignition or re. It is not suitable for
commercial or laboratory use.

EN
EN – 8EN – 8
(mode applicable to model), children should only use the
oven under adult supervision due to the temperature
generated.
This appliance is not intended for use by persons
(including children) with reduced physical, sensory or
mental capabilities, or lack of experience and knowledge,
unless they have been given supervision or instruction
concerning use of the appliance by a person responsible
for their safety.
Children should be supervised to ensure that they do not
play with the appliance. Cleaning by children should be
monitored.
Models with Electronic touch panel are enabled with a
child lock mode.
Do not lean or swing on the oven door. Do not play with the
oven or use it as a toy.
Children should be taught all important safety instructions:
use of pot holders, careful removal of food coverings - paying
special attention to packaging (e.g., self-heating materials)
designed to make food crisp, as they may be extra hot.
Other warnings
Never modify the oven in any way.
Do not move the oven while it is in operation.
This appliance is intended to be used in household. This oven
is for home food preparation and may only be used for cooking
food and beverages. Drying of food or clothing and heating
of warming pads, slippers, sponges, damp cloth and similar
may lead to risk of injury, ignition or re. It is not suitable for
commercial or laboratory use.
EN – 9
EN – 9
To promote trouble-free use of your oven and avoid
damage.
Never operate the oven when it is empty. When using a
browning dish or self-heating material, always place a heat-
resistant insulator such as a porcelain plate under it to prevent
damage to the oven base due to heat stress. The preheating
time speci ed in the dish’s instructions must not be exceeded.
Do not use metal utensils, which re ect microwaves and may
cause electrical arcing. Do not put cans in the oven.
To prevent the turntable or base of the oven breaking:
a) Before cleaning with water, leave to cool.
b) Do not put hot or cold foods or hot utensils on a cold
turntable/oven base.
c) Do not place anything on the outer cabinet during
operation.
NOTE:
Do not use plastic containers for microwaving if the oven is still
hot from using a combination mode (oven model dependant)
because they may melt.
Plastic containers must not be used during above modes unless
the container manufacturer says they are suitable.
If you are unsure how to connect your oven, please consult an
authorised, quali ed electrician.
Neither the manufacturer nor the dealer can accept any liability
for damage to the oven or personal injury resulting from failure
to observe the correct electrical connection procedure.
Water vapour or drops may occasionally form on the oven walls
or around the door seals and sealing surfaces. This is a normal
occurrence and is not an indication of microwave leakage or a
malfunction.
This appliance is intended for use in household and similar

EN – 10
EN – 10
applications such as; Kitchen areas reserved for sta in
stores, o ces and other professional environments / Farms
/ Use by clients of hotels, motels and other residential type
environments / Bed and breakfast type environments.
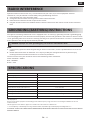
This symbol means that the surfaces are liable to get
hot during use.
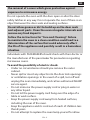
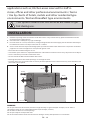
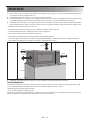
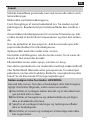
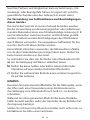
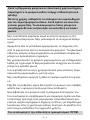
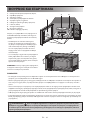
INSTALLATION
1. Remove all packing materials from the inside of the oven cavity and remove any protective lm found on the
microwave oven cabinet surface.
2. Check the oven carefully for any signs of damage.
3. Place the oven on a secure, level surface, strong enough to take the oven weight, plus the heaviest item likely to
be cooked in the oven. Do not place the oven in a cabinet.
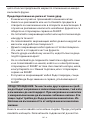
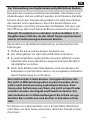
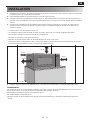
4. Select a level surface that provide enough open space for the intake and/or outlet vents. See picture on the rst
page. The rear surface of appliance can be placed against a wall.
• The minimum installation height is 85 cm.
• A minimum space of 20 cm is required between the sides of the microwave oven and any adjacent walls or objects.
• Leave a minimum space of 30 cm above the oven.
• Do not remove the feet from the bottom of the oven.
• Blocking the intake and/or outlet openings can damage the oven.
• Place the oven as far away from radios and TV as possible. Operation of microwave oven may cause interference to
your radio or TV reception.
20 cm
30 cm
85 cm
10 cm
20 cm
5. Securely connect the plug of the oven to a standard earthed (grounded) household electrical outlet.
WARNING:
Do not place the oven where heat, moisture or high humidity are generated, (for example, near or above a
conventional oven) or near combustible materials (for example, curtains).
Do not block or obstruct air vent openings.
Do not place objects on top of the oven.
Do not touch the exterior of the microwave oven during or shortly after operation as it will be hot.

EN
EN – 10EN – 10
applications such as; Kitchen areas reserved for sta in
stores, o ces and other professional environments / Farms
/ Use by clients of hotels, motels and other residential type
environments / Bed and breakfast type environments.
This symbol means that the surfaces are liable to get
hot during use.
INSTALLATION
1. Remove all packing materials from the inside of the oven cavity and remove any protective lm found on the
microwave oven cabinet surface.
2. Check the oven carefully for any signs of damage.
3. Place the oven on a secure, level surface, strong enough to take the oven weight, plus the heaviest item likely to
be cooked in the oven. Do not place the oven in a cabinet.
4. Select a level surface that provide enough open space for the intake and/or outlet vents. See picture on the rst
page. The rear surface of appliance can be placed against a wall.
• The minimum installation height is 85 cm.
• A minimum space of 20 cm is required between the sides of the microwave oven and any adjacent walls or objects.
• Leave a minimum space of 30 cm above the oven.
• Do not remove the feet from the bottom of the oven.
• Blocking the intake and/or outlet openings can damage the oven.
• Place the oven as far away from radios and TV as possible. Operation of microwave oven may cause interference to
your radio or TV reception.
20 cm
30 cm
85 cm
10 cm
20 cm
5. Securely connect the plug of the oven to a standard earthed (grounded) household electrical outlet.
WARNING:
Do not place the oven where heat, moisture or high humidity are generated, (for example, near or above a
conventional oven) or near combustible materials (for example, curtains).
Do not block or obstruct air vent openings.
Do not place objects on top of the oven.
Do not touch the exterior of the microwave oven during or shortly after operation as it will be hot.
EN – 11
EN – 11
RADIO INTERFERENCE
Operation of the microwave oven may cause interference to your radio, TV, or similar equipment. If there is
interference, it may be reduced or eliminated by taking the following measures:
1. Clean the door and cavity where they meet.
2. Change the direction of the receiving antenna of the radio or television.
3. Relocate the microwave oven with respect to the receiver.
4. Plug the microwave oven into a di erent outlet so that microwave oven and receiver are not on the same mains
feed.
GROUNDING (EARTHING) INSTRUCTIONS
This appliance must be grounded. This oven is equipped with a cord having a grounding wire with a grounding plug.
It must be plugged into a wall socket that has been properly installed and grounded. In the event of an electrical short
circuit, grounding reduces risk of electric shock by providing an escape wire for the electric current. It is recommended
that a separate circuit serving only the oven be provided.
WARNING: Improper use of the grounding plug can result in a risk of electric shock.
NOTE:
1. If you have any questions about the grounding or electrical instructions, consult a quali ed electrician or service
person.
2. Neither the manufacturer nor the dealer can accept any liability for damage to the oven or personal injury
resulting from failure to observe the electrical connection procedures.
The mains lead used in your microwave oven uses the following colour coded wires:
Green and Yellow = EARTH
Blue = NEUTRAL
Brown = LIVE
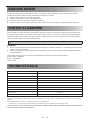
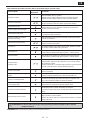
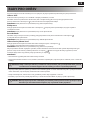
SPECIFICATIONS
Model name YC-PS201A
Power Supply 230~240 V/ 50 Hz
Power Consumption 1200 W
Rated Microwave Power Output 700 W
Operation Frequency 2450 MHz
Outside Dimensions (W) x (H) x (D) mm 455 x 274 x 329
Cavity Dimensions (W) x (H) x (D)** mm 315 x 198 x 297
Oven Capacity 20 litres**
Cooking Uniformity Turntable System
Net Weight approx. 10.5 kg
Led Bulb 1.5 W
* - This Product ful ls the requirement of the European standard EN55011. In conformity with this standard, this product is classi ed as group 2
class B equipment.
Group 2 means that the equipment intentionally generates radio-frequency energy in the form of electromagnetic radiation for the heat
treatment of food.
Class B equipment means that the equipment is suitable to be used in domestic establishments.
** - Internal capacity is calculated by measuring maximum width, depth and height. Actual capacity for holding food is less.
AS PART OF A POLICY OF CONTINUOUS IMPROVEMENT, WE RESERVE THE RIGHT TO ALTER DESIGN AND SPECIFICATIONS
WITHOUT NOTICE.

EN – 12
EN – 12
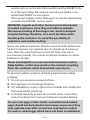
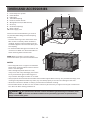
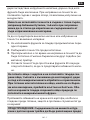
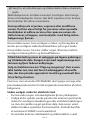
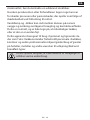
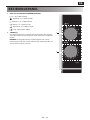
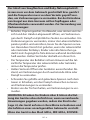
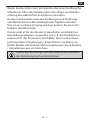
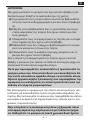
OVEN AND ACCESSORIES
1. Door Safety Lock System
2. Oven Window
3. Roller Ring
4. Turntable Coupling
5. Power and Time controls
6. Waveguide Cover (Do Not remove)
7. Glass Tray
8. Ventilation openings
9. Outer cabinet
10. Power supply cord
Check to make sure the following accessories
are provided: Roller Ring, Turntable Coupling
and Glass Tray
• Place the roller ring in the centre of the oven
oor so that it can freely rotate around the
coupling. Then place the turntable on to the
turntable support so that it locates rmly into
the coupling.
• To avoid turntable damage, ensure dishes and
containers are lifted clear of the turntable rim
when removing them from the oven.
NOTE: When you order accessories, please
mention two items: part name and model name.
NOTES:
• The waveguide cover is fragile. Care should be
taken when cleaning inside the oven to ensure
that it is not damaged.
• After cooking fatty foods without a cover,
always clean the cavity thoroughly, these must
be dry and free from grease. Built-up grease
may overheat and begin to smoke or catch re.
• Always operate the oven with the turntable and turntable support tted correctly. This promotes thorough, even
cooking. A badly tted turntable may rattle, may not rotate properly and could cause damage to the oven.
• All food and containers of food are always placed on the turntable for cooking.
• The turntable rotates clockwise or anti-clockwise. The rotary direction may change each time you start the oven.
This does not a ect cooking performance.
WARNING: This symbol means that the surfaces are liable to get hot during use. The door, outer
cabinet, oven cavity, accessories and dishes will become very hot during operation. To prevent burns,
always use thick oven gloves.
2
7
4
6
3
1
5
10
8
9

EN
EN – 12EN – 12
OVEN AND ACCESSORIES
1. Door Safety Lock System
2. Oven Window
3. Roller Ring
4. Turntable Coupling
5. Power and Time controls
6. Waveguide Cover (Do Not remove)
7. Glass Tray
8. Ventilation openings
9. Outer cabinet
10. Power supply cord
Check to make sure the following accessories
are provided: Roller Ring, Turntable Coupling
and Glass Tray
• Place the roller ring in the centre of the oven
oor so that it can freely rotate around the
coupling. Then place the turntable on to the
turntable support so that it locates rmly into
the coupling.
• To avoid turntable damage, ensure dishes and
containers are lifted clear of the turntable rim
when removing them from the oven.
NOTE: When you order accessories, please
mention two items: part name and model name.
NOTES:
• The waveguide cover is fragile. Care should be
taken when cleaning inside the oven to ensure
that it is not damaged.
• After cooking fatty foods without a cover,
always clean the cavity thoroughly, these must
be dry and free from grease. Built-up grease
may overheat and begin to smoke or catch re.
• Always operate the oven with the turntable and turntable support tted correctly. This promotes thorough, even
cooking. A badly tted turntable may rattle, may not rotate properly and could cause damage to the oven.
• All food and containers of food are always placed on the turntable for cooking.
• The turntable rotates clockwise or anti-clockwise. The rotary direction may change each time you start the oven.
This does not a ect cooking performance.
WARNING: This symbol means that the surfaces are liable to get hot during use. The door, outer
cabinet, oven cavity, accessories and dishes will become very hot during operation. To prevent burns,
always use thick oven gloves.
2
7
4
6
3
1
5
10
8
9
EN – 13
EN – 13
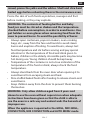
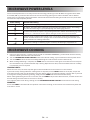
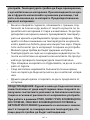
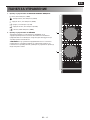
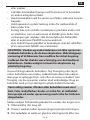
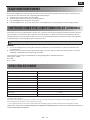
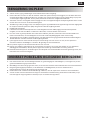
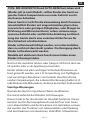
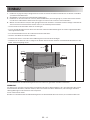
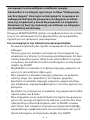
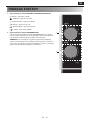
CONTROL PANEL
1. MICROWAVE POWER CONTROL knob
– Low - 20% power (140W)
– Defrost - 42% power (294W)
– Medium Low - 52% power (364W)
– Medium - 73% power (511W)
– Medium High - 88% power (616W)
– High - 100% power (700W)
2. TIMER knob
Turn TIMER knob to set cooking time. The longest time is 30 minutes.
Then the oven starts cooking automatically.
NOTE: To increase the cooking/defrosting time, turn the timer knob
to the right. To decrease the cooking/defrosting time, turn the timer
knob to the left.
700W YC-PS201A
TIME
01
3
4
5
6
2
7
8
9
10
15
20
25
30
POWER
1
2

EN – 14
EN – 14
MICROWAVE POWER LEVELS
The microwave power level is varied by the microwave energy switching on and o . When using power levels other
than HIGH (100 %) you will be able to hear the microwave energy pulsing on and o as the food cook or defrosts.
These levels are selected by rotating the Power control knob to the desired setting. The knob will click in place when
moved to the required power position.
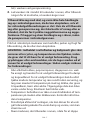
Power Setting Recommend Cooking
For gentle defrosting, e.g. cream gateaux or pastry.
To defrost, select this power setting, to ensure that the dish defrosts evenly. This setting is
also ideal for simmering rice, pasta, dumplings and cooking egg custard.
For dense foods which require a long cooking time when cooked conventionally, e.g. beef
casserole, it is advisable to use this power setting to ensure the meat will be tender.
Used for longer cooking of dense foods such as roast joints, meat loaf and plated meals,
also for sensitive dishes such as sponge cakes. At this reduced setting, the food will cook
evenly without over cooking at the sides.
Used for fast cooking or reheating e.g. for casseroles, hot beverages, vegetables etc.
MICROWAVE COOKING
1. Prepare and place food in a suitable container (refer to “SUITABLE OVENWARE” ), position food/container directly
onto the middle of the turntable. Close the door.
2. Turn the MICROWAVE POWER CONTROL knob to the desired setting; any one of the 6 microwave power levels.
3. Turn the TIMER knob to the desired cooking/defrosting time and the oven will start automatically.
4. When cooking/defrosting is complete, the TIMER returns to “0” zero and the signal will sound. The oven lamp will
turn o automatically and the turntable stops rotating. Open the oven door, remove the food/container carefully.
Leave food to stand as required.
COOKING HINTS:
When the oven starts, the oven lamp will light and the turntable will rotate clockwise or anticlockwise.
If you wish to stop cooking before the cooking time has elapsed, turn the TIMER knob back to “0” (o ), or open the
oven door. The oven door may be opened at any time during cooking. To continue cooking, close the door. If you wish
to change the cooking time during cooking, simply turn the TIMER knob to the desired new setting.
When cooking/defrosting for less than 3 minutes, turn the TIMER knob past the 10 minute mark, and then back to the
desired setting. The timer will then run more accurately.
To change the power level during cooking, turn the MICROWAVE POWER CONTROL knob to the desired setting.
WARNING:
Ensure the TIMER is returned to “0” zero position at the end of cooking, or the oven will start automatically when the
oven door is closed.

EN
EN – 14EN – 14
MICROWAVE POWER LEVELS
The microwave power level is varied by the microwave energy switching on and o . When using power levels other
than HIGH (100 %) you will be able to hear the microwave energy pulsing on and o as the food cook or defrosts.
These levels are selected by rotating the Power control knob to the desired setting. The knob will click in place when
moved to the required power position.
Power Setting Recommend Cooking
For gentle defrosting, e.g. cream gateaux or pastry.
To defrost, select this power setting, to ensure that the dish defrosts evenly. This setting is
also ideal for simmering rice, pasta, dumplings and cooking egg custard.
For dense foods which require a long cooking time when cooked conventionally, e.g. beef
casserole, it is advisable to use this power setting to ensure the meat will be tender.
Used for longer cooking of dense foods such as roast joints, meat loaf and plated meals,
also for sensitive dishes such as sponge cakes. At this reduced setting, the food will cook
evenly without over cooking at the sides.
Used for fast cooking or reheating e.g. for casseroles, hot beverages, vegetables etc.
MICROWAVE COOKING
1. Prepare and place food in a suitable container (refer to “SUITABLE OVENWARE” ), position food/container directly
onto the middle of the turntable. Close the door.
2. Turn the MICROWAVE POWER CONTROL knob to the desired setting; any one of the 6 microwave power levels.
3. Turn the TIMER knob to the desired cooking/defrosting time and the oven will start automatically.
4. When cooking/defrosting is complete, the TIMER returns to “0” zero and the signal will sound. The oven lamp will
turn o automatically and the turntable stops rotating. Open the oven door, remove the food/container carefully.
Leave food to stand as required.
COOKING HINTS:
When the oven starts, the oven lamp will light and the turntable will rotate clockwise or anticlockwise.
If you wish to stop cooking before the cooking time has elapsed, turn the TIMER knob back to “0” (o ), or open the
oven door. The oven door may be opened at any time during cooking. To continue cooking, close the door. If you wish
to change the cooking time during cooking, simply turn the TIMER knob to the desired new setting.
When cooking/defrosting for less than 3 minutes, turn the TIMER knob past the 10 minute mark, and then back to the
desired setting. The timer will then run more accurately.
To change the power level during cooking, turn the MICROWAVE POWER CONTROL knob to the desired setting.
WARNING:
Ensure the TIMER is returned to “0” zero position at the end of cooking, or the oven will start automatically when the
oven door is closed.
EN – 15
EN – 15
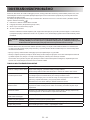
CLEANING AND CARE
1. Turn o the oven and unplug the power cord from the wall when cleaning.
2. Keep the inside of the oven clean. When food splatters or spilled liquids adhere to oven walls, wipe with a damp
cloth. Mild detergents may be used if the oven gets very dirty. Avoid using spray or other harsh cleaners. They may
stain, streak or dull the door surface.
3. The outside of the oven should be cleaned with a damp cloth. To prevent damage to the operating parts inside
the oven, water should not be allowed to seep into the ventilation openings.
4. Wipe the door and window on both sides, the door seals and adjacent parts frequently with a damp cloth to
remove any spills or spatters. Do not use abrasive cleaners.
5. Do not steam clean.
6. Do not allow the mechanical controls to become wet. Clean with a soft, damp cloth. When cleaning the
mechanical controls, leave oven door open to prevent oven from accidentally turning on.
7. If steam accumulates inside or around the outside of the oven door, wipe with a soft cloth. This may occur when
the microwave oven is operated under high humidity condition. This is not a fault.
8. The oven oor should be cleaned regularly to avoid contamination and potential arcing/damage. Simply wipe the
bottom surface of the oven with mild detergent.
9. Remove odors from your oven by combining a cup of water with the juice and skin of one lemon in a
microwaveable bowl. Microwave for 5 minutes. Wipe thoroughly and dry with a soft cloth.
10. If the light bulb fails, please contact customer service for advice.
11. The oven should be cleaned regularly and any food deposits should be removed. Failure to maintain the oven in
a clean condition could lead to deterioration of surface that could adversely a ect the life of the unit and could
possibly result in a hazardous situation.
12. Please do not dispose of this appliance into the domestic rubbish bin; it should be disposed to the particular
disposal center provided by the municipalities.
SUITABLE OVENWARE
1. The ideal material for a microwave utensil is transparent to microwave, it allows energy to pass through the
container and heat the food.
2. Microwave cannot penetrate metal, so metal utensils or dishes with metallic trim should not be used.
3. Do not use recycled paper products when microwave cooking, as they may contain small metal fragments which
may cause sparks and/or res.
4. Round /oval dishes rather than square/oblong ones are recommend, as food in corners tends to overcook.
5. Narrow strips of aluminum foil may be used to prevent overcooking of exposed areas. But be careful don’t use too
much and keep a distance of 2.54 cm between foil and cavity

EN – 16
EN – 16
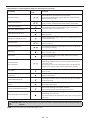
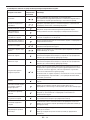
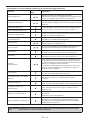
The list below is a general guide to help you select the correct utensils.
Cookware Microwave
Safe Comment
Browning dishes /
Always follow the manufacturers instructions.
Do not exceed heating times given. Be very careful as these
dishes become very hot.
China and ceramics / Porcelain, pottery, glazed earthenware and bone china are
usually suitable, except for those with metallic decoration.
Heat–Resistant Glass Care should be taken to ensure that any glass cook ware is
suitable for use in a microwave oven.
Non Heat–Resistant Glass
Heat–Resistant Ceramics Ensure that any ceramic material is not too thick or in high in
mineral content.
Microwave–Safe Plastic Dish Always check that the plastic cook ware is suitable to be used
in a microwave oven.
Kitchen Paper / Only use kitchen paper which is recommended for use in
microwave ovens.
Glassware e.g. Pyrex® / Care should be taken if using ne glassware as it can break or
crack if heated suddenly.
Metal Tray It is not recommended to use metal cookware as it will arc,
which can lead to re.
Metal Rack It is not recommended to use metal cookware as it will arc,
which can lead to re.
Aluminium foil
Foil Containers /
Small pieces of aluminium foil can be used to shield food from
overheating. Keep foil at least 2.54 cm from the oven walls, as
arcing may occur.
Foil containers are not recommended unless speci ed by the
manufacturer, e.g. Microfoil®, follow instructions carefully.
Cling lm It should not touch the food and must be pierced to let the
steam escape.
Plastic/Polystyrene e.g fast food
containers
Care must be taken as some containers warp, melt or discolour
at high temperatures.
Freezer/Roasting bags Must be pierced to let steam escape. Ensure bags are suitable
for microwave use.
Paper - Plates, cups and kitchen
paper
Do not use plastic or metal ties, as they may melt or catch re
due to the metal ‘arcing’.
Straw and wooden Containers Only use for warming or to absorb moisture.
Care must be taken as overheating may cause re.
Recycled paper and newspaper
Always attend the oven when using these materials as
overheating may cause re.
May contain extracts of metal which will cause ‘arcing’ and may
lead to re.
WARNING: When heating food in plastic or paper containers, monitor the oven due to the possibility of
ignition.
NOTE: Do not leave your oven unattended while in use.

EN
EN – 16EN – 16
The list below is a general guide to help you select the correct utensils.
Cookware Microwave
Safe Comment
Browning dishes /
Always follow the manufacturers instructions.
Do not exceed heating times given. Be very careful as these
dishes become very hot.
China and ceramics / Porcelain, pottery, glazed earthenware and bone china are
usually suitable, except for those with metallic decoration.
Heat–Resistant Glass Care should be taken to ensure that any glass cook ware is
suitable for use in a microwave oven.
Non Heat–Resistant Glass
Heat–Resistant Ceramics Ensure that any ceramic material is not too thick or in high in
mineral content.
Microwave–Safe Plastic Dish Always check that the plastic cook ware is suitable to be used
in a microwave oven.
Kitchen Paper / Only use kitchen paper which is recommended for use in
microwave ovens.
Glassware e.g. Pyrex® / Care should be taken if using ne glassware as it can break or
crack if heated suddenly.
Metal Tray It is not recommended to use metal cookware as it will arc,
which can lead to re.
Metal Rack It is not recommended to use metal cookware as it will arc,
which can lead to re.
Aluminium foil
Foil Containers /
Small pieces of aluminium foil can be used to shield food from
overheating. Keep foil at least 2.54 cm from the oven walls, as
arcing may occur.
Foil containers are not recommended unless speci ed by the
manufacturer, e.g. Microfoil®, follow instructions carefully.
Cling lm It should not touch the food and must be pierced to let the
steam escape.
Plastic/Polystyrene e.g fast food
containers
Care must be taken as some containers warp, melt or discolour
at high temperatures.
Freezer/Roasting bags Must be pierced to let steam escape. Ensure bags are suitable
for microwave use.
Paper - Plates, cups and kitchen
paper
Do not use plastic or metal ties, as they may melt or catch re
due to the metal ‘arcing’.
Straw and wooden Containers Only use for warming or to absorb moisture.
Care must be taken as overheating may cause re.
Recycled paper and newspaper
Always attend the oven when using these materials as
overheating may cause re.
May contain extracts of metal which will cause ‘arcing’ and may
lead to re.
WARNING: When heating food in plastic or paper containers, monitor the oven due to the possibility of
ignition.
NOTE: Do not leave your oven unattended while in use.
EN – 17
EN – 17
MICROWAVE COOKING ADVICE
Microwaves cook food faster than conventional cooking. It is therefore essential that certain techniques are followed
to ensure good results. Many of the following techniques are similar to those used in conventional cooking.
WARNING: Liquids and foods must not be heated in sealed containers or jars/containers with lids on, as
pressure will build up inside and may cause the jar/container to explode.
COOKING ADVICE NOTES:
• Always attend the oven when in use.
• Ensure that the utensils are suitable for use in a microwave oven.
• Refer to the charts in the cookbook section for recommended cooking times and power levels.
• Only use microwave popcorn within the recommended packaging (follow the manufacturers instructions). Never
use oil unless speci ed by the manufacturer and never cook for longer than instructed.
WARNING: Follow instructions in the SHARP operation manual at all times. If you exceed recommended
cooking times and use power levels that are too high, food may overheat, burn and, in
extreme circumstances, catch re and damage the oven.
Arrange
Place the thickest parts of food towards the outside of the dish. e.g. Chicken drumsticks.
Foods that are placed towards the outside of the dish will receive more energy, so cook quicker, than those in the centre.
Cover
Certain foods bene t from being covered during microwave cooking.
Use vented microwave cling lm or a suitable lid.
Pierce
Foods with a shell, skin or membrane must be pierced in several places before cooking or reheating as steam will build
up and may cause food to explode. e.g. Potatoes, Fish, Chicken, Sausages.
NOTE: Eggs should not be heated using microwave power as they may explode, even after cooking has ended. e.g.
poached, fried, hard boiled.
Stir, turn and rearrange
For even cooking it is essential to stir, turn and rearrange food during cooking. Always stir and rearrange from the
outside towards the centre.
Stand
Standing time is necessary after cooking so it enables the heat to disperse equally throughout the food.

EN – 18
EN – 18
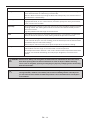
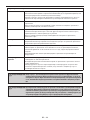
Food Characteristics
Composition Foods high in fat or sugar (e.g. Christmas pudding, mince pies) require less heating time.
Care should be taken as overheating can lead to re.
Bones in food conduct heat, making the food cook more quickly. Care must be taken so
that the food is cooked evenly.
Density Food density will a ect the amount of cooking time needed.
Light porous foods, such as cakes or bread, cook more quickly than heavy, dense foods,
such as roasts and casseroles.
Quantity The number of microwaves in your oven remains the same regardless of how much food
is being cooked. The cooking time must be increased as the amount of food placed in
the oven increases.
e.g. Four potatoes will take longer to cook than two.
Size Small foods and small pieces cook faster than large ones, as microwaves can penetrate
from all sides to the centre. For even cooking make all the pieces the same size.
Shape Foods which are irregular in shape, such as chicken breasts or drumsticks, take longer to
cook in the thicker parts. For even cooking, place the thickest parts to the outside of the
dish where they will receive more energy.
Round shapes cook more evenly than square shapes when microwave cooking.
Temperature of food The initial temperature of food a ects the amount of cooking time needed.
Chilled foods will take longer to cook than food at room temperature.
The temperature of the container is not a true indication of the temperature of the food
or drink. Cut into foods with llings, for example jam doughnuts, to release heat or
steam.
WARNING: Face & Hands: Always use oven gloves to remove food or cookware from the oven. Stand
back when opening the oven door to allow heat or steam to disperse. When removing
covers (such as cling lm), opening roasting bags or popcorn packaging, direct steam away
from face and hands.
WARNING: Check the temperature of food and drink, stir before serving. Take special care when
serving to babies, children or the elderly. The contents of feeding bottles and baby food
jars are to be stirred or shaken and the temperature is to be checked before consumption
to avoid burns.
Pagina se încarcă...
Pagina se încarcă...
Pagina se încarcă...
Pagina se încarcă...
Pagina se încarcă...
Pagina se încarcă...
Pagina se încarcă...
Pagina se încarcă...
Pagina se încarcă...
Pagina se încarcă...
Pagina se încarcă...
Pagina se încarcă...
Pagina se încarcă...
Pagina se încarcă...
Pagina se încarcă...
Pagina se încarcă...
Pagina se încarcă...
Pagina se încarcă...
Pagina se încarcă...
Pagina se încarcă...
Pagina se încarcă...
Pagina se încarcă...
Pagina se încarcă...
Pagina se încarcă...
Pagina se încarcă...
Pagina se încarcă...
Pagina se încarcă...
Pagina se încarcă...
Pagina se încarcă...
Pagina se încarcă...
Pagina se încarcă...
Pagina se încarcă...
Pagina se încarcă...
Pagina se încarcă...
Pagina se încarcă...
Pagina se încarcă...
Pagina se încarcă...
Pagina se încarcă...
Pagina se încarcă...
Pagina se încarcă...
Pagina se încarcă...
Pagina se încarcă...
Pagina se încarcă...
Pagina se încarcă...
Pagina se încarcă...
Pagina se încarcă...
Pagina se încarcă...
Pagina se încarcă...
Pagina se încarcă...
Pagina se încarcă...
Pagina se încarcă...
Pagina se încarcă...
Pagina se încarcă...
Pagina se încarcă...
Pagina se încarcă...
Pagina se încarcă...
Pagina se încarcă...
Pagina se încarcă...
Pagina se încarcă...
Pagina se încarcă...
Pagina se încarcă...
Pagina se încarcă...
Pagina se încarcă...
Pagina se încarcă...
Pagina se încarcă...
Pagina se încarcă...
Pagina se încarcă...
Pagina se încarcă...
Pagina se încarcă...
Pagina se încarcă...
Pagina se încarcă...
Pagina se încarcă...
Pagina se încarcă...
Pagina se încarcă...
Pagina se încarcă...
Pagina se încarcă...
Pagina se încarcă...
Pagina se încarcă...
Pagina se încarcă...
Pagina se încarcă...
Pagina se încarcă...
Pagina se încarcă...
Pagina se încarcă...
Pagina se încarcă...
Pagina se încarcă...
Pagina se încarcă...
Pagina se încarcă...
Pagina se încarcă...
Pagina se încarcă...
Pagina se încarcă...
Pagina se încarcă...
Pagina se încarcă...
Pagina se încarcă...
Pagina se încarcă...
Pagina se încarcă...
Pagina se încarcă...
Pagina se încarcă...
Pagina se încarcă...
Pagina se încarcă...
Pagina se încarcă...
Pagina se încarcă...
Pagina se încarcă...
Pagina se încarcă...
Pagina se încarcă...
Pagina se încarcă...
Pagina se încarcă...
Pagina se încarcă...
Pagina se încarcă...
Pagina se încarcă...
Pagina se încarcă...
Pagina se încarcă...
Pagina se încarcă...
Pagina se încarcă...
Pagina se încarcă...
Pagina se încarcă...
Pagina se încarcă...
Pagina se încarcă...
Pagina se încarcă...
Pagina se încarcă...
Pagina se încarcă...
Pagina se încarcă...
Pagina se încarcă...
Pagina se încarcă...
Pagina se încarcă...
Pagina se încarcă...
Pagina se încarcă...
Pagina se încarcă...
Pagina se încarcă...
Pagina se încarcă...
Pagina se încarcă...
Pagina se încarcă...
Pagina se încarcă...
Pagina se încarcă...
Pagina se încarcă...
Pagina se încarcă...
Pagina se încarcă...
Pagina se încarcă...
Pagina se încarcă...
Pagina se încarcă...
Pagina se încarcă...
Pagina se încarcă...
Pagina se încarcă...
Pagina se încarcă...
Pagina se încarcă...
Pagina se încarcă...
Pagina se încarcă...
Pagina se încarcă...
Pagina se încarcă...
Pagina se încarcă...
Pagina se încarcă...
Pagina se încarcă...
Pagina se încarcă...
Pagina se încarcă...
Pagina se încarcă...
Pagina se încarcă...
Pagina se încarcă...
Pagina se încarcă...
Pagina se încarcă...
Pagina se încarcă...
Pagina se încarcă...
Pagina se încarcă...
Pagina se încarcă...
Pagina se încarcă...
Pagina se încarcă...
Pagina se încarcă...
Pagina se încarcă...
Pagina se încarcă...
Pagina se încarcă...
Pagina se încarcă...
Pagina se încarcă...
Pagina se încarcă...
Pagina se încarcă...
Pagina se încarcă...
Pagina se încarcă...
Pagina se încarcă...
Pagina se încarcă...
Pagina se încarcă...
Pagina se încarcă...
Pagina se încarcă...
Pagina se încarcă...
Pagina se încarcă...
Pagina se încarcă...
Pagina se încarcă...
Pagina se încarcă...
Pagina se încarcă...
Pagina se încarcă...
Pagina se încarcă...
Pagina se încarcă...
Pagina se încarcă...
Pagina se încarcă...
Pagina se încarcă...
Pagina se încarcă...
Pagina se încarcă...
Pagina se încarcă...
Pagina se încarcă...
Pagina se încarcă...
Pagina se încarcă...
Pagina se încarcă...
Pagina se încarcă...
Pagina se încarcă...
Pagina se încarcă...
Pagina se încarcă...
Pagina se încarcă...
Pagina se încarcă...
Pagina se încarcă...
Pagina se încarcă...
Pagina se încarcă...
Pagina se încarcă...
Pagina se încarcă...
Pagina se încarcă...
Pagina se încarcă...
Pagina se încarcă...
Pagina se încarcă...
Pagina se încarcă...
Pagina se încarcă...
Pagina se încarcă...
Pagina se încarcă...
Pagina se încarcă...
Pagina se încarcă...
Pagina se încarcă...
Pagina se încarcă...
Pagina se încarcă...
Pagina se încarcă...
Pagina se încarcă...
Pagina se încarcă...
Pagina se încarcă...
Pagina se încarcă...
Pagina se încarcă...
Pagina se încarcă...
Pagina se încarcă...
Pagina se încarcă...
Pagina se încarcă...
Pagina se încarcă...
Pagina se încarcă...
Pagina se încarcă...
Pagina se încarcă...
Pagina se încarcă...
Pagina se încarcă...
Pagina se încarcă...
Pagina se încarcă...
Pagina se încarcă...
Pagina se încarcă...
Pagina se încarcă...
Pagina se încarcă...
Pagina se încarcă...
Pagina se încarcă...
Pagina se încarcă...
Pagina se încarcă...
Pagina se încarcă...
Pagina se încarcă...
Pagina se încarcă...
Pagina se încarcă...
Pagina se încarcă...
Pagina se încarcă...
Pagina se încarcă...
Pagina se încarcă...
Pagina se încarcă...
Pagina se încarcă...
Pagina se încarcă...
Pagina se încarcă...
Pagina se încarcă...
Pagina se încarcă...
Pagina se încarcă...
Pagina se încarcă...
Pagina se încarcă...
Pagina se încarcă...
Pagina se încarcă...
Pagina se încarcă...
Pagina se încarcă...
Pagina se încarcă...
Pagina se încarcă...
Pagina se încarcă...
Pagina se încarcă...
Pagina se încarcă...
Pagina se încarcă...
Pagina se încarcă...
Pagina se încarcă...
Pagina se încarcă...
Pagina se încarcă...
Pagina se încarcă...
Pagina se încarcă...
Pagina se încarcă...
Pagina se încarcă...
Pagina se încarcă...
Pagina se încarcă...
Pagina se încarcă...
Pagina se încarcă...
Pagina se încarcă...
Pagina se încarcă...
Pagina se încarcă...
Pagina se încarcă...
Pagina se încarcă...
Pagina se încarcă...
Pagina se încarcă...
Pagina se încarcă...
Pagina se încarcă...
Pagina se încarcă...
Pagina se încarcă...
Pagina se încarcă...
Pagina se încarcă...
Pagina se încarcă...
Pagina se încarcă...
Pagina se încarcă...
Pagina se încarcă...
Pagina se încarcă...
Pagina se încarcă...
Pagina se încarcă...
Pagina se încarcă...
Pagina se încarcă...
Pagina se încarcă...
Pagina se încarcă...
Pagina se încarcă...
Pagina se încarcă...
Pagina se încarcă...
Pagina se încarcă...
Pagina se încarcă...
Pagina se încarcă...
Pagina se încarcă...
Pagina se încarcă...
Pagina se încarcă...
Pagina se încarcă...
Pagina se încarcă...
Pagina se încarcă...
Pagina se încarcă...
Pagina se încarcă...
Pagina se încarcă...
Pagina se încarcă...
Pagina se încarcă...
Pagina se încarcă...
Pagina se încarcă...
Pagina se încarcă...
Pagina se încarcă...
Pagina se încarcă...
Pagina se încarcă...
Pagina se încarcă...
Pagina se încarcă...
Pagina se încarcă...
Pagina se încarcă...
Pagina se încarcă...
Pagina se încarcă...
Pagina se încarcă...
Pagina se încarcă...
Pagina se încarcă...
Pagina se încarcă...
Pagina se încarcă...
Pagina se încarcă...
Pagina se încarcă...
Pagina se încarcă...
Pagina se încarcă...
Pagina se încarcă...
Pagina se încarcă...
Pagina se încarcă...
Pagina se încarcă...
Pagina se încarcă...
Pagina se încarcă...
Pagina se încarcă...
Pagina se încarcă...
Pagina se încarcă...
Pagina se încarcă...
Pagina se încarcă...
Pagina se încarcă...
Pagina se încarcă...
Pagina se încarcă...
Pagina se încarcă...
Pagina se încarcă...
Pagina se încarcă...
Pagina se încarcă...
Pagina se încarcă...
Pagina se încarcă...
Pagina se încarcă...
Pagina se încarcă...
Pagina se încarcă...
Pagina se încarcă...
Pagina se încarcă...
Pagina se încarcă...
Pagina se încarcă...
Pagina se încarcă...
Pagina se încarcă...
Pagina se încarcă...
Pagina se încarcă...
Pagina se încarcă...
Pagina se încarcă...
Pagina se încarcă...
Pagina se încarcă...
Pagina se încarcă...
Pagina se încarcă...
Pagina se încarcă...
Pagina se încarcă...
Pagina se încarcă...
Pagina se încarcă...
Pagina se încarcă...
Pagina se încarcă...
Pagina se încarcă...
Pagina se încarcă...
Pagina se încarcă...
Pagina se încarcă...
Pagina se încarcă...
Pagina se încarcă...
Pagina se încarcă...
Pagina se încarcă...
Pagina se încarcă...
Pagina se încarcă...
Pagina se încarcă...
Pagina se încarcă...
Pagina se încarcă...
Pagina se încarcă...
Pagina se încarcă...
Pagina se încarcă...
Pagina se încarcă...
Pagina se încarcă...
Pagina se încarcă...
Pagina se încarcă...
Pagina se încarcă...
Pagina se încarcă...
Pagina se încarcă...
Pagina se încarcă...
Pagina se încarcă...
Pagina se încarcă...
Pagina se încarcă...
Pagina se încarcă...
Pagina se încarcă...
Pagina se încarcă...
Pagina se încarcă...
Pagina se încarcă...
Pagina se încarcă...
Pagina se încarcă...
Pagina se încarcă...
Pagina se încarcă...
Pagina se încarcă...
Pagina se încarcă...
Pagina se încarcă...
Pagina se încarcă...
Pagina se încarcă...
Pagina se încarcă...
Pagina se încarcă...
Pagina se încarcă...
Pagina se încarcă...
Pagina se încarcă...
Pagina se încarcă...
Pagina se încarcă...
Pagina se încarcă...
Pagina se încarcă...
Pagina se încarcă...
Pagina se încarcă...
Pagina se încarcă...
Pagina se încarcă...
Pagina se încarcă...
Pagina se încarcă...
Pagina se încarcă...
Pagina se încarcă...
Pagina se încarcă...
Pagina se încarcă...
Pagina se încarcă...
Pagina se încarcă...
Pagina se încarcă...
Pagina se încarcă...
Pagina se încarcă...
Pagina se încarcă...
Pagina se încarcă...
Pagina se încarcă...
Pagina se încarcă...
Pagina se încarcă...
Pagina se încarcă...
Pagina se încarcă...
Pagina se încarcă...
Pagina se încarcă...
Pagina se încarcă...
Pagina se încarcă...
Pagina se încarcă...
Pagina se încarcă...
Pagina se încarcă...
Pagina se încarcă...
Pagina se încarcă...
Pagina se încarcă...
Pagina se încarcă...
Pagina se încarcă...
Pagina se încarcă...
Pagina se încarcă...
Pagina se încarcă...
Pagina se încarcă...
Pagina se încarcă...
Pagina se încarcă...
Pagina se încarcă...
Pagina se încarcă...
Pagina se încarcă...
Pagina se încarcă...
Pagina se încarcă...
Pagina se încarcă...
Pagina se încarcă...
Pagina se încarcă...
Pagina se încarcă...
Pagina se încarcă...
Pagina se încarcă...
Pagina se încarcă...
Pagina se încarcă...
Pagina se încarcă...
Pagina se încarcă...
Pagina se încarcă...
Pagina se încarcă...
Pagina se încarcă...
Pagina se încarcă...
Pagina se încarcă...
Pagina se încarcă...
Pagina se încarcă...
Pagina se încarcă...
Pagina se încarcă...
Pagina se încarcă...
Pagina se încarcă...
Pagina se încarcă...
Pagina se încarcă...
Pagina se încarcă...
Pagina se încarcă...
Pagina se încarcă...
Pagina se încarcă...
Pagina se încarcă...
Pagina se încarcă...
Pagina se încarcă...
Pagina se încarcă...
Pagina se încarcă...
Pagina se încarcă...
Pagina se încarcă...
Pagina se încarcă...
Pagina se încarcă...
Pagina se încarcă...
Pagina se încarcă...
Pagina se încarcă...
Pagina se încarcă...
Pagina se încarcă...
Pagina se încarcă...
Pagina se încarcă...
Pagina se încarcă...
Pagina se încarcă...
Pagina se încarcă...
Pagina se încarcă...
Pagina se încarcă...
Pagina se încarcă...
Pagina se încarcă...
Pagina se încarcă...
Pagina se încarcă...
Pagina se încarcă...
Pagina se încarcă...
Pagina se încarcă...
Pagina se încarcă...
Pagina se încarcă...
Pagina se încarcă...
Pagina se încarcă...
Pagina se încarcă...
Pagina se încarcă...
Pagina se încarcă...
Pagina se încarcă...
Pagina se încarcă...
Pagina se încarcă...
Pagina se încarcă...
Pagina se încarcă...
Pagina se încarcă...
Pagina se încarcă...
Pagina se încarcă...
Pagina se încarcă...
Pagina se încarcă...
Pagina se încarcă...
-
 1
1
-
 2
2
-
 3
3
-
 4
4
-
 5
5
-
 6
6
-
 7
7
-
 8
8
-
 9
9
-
 10
10
-
 11
11
-
 12
12
-
 13
13
-
 14
14
-
 15
15
-
 16
16
-
 17
17
-
 18
18
-
 19
19
-
 20
20
-
 21
21
-
 22
22
-
 23
23
-
 24
24
-
 25
25
-
 26
26
-
 27
27
-
 28
28
-
 29
29
-
 30
30
-
 31
31
-
 32
32
-
 33
33
-
 34
34
-
 35
35
-
 36
36
-
 37
37
-
 38
38
-
 39
39
-
 40
40
-
 41
41
-
 42
42
-
 43
43
-
 44
44
-
 45
45
-
 46
46
-
 47
47
-
 48
48
-
 49
49
-
 50
50
-
 51
51
-
 52
52
-
 53
53
-
 54
54
-
 55
55
-
 56
56
-
 57
57
-
 58
58
-
 59
59
-
 60
60
-
 61
61
-
 62
62
-
 63
63
-
 64
64
-
 65
65
-
 66
66
-
 67
67
-
 68
68
-
 69
69
-
 70
70
-
 71
71
-
 72
72
-
 73
73
-
 74
74
-
 75
75
-
 76
76
-
 77
77
-
 78
78
-
 79
79
-
 80
80
-
 81
81
-
 82
82
-
 83
83
-
 84
84
-
 85
85
-
 86
86
-
 87
87
-
 88
88
-
 89
89
-
 90
90
-
 91
91
-
 92
92
-
 93
93
-
 94
94
-
 95
95
-
 96
96
-
 97
97
-
 98
98
-
 99
99
-
 100
100
-
 101
101
-
 102
102
-
 103
103
-
 104
104
-
 105
105
-
 106
106
-
 107
107
-
 108
108
-
 109
109
-
 110
110
-
 111
111
-
 112
112
-
 113
113
-
 114
114
-
 115
115
-
 116
116
-
 117
117
-
 118
118
-
 119
119
-
 120
120
-
 121
121
-
 122
122
-
 123
123
-
 124
124
-
 125
125
-
 126
126
-
 127
127
-
 128
128
-
 129
129
-
 130
130
-
 131
131
-
 132
132
-
 133
133
-
 134
134
-
 135
135
-
 136
136
-
 137
137
-
 138
138
-
 139
139
-
 140
140
-
 141
141
-
 142
142
-
 143
143
-
 144
144
-
 145
145
-
 146
146
-
 147
147
-
 148
148
-
 149
149
-
 150
150
-
 151
151
-
 152
152
-
 153
153
-
 154
154
-
 155
155
-
 156
156
-
 157
157
-
 158
158
-
 159
159
-
 160
160
-
 161
161
-
 162
162
-
 163
163
-
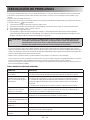 164
164
-
 165
165
-
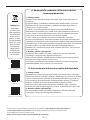 166
166
-
 167
167
-
 168
168
-
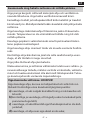 169
169
-
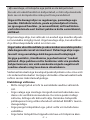 170
170
-
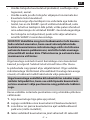 171
171
-
 172
172
-
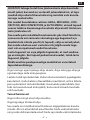 173
173
-
 174
174
-
 175
175
-
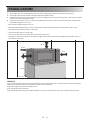 176
176
-
 177
177
-
 178
178
-
 179
179
-
 180
180
-
 181
181
-
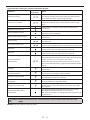 182
182
-
 183
183
-
 184
184
-
 185
185
-
 186
186
-
 187
187
-
 188
188
-
 189
189
-
 190
190
-
 191
191
-
 192
192
-
 193
193
-
 194
194
-
 195
195
-
 196
196
-
 197
197
-
 198
198
-
 199
199
-
 200
200
-
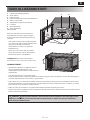 201
201
-
 202
202
-
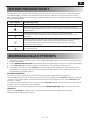 203
203
-
 204
204
-
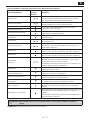 205
205
-
 206
206
-
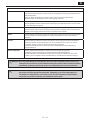 207
207
-
 208
208
-
 209
209
-
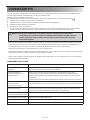 210
210
-
 211
211
-
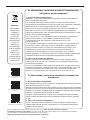 212
212
-
 213
213
-
 214
214
-
 215
215
-
 216
216
-
 217
217
-
 218
218
-
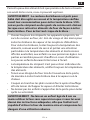 219
219
-
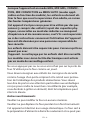 220
220
-
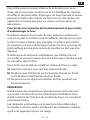 221
221
-
 222
222
-
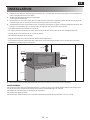 223
223
-
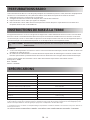 224
224
-
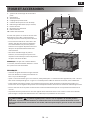 225
225
-
 226
226
-
 227
227
-
 228
228
-
 229
229
-
 230
230
-
 231
231
-
 232
232
-
 233
233
-
 234
234
-
 235
235
-
 236
236
-
 237
237
-
 238
238
-
 239
239
-
 240
240
-
 241
241
-
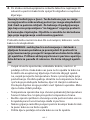 242
242
-
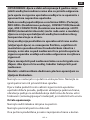 243
243
-
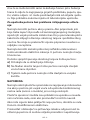 244
244
-
 245
245
-
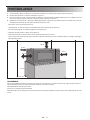 246
246
-
 247
247
-
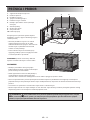 248
248
-
 249
249
-
 250
250
-
 251
251
-
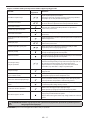 252
252
-
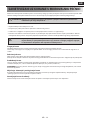 253
253
-
 254
254
-
 255
255
-
 256
256
-
 257
257
-
 258
258
-
 259
259
-
 260
260
-
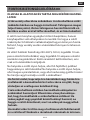 261
261
-
 262
262
-
 263
263
-
 264
264
-
 265
265
-
 266
266
-
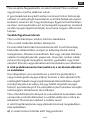 267
267
-
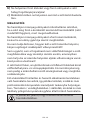 268
268
-
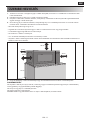 269
269
-
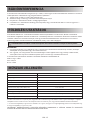 270
270
-
 271
271
-
 272
272
-
 273
273
-
 274
274
-
 275
275
-
 276
276
-
 277
277
-
 278
278
-
 279
279
-
 280
280
-
 281
281
-
 282
282
-
 283
283
-
 284
284
-
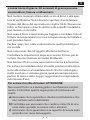 285
285
-
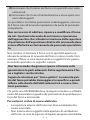 286
286
-
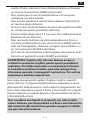 287
287
-
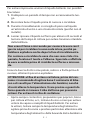 288
288
-
 289
289
-
 290
290
-
 291
291
-
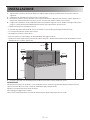 292
292
-
 293
293
-
 294
294
-
 295
295
-
 296
296
-
 297
297
-
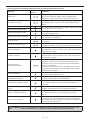 298
298
-
 299
299
-
 300
300
-
 301
301
-
 302
302
-
 303
303
-
 304
304
-
 305
305
-
 306
306
-
 307
307
-
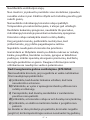 308
308
-
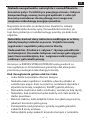 309
309
-
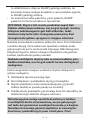 310
310
-
 311
311
-
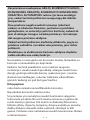 312
312
-
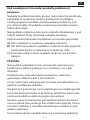 313
313
-
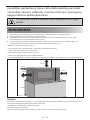 314
314
-
 315
315
-
 316
316
-
 317
317
-
 318
318
-
 319
319
-
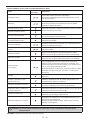 320
320
-
 321
321
-
 322
322
-
 323
323
-
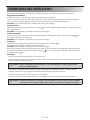 324
324
-
 325
325
-
 326
326
-
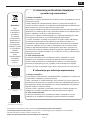 327
327
-
 328
328
-
 329
329
-
 330
330
-
 331
331
-
 332
332
-
 333
333
-
 334
334
-
 335
335
-
 336
336
-
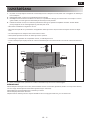 337
337
-
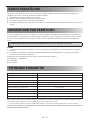 338
338
-
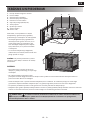 339
339
-
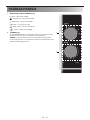 340
340
-
 341
341
-
 342
342
-
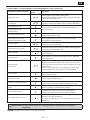 343
343
-
 344
344
-
 345
345
-
 346
346
-
 347
347
-
 348
348
-
 349
349
-
 350
350
-
 351
351
-
 352
352
-
 353
353
-
 354
354
-
 355
355
-
 356
356
-
 357
357
-
 358
358
-
 359
359
-
 360
360
-
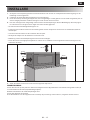 361
361
-
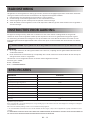 362
362
-
 363
363
-
 364
364
-
 365
365
-
 366
366
-
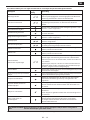 367
367
-
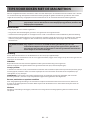 368
368
-
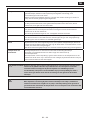 369
369
-
 370
370
-
 371
371
-
 372
372
-
 373
373
-
 374
374
-
 375
375
-
 376
376
-
 377
377
-
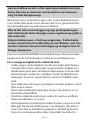 378
378
-
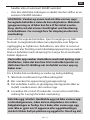 379
379
-
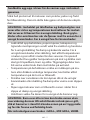 380
380
-
 381
381
-
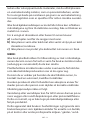 382
382
-
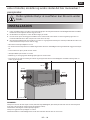 383
383
-
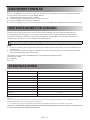 384
384
-
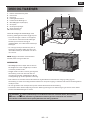 385
385
-
 386
386
-
 387
387
-
 388
388
-
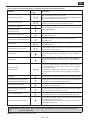 389
389
-
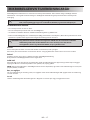 390
390
-
 391
391
-
 392
392
-
 393
393
-
 394
394
-
 395
395
-
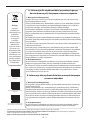 396
396
-
 397
397
-
 398
398
-
 399
399
-
 400
400
-
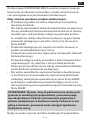 401
401
-
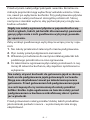 402
402
-
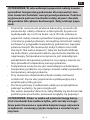 403
403
-
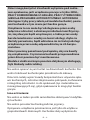 404
404
-
 405
405
-
 406
406
-
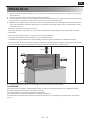 407
407
-
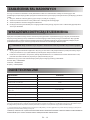 408
408
-
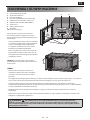 409
409
-
 410
410
-
 411
411
-
 412
412
-
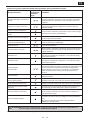 413
413
-
 414
414
-
 415
415
-
 416
416
-
 417
417
-
 418
418
-
 419
419
-
 420
420
-
 421
421
-
 422
422
-
 423
423
-
 424
424
-
 425
425
-
 426
426
-
 427
427
-
 428
428
-
 429
429
-
 430
430
-
 431
431
-
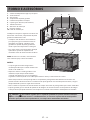 432
432
-
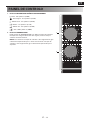 433
433
-
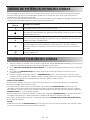 434
434
-
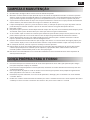 435
435
-
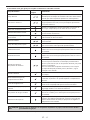 436
436
-
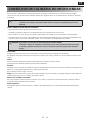 437
437
-
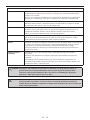 438
438
-
 439
439
-
 440
440
-
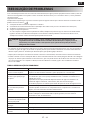 441
441
-
 442
442
-
 443
443
-
 444
444
-
 445
445
-
 446
446
-
 447
447
-
 448
448
-
 449
449
-
 450
450
-
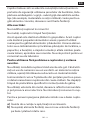 451
451
-
 452
452
-
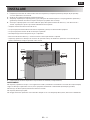 453
453
-
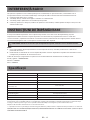 454
454
-
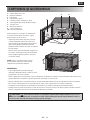 455
455
-
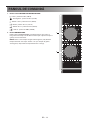 456
456
-
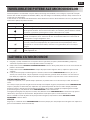 457
457
-
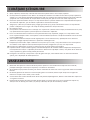 458
458
-
 459
459
-
 460
460
-
 461
461
-
 462
462
-
 463
463
-
 464
464
-
 465
465
-
 466
466
-
 467
467
-
 468
468
-
 469
469
-
 470
470
-
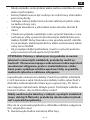 471
471
-
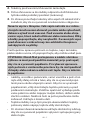 472
472
-
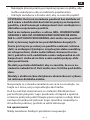 473
473
-
 474
474
-
 475
475
-
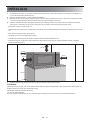 476
476
-
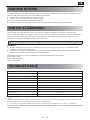 477
477
-
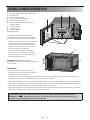 478
478
-
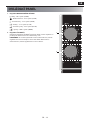 479
479
-
 480
480
-
 481
481
-
 482
482
-
 483
483
-
 484
484
-
 485
485
-
 486
486
-
 487
487
-
 488
488
-
 489
489
-
 490
490
-
 491
491
-
 492
492
-
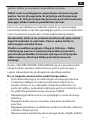 493
493
-
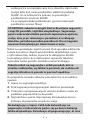 494
494
-
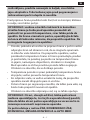 495
495
-
 496
496
-
 497
497
-
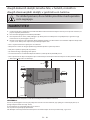 498
498
-
 499
499
-
 500
500
-
 501
501
-
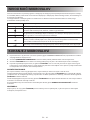 502
502
-
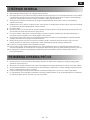 503
503
-
 504
504
-
 505
505
-
 506
506
-
 507
507
-
 508
508
-
 509
509
-
 510
510
-
 511
511
-
 512
512
-
 513
513
-
 514
514
-
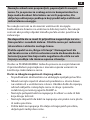 515
515
-
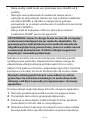 516
516
-
 517
517
-
 518
518
-
 519
519
-
 520
520
-
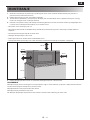 521
521
-
 522
522
-
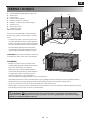 523
523
-
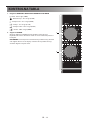 524
524
-
 525
525
-
 526
526
-
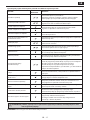 527
527
-
 528
528
-
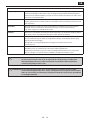 529
529
-
 530
530
-
 531
531
-
 532
532
-
 533
533
-
 534
534
-
 535
535
-
 536
536
-
 537
537
-
 538
538
-
 539
539
-
 540
540
-
 541
541
-
 542
542
-
 543
543
-
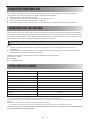 544
544
-
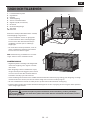 545
545
-
 546
546
-
 547
547
-
 548
548
-
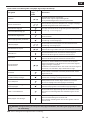 549
549
-
 550
550
-
 551
551
-
 552
552
-
 553
553
-
 554
554
-
 555
555
-
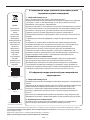 556
556
-
 557
557
-
 558
558
-
 559
559
-
 560
560
-
 561
561
-
 562
562
-
 563
563
-
 564
564
-
 565
565
-
 566
566
-
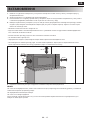 567
567
-
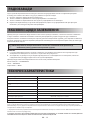 568
568
-
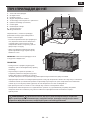 569
569
-
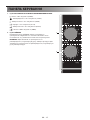 570
570
-
 571
571
-
 572
572
-
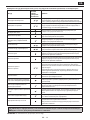 573
573
-
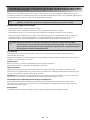 574
574
-
 575
575
-
 576
576
-
 577
577
-
 578
578
-
 579
579
-
 580
580


Sharp YC-PS201AE-S Manualul proprietarului
- Categorie
- Microunde
- Tip
- Manualul proprietarului
în alte limbi
- slovenčina: Sharp YC-PS201AE-S Návod na obsluhu
- eesti: Sharp YC-PS201AE-S Omaniku manuaal
- italiano: Sharp YC-PS201AE-S Manuale del proprietario
- dansk: Sharp YC-PS201AE-S Brugervejledning
Lucrări înrudite
Alte documente
-
Samsung GW73E-WB Manual de utilizare
-
Tesla MW2391MB Manual de utilizare
-
Electrolux EMS2140S Manual de utilizare
-
-
Samsung MW71E Manual de utilizare
-
-
Samsung GW71E Manual de utilizare
-
Electrolux EMS2120 Manual de utilizare
-
IKEA VÄRMD Microwave Oven Manual de utilizare