Tesla 32T300BHS Manual de utilizare
- Categorie
- Televizoare LCD
- Tip
- Manual de utilizare

USER
MANUAL
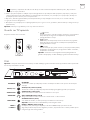
HU RO SLOENG BG GR HR
SMART TV
32T300BHS
32T300SHS

OPERATING INSTRUCTION
Please read these instructions before operating
your set and retain them for future reference.
UPUTE ZA KORIŠTENJE
Prije korištenja uređaja pažljivo pročitati
upute i sačuvati ih za buduću upotrebu.
KEZELÉSI UTASÍTÁ
Kérjük, a készülék használata előtt olvassa el ezeket az
utasításokat, és őrizze ezeket meg későbbi betekintésre.
OPERATING INSTRUCTION
Please read these instructions before operating
your set and retain them for future reference.
ИНСТРУКЦИИ ЗА ЕКСПЛОАТАЦИЯ
Моля, прочетете тези инструкции, преди да използвате
устройството и ги запазете за бъдещи справки.
NAVODILA ZA UPORABO
Pred uporabo pozorno preberite navodila
in jih shranite za morebitno uporabo v prihodnosti.
INSTRUCȚIUNI DE UTILIZARE
Vă rugăm să citiți aceste instrucțiuni înainte de a folosi
televizorul și păstrați-le pentru referințe ulterioare.
ENG
HR
HU
GR
BG
SLO
RO


4
ENG
Read all of the instructions before operating the set. Keep these instructions well for future use.
• Do not block or cover the ventilation openings on the back cover.
• Do not push objects of any kind into this unit through the cabinet slots as they could touch the current carrying
parts or short-circuit parts, resulting in fire, electric shock, or damage to the unit.
• Do not attempt to open the cabinet as this may cause damage. There are no parts inside you can service by
yourself. Refer all servicing to qualified personnel.
• Do not touch the screen surface with fingers as this may scratch or mar the TV screen.
• Do not impact the TV screen with hard pressure as this may damage the TV screen severely.
Unplug the set under the following conditions:
• If the set will not be used for a long period of time.
• If the power cord or the power outlet/plug is damaged.
• Follow the instructions to install and adjust the product. Adjust those controls that are covered in this operating
instructions as improper adjustment of other controls may result in damage. If this happens, unplug the set and
refer to the service personnel.
• If the set is subject to impact or has been dropped to have the cabinet damaged.
• Do not allow anything to rest on or roll over the power cord and the signal cable.
• Protect the power cord and the signal cable from being trampled.
• Do not overload the power cord or the power outlet.
• Do not expose the power cord and the signal cable to moisture.
• Do not place the set on an unstable cart, stand, or table.
• Place the set on a place that allows good ventilation.
• Do not use the set near damp, and cold areas. Protect the set from overheating.
• Keep the set away from direct sunlight.
• Apparatus shall not be exposed to dripping or splashing and no objects filled with liquids, such as vases, shall
be placed on the apparatus.
• Do not use the set near dust place.
• Dust the set by wiping the screen and the cabinet with a soft, clean cloth or some special liquid cleaner.
• Do not apply excessive force to the screen when cleaning.
• Do not use water or other chemical cleaner to clean the screen as this may damage the surface of the TV screen.
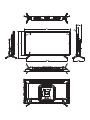
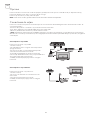
Warning: This operation requires two people.
To ensure a safe installation, observe the following safety notes:
• Check that the wall can support the weight of the TV set and wall mount assembly.
• Follow the mounting instructions provided with the wall mount.
• The TV set must be installed on a vertical wall.
• Make sure to use only screws suitable for the material of the wall.
Make sure that the TV set cables are placed so that there is not danger of tripping over them.
All other safety instructions about our TV sets are also applicable here.
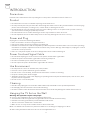
INTRODUCTION
Precautions
Product
Power and Plug
Power Cord and Signal Cable
Use Environment
Cleaning
Hanging the TV Set on the Wall

5
ENG
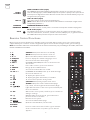
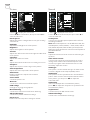
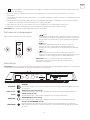
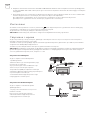
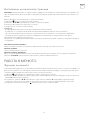
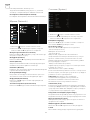
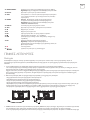
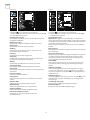
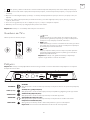
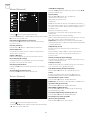
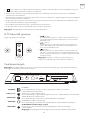
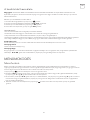
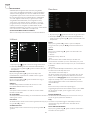
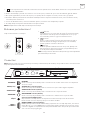
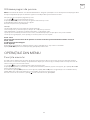
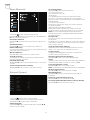
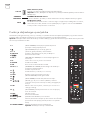
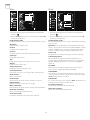
Buttons on the TV
Sockets
Take a certain model for an example:
1.
button
Scans up/down through the channel list. In the menu
system, they act like the up/down direction buttons on the
remote and adjust menu controls.
2.
button
lncreases/decreases the voIume.ln the menu system,they act
like the right/left direction buttons on the remote and adjust
menu controls.
3.
button
Turns the TV on. The TV is on, short press it to display Source
Select, long press it for 3 seconds to display NAV menu.
Note: The location and names of the function buttons and
power button on the TV may vary according to TV model.
1.
This equipment is a Class II or double insulated electrical appliance. It has been designed in such a way
that it does not require a safety connection to electrical earth.
2. Where the MAINS plug or an appliance coupler is used as the disconnect device, the disconnect device shall
remain readily operable.
3. The apparatus shall not be exposed to dripping or splashing and that no objects filled with liquids, such as
vases, shall be placed on the apparatus.
4. A warning that batteries (battery pack or batteries installed) shall not be exposed to excessive heat such as
sunshine, fire or the like.
5. No naked flame sources, such as lighted candles, should be placed on the apparatus;
6. Attention should be drawn to the environmental aspects of battery disposal;
Note: Illustrations within this publication are provided for reference only.
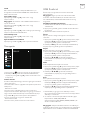
Note: The location and names of the sockets on the TV may vary according to TV model, and some sockets may not
available for some models.
ETHERNET
ETHERNET
This socket can be used to connect to external modem or network access
equipment.
SPDIF (coax.)
SPDIF (coax.) socket (output)
This socket can be used to connect a compatible digital audio receiver.
SATELLITE IN
SATELLITE IN socket (input)
This socket can be used to connect the satellite receiver port.
ANTTENNA
ANT/CABLE IN socket (input)
This socket can be used to connect the outside aerial or cable network.
EARPHONE
EARPHONE socket (output)
Allow you to connect earphones to listen to the sound coming from the TV .
Note: Excessive sound pressure from earphones can cause hearing loss.
EARPHONE
COMMON INTERFACE (CI)
HDMI 2 AV IN
USB 2.0
5V 0.5A
HDMI 1
ANTENNA
S/PDIF
ETHERNET
13/18V 0.5A MAX
SATELLITE IN

6
ENG
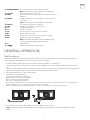
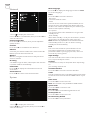
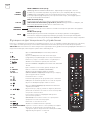
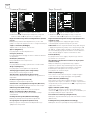
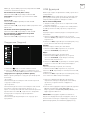
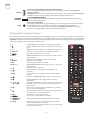
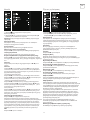
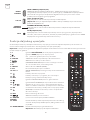
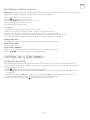
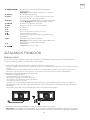
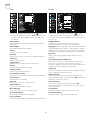
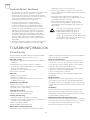
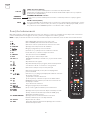
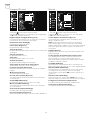
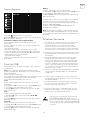
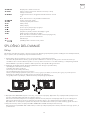
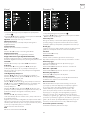
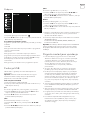
Remote Control Functions
Most of your television’s functions are available on the menu that appear on the screen. The remote control
supplied with your set can be used to navigate through the menus and to configure all the general settings.
Note: The location and names of the buttons on the remote control may vary according to TV model, and not all
buttons available on all models.
HDMI 1
or HDMI 2
HDMI 1/HDMI 2 socket (input)
The HDMI (High-Definition Multimedia Interface) socket lets you connect a device,
such as a Blu-ray player, with a HDMI output for best picture quality. It also provides an
uncompressed digital connection that carries both video and audio data by way of an
integrated mini-plug cable.
USB 2.0
USB 2.0 socket (input)
This socket can be used to connect a USB device.
(Note: Please don’t turn on the unit when USB 3.0 drive is inserted,as it might cause
compatibility problems. )
COMMON
INTERFACE
COMMON INTERFACE socket
This CI socket can be used to put the CI card in to accept the Scrambled programs.
AV IN
AV IN socket (input)
The AV IN sockets can be used to connect a range of equipment, including video
recorders, camcorders, decoders, satellite receivers, DVD players, or games consoles.
The VIDEO IN socket provides composite video connection.
1. q (POWER button) Turns the TV on or standby.
2.
(MUTE button) Turns the volume off or on.
3. 0 ~ 9 (Numeric buttons) Enters channel numbers.
4. SUBTITLE Press to display the Subtitle Language menu.
5.
Goes to the You Tube homepage.
6. VOL +/ (VOLUME UP/DOWN) Increases or decreases the
TV’s volume.
7. TV In the other sources, presses to back TV.
8. SOURCE Brings up the SOURCE menu.
9. USB Goes to the multimedia files in USB.
10. CH ./ , (CHANNEL UP/DOWN) Scans up or down through
the current channel list.
11.
To display the option menu.
12.
To display program information, if available.
13. ECO To select desired power saving mode.
14.
(SETTING button) Brings upthe main menu.
15.
(HOME button) Goes to the smart TV homepage.
16.
( Up, down, left and right direction buttons) High
lights different items in the menu system and adjusts
the menu controls.
17. OK When in the menu system, confirms your selection or
changes settings.
18.
(BACK button) In menu mode, goes back to the
previous menu or interface.
19. EXIT Exits the menu system.
20.
Goes to the Netflix homepage.
21. COLOURED
BUTTONS
(Red/Green/Yelbw/Blue) Selects tasks.
22. SLEEP Press to set the TV to turn off after a given amount
of time. To cancel the sleep timer, press until off
appears.

7
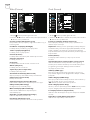
ENG
23. ZOOM‑/ZOOM+ Press to select the desired screen format.
Note: This function is not available in USB mode.
24. CH LIST Displays the channel list menu.
25. TEXT Turn On/Off Teletext. Press to turn on/off the teletext
function.
26. GUIDE Toggles the Electronic Programme Guide between
on and off.
Note: This function is only available in DTV mode.
27. PRE‑CH To return to the previous channel.
28. FAV Brings up your favorite channel list.
29. 5 Searches backward.
30. 6 Searches forward.
31. 7 (Previous) Goes to the previous chapter.
32. 3 (Stop) Stops viewing.
33. u2
(Play/Pause) Starts, pauses or resumes viewing.
34. 8 (Next) Goes to the next chapter.
Note: The above six buttons can be used for playing
music, pictures and videos in the USB menu.
35. 4 PVR function.
36.
(LANG) display audio language list.
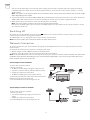
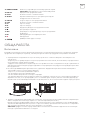
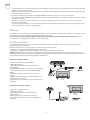
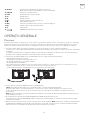
Switching on
GENERAL OPERATION
Follow the instructions on this page on how to switch on your TV set and the remote control before going on to
following pages describing how to use the channel set-up procedure.
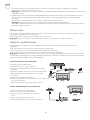
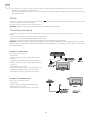
1. To fix the double support base on the unit by screws,the installation is completed.
- To bring you better visual experience, please remove all labels, if any, from TV front panel and screen before
use.
- Figures and illustrations in this User Manual are provided for reference only and may differ from actual product
appearance.Product design and specifications may be changed without notice.
2. Insert two AAA batteries in the remote control.
Precautions on using batteries:
Only use the battery types specified.
Make sure you use the correct polarity.
Do not mix new and used batteries.
Do not use rechargeable batteries.
Do not expose batteries to excessive heat such as sunshine, fire or the like, throw them in a fire, recharge them
or try to open them, as this could cause them to leak or explode.
Remove the batteries from the remote control if you are not using it for a long period of time.
3. Connect the power cable FIRST to the television, THEN to a mains socket.
(Note: If the power cable is connected to the television, please only connect the power cable to the mains
socket.)

8
ENG
Switching off
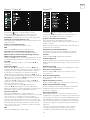
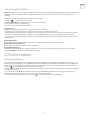
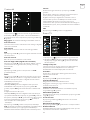
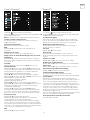
Network Connection
Connectinq to a wired network
Connectinq to a wireless network
To put the TV set into standby mode, press the
button on the remote control or on the TV, the TV set remains
powered up, but with low energy consumption.
To switch off the TV set, unplug the mains socket from the mains outlet.
Note: For some models, press the power button to switch off the TV set.
To access the Internet, you must subscribe to high speed broadband Internet service with your Internet service
provider (lSP).
Your TV can be connected to your home network in two ways:
• Wired, using the RJ45 (LAN) connector on the back panel.
• Wireless, using the internal wireless and your home wireless network.
Note: Instructions below are just the usual ways to connect your TV to the wired or wireless network. The connection
method may be different depending on your actual network configuration. If you have any questions about your
home network, please refer to your lSP.
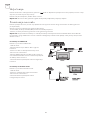
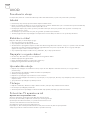
To connect to a wired network:
1. Ensure you have:
• An Ethernet cable long enough to reach your TV
• A router or modem with an available Ethernet port
• A high-speed Internet connection
• An Ethernet (LAN) port on the back of the TV
2. Connect your Ethernet cable to the router and to the
Ethernet port on the back of the TV.
3. Use the Network menu to configure the TV.
To connect to a wireless network:
1. Ensure you have:
• A router broadcasting a high-speed wireless
signal
• A high-speed Internet connection
2. Use the Network menu to configure the TV.
Your TV set should only be connected to an AC supply. It must not be connected to a DC supply. If the plug
is detached from the cable, do not, under any circumstances, connect it to a mains socket, as there is a risk of
electric shock.
Note: The figures are for representation only. The location of the power socket at the back of the television might
differ depending on the model.
4. Connect an outside aerial to the ANT/CABLE IN or SAT IN socket at the back of the TV set. The aerial socket (75
OHM - VHF / UHF / cable) can be used for connecting an external aerial or other equipment fitted.
5. When powered on, the TV will be turned on directly or be in standby.
Note: For some models, switch the TV on by pressing the power button.
If the power indicator lights up, the TV set is in standby mode. Press the button on the remote control or on the
TV set to turn on the TV.

9
ENG
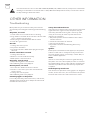
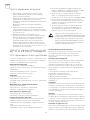
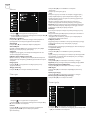
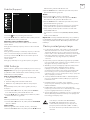
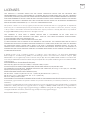
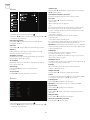
Using Homepage
Menu Function
MENU OPERATION
Note: This manual is for common use. Figures and illustrations in this User Manual are provided for reference only
and may differ from actual product appearance. And for some models, certain options are not available.
You can select all the features from homepage.
1. Press
to display homepage.
2. Press ///u to select icons from the screen list.
3. Press OK to enter each option.
4. To exit the menu, press EXIT.
WARNING:
• Configure the network settings before using Smart TV.
• Slow responses and/or interruptions may occur, depending on your network conditions.
• If you experience a problem using an application, please contact the content provider.
• According to circumstances of the contents provider, an application’s updates or the application itself may be
discontinued.
• Depending on your country’s regulations, some applications may have limited service or not be supported.
Homepage‑Source
Source: Select the input source from devices connected to TV through different ports.
Homepage‑Smart
Smart: Displays the smart menu.
Homepage‑Apps
Many useful and entertaining apps for using. After entering the Apps Store, you will see the recommendations.
Press ///u to select, press OK to enter.
This section explores the system settings menu of your TV. Each menu is outlined and detailed to help you get
the most from your TV. Please note that some function might be unavailable in certain input source. To access the
menu system:
1. Press
on remote control to display the main menu.
2. Press / to select Picture, Sound, Channel, Smart TV, Network, System or Support, then press OK or u to enter
the submenu.
3. In the submenu, press / to select options, press OK or u to set functions or change values, press OK to open
the corresponding submenu or activate a setting.
4. To return the previous menu, press
. To close the menu, press EXIT.

10
ENG
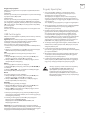
Picture Sound
1. Press to display the main menu.
2. Press / to select Picture, then press OK or u to
enter the submenu.
Picture preset
Adjusts the picture setting that best suits your viewing
environment.
Backlight
Adjusts the backlight levels of the picture.
Brightness
Adjusts the brightness of the picture.
Contrast
Adjusts the difference between the light and dark areas
of the picture.
Saturation
Adjusts the richness of color.
Tint
Adjusts the balance between the red and green levels.
Sharpness
Adjusts the crispness of the edges in the picture.
Color temperature
Adjusts the color temperature of the picture.
Auto format
Enables/disables the aspect ratio selection
automatically.
Screen mode
Selects the picture size.
Overscan
Selects On or Off to turn on/off this option.
ECO settings
Configures engergy saving options.
Micro Dimming
Selects On or Off to turn on/off micro dimming.
Advanced Settings
Selects more picture advanced settings.
Picture reset
Restores the current picture settings to default.
1. Press
to display the main menu.
2. Press / to select Sound, then press OK or u to
enter the submenu.
Sound preset
Selects a preset audio option optimized for different
sounding conditions.
Note: When Sound preset is set to different mode, five
Sound options (100 Hz, 500 Hz, 1.5 KHz, 5 KHz, and 10
KHz) will be adjusted, which enable you to adjust the
frequency levels desired. You can also set the options to
your desired levels.
Balance
Adjusts the amount of audio sent to the left and right
speakers.
Auto volume control
Selects On to reduce the annoying blasts in volume
during commercial breaks and also amplifies softer
sounds in program material. Eliminates the need to
constantly adjust the volume.
SPDIF type
This option is used to control the type of audio stream
sent to the Digital Audio Output (SPDIF) socket.
SPDIF delay
This option is used to synchronize the sound with the
picture. If the sound is slower/quicker than the action
of the picture, you can press /u to adjust the
numerical value.
Audio delay
if the sound output does not match the picture,
press /u to adjust the delay time to synchronize the
sound with the picture.
TV placement
Selects Desk top or Wall mount mode.
Advanced Settings
Selects more sound advanced settings.

11
ENG
Channel Smart TV
1. Press to display the main menu.
2. Press / to select Channel, then press OK or u to
enter the submenu.
Note: This function is only available in TV mode.
Channel scan
Allows you to scan for all available analog and digital
channels.
Channel List
Shows all the searched channel in a list.
EPG
Press OK/u to enter the Program Guide menu.
Channel organiser
This option allows you to organise channels.
Channel diagnostics (on digital TV channels)
Press OK/u to display some signal information on current
digital channel, such as signal strength,
Frequency, etc.
Timeshift
Note: This Option is only available when Timeshift is set
to On: In TV mode, press
, select Settings> Channel>
Time Shift, press OK to enter and use / to set
Timeshift to On or Off.
Subtitle
press OK/u to enter, press / to turn On or Off the
subtitles. When Subtitle is set to On, you can enable
subtitle languages on digital TV channels.
-Digital subtitle language:
Press / to select Digital subtitle language. Press OK/u
to enter, press / to select a subtitle language as your
preferred language.
-Digital subtitle language 2nd:
Press /to select Digital subtitle language 2nd.Press
OK/uto enter,press /to select a secondary subtitle
language.Press
to return to previous menu.
-Subtitle type:
Press OK/u to to enter,press / to select a subtitle
type. You can select Hearing impaired to display the
hearing impaired subtitle with your selected language.
Teletext
Press OK/u to display its submenu.
Decoding page language:select a proper type of
language in which
T
eletext will display.
Digital teletext language:for digital TV channels, your TV
could zap to a service with multiple initial
T
eletext pages in
different languages. This function allows you to select an
available language as primary language which relates to
different initial Teletext page.
PVR
Press OK/u open PVR.
1. Press to display the main menu.
2. Press / to select SmartTV, then press OK or u to
enter the submenu.
Smart TV portal
Allows you to enjoy Internet Applications (Apps),
specially adapted Internet websites for your TV. You
can control the Apps with the TV remote control.
Share&See
With Share&See, you can enjoy recorded video, picture,
music saved on your PC.
Fast Cast
Press OK/u to enter the Fast Cast.
Wireless display
Displays your smartphone contents on the TV.
Note: This function may be unavailable for some
models.
Terms and Conditions
Press OK or u to read the Terms and Conditions.
Privacy Notice
Press OK or u to read the Privacy Notice.
Cookie Notice
Press OK or u to read the Cookie Notice.
Networked standby
Press OK or u to select off or on.
Netflix settings
In Netflix Setting menu, Netflix Deactivation can
deactivate your device form Netflix.
HbbTV Setting
HbbTV (Hybrid broadcast broadband TV) is a service
offered b by certain broadcasters and available only on
some digital TV channels. HbbTV delivers interactive
television over broadband Internet. These interactive
features are added to and enrich the normal digital
programmes, and include services such as digital
teletext, electronic programme guide, games, voting,
specific information related to the current programme,
interactive advertising, information magazines, catchup
TV, etc.
To use HbbTV please ensure your TV is connected to
Internet and HbbTV is switched on.
Reset smart TV
Reset the settings of smart TV.

12
ENG
Network
System
1. Press to display the main menu.
2. Press / to select Network, then press OK or u to
enter the submenu.
Internet connection
Press OK or u to select On, then you can adjust the
options below.
Interface
Press OK or u to select Ethernet or Wireless.
Ethernet
Connects your ethernet cable to the router and to the
Ethernet port on the back of the TV.
Wireless
Wireless, using the internal wireless and your home
wireless network.
IP setting
Sets Address type to Auto, it will acquire and enter the
needed IP address automatically.
Information
Press OK/u to display the information on current
connection.
Connection test
Press OK/u to test the internect connection.
1. Press
to display the main menu.
2. Press / to select System, then press OK or u to
enter the submenu.
Menu Language
Press OK/u to display the language list and use /
to select a language.
Timer
Press OK or u to enter the submenu.
-Time zone
Selects the local time zone.
-Clock
Select on to turn on the Auto synchronization, the TV
will get the time automatically from DTV signals, and
the Time item cannot be adjusted. If you select off, you
should set the options manually.
-Sleep timer
Sets a period of time after which the TV set goes into
standby mode.
-Auto standby
When Auto Standby is set to your desired time, TV and
device will be in standby mode at the same time.
Note: Without any operation in TV interface when the
Auto standby mode is on, the set will be entering
standby mode automatically.
Lock
This menu can control the special function for TV.
The factory default code is 1234. And the super
password is 0423. If you forget your code, enter it to
override any existing codes.
Input Settings
User can select the device name of the input source
here, easy to identify the source.
Location
Selects Home or Shop or Shop with demo depending
on
your viewing environment.
Common Interface
Press OK or u to enter the Common Interface.
T‑Link
Use this function to turn on the ARC function and search
for CEC devices connected to the HDMI sockets in your
TV.
Auto source
Press OK or u to select On or Off.
Note: This function is only available in HDMI Source.
Sports mode
Press OK or uto select On or Off.
LED Indicator
Press OK or u to select Flashing, Normal or Off.
Instant power on
Press OK or u to select On or Off.
Restore Factory Default
Press OK or u to enter password.

13
ENG
You can enjoy viewing pictures from your USB storage
device.
Note: Some options may unavailable in some models.
In USB state, if USB device didn’t connected, the USB
interface will be not displayed.
How to enter USB mode
1. Connect the USB storage device into the USB Input
terminal.
2.Press USB button to enter USB mode.
3.Select your USB device to enter.
All
To browse picture or video or music if available.
1. Press OK or u to enter, then press / to selectthe
folder, press OK to enter.
2. Press / to select your desired file, then press OK
to play.
Picture
To browse pictures if available.
1. Press OK or u to enter, then press / to select the
folder, press OK to enter.
2. Press ///u to select your desired file, then press
OK to play.
1. Under the following conditions, this system cannot
decode the file and the file cannot be play normally:
-The parameters of file, such as the pixel of picture,
code rate of audio and video file, sampling rate of
audio file, exceed the limit of the system;
-The format of file is not matched or the file is
harmed.
2. Hot plug: Do not disconnection when the system is
reading or transmitting data, avoid damaging the
system or the device.
3. Pay attention to the power supply of the device when
you are using a mobile hard disk or a digital camera.
If the power supply is not sufficient or not stable,
you may encounter problems during operating or
can not operate at all. In this case, please restart the
device, or unplug the device and plug it again, and
ensure that its power supply is normal.
4. The system supports standard USB1.1 and USB2.0
devices, such as standard U-disks, MP3 players,
mobile hard disks, etc..
5. For obtaining better audio and video quality,
suggests to use the external device which accords
with USB2.0 standard.
6. When playing the video with high compression ratio,
these phenomenons, such as picture standstill and
menu long time response, are normal.
7. For some USB device with power supply, such as
large size hard disk, MP4, etc., suggests using it with
power to avoid electric power shortage.
USB Function
Frequently Asked Questions
Support
1. Press to display the main menu.
2. Press / to select Support,, then press OK or u to
enter the submenu.
Software update
You can update software by USB, network or channel.
-By USB
Enables you to install the latest version of the software
from your USB ports.
-By network
Enables you to download and install the latest software
version from the Internet. Make sure to set up a wired or
wireless network connection first. Press OK/u to enter.
Follow the on-screen instructions to continue.
-By channel
Enables you to update a new software on the air.
Video
To watch video if available.
1. Press OK or u to enter, then press / to select the
folder, press OK to enter.
2. Press ///u to select your desired file, then press
OK to play.
Music
To playback music if available.
1. Press OK or u to enter, then press / to select the
folder, press OK to enter.
2. Press / to select your desired file, then press OK
to play.
1. Some non-standard mobile storage device may not
be recognized. Please change to use the standard
device.
2. This system supports the following file formats:
Picture format: JPEG, BMP, PNG etc..
Video format: H.264, MPEG4, MPEG2,
MPEG1, etc..
Audio format: MP3 etc..
Note: For coding files, there are many kinds
nonstandard coding method, so this system can not be
guaranteed to support the file formats using any coding
method.

14
ENG
* Do not touch or be close to the ANT/CABLE IN, HDMI, USB, SPDIF terminals, and prevent electrostatic
discharge to disturb these terminals while in USB, WIFI and LAN operation mode, or it will cause the TV
to stop working or abnormal status.
OTHER INFORMATION
Troubleshooting
Most problems you encounter with your TV can be
corrected by consulting the following troubleshooting
list.
No picture, no sound
1. Check if the fuse or circuit breaker is working.
2. Plug another electrical device into the outlet to make
sure it is working or turned on.
3. Power plug is in a bad contact with the outlet.
4. Check the signal source.
No color
1. Change the color system.
2. Ad just the saturation.
3. Try another channel. Black-white program may be
received.
Remote control does not work
1. Change the batteries.
2. Batteries are not installed correctly.
3. Main power is not connected.
No picture, normal sound
1. Adjust the brightness and contrast.
2. Broadcasting failure may happen.
Normal picture, no sound
1. Press the Vol+ button to increase volume.
2. Volume is set to mute, press the mute button to
restore sound.
3. Change the sound system.
4. Broadcasting failure may happen.
Unorderly ripples on the picture
It is usually caused by local interference, such as cars,
daylight lamps and hair driers. Adjust the antenna to
minimize the interference.
Snowy dots and interference
If the antenna is located in the fringe area of a television
signal where the signal is weak, the picture may be
marred by dots. When the signal is extremely weak,
it may be necessary to install a special antenna to
improve the reception.
1. Adjust the position and orientation of the indoor/
outdoor antenna.
2. Check the connection of antenna.
3. Fine tune the channel.
4. Try another channel. Broadcasting failure may
happen.
Ignition
Black spots or horizontal streaks appear, or the picture
flutters or drifts. This is usually caused by interference
from car ignition system, neon lamps, electric drills, or
other electrical appliance.
Ghost
Ghosts are caused by the television signal following
two paths. One is the direct path, the other is reflected
from tall buildings, hills, or other objects. Changing the
direction or position of the antenna may improve the
reception.
Radio frequency interference
This interference produces moving ripples or diagonal
streaks, and in some case, loss of contrast in the picture.
Find out and remove the radio interference source.

15
ENG
LICENSES
THIS PRODUCT IS LICENSED UNDER THE AVC PATENT PORTFOLIO LICENSE FOR THE PERSONAL AND
NONCOMMERCIAL USE OF A CONSUMER TO (i) ENCODE VIDEO IN COMPLIANCE WITH THE AVC
STANDARD (“AVC VIDEO”) AND/OR (ii) DECODE AVC VIDEO THAT WAS ENCODED BY A CONSUMER
ENGAGED IN A PERSONAL AND NON-COMMERCIAL ACTIVITY AND/OR WAS OBTAINED FROM A VIDEO
PROVIDER LICENSED TO PROVIDE AVC VIDEO. NO LICENSE IS GRANTED OR SHALL BE IMPLIED FOR ANY
OTHER USE. ADDITIONAL INFORMATION MAY BE OBTAINED FROM MPEG LA, L.L.C. SEE HTTP://WWW.
MPEGLA.COM
This product contains one or more programs protected under international and U.S. copyright laws as
unpublished works. They are con dential and proprietary to Dolby Laboratories. Their reproduction or
disclosure, in whole or in part, or the production of derivative works therefrom without the express permission
of Dolby Laboratories is prohibited. Copyright 2003-2009 by Dolby Laboratories. All rights reserved.
THIS PRODUCT IS SOLD WITH A LIMITED LICENSE AND IS AUTHORIZED TO BE USED ONLY IN
CONNECTION WITH HEVC CONTENT THAT MEETS EACH OF THE THREE FOLLOWING QUALIFICATIONS:
(1) HEVC CONTENT ONLY FOR PERSONAL USE;
(2) HEVC CONTENT THAT IS NOT OFFERED FOR SALE; AND
(3) HEVC CONTENT THAT IS CREATED BY THE OWNER OF THE PRODUCT. THIS PRODUCT MAY NOT BE
USED IN CONNECTION WITH HEVC ENCODED CONTENT CREATED BY A THIRD PARTY, WHICH THE
USER HAS ORDERED OR PURCHASED FROM A THIRD PARTY, UNLESS THE USER IS SEPARATELY GRANTED
RIGHTS TO USE THE PRODUCT WITH SUCH CONTENT BY A LICENSED SELLER OF THE CONTENT. YOUR
USE OF THIS PRODUCT IN CONNECTION WITH HEVC ENCODED CONTENT IS DEEMED ACCEPTANCE OF
THE LIMITED AUTHORITY TO USE AS NOTED ABOVE.
Tesla declares that the equipment complies with the European Directive 2014/30/EU (EMC) and the Low
Voltage Directive 2014/35/EU (LVD) and the ErP Directive 2009/125/EC and Radio Equipment Directive
2014/53/EU and the RoHS Directive 2011/65/EU in accordance with the following technical standards:
ELECTROMAGNETIC COMPATIBILITY
EN55032:2015;EN55035:2017;EN 61000-3-2:2014;EN 61000-3-3:2013
LOW VOLTAGE
EN60065:2014
ENERGY RELATED PRODUCTS
Commission regulation (EC) No 642/2009; 801/2013;EN 50564:2011;IEC 62087:2011
RED
EN 303 340 V1.1.2(2016-09);EN 303 372-2 V1.1.1(2016-04);EN 300 328 V2.1.1(2016-11);
EN 301 489 -1 V2.1.1 (2017-02);EN 301 489 -17 V3.1.1(2017-02);
EN 62311:2008; EN 62479:2010
RoHS
EN50581:2012
Subject to alterations. In consequence of continuous research and development technical speci cations, design
and appearance of products may change. Manufactured under license from Dolby Laboratories. Dolby Audio
and the double-D symbol are trademarks of Dolby Laboratories. HDMI, the HDMI logo and High-De nition
Multimedia Interface are trademarks or registered trademarks of HDMI Licensing LLC in the United States and
other countries. All product names are trademarks or registered trademarks of their respective owners.
© Tesla 2019. All rights reserved.

16
BG
Прочетете всички инструкции, преди да използвате устройството. Дръжте тези инструкции добре за бъдеща употреба.
• Не блокирайте и не покривайте вентилационните отвори на задния капак.
• Не пропускайте никакви предмети в това устройство през отворите на устройството, тъй като това може да
доведе до контакт с части под напрежение или късо съединение, което може да доведе до пожар, токов удар
или повреда на устройството.
• Не се опитвайте да отваряте устройството, тъй като това може да причини повреда. Устройството няма части,
които можете да замените сами. Оставете пълно обслужване на квалифициран персонал.
• Не докосвайте екрана с пръст, тъй като това може да доведе до надраскване или замърсяване на телевизионния
екран.
• Не излагайте екрана на телевизора на прекалено високо налягане, тъй като това може да повреди
телевизионния екран.
Изключете устройството от захранването при следните обстоятелства:
• Ако устройството не се използва продължително време.
• Ако захранващият кабел или щепселът / гнездото са повредени.
• Следвайте инструкциите за инсталиране и настройване на продукта. Регулирайте командите, описани в това
ръководство за потребителя, тъй като грешната настройка може да доведе до повреда на други контроли. Ако
това се случи, изключете уреда от захранването и се свържете с сервиза.
• Ако устройството е претърпяло удар или падане, което е причинило повреда на корпуса.
• Не позволявайте нищо да стои или да преминава през захранващите кабели и сигнала.
• Защитете захранващите кабели и сигнала от настъпване
• Не претоварвайте захранващия кабел и контакта
• Не излагайте на влага захранващия кабел и кабела за сигнала
• Не поставяйте устройството върху нестабилна количка, основа или маса.
• Поставете устройството на място, което позволява добра вентилация.
• Не използвайте устройството близо до мокра и студена среда. Защитете устройството от прегряване.
• Съхранявайте комплекта далеч от пряка слънчева светлина
• Уредът не трябва да е изложен на капки или пръски и не трябва да се поставят предмети, пълни с течности, като
вази, на апарата
• Не използвайте устройството в близост до прашната среда.
• Избършете праха от устройството, като избършете екрана и кутията с мека, чиста кърпа или специална почистваща
течност.
• Не използвайте прекомерна сила, докато почиствате екрана.
• Не използвайте вода или други химически почистващи препарати при почистване на екрана, тъй като повърхността на
телевизионния екран може да се повреди.
Предупреждение: Това действие може да изисква двама души.
За да осигурите безопасна инсталация, спазвайте следните указания за безопасност:
Забележка:Илюстрациите в тази публикация са само за справка.
Всички останали инструкции за безопасност относно нашите телевизори са приложими и тук.
Проверете дали стената може да поддържа теглото на телевизора и монтажа на стена. Следвайте инструкциите за
монтаж, приложени към монтирането на стена.
Телевизорът трябва да е инсталиран на вертикална стена. Уверете се, че използвате само винтове, подходящи за
материала на стената.
Уверете се, че кабелите на телевизора са поставени така, че да няма опасност от запушване.
ВЪВЕДЕНИЕ
Предпазни мерки
Продукт
Захранване и включване в тока
Захранващият кабел и кабелът за сигнала
Потребителска среда
Почистване
Поставяне на телевизора на стената

17
BG
Бутони на телевизора
Контакти
Използвайте следния модел като пример:
1.
бутон
Сканира нагоре / надолу през списъка с канали. В системното
меню действа като бутон за придвижване нагоре / надолу на
дистанционното управление и за настройване на команди в
менюто.
2.
бутон
Увеличава / намалява обема. В системното меню той
действа като бутон за превъртане наляво / надясно на
дистанционното управление и за настройване на команди в
менюто.
3.
бутон
Включва устройството. Когато телевизорът е включен,
натиснете за кратко бутона, за да изведете Избор на източник,
задръжте го за 3 секунди, за да се покаже NAV менюто.
Забележка: Мястото и името на бутоните за функции и
включването на устройството могат и да се различават, в
зависимост от модела.
1.
Това оборудване е клас II или двойно изолирано електрическо устройство. Той е проектиран така, че да
не изисква заземяване.
2. Когато използвате захранващ или конектор за захранване, системата за изключване винаги е готова за
използване.
3. Не излагайте уреда на капки или пръскане и не поставяйте предмети, пълни с течности, като например вази, на
устройството.
4. Предупреждение: Батерията (батерията или инсталираната батерия) не трябва да се излага на прекомерна
топлина, като например слънчева светлина, огън и други подобни.
5. Източници на открит огън, като запалени свещи, не трябва да се поставят върху устройството.
6. Обърнете внимание на въздействието на изхвърляне на батериите върху околната среда.
Забележка: Илюстрациите в тази публикация са само за справка.
Забележка: Местоположението и имената на входовете на телевизора може да варират в зависимост от модела на
телевизора и някои приемници може да не са налични за някои модели.
ETHERNET
ETERNET
Този вход може да се използва за свързване с външен модем или оборудване за достъп
до мрежата.
SPDIF (coax.)
SPDIF (коакс.) контакт (изход)
Този вход може да се използва за свързване на съвместим цифров аудио приемник.
SAT IN
SAT IN контакт (вход)
Този вход може да се използва за свързване към сателитен приемник.
ANTTENNA
ANT/CABLE IN контакт (вход)
Този вход може да се използва за свързване с външна антена или кабелна мрежа.
EARPHONE
Контакт за СЛУШАЛКИ (изход)
O Позволява ви да свързвате слушалки, за да слушате звука, идващ от телевизора.
Забележка: Прекомерното звуково налягане от слушалките може да доведе до загуба
на слуха.
EARPHONE
COMMON INTERFACE (CI)
HDMI 2 AV IN
USB 2.0
5V 0.5A
HDMI 1
ANTENNA
S/PDIF
ETHERNET
13/18V 0.5A MAX
SATELLITE IN

18
BG
Функции на дистанционното управление
Повечето от функциите на телевизора се предлагат в менюто, което се появява на екрана. Дистанционно устройство,
което идва с телевизора може да се използва за навигация в менютата и да настроите всички общи настройки.
Забележка: Местоположението и името на бутоните на дистанционното управление могат да варират в зависимост от
модела на телевизора, някои модели не разполагат с всички бутони.
HDMI 1
or HDMI 2
HDMI 1/HDMI 2 контакт (вход)
HDMI (High-Definition Multimedia Interface – Мултимедиен интерфейс с висока
детайлност) позволява свързване на устройството, като например Blu-ray плейър,
с HDMI изход за най-добро качество на картината. Той също така осигурява
некомпресирана цифрова връзка, която пренася както видео, така и аудио данни
посредством вграден мини кабел.
USB 2.0
USB 2.0 контакт (вход)
Този контакт може да се използва за свързване към USB устройство
(Забележка: Не включвайте устройството, когато USB устройството е вкарано, тъй
като могат да възникнат проблеми със съвместимостта.)
COMMON
INTERFACE
COMMON INTERFACE контакт
Този контакт може да се използва за поставяне на CI карта за приемане на кодирани
програми
AV IN
AV IN контакт (вход)
AV IN вход може да се използва за свързване на на широк диапазон на оборудване,
включително видеорекордери, видеокамери, декодери, сателитни приемници, DVD
плейъри, конзоли за играчки. Конекторът VIDEO IN позволява композитно видео свързване.
1. q (бутон за ВКЛЮЧВАНЕ)TV се включва /режим на
готовност
2.
(бутон за ЗВУК) Включва или изключва звука.
3. 0 ~ 9 (цифрови бутони) Въвеждане на номера на канала.
4. SUBTITLE Натиснете, за да се покаже менюто за субтитрите.
5.
Отиване на началната страница на You Tube.
6. VOL +/ (Volume НАГОРЕ / НАДОЛУ) Увеличава или намалява
обема.
7. TV При останалите източници, връща назад на TV.
8. SOURCE Влиза се в менюто SOURCE (ИЗТОЧНИк).
9. USB Отива на мултимедийни файлове на USB
10. CH ./ , (КАНАЛ НАГОРЕ / НАДОЛУ) Сканира нагоре / надолу
през текущия списък с канали
11.
Показва менюто с опции.
12.
Показва информация за програмата, ако е налична.
13. ECO Избиране на желания режим за пестена на енергия.
14.
(бутон за SETUP) Стартира главното меню
15.
(бутон за НАЧ.СТРАНИЦА) Преминава на началната
страница на smart TV
16.
(бутони нагоре, надолу, наляво и надясно) Показва
различни елементи в системното меню и настройва
контролите на менютата.
17. OK В системното меню потвърждава избора или
променя настройките.
18.
(ОБРАТНО) В системното меню тя се връща към
предишното меню или интерфейс.
19. EXIT Излизане от системното меню.
20.
Отиване на Netflix начална страница
21. ЦВЯТНИ БУТОНИ (червено / зелено / жълто / синьо) Избор на задачи.
22. SLEEP Натиснете, за да изключите телевизора след
определено време. За да изключите таймера за SLEEP,
задръжте бутона докато се изключи.

19
BG
23. ZOOM‑/ZOOM+ Натиснете, за да изберете желания формат на екрана.
Забележка: Тази функция не е достъпна в USB режим.
24. CH LIST Връщане към предишния канал.
25. TEXT Показва списъка с любими канали
26. GUIDE Превключва Електронното програмно ръководство
между включено и изключено.
27. PRE‑CH За да се върнете към предишния канал.
28. FAV Показва списъка с любими канали
29. 5 Търсете назад
30. 6 Търсете напред
31. 7 Предишно) Отидете на предишната глава.
32. 3 (Стоп) Спира гледането.
33. u2
(Стартиране / пауза) Стартира, спира и продължава
да браузва
34. 8 (Напред) Отидете на следващата глава.
35. 4 PVR функция
36.
(ЕЗИК) Показва аудио списъци.
Включване
ОБЩА РАБОТА
Следвайте инструкциите на тази страница как да включите телевизора и дистанционното управление, преди да
продължите към следващите страници, описващи как да използвате процедурата за настройване на канала.
1. С прикрепването на двойната носеща основа на устройството с винтове завършва с инсталирането на
устройството
-За да получите по-добър визуален опит, моля, премахнете всички етикети, ако има такива, от предния панел
на телевизора и екрана преди употреба..
- Цифрите и илюстрациите в това ръководство за потребителя са само за справка и могат да се различават от
действителния външен вид на продукта. Дизайнът и спецификациите на продукта могат да бъдат променяни
без предизвестие.
2. Поставете две AAA батерии в дистанционното управление. Предпазни мерки за използване на батериите:
- Използвайте само посочените видове батерии
- Уверете се, че използвате правилния полярност
- Не смесвайте нови и използвани батерии
- Не използвайте батерии които могат да се зареждат.
- Не излагайте батериите на прекомерна топлина, като например слънчево греене, огън или други подобни, не
хвърляйте ги в огън, не ги презареждайте, и не се опитвайте да ги отворите, тъй като това може да доведе до
изтичане или експлозия. Извадете батериите от дистанционното, ако не ги използвате за дълъг период от време.
3. Свържете захранващия кабел FIRST към телевизора, след това към контакта. (Забележка: Ако захранващият
кабел е свързан към телевизора, свържете го само към захранващия контакт.)
Вашият телевизор трябва да бъде свързан само към променливо токово захранване. Той не трябва да бъде
свързан към DC захранване. Ако щепселът е отделен от кабела, при никакви обстоятелства не го свързвайте
към електрическата мрежа, тъй като съществува риск от токов удар.
Забележка: Цифрите са само за представяне. Местоположението на контакта в задната част на телевизора
може да се различава в зависимост от модела.

20
BG
Изключване
Свързване с мрежа
Свързване към LAN мрежа
Свързване към безжична мрежа
За влизане на TV в режим на готовност, натиснетеe
бутон на дистанционното управление или на самия уред;
телевизорът остава включен, но при ниска консумация на енергия.
За да изключите телевизора, извадете кабела из щепсела. ,
Забележка: За някои модели, натискането на бутона за захранване изключва устройството
За да осъществите достъп до интернет, трябва да се абонирате за високоскоростен широколентов интернет с
вашия доставчик на интернет услуги (ISP).
• Вашият телевизор може да бъде свързан към вашата домашна мрежа по два начина: чрез кабела, използвайки
съединителите RJ45 (LAN) на задния панел.
• Безжичен, използващ безжичен интернет и домашен безжичен интернет.
Забележка: Следващите инструкции са обичайните начини за свързване на вашия телевизор с LAN или безжична
мрежа. Методите за свързване може да варират в зависимост от конфигурацията в интернет. Ако имате въпроси
относно домашната си мрежа, моля, свържете се с ISP.
За да се свържете към LAN мрежата:
1. Трябва да имате:
• Ethernet кабел с достатъчна дължина, за да
достигне до телевизора
• Рутер или модем с наличен Ethernet порт
• Високоскоростна интернет връзка
• Порт Ethernet (LAN) на гърба на телевизора
2. Свържете Ethernet кабела към рутера и Етернет
порта на гърба на телевизора
3. Ползвайте Network (мрежов) меню за да
конфигурирате телевизора си.
За да се свържете с безжична мрежа:
Трябва да имате:
1. Рутер, който излъчва високоскоростен
безжичен сигнал
Високоскоростна интернет връзка
2.Ползвате Network (мрежов) меню за
конфигуриране на телевизора.
4. Свържете външна антена към антената ANT / CABLE IN или SAT IN контакт на гърба на телевизора. Въздушния
контакт (75 OHM - VHF / UHF / кабел) може да се използва за свързване на външна антена или друго монтирано
оборудване.
5. Когато бъде включен, телевизорът ще бъде включен директно или ще бъде в режим на готовност. Забележка:
За някои модели включете телевизора, като натиснете бутона за захранване.
Ако индикаторът за захранване свети, телевизорът е в режим на готовност. Натиснете бутона на
дистанционното управление или на телевизора, за да включите телевизора.
Pagina se încarcă ...
Pagina se încarcă ...
Pagina se încarcă ...
Pagina se încarcă ...
Pagina se încarcă ...
Pagina se încarcă ...
Pagina se încarcă ...
Pagina se încarcă ...
Pagina se încarcă ...
Pagina se încarcă ...
Pagina se încarcă ...
Pagina se încarcă ...
Pagina se încarcă ...
Pagina se încarcă ...
Pagina se încarcă ...
Pagina se încarcă ...
Pagina se încarcă ...
Pagina se încarcă ...
Pagina se încarcă ...
Pagina se încarcă ...
Pagina se încarcă ...
Pagina se încarcă ...
Pagina se încarcă ...
Pagina se încarcă ...
Pagina se încarcă ...
Pagina se încarcă ...
Pagina se încarcă ...
Pagina se încarcă ...
Pagina se încarcă ...
Pagina se încarcă ...
Pagina se încarcă ...
Pagina se încarcă ...
Pagina se încarcă ...
Pagina se încarcă ...
Pagina se încarcă ...
Pagina se încarcă ...
Pagina se încarcă ...
Pagina se încarcă ...
Pagina se încarcă ...
Pagina se încarcă ...
Pagina se încarcă ...
Pagina se încarcă ...
Pagina se încarcă ...
Pagina se încarcă ...
Pagina se încarcă ...
Pagina se încarcă ...
Pagina se încarcă ...
Pagina se încarcă ...
Pagina se încarcă ...
Pagina se încarcă ...
Pagina se încarcă ...
Pagina se încarcă ...
Pagina se încarcă ...
Pagina se încarcă ...
Pagina se încarcă ...
Pagina se încarcă ...
Pagina se încarcă ...
Pagina se încarcă ...
Pagina se încarcă ...
Pagina se încarcă ...
Pagina se încarcă ...
Pagina se încarcă ...
Pagina se încarcă ...
Pagina se încarcă ...
Pagina se încarcă ...
Pagina se încarcă ...
Pagina se încarcă ...
Pagina se încarcă ...
-
 1
1
-
 2
2
-
 3
3
-
 4
4
-
 5
5
-
 6
6
-
 7
7
-
 8
8
-
 9
9
-
 10
10
-
 11
11
-
 12
12
-
 13
13
-
 14
14
-
 15
15
-
 16
16
-
 17
17
-
 18
18
-
 19
19
-
 20
20
-
 21
21
-
 22
22
-
 23
23
-
 24
24
-
 25
25
-
 26
26
-
 27
27
-
 28
28
-
 29
29
-
 30
30
-
 31
31
-
 32
32
-
 33
33
-
 34
34
-
 35
35
-
 36
36
-
 37
37
-
 38
38
-
 39
39
-
 40
40
-
 41
41
-
 42
42
-
 43
43
-
 44
44
-
 45
45
-
 46
46
-
 47
47
-
 48
48
-
 49
49
-
 50
50
-
 51
51
-
 52
52
-
 53
53
-
 54
54
-
 55
55
-
 56
56
-
 57
57
-
 58
58
-
 59
59
-
 60
60
-
 61
61
-
 62
62
-
 63
63
-
 64
64
-
 65
65
-
 66
66
-
 67
67
-
 68
68
-
 69
69
-
 70
70
-
 71
71
-
 72
72
-
 73
73
-
 74
74
-
 75
75
-
 76
76
-
 77
77
-
 78
78
-
 79
79
-
 80
80
-
 81
81
-
 82
82
-
 83
83
-
 84
84
-
 85
85
-
 86
86
-
 87
87
-
 88
88


Tesla 32T300BHS Manual de utilizare
- Categorie
- Televizoare LCD
- Tip
- Manual de utilizare