Beko VCO 42701 AB Manual de utilizare
- Categorie
- Aspiratoare
- Tip
- Manual de utilizare
Acest manual este potrivit și pentru

Vacuum Cleaner
User Manual
EN - DE - BG - CS - HU -RO - SL - ES - PL - IT - FR -NL - PT - RU - SQ - SR - MK - UA
VCO 42701 AB
VCO 42701 AR
01M-8837863200-4520-10
01M-8839583200-2420-10

Please read this manual first!
Dear Valued Customer,
Thank you for preferring this Beko appliance. We hope that you get the best results
from your appliance which has been manufactured with high quality and state-of-the-
art technology. For this reason, please read this user manual and all other provided
documents carefully before using the appliance and keep it as a reference for future
use. If you hand over the appliance to someone else, give the user manual as well.
Follow the instructions by paying attention to all the information and warnings in the
user manual.
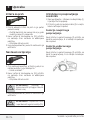
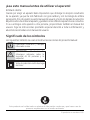
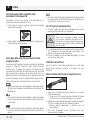
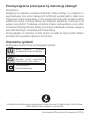
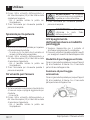
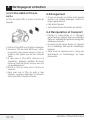
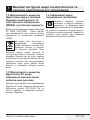
Meanings of the Symbols
Following symbols are used in various sections of this manual:
C
Important information and useful
hints about usage.
AWARNING:
Warnings against
dangerous situations concerning the
security of life and property.
Protection class for electric shock.
This product has been manufactured in environmental friendly modern plants
without giving any harm to the nature.
It does not contain PCB.

Vacuum Cleaner / User Manual 3 / EN
CONTENTS
ENGLISH 4-11
DEUTSCH 12-21
BULGARIAN 22-30
ČESKY 31-39
MAGYAR 40-48
ROMANIAN 49-59
SLOVENŠČINA 60-68
ESPAÑOL 69-79
POLSKI 80-91
ITALIANO 92-101
FRANÇAIS 102-110
NEDERLANDS 111- 119
PORTUGUÊS 120- 128
RUSSIAN 129- 142
SHQIPTARE 143-151
СРПСКИ 152-160
МАКЕДОНСКИ 161-169
UKRAINIAN 170-180

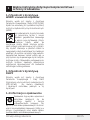
4 / EN Vacuum Cleaner / User Manual
This section contains safety
instructions that will help protect
from risk of personal injury or
property damage.
Failure to follow these
instructions invalidates the
granted warranty.
1.1 General safety
•This appliance complies with
international safety standards.
•This appliance can be used by
children aged from 8 years and
above and persons with reduced
physical, sensory or mental
capabilities or lack of experience
and knowledge if they have
been given supervision or
instruction concerning use of
the appliance in a safe way
and understand the hazards
involved. Children shall not play
with the appliance. Cleaning
and user maintenance shall not
be made by children without
supervision.
•If the power cable or the
appliance itself is damaged, do
not use it. Contact an authorised
service.
1 Important safety and environmental instructions
•Your mains power supply should
comply with the information on
the rating plate of the appliance.
•The mains supply on which you
will use the appliance must
be secured with a 16 A fuse
minimum.
•Do not use the appliance with
an extension cable.
•To avoid any damage to the
power cable, prevent it from
being squeezed, bent or rubbed
on sharp edges.
•Do not touch the plug when the
appliance is plugged in if your
hands are damp or wet.
•Do not pull the power cable
when unplugging the appliance.
•Do not vacuum flammable
materials and when vacuuming
cigarette ash, make sure that it
has cooled down.
•Do not vacuum water or other
liquids.
•Protect the appliance from rain,
humidity and heat sources.
•Never use the appliance in or
near places where combustible
or inflammable ambience or
places are present.

Vacuum Cleaner / User Manual 5 / EN
1 Important safety and environmental instructions
•Unplug the appliance before
cleaning and maintenance.
•Do not immerse the appliance
or its power cable in water for
cleaning.
•Check the hose of the appliance
regularly. Do not use if it is
damaged and contact an
authorised service.
•Do not dismantle the appliance.
•Only use the original parts or
parts recommended by the
manufacturer.
•Do not use the appliance
without filters; otherwise, it can
get damaged.
•When vacuum-cleaning the
stairs, the appliance should be
located below the user.
•If you keep the packaging
materials, store them out of the
reach of children.
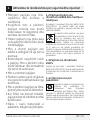
1.2 Compliance with the WEEE
Directive and Disposing of the
Waste Product
This product complies with EU WEEE Directive
(2012/19/EU). This product bears a classification
symbol for waste electrical and electronic
equipment (WEEE).
This symbol indicates that this product
shall not be disposed with other
household wastes at the end of its
service life. Used device must be
returned to offical collection point for
recycling of electrical and electronic devices. To
find these collection systems please contact to
your local authorities or retailer where the product
was puchased. Each household performs
important role in recovering and recycling of old
appliance. Appropriate disposal of used appliance
helps prevent potential negative consequences
for the environment and human health.
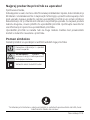
1.3 Compliance with RoHS
Directive
The product you have purchased complies with EU
RoHS Directive (2015/863/EU). It does not contain
harmful and prohibited materials specified in the
Directive.
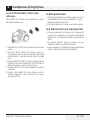
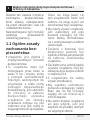
1.4 Package information
Packaging materials of the product are
manufactured from recyclable materials
in accordance with our National
Environment Regulations. Do not
dispose of the packaging materials together with
the domestic or other wastes. Take them to the
packaging material collection points designated by
the local authorities.

6 / EN Vacuum Cleaner / User Manual
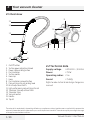
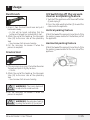
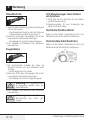
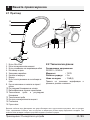
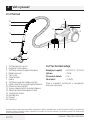
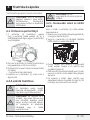
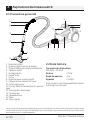
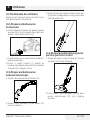
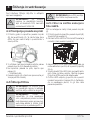
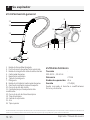
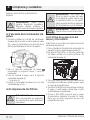
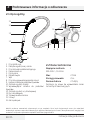
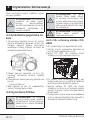
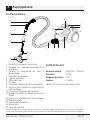
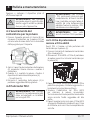
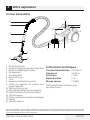
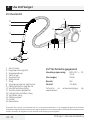
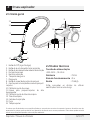
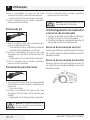
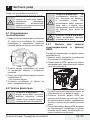
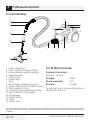
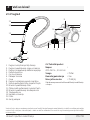
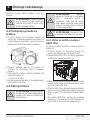
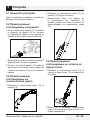
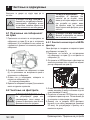
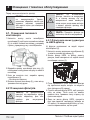
2.1 Overview
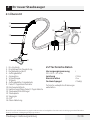
2 Your vacuum cleaner
1. On/Off button
2. Suction power adjustment knob
3. Power cable winding button
4. Dust container
5. Suction nozzle
6. Hose cap
7. Hose
8. Dust container removal button
9. Parquet/carpet brush parking hook
10. Brush adjustment latch
11. High performance parquet/carpet brush
12. Telescopic tube adjustment latch
13. Telescopic tube
14. Vacuum control
15. Handle
16. Top lid
2.2 Technical data
Supply voltage :
220-240 V~, 50-60 Hz
Power :
750 W
Operating radius :
9 m
Sound :
75 dB(A)
Rights to make technical and design changes are
reserved.
1
2
3
4567
10
11
12
13
14
15
9
8
16
The values which are declared in the markings affixed on your appliance or other printed documents supplied with it represent the
values which were obtained in the laboratories pursuant to the pertinent standards. These values may vary according to the usage
of the appliance and ambient conditions.

Vacuum Cleaner / User Manual 7 / EN
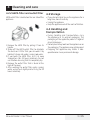
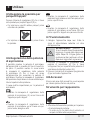
3 Usage
3.1 Intended use
The appliance has been designed for household
use and is not suitable for industrial use.
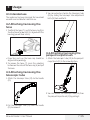
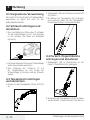
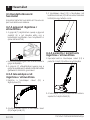
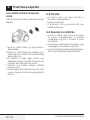
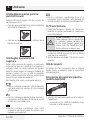
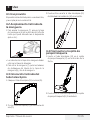
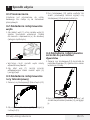
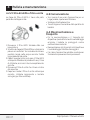
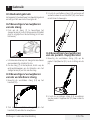
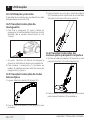
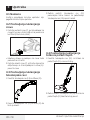
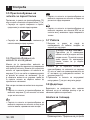
3.2 Attaching/removing the
hose
1. To attach the hose (7), push the hose cap (6) in
the direction of arrow until it is aligned with the
housing (you will hear a click).
•Projecting parts on the hose cap should be
aligned correspondingly.
2. To remove the hose (7), press the unlocking
buttons on the sides of the hose cap (6) and pull
the hose.
3.3 Attaching/removing the
telescopic tube
1. Attach the telescopic tube (13) to the handle
(15).
2. Pull the telescopic tube (13) from the handle
(15) to remove it.
3. You can extend or shorten the telescopic tube
(13) by sliding the telescopic tube adjustment
latch (12) back and forth.
3.4 Attaching/removing the
parquet/carpet brush
1. Attach the telescopic tube (13) to the parquet/
carpet brush (11) in the arrow direction.
2. You can remove the telescopic tube (13) from
the parquet/carpet brush (11) by pulling it.

8 / EN Vacuum Cleaner / User Manual
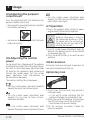
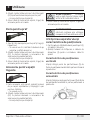
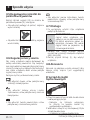
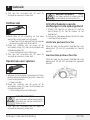
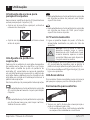
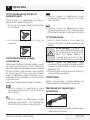
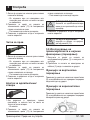
3.5 Adjusting the parquet/
carpet brush
Press the adjustment latch (10) located on the
parquet/carpet brush (11) and;
•Vacuum on firm ground and parquet; extend the
brush before vacuuming.
•Vacuum on carpets and rugs; retract the brush
before vacuuming.
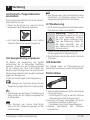
3.6 Adjusting the suction
power
You can adjust the suction power of the appliance
according to the type of the surface to be cleaned.
You can turn the suction power adjustment knob
(2) found on the appliance's body clockwise to
increase the suction power. Turn the suction
power adjustment knob anti-clockwise to
decrease the suction power.
There are four settings for suction power:
•Turn the suction power adjustment knob (2)
towards the carpet icon to clean carpets.
•Turn the suction power adjustment knob
towards the eco icon to clean curtains,
tablecloths and sofas.
•Turn the suction power adjustment knob
towards the parquet icon to clean hard surfaces.
•Turn the suction power adjustment knob
towards the MAX icon to clean heavily soiled
hard surfaces and carpets.
3.7 Operation
1. Plug in the appliance after pulling the power
plug located at the back of the appliance.
A
WARNING:
Stop pulling the
appliance cable when it comes to
the yellow mark located on it. After
the yellow mark, the red mark will
come. Do not pull any more after
reaching the red mark.
2. Use the suction power adjustment knob (2)
found on the appliance to set it to the desired
suction power (see 3.6).
3. Press the on/off button (1) to switch on your
appliance.
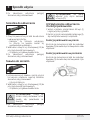
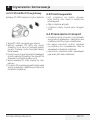
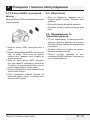
3.8 Accessories
Accessories have been designed in one piece to
save space and provide practical use.
Upholstery tool
1. Grasp it from the dust brush area and pull it
backwards slowly.
– A click will be heard, indicating that the
button on the body has seated into its slot.
2. Attach the end of the handle or the telescopic
tube (13) to the inner side of the dust brush.
– You can now start vacuum cleaning.
3. Pull the accessory to remove it when the
process is complete.
3 Usage

Vacuum Cleaner / User Manual 9 / EN
3 Usage
Dust brush
1. Grasp it from the dust brush area and pull it
backwards slowly.
– A click will be heard, indicating that the
button on the body has seated into its slot.
2. Attach the end of the handle or the telescopic
tube (13) to the inner side of the upholstery
tool.
– You can now start vacuum cleaning.
3. Pull the accessory to remove it when the
process is complete.
Crevice tool
1. If the accessory is on, press the button found on
the body and push it slightly to close.
– It clicks.
2. Attach the end of the handle or the telescopic
tube (13) to the inner side of the upholstery
tool.
– You can now start vacuum cleaning.
AWARNING:
The crevice tool must
be adjusted to remain outside.
3. Pull the accessory to remove it when the
process is complete.
AWARNING:
Do not make cleaning
by using the handle's (15) end part.
3.9 Switching off the vacuum
cleaner and parking feature
1. Switch off the appliance with the on/off button
(1) and unplug it.
2. Press the cable winding button (3) to wind the
cable inside the appliance.
Vertical parking feature
Attach the hook of the parquet/carpet brush (9) to
the parking groove located at the bottom part of
the appliance.
Horizontal parking feature
Attach the hook of the parquet/carpet brush (9) to
the parking groove located at the rear side of the
appliance.

10 / EN Vacuum Cleaner / User Manual
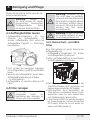
4 Cleaning and care
Switch off and unplug the appliance before
cleaning it.
AWARNING:
Never use gasoline,
solvent, abrasive cleaning agents,
metal objects or hard brushes to
clean the appliance.
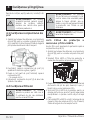
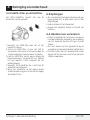
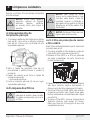
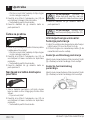
4.1 Emptying the dust
container
1. Press the dust container removal button (8) to
remove the dust container (4) and remove the
dust container in the direction of the arrow by
holding from the dust container carrying handle.
2. Open the lid of the dust container (4) by pressing
the inner latch and empty the container.
3. When you have emptied the dust, close the dust
container lid (4).
– A click will be heard.
4. Insert the dust container (4) into its place by
holding it from the handle.
4.2 Cleaning the filters
AWARNING:
Do not use appliances
producing hot air such as hair dryer
or heater to dry the filters.
A
WARNING:
Do not install the
filters without completely drying
them; otherwise, smell of moisture
may occur during use, water can leak
from the back of the appliance or the
filters may get damaged.
AWARNING:
Attach the filters into
their places after they have dried.
4.2.1 Motor protection filter and
HEPA filter
These filters are located on the rear side of the
dust container (4).
1. Press the dust container removal button (8) and
remove the dust container (4).
2. Remove the HEPA filter and motor protection
filter found at the back of the dust container (4).
3. After washing the sponge protection filter
under running water, wring it out slightly and
leave it to dry (for 24 hours minimum).
4. Shake off the HEPA inlet filter to eliminate
the dusts on it. After that, you can wash it by
holding its clean side under running cool water.
5. If you wash the HEPA filter, dry it at room
temperature (for 24 hours minimum). Do not
use it before ensuring that it is completely dry.

Vacuum Cleaner / User Manual 11 / EN
4.2.2 HEPA filter and outlet filter
HEPA outlet filter is located on the rear side of the
appliance.
1. Remove the HEPA filter by pulling it from its
handle.
2. Shake off the HEPA outlet filter to eliminate
the dusts on it. After that, you can wash it by
holding its clean side under running cool water.
3. If you wash the HEPA filter, dry it at room
temperature (for 24 hours minimum). Do not
use it before ensuring that it is completely dry.
4. Remove the outlet filter that is found at the
back of the cover.
5. After washing the outlet filter under running
water, wring it out slightly and let it dry (for 24
hours minimum).
4.3 Storage
•If you do not intend to use the appliance for a
long time, store it carefully.
•Unplug the appliance.
•Keep the appliance out of the reach of children.
4.4 Handling and
transportation
•During handling and transportation, carry
the appliance in its original packaging. The
packaging of the appliance protects it against
physical damages.
•Do not place heavy loads on the appliance or on
the packaging. The appliance may get damaged.
•Dropping the appliance may render it non-
operational or cause permanent damage.
4 Cleaning and care

Bitte zunächst diese Anleitung lesen!
Sehr geehrte Kundin, sehr geehrter Kunde,
Danke, dass Sie sich für dieses Gerät der Marke Beko entschieden haben. Wir hoffen,
dass Sie mit diesem Gerät, das mit den höchsten Qualitätsanforderungen und der
modernsten Technologie hergestellt wurde, beste Ergebnisse erzielen. Bitte lesen Sie
diese Bedienungsanleitung und alle anderen Begleitdokumente aufmerksam, bevor Sie
das Gerät verwenden; bewahren Sie sie zum künftigen Nachschlagen sicher auf. Wenn
Sie das Gerät an einen Dritten weitergeben, händigen Sie bitte auch diese Anleitung
aus. Befolgen Sie die Anweisungen, indem Sie alle Informationen und Warnhinweise in
der Bedienungsanleitung beachten.
Bedeutung der Symbole
Folgende Symbole werden in den verschiedenen Abschnitten dieser Anleitung
verwendet:
C
Wichtige Informationen und nützliche
Tipps zur Verwendung.
AWARNUNG:
Warnhinweise zu
gefährlichen Situationen im Hinblick
auf die Sicherheit von Leib, Leben
und Eigentum.
Schutzklasse gegen Stromschläge.
Dieses Produkt wurde in umweltfreundlichen, modernen Einrichtungen hergestellt.
Es enthält kein PCB.

Staubsauger / Bedienungsanleitung 13 / DE
Dieser Abschnitt enthält
Sicherheitsanweisungen, die
beim Schutz vor Personen- und
Sachschäden helfen.
Bei Nichtbeachtung dieser
Anweisungen erlischt die gewährte
Garantie.
1.1 Allgemeine Sicher-
heit
•Dieses Gerät erfüllt internationale
Sicherheitsstandards.
•Dieses Gerät darf nur dann von
Kindern (ab acht Jahren) oder von
Personen bedient werden, die
unter körperlichen oder geistigen
Einschränkungen leiden oder
denen es an der nötigen Erfahrung
im Umgang mit solchen Geräten
mangelt, wenn solche Personen
aufmerksam und lückenlos
beaufsichtigt werden, zuvor
gründlich mit der Bedienung des
Gerätes vertraut gemacht wurden
und sich der damit verbundenen
Gefahren voll und ganz bewusst
sind. Kinder dürfen nicht mit
dem Gerät spielen. Reinigung
und Benutzerwartung dürfen
von Kindern nicht ohne Aufsicht
durchgeführt werden.
•Verwenden Sie das Produkt nicht,
falls Netzkabel oder Gerät selbst
beschädigt sind. Wenden Sie
sich dann an einen autorisierten
Serviceanbieter.
•Die Stromversorgung muss mit
den Angaben am Typenschild des
Gerätes übereinstimmen.
•Die Stromversorgung des Gerätes
muss mit einer Sicherung von
mindestens 16 A abgesichert
werden.
•Das Gerät nicht mit einem
Verlängerungskabel verwenden.
•Achten Sie zur Vermeidung von
Schäden am Netzkabel darauf,
dass es nicht eingeklemmt,
verbogen oder über scharfe
Kanten gezogen wird.
•Berühren Sie den Stecker nicht
mit feuchten oder gar nassen
Händen, wenn das Gerät an die
Stromversorgung angeschlossen
ist.
•Beim Ausziehen des Steckers
nicht am Netzkabel selbst ziehen.
•Keine brennbaren Materialien
aufsaugen; Zigarettenasche nur
dann aufsaugen, wenn diese
definitiv kalt ist.
•Saugen Sie weder Wasser noch
andere Flüssigkeiten auf.
1 Wichtige Hinweise zu Sicherheit und Umwelt

14 / DE Staubsauger / Bedienungsanleitung
•Gerät vor Regen, Feuchtigkeit und
Wärmequellen schützen.
•Gerät niemals an oder in der Nähe
von Stellen benutzen, an denen
sich leicht brennbare oder gar
explosive Materialien befinden.
•Vor Reinigung und Wartung den
Netzstecker ziehen.
•Tauchen Sie zur Reinigung weder
das Gerät noch sein Netzkabel in
Wasser.
•Schlauch des Gerätes regelmäßig
prüfen. Bei Schäden nicht
verwenden; wenden Sie
sich an einen autorisierten
Servicemitarbeiter.
•Demontieren Sie das Gerät nicht.
•Nur Originalteile und vom
Hersteller empfohlene Teile
verwenden.
•Gerät nicht ohne Filter verwenden;
andernfalls können Schäden
auftreten.
•Beim Saugen von Treppen
sollte sich das Gerät unter dem
Anwender befinden.
•Falls Sie die
Verpackungsmaterialien
aufheben möchten, bewahren Sie
sie außerhalb der Reichweite von
Kindern auf.
1.2 Konformität mit WEEE-
Richtlinie und Entsorgung von
Altgeräten
Dieses Produkt stimmt mit der
europäischen WEEE-Richtlinie überein
(2012/19/EU). Dieses Produkt trägt ein
Klassifizierungssymbol für elektrische
und elektronische Altgeräte (WEEE).
Dieses Symbol zeigt an, dass dieses Gerät am Ende
seiner Einsatzzeit nicht mit anderem Hausmüll
entsorgt werden darf. Altgeräte müssen an
offizielle Sammelstellen zum Recycling
elektrischer und elektronischer Geräte abgegeben
werden. Nähere Angaben zu diesen Sammelstellen
erhalten Sie von Ihrer Stadtverwaltung oder dem
Händler, bei dem Sie das Gerät erworben haben.
Der Beitrag jedes Haushalts zum Umweltschutz
ist wichtig. Eine angemessene Entsorgung von
Altgeräten hilft bei der Verhinderung negativer
Auswirkungen auf Umwelt und menschliche
Gesundheit.
1.3 Konformität mit der RoHS-
Richtlinie
Das von Ihnen erworbene Produkt stimmt mit
der europäischen RoHS-Richtlinie (2011/65/
EU) überein. Es enthält keine in der Richtlinie
angegebenen gefährlichen und verbotenen
Materialien.
1.4 Informationen zur
Verpackung
Die Verpackungsmaterialien des
Produktes sind gemäß unseren
nationalen Umweltschutzbestimmungen
aus recyclingfähigen Materialien
hergestellt. Entsorgen Sie die
Verpackungsmaterialien nicht mit dem Hausmüll
oder anderem Müll. Bringen Sie sie zu einer von
der Stadtverwaltung bereitgestellten
Sammelstelle für Verpackungsmaterial.
1 Wichtige Hinweise zu Sicherheit und Umwelt

Staubsauger / Bedienungsanleitung 15 / DE
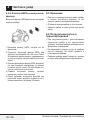
2 Ihr neuer Staubsauger
1
2
3
4567
10
11
12
13
14
15
9
8
16
2.1 Übersicht
1. Ein-/Austaste
2. Einstellknopf der Saugleistung
3. Netzkabeleinzugtaste
4. Auffangbehälter
5. Ansaugdüse
6. Schlauchkappe
7. Schlauch
8. Auffangbehälter-Freigabetaste
9. Parkett-/Teppichbürstenhalter
10. Bürsteneinstelltaste
11. Hochleistungsfähige Parkett-/Teppichbürste
12. Teleskoprohr-Einstellriegel
13. Teleskoprohr
14. Saugregler
15. Griff
16. Obere Abdeckung
2.2 Technische Daten
Versorgungsspannung :
220 -240 V~ , 50 - 60 Hz
Leistung :
750 W
Einsatzradius :
9 m
Geräuschpegel :
75 dB(A)
Technische und optische Änderungen
vorbehalten.
Die am Gerät oder in der Dokumentation angegebenen Werte wurden nach maßgeblichen Standards unter Laborbedingungen ermittelt. Diese Werte
können je nach Einsatz- und Umgebungsbedingungen variieren.

16 / DE Staubsauger / Bedienungsanleitung
3 Nutzung
3.1 Vorgesehene Verwendung
Das Gerät ist für den Einsatz in Privathaushalten
vorgesehen; es eignet sich nicht für den
professionellen Einsatz.
3.2 Schlauch anbringen und
abnehmen
1. Zum Anschließen des Schlauches (7) schieben
Sie die Schlauchkappe (6) bis zum Anschlag
in das Gehäuse (Sie hören ein klickendes
Geräusch).
•Die hervorstehenden Teile an der Schlauchkappe
sind entsprechend auszurichten.
2. Zum Entfernen des Schlauchs (7) auf
die Freigabetasten an den Seiten der
Schlauchkappe (6) drücken und am Schlauch
ziehen.
3.3 Teleskoprohr anbringen
und abnehmen
1. Bringen Sie das Teleskoprohr (13) am Griff (15)
an.
2. Teleskoprohr (13) zum Entfernen aus dem Griff
(15) ziehen.
3. Sie können das Teleskoprohr (13) verlängern
und verkürzen, indem Sie den Teleskoprohr-
Einstellriegel (12) vor- und zurückschieben.
3.4 Parkett-/Teppichbürste
anbringen und abnehmen
1. Teleskoprohr (13) in Pfeilrichtung an der
Parkett-/Teppichbürste (11) anbringen.
2. Sie können das Teleskoprohr (13) durch Ziehen
von der Parkett-/Teppich-Bürste (11) entfernen.

Staubsauger / Bedienungsanleitung 17 / DE
3.5 Parkett-/Teppichbürste
einstellen
Drücken Sie die Verstelltaste (10) an der Parkett-/
Teppichbürste (11) und
•fahren Sie die Bürste aus, wenn Sie festen
Boden oder Parkett absaugen möchten.
•Bei Teppichen, Teppichböden und Läufern
ziehen Sie die Bürsten vor dem Saugen ein.
3.6 Saugleistung anpassen
Sie können die Saugleistung des Gerätes
entsprechend der zu reinigenden Oberfläche
anpassen. Drehen Sie den Saugleistungsknopf
(2) am Gehäuse der Taste zum Erhöhen der
Saugleistung im Uhrzeigersinn. Zum Verringern der
Saugleistung drehen Sie den Saugleistungsknopf
gegen den Uhrzeigersinn.
Es gibt vier Einstellungen für die Saugleistung:
•Zum Reinigen von Teppichen drehen Sie den
Saugleistungsknopf (2) auf das Teppichsymbol.
•Zum Reinigen von Vorhängen, Tischdecken und
Sofas drehen Sie den Saugleistungsknopf auf
das Ökosymbol.
•Zum Reinigen von harten Oberflächen
drehen Sie den Saugleistungsknopf auf das
Parkettsymbol.
•Zum Reinigen von stark verschmutzten harten
Oberflächen und Teppichen drehen Sie den
Saugleistungsknopf auf das MAX-Symbol.
3.7 Bedienung
1. Gerät nach Herausziehen des Netzkabels an der
Rückseite des Gerätes anschließen.
A
Warnung:
Ziehen Sie das
Netzkabel nicht weiter heraus, wenn
die gelbe Markierung erscheint.
Nach der gelben Markierung folgt
eine rote Markierung. Ziehen Sie
das Kabel keinesfalls über die
rote Markierung hinaus aus dem
Gehäuse heraus.
2. Stellen Sie über den Saugleistungsknopf (2) am
Gerät die gewünschte Saugleistung ein.
3. Zum Einschalten des Gerätes die Ein-/Austaste
(1) drücken.
3.8 Zubehör
Das Zubehör wurde zur Platzeinsparung und
praktischen Anwendung in einem Stück gestaltet.
Polsterdüse
1. Vom Staubbürstenbereich greifen und langsam
nach hinten ziehen.
– Ein Klickgeräusch zeigt an, dass die Taste am
Gehäuse in ihrem Schlitz eingerastet ist.
2. Ende des Griffs oder Teleskoprohr (13) an der
Innenseite der Staubbürste anbringen.
– Nun können Sie mit dem Saugen beginnen.
3. Zubehör anschließend zum Entfernen
herausziehen.
3 Nutzung

18 / DE Staubsauger / Bedienungsanleitung
Staubbürste
1. Vom Staubbürstenbereich greifen und langsam
nach hinten ziehen.
– Ein Klickgeräusch zeigt an, dass die Taste am
Gehäuse in ihrem Schlitz eingerastet ist.
2. Ende des Griffs oder Teleskoprohr (13) an der
Innenseite der Polsterdüse anbringen.
– Nun können Sie mit dem Saugen beginnen.
3. Das Zubehör anschließend zum Entfernen
herausziehen.
Fugendüse
1. Bei angebrachtem Zubehör die Taste am
Gehäuse drücken und zum Schließen leicht
drücken.
– Ein Klickgeräusch ist zu hören.
2. Ende des Griffs oder Teleskoprohr (13) an der
Innenseite der Polsterdüse anbringen.
– Nun können Sie mit dem Saugen beginnen.
AWarnung:
Die Fugendüse muss
so angepasst werden, dass sie
außerhalb bleibt.
3. Das Zubehör anschließend zum Entfernen
herausziehen.
AWarnung:
Nicht mit Hilfe des
Abschlussteils des Griffs (15)
saugen.
3.9 Staubsauger abschalten
und parken
1. Gerät über die Ein-/Austaste (1) ausschalten
und Netzstecker ziehen.
2. Kabeleinzugtaste (3) zum Aufwickeln des
Kabels im Gerät drücken.
Vertikale Parkfunktion
Haken Sie die Parkett-/Teppichbürste (9) in die
Parkkerbe an der Unterseite des Gerätes ein.
Horizontale Parkfunktion
Haken Sie die Parkett-/Teppichbürste (9) in die
Parkkerbe an der Rückseite des Gerätes ein.
3 Nutzung

Staubsauger / Bedienungsanleitung 19 / DE
Schalten Sie das Gerät vor der Reinigung ab und
ziehen Sie den Netzstecker.
A
Warnung:
Reinigen Sie
das Gerät niemals mit Benzin,
Lösungsmitteln, Scheuermitteln,
Metallgegenständen, harten
Bürsten oder ähnlichen Mitteln.
4.1 Auffangbehälter leeren
1. Auffangbehälter-Freigabetaste (8) zum
Entfernen des Auffangbehälters (4)
drücken; Auffangbehälter durch Halten am
Auffangbehälter-Tragegriff in Pfeilrichtung
herausnehmen.
2. Durch Drücken des Innenriegels Abdeckung
des Auffangbehälters (4) öffnen und Behälter
leeren.
3. Wenn Sie den Auffangbehälter geleert haben,
Auffangbehälterabdeckung (4) schließen.
– Er rastet hörbar ein.
4. Auffangbehälter (4) einsetzen, dabei am Griff
halten.
4.2 Filter reinigen
AWarnung:
Keine Wärme
erzeugenden Geräte wie
Haartrockner oder Heizungen zur
Trocknung der Filter verwenden.
A
Warnung:
Installieren Sie die
Filter nicht, bevor sie vollständig
getrocknet sind; andernfalls können
Gerüche oder Feuchtigkeit während
der Benutzung auftreten, Wasser
kann an der Rückseite des Gerätes
austreten oder Filter können
beschädigt werden.
AWarnung:
Bringen Sie die Filter
erst an ihren Positionen an, wenn
sie vollständig getrocknet sind.
4.2.1 Motorschutz- und HEPA-
Filter
Diese Filter befinden sich an der Rückseite des
Auffangbehälters (4).
1. Auffangbehälter-Freigabetaste (8) drücken
und Auffangbehälter (4) entfernen.
2. HEPA- und Motorschutzfilter an der Rückseite
des Auffangbehälters (4) entfernen.
3. Nach Abspülen unter fließendem Wasser den
Schutzfilterschwamm sanft auswringen und
trocknen lassen (mindestens 24 Stunden).
4. HEPA-Zuluftfilter durch Ausschütteln von
Staub befreien. Anschließend können Sie ihn
auswaschen, indem Sie seine saubere Seite
unter fließendes kaltes Wasser halten.
5. Lassen Sie den HEPA-Filter nach der Reinigung
bei Zimmertemperatur trocknen (mindestens
24 Stunden). Setzen Sie ihn erst wieder ein,
wenn er vollständig trocken ist.
4 Reinigung und Pflege

20 / DE Staubsauger / Bedienungsanleitung
4.2.2 HEPA-Filter und
Abluftfilter
Der HEPA-Abluftfilter befindet sich an der
Rückseite des Gerätes.
1. Ziehen Sie den HEPA-Filter am Griff heraus.
2. HEPA-Abluftfilter durch Ausschütteln von
Staub befreien. Anschließend können Sie ihn
auswaschen, indem Sie seine saubere Seite
unter fließendes kaltes Wasser halten.
3. Lassen Sie den HEPA-Filter nach der Reinigung
bei Zimmertemperatur trocknen (mindestens
24 Stunden). Setzen Sie ihn erst wieder ein,
wenn er vollständig trocken ist.
4. Entfernen Sie den Abluftfilter an der Rückseite
der Abdeckung.
5. Spülen Sie den Abluftfilter unter fließendem
Wasser aus, wringen in sanft aus und lassen ihn
trocknen (mindestens 24 Stunden).
4.3 Lagerung
•Verstauen Sie das Gerät sorgfältig, falls Sie es
längere Zeit nicht benutzen sollten.
•Ziehen Sie den Netzstecker.
•Halten Sie das Gerät von Kindern fern.
4.4 Handhabung und
Transport
•Transportieren Sie das Gerät in seiner
Originalverpackung. Die Verpackung schützt das
Gerät vor Beschädigungen.
•Legen Sie keine schweren Gegenstände auf
dem Gerät oder der Verpackung ab. Andernfalls
könnte das Gerät beschädigt werden.
•Falls das Gerät herunterfällt, ist es
möglicherweise nicht mehr funktionsfähig oder
weist dauerhafte Schäden auf.
4 Reinigung und Pflege
Pagina se încarcă ...
Pagina se încarcă ...
Pagina se încarcă ...
Pagina se încarcă ...
Pagina se încarcă ...
Pagina se încarcă ...
Pagina se încarcă ...
Pagina se încarcă ...
Pagina se încarcă ...
Pagina se încarcă ...
Pagina se încarcă ...
Pagina se încarcă ...
Pagina se încarcă ...
Pagina se încarcă ...
Pagina se încarcă ...
Pagina se încarcă ...
Pagina se încarcă ...
Pagina se încarcă ...
Pagina se încarcă ...
Pagina se încarcă ...
Pagina se încarcă ...
Pagina se încarcă ...
Pagina se încarcă ...
Pagina se încarcă ...
Pagina se încarcă ...
Pagina se încarcă ...
Pagina se încarcă ...
Pagina se încarcă ...
Pagina se încarcă ...
Pagina se încarcă ...
Pagina se încarcă ...
Pagina se încarcă ...
Pagina se încarcă ...
Pagina se încarcă ...
Pagina se încarcă ...
Pagina se încarcă ...
Pagina se încarcă ...
Pagina se încarcă ...
Pagina se încarcă ...
Pagina se încarcă ...
Pagina se încarcă ...
Pagina se încarcă ...
Pagina se încarcă ...
Pagina se încarcă ...
Pagina se încarcă ...
Pagina se încarcă ...
Pagina se încarcă ...
Pagina se încarcă ...
Pagina se încarcă ...
Pagina se încarcă ...
Pagina se încarcă ...
Pagina se încarcă ...
Pagina se încarcă ...
Pagina se încarcă ...
Pagina se încarcă ...
Pagina se încarcă ...
Pagina se încarcă ...
Pagina se încarcă ...
Pagina se încarcă ...
Pagina se încarcă ...
Pagina se încarcă ...
Pagina se încarcă ...
Pagina se încarcă ...
Pagina se încarcă ...
Pagina se încarcă ...
Pagina se încarcă ...
Pagina se încarcă ...
Pagina se încarcă ...
Pagina se încarcă ...
Pagina se încarcă ...
Pagina se încarcă ...
Pagina se încarcă ...
Pagina se încarcă ...
Pagina se încarcă ...
Pagina se încarcă ...
Pagina se încarcă ...
Pagina se încarcă ...
Pagina se încarcă ...
Pagina se încarcă ...
Pagina se încarcă ...
Pagina se încarcă ...
Pagina se încarcă ...
Pagina se încarcă ...
Pagina se încarcă ...
Pagina se încarcă ...
Pagina se încarcă ...
Pagina se încarcă ...
Pagina se încarcă ...
Pagina se încarcă ...
Pagina se încarcă ...
Pagina se încarcă ...
Pagina se încarcă ...
Pagina se încarcă ...
Pagina se încarcă ...
Pagina se încarcă ...
Pagina se încarcă ...
Pagina se încarcă ...
Pagina se încarcă ...
Pagina se încarcă ...
Pagina se încarcă ...
Pagina se încarcă ...
Pagina se încarcă ...
Pagina se încarcă ...
Pagina se încarcă ...
Pagina se încarcă ...
Pagina se încarcă ...
Pagina se încarcă ...
Pagina se încarcă ...
Pagina se încarcă ...
Pagina se încarcă ...
Pagina se încarcă ...
Pagina se încarcă ...
Pagina se încarcă ...
Pagina se încarcă ...
Pagina se încarcă ...
Pagina se încarcă ...
Pagina se încarcă ...
Pagina se încarcă ...
Pagina se încarcă ...
Pagina se încarcă ...
Pagina se încarcă ...
Pagina se încarcă ...
Pagina se încarcă ...
Pagina se încarcă ...
Pagina se încarcă ...
Pagina se încarcă ...
Pagina se încarcă ...
Pagina se încarcă ...
Pagina se încarcă ...
Pagina se încarcă ...
Pagina se încarcă ...
Pagina se încarcă ...
Pagina se încarcă ...
Pagina se încarcă ...
Pagina se încarcă ...
Pagina se încarcă ...
Pagina se încarcă ...
Pagina se încarcă ...
Pagina se încarcă ...
Pagina se încarcă ...
Pagina se încarcă ...
Pagina se încarcă ...
Pagina se încarcă ...
Pagina se încarcă ...
Pagina se încarcă ...
Pagina se încarcă ...
Pagina se încarcă ...
Pagina se încarcă ...
Pagina se încarcă ...
Pagina se încarcă ...
Pagina se încarcă ...
Pagina se încarcă ...
Pagina se încarcă ...
Pagina se încarcă ...
Pagina se încarcă ...
Pagina se încarcă ...
Pagina se încarcă ...
Pagina se încarcă ...
Pagina se încarcă ...
Pagina se încarcă ...
-
 1
1
-
 2
2
-
 3
3
-
 4
4
-
 5
5
-
 6
6
-
 7
7
-
 8
8
-
 9
9
-
 10
10
-
 11
11
-
 12
12
-
 13
13
-
 14
14
-
 15
15
-
 16
16
-
 17
17
-
 18
18
-
 19
19
-
 20
20
-
 21
21
-
 22
22
-
 23
23
-
 24
24
-
 25
25
-
 26
26
-
 27
27
-
 28
28
-
 29
29
-
 30
30
-
 31
31
-
 32
32
-
 33
33
-
 34
34
-
 35
35
-
 36
36
-
 37
37
-
 38
38
-
 39
39
-
 40
40
-
 41
41
-
 42
42
-
 43
43
-
 44
44
-
 45
45
-
 46
46
-
 47
47
-
 48
48
-
 49
49
-
 50
50
-
 51
51
-
 52
52
-
 53
53
-
 54
54
-
 55
55
-
 56
56
-
 57
57
-
 58
58
-
 59
59
-
 60
60
-
 61
61
-
 62
62
-
 63
63
-
 64
64
-
 65
65
-
 66
66
-
 67
67
-
 68
68
-
 69
69
-
 70
70
-
 71
71
-
 72
72
-
 73
73
-
 74
74
-
 75
75
-
 76
76
-
 77
77
-
 78
78
-
 79
79
-
 80
80
-
 81
81
-
 82
82
-
 83
83
-
 84
84
-
 85
85
-
 86
86
-
 87
87
-
 88
88
-
 89
89
-
 90
90
-
 91
91
-
 92
92
-
 93
93
-
 94
94
-
 95
95
-
 96
96
-
 97
97
-
 98
98
-
 99
99
-
 100
100
-
 101
101
-
 102
102
-
 103
103
-
 104
104
-
 105
105
-
 106
106
-
 107
107
-
 108
108
-
 109
109
-
 110
110
-
 111
111
-
 112
112
-
 113
113
-
 114
114
-
 115
115
-
 116
116
-
 117
117
-
 118
118
-
 119
119
-
 120
120
-
 121
121
-
 122
122
-
 123
123
-
 124
124
-
 125
125
-
 126
126
-
 127
127
-
 128
128
-
 129
129
-
 130
130
-
 131
131
-
 132
132
-
 133
133
-
 134
134
-
 135
135
-
 136
136
-
 137
137
-
 138
138
-
 139
139
-
 140
140
-
 141
141
-
 142
142
-
 143
143
-
 144
144
-
 145
145
-
 146
146
-
 147
147
-
 148
148
-
 149
149
-
 150
150
-
 151
151
-
 152
152
-
 153
153
-
 154
154
-
 155
155
-
 156
156
-
 157
157
-
 158
158
-
 159
159
-
 160
160
-
 161
161
-
 162
162
-
 163
163
-
 164
164
-
 165
165
-
 166
166
-
 167
167
-
 168
168
-
 169
169
-
 170
170
-
 171
171
-
 172
172
-
 173
173
-
 174
174
-
 175
175
-
 176
176
-
 177
177
-
 178
178
-
 179
179
-
 180
180


Beko VCO 42701 AB Manual de utilizare
- Categorie
- Aspiratoare
- Tip
- Manual de utilizare
- Acest manual este potrivit și pentru
în alte limbi
- italiano: Beko VCO 42701 AB Manuale utente
Lucrări conexe
Alte documente
-
Solac AS3258 Manualul proprietarului
-
Siemens Vacuum Cleaner Manual de utilizare
-
Gorenje VC-HT4530 Manualul proprietarului
-
Solac AS3241 Instrucțiuni de utilizare
-
-
-
-
Siemens VSZ6GP1266/04 Manual de utilizare