
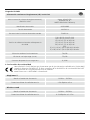
5000mAh
00
201696
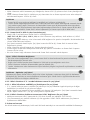
MagPower 5
Wireless Power Pack
E
CZ
F
D
GB
I
P
NL
TR
GR
RO
H
FIN
BG
PL
S
RUS
SK
Operating Instructions
Bedienungsanleitung
Mode d‘emploi
Instrucciones de uso
Gebruiksaanwijzing
Istruzioni per l‘uso
Instrukcja obsługi
Használati útmutató
Manual de utilizare
Návod k použití
Návod na použitie
Manual de instruções
Bruksanvisning
Руководство по эксплуатации
Работна инструкция
Οδηγίες χρήσης
Kullanma kılavuzu
Käyttöohje

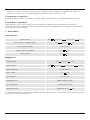
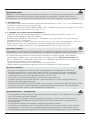
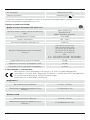
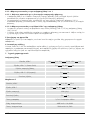
A
C
B
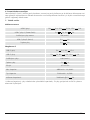
1
324
12
10
11
8
6
9 7
5

2
GOperating instruction
Thank you for choosing a Hama product.
Take your time and read the following instructions and information completely. Please keep these
instructions in a safe place for future reference. If you sell the device, please pass these operating
instructions on to the new owner.
1. Explanation of warning symbols and notes
Warning
This symbol is used to indicate safety instructions or to draw your attention to specic hazards and
risks.
Note
This symbol is used to indicate additional information or important notes.
2. Package contents
• "MagPower 5" power pack
• 2in1 wireless stand
• USB-C charging cable
• PD30W charger
• These operating instructions
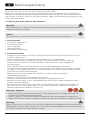
3. Safety instructions
• Protect the product from dirt, moisture and overheating and use it in dry environments only.
• As with all electrical products, this device should be kept out of the reach of children.
• Do not drop the product and do not expose it to any major shocks.
• Do not operate the product outside the power limits given in the specications.
• Do not open the device or continue to operate it if it becomes damaged.
• Dispose of packaging material immediately in accordance with the locally applicable regulations.
• The battery is permanently installed and cannot be removed; dispose of the product as a whole in
accordance with the statutory regulations.
• Do not modify the product in any way. Doing so voids the warranty.
• Do not incinerate the battery or the product.
• Do not tamper with or damage/heat/disassemble the batteries/rechargeable batteries.
• Do not use the product in the immediate vicinity of heaters, other heat sources or in direct sunlight.
• Do not use the product in areas in which electronic products are not permitted.
• Do not attempt to service or repair the product yourself. Leave any and all service work to qualied
experts.
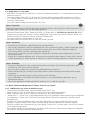
Warning - magnets
• People with pacemakers should keep away from the magnets. The magnets can negatively affect
the function of the pacemaker.
• Do not place any bank or similar cards with magnetic strips or magnetically sensitive objects on the
product. The data on the cards could be damaged or completely deleted.
Warning
Ensure that there are no metal parts (e.g. metal plate for magnetic holders) on the back of your device.
Metal heats up signicantly in the eld of an induction charger and can damage your device and/or
the power pack.
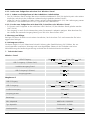
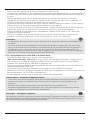
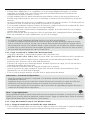
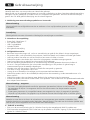
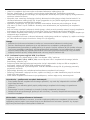
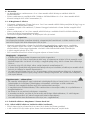
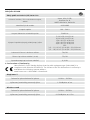
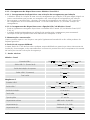
4. Operation
• To supply the power, connect the 2in1 wireless stand to the 30W PD charger included.
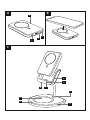
• To do this, connect the enclosed USB-C cable to the charger and the USB-C port (5) on the back of the
2in1 wireless stand.

3
4.1. Charging the MagPower 5
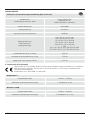
• Push the MagPower 5 power pack with the induction charging area pointing forwards into the holder
(6) on the 2in1 wireless stand.
• The USB plug (7) integrated into the holder connects to the USB-C port integrated into the power pack
and makes a click sound.
• Charging of the power pack starts automatically as soon as the 2in1 wireless stand is connected to the
included 30W PD charger.
• Once the charging process is complete, the status LED (8) goes out.
Note – capacity
When the power pack is being charged in the holder, the capacity display is not visible. The charging
function is only indicated via the white status LED (8) on the front of the holder.
• Alternatively, start the power pack charging process by connecting the enclosed USB-C cable to the
USB-C port on the power pack (IN 5 V / 2 A or 9 V / 1.5 A) and to a suitable USB charger. To do this,
consult the operating instructions for the USB charger you are using.
• The charging process begins and ends automatically.
• Fully charge the power pack once before using it for the rst time.
Note – capacity
• During the power pack charging process, the capacity is displayed constantly.
• Each LED (4) corresponds to 25% of the capacity. The permanent illumination of an LED indicates
that the capacity has already been reached. If three LEDs light up and the fourth one ashes, the
power pack is at least 75% charged.
• If all four LEDs (4) light up, the full capacity is available.
• Press the button on the power pack to switch this on, to determine the power pack's current
capacity and to start the wireless function.
• The power pack switches itself off after around 40 seconds of non-use. Press the Power button
twice to switch the power pack off manually. When the power pack switches off, the LED display
also goes out.
Warning - rechargeable battery
• Do not charge the power pack via your PC or notebook. The charging currents can damage the USB
port on the PC or notebook.
• Only use suitable charging devices or USB ports to charge the product.
• Do not use defective chargers or USB ports and do not attempt to repair them.
• Do not overcharge the product or allow the battery to completely discharge.
• Avoid storing, charging and using in extreme temperatures and at extremely low atmospheric
pressures (such as at high altitudes).
• When stored over a long period of time, batteries should be charged regularly (at least every three
months).
4.2. Charging devices with the MagPower 5 Power Pack
4.2.1. Wireless charging with the induction charging zone:
•rst switch the power pack on using the Power button on the underside of the holder.
• The blue function LED (2) briey indicates the power pack's ready state and then switches off.
• Place your device with its back on the inductive charging zone (B).
• The "MagPower 5" power pack is compatible with Apple MagSafe technology. The correct alignment
and xation of the device takes place automatically thanks to the magnets integrated into the power
pack and the iPhone.
• All other smartphones that support the inductive charging function should also be placed on the
induction charging zone (B). In this case, however, the automatic central xing of the device does not
take place.

4
• The charging process begins as soon as an effective induction eld has been established. The status
LED (2) lights up blue. The current charge status is displayed on your device.
• If no induction connection can be established, change the position of your device if necessary (B). (For
all smartphones that do not feature MagSafe technology)
• If your device's battery is fully charged, the status LED (2) goes out once when you remove the device.
• Remove your device from the power pack's induction charging zone and switch it off by pressing the
Power button twice in quick succession. The LEDs (4) go out.
Note
• The power pack can be charged and the inductive charging function used simultaneously.
• In the wireless stand's holding device, the power pack automatically switches to charging mode
as soon as the stand is connected to a power supply. The Power button (9) on the underside of the
holder is inactive in this case. If the wireless stand is not connected via the power supply, the power
pack can be switched on via the Power button (9) by pressing it once. Press the Power button (9)
twice switch the power pack off again.
4.2.2. Charging via the power pack's USB-C output:
• connect the enclosed USB-C charging cable to the USB-C port on the power pack
(OUT 5V/2A, 9V/1.5A, 12V/1.1A) and with the USB-C port on your device (mobile phone,
smartphone, etc.).
• In certain circumstances, the enclosed charging / connecting cable may not match the USB port on
your device. In this case, use the USB cable that came with your device.
• The charging process begins automatically. During the charging process, the LEDs (4) the power pack's
remaining available capacity.
• The current battery charge status of your device is indicated on this.
• Terminate the charging process and switch the power pack off by pressing the power button twice in
quick succession. The status LEDs go out.
• In the event that no device is connected, the power pack switches itself off automatically.
Warning - connecting devices
• Before connecting a device, check whether it can be adequately supplied with the power pack's
current delivery.
• Ensure that the total current consumption of the connected device does not exceed 2000 mA.
• Note the instructions in your device's operating manual.
• You must obey the instructions and safety notes contained therein regarding the supply of power
to your devices.
Note – optimised charging
Optimised charging means that the power pack recognises the connected device, supplies it with the
ideal current strength and therefore reduces the charging time to a minimum. Note that the power
pack's maximum current delivery is 2000 mA.
4.2.3. Charging devices with the 2in1 wireless stand
4.2.3.1. Charging devices with the inductive charging function
• The 2in1 wireless stand has an induction charging zone (5W) for Apple Airpods or other headphones
that can be charged using inductive charging technology.
• To charge your device, place it on the inductive charging zone (10). The charging process begins
automatically. The white status LED (11) indicates the charging function.
4.2.3.2 Charging devices with the USB-C port on the wireless stand
• Devices can also be charged on the wireless stand's USB-C port (12) (OUT 5V/1A).
• The port is also suitable for using a smart watch charging pad. Please ensure that the maximum output
of 5W is not exceeded.

5
5. Care and maintenance
Only clean this product using a lint-free, slightly damp cloth and do not use any harsh cleaners.
6. Warranty disclaimer
Hama GmbH & Co KG assumes no liability and provides no warranty for damage resulting from improper
installation/mounting, improper use of the product or from failure to observe the operating instructions
and/or safety notes.
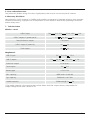
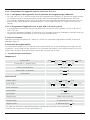
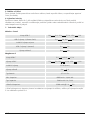
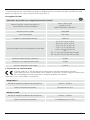
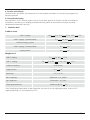
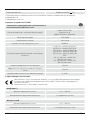
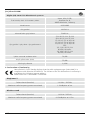
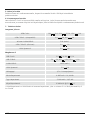
7. Technical data
Wireless stand
USB-C input 9V 3A, 12V 2.5A, 15V 2A
USB-C outputs 1 (power pack) 5V 2A, 9V 2A
Stand induction output 5 W (max.)
USB-C output 2 (external) 5V 1A
Total output 5V 1A
MagPower5
USB-C input 5V 2A, 9V 1.5A
USB-C output 5V 2A, 9V 1.5A, 12V 1.1A
Induction output 10 W (max.)
Total output 5V 2A
Battery type 3.7V/Li-Po
Min. capacity 4995 mAh/18.48 Wh
Typ. capacity 5000mAh / 18.5 Wh
Usable capacity* 3266mAh@5V 2A
* The usable capacity is the capacity that can be drawn from the output sockets, measured at 5V
Output voltage and a draw current of 2A.

6
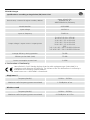
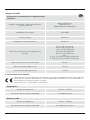
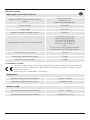
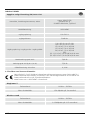
PD30W charger
Specications according to Regulation (EU) 2019/1782
Brand name, commercial register number, address
Hama, HRA12159,
Dresdner Str. 9,
86653 Monheim,Germany
Model identier 00201696
Input voltage 100-240 V
Input AC frequency 50/60 Hz
Output voltage / output current / output power
5.0 V DC / 3.0 A / 15.0 W
9.0 V DC / 3.0 A / 27.0 W
12.0 V DC / 2.5 A / 30.0 W
15.0 V DC / 2.0 A / 30.0 W
20.0 V DC / 1.5 A / 30.0 W
PPS:
3.3-11.0 V DC / 3.0 A / 9.9-30.0 W max.
3.3-16.0 V DC / 2.0 A / 6.6-30.0 W max.
Average eciency during operation 78.6%
Eciency at low load (10%) 75.6%
Power consumption at zero load 0.10W
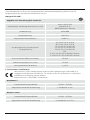
8. Declaration of Conformity
Hama GmbH & Co KG hereby declares that the radio equipment type [00201696] is in
compliance with Directive 2014/53/EU. The full text of the EU declaration of conformity is
available at the following Internet address:
www.hama.com->00201696->Downloads.
MagPower 5
Frequency band(s) 110kHz – 205 kHz
Maximum radio-frequency power transmitted 1.24 dBμA/m at 3m
Wireless stand
Frequency band(s) 110kHz – 205 kHz
Maximum radio-frequency power transmitted 0.124dBμA/m at 0.15m

7
Vielen Dank, dass Sie sich für ein Hama Produkt entschieden haben!
Nehmen Sie sich Zeit und lesen Sie die folgenden Anweisungen und Hinweise zunächst ganz durch.
Bewahren Sie diese Bedienungsanleitung anschließend an einem sicheren Ort auf, um bei Bedarf darin
nachschlagen zu können. Sollten Sie das Gerät veräußern, geben Sie diese Bedienungsanleitung an den
neuen Eigentümer weiter.
1. Erklärung von Warnsymbolen und Hinweisen
Warnung
Wird verwendet, um Sicherheitshinweise zu kennzeichnen oder um Aufmerksamkeit auf besondere
Gefahren und Risiken zu lenken.
Hinweis
Wird verwendet, um zusätzlich Informationen oder wichtige Hinweise zu kennzeichnen.
2. Packungsinhalt
• Power Pack „MagPower 5“
• 2in1 Wireless Stand
• USB-C-Ladekabel
• Ladegerät PD30W
• diese Bedienungsanleitung
3. Sicherheitshinweise
• Schützen Sie das Produkt vor Schmutz, Feuchtigkeit und Überhitzung und verwenden Sie es nur in
trockenen Umgebungen.
• Dieses Produkt gehört, wie alle elektrischen Produkte, nicht in Kinderhände!
• Lassen Sie das Produkt nicht fallen und setzen Sie es keinen heftigen Erschütterungen aus.
• Betreiben Sie das Produkt nicht außerhalb seiner in den technischen Daten angegebenen
Leistungsgrenzen.
• Öffnen Sie das Produkt nicht und betreiben Sie es bei Beschädigungen nicht weiter.
• Entsorgen Sie das Verpackungsmaterial sofort gemäß den örtlich gültigen Entsorgungsvorschriften.
• Der Akku ist fest eingebaut und kann nicht entfernt werden, entsorgen Sie das Produkt als Ganzes
gemäß den gesetzlichen Bestimmungen.
• Nehmen Sie keine Veränderungen am Produkt vor. Dadurch verlieren Sie jegliche
Gewährleistungsansprüche.
• Werfen Sie den Akku bzw. das Produkt nicht ins Feuer.
• Verändern und/oder deformieren/erhitzen/zerlegen Sie Akkus/Batterien nicht.
• Betreiben Sie das Produkt nicht in unmittelbarer Nähe der Heizung, anderer Hitzequellen oder in
direkter Sonneneinstrahlung.
• Benutzen Sie das Produkt nicht in Bereichen, in denen elektronische Produkte nicht erlaubt sind.
• Versuchen Sie nicht, das Produkt selbst zu warten oder zu reparieren. Überlassen Sie jegliche
Wartungsarbeit dem zuständigen Fachpersonal.
Warnung – Magnete
• Halten Sie Personen mit Herzschrittmachern von den Magneten fern. Die Magnete können die
Funktion des Schrittmachers beeinträchtigen.
• Legen Sie keine EC- oder ähnliche Karten mit Magnetstreifen sowie magnetisch empndliche
Gegenstände auf das Produkt. Die Daten auf den Karten können beschädigt oder gelöscht werden.
Warnung
Stellen Sie sicher, dass sich auf der Rückseite Ihres Endgerätes keine Metallteile (z.B. Metallplatte für
Magnethalter) benden. Metall erwärmt sich im Feld des Induktionsladebereiches sehr stark und kann
Ihr Endgerät und/oder das Power Pack beschädigen.
DBedienungsanleitung

8
4. Betrieb
• Schließen Sie für die Stromversorgung den 2in1 Wireless Stand an das beiliegende 30W PD-Ladegerät
an.
• Verbinden sie dazu das beiliegende USB-C-Kabel mit dem Ladegerät und dem USB-C-Eingang (5) an
der Rückseite des 2in1 Wireless Stand.
4.1. Laden des MagPower 5 Power Pack
• Schieben Sie das MagPower 5 Power Pack mit dem Induktionsladebereich nach vorne zeigend in die
Halterung (6) des 2in1 Wireless Stand.
• Der in der Halterung integrierte USB-Stecker (7) verbindet sich dabei mit dem im Power Pack
integrierten USB-C-Anschluss mit einem Klickgeräusch.
• Die Ladung des Power Pack startet automatisch, sobald der 2in1 Wireless Stand an das beiliegende
30W PD-Ladegerät angeschlossen ist.
• Ist der Ladevorgang beendet erlischt die Status LED (8).
Hinweis – Kapazität
Wird der Power Pack in der Halterung geladen, ist die Kapazitätsanzeige nicht sichtbar. Die
Ladefunktion wird nur über die weiße Status-LED (8) an der Vorderseite der Halterung angezeigt.
• Alternativ starten Sie den Ladevorgang des Power Pack, indem Sie das beiliegende USB-C-Kabel an den
USB-C-Anschluss des Power Packs (IN 5V/2A bzw. 9V/1.5A) und an ein geeignetes USB-Ladegerät
anschließen. Beachten Sie hierzu die Bedienungsanleitung des verwendeten USB-Ladegeräts.
• Der Ladevorgang startet und endet automatisch.
• Laden Sie vor dem ersten Gebrauch das Power Pack zunächst einmal vollständig auf.
Hinweis – Kapazität
• Während des Ladevorgangs des Power Packs wird die Kapazität dauerhaft angezeigt.
• Jede LED (4) entspricht 25 % der Kapazität. Das dauerhafte Leuchten einer LED signalisiert die
bereits erreichte Kapazität. Leuchten drei LEDs auf, und die vierte blinkt, ist das Power Pack zu mind.
75 % geladen.
• Leuchten alle vier LEDs (4), ist die volle Kapazität verfügbar.
• Drücken Sie die Taste des Power Packs, um dieses einzuschalten, die aktuelle Kapazität des Power
Packs zu erfahren und die Wireless-Funktion zu starten.
• Das Power Pack schaltet sich bei Nichtbenutzung nach ca. 40 Sekunden selbständig ab. Drücken Sie
die Power-Taste zwei mal um das Power Pack manuell auszuschalten. Schaltet das Power Pack ab,
erlischt auch die LED-Anzeige.
Warnung – Akku
• Laden Sie das Power Pack nicht über Ihren PC oder das Notebook. Die Ladeströme können den USB
Port des PC oder Notebooks beschädigen.
• Verwenden Sie nur geeignete Ladegeräte oder USB-Anschlüsse zum Auaden.
• Verwenden Sie defekte Ladegeräte oder USB-Anschlüsse generell nicht mehr und versuchen Sie
nicht, diese zu reparieren.
• Überladen oder tiefentladen Sie das Produkt nicht.
• Vermeiden Sie Lagerung, Laden und Benutzung bei extremen Temperaturen und extrem niedrigem
Luftdruck (wie z.B. in großen Höhen).
• Laden Sie bei längerer Lagerung regelmäßig (mind. vierteljährig) nach.
4.2. Laden von Endgeräten mit dem MagPower 5 Power Pack
4.2.1. Kabellos Laden mit dem Induktionsladebereich:
• Schalten Sie zunächst das Power Pack über die Power-Taste(9) an der Unterseite der Aufnahme ein.
• Die blaue Funktions-LED(2) signalisiert kurz die Bereitschaft der Power Pack und schaltet dann ab.

9
• Legen Sie Ihr Endgerät mit der Rückseite auf den Induktionsladebereich (B).
• Der „MagPower 5“- Power Pack ist kompatibel mit der Apple MagSafe-Technologie. Hierbei erfolgt die
korrekte Ausrichtung und Fixierung des Endgerätes automatisch durch die im Power Pack sowie im
iPhone integrierten Magnete.
• Alle anderen Smartphones, welche die induktive Ladefunktion unterstützen, legen Sie bitte ebenfalls
auf den Induktionsladebereich (B). Hierbei entfällt allerdings die automatische, zentrale Fixierung des
Endgerätes.
• Der Ladevorgang beginnt, sobald ein wirksames Induktionsfeld aufgebaut ist. Die Status-LED (2)
leuchtet blau. Der aktuelle Ladestatus wird auf Ihrem Endgerät angezeigt.
• Kann keine Induktionsverbindung hergestellt werden, verändern Sie ggfs. die Position Ihres Endgerätes
(B). (Bei allen Smartphones, die die MagSafe Technologie nicht beinhalten)
• Wenn der Akku Ihres Endgerätes vollständig geladen ist erlischt die Status-LED (2) erst, wenn Sie das
Endgerät entfernen.
• Nehmen Sie Ihr Endgerät von dem Induktionsladebereich des Power Pack und schalten Sie dieses aus,
indem Die die Power-Taste zweimal kurz hintereinander drücken. Die LEDs (4) erlöschen.
Hinweis
• Das gleichzeitige Laden der Power Pack sowie die Nutzung des induktiven Ladens ist möglich.
• Das Power Pack wechselt in der Haltevorrichtung des Wireless Stand automatisch in den
Lademodus, sobald der Stand am Strom angeschlossen wird. Die Power Taste (9) auf der Unterseite
der Halterung ist in diesem Fall inaktiv. Ist der Wireless Stand nicht über die Stromversorgung
angeschlossen, kann das Power Pack über die Power Taste (9) durch einmaliges Drücken
angeschaltet werden. Drücken Sie die Power-Taste (9) zweimal, um das Power Pack wieder
auszuschalten.
4.2.2. Laden über den USB-C-Ausgang des Power Packs:
• Verbinden Sie das beiliegende USB-C-Ladekabel mit dem USB-C-Anschluss des Power Packs
(OUT 5V/2A, 9V/1,5A, 12V/1,1A) und mit dem USB-C-Anschluss Ihres Endgerätes (Handy,
Smartphone, etc.).
• Unter Umständen ist das beiliegende Lade-/ Verbindungskabel für den endgeräteseitigen USB-
Anschluss unpassend. Verwenden Sie dann das USB-Kabel des Endgerätes.
• Der Ladevorgang startet automatisch. Während des Ladevorgangs zeigen die LEDs (4) die noch
verfügbare Kapazität des Power Packs an.
• Der aktuelle Akku-Ladestatus Ihres Endgerätes wird auf diesem angezeigt.
• Beenden Sie den Ladevorgang und schalten Sie das Power Pack aus, indem Sie die Power-Taste
zweimal kurz hintereinander drücken. Die Status-LEDs erlöschen.
• Für den Fall, dass kein Endgerät angeschlossen wird, schaltet sich das Power Pack automatisch ab.
Warnung – Anschluss von Endgeräten
• Prüfen Sie vor Anschluss eines Endgerätes, ob dieses mit der Stromabgabe des Power Packs
ausreichend versorgt werden kann.
• Stellen Sie sicher, dass die gesamte Stromaufnahme des angeschlossenen Endgerätes 2000mA nicht
überschreitet.
• Beachten Sie die Hinweise in der Bedienungsanleitung Ihres Endgerätes.
• Beachten Sie unbedingt die dort aufgeführten Angaben und Sicherheitshinweise zur
Stromversorgung Ihrer Geräte.
Hinweis – Optimiertes Laden
Optimiertes Laden bedeutet, dass das Power Pack das angeschlossene Endgerät erkennt, mit der
optimalen Stromstärke versorgt und dadurch die Ladezeit auf ein Minimum reduziert. Beachten Sie,
dass die jeweilige Stromabgabe des Powerpacks maximal 2000 mA beträgt.

10
4.2.3. Laden von Endgeräten mit dem 2in1 Wireless Stand
4.2.3.1. Laden von Endgeräten mit der Induktiven Ladefunktion
• Der 2in1 Wireless Stand verfügt über einen Induktionsladebereich (5W) für Apple Airpods oder andere
Kopfhörer, welche mit der induktiven Ladetechnologie geladen werden können.
• Legen Sie, um Ihr Endgerät zu laden, dieses auf den Induktivladebereich (10). Der Ladevorgang startet
automatisch. Die weiße Status-LED (11) signalisiert die Ladefunktion.
4.2.3.2 Laden von Endgeräten mit dem USB-C-Anschluss des Wireless Stand
• Es können auch Endgeräte an der seitlichen USB-C-Buchse (12) des Wireless Stand geladen werden
(OUT 5V/1A).
• Der Ausgang ist auch für die Verwendung eines Smartwatch-Ladepads geeignet. Bitte beachten Sie,
dass dabei die maximale Ausgangsleitung von 5W nicht überschritten wird.
5. Wartung und Pflege
Reinigen Sie dieses Produkt nur mit einem fusselfreien, leicht feuchten Tuch und verwenden Sie keine
aggressiven Reiniger.
6. Haftungsausschluss
Die Hama GmbH & Co KG übernimmt keinerlei Haftung oder Gewährleistung für Schäden, die aus
unsachgemäßer Installation, Montage und unsachgemäßem Gebrauch des Produktes oder einer
Nichtbeachtung der Bedienungsanleitung und/oder der Sicherheitshinweise resultieren.
7. Technische Daten
Wireless Stand
USB-C Eingang 9V 3A, 12V 2.5A, 15V 2A
USB-C-Ausgang 1 (Power Pack) 5V 2A, 9V 2A
Inudktionsausgang Stand 5W (max.)
USB-C-Ausgang 2 (Extern) 5V 1A
Ausgang gesamt 5V 1A
MagPower 5
USB-C Eingang 5V 2A, 9V 1.5A
USB-C-Ausgang 5V 2A, 9V 1.5A, 12V 1.1A
Inudktionsausgang 10W (max.)
Ausgang gesamt 5V 2A
Batterietyp 3,7V/Li-Po
Min. Kapazität 4995 mAh/18,48Wh
Typ. Kapazität 5000mAh / 18,5Wh
Nutzkapazität* 3266mAh@5V 2A

11
* Die Nutzkapazität ist die an den Ausgangsbuchsen entnehmbare Kapazität, gemessen bei 5V
Ausgangsspannung und einem Entnahmestrom von 2A.
Ladegerät PD30W
Angaben nach Verordnung (EU) 2019/1782
Handelsmarke, Handelsregisternummer, Anschrift
Hama, HRA12159,
Dresdner Str. 9,
86653 Monheim, Germany
Modellkennung 00201696
Eingangsspannung 100-240 V
Eingangswechselstromfrequenz 50/60 Hz
Ausgangsspannung/ Ausgangsstrom/
Ausgangsleistung
5,0 V DC/ 3,0 A/ 15,0 W
9,0 V DC/ 3,0 A/ 27,0 W
12,0 V DC/ 2,5 A/ 30,0 W
15,0 V DC/ 2,0 A/ 30,0 W
20,0 V DC/ 1,5 A/ 30,0 W
PPS:
3,3-11,0 V DC/ 3,0 A/ 9,9-30,0 W max.
3,3-16,0 V DC/ 2,0 A/ 6,6-30,0 W max.
Durchschnittliche Ezienz im Betrieb 78,6 %
Ezienz bei geringer Last (10 %) 75,6 %
Leistungsaufnahme bei Nulllast 0,10 W
8. Declaration of Conformity
Hama GmbH & Co KG hereby declares that the radio equipment type [00201696] is in
compliance with Directive 2014/53/EU. The full text of the EU declaration of conformity is
available at the following internet address:
www.hama.com->00201696->Downloads.
MagPower 5
Frequenzband/Frequenzbänder 110kHz – 205kHz
Abgestrahlte maximale Sendeleistung 1.24 dBμA/m at 3m
Wireless stand
Frequenzband/Frequenzbänder 110kHz – 205kHz
Abgestrahlte maximale Sendeleistung 0.124dBμA/m at 0.15m

12 12
Nous vous remercions d’avoir choisi un produit Hama !
Veuillez prendre le temps de lire l’ensemble des remarques et consignes suivantes. Veuillez conserver ce
mode d’emploi à portée de main an de pouvoir le consulter en cas de besoin. Transmettez-le au nouveau
propriétaire avec l’appareil le cas échéant.
1. Explication des symboles d’avertissement et des remarques
Avertissement
Ce symbole est utilisé pour indiquer des consignes de sécurité ou pour attirer votre attention sur des
dangers et risques particuliers.
Remarque
Ce symbole est utilisé pour indiquer des informations supplémentaires ou des remarques importantes.
2. Contenu de l’emballage
• Power Pack "MagPower 5"
• Socle sans l2en1
• Câble de chargement USB-C
• Chargeur PD30W
• Le présent mode d’emploi
3. Consignes de sécurité
• Protégez le produit de toute saleté, humidité, surchauffe et utilisez-le uniquement dans des
environnements secs.
• Cet appareil, comme tout appareil électrique, doit être gardé hors de portée des enfants !
• Protégez le produit des secousses violentes et évitez tout choc ou toute chute.
• N’utilisez pas le produit en dehors des limites de puissance indiquées dans les caractéristiques
techniques.
• Ne tentez pas d’ouvrir le produit en cas de détérioration et cessez de l’utiliser.
• Recyclez les matériaux d’emballage conformément aux prescriptions locales en vigueur.
• La batterie est installée de manière permanente et ne peut pas être retirée ; éliminer l’ensemble du
produit conformément aux dispositions légales.
• N’apportez aucune modication au produit. Toute modication vous ferait perdre vos droits de
garantie.
• Ne jetez pas la batterie ou le produit au feu.
• Ne modiez pas et/ou ne déformez/chauffez/démontez pas les batteries/piles.
• N’utilisez pas le produit à proximité immédiate d’un chauffage, d’autres sources de chaleur ou à la
lumière directe du soleil.
• N’utilisez pas le produit dans des zones où les produits électroniques ne sont pas autorisés.
• Ne tentez pas de réparer le produit vous-même ni d’effectuer des travaux d’entretien. Déléguez tous
travaux d’entretien à des techniciens qualiés.
Avertissement - Aimants
• Veillez à ce qu’une personne portant un stimulateur cardiaque ne s’approche des aimants. Les
aimants sont susceptibles d’inuencer négativement le fonctionnement de stimulateurs cardiaques.
• Ne placez aucune carte bancaire ou similaire munie d’une piste magnétique ou aucun objet
sensible au magnétisme sur le produit. Les données des cartes sont susceptibles d’être
endommagées, voire supprimées.
Avertissement
Assurez-vous qu’aucune pièce métallique ne se trouve au dos de l’appareil (par ex. plaque métallique
pour support magnétique). Le métal chauffe très fortement dans la zone de chargement à induction et
peut endommager l’appareil et/ou le Power Pack.
FMode d‘emploi

13
4. Fonctionnement
• Pour l’alimentation en électricité, connectez le socle sans l 2 en 1 au chargeur PD 30W fourni.
• Pour ce faire, connectez le câble USB-C fourni au chargeur et à l’entrée USB-C (5) à l’arrière du socle
sans l 2 en 1.
4.1. Chargement du MagPower 5
• Faites glisser le Power Pack MagPower 5 dans le support (6) du socle sans l 2 en 1, la zone de
chargement par induction étant orientée vers l’avant.
• La che USB (7) intégrée dans le support se connecte alors au port USB-C intégré du Power Pack en
émettant un clic.
• La charge du Power Pack démarre automatiquement dès que le socle sans l 2 en 1 est connecté au
chargeur PD 30 W fourni.
• Lorsque le chargement est terminé, la LED d’état s’éteint (8).
Remarque – Capacité
Si le Power Pack est chargé dans le support, l’indicateur de capacité n’est pas visible La fonction de
chargement est uniquement indiquée par la LED d’état blanche (8) située à l’avant du support.
• Sinon lancez le processus de chargement du Power Pack en raccordant le câble USB-C fourni au port
USB-C du Power Pack (IN 5 V/2A ou 9 V/1,1A) et à un chargeur USB adapté. Reportez-vous au mode
d’emploi du chargeur USB que vous utilisez.
• Le processus de charge se termine automatiquement.
• Chargez complètement le Power Pack une fois avant sa première utilisation.
Remarque – Capacité
• Pendant le processus de charge du Power Pack, la capacité est achée en permanence.
• Chaque LED (4) correspond à 25 % de la capacité. Une LED allumée en continu indique la capacité
déjà atteinte. Si trois LED sont allumées et si la quatrième clignote, le Power Pack est au moins
chargé à 75 %.
• Si les quatre LED (4) sont allumées, la capacité complète est disponible.
• Appuyez sur la touche du Power Pack an d’allumer ce dernier, de consulter sa capacité réelle et de
démarrer la fonction sans l.
• Le Power Pack s’éteint automatiquement après environ 40 secondes d’inutilisation. Appuyez deux
fois sur la touche Power pour éteindre le Power Pack manuellement. Si le Power Pack s’éteint,
l’achage LED s’éteint également.
Avertissement - Batterie
• Ne chargez pas le Power Pack via votre PC ou ordinateur portable. Les courants de charge
pourraient endommager le port USB de ces appareils.
• Utilisez exclusivement un chargeur approprié ou une connexion USB pour la recharge.
• N’utilisez plus des chargeurs ou des ports USB défectueux et n’essayez pas de les réparer.
• Ne surchargez ou ne déchargez pas totalement le produit.
• Évitez le stockage, le chargement et l’utilisation du produit à des températures extrêmes et à des
pressions atmosphériques extrêmement basses (comme en haute altitude par exemple).
• Rechargez régulièrement (au moins tous les trois mois) si l’appareil est entreposé pendant une
période prolongée.
4.2. Chargement de terminaux avec le MagPower 5 Power Pack
4.2.1. Chargement sans fil avec la zone de chargement à induction :
• Allumez d’abord le Power Pack via la touche Power située sur la partie inférieure de la prise permet
d’allumer l’appareil.
• La LED de fonctionnement (2) bleue signale brièvement que le Power Pack est prêt, puis s’éteint.

14
• Placez le dos de l’appareil sur la zone de chargement à induction (B).
• Le Power Pack "MagPower 5" est compatible avec la technologie Apple MagSafe. Les aimants intégrés
au Power Pack et à l’iPhone garantissent automatiquement que l’appareil est correctement aligné et
en place.
• Veuillez également placer tous les autres smartphones qui prennent en charge la fonction de
chargement par induction sur la zone de chargement par induction (B). Dans ce cas, cependant, la
xation automatique et centrale de l’appareil n’est pas nécessaire.
• Le processus de charge commence dès qu’un champ d’induction ecace est obtenu. La LED d’état (2)
s’allume en bleu. Le statut de charge actuel est aché sur votre appareil.
• Si aucune connexion par induction ne peut être établie, changez, éventuellement, la position de votre
appareil (B). (Pour tous les smartphones qui ne disposent pas de la technologie MagSafe)
• Lorsque la batterie de votre terminal est complètement chargée, la LED d’état (2) ne s’éteint que
lorsque vous retirez le terminal.
• Retirez votre appareil de la zone de chargement par induction du Power Pack et éteignez-le en
appuyant sur la touche Power deux fois de suite brièvement. Les LED (4) s’éteignent.
Remarque
• Le chargement du Power Pack ainsi que l’utilisation de la charge par induction simultanément sont
possibles.
• Le Power Pack passe automatiquement en mode de charge dans le support du socle sans l dès
que le socle est branché sur le secteur. La touche Power (9) sur la partie inférieure du support est
inactive dans ce cas. Si le socle sans l n’est pas connecté à l’alimentation en électricité, il est
possible de mettre en marche le Power Pack en appuyant une fois sur la touche Power (9). Appuyez
deux fois sur la touche Power (9) pour éteindre le Power Pack.
4.2.2. Chargement via la sortie USB-C du Power Pack :
• Raccordez le câble USB-C fourni au port USB-C du Power Pack
(OUT 5V/2A, 9V/1,5A, 12V/1,1A) et au port USB-C de votre appareil (portable, smartphone, etc.).
• Dans certains cas, le câble de charge/raccordement fourni ne convient pas pour le port USB de
l’appareil nal. Utilisez alors le câble USB de l’appareil nal.
• Le processus de charge démarre automatiquement. Pendant le processus état, les LED (4) achent la
capacité disponible du Power Pack.
• Le statut de charge actuel de la batterie de votre appareil nal est aché sur ce dernier.
• Mettez n au processus de charge et éteignez le Power Pack en appuyant sur la touche Power deux fois
de suite brièvement. Les LED d’état s’éteignent alors.
• Si aucun appareil n’est raccordé, le Power Pack s’éteint automatiquement.
Avertissement : connexion d’appareils naux
• Avant toute connexion de l’appareil, vériez qu’il peut être susamment alimenté par le Power Pack.
• Assurez-vous que la consommation de courant totale de l’appareil raccordé ne dépasse pas
2000mA.
• Respectez les consignes gurant dans le mode d’emploi de votre appareil nal.
• Respectez impérativement les informations qui y sont mentionnées et les consignes de sécurité
relatives à l’alimentation en électricité de votre appareil.
Remarque – Chargement optimisé
Le chargement optimisé signie que le Power Pack reconnaît l’appareil raccordé et lui fournit le courant
de charge optimal ce qui permet au temps de charge d’être réduit au minimum. Notez que le courant
de sortie du Power Pack est au maximum de 2 000 mA.

15
4.2.3. Chargement des appareils avec le socle sans fil 2 en 1
4.2.3.1. Chargement des appareils avec la fonction de chargement par induction
• Le socle sans l 2 en 1 dispose d’une zone de chargement par induction (5 W) pour les Apple Airpods
ou d’autres écouteurs qui peuvent être chargés avec la technologie de chargement par induction.
• Pour charger l’appareil, placez le dos de ce dernier sur la zone de chargement par induction (10). Le
processus de charge démarre automatiquement. La LED d’état blanche (11) signale la fonction de
charge.
4.2.3.2 Chargement d’appareils avec le port USB-C du socle sans fil
• Il est également possible de charger des terminaux sur la prise USB-C latérale (12) du socle sans l
(OUT 5 V/1 A).
• La sortie est également adaptée à l’utilisation d’un chargeur de montre intelligente. Veuillez noter que
la puissance de sortie maximale de 5 W ne doit pas être dépassée.
5. Soins et entretien
Nettoyez le produit uniquement à l’aide d’un chiffon non pelucheux légèrement humide ; évitez tout
détergent agressif.
6. Exclusion de responsabilité
La société Hama GmbH & Co KG décline toute responsabilité en cas de dommages provoqués par une
installation, un montage ou une utilisation non conformes du produit ou encore provoqués par le non-
respect des consignes du mode d’emploi et/ou des consignes de sécurité.
7. Caractéristiques techniques
MagPower 5
Entrée USB-C 9 V 3 A, 12 V 2,5 A, 15 V 2 A
Sortie USB-C 1 (Power Pack) 5V 2A, 9V 2A
Socle sortie induction 5W (max.)
Sortie USB-C 2 (externe) 5V 1A
Sortie totale 5V 1A
Socle sans l
Entrée USB-C 5V 2A, 9V 1,5A
Sortie USB-C 5V2A, 9V 1,5A, 12V 1,1A
Sortie induction 10 W (max.)
Sortie totale 5V2A
Type de pile 3,7 V/Li-Po
Capacité min. 4 995mAh/18,48 Wh
Capacité type 5 000mAh/18,5 Wh
Capacité utile* 3 266mAh@5V 2A
* La capacité utile est la capacité disponible au niveau des prises de sortie, mesurée à 5 V.
La tension de sortie et un courant absorbé de 2 A.

16
Chargeur PD30W
Informations conformément au règlement (UE)
2019/1782
Marque commerciale, numéro de registre du
commerce, adresse
Hama, HRA12159,
Dresdner Str. 9,
86653 Monheim, Allemagne
Identication du modèle 00201696
Tension d’entrée 100-240 V
Fréquence du courant alternatif 50/60 Hz
Tension de sortie/courant de sortie/puissance
de sortie
5,0 V CC/3,0 A/15,0 W
9,0 V CC/3,0 A/27,0 W
12,0 V CC/2,5 A/30,0 W
15,0 V CC/2,0 A/30,0 W
20,0 V CC/1,5 A/30,0 W
PPS :
3,3-11,0 V CC/3,0 A/ 9,9-30,0 W max.
3,3-16,0 V CC/2,0 A/ 6,6-30,0 W max.
Ecacité moyenne en fonctionnement 78,6 %
Ecacité à faible charge (10 %) 75,6 %
Consommation d’énergie à vide 0,10 W
8. Déclaration de conformité
Hama GmbH & Co KG déclare par la présente que le type d’équipement radio [00201696] est
conforme à la Directive 2014/53/EU. Le texte intégral de la déclaration de conformité de l’UE
est disponible à l’adresse Internet suivante :
www.hama.com->00201696->Downloads.
MagPower 5
Bandes de fréquences 110 kHz – 205 kHz
Puissance d’émission émise maximale 1.24 dBμA/m à 3m
Wireless stand
Bandes de fréquences 110 kHz – 205 kHz
Puissance d’émission émise maximale 0.124dBμA/m à 0.15m

17
Gracias por adquirir un producto de Hama.
Lea primero las siguientes instrucciones e indicaciones. Después, guarde estas instrucciones de manejo
en un lugar seguro para poder consultarlas cuando sea necesario. Si vende el aparato, entregue estas
instrucciones de manejo al nuevo propietario.
1. Explicación de los símbolos de aviso y de las indicaciones
Advertencia
Se utiliza para identicar indicaciones de seguridad o para llamar la atención sobre peligros y riesgos
especiales.
Nota
Se utiliza para indicar información adicional o indicaciones importantes.
2. Contenido del paquete
• Power Pack "MagPower 5"
• 2in1 Wireless Stand
• Cable de carga USB-C
• Cargador PD30W
• Este manual de instrucciones
3. Indicaciones de seguridad
• Proteja el producto de la suciedad, la humedad y el sobrecalentamiento y utilícelo solo en entornos
secos.
• Este producto, como todos los productos eléctricos, no debe estar en manos de los niños.
• No deje caer el producto ni lo someta a sacudidas fuertes.
• No utilice el producto fuera de los límites de potencia indicados en los datos técnicos.
• No abra el producto ni siga utilizándolo en caso de presentar daños.
• Deseche el material de embalaje de conformidad con las normativas locales vigentes en materia de
eliminación de desechos.
• La batería está instalada de manera permanente y no puede retirarse; deseche el producto de manera
íntegra de conformidad con las disposiciones legales vigentes.
• No realice cambios en el producto. Esto conllevaría la pérdida de todos los derechos de la garantía.
• No eche la batería o el producto al fuego.
• No modique ni deforme/caliente/desensamble las pilas recargables/baterías.
• No utilice el producto junto a sistemas de calefacción, otras fuentes de calor ni expuesto a la luz solar
directa.
• No utilice el producto en áreas donde no se permitan aparatos electrónicos.
• No intentes mantener ni reparar el producto por cuenta propia. Encargue cualquier trabajo de
mantenimiento al personal especializado competente.
Advertencia - Magnetismo
• Las personas con marcapasos deben mantenerse alejadas de los imanes. Los imanes pueden
afectar al funcionamiento del marcapasos.
• No coloque tarjetas EC o similares con bandas magnéticas u objetos magnéticamente sensibles
sobre el producto. Los datos de las tarjetas pueden sufrir deterioros o incluso borrarse por
completo.
Advertencia
Asegúrese de que no haya ninguna pieza metálica (por ejemplo, placa metálica para soporte
magnético) en la parte trasera de su terminal. El metal se calienta con mucha fuerza en el campo del
área de carga inductiva y puede dañar su terminal y/o el Power Pack.
EInstrucciones de uso

18
4. Funcionamiento
• Para la alimentación eléctrica, conecte el 2in1 Wireless Stand al cargador PD de 30 W suministrado.
• Para ello, conecte el cable USB-C suministrado al cargador y a la entrada USB-C (5) de la parte
posterior del 2in1 Wireless Stand.
4.1. Carga del MagPower 5
• Deslice el Power Pack MagPower 5 con la zona de carga por inducción orientada hacia delante por el
soporte (6) del 2in1 Wireless Stand.
• La clavija USB (7) integrada en el soporte se conecta al puerto USB-C integrado en el Power Pack con
un chasquido.
• La carga del Power Pack se inicia automáticamente en cuanto el 2in1 Wireless Stand se conecta al
cargador PD de 30 W incluido.
• El LED de estado (8) se apaga cuando la carga se ha completado.
Nota – Capacidad
Cuando el Power Pack se carga en el soporte, el indicador de capacidad no es visible. La función de
carga solo se indica a través del LED de estado blanco (8) situado en la parte frontal del soporte.
• Alternativamente, puede empezar a cargar el Power Pack conectando el cable USB-C suministrado a
la conexión USB-C del Power Pack (IN 5 V/2 A; 9 V/1,5 A) y a un cargador USB adecuado. Tenga en
cuenta las instrucciones de uso del cargador USB utilizado.
• El proceso de carga comienza y termina automáticamente.
• Antes de utilizar el Power Pack por primera vez, cárguelo completamente.
Nota – Capacidad
• Durante el proceso de carga del Power Pack, la capacidad se muestra de forma continua.
• Cada LED (4) equivale a un 25 % de capacidad. Cuando un LED está iluminado permanentemente
indica que la capacidad ya ha sido alcanzada. Con tres LED encendidos y el cuarto parpadeando, el
Power Pack está cargado al menos en un 75%.
• Si se encienden los cuatro LED (4), la capacidad total está disponible.
• Presione el botón del Power Pack para encenderlo y para saber su capacidad actual e iniciar la
función inalámbrica.
• El Power Pack se apaga automáticamente tras de 40 segundos de inactividad. Presione dos veces el
botón de encendido para apagar el Power Pack manualmente. Cuando se apaga el Power Pack, la
indicación LED también se apaga.
Aviso: batería
• No cargue el Power Pack desde su PC o portátil. La corriente de carga puede dañar el puerto USB
del PC o del portátil.
• Utilice únicamente cargadores adecuados o conexiones USB para cargar el dispositivo.
• No utilice cargadores ni conexiones USB defectuosos; asimismo, no intente repararlos.
• No sobrecargue ni descargue totalmente el producto.
• Evite almacenar, cargar o usar las pilas en condiciones de temperatura extrema o de presión
atmosférica extremadamente baja como, por ejemplo, a grandes alturas.
• Recárguelo con regularidad (al menos cada tres meses) si va a estar almacenado durante mucho
tiempo.
4.2. Carga de terminales con el Power Pack MagPower 5
4.2.1. Carga inalámbrica con el área de carga inductiva:
• Encienda primero el Power Pack con el botón de encendido situado en la parte inferior del alojamiento.
• El LED de función (2) azul indica brevemente que el Power Pack está listo y luego se apaga
• Ponga su terminal con la parte trasera situada sobre el área de carga inductiva (B).

19
• El Power Pack "MagPower 5" es compatible con la tecnología MagSafe de Apple. Los imanes
integrados en el Power Pack y en el iPhone garantizan automáticamente que el terminal esté
correctamente alineado y jado en su sitio.
• Coloque también todos los demás smartphones que admitan la función de carga inductiva en el
área de carga inductiva (B). En este caso, sin embargo, se omite la jación automática y central del
terminal.
• La carga comienza tan pronto como se establece un campo de inducción efectivo. El LED de estado (2)
se ilumina en azul. El estado de carga actual se muestra en su terminal.
• Si no se puede establecer ninguna conexión de inducción, cambie la posición de su terminal (B). (Para
todos los smartphones que no incluyen la tecnología MagSafe)
• Cuando la batería de su terminal está completamente cargada, el LED de estado (2) solo se apaga
cuando retira el terminal.
• Retire su terminal del área de carga por inducción del Power Pack y apague este último pulsando el
botón de encendido dos veces rápidamente. Los LED (4) se apagan.
Nota
• Es posible la carga simultánea del Power Pack y el uso de la carga inductiva.
• El Power Pack pasa automáticamente al modo de carga en la base del Wireless Stand en cuanto
éste se conecta a la corriente. En este caso, el botón de encendido (9) situado en la parte inferior
del soporte está inactivo. Si el Wireless Stand no está conectado a la red eléctrica, puede conectarse
el Power Pack a través del botón de encendido (9) pulsándolo una vez. Presione dos veces el botón
de encendido (9) para apagar de nuevo el Power Pack.
4.2.2. Carga a través de la salida USB-C del Power Pack:
• Conecte el cable USB-C suministrado al puerto USB-C del Power Pack
(OUT 5V/2A, 9V/1,5A, 12V/1,1A) y al puerto USB-C de su terminal (teléfono móvil, smartphone,
etc.).
• Es posible que el cable de carga/conexión suministrado no sea adecuado para el puerto USB del
dispositivo nal. Entonces, use el cable USB del terminal.
• El proceso de carga se inicia automáticamente. Durante el proceso de carga, los LED (4) indican la
capacidad disponible del Power Pack.
• Estos muestran el estado actual de carga de la batería de su terminal.
• Finalice el proceso de carga y apague el Power Pack pulsando el botón de encendido dos veces
rápidamente. Los LED de estado se apagan.
• Si no se conecta ningún terminal, el Power Pack se apaga automáticamente.
Advertencia - Conexión de dispositivos
• Antes de conectar un terminal, compruebe si la salida de corriente del Power Pack ofrece la
alimentación suciente.
• Asegúrese de que el consumo total de corriente del terminal conectado no supere los 2000 mA.
• Observe las indicaciones que se recojan en el manual de instrucciones de su terminal;
• Es esencial que cumpla con la información y las instrucciones de seguridad que guran allí para el
suministro de energía de sus dispositivos.
Nota – Carga optimizada
Carga optimizada signica que el Power Pack reconoce el terminal conectado, le suministra la corriente
óptima y, por lo tanto, reduce el tiempo de carga al mínimo. Tenga en cuenta que la salida de corriente
respectiva del Power Pack es de 2000 mA como máximo.
4.2.3. Carga de terminales con el 2in1 Wireless Stand
4.2.3.1. Carga de terminales con función de carga inductiva
• El 2in1 Wireless Stand cuenta con una zona de carga por inducción (5 W) para los Airpods de Apple u
otros auriculares que puedan cargarse mediante tecnología de carga inductiva.
Pagina se încarcă...
Pagina se încarcă...
Pagina se încarcă...
Pagina se încarcă...
Pagina se încarcă...
Pagina se încarcă...
Pagina se încarcă...
Pagina se încarcă...
Pagina se încarcă...
Pagina se încarcă...
Pagina se încarcă...
Pagina se încarcă...
Pagina se încarcă...
Pagina se încarcă...
Pagina se încarcă...
Pagina se încarcă...
Pagina se încarcă...
Pagina se încarcă...
Pagina se încarcă...
Pagina se încarcă...
Pagina se încarcă...
Pagina se încarcă...
Pagina se încarcă...
Pagina se încarcă...
Pagina se încarcă...
Pagina se încarcă...
Pagina se încarcă...
Pagina se încarcă...
Pagina se încarcă...
Pagina se încarcă...
Pagina se încarcă...
Pagina se încarcă...
Pagina se încarcă...
Pagina se încarcă...
Pagina se încarcă...
Pagina se încarcă...
Pagina se încarcă...
Pagina se încarcă...
Pagina se încarcă...
Pagina se încarcă...
Pagina se încarcă...
Pagina se încarcă...
Pagina se încarcă...
Pagina se încarcă...
Pagina se încarcă...
Pagina se încarcă...
Pagina se încarcă...
Pagina se încarcă...
Pagina se încarcă...
Pagina se încarcă...
Pagina se încarcă...
Pagina se încarcă...
Pagina se încarcă...
Pagina se încarcă...
Pagina se încarcă...
Pagina se încarcă...
Pagina se încarcă...
Pagina se încarcă...
Pagina se încarcă...
Pagina se încarcă...
Pagina se încarcă...
Pagina se încarcă...
Pagina se încarcă...
Pagina se încarcă...
Pagina se încarcă...
Pagina se încarcă...
Pagina se încarcă...
Pagina se încarcă...
Pagina se încarcă...
Pagina se încarcă...
Pagina se încarcă...
Pagina se încarcă...
Pagina se încarcă...
-
 1
1
-
 2
2
-
 3
3
-
 4
4
-
 5
5
-
 6
6
-
 7
7
-
 8
8
-
 9
9
-
 10
10
-
 11
11
-
 12
12
-
 13
13
-
 14
14
-
 15
15
-
 16
16
-
 17
17
-
 18
18
-
 19
19
-
 20
20
-
 21
21
-
 22
22
-
 23
23
-
 24
24
-
 25
25
-
 26
26
-
 27
27
-
 28
28
-
 29
29
-
 30
30
-
 31
31
-
 32
32
-
 33
33
-
 34
34
-
 35
35
-
 36
36
-
 37
37
-
 38
38
-
 39
39
-
 40
40
-
 41
41
-
 42
42
-
 43
43
-
 44
44
-
 45
45
-
 46
46
-
 47
47
-
 48
48
-
 49
49
-
 50
50
-
 51
51
-
 52
52
-
 53
53
-
 54
54
-
 55
55
-
 56
56
-
 57
57
-
 58
58
-
 59
59
-
 60
60
-
 61
61
-
 62
62
-
 63
63
-
 64
64
-
 65
65
-
 66
66
-
 67
67
-
 68
68
-
 69
69
-
 70
70
-
 71
71
-
 72
72
-
 73
73
-
 74
74
-
 75
75
-
 76
76
-
 77
77
-
 78
78
-
 79
79
-
 80
80
-
 81
81
-
 82
82
-
 83
83
-
 84
84
-
 85
85
-
 86
86
-
 87
87
-
 88
88
-
 89
89
-
 90
90
-
 91
91
-
 92
92
-
 93
93


în alte limbi
- Türkçe: Hama 00201696 Kullanım kılavuzu
- slovenčina: Hama 00201696 Používateľská príručka
- polski: Hama 00201696 Instrukcja obsługi
- italiano: Hama 00201696 Manuale utente
