Yamaha XF6 Manual de utilizare
- Categorie
- Controlere DJ
- Tip
- Manual de utilizare

MUSIC PRODUCTION SYNTHESIZER
Supplementary Manual
EN

2 New Functions in MOTIF XF Version 1.50
New Functions in MOTIF XF Version 1.50
Yamaha has upgraded the MOTIF XF firmware to Version 1.50, adding a new function. This supplement to the Owner’s Manual
describes this change.
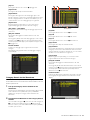
Additional New Effect Types
The MOTIF XF offers following new effect types.
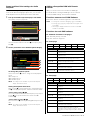
Reverb
The following new Reverb types are now available.
Insertion
The following new Insertion guitar effect types (in the Guitar Efx
category) are now available. The basic parameters are common
with the existing Distortion effect types, but these new effect
types reproduce more realistic and characteristic amplifier
sounds.
New Effect Parameters
Effect Type Description
HD HALL Reverb emulating the acoustics of a concert hall
with high-density sound.
HD ROOM Reverb emulating the acoustics of a room with
high-density sound.
HD PLATE Reverb emulating the acoustics of a metal plate
reverb unit with high-density sound.
Effect Type Description
US COMBO A simulation of an American combo amp.
JAZZ COMBO A simulation of a famous combo amp.
US HIGH GAIN A simulation of a famous American high gain
amp.
BRITISH LEAD A simulation of a famous British stack amp.
MULTI FX A simulation of multiple effect devices for guitar
sounds.
SMALL STEREO Stereo distortion effect for guitar sounds.
BRITISH COMBO A simulation of a famous British combo amp.
BRITISH LEGEND A simulation of another famous British legend
amp.
Parameter name Description
Balance Determines the sound balance of the low and
high frequencies.
Bass Determines the characteristics of the low
frequency.
Brilliant Determines the brilliance of the sound.
Chorus Determines the Chorus type.
Comp. Level Determines the level of the compressor.
Comp. Sustain Determines the ratio of the compressor.
Comp. SW Turns the compressor on or off.
Cut Determines the cutoff of the high frequency.
Delay Ctrl Determines the delay depth/level selected in
Delay SW.
Delay SW Determines the Delay or Modulation type.
Delay Time Determines the delay time.
Depth Determines the depth of the Chorus/Vibrato.
Distortion Determines the degree and character of the
distortion effect.
Dist EQ Determines the Equalizer type for the
distortion characteristics.
Dist Drive Determines the degree of the distortion effect.
Dist Presence Determines the characteristics of the
distortion effect.
Dist SW Determines the distortion type.
Dist Tone Determines the characteristics of the
distortion sound.
Dist Type Determines the distortion type.
Gain Determines the gain of the pre-amp.
Gain Boost Switches the gain of the power amp.
High Cut Cuts the sound of the high frequency.
High Damp Frequency Determines the decay of the high frequency.
High Treble Adjusts the characteristics of frequencies
higher than the Treble setting.
LFO Speed Determines the modulation speed.
Low Cut Cuts the sound of the low frequency.
Master Volume Determines the gain of the power amp.
Mic Position Determines the virtual distance of the
microphone from the speaker.
Mid Cut Cuts the sound of the middle frequency.
Mid Sweep Determines the cutoff frequency around
which the middle frequency sound is cut.
Mid Width Determines the width of middle frequencies
which are to be cut.
Middle Determines the characteristics of the middle
frequency.
Mode Determines the pre-amp type.
Normal Determines the volume for flat EQ settings.
Output Determines the output volume.
Panning Determines the spread of the chorus/vibrato
sound.
Phaser SW Determines the type of the phaser.
Plate Type Determines the type of the plate.
Preamp Determines the gain of the pre-amp.
Presence Boosts the high frequency sound.
Sensitivity Switches the gain of the pre-amp.
Speaker Air Boosts the special characteristics of the
speaker cabinet.
Speaker Type Determines the type of speaker.
Treble Determines the characteristics of the high
frequencies.
Tone Shift Determines the characteristics of the tone
control.
Type Determines the type of amplifier.
Vib Speed Determines the speed of the vibrato. This
parameter is available only when the Chorus
parameter is set to “On.”
Volume Determines the volume of the pre amp.
Wah Pedal Determines the position of the wah pedal.
Wah SW Determines the type of wah effect.
Parameter name Description

New Functions in MOTIF XF Version 1.50 3
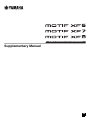
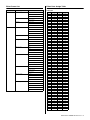
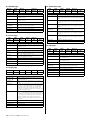
Effect Type List
Effect Parameter List
Reverb Block
[10] HD HALL
[11] HD ROOM
[12] HD PLATE
Cho, Var, Insertion Block
Category – Guitar Efx
[1] US COMBO
[2] JAZZ COMBO
[3] US HIGH GAIN
Category
(Display)
Effect Type
Name
Type (HEX)
REV CHO InsA InsB InsL Mas
MSB LSB
REVERB
REV HD HALL 01 03
REV HD ROOM 01 13
REV HD PLATE 01 21
GUITAR EFX
GTE US COMBO 07 40
GTE JAZZ
COMBO
07 41
GTE US HIGH
GAIN
07 42
GTE BRITISH
LEAD
07 43
GTE MULTI FX 07 44
GTE SMALL
STEREO
07 45
GTE BRITISH
COMBO
07 46
GTE BRITISH
LEGEND
07 47
No. Parameter Range Value
Table No
1 Reverb Time 0.3s – 30.0s (0 – 69) 4
2 Room Size 0 – 4 (0 – 4)
3 Initial Delay 0.1ms – 200.0ms (0 – 127) 5
4 High Damp Frequency 1.0kHz – 20.0kHz (34 – 60) 3
5—
6 High Ratio 0.0 – 1.0 (0 – 10)
7—
8—
9—
10 —
11 —
12 —
13 EQ Low Frequency 22Hz – 1.0kHz (1 – 34) 3
14 EQ Low Gain -12dB – 0dB – +12dB (52 – 76)
15 EQ High Frequency 500Hz – 18.0kHz (28 – 59) 3
16 EQ High Gain -12dB – 0dB – +12dB (52 – 76)
No. Parameter Range Value
Table No
1 Reverb Time 0.3s – 30.0s (0 – 69) 4
2 Plate Type 0 – 2 (0 – 2)
3 Initial Delay 0.1ms – 200.0ms (0 – 127) 5
4 High Damp Frequency 1.0kHz – 20.0kHz (34 – 60) 3
5—
6 High Ratio 0.0 – 1.0 (0 – 10)
7—
8—
9—
10 —
11 —
12 —
13 EQ Low Frequency 22Hz – 1.0kHz (1 – 34) 3
14 EQ Low Gain -12dB – 0dB – +12dB (52 – 76)
15 EQ High Frequency 500Hz – 18.0kHz (28 – 59) 3
16 EQ High Gain -12dB – 0dB – +12dB (52 – 76)
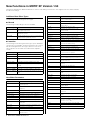
No. Parameter Range Value
Table No
1 Gain Boost Low, High (0 – 1)
2 Volume 0.0 – 10.0 (0 – 100)
3 Low Cut 0.0 – 10.0 (0 – 100)
4 Mid Cut 0.0 – 10.0 (0 – 100)
5 Mid Width 0.0 – 10.0 (0 – 100)
6 Mid Sweep 0.0 – 10.0 (0 – 100)
7 High Cut 0.0 – 10.0 (0 – 100)
8 Balance 0.0 – 10.0 (0 – 100)
9 Output 0 – 127 (0 – 127)
10 —
11 Speaker Type Off, BS 4x12, AC 2x12, AC
1x12, AC 4x10, BC 2x12,
AM 4x12, YC 4x12, JC
2x12, OC 2x12, OC 1x8
(0 – 10)
12 Speaker Air 0 – 2 (0 – 2)
13 Mic Position Center, Edge (0 – 1)
14 Presence 0.0 – 10.0 (0 – 100)
15 —
16 —
No. Parameter Range Value
Table No
1 Panning 0.0 – 10.0 (0 – 100)
2 Volume 0.0 – 10.0 (0 – 100)
3 Distortion Off, 0.1 – 10.0 (0 – 100)
4 Bass 0.0 – 10.0 (0 – 100)
5 Middle 0.0 – 10.0 (0 – 100)
6 Treble 0.0 – 10.0 (0 – 100)
7 High Treble 0.0 – 10.0 (0 – 100)
8—
9 Output 0 – 127 (0 – 127)
10 —
11 Speaker Type Off, BS 4x12, AC 2x12, AC
1x12, AC 4x10, BC 2x12,
AM 4x12, YC 4x12, JC
2x12, OC 2x12, OC 1x8
(0 – 10)
12 Speaker Air 0 – 2 (0 – 2)
13 Mic Position Center, Edge (0 – 1)
14 Chorus Off, Chorus, Vib (0 – 2)
15 Vib Speed 0.0 – 10.0 (0 – 100)
16 Depth 0.0 – 10.0 (0 – 100)
No. Parameter Range Value
Table No
1 Type Raw1, Vintage1, Modern1,
Raw2, Vintage2, Modern2
(0 – 5)
2 Gain 0.0 – 10.0 (0 – 100)
3—
4 Bass 0.0 – 10.0 (0 – 100)
5 Middle 0.0 – 10.0 (0 – 100)
6 Treble 0.0 – 10.0 (0 – 100)
7 Presence 0.0 – 10.0 (0 – 100)
8 Master Volume 0.0 – 10.0 (0 – 100)
9 Output 0 – 127 (0 – 127)
10 —
11 Speaker Type Off, BS 4x12, AC 2x12, AC
1x12, AC 4x10, BC 2x12,
AM 4x12, YC 4x12, JC
2x12, OC 2x12, OC 1x8
(0 – 10)
12 Speaker Air 0 – 2 (0 – 2)
No. Parameter Range Value
Table No

4 New Functions in MOTIF XF Version 1.50
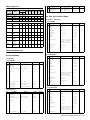
[4] BRITISH LEAD
[5] MULTI FX
[6] SMALL STEREO
[7] BRITISH COMBO
[8] BRITISH LEGEND
13 Mic Position Center, Edge (0 – 1)
14 —
15 —
16 —
No. Parameter Range Value
Table No
1 Type Crunch, Hi-Gain, Lead (0 – 2)
2 Preamp 0.0 – 10.0 (0 – 100)
3 Tone Shift Normal, Loose, Tight (0 – 2)
4 Bass 0.0 – 10.0 (0 – 100)
5 Middle 0.0 – 10.0 (0 – 100)
6 Treble 0.0 – 10.0 (0 – 100)
7 Presence 0.0 – 10.0 (0 – 100)
8 Master Volume 0.0 – 10.0 (0 – 100)
9 Output 0 – 127 (0 – 127)
10 —
11 Speaker Type Off, BS 4x12, AC 2x12, AC
1x12, AC 4x10, BC 2x12,
AM 4x12, YC 4x12, JC
2x12, OC 2x12, OC 1x8
(0 – 10)
12 Speaker Air 0 – 2 (0 – 2)
13 Mic Position Center, Edge (0 – 1)
14 —
15 —
16 —
No. Parameter Range Value
Table No
1 Comp. Sustain Off, 0.1 – 10.0 (0 – 100)
2 Wah SW Off, Wah Pedal, Auto+ Full,
Auto+ Mid, Auto+ Light,
Auto- Full, Auto- Mid, Auto-
Light
(0 – 7)
3 Wah Pedal 0 – 127 (0 – 127)
4 Dist SW Off, Overdrive, Distortion1,
Distortion2, Clean, Crunch,
Hi-Gain, Modern
(0 – 7)
5 Dist Drive 0.0 – 10.0 (0 – 100)
6 Dist EQ High Boost, Mid Boost,
Mid Cut 1, Mid Cut 2, Mid
Cut 3, Low Cut 1, Low Cut
2, High Cut, High/Low
(0 – 8)
7 Dist Tone 0.0 – 10.0 (0 – 100)
8 Dist Presence 0.0 – 10.0 (0 – 100)
9 Output 0 – 127 (0 – 127)
10 —
11 Speaker Type Off, Stack, Twin, Tweed,
Oldies, Modern, Mean,
Soft, Small, Dip1, Dip2,
Metal, Light
(0 – 12)
12 LFO Speed 0.1Hz – 9.925Hz (0 – 127) 39
13 Phaser SW Off, Standard, Wide, Vibe,
Tremolo
(0 – 4)
14 Delay SW Off, Delay M, Echo1 M,
Echo2 M, Chorus M, Dl
Chorus M, Flanger1 M,
Flanger2 M, Flanger3 M,
Delay St, Echo1 St, Echo2
St, Chorus St, Dl Chorus
St, Flanger1 St, Flanger2
St, Flanger3 St
(0 – 16)
15 Delay Ctrl 0 – 127 (0 – 127)
16 Delay Time 0 – 127 (0 – 127)
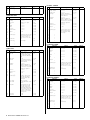
No. Parameter Range Value
Table No
No. Parameter Range Value
Table No
1 Comp. SW Off, On (0 – 1)
2 Comp. Sustain 0.0 – 10.0 (0 – 100)
3 Comp. Level 0.0 – 10.0 (0 – 100)
4 Dist Type Overdrive, Distortion1,
Distortion2, Clean, Crunch,
Hi-Gain, Modern
(1 – 7)
5 Dist Drive 0.0 – 10.0 (0 – 100)
6 Dist EQ High Boost, Mid Boost,
Mid Cut 1, Mid Cut 2, Mid
Cut 3, Low Cut 1, Low Cut
2, High Cut, High/Low
(0 – 8)
7 Dist Tone 0.0 – 10.0 (0 – 100)
8 Dist Presence 0.0 – 10.0 (0 – 100)
9 Output 0 – 127 (0 – 127)
10 —
11 Speaker Type Off, Stack, Twin, Tweed,
Oldies, Modern, Mean,
Soft, Small, Dip1, Dip2,
Metal, Light
(0 – 12)
12 —
13 —
14 —
15 —
16 —
No. Parameter Range Value
Table No
1 Mode Bright, Top Boost (0 – 1)
2 Normal 0.0 – 10.0 (0 – 100)
3 Brilliant 0.0 – 10.0 (0 – 100)
4 Bass 0.0 – 10.0 (0 – 100)
5—
6 Treble 0.0 – 10.0 (0 – 100)
7 Cut 0.0 – 10.0 (0 – 100)
8—
9 Output 0 – 127 (0 – 127)
10 —
11 Speaker Type Off, BS 4x12, AC 2x12, AC
1x12, AC 4x10, BC 2x12,
AM 4x12, YC 4x12, JC
2x12, OC 2x12, OC 1x8
(0 – 10)
12 Speaker Air 0 – 2 (0 – 2)
13 Mic Position Center, Edge (0 – 1)
14 —
15 —
16 —
No. Parameter Range Value
Table No
1 Sensitivity High, Low (0 – 1)
2 Preamp 0.0 – 10.0 (0 – 100)
3—
4 Bass 0.0 – 10.0 (0 – 100)
5 Middle 0.0 – 10.0 (0 – 100)
6 Treble 0.0 – 10.0 (0 – 100)
7 Presence 0.0 – 10.0 (0 – 100)
8 Master Volume 0.0 – 10.0 (0 – 100)
9 Output 0 – 127 (0 – 127)
10 —
11 Speaker Type Off, BS 4x12, AC 2x12, AC
1x12, AC 4x10, BC 2x12,
AM 4x12, YC 4x12, JC
2x12, OC 2x12, OC 1x8
(0 – 10)
12 Speaker Air 0 – 2 (0 – 2)
13 Mic Position Center, Edge (0 – 1)
14 —
15 —
16 —

New Functions in MOTIF XF Version 1.50 5
Effect Preset List Effect Data Assign Table
Table #39
LFO Speed
Category Effect Type Name Preset Name
Reverb HD Hall Large Hall
Medium Hall
Bright Hall
HD Room Room
Power Room
HD Plate Large Plate
Medium Plate
Rattle Plate
Guitar Efx US Combo Twin
Rich Clean
Thin Clean
Crunch
Jazz Combo Basic
Warm Chorus
US High Gain Dirty
Riff
Burn
Solo
British Lead Dirty
Drive
Gainer
Hard
Multi FX Distortion Solo
Distortion Basic
Overdrive Chorus
Crunch Wah
Oldies Delay
Vintage Echo
Small Stereo Distortion
Overdrive
Vintage Amp
Heavy Dist
British Combo Classic
Top Boost
Custom
Heavy
British Legend Blues
Heavy1
Heavy2
Clean
Dirty Clean
Data Value Data Value
0 0.100 64 1.009
1 0.103 65 1.051
2 0.105 66 1.093
3 0.110 67 1.125
4 0.113 68 1.167
5 0.118 69 1.22
6 0.124 70 1.262
7 0.129 71 1.304
8 0.131 72 1.346
9 0.137 73 1.409
10 0.142 74 1.451
11 0.147 75 1.514
12 0.152 76 1.556
13 0.158 77 1.619
14 0.166 78 1.682
15 0.171 79 1.745
16 0.176 80 1.808
17 0.184 81 1.872
18 0.192 82 1.956
19 0.197 83 2.019
20 0.205 84 2.103
21 0.213 85 2.166
22 0.221 86 2.25
23 0.229 87 2.334
24 0.237 88 2.418
25 0.247 89 2.502
26 0.255 90 2.608
27 0.265 91 2.692
28 0.276 92 2.776
29 0.284 93 2.902
30 0.294 94 2.986
31 0.308 95 3.112
32 0.318 96 3.238
33 0.329 97 3.365
34 0.342 98 3.491
35 0.352 99 3.617
36 0.368 100 3.743
37 0.379 101 3.869
38 0.394 102 4.037
39 0.410 103 4.164
40 0.426 104 4.332
41 0.442 105 4.500
42 0.457 106 4.668
43 0.473 107 4.837
44 0.489 108 5.005
45 0.51 109 5.173
46 0.526 110 5.383
47 0.547 111 5.552
48 0.568 112 5.804
49 0.589 113 5.972
50 0.61 114 6.224
51 0.631 115 6.393
52 0.657 116 6.645
53 0.673 117 6.897
54 0.704 118 7.15
55 0.725 119 7.402
56 0.757 120 7.738
57 0.789 121 7.991
58 0.81 122 8.327
59 0.841 123 8.58
60 0.873 124 8.916
61 0.904 125 9.253
62 0.946 126 9.589
63 0.978 127 9.925

6 New Functions in MOTIF XF Version 1.40
New Functions in MOTIF XF Version 1.40
Yamaha has upgraded the MOTIF XF firmware to Version 1.40, adding a number of new functions. This supplement to the Owner’s
Manual describes these changes.
• The company names and product names in this Manual are the trademarks or registered trademarks of their respective companies.
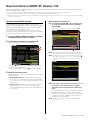
Support for CMC series controllers
The MOTIF XF can now be connected to the Steinberg CMC-PD
or CMC-FD, letting you record rhythm patterns to the MOTIF XF
by playing the CMC-PD or edit the Mixing parameters from the
CMC-FD.
Connection of CMC-PD or CMC-FD to MOTIF
XF
Plug the USB cable supplied with the CMC-PD or CMC-FD into
the USB TO DEVICE terminal of the MOTIF XF and the USB TO
HOST terminal of the CMC-PD or CMC-FD.
NOTE The CMC-PD or CMC-FD is bus-powered by the MOTIF XF
through the USB cable.
Playing the MOTIF XF from the CMC-PD
After connecting the CMC-PD to the MOTIF XF, you can play the
MOTIF XF from the CMC-PD simply by hitting the Pads. Hitting
the Pads transmits MIDI note numbers with velocity data to the
MOTIF XF, then sounds the Voice currently selected on the
MOTIF XF.
NOTE • Pressing the MOTIF XF keyboard lights the LED of the CMC-
PD Pad to which the corresponding MIDI note number is
assigned. (Note that the LED lamp does not light when Local
Switch is set to off or Internal Switch of the selected track is
set to off.)
• You can use a computer to assign MIDI note numbers and
velocity data to the Pads by using the editor bundled with the
CMC-PD.
• You can also change the Pad Bank, Velocity curve and
Velocity mode. For details about the operation of the CMC-
PD, refer to the CMC-PD Owner’s Manual.
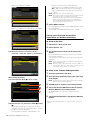
Controlling Mixing parameters from CMC-FD
You can control the Mixing parameters of the Song/Pattern mode
from the CMC-FD.
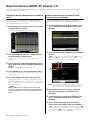
1 Connect the CMC-FD to the MOTIF XF.
2 Select the desired parameter for control.
Open the UTILITY Controller Assign display by pressing
[UTILITY], [F5] Control, then [SF3] Control.
At the CMC-Fader column, specify the target parameter of the
CMC-Fader from these parameters:
Volume, Pan, Reverb Send, Chorus Send, Dry Level, Assignable
Knob 1 Value, Assignable Knob 2 Value, Cutoff Frequency,
Resonance, AEG Attack Time, AEG Decay Time, AEG Sustain
Level, AEG Release Time, FEG Attack Time, FEG Decay Time,
FEG Sustain Level, FEG Release Time, FEG Depth, Portamento
Time
NOTE
The target parameter can be changed from the CMC-FD by
pressing [SHIFT]+[BANK E] or [SHIFT]+[BANK F].
3 Enter the Song/Pattern mode.
Now you can control the MOTIF XF Mixing parameters via the
CMC-FD.
Operations which can be controlled from
the CMC-FD
[CHANNEL E] or
[CHANNEL F]
Moves the current Part on the Mixing Play
display leftward or rightward.
[BANK E] or [BANK F] Changes the target Parts of the CMC-FD’s
four faders by four Parts.
Fader 1 Edits the specified parameter for Part 1, 5,
9, or 13.
[SHIFT]+Fader 1 top Switches mute on/off for Part 1, 5, 9, or 13.
[SHIFT]+Fader 1 bottom Switches solo on/off for Part 1, 5, 9, or 13.
Fader 2 Edits the specified parameter for Part 2, 6,
10, or 14.
[SHIFT]+Fader 2 top Switches mute on/off for Part 2, 6, 10, or 14.
[SHIFT]+Fader 2 bottom Switches solo on/off for Part 2, 6, 10, or 14.
Fader 3 Edits the specified parameter for Part 3, 7,
11, or 15.
[SHIFT]+Fader 3 top Switches mute on/off for Part 3, 7, 11, or 15.
[SHIFT]+Fader 3 bottom Switches solo on/off for Part 3, 7, 11, or 15.
Fader 4 Edits the specified parameter for Part 4, 8,
12, or 16.
[SHIFT]+Fader 4 top Switches mute on/off for Part 4, 8, 12, or 16.
[SHIFT]+Fader 4 bottom Switches solo on/off for Part 4, 8, 12, or 16.
[SHIFT]+[CHANNEL F] Switches between the fader function and
the level meter function. When the level
meter function is active, input velocity to
each part is indicated at the corresponded
CMC-FD faders.
[SHIFT]+[BANK E] or
[SHIFT]+[BANK F]
Select one before or the next CMC-FD
Fader parameter in the UTILITY Controller
Assign display.

New Functions in MOTIF XF Version 1.40 7
Automatic Mounting of the Network Drive
In the new version, turning the power on will automatically mount
the network drive which was mounted the previous time.
Turning Auto Remount on/off
Open the Network Drive Setup display by pressing [UTILITY],
[F1] General, then [SF4] AutoLoad. In this display, set Auto
Remount to on or off, then store the Utility setting.
After setting Auto Remount to on, mount the network drive, turn
the power off, then turn the power on again. MOTIF XF
automatically remounts the network drive.
NOTE • If the last mounted network drive cannot be found, MOTIF XF
will not mount the network drive automatically, even though
Auto Remount is set to on.
• If the instrument was turned off without mounting any network
drive, the MOTIF XF will not mount the network drive
automatically, even though Auto Remount is set to on.
New function of the [PERFORMANCE
CONTROL] button in the Master mode
When the Mode is set to “Song” or “Pattern” and Zone Switch is
set to “on” in the Master Play mode, the [PERFORMANCE
CONTROL] button works as follows:
• [1] – [8] buttons
Each of these will turn the Internal Switches of Zone 1 – 8 on/off.
• [9] – [16] buttons
Each of these will turn the External Switches of Zone 1 – 8 on/off.
NOTE The on/off status of the Internal Switch/External Switch can be
confirmed via the corresponding lamp.

8 New Functions in MOTIF XF Version 1.30
New Functions in MOTIF XF Version 1.30
Yamaha has upgraded the MOTIF XF firmware to Version 1.30, adding a number of new functions. This supplement to the Owner’s
Manual describes these changes.
• The company names and product names in this Manual are the trademarks or registered trademarks of their respective companies.
“News” function
With the MOTIF XF connected to Internet, this function
automatically downloads the latest information about the
instrument from a special Yamaha server and shows it on the
display.
1 Connect this instrument to the Internet.
When connecting via an ETHERNET cable, refer to the “Network
connection” in the Reference Manual.
When connecting via a Wireless USB-LAN Adaptor, refer to the
“Wireless Network MIDI function” of “New Functions in MOTIF XF
Version 1.20" in this manual. Note that the “Configuration Mode”
parameter should be set to “infrastructure.”
2 Turn the power on.
This operation will download the latest information from the
Yamaha server.
3 Confirm the downloaded information on the
display.
Press the [F5] button if “i” is shown at the [F5] location of the
Play display in the Voice, Performance, or Master mode. The
downloaded information is shown on the display. If the
information consists of several pages, the page will be changed
automatically in order every few seconds.
Press any button other than [INC/YES] and [DEC/NO] buttons to
exit from the information display. Once the latest information is
shown, the “i” indication disappears.
News-related parameters
Press [UTILITY] [F1] General [SF4] AudioLoad to call up
the Auto Load Setup display.
News
Turns the News function on or off. This is set to “on” by default;
however, it can be turned off as desired.
Interval
Determines the amount of time for which each page is shown
until the next page is called up. This parameter is useful if the
information consists of several pages.
Downloading the latest information
manually
Even when the News ( ) is set to “off,” the latest information can
be downloaded via panel operations.
1 On the Auto Load Setup display of the UTILITY,
move the cursor to News ( ) or Interval ( ).
2 If “DISP” appears on the [SF6] location, press
[SF6].
“i” indicator button

New Functions in MOTIF XF Version 1.30 9
Speed and Start Point settings for Audio
Playback
Now you can change the playback speed of the Audio Playback
in File mode without changing the pitch. Also, you can start
Audio Playback from any desired point in the audio data.
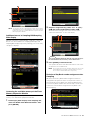
1 Call up the Audio Playback display in File mode.
Press [FILE], then press [F4] Audio.
Select the favorite audio file in the area ( ), then press [SF2]
Play ( ).
2 Set the parameters in the Audio Playback display.
To change the playback speed:
Set the Time-Stretch ( ) value to change the audio playback
speed.
50%: Half speed
100%: Original speed
200%: Double speed
NOTE
The settings here are available only in the Audio Playback
display, and cannot be stored.
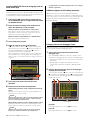
Setting the Playback Start Point:
While checking “Current playback time / Total playback time”
and Current playback position, follow the instructions below.
• Setting while playing ( ) ( )
As soon as playback reaches the desired point, press [SF3] Set
Locate ( ). The specified Start Point is shown as the
indication ( ).
• Setting while stopping ( ) ( )
Move the cursor to , then use [INC/YES]/[DEC/NO] or the data
dial.
NOTE
The settings here are available only in the Audio Playback
display, and cannot be stored.
Adding a Compatible DAW with Remote
Control
Now you can select Pro Tools in the Remote DAW type.
For details about selecting the DAW type, refer to “Remote
Control and MIDI settings” in the Reference Manual.
Functions common to all DAW Software
Refer to the “Remote Control Assignments” in the Data List.
NOTE • Selecting the channel for editing by [<]/[>] is unavailable.
• Pressing [<]/[>], [ ]/[ ] corresponds to moving the cursor
in the DAW.
• Switching the display format for the location on the DAW
software is unavailable.
Functions for each DAW software
Common Functions in all pages
Shift: Transmits [SHIFT] command.
Page List: Shows the Page List.
Fader page
Send page
Flip Pan E Channel Channel F Page List
Edit Mixer Default E Bank Bank F Shift
Buttons Functions
[F1] Edit Starts the Edit window, or brings it to the front of the
computer screen.
[F2] Mixer Starts the Mixer window, or brings it to the front of the
computer screen.
[F3] Default Pressing [9] – [16] while holding this button resets the
positions of the corresponding channel faders.
[F4] E Bank
[F5] Bank F
Scrolls through the track indication on the LCD of the
instrument in eight-channel jumps.
[SF1] Flip Assigns the functions of Sends A – E to faders and
knobs.
[SF2] Pan Assigns the Pan parameter of each channel to each
of the knobs on the instrument.
[SF3] E Channel
[SF4] Channel F
Scrolls through the channel indication on the LCD of
the instrument channel-by-channel.
Send D Send E Pan Assign Page List
Send A Send B Send C E Bank Bank F Shift
Buttons Functions
[F1] Send A Assigns the Send A parameter to the knob on the
instrument.
[F2] Send B Assigns the Send B parameter to the knob on the
instrument.
[F3] Send C Assigns the Send C parameter to the knob on the
instrument.
[F4] E Bank
[F5] Bank F
Scrolls through the track indication on the LCD of the
instrument in eight-channel jumps.
[SF1] Send D Assigns the Send D parameter to the knob on the
instrument.
[SF2] Send E Assigns the Send E parameter to the knob on the
instrument.
[SF3] Pan Assigns the Pan parameter of each channel to each
of the knobs on the instrument.
[SF4] Assign Switches Assign mode on/off. When the mode is set
to “on,” the outputs of the knobs modify the
destinations of each channel of Sends A – E. The
destination is actually changed only after exiting the
mode.

10 New Functions in MOTIF XF Version 1.30
Window page
Locate page
Plugin page
Automation page
Edit page
Mem-Loc Status Alt View - Page List
Edit Mixer Transport E Bank Bank F Shift
Buttons Functions
[F1] Edit Starts the Edit window, or brings it to the front of the
computer screen.
[F2] Mixer Starts the Mixer window, or brings it to the front of the
computer screen.
[F3] Transport Opens or closes the Transport window.
[F4] E Bank
[F5] Bank F
Scrolls through the track indication on the LCD of the
instrument in eight-channel jumps.
[SF1] Mem-Loc Opens or closes the Memory Location window.
[SF2] Status Opens or closes the Status window.
[SF3] Alt View Opens or closes the selected Plug-in window.
RTZ END Loop Punch Page List
Edit Mem-Loc On line IN OUT Shift
Buttons Functions
[F1] Edit Starts the Mixer window, or brings it to the front of the
computer screen.
[F2] Mem-Loc Opens or closes the Memory Location window.
[F3] On line Switches between internal sync and external sync.
[F4] IN Pressing this during playback sets the location at that
time to the starting point of the edit.
[F5] OUT Pressing this during playback sets the location at that
time to the end point of the edit.
[SF1] RTZ Moves the playback cursor to the top of the project.
[SF2] END Moves the playback cursor to the end of the project.
[SF3] Loop Switches loop playback on/off.
[SF4] Punch Switches punch-in recording on/off.
Select 1 Select 2 Select 3 Select 4 Page List
Page Page Alt View Param Assign Shift
Buttons Functions
[F1] Page
[F2] Page
Changes the page in the Insert Parameter mode or
Insert Assign mode.
[F3] Alt View Opens or closes the edit window of the selected
Insert.
[F4] Param Switches the Parameter mode on/off. When the mode
is set to “on,” the output from the knobs change the
parameters of the Insert. Knobs 1/2 correspond to
parameter1, knobs 3/4 correspond to parameter 2,
knobs 5/6 correspond to parameter 3, and knobs 7/8
correspond to parameter 4.
[F5] Assign Switches the Assign mode on/off. When the mode is
set to “on,” the outputs from the knob change Inserts
A – E. Knobs 1/2 correspond to Insert A or E, knobs 3/
4 correspond to Insert B, knobs 5/6 correspond to
Insert C, and knobs 7/8 correspond to Insert D.
Changes to the Insert are applied only after exiting
the mode.
[SF1] Select 1 Selects Insert A or E.
[SF2] Select 2 Selects Insert B.
[SF3] Select 3 Selects Insert C.
[SF4] Select 4 Selects Insert D.
Read Latch Status Suspend Page List
Off Touch Write E Bank Bank F Shift
Buttons Functions
[F1] Off Pressing [PRE 1] – [PRE 8] while holding this button
turns the Automation of the corresponding channel to
“Off.”
[F2] Touch Pressing [PRE 1] – [PRE 8] while holding this button
sets the Automation of the corresponding channel to
“Touch.”
[F3] Write Pressing [PRE 1] – [PRE 8] while holding this button
sets the Automation of the corresponding channel to
“Write.”
[F4] E Bank
[F5] Bank F
Scrolls through the track indication on the LCD of the
instrument in eight-channel jumps.
[SF1] Read Pressing [PRE 1] – [PRE 8] while holding this button
sets the Automation of the corresponding channel to
“Read.”
[SF2] Latch Pressing [PRE 1] – [PRE 8] while holding this button
sets the Automation of the corresponding channel to
“Latch.”
[SF3] Status Shows the Automation settings.
[SF4] Suspend Enables/disables Automaton for all channels.
Undo Cancel Mode Tool Page List
Edit Mixer Save E Bank Bank F Shift
Buttons Functions
[F1] Edit Starts the Edit window, or brings it to the front of
the computer screen.
[F2] Mixer Starts the Mixer window, or brings it to the front of
the computer screen.
[F3] Save Overwrites the project.
[F4] E Bank
[F5] Bank F
Scrolls through the track indication on the LCD of
the instrument in eight-channel jumps.
[SF1] Undo Executes the Undo operation.
[F6] Shift + [SF1] Undo Executes the Redo operation.
[SF2] Cancel Same as selecting “No” in the dialog.
[SF3] Mode Changes the Edit mode.
[SF4] Tool Changes the Edit tool.

New Functions in MOTIF XF Version 1.20 11
New Functions in MOTIF XF Version 1.20
Yamaha has upgraded the MOTIF XF firmware to Version 1.20, adding Wireless Network functions. This supplement to the Owner’s
Manual describes these changes.
• The company names and product names in this Manual are the trademarks or registered trademarks of their respective companies.
• MIDI communication performance may be affected by your network environment, including the network device.
• Operation of other wireless network devices in the area and the use of electrical devices such as a microwave oven in close proximity may also affect the MIDI
communication performance.
Wireless Network MIDI function
Now the MOTIF XF offers wireless MIDI connectivity with
Yamaha’s new iPad applications*. After connecting a compatible
Wireless USB LAN Adapter, you can send and receive MIDI
messages between the XF and the iPad.
*There are 4 new Yamaha iPad applications which expand the features of
MOTIF XF including Keyboard Arp & Drum Pad, Faders & XY Pad, Multi Editor
Essential and Voice Editor Essential (as of April, 2011).
1 Connect a Wireless USB LAN Adapter to the USB
TO DEVICE terminal of the instrument.
2 Set the Wireless Network in the Utility mode.
Press [UTILITY], [F1] General, then [SF3] Network.
Set Device ( ) to “wireless,” press [ENTER] then wait until the
“Complete” message appears.
Move the cursor to Wireless Setting ( ), then press [ENTER].
3 Make the connection setup.
Select the desired one from the following methods, then set the
related parameters.
•
Infrastructure mode: Data will be communicated via the
Access Point. Select this mode when you have an available
Access Point and you need to communicate with two or more
network devices.
•
Ad-hoc mode: Data will be communicated directly without
use of the Access Point. Select this mode when you are
communicating with iPad or other devices directly without any
Access Point.
When setting to Infrastructure:
3-1 At Configuration Mode ( ), select “infrastructure”
to call up the available Access Points in Wireless
Networks ( ).
Select the desired Access Point then press [ENTER].
NOTE
Pressing [SF6] INFO calls up the Utility Information display,
allowing you to confirm the network information of the instrument.
NOTE Confidential Access Points (like Stealth Mode) will not be shown
in the Wireless Networks. In such a case, press [SF5] Add ( ),
then enter SSID, Security, Key or Passphrase in the following
display.
3-2 If you select a security-free Access Point, go to 3-3.
If not, either of the following displays appears,
depending on the security protocol of the Access
Point.
Press [SF6] CHAR, enter the Key or Passphrase, and press
[ENTER]. An “Executing...” message appears and the
instrument starts connection to an Access Point. When the
instrument successfully establishes communication, a
“Completed” message appears.
NOTE
The Key or Passphrase can be entered with a USB ASCII
keyboard.

12 New Functions in MOTIF XF Version 1.20
When the Security protocol is WEP:
When the Security protocol is WPA, WPA2, or WPA/WPA2:
3-3 When the connection to an Access Point is
successful, “connected” appears as shown below.
When setting to Ad-hoc:
3-1 At Configuration Mode ( ), select “ad hoc.”
3-2 Enter the necessary characters to SSID ( ) and Key
( ).
Set a unique SSID that will not conflict with any other
computers. In general, the default SSID suffices, so there
should be no need to change this.
As an initial value for the Key, “yamahamotifxf” is set.
When you need to prevent your instrument from
unauthorized access via Wireless Network, set Security
( ) to “WEP” and specify the Key. You should assign a
unique combination for the Key that only you know and
recognize.
NOTE
SSID requires less than 32 character input.
NOTE Key requires character or hexadecimal number input. Character
input requires between five and thirteen characters.
Hexadecimal number input requires between ten and twenty-six
figures. The method of input (character or hexadecimal) is
automatically determined depending on the number of figures
entered and the actual entries themselves.
4 Set the MIDI parameter.
Press [UTILITY], [F5] Control, then [SF2] MIDI Network to call up
the Control display.
In this display, set the MIDI In/Out parameter to “network.”
Setting up the iPad and Yamaha iPad
applications for Wireless Networking
Setup of the iPad
1 Tap Settings > Wi-Fi in your iPad.
2 Set the Wi-Fi to “On.”
3 The available Access Points will be listed in the
display.
In case of Infrastructure mode, tap the same Access Point as
selected in the instrument.
In case of Ad-hoc mode, tap the same name as the SSID of the
instrument.
NOTE
You can confirm the SSID of the instrument by pressing [SF6]
INFO in the Utility mode.
NOTE When the Security of the instrument has been set to “WEP,” the
Key must input. In this case, enter the Key, as explained in step
3-2 of “When setting to Ad-hoc” in this manual.
Setup of the Yamaha iPad applications
1 Open the application in the iPad.
2 Open the Utility window by tapping the upper right
of the display.
NOTE For details about opening the Utility window, refer to the Owner's
Manuals of the respective applications.
3 Set MIDI Type to “wireless” in the Utility window.
4 Call up the Wireless MIDI Port window by tapping
Wireless MIDI Port in the Utility window.
All available MIDI Ports of the devices will be listed in the
window.
5 Tap the desired MIDI Port in the Wireless MIDI Port
window.
*Apple, iPad are trademarks of Apple Inc., registered in the U.S. and other
countries.

New Functions in MOTIF XF Version 1.20 13
Wireless Network File Sharing function
The MOTIF XF can now be connected to a network without an
Ethernet cable. You can save/load the files and record/playback
audio between the instrument and a computer drive connected
to the same network.
1 Set up Wireless Networking by executing step 1 to
3 on “Wireless Network MIDI function.”
2 Set up File Sharing between a computer by
executing the steps on the “Network Settings” in
the MOTIF XF Reference Manual.
For details about recording and playing back audio, refer to the
relevant Audio Record/Playback section in the Owner’s Manual
of the instrument.
NOTE When you set DHCP of MOTIF XF to “On” in Ad-hoc mode, the
instrument will be the DHCP administrator and assign IP
address to a computer.

14 New Functions in MOTIF XF Version 1.10
New Functions in MOTIF XF Version 1.10
Yamaha has upgraded the MOTIF XF firmware to Version 1.10, adding a number of new functions. This supplement to the Owner’s
Manual describes these changes.
Editing and storing a Sample Voice as a Mixing
Voice
You can now convert a Sample Voice to a Mixing Voice in the
Mixing Play display of the Song/Pattern mode, allowing you to
then edit the sampled audio as a Voice.
1 From the Mixing Play display, select a Part to which
a Sample Voice is assigned.
“VceConv” appears at the tab corresponding to [F6].
2 Press [F6] VceConv to convert a Sample Voice of
the selected Part to a Mixing Voice.
Completion of conversion calls up the Mixing Voice Store
window.
3 Use the data dial or [INC/YES]/[DEC/NO] to select a
Store destination number in the Mixing Voice Store
window.
NOTE Only the MIXV (Mixing Voice Bank) is available.
4 Press [ENTER] to call up the Confirmation dialog.
To cancel the Store operation, press [DEC/NO] to return to the
original display.
5 Press [INC/YES] to execute the Store operation.
After the Store has been completed, a “Completed” message
appears and operation returns to the Mixing Voice Play display.
You can confirm that the stored Mixing Voice is assigned to the
Part selected in step 1.
NOTICE
After the above operations, make sure to execute the Song/
Pattern Store. Otherwise, the Mixing Voice assignment will be
lost when turning the power off or selecting the different Song/
Pattern.
Editing a Waveform on the optional Flash
Memory Expansion Module
You can edit a Waveform on the optional Flash Memory
Expansion Module by using the newly added Sampling Job.
1 From the [F3] Other display of the Sampling Job,
select “04:Copy from Flash Memory” then press
[ENTER].
2 Copy a Waveform from the Module to the Sampling
memory.
At , select the source memory (FL1 or FL2). At , select a
Waveform. At , select whether or not the original wave is to be
deleted. After these operations, press [ENTER].
NOTE
This operation will cancel the link between all the Voices and the
original Waveform, then make a new link between the same
Voices and the Waveform copied to the Sampling memory.
3 Edit the Waveform in the sampling memory by
using the Sampling Edit and Sampling Job
operations.
4 From the [F3] Other display of the Sampling Job,
select “03:Copy to Flash Memory” then press
[ENTER].
5 Copy the edited Waveform from the sampling
memory to the Flash Memory Expansion Module.
At , confirm that the edited Waveform number is shown. At ,
select whether or not the original wave on the Sampling Memory
is to be deleted. At , select the destination memory (FL1 or
FL2). After these operations, press [ENTER].

New Functions in MOTIF XF Version 1.10 15
NOTE This operation will cancel the link between all the Voices and the
edited Waveform on the Sampling Memory, then make a new link
between the same Voices and the Waveform copied to the Flash
Memory Expansion Module.
Additional menus in Sampling Edit/Sampling
Main display
With this new version, “[F3] Normalize,” “[F4] Slice,” and “[F5]
Remix” have been added to the Sampling Edit display and
Sampling Main display respectively, allowing you to more easily
call up these displays.
Increasing the available memory of the Flash
Memory Expansion Module
A new Sampling Job now lets you increase the available
memory of the Flash Memory Expansion Module.
1 From the [F3] Other display of the Sampling Job,
select “05: Delete Same Name Waveforms” then
press [ENTER].
2 Select the target memory (“USR”, “FL1” or “FL2”)
at , then select the Waveform number at .
All the Waveforms having the same name are listed on the
“Same Name Waveforms” section of the display.
NOTICE
This Job will delete all Waveforms with the same name except for
the selected Waveform, even if they contain different data.
3 Press [ENTER] to execute the Job.
This operation will delete all the Waveforms with the same name
except for the selected Waveform.
NOTE
This operation will cancel the link status between the Voices and
deleted Waveforms, then make a new link between the same
Voices and the undeleted Waveforms respectively.
Revision of Key Bank number assignment after
Sampling
The method of the Key Bank number assignment has been
changed from the previous version. In the previous version, “1”
was assigned to the Key Bank of the latest Sampling and the
rest of the Key Bank numbers were increased by 1. In this new
version, the next number is assigned to the Key Bank of the
latest Sampling.

16 New Functions in MOTIF XF Version 1.10
Loading WAV/AIFF files and assigning each of
them to the keys
With this new version, you can load WAV or AIFF files in a single
folder at the same time. The loaded files will be assigned to the
keys in alphabetical order from the specified key. This allows you
to easily create your own custom Waveforms.
1 Connect the USB storage device containing the
desired WAV/AIFF files in a single folder to the USB
TO DEVICE terminal.
2 Enter the mode according to the destination to
which the Waveform is to be assigned.
When you want to assign the files to a User Voice:
Enter the Voice mode then select a Drum or Normal Voice.
Or alternately, enter the Performance mode then select the
Performance having an empty User Voice.
When you want to assign the files to a Sample Voice:
Enter the Song mode or Pattern mode.
3 Press [FILE] then [F1] File.
4 Make the settings for the Load operation.
At , select “WAV” or “AIFF.” At , select the desired folder
(directory) then any of the files. At , select the head Key to
which the first WAV/AIFF file is assigned. At , select the
destination memory of the Load operation.
When entering the Voice mode in step 2, select an Element to
which the Waveform is to be assigned. When entering other
modes in step 2, select a Part to which the empty User Voice is
assigned.
5 Press [F6] Load multi to execute the Load
operation.
6 Confirm the result of the Load operation.
When entering the Voice mode or Performance mode in
step 2:
Exit from the File mode then play the corresponding Voice or
Performance to check the sound.
NOTICE
After the above operations, make sure to execute the Voice Store
operation. Otherwise, the Voice will be lost when turning the
power off or selecting a different Voice.
When entering the Song mode or Pattern mode in step 2:
Exit from the File mode, select the corresponding Part of the
Song or Pattern then play the keyboard to check the sound.
NOTICE
After the above operations, make sure to execute the Song/
Pattern Store operation. Otherwise, the Sampling Voice
assignment will be lost when turning the power off or selecting a
different Song/Pattern.
Additional option in file loading operation
With this new version, you can load the file without the
Waveforms, even if the corresponding file contains Waveforms.
If you select “None” at “FL1” and “FL2,” the Load operation will
load the file, but not the Waveforms, to the Flash Memory
Expansion Module.
Category Search for Arpeggio Types
With this new version, you can use the Category Search function
to conveniently find desired Arpeggio Types.
1 Call up the Category Search window for the
Arpeggio Type.
Press [CATEGORY SEARCH] to call up the Category Search
window for the Arpeggio Type from any of the following displays:
• [F4] Arpeggio display of the Voice Play mode or Performance
Play mode
• [F2] ARP Main or [F3] ARP Other display of the Voice
Common Edit, Performance Part Edit, or Mixing Part Edit
mode
2 Find the desired Arpeggio Type on the Arpeggio
Category Search window.
Select the Main Category at , then select the Sub Category at
to call up the listed Arpeggio types at Arpeggio List. Move
the cursor to the desired Arpeggio Type then press [ENTER] to
finalize your selection.
[F1] Main
Pressing this will move the cursor to Main column.
[F2] Sub
Pressing this will move the cursor to Sub column.
Favorite window

New Functions in MOTIF XF Version 1.10 17
[F3] List
Pressing this will move the cursor to Arpeggio List.
[F4] Favorite
Pressing this will call up the Favorite window.
[F5] Set/Clear
Pressing this will register the current Arpeggio Type to the
Favorite Category, or remove the current Arpeggio Type from the
Favorite Category. With the checkboxes listed at left, you can
confirm whether or not each Arpeggio Type is registered.
[F6] All Clear
By pressing this then [INC/YES], you can remove all the
registered Arpeggio Types from the Favorite Category.
[SF1] ARP1 – [SF5] ARP5
Pressing each of these will change the Arpeggio Type from the
current one.
[SF6] All / Filtered
Pressing this will toggle the indication between “All” and
“Filtered.”
Pressing [SF6] All will show all the Arpeggio types of the current
Category on the Arpeggio List. Pressing [SF6] Filtered will
show only representative Types picked up from all Types on the
Arpeggio List.
Favorite window
Indicates the Arpeggio Types registered to the Favorite
Category.
Pressing [F4] Category will return to the Arpeggio Category
Search display.
Category Search for the Waveforms
With this new version, you can use the Category Search to find
desired Waveforms in the Normal Voice Element Edit mode and
Drum Key Edit mode.
1 Call up the Category Search window for the
Waveforms.
From the [F1] Oscillator display of the Normal Voice Element Edit
mode or Drum Voice Key Edit mode, press [CATEGORY
SEARCH] to call up the Category Search window for the
Waveforms.
2 Find the desired Waveform on the Category Search
window.
Select the Main Category at , then select the Sub Category at
to call up the listed Waveform types at Waveform List.
Move the cursor to your desired Waveform then press [ENTER]
to finalize your selection.
[F1] Main
Pressing this will move the cursor to Main column.
[F2] Sub
Pressing this will move the cursor to Sub column.
[F3] List
Pressing this will move the cursor to Waveform List.
[F4] Favorite
Pressing this will call up the Favorite window.
[F5] Set/Clear
Pressing this will register the current Waveform to the Favorite
Category, or remove the current Waveform from the Favorite
Category. With the checkboxes listed at left, you can confirm
whether or not each Waveform is registered.
[F6] All Clear
By pressing this then [INC/YES], you can remove all the
registered Waveforms from the Favorite Category.
[SF6] All / Filtered
Pressing this will toggle the indication between “All” and
“Filtered.”
Pressing [SF6] All will show all the Waveforms of the current
Category on the Waveform List. Pressing [SF6] Filtered will
show only representative Waveforms picked up from all
Waveforms on the Waveform List.
Favorite window
Indicates the Waveforms registered to the Favorite Category.
Pressing [F4] Category will return to the Waveform Search
display.
Favorite window

18
mdnsresponder
APPLE PUBLIC SOURCE LICENSE
Version 2.0 – August 6, 2003
Please read this License carefully before downloading this software. By
downloading or using this software, you are agreeing to be bound by the
terms of this License. If you do not or cannot agree to the terms of this License,
please do not download or use the software.
Apple Note: In January 2007, Apple changed its corporate name from “Apple
Computer, Inc.” to “Apple Inc.” This change has been reflected below and
copyright years updated, but no other changes have been made to the APSL
2.0.
1. General; Definitions. This License applies to any program or other work
which Apple Inc. (“Apple”) makes publicly available and which contains
a notice placed by Apple identifying such program or work as “Original
Code” and stating that it is subject to the terms of this Apple Public
Source License version 2.0 (“License”). As used in this License:
1.1 “Applicable Patent Rights” mean: (a) in the case where Apple is the
grantor of rights, (i) claims of patents that are now or hereafter acquired,
owned by or assigned to Apple and (ii) that cover subject matter
contained in the Original Code, but only to the extent necessary to use,
reproduce and/or distribute the Original Code without infringement; and
(b) in the case where You are the grantor of rights, (i) claims of patents
that are now or hereafter acquired, owned by or assigned to You and (ii)
that cover subject matter in Your Modifications, taken alone or in
combination with Original Code.
1.2 “Contributor” means any person or entity that creates or contributes to
the creation of Modifications.
1.3 “Covered Code” means the Original Code, Modifications, the
combination of Original Code and any Modifications, and/or any
respective portions thereof.
1.4 “Externally Deploy” means: (a) to sublicense, distribute or otherwise
make Covered Code available, directly or indirectly, to anyone other than
You; and/or (b) to use Covered Code, alone or as part of a Larger Work,
in any way to provide a service, including but not limited to delivery of
content, through electronic communication with a client other than You.
1.5 “Larger Work” means a work which combines Covered Code or portions
thereof with code not governed by the terms of this License.
1.6 “Modifications” mean any addition to, deletion from, and/or change to,
the substance and/or structure of the Original Code, any previous
Modifications, the combination of Original Code and any previous
Modifications, and/or any respective portions thereof. When code is
released as a series of files, a Modification is: (a) any addition to or
deletion from the contents of a file containing Covered Code; and/or (b)
any new file or other representation of computer program statements that
contains any part of Covered Code.
1.7 “Original Code” means (a) the Source Code of a program or other work
as originally made available by Apple under this License, including the
Source Code of any updates or upgrades to such programs or works
made available by Apple under this License, and that has been
expressly identified by Apple as such in the header file(s) of such work;
and (b) the object code compiled from such Source Code and originally
made available by Apple under this License
1.8 “Source Code” means the human readable form of a program or other
work that is suitable for making modifications to it, including all modules
it contains, plus any associated interface definition files, scripts used to
control compilation and installation of an executable (object code).
1.9 “You” or “Your” means an individual or a legal entity exercising rights
under this License. For legal entities, “You” or “Your” includes any entity
which controls, is controlled by, or is under common control with, You,
where “control” means (a) the power, direct or indirect, to cause the
direction or management of such entity, whether by contract or
otherwise, or (b) ownership of fifty percent (50%) or more of the
outstanding shares or beneficial ownership of such entity.
2. Permitted Uses; Conditions & Restrictions. Subject to the terms and
conditions of this License, Apple hereby grants You, effective on the date
You accept this License and download the Original Code, a world-wide,
royalty-free, non-exclusive license, to the extent of Apple’s Applicable
Patent Rights and copyrights covering the Original Code, to do the
following:
2.1 Unmodified Code. You may use, reproduce, display, perform, internally
distribute within Your organization, and Externally Deploy verbatim,
unmodified copies of the Original Code, for commercial or non-
commercial purposes, provided that in each instance:
(a) You must retain and reproduce in all copies of Original Code the
copyright and other proprietary notices and disclaimers of Apple as
they appear in the Original Code, and keep intact all notices in the
Original Code that refer to this License; and
(b) You must include a copy of this License with every copy of Source
Code of Covered Code and documentation You distribute or
Externally Deploy, and You may not offer or impose any terms on
such Source Code that alter or restrict this License or the recipients’
rights hereunder, except as permitted under Section 6.
2.2 Modified Code. You may modify Covered Code and use, reproduce,
display, perform, internally distribute within Your organization, and
Externally Deploy Your Modifications and Covered Code, for commercial
or non-commercial purposes, provided that in each instance You also
meet all of these conditions:
(a) You must satisfy all the conditions of Section 2.1 with respect to the
Source Code of the Covered Code;
(b) You must duplicate, to the extent it does not already exist, the notice
in Exhibit A in each file of the Source Code of all Your Modifications,
and cause the modified files to carry prominent notices stating that
You changed the files and the date of any change; and
(c) If You Externally Deploy Your Modifications, You must make Source
Code of all Your Externally Deployed Modifications either available to
those to whom You have Externally Deployed Your Modifications, or
publicly available. Source Code of Your Externally Deployed
Modifications must be released under the terms set forth in this
License, including the license grants set forth in Section 3 below, for
as long as you Externally Deploy the Covered Code or twelve (12)
months from the date of initial External Deployment, whichever is
longer. You should preferably distribute the Source Code of Your
Externally Deployed Modifications electronically (e.g. download from
a web site).
2.3 Distribution of Executable Versions. In addition, if You Externally Deploy
Covered Code (Original Code and/or Modifications) in object code,
executable form only, You must include a prominent notice, in the code
itself as well as in related documentation, stating that Source Code of the
Covered Code is available under the terms of this License with
information on how and where to obtain such Source Code.
2.4 Third Party Rights. You expressly acknowledge and agree that although
Apple and each Contributor grants the licenses to their respective
portions of the Covered Code set forth herein, no assurances are
provided by Apple or any Contributor that the Covered Code does not
infringe the patent or other intellectual property rights of any other entity.
Apple and each Contributor disclaim any liability to You for claims
brought by any other entity based on infringement of intellectual property
rights or otherwise. As a condition to exercising the rights and licenses
granted hereunder, You hereby assume sole responsibility to secure any
other intellectual property rights needed, if any. For example, if a third
party patent license is required to allow You to distribute the Covered
Code, it is Your responsibility to acquire that license before distributing
the Covered Code.
3. Your Grants. In consideration of, and as a condition to, the licenses
granted to You under this License, You hereby grant to any person or
entity receiving or distributing Covered Code under this License a non-
exclusive, royalty-free, perpetual, irrevocable license, under Your
Applicable Patent Rights and other intellectual property rights (other than
patent) owned or controlled by You, to use, reproduce, display, perform,
modify, sublicense, distribute and Externally Deploy Your Modifications
of the same scope and extent as Apple's licenses under Sections 2.1
and 2.2 above.
4. Larger Works. You may create a Larger Work by combining Covered
Code with other code not governed by the terms of this License and
distribute the Larger Work as a single product. In each such instance,
You must make sure the requirements of this License are fulfilled for the
Covered Code or any portion thereof.
5. Limitations on Patent License. Except as expressly stated in Section 2,
no other patent rights, express or implied, are granted by Apple herein.
Modifications and/or Larger Works may require additional patent
licenses from Apple which Apple may grant in its sole discretion.
6. Additional Terms. You may choose to offer, and to charge a fee for,
warranty, support, indemnity or liability obligations and/or other rights
consistent with the scope of the license granted herein (“Additional
Terms”) to one or more recipients of Covered Code. However, You may
do so only on Your own behalf and as Your sole responsibility, and not on
behalf of Apple or any Contributor. You must obtain the recipient's
agreement that any such Additional Terms are offered by You alone, and
You hereby agree to indemnify, defend and hold Apple and every
Contributor harmless for any liability incurred by or claims asserted
against Apple or such Contributor by reason of any such Additional
Terms.

19
7. Versions of the License. Apple may publish revised and/or new versions
of this License from time to time. Each version will be given a
distinguishing version number. Once Original Code has been published
under a particular version of this License, You may continue to use it
under the terms of that version. You may also choose to use such
Original Code under the terms of any subsequent version of this License
published by Apple. No one other than Apple has the right to modify the
terms applicable to Covered Code created under this License.
8. NO WARRANTY OR SUPPORT. The Covered Code may contain in whole
or in part pre-release, untested, or not fully tested works. The Covered
Code may contain errors that could cause failures or loss of data, and
may be incomplete or contain inaccuracies. You expressly acknowledge
and agree that use of the Covered Code, or any portion thereof, is at Your
sole and entire risk. THE COVERED CODE IS PROVIDED “AS IS” AND
WITHOUT WARRANTY, UPGRADES OR SUPPORT OF ANY KIND AND
APPLE AND APPLE'S LICENSOR(S) (COLLECTIVELY REFERRED TO AS
“APPLE” FOR THE PURPOSES OF SECTIONS 8 AND 9) AND ALL
CONTRIBUTORS EXPRESSLY DISCLAIM ALL WARRANTIES AND/OR
CONDITIONS, EXPRESS OR IMPLIED, INCLUDING, BUT NOT LIMITED
TO, THE IMPLIED WARRANTIES AND/OR CONDITIONS OF
MERCHANTABILITY, OF SATISFACTORY QUALITY, OF FITNESS FOR A
PARTICULAR PURPOSE, OF ACCURACY, OF QUIET ENJOYMENT, AND
NON INFRINGEMENT OF THIRD PARTY RIGHTS. APPLE AND EACH
CONTRIBUTOR DOES NOT WARRANT AGAINST INTERFERENCE WITH
YOUR ENJOYMENT OF THE COVERED CODE, THAT THE FUNCTIONS
CONTAINED IN THE COVERED CODE WILL MEET YOUR
REQUIREMENTS, THAT THE OPERATION OF THE COVERED CODE
WILL BE UNINTERRUPTED OR ERROR-FREE, OR THAT DEFECTS IN
THE COVERED CODE WILL BE CORRECTED. NO ORAL OR WRITTEN
INFORMATION OR ADVICE GIVEN BY APPLE, AN APPLE AUTHORIZED
REPRESENTATIVE OR ANY CONTRIBUTOR SHALL CREATE A
WARRANTY. You acknowledge that the Covered Code is not intended for
use in the operation of nuclear facilities, aircraft navigation,
communication systems, or air traffic control machines in which case the
failure of the Covered Code could lead to death, personal injury, or
severe physical or environmental damage.
9. LIMITATION OF LIABILITY. TO THE EXTENT NOT PROHIBITED BY LAW,
IN NO EVENT SHALL APPLE OR ANY CONTRIBUTOR BE LIABLE FOR
ANY INCIDENTAL, SPECIAL, INDIRECT OR CONSEQUENTIAL
DAMAGES ARISING OUT OF OR RELATING TO THIS LICENSE OR
YOUR USE OR INABILITY TO USE THE COVERED CODE, OR ANY
PORTION THEREOF, WHETHER UNDER A THEORY OF CONTRACT,
WARRANTY, TORT (INCLUDING NEGLIGENCE), PRODUCTS LIABILITY
OR OTHERWISE, EVEN IF APPLE OR SUCH CONTRIBUTOR HAS BEEN
ADVISED OF THE POSSIBILITY OF SUCH DAMAGES AND
NOTWITHSTANDING THE FAILURE OF ESSENTIAL PURPOSE OF ANY
REMEDY. SOME JURISDICTIONS DO NOT ALLOW THE LIMITATION OF
LIABILITY OF INCIDENTAL OR CONSEQUENTIAL DAMAGES, SO THIS
LIMITATION MAY NOT APPLY TO YOU. In no event shall Apple's total
liability to You for all damages (other than as may be required by
applicable law) under this License exceed the amount of fifty dollars
($50.00).
10. Trademarks. This License does not grant any rights to use the
trademarks or trade names “Apple”, “Mac”, “Mac OS”, “QuickTime”,
“QuickTime Streaming Server” or any other trademarks, service marks,
logos or trade names belonging to Apple (collectively “Apple Marks”) or
to any trademark, service mark, logo or trade name belonging to any
Contributor. You agree not to use any Apple Marks in or as part of the
name of products derived from the Original Code or to endorse or
promote products derived from the Original Code other than as expressly
permitted by and in strict compliance at all times with Apple’s third party
trademark usage guidelines which are posted at http://www.apple.com/
legal/guidelinesfor3rdparties.html.
11. Ownership. Subject to the licenses granted under this License, each
Contributor retains all rights, title and interest in and to any Modifications
made by such Contributor. Apple retains all rights, title and interest in
and to the Original Code and any Modifications made by or on behalf of
Apple (“Apple Modifications”), and such Apple Modifications will not be
automatically subject to this License. Apple may, at its sole discretion,
choose to license such Apple Modifications under this License, or on
different terms from those contained in this License or may choose not to
license them at all.
12. Termination.
12.1 Termination. This License and the rights granted hereunder will
terminate:
(a) automatically without notice from Apple if You fail to comply with any
term(s) of this License and fail to cure such breach within 30 days of
becoming aware of such breach;
(b) immediately in the event of the circumstances described in Section
13.5 (b); or
(c) automatically without notice from Apple if You, at any time during the
term of this License, commence an action for patent infringement
against Apple; provided that Apple did not first commence an action
for patent infringement against You in that instance.
12.2 Effect of Termination. Upon termination, You agree to immediately stop
any further use, reproduction, modification, sublicensing and distribution
of the Covered Code. All sublicenses to the Covered Code which have
been properly granted prior to termination shall survive any termination
of this License. Provisions which, by their nature, should remain in effect
beyond the termination of this License shall survive, including but not
limited to Sections 3, 5, 8, 9, 10, 11, 12.2 and 13. No party will be liable to
any other for compensation, indemnity or damages of any sort solely as a
result of terminating this License in accordance with its terms, and
termination of this License will be without prejudice to any other right or
remedy of any party.
13. Miscellaneous.
13.1 Government End Users. The Covered Code is a “commercial item” as
defined in FAR 2.101. Government software and technical data rights in
the Covered Code include only those rights customarily provided to the
public as defined in this License. This customary commercial license in
technical data and software is provided in accordance with FAR 12.211
(Technical Data) and 12.212 (Computer Software) and, for Department of
Defense purchases, DFAR 252.227-7015 (Technical Data – Commercial
Items) and 227.7202-3 (Rights in Commercial Computer Software or
Computer Software Documentation). Accordingly, all U.S. Government
End Users acquire Covered Code with only those rights set forth herein.
13.2 Relationship of Parties. This License will not be construed as creating an
agency, partnership, joint venture or any other form of legal association
between or among You, Apple or any Contributor, and You will not
represent to the contrary, whether expressly, by implication, appearance
or otherwise.
13.3 Independent Development. Nothing in this License will impair Apple’s
right to acquire, license, develop, have others develop for it, market and/
or distribute technology or products that perform the same or similar
functions as, or otherwise compete with, Modifications, Larger Works,
technology or products that You may develop, produce, market or
distribute.
13.4 Waiver; Construction. Failure by Apple or any Contributor to enforce any
provision of this License will not be deemed a waiver of future
enforcement of that or any other provision. Any law or regulation which
provides that the language of a contract shall be construed against the
drafter will not apply to this License.
13.5 Severability. (a) If for any reason a court of competent jurisdiction finds
any provision of this License, or portion thereof, to be unenforceable, that
provision of the License will be enforced to the maximum extent
permissible so as to effect the economic benefits and intent of the
parties, and the remainder of this License will continue in full force and
effect. (b) Notwithstanding the foregoing, if applicable law prohibits or
restricts You from fully and/or specifically complying with Sections 2 and/
or 3 or prevents the enforceability of either of those Sections, this License
will immediately terminate and You must immediately discontinue any
use of the Covered Code and destroy all copies of it that are in your
possession or control.
13.6 Dispute Resolution. Any litigation or other dispute resolution between You
and Apple relating to this License shall take place in the Northern District
of California, and You and Apple hereby consent to the personal
jurisdiction of, and venue in, the state and federal courts within that
District with respect to this License. The application of the United Nations
Convention on Contracts for the International Sale of Goods is expressly
excluded.
13.7 Entire Agreement; Governing Law. This License constitutes the entire
agreement between the parties with respect to the subject matter hereof.
This License shall be governed by the laws of the United States and the
State of California, except that body of California law concerning
conflicts of law.
Where You are located in the province of Quebec, Canada, the following
clause applies: The parties hereby confirm that they have requested that this
License and all related documents be drafted in English. Les parties ont exigé
que le présent contrat et tous les documents connexes soient rédigés en
anglais.
EXHIBIT A.
“Portions Copyright © 1999-2007 Apple Inc. All Rights Reserved.
This file contains Original Code and/or Modifications of Original Code as
defined in and that are subject to the Apple Public Source License Version 2.0
(the 'License'). You may not use this file except in compliance with the

20
License. Please obtain a copy of the License at http://
www.opensource.apple.com/apsl/ and read it before using this file.
The Original Code and all software distributed under the License are
distributed on an ‘AS IS’ basis, WITHOUT WARRANTY OF ANY KIND, EITHER
EXPRESS OR IMPLIED, AND APPLE HEREBY DISCLAIMS ALL SUCH
WARRANTIES, INCLUDING WITHOUT LIMITATION, ANY WARRANTIES OF
MERCHANTABILITY, FITNESS FOR A PARTICULAR PURPOSE, QUIET
ENJOYMENT OR NON-INFRINGEMENT. Please see the License for the
specific language governing rights and limitations under the License.”
dhcp
Copyright © 1996, 1998, 1999 The Internet Software Consortium.
All rights reserved.
Redistribution and use in source and binary forms, with or without
modification, are permitted provided that the following conditions are met:
1. Redistributions of source code must retain the above copyright notice, this
list of conditions and the following disclaimer.
2. Redistributions in binary form must reproduce the above copyright notice,
this list of conditions and the following disclaimer in the documentation and/
or other materials provided with the distribution.
3. Neither the name of The Internet Software Consortium nor the names of its
contributors may be used to endorse or promote products derived from this
software without specific prior written permission.
THIS SOFTWARE IS PROVIDED BY THE INTERNET SOFTWARE
CONSORTIUM AND CONTRIBUTORS “AS IS” AND ANY EXPRESS OR
IMPLIED WARRANTIES, INCLUDING, BUT NOT LIMITED TO, THE IMPLIED
WARRANTIES OF MERCHANTABILITY AND FITNESS FOR A PARTICULAR
PURPOSE ARE DISCLAIMED. IN NO EVENT SHALL THE INTERNET
SOFTWARE CONSORTIUM OR CONTRIBUTORS BE LIABLE FOR ANY
DIRECT, INDIRECT, INCIDENTAL, SPECIAL, EXEMPLARY, OR
CONSEQUENTIAL DAMAGES (INCLUDING, BUT NOT LIMITED TO,
PROCUREMENT OF SUBSTITUTE GOODS OR SERVICES; LOSS OF USE,
DATA, OR PROFITS; OR BUSINESS INTERRUPTION) HOWEVER CAUSED
AND ON ANY THEORY OF LIABILITY, WHETHER IN CONTRACT, STRICT
LIABILITY, OR TORT (INCLUDING NEGLIGENCE OR OTHERWISE) ARISING
IN ANY WAY OUT OF THE USE OF THIS SOFTWARE, EVEN IF ADVISED OF
THE POSSIBILITY OF SUCH DAMAGE.
This software has been written for the Internet Software Consortium by Ted
Lemon <[email protected]> in cooperation with Vixie Enterprises. To learn
more about the Internet Software Consortium, see “http://www.vix.com/isc”. To
learn more about Vixie Enterprises, see “http://www.vix.com”.
Pagina se încarcă ...
Pagina se încarcă ...
Pagina se încarcă ...
Pagina se încarcă ...
-
 1
1
-
 2
2
-
 3
3
-
 4
4
-
 5
5
-
 6
6
-
 7
7
-
 8
8
-
 9
9
-
 10
10
-
 11
11
-
 12
12
-
 13
13
-
 14
14
-
 15
15
-
 16
16
-
 17
17
-
 18
18
-
 19
19
-
 20
20
-
 21
21
-
 22
22
-
 23
23
-
 24
24


Yamaha XF6 Manual de utilizare
- Categorie
- Controlere DJ
- Tip
- Manual de utilizare
în alte limbi
- Türkçe: Yamaha XF6 Kullanım kılavuzu
- français: Yamaha XF6 Manuel utilisateur
- čeština: Yamaha XF6 Uživatelský manuál
- русский: Yamaha XF6 Руководство пользователя
- English: Yamaha XF6 User manual
- suomi: Yamaha XF6 Ohjekirja
- polski: Yamaha XF6 Instrukcja obsługi
- Deutsch: Yamaha XF6 Benutzerhandbuch
- italiano: Yamaha XF6 Manuale utente
- español: Yamaha XF6 Manual de usuario
- svenska: Yamaha XF6 Användarmanual
- dansk: Yamaha XF6 Brugermanual
- português: Yamaha XF6 Manual do usuário
- Nederlands: Yamaha XF6 Handleiding
Lucrări conexe
-
Yamaha XF6 Manualul proprietarului
-
-
-
-
-
Yamaha PSR-S970 Fișa cu date
-
-
Yamaha PSR-SX700 Fișa cu date
-
Yamaha PSR-S670 Fișa cu date
-
Yamaha DGX-670 Fișa cu date