Philips SCD469/00 Manual de utilizare
- Categorie
- Telefoane pentru copii
- Tip
- Manual de utilizare

Baby Monitor
SCD 469

2

3
A
B
15
1
16 17 18
3 4 7
13
14
12
6
5
4
1 10
3
11
12 13
14
2
5 6
2 11
10
19
20
7
8
9
9
8
21
PRG
1
2
3
4 5 6
7
8
9
C 0
OK
PIN
1

4

SCD 469
ENGLISH 6
19
35
48
61
75
89
105
118
131
145
160
176
190
203
216

6
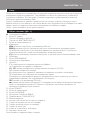
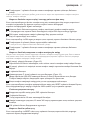
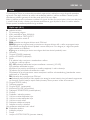
Introduction
Philips is dedicated to producing caring, reliable products to give parents the reassurance they need.
This baby monitor consists of a parent unit and a baby unit. It provides round-the-clock support by
ensuring that you can always hear your baby clearly.
When the units are connected properly, you have the certainty that you can hear your baby
wherever you are in or around your home or garden. When the regular baby monitor is out of
range, simply connect it to your phone or mobile phone.
Philips Baby Care: taking care together
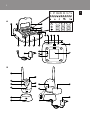
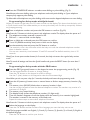
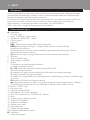
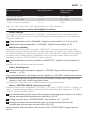
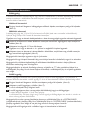
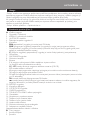
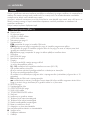
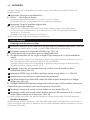
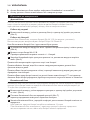
General description (Fig. 1)
Baby unit
1 M (memory) button
2 CHANNEL selection slide
3 SENSITIVITY slide
4 Nightlight button
Q
5 Keypad
PIN press this button to enter a PIN code.
PRG (
program button) press this button to enter the program mode.
Ö press this button to set the sensitivity time. With this button you can also include a pause
when you enter a telephone number.
C (clear button) press this button to clear the last input.
6 Microphone
7 POWER button
8 Power light
9 Display
Ä unit in regular baby monitor mode
Å unit in dial-up mode
É indicates phone numbers stored in the memory (M1-M5)
Ñ indicates phone numbers
Ü unit not/not properly connected to the mains or running on batteries
Ç unit not connected to the telephone network
Ö indicates that a non-default sensitivity time has been programmed (the default sensitivity time
is 10 seconds)
á indicates that a PIN code has been programmed
T indicates the battery status. As the energy level inside the batteries drops, the number of
segments shown decreases. The battery symbol blinks when the batteries are low and need to
be replaced.
10 MODE button
11 Keypad cover
12 RESET button
13 VOLUME control
14 TONE/PULSE selector
15 Loudspeaker
16 Extendable and turnable antenna
17 Phoneline-out socket
18 Phoneline-in socket
19 Socket for small plug
20 Battery compartment lid
21 Adapter with small plug
Not shown: telephone cable and plug
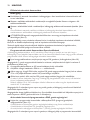
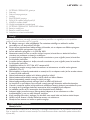
B Parent unit
1 Charging light
-
-
-
-
-
-
-
-
-
-
-
-
-
ENGLISH

2 Charger
3 SYSTEM CHECK light
4 Loudspeaker
5 Sound level lights
6 Antenna
7 POWER light
8 VOLUME control with off position
9 CHANNEL selection slide
10 Socket for small plug
11 SYSTEM CHECK ALARM switch
12 Battery compartment
13 Battery compartment lid
14 Adapter with small plug
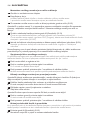
Important
Read these instructions for use carefully before you use the appliance and save them for future
reference.
This baby monitor is intended as an aid. It is not a substitute for responsible and proper adult
supervision and should not be used as such.
Check if the voltage indicated on the adapter corresponds to the local mains voltage before
you connect the appliance.
The appliance is suitable for mains voltages from 220 to 240V.
Except for the battery compartments, do not open the housing of the baby unit and parent
unit to prevent electric shock.
If the adapter of the baby unit or the parent unit is damaged, always have it replaced by one
of the original type to avoid a hazard.
If the charger of the parent unit is damaged, always have it replaced by one of the original
type to avoid a hazard.
Use and store the appliance at a temperature between 10°C and 40°C.
Do not expose the baby monitor to extreme cold or heat or to direct sunlight. (Fig. 2)
Make sure the baby unit and the cord are always out of reach of the baby (at least 1 metre/3
feet away).
Do not place the baby unit inside the baby’s bed or playpen.
Do not use the baby monitor in moist places or close to water.
Do not cover the baby monitor with a towel or blanket.
Do not immerse any part of the baby monitor in water or any other liquid.
Always place batteries of the correct type in the baby unit to avoid the risk of explosion.
Always replace the rechargeable battery pack of the parent unit with one of the correct type.
Only use the adapter supplied to connect the baby unit to the mains.
Only use the charger supplied to charge the parent unit.
The adapters contain a transformer. Do not cut off the adapters to replace them with other
plugs, as this will cause a hazardous situation.
Since continuous transmission is prohibited, you only hear your baby when it makes sounds.
The antenna of the parent unit is xed. Do not pull at the antenna or bend it.
The antenna of the baby unit can be pulled out and turned upwards.
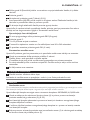
Preparing for use
Baby unit
You can use the baby unit from the mains or on batteries. Even if you intend to use the unit from
the mains, we advise you to insert batteries. This guarantees automatic back-up in case of mains
failure.
,
,
,
,
,
,
,
,
,
,
,
,
,
,
,
,
,
,
,
,
,
ENGLISH 7

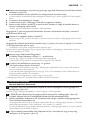
Mains operation
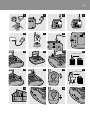
1 Put the small plug in the socket on the baby unit and insert the adapter in a wall socket.
(Fig. 3)
Battery operation
The baby unit runs on four 1.5-volt R6 AA batteries (not included). We strongly advise you to use
Philips LR6 PowerLife batteries.
Make sure your hands and the unit are dry when you insert the batteries.
1 Undo the screw of the battery compartment lid with a screwdriver and remove the lid.
(Fig. 4)
2 Insert four 1.5V AA batteries.
Make sure the + and - poles of the batteries point in the right direction.
3 Put the battery compartment lid back on the appliance and fasten the screw with a
screwdriver. (Fig. 5)
Note:Do not mix old and new batteries.
Note:Remove the batteries if you do not intend to use the baby unit for a month or more.
Note:If the batteries are in the unit when you operate it on mains power, check them for leakage every
six months.
Note:When the batteries are low, the battery symbol
à on the display and the power light blink. When
the batteries are empty, the power light and the display do not go on at all.
Parent unit
The parent unit has a rechargeable battery pack and can be recharged in the charger. When the
battery pack is fully charged, you can use the parent unit cordlessly for up to 12 hours.
1 Put the small plug into the socket of the charger and put the adapter in a wall socket. (Fig. 6)
2 Place the parent unit in the charger. (Fig. 7)
The charging light starts to burn red.
3 Leave the parent unit in the charging base until the battery pack is fully charged.
It takes at least 14 hours to charge the battery pack fully.
The charging light burns red as long as the parent unit is in the charger, even when the battery
pack is fully charged.
Note:When the battery pack is low, the power light and SYSTEM CHECK light blink. When the power
light and SYSTEM CHECK light do not go on at all, the battery pack is empty.
Note:You can also leave the parent unit in the charger to run it from the mains.
Preparing for dial-up mode
Baby unit
1 Follow the instructions above to prepare the baby unit for mains operation.
2 Insert one connector of the telephone cable supplied in the appropriate plug. Insert the plug
in the wall telephone socket.
3 Insert the other connector of the telephone cable into the phoneline-in socket of the baby
unit. (Fig. 8)
If you want your telephone to work while the baby unit is in dial-up mode, insert the cable of
the telephone in the phoneline-out socket of the baby unit.
,
,
-
-
-
ENGLISH8

4 Press the TONE/PULSE selector to select tone dialling or pulse dialling. (Fig. 9)
Note:Always select tone dialling unless your telephone works with pulse dialling or if your telephone
company only supports pulse dialling.
Tip:Most older dial telephones use pulse dialling, while most modern keypad telephones use tone dialling.
Programming for dial-up mode with Quick Install
When you switch on the baby unit, M1 starts to blink on the display. This shows that the baby unit is
in Quick Install mode. This mode enables you to set up the baby unit for dial-up use quickly without
any preprogramming.
1 Enter a telephone number and press the OK button to conrm. (Fig. 10)
Note:Press the Ö button to include a pause in the telephone number. The display shows the pause as P.
The telephone number entered is stored in M1.
PIN and ---- start to blink on the display.
2 Enter a 4-digit pin code and press the OK button to conrm.
Ö and 10 (default sensitivity time) start to blink on the display.
3 Set the sensitivity time and press the OK button to conrm.
The sensitivity time is the time after which the baby unit calls the selected telephone number
when it detects a sound.
You can set a sensitivity time between 10 and 360 seconds. The default sensitivity time is 10
seconds.
Note:If you do not press another button for 5 seconds, the baby unit enters the regular baby monitor
mode.
Note:To cancel all settings and leave the Quick Install mode, press the RESET button for more than 5
seconds.
Programming for dial-up mode with the PRG button
1 Press the PRG (program) button on the keypad to enter the programming mode. (Fig. 11)
Use the keypad buttons to enter or change settings.
Press the OK button on the keypad to conrm settings.
Use the C (clear) button on the keypad to clear the last entered digit.
Note:When you do not press a key for 5 seconds, the baby unit leaves the programming mode.
2 Press the M (memory) button once or several times to nd an empty memory location. (Fig.
12)
The memory icon (M1-M5) blinks when a memory location is free.
Use the numeric keypad to enter the desired telephone number. The number may consist of a
maximum of 40 digits.
The memory icon stops blinking.
The display briey shows the telephone number (11 digits only).
Then the number disappears from the display while the memory icon remains highlighted.
The number is stored in the memory of the baby unit.
Repeat the above steps to store other telephone numbers.
Note:Press the Ö button to include a pause in the telephone number. The display shows the pause as P.
3 Select the language on the display.
Press the OK button and the number of the language you want the baby unit to use.
Note:The languages available are English (1), French (2), German (3), Spanish (3) or Dutch (5). English is
the default language.
Press the OK button to conrm your choice.
,
,
,
-
-
-
-
-
,
-
,
,
,
-
-
-
ENGLISH 9

When you phone the baby unit to listen to your baby, the baby unit asks you to enter the PIN code
in the language you have selected.
4 Press the PIN button on the keypad.
PIN and ---- start to blink on the display.
Use the numeric keypad to enter a 4-digit PIN code.
Press the OK button on the keypad to conrm the setting.
5 Press the Öbutton to set the sensitivity time.
Öand 10 start to blink on the display.
Sensitivity time is the time after which the baby unit calls the selected telephone number when
it detects a sound.
Use the numeric keypad to enter a time between 10 and 360 seconds. The default setting is 10
seconds.
Press the OK button to conrm the setting.
The baby unit is now ready for dial-up use.
Regular baby monitor mode
1 Place the parent unit and the baby unit in the same room to test the connection. (Fig. 13)
Make sure the baby unit is at least 1 metre/3 feet away from the parent unit.
2 Press the POWER button to switch on the baby unit. (Fig. 14)
The display lights up and the power light starts to burn green
After a few seconds, M1 starts to blink on the display. The baby unit is now in Quick Install
mode.
If you want to set up the baby unit for dial-up mode without programming, follow steps 1 to 4
in ‘Programming for dial-up mode with Quick Install’.
If you want to set up the baby unit for use as a regular baby monitor, skip the Quick Install mode
(see step 3 below).
3 Wait 5 seconds or press the OK button a few times to skip the Quick Install mode. (Fig. 10)
4 Use the MODE button to select regular baby monitor mode Ä. (Fig. 15)
5 Pull out the antenna and turn it upwards for proper reception.
6 Turn the VOLUME control of the parent to a volume position to switch on the parent unit.
(Fig. 16)
The SYSTEM CHECK light starts to burn green when connection has been established
between the units.
Note:It takes about 30 seconds before a connection is established.
7 Place the baby unit at least 1 metre/3 feet away from your baby. (Fig. 17)
8 Position the parent unit within the operating range of the baby unit. Make sure it is at least 1
metre/3 feet away from the baby unit. (Fig. 18)
For more information on the operating range, see section ‘Operating range’ below.
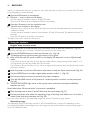
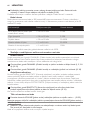
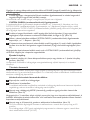
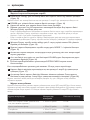
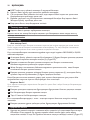
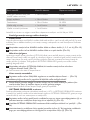
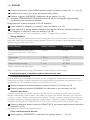
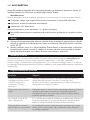
Operating range
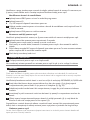
The operating range of the baby monitor is 200 metres/600 feet in open air. Depending on the
surroundings and other disturbing factors, this range may be smaller. Indoors the operating range is
up to 50 metres/150 feet.
,
-
-
,
-
-
-
,
,
-
-
,
ENGLISH10

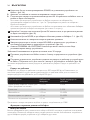
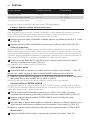
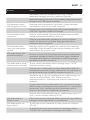
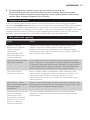
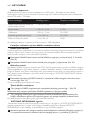
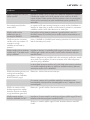
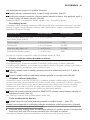
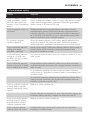
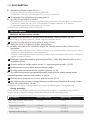
Dry materials Material thickness Loss of range
Wood, plaster, cardboard, glass
(without metal, wires or lead)
< 30cm/12in 0-10%
Brick, plywood < 30cm/12in 5-35%
Reinforced concrete < 30cm/12in 30-100%
Metal grilles or bars < 1cm /0.4in 90-100%
Metal or aluminium sheets < 1cm/0.4in 100%
For wet and moist materials, the range loss may be up to 100%.
Features in regular baby monitor mode
Channel selection
Always make sure that the CHANNEL selection slides on both units are set to the same position.
You can select four different channels. If you experience interference from other baby monitors,
radio devices etc., select a different channel.
1 Push the CHANNEL selection slide on the baby unit to the desired channel (1, 2, 3 or 4).
(Fig. 19)
2 Push the CHANNEL selection slide on the parent unit to the same channel. (Fig. 20)
Microphone sensitivity
With the microphone SENSITIVITY slide on the baby unit you can set the sound that is picked up
by the baby unit to the desired level: low, mid or high. When the microphone sensitivity is set to
‘high’, the baby unit picks up all sounds. You can only change the microphone sensitivity when the
connection between the baby unit and parent unit has been established. This is the case when the
SYSTEM CHECK light on the parent unit burns green continuously.
1 Push the microphone SENSITIVITY slide to set the microphone sensitivity of the baby unit
to the desired level. (Fig. 21)
You can use your own voice as a sound reference.
Silent baby monitoring
1 Turn the VOLUME control of the parent unit to the lowest volume level £. (Fig. 22)
Do not switch off the parent unit completely by turning the VOLUME control to off position.
The sound level lights on the parent unit visually alert you to any sound the baby makes.The
louder the sounds, the more lights go on.
When no sound is detected, all sound level lights are off.
The default setting of the system check alarm is ‘off’?. If the SYSTEM CHECK alarm has been set to
‘on’, the parent unit beeps and the SYSTEM CHECK light blinks red when the connection with the
baby unit is lost.
1 Turn the locking knob in the bottom of the parent unit a quarter turn (1) with a screwdriver.
Then slide the battery compartment lid downwards to remove it (2). (Fig. 23)
2 Set the SYSTEM CHECK alarm switch inside the compartment to ‘on’>. (Fig. 24)
3 Slide the battery compartment lid back onto the parent unit (1). Then turn the locking knob
a quarter turn with a screwdriver to fasten the lid (2). (Fig. 25)
Note:In default setting, only the SYSTEM CHECK light blinks red when the connection is lost.
,
ENGLISH 11

Nightlight
1 Press the nightlight button Q to switch the nightlight on or off. (Fig. 26)
When you run the baby unit on batteries, switch off the nightlight to save power.
Dial-up mode
In this mode, the baby unit calls a preprogrammed phone number if a sound is detected. You can
also phone the phone number to which the baby unit is connected to check on your baby.
Setting the baby monitor up for dial-up mode
1 Switch on the baby unit and the parent unit.
2 Make sure that:
the telephone cable supplied is connected to the phoneline-in socket of the baby unit.
at least one telephone number is stored in the memory of the baby unit.
3 Press the MODE button on the baby unit to set the unit to dial-up mode. (Fig. 15)
Note:If
Ç lights up on the display, there is no connection to the telephone network. Follow the steps in
‘Preparing the baby monitor for dial-up mode’ to establish a connection with the telephone network.
4 Press the M (memory) button to select the telephone number. (Fig. 12)
If you have used Quick Install to enter a telephone number in the memory, press M1.
If you have programmed the baby unit with the PRG button, choose one of the telephone
numbers stored in the memory (M1-M5).
5 Push the SENSITIVITY slide to the desired microphone sensitivity level. (Fig. 21)
See ‘Microphone sensitivity’ for instructions on how to set the microphone sensitivity of the
baby unit.
Tip:We advise you to test the dial-up function before you leave by making a sound close to the baby unit.
Of course, this is easiest when you have programmed your mobile phone number.
When the baby unit picks up a sound, it calls the preprogrammed telephone number after the
preset sensitivity time. If the call is not answered, the baby unit calls again after 1 minute.
1 Answer the phone to listen to your baby.
2 Press the # button on the telephone to talk to your baby.
After 3 minutes, the baby unit disconnects.
3 Press the * button on the telephone or hang up to disconnect.
If the baby unit detects a sound again, it calls the preprogrammed telephone number again.
Calling the baby monitor to check on your baby
Note:To call the baby unit, use a tone-dial telephone with a keypad. This function does not work on pulse-
dial telephones and on telephones with a dial.
1 Dial the number of the telephone line the baby unit is connected to.
After 3 rings, the baby unit is activated and asks you to enter your PIN code.
2 Enter your PIN code with the numeric keys on the telephone.
You can now hear your baby.
Note:If you enter the wrong PIN code three times, the baby unit disconnects.
3 Press the # button on the telephone to talk to your baby.
After 3 minutes, the baby unit disconnects.
4 Press the * button on the telephone or hang up to disconnect.
-
-
-
-
-
-
,
,
-
ENGLISH12

Clearing telephone numbers from the memory
When the memory is full or when a telephone number stored in the memory is no longer correct
or required, follow the procedure below to clear telephone numbers from the memory of the baby
unit.
1 Press the M (memory) button. (Fig. 12)
M1 blinks on the display and the corresponding telephone number appears.
2 Press the M (memory) button until the telephone number you want to clear appears on the
display.
3 Press the 0 button.
4 Briey press the C (clear) button on the keypad. (Fig. 11)
The memory icon (M1-M5) starts to blink and 0 disappears from the display. The telephone
number has been cleared and the memory location is free again.
5 Repeat the above steps to clear other telephone numbers.
Note:To clear all telephone numbers at once, press the RESET button. All other settings are cleared as
well. See ‘Resetting the baby unit’.
Changing the sensitivity time
1 Press the PRG button to enter the program mode.
2 Press the Ö button.
Ö and 10 start to blink on the display.
3 Use the numeric keypad to enter a new sensitivity time between 10 and 360 seconds.
4 Press the OK button to conrm the setting.
Resetting the baby unit
Note:If you press the RESET button, all settings are cleared from the memory of the baby unit.
1 Press the RESET button for about 5 seconds.
The baby unit gives a short beep to conrm.
When you hear a double beep, the baby unit has been reset to its default settings.
After a few seconds, M1 starts to blink on the display. The baby unit is now in Quick Install
mode.
2 Enter new settings, if desired.
Cleaning and maintenance
1
Clean the baby monitor with a damp cloth.
Do not immerse the parent unit and the baby unit in water and do not clean them under the tap.
Replacement
Parent unit
If the battery pack of the parent unit needs to be recharged more often than usual, replace it with a
new one. You can obtain a new battery pack at the shop where you bought the baby monitor.
Note:Always replace the battery pack with one of the same type: SBC EB4880, 4.8V, 800 mAh.
1 Turn the locking knob in the bottom a quarter turn (1) and slide the battery compartment
lid downwards to remove it (2). (Fig. 22)
,
,
,
,
,
,
ENGLISH 13

2 Remove the old battery pack from the battery compartment and pull the connector of the
old battery pack out of the socket.
3 Insert the connector of the new battery pack into the socket and place the new battery pack
in the battery compartment.
4 Slide the battery compartment lid back onto the parent unit (1) and turn the locking knob a
quarter turn to fasten the lid (2).
Tip:To extend the life of the battery pack, remove it from the battery compartment when you do not
intend to use the baby monitor for a longer period of time.
Baby unit
When the power light blinks and the battery empty symbol appears on the display, replace the
batteries.
1 Undo the screw of the battery compartment lid with a screwdriver and remove the lid.
2 Remove the old batteries from the battery compartment.
3 Insert four new 1.5V AA batteries.
Note:Make sure the + and - poles of the batteries point in the right direction.
4 Put the battery compartment lid back onto the baby unit and tighten the screw with a
screwdriver.
Environment
Do not throw away the appliance with the normal household waste at the end of its life, but
hand it in at an ofcial collection point for recycling. By doing this, you help to preserve the
environment. (Fig. 27)
Batteries contain substances that may pollute the environment. Do not throw away empty
batteries with the normal household waste, but hand them in at an ofcial collection point.
Always remove the batteries before you discard or hand in the appliance at an ofcial
collection point.
Guarantee and service
If you need information or if you have a problem, please visit the Philips website at www.philips.com
or contact the Philips Customer Care Centre in your country (you nd its phone number in the
worldwide guarantee leaet). If there is no Customer Care Centre in your country, turn to your
local Philips dealer or contact the Service Department of Philips Domestic appliances and Personal
Care BV.
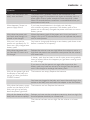
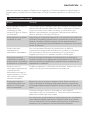
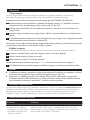
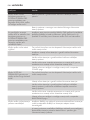
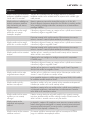
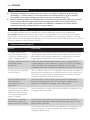
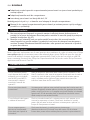
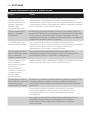
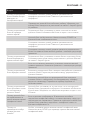
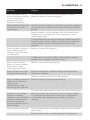
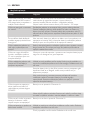
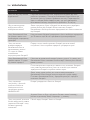
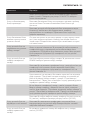
Frequently asked questions
Question Answer
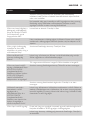
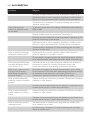
Why does the baby monitor
have a smaller operating
range than the 200
meters/600 feet mentioned
under ‘Operating range’?
The specied range is only valid outdoors in open air. Inside your
home, the workable range is limited by the number and type of
walls and/or ceilings between the baby unit and the parent unit.
The maximum operating range inside your home is 50
meters/150 feet.
,
,
ENGLISH14

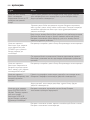
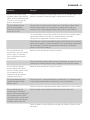
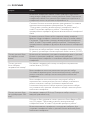
Question Answer
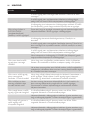
Why is the connection lost
every now and then?
The parent unit is probably close to the boundaries of the
operating range. Put the parent unit closer to the baby unit in a
place where it has a better reception. Please note that it takes
about 30 seconds before connection is re-established when you
move one or both units.
What happens if there is a
power supply failure?
If you have placed batteries in the baby unit, the baby
unit switches to battery operation. If the battery pack of the
parent unit is sufciently charged, the parent unit starts to run on
battery power.
Why does the parent unit
not work even though it is
placed in the charger?
When the battery pack of the parent unit is low, you have to
charge it for up to 20 minutes before you can operate the parent
unit on mains power.
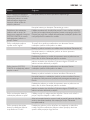
Why can I not use the
parent unit cordlessly for 12
hours on a fully charged new
battery pack?
You have to charge and discharge a new battery pack three times
before it reaches its full capacity.
Why does the parent unit
run less than 12 hours on a
full charge?
Perhaps the volume is set too high. When the volume is set to a
high level, the parent unit consumes more power. Set the volume
to a lower level.
A battery pack that has been in use for quite some time gradually
loses its capacity. When this happens, you get fewer running hours
on a full charge.
If you start to use the parent unit again after some time, the
battery pack may have lost some of its charge. Place the parent
unit in the charger to recharge the battery pack.
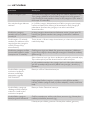
Why do the power light and
the display of the baby unit
not go on when I press the
POWER button?
The batteries are empty. Replace the batteries.
You have not plugged in the baby unit. Insert the small plug in the
socket on the baby unit and insert the adapter in the wall socket.
Why does the battery empty
symbol on the display of the
baby unit light up and why
does the power light blink?
The batteries are low. Replace the batteries.
Why do the batteries of the
baby unit run out so quickly?
Perhaps you have set the microphone sensitivity level too high. Set
the microphone sensitivity to a lower level.
The volume has been set too high. Set the volume to a lower
level.
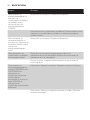
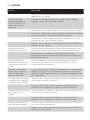
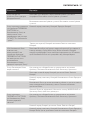
ENGLISH 15

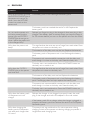
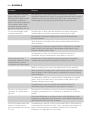
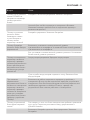
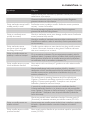
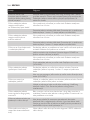
Question Answer
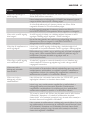
Why do the power light and
the SYSTEM CHECK light of
the parent unit not go on
when I turn the VOLUME
control to switch on the
parent unit?
The battery pack is low. Recharge the battery pack.
The battery pack has reached the end of its life. Replace the
battery pack.
I try to use the parent unit
on mains power, but the
power light and SYSTEM
CHECK light do not go on
when I place the parent unit
in the charger. Why?
Perhaps you forgot to plug in the charger. In that case, plug in the
charger. If the battery pack is entirely empty, you have to charge it
for 20 minutes before you can run the parent unit from the mains.
Why does the parent unit
beep?
This signies that the units are out of range from each other. Place
the parent unit closer to the baby unit.
The batteries of the baby unit may be low. Replace the batteries.
The battery pack of the parent unit is low. Recharge the battery
pack.
The parent unit cannot establish connection with the baby unit
even though it is close to the baby unit. Reset the baby unit.
The baby unit is not switched on. Press the POWER button on
the baby unit to switch it on.
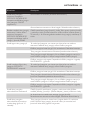
Why does the SYSTEM
CHECK light on the parent
unit blink red?
This signies that the units are out of range from each other. Place
the parent unit closer to the baby unit.
The batteries of the baby unit are low. Replace the batteries.
The battery pack of the parent unit is low. Recharge the battery
pack. If recharging does not help, replace the battery pack.
The parent unit cannot establish connection with the baby unit
even though it is close to the baby unit. Reset the baby unit.
The baby unit is not switched on. Press the POWER button on
the baby unit to switch it on.
Why does the battery pack
of the parent unit not
charge?
Perhaps the charger is not plugged in properly. Insert the small
plug in the charger and insert the adapter in the wall socket.
If the battery pack fails to charge when the charger is plugged in
properly, the battery pack has reached the end of its life. Replace
the battery pack.
Why does charging the
battery pack of the parent
unit take much longer than
14 hours?
The parent unit was switched on for mains operation during
charging. Switch off the parent unit during charging to prevent a
longer-than-usual charging time.
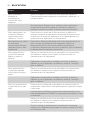
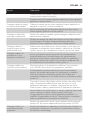
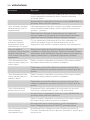
ENGLISH16

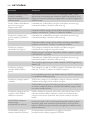
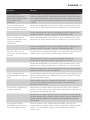
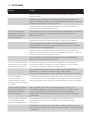
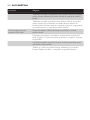
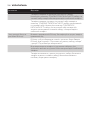
Question Answer
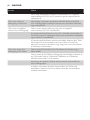
Why does the operating
time of the rechargeable
battery pack decrease after
each new charging cycle?
The battery pack approaches the end of its life and soon has to
be replaced. The life of the battery pack decreases if you leave the
parent unit continuously connected to the mains by placing it in a
plugged-in charger.
Why does the parent unit
react too slowly to the baby’s
sounds?
The microphone sensitivity level on the baby unit is too low. Set
the microphone sensitivity to a higher level.
Move the baby unit closer to the baby. Make sure the baby unit is
at least 1 metre/3 feet away from your baby.
Why does the parent unit
react too quickly to ambient
sounds?
The microphone sensitivity level on the baby unit is too low. Set
the microphone sensitivity to a higher level.
Move the baby unit closer to the baby. Make sure the baby unit is
at least 1 metre/3 feet away from your baby.
Why do I get no sound out
of the parent unit?
The parent unit is set to a different channel than the baby unit. Set
both units to the same channel.
The baby unit is not switched on. Press the POWER button on
the baby unit to switch it on.
The microphone sensitivity level on the baby unit is too low. Set
the microphone sensitivity to a higher level.
The volume of the parent unit is set too low. Turn the VOLUME
control to a higher level.
Why does the parent unit
squeal/produce a high-
pitched noise?
The parent unit is too close to the baby unit. Move the parent
unit at least 1 metre/3 feet away from the baby unit.
If this does not help, the volume is too high. Turn the VOLUME
control to select a lower volume.
Why do I get interference on
the parent unit?
Perhaps the parent unit is out of range of the baby unit. Place the
parent unit closer to the baby unit.
Perhaps the baby unit or parent unit is too close to a mobile or
cordless phone, a radio or a TV. Move the unit away from this
source of interference.
Why does the parent unit
pick up signals from another
baby monitor?
The baby monitor operates on the same channel as another baby
monitor in the neighbourhood. Set both units to a different
channel. Make sure they are both set to the same channel.
Why does the baby unit not
switch to dial-up mode?
If the display shows Ç, you probably forgot to insert the
telephone cable in the appropriate socket or did not insert the
cable properly. Insert the cable properly. If the baby unit is
connected properly to the telephone line, the display shows
Å.
Why does the baby unit fail
to dial a telephone number?
You did not select the dial-up mode. Use the MODE button to
select dial-up mode.
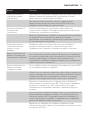
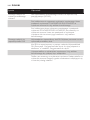
ENGLISH 17

Question Answer
Perhaps you did not insert the telephone cable properly into the
phoneline-in socket of the baby unit. Insert the telephone cable. If
the baby unit is connected properly to the telephone line, the
display shows Å.
The sensitivity time is too long. Set a shorter sensitivity time. See
‘Preparing the baby monitor for dial-up mode’ in chapter
‘Preparing for use’. We advise you to test the dial-up mode before
you leave.
You did not store a telephone number in the memory of the baby
unit. Enter a telephone number and store it in one of the memory
locations. See ‘Preparing for dial-up mode’ in chapter ‘Preparing for
use’. We advise you to test the dial-up mode before you leave.
Perhaps you forgot to select a telephone number. Press the M
(memory) button to select the appropriate memory location
(M1-M5).
Why does the baby unit not
answer my call?
You probably try to phone the baby unit with a pulse dial
telephone. Use a tone dial telephone or a mobile phone.
Why does the baby unit not
dial the correct number?
You did not enter the correct number or you selected the wrong
memory location (M1-M5).
Your telephone network does not recognise dialling pulses. Set
the TONE/PULSE selector to tone dialling or use a mobile phone.
Your telephone network uses pulse dialling, but the TONE/PULSE
selector is set to tone dialling. Set the TONE/PULSE selector to
pulse dialling or leave the TONE/PULSE selector in tone setting
and use a mobile phone.
Why does the baby unit not
recognise the PIN code?
You entered the wrong PIN code. Redial and enter the correct
code.
You did not store a PIN code in the memory of the baby unit.
Enter a PIN code. See ‘Preparing for dial-up mode’ in chapter
‘Preparing for use’.
You use a pulse dial telephone. Use a mobile phone to phone the
baby unit.
The telephone is in pulse dial mode. Set the telephone to tone
dialling. Follow the instructions in the user manual of the
telephone.
ENGLISH18

19
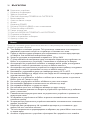
Philips са се посветили на създаването на грижовни, надеждни продукти, които да осигурят на
родителите нужната им увереност. Този бебефон се състои от родителско устройство и
устройство за бебето. Той осигурява 24-часова поддръжка и прави възможно винаги да
можете да чувате ясно вашето бебе.
Когато устройствата са свързани правилно, вие сте сигурни, че винаги можете да чуете
бебето, когато не сте наблизо, а сте някъде вкъщи или в градината. Когато бебефонът е извън
обхват, просто го свържете към вашия стационарен или мобилен телефон.
Philips - грижи за бебето, да се грижим заедно!
Устройство за бебето
1 Бутон M (памет)
2 Плъзгач за избор на КАНАЛ
3 Плъзгач за ЧУВСТВИТЕЛНОСТ
4 Бутон за нощна светлина
Q
5 Клавиатура
PIN натиснете този бутон, за да въведете PIN код.
PRG (
програмен бутон) натиснете този бутон, за да влезете в програмен режим.
Ö натиснете този бутон, за да настроите времето за чувствителност. С този бутон
можете да включите и пауза, когато въвеждате телефонен номер.
C (бутон за изчистване) натиснете този бутон, за да изчистите последния въведен знак.
6 Микрофон
7 Бутон ЗАХРАНВАНЕ
8 Индикатор за захранване
9 Дисплей
Ä устройството е в нормален режим на бебефон
Å устройството е в режим на набиране
É показва телефонните номера, записани в паметта (M1-M5)
Ñ показва телефонните номера
Ü устройството не е (правилно) свързано към мрежата или работи на батерии
Ç устройството не е свързано към телефонната мрежа
Ö показва, че е програмирано време за чувствителност, което е различно от това по
подразбиране (времето по подразбиране е 10 секунди)
á показва, че е програмиран PIN код
T показва състоянието на батерията. С намаляването на заряда на батерията намалява и
броят на показваните сегменти. Символът на батерията мига, когато батериите са
изтощени и трябва да бъдат сменени.
10 Бутон РЕЖИМ
11 Капак на клавиатурата
12 Бутон НУЛИРАНЕ
13 Регулиране СИЛА НА ЗВУКА
14 Превключвател ТОН/ИМПУЛС
15 Високоговорител
16 Антена, която може да се изтегля и завърта
17 Гнездо за изходящ сигнал към телефон
18 Гнездо за входящ сигнал от телефон
19 Гнездо за малък жак
20 Капак на отделението за батерии
21 Адаптер с малък жак
Не е показано: телефонен кабел и щепсел
-
-
-
-
-
-
-
-
-
-
-
-
-

B Родителско устройство
1 Индикатор за зареждане
2 Зарядно устройство
3 Светлинен индикатор ПРОВЕРКА НА СИСТЕМАТА
4 Високоговорител
5 Лампи за нивото на звука
6 Антена
7 Индикатор POWER
8 Регулатор СИЛА НА ЗВУКА с ключ за изключване
9 Плъзгач за избор на КАНАЛ
10 Гнездо за малък жак
11 Ключ за АЛАРМА НА ПРОВЕРКАТА НА СИСТЕМАТА
12 Отделение за батерията
13 Капак на отделението за батерии
14 Адаптер с малък жак
Преди да използвате уреда, прочетете внимателно това ръководство за експлоатация и го
запазете за справка в бъдеще.
Този бебефон е помощно средство. Той не може да е заместител на отговорния и
навременен родителски контрол и не трябва да се използва като такъв.
Преди да свържете уреда, проверете дали напрежението, посочено върху адаптера,
отговаря на това на местната електрическа мрежа.
Уредът е подходящ за напрежение на мрежата от 220 до 240 V.
С оглед избягване на електрически удар, не отваряйте корпусите на устройството за
бебето и на родителското устройство, с изключение на отделенията за батерии.
Ако адаптерът на устройството за бебето се повреди, винаги трябва да осигурявате
замяната му с такъв от оригиналния тип, за да се избегне опасност.
Ако адаптерът на родителското устройство се повреди, винаги трябва да осигурявате
замяната му с такъв от оригиналния тип, за да се избегне опасност.
Използвайте и съхранявайте уреда при температури между 10°C и 40°C.
Не излагайте бебефона на твърде ниски или твърде високи температури и на директна
слънчева светлина. (фиг. 2)
Убедете се, че устройството за бебето и кабелът ще са винаги далече от достъпа на
бебето (поне на 1 метър от него).
Не слагайте устройството за бебето в бебешкото легло или кошарка.
Не използвайте бебефона на влажни места или в близост до вода.
Не покривайте бебефона с одеяла или кърпи.
Не потапяйте никоя част от бебефона във вода или друга течност.
Винаги поставяйте правилен тип батерии в устройството при бебето, за да избегнете
риска от експлозия.
Сменяйте винаги акумулаторния пакет на родителското устройство с правилен тип
акумулаторен пакет.
За свързване на устройството за бебето в мрежата използвайте само включения в
комплекта адаптер.
За зареждане на родителското устройство използвайте само включеното в комплекта
зарядно устройство.
В адаптера има трансформатор. Не отрязвайте адаптера, за да го замените с друг
щепсел, тъй като това носи опасност.
Тъй като непрекъснатото радиопредаване е забранено, ще чувате бебето само когато
то издава звуци.
Антената на родителското устройство е фиксирана. Не я дърпайте и не я огъвайте.
,
,
,
,
,
,
,
,
,
,
,
,
,
,
,
,
,
,
,
,
20
Pagina se încarcă...
Pagina se încarcă...
Pagina se încarcă...
Pagina se încarcă...
Pagina se încarcă...
Pagina se încarcă...
Pagina se încarcă...
Pagina se încarcă...
Pagina se încarcă...
Pagina se încarcă...
Pagina se încarcă...
Pagina se încarcă...
Pagina se încarcă...
Pagina se încarcă...
Pagina se încarcă...
Pagina se încarcă...
Pagina se încarcă...
Pagina se încarcă...
Pagina se încarcă...
Pagina se încarcă...
Pagina se încarcă...
Pagina se încarcă...
Pagina se încarcă...
Pagina se încarcă...
Pagina se încarcă...
Pagina se încarcă...
Pagina se încarcă...
Pagina se încarcă...
Pagina se încarcă...
Pagina se încarcă...
Pagina se încarcă...
Pagina se încarcă...
Pagina se încarcă...
Pagina se încarcă...
Pagina se încarcă...
Pagina se încarcă...
Pagina se încarcă...
Pagina se încarcă...
Pagina se încarcă...
Pagina se încarcă...
Pagina se încarcă...
Pagina se încarcă...
Pagina se încarcă...
Pagina se încarcă...
Pagina se încarcă...
Pagina se încarcă...
Pagina se încarcă...
Pagina se încarcă...
Pagina se încarcă...
Pagina se încarcă...
Pagina se încarcă...
Pagina se încarcă...
Pagina se încarcă...
Pagina se încarcă...
Pagina se încarcă...
Pagina se încarcă...
Pagina se încarcă...
Pagina se încarcă...
Pagina se încarcă...
Pagina se încarcă...
Pagina se încarcă...
Pagina se încarcă...
Pagina se încarcă...
Pagina se încarcă...
Pagina se încarcă...
Pagina se încarcă...
Pagina se încarcă...
Pagina se încarcă...
Pagina se încarcă...
Pagina se încarcă...
Pagina se încarcă...
Pagina se încarcă...
Pagina se încarcă...
Pagina se încarcă...
Pagina se încarcă...
Pagina se încarcă...
Pagina se încarcă...
Pagina se încarcă...
Pagina se încarcă...
Pagina se încarcă...
Pagina se încarcă...
Pagina se încarcă...
Pagina se încarcă...
Pagina se încarcă...
Pagina se încarcă...
Pagina se încarcă...
Pagina se încarcă...
Pagina se încarcă...
Pagina se încarcă...
Pagina se încarcă...
Pagina se încarcă...
Pagina se încarcă...
Pagina se încarcă...
Pagina se încarcă...
Pagina se încarcă...
Pagina se încarcă...
Pagina se încarcă...
Pagina se încarcă...
Pagina se încarcă...
Pagina se încarcă...
Pagina se încarcă...
Pagina se încarcă...
Pagina se încarcă...
Pagina se încarcă...
Pagina se încarcă...
Pagina se încarcă...
Pagina se încarcă...
Pagina se încarcă...
Pagina se încarcă...
Pagina se încarcă...
Pagina se încarcă...
Pagina se încarcă...
Pagina se încarcă...
Pagina se încarcă...
Pagina se încarcă...
Pagina se încarcă...
Pagina se încarcă...
Pagina se încarcă...
Pagina se încarcă...
Pagina se încarcă...
Pagina se încarcă...
Pagina se încarcă...
Pagina se încarcă...
Pagina se încarcă...
Pagina se încarcă...
Pagina se încarcă...
Pagina se încarcă...
Pagina se încarcă...
Pagina se încarcă...
Pagina se încarcă...
Pagina se încarcă...
Pagina se încarcă...
Pagina se încarcă...
Pagina se încarcă...
Pagina se încarcă...
Pagina se încarcă...
Pagina se încarcă...
Pagina se încarcă...
Pagina se încarcă...
Pagina se încarcă...
Pagina se încarcă...
Pagina se încarcă...
Pagina se încarcă...
Pagina se încarcă...
Pagina se încarcă...
Pagina se încarcă...
Pagina se încarcă...
Pagina se încarcă...
Pagina se încarcă...
Pagina se încarcă...
Pagina se încarcă...
Pagina se încarcă...
Pagina se încarcă...
Pagina se încarcă...
Pagina se încarcă...
Pagina se încarcă...
Pagina se încarcă...
Pagina se încarcă...
Pagina se încarcă...
Pagina se încarcă...
Pagina se încarcă...
Pagina se încarcă...
Pagina se încarcă...
Pagina se încarcă...
Pagina se încarcă...
Pagina se încarcă...
Pagina se încarcă...
Pagina se încarcă...
Pagina se încarcă...
Pagina se încarcă...
Pagina se încarcă...
Pagina se încarcă...
Pagina se încarcă...
Pagina se încarcă...
Pagina se încarcă...
Pagina se încarcă...
Pagina se încarcă...
Pagina se încarcă...
Pagina se încarcă...
Pagina se încarcă...
Pagina se încarcă...
Pagina se încarcă...
Pagina se încarcă...
Pagina se încarcă...
Pagina se încarcă...
Pagina se încarcă...
Pagina se încarcă...
Pagina se încarcă...
Pagina se încarcă...
Pagina se încarcă...
Pagina se încarcă...
Pagina se încarcă...
Pagina se încarcă...
Pagina se încarcă...
Pagina se încarcă...
Pagina se încarcă...
Pagina se încarcă...
Pagina se încarcă...
Pagina se încarcă...
Pagina se încarcă...
Pagina se încarcă...
Pagina se încarcă...
Pagina se încarcă...
Pagina se încarcă...
Pagina se încarcă...
Pagina se încarcă...
Pagina se încarcă...
Pagina se încarcă...
Pagina se încarcă...
Pagina se încarcă...
Pagina se încarcă...
Pagina se încarcă...
Pagina se încarcă...
Pagina se încarcă...
Pagina se încarcă...
Pagina se încarcă...
-
 1
1
-
 2
2
-
 3
3
-
 4
4
-
 5
5
-
 6
6
-
 7
7
-
 8
8
-
 9
9
-
 10
10
-
 11
11
-
 12
12
-
 13
13
-
 14
14
-
 15
15
-
 16
16
-
 17
17
-
 18
18
-
 19
19
-
 20
20
-
 21
21
-
 22
22
-
 23
23
-
 24
24
-
 25
25
-
 26
26
-
 27
27
-
 28
28
-
 29
29
-
 30
30
-
 31
31
-
 32
32
-
 33
33
-
 34
34
-
 35
35
-
 36
36
-
 37
37
-
 38
38
-
 39
39
-
 40
40
-
 41
41
-
 42
42
-
 43
43
-
 44
44
-
 45
45
-
 46
46
-
 47
47
-
 48
48
-
 49
49
-
 50
50
-
 51
51
-
 52
52
-
 53
53
-
 54
54
-
 55
55
-
 56
56
-
 57
57
-
 58
58
-
 59
59
-
 60
60
-
 61
61
-
 62
62
-
 63
63
-
 64
64
-
 65
65
-
 66
66
-
 67
67
-
 68
68
-
 69
69
-
 70
70
-
 71
71
-
 72
72
-
 73
73
-
 74
74
-
 75
75
-
 76
76
-
 77
77
-
 78
78
-
 79
79
-
 80
80
-
 81
81
-
 82
82
-
 83
83
-
 84
84
-
 85
85
-
 86
86
-
 87
87
-
 88
88
-
 89
89
-
 90
90
-
 91
91
-
 92
92
-
 93
93
-
 94
94
-
 95
95
-
 96
96
-
 97
97
-
 98
98
-
 99
99
-
 100
100
-
 101
101
-
 102
102
-
 103
103
-
 104
104
-
 105
105
-
 106
106
-
 107
107
-
 108
108
-
 109
109
-
 110
110
-
 111
111
-
 112
112
-
 113
113
-
 114
114
-
 115
115
-
 116
116
-
 117
117
-
 118
118
-
 119
119
-
 120
120
-
 121
121
-
 122
122
-
 123
123
-
 124
124
-
 125
125
-
 126
126
-
 127
127
-
 128
128
-
 129
129
-
 130
130
-
 131
131
-
 132
132
-
 133
133
-
 134
134
-
 135
135
-
 136
136
-
 137
137
-
 138
138
-
 139
139
-
 140
140
-
 141
141
-
 142
142
-
 143
143
-
 144
144
-
 145
145
-
 146
146
-
 147
147
-
 148
148
-
 149
149
-
 150
150
-
 151
151
-
 152
152
-
 153
153
-
 154
154
-
 155
155
-
 156
156
-
 157
157
-
 158
158
-
 159
159
-
 160
160
-
 161
161
-
 162
162
-
 163
163
-
 164
164
-
 165
165
-
 166
166
-
 167
167
-
 168
168
-
 169
169
-
 170
170
-
 171
171
-
 172
172
-
 173
173
-
 174
174
-
 175
175
-
 176
176
-
 177
177
-
 178
178
-
 179
179
-
 180
180
-
 181
181
-
 182
182
-
 183
183
-
 184
184
-
 185
185
-
 186
186
-
 187
187
-
 188
188
-
 189
189
-
 190
190
-
 191
191
-
 192
192
-
 193
193
-
 194
194
-
 195
195
-
 196
196
-
 197
197
-
 198
198
-
 199
199
-
 200
200
-
 201
201
-
 202
202
-
 203
203
-
 204
204
-
 205
205
-
 206
206
-
 207
207
-
 208
208
-
 209
209
-
 210
210
-
 211
211
-
 212
212
-
 213
213
-
 214
214
-
 215
215
-
 216
216
-
 217
217
-
 218
218
-
 219
219
-
 220
220
-
 221
221
-
 222
222
-
 223
223
-
 224
224
-
 225
225
-
 226
226
-
 227
227
-
 228
228
-
 229
229
-
 230
230
-
 231
231
-
 232
232
-
 233
233
-
 234
234
-
 235
235
-
 236
236


Philips SCD469/00 Manual de utilizare
- Categorie
- Telefoane pentru copii
- Tip
- Manual de utilizare
în alte limbi
- русский: Philips SCD469/00 Руководство пользователя
- slovenčina: Philips SCD469/00 Používateľská príručka