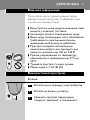
Philips HQ5413 Manual de utilizare
- Categorie
- Aparate de bărbierit
- Tip
- Manual de utilizare
Acest manual este potrivit și pentru


Important
Read these instructions for use carefully before
using the appliance and save them for future
reference.
◗ Only use the mains cord supplied.
◗ Do not use a damaged mains cord.
◗ If the mains cord is damaged, always have it
replaced by one of the original type in order
to avoid a hazard.
◗ The appliance is equipped with an automatic
voltage selector and is suitable for mains
voltages ranging from 100 to 240 volts.
◗ Store and use the appliance at a temperature
between 5cC and 35cC.
C
◗ Keep the appliance and the mains cord dry.
◗ Noise level: Lc= 62 dB [A]
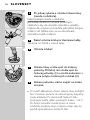
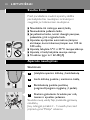
Using the appliance
Shaving
C
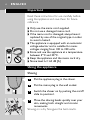
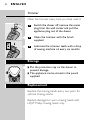
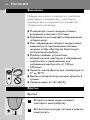
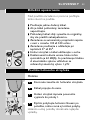
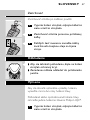
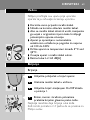
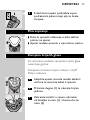
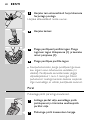
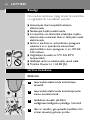
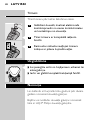
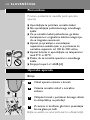
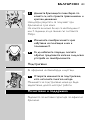
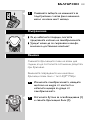
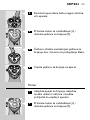
1 Put the appliance plug in the shaver.
2 Put the mains plug in the wall socket.
3 Switch the shaver on by pushing the on/off
slide to position I.
C
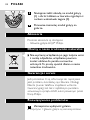
4 Move the shaving heads quickly over your
skin, making both straight and circular
movements.
Shaving on a dry face gives the best results.
ENGLISH4

Your skin may need 2 or 3 weeks to get
accustomed to the Philips system.
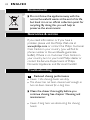
5 Switch the shaver off by pushing the on/off
slide to position 0.
C
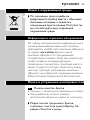
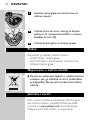
6 Put the protection cap on the shaver every
time you have used it, to prevent damage.
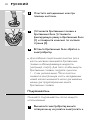
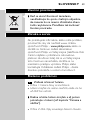
Trimming
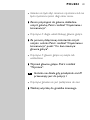
For grooming sideburns and moustache.
C
1 Open the trimmer by pushing the slide
upwards.
The trimmer can be activated while the motor is
running.
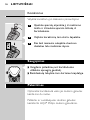
Cleaning and maintenance
Regular cleaning guarantees better shaving
performance.
Every week: shaving unit and hair chamber
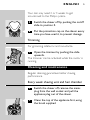
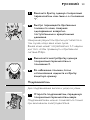
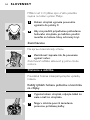
1 Switch the shaver off, remove the mains
plug from the wall socket and pull the
appliance plug out of the shaver.
C
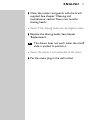
2 Clean the top of the appliance first, using
the brush supplied.
ENGLISH 5

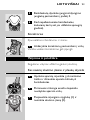
C
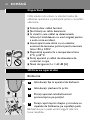
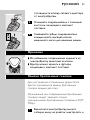
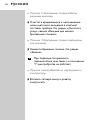
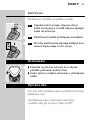
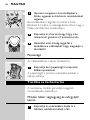
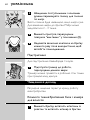
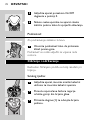
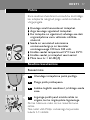
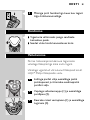
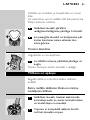
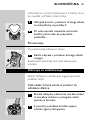
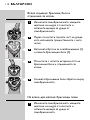
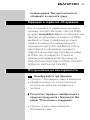
3 Press the release button (1) and remove
the shaving unit (2).
C
4 Clean the inside of the shaving unit and the
hair chamber with the brush.
C
5 Put the shaving unit back onto the shaver.
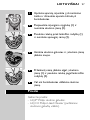
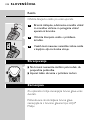
Every two months: shaving heads
1 Switch the shaver off, remove the mains
plug from the wall socket and pull the
appliance plug out of the shaver.
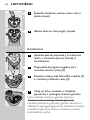
C
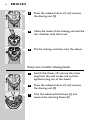
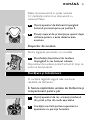
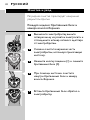
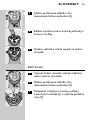
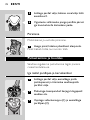
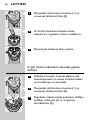
2 Press the release button (1) and remove
the shaving unit (2).
C
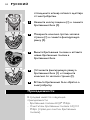
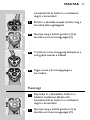
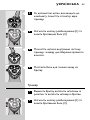
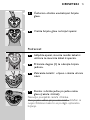
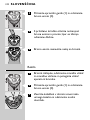
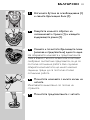
3 Turn the wheel anticlockwise (1) and
remove the retaining frame (2).
ENGLISH6
2
1
2
1
1
2

C
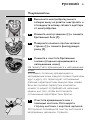
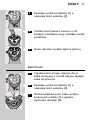
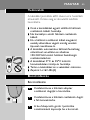
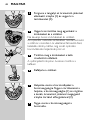
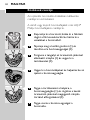
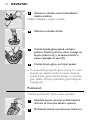
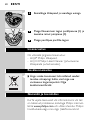
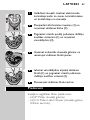
4 Remove and clean the shaving heads
(cutters and guards) one by one.
Do not mix up the cutters and the guards.
This is essential since each cutter has been
ground with its corresponding guard for optimal
performance. If you accidentally mix the sets up, it
could take several weeks before optimal shaving
performance is restored.
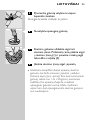
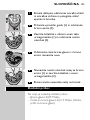
C
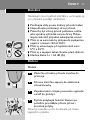
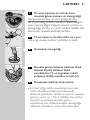
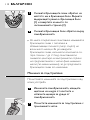
5 Clean the cutter with the short-bristled
side of the brush.
Brush carefully in the direction of the arrow.
C
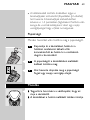
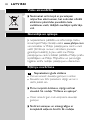
6 Brush the guard.
C
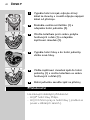
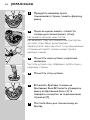
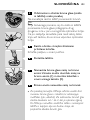
7 Put the shaving heads back into the shaving
unit. Put the retaining frame back into the
shaving unit (1) and turn the wheel
clockwise (2).
8 Put the shaving unit back onto the shaver.
B
For extra thorough cleaning, clean the shaving
heads by putting them in a degreasing liquid (e.g.
alcohol) every six months.To remove the shaving
heads, follow steps 1 to 4 described above. After
cleaning, lubricate the central point on the inside
of the guards with a drop of sewing machine oil to
prevent wear of the shaving heads.
ENGLISH 7
1
2

Trimmer
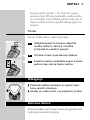
Clean the trimmer every time you have used it.
1 Switch the shaver off, remove the mains
plug from the wall socket and pull the
appliance plug out of the shaver.
C
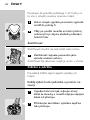
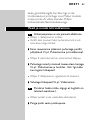
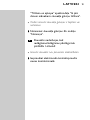
2 Clean the trimmer with the brush
supplied.
C
3 Lubricate the trimmer teeth with a drop
of sewing machine oil every six months.
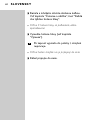
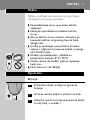
Storage
C
◗ Put the protection cap on the shaver to
prevent damage.
◗ The appliance can be stored in the pouch
supplied.
Replacement
Replace the shaving heads every two years for
optimal shaving results.
Replace damaged or worn shaving heads with
HQ4« Philips shaving heads only.
ENGLISH8

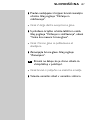
1 Switch the shaver off, remove the mains
plug from the wall socket and pull the
appliance plug out of the shaver.
C
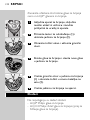
2 Press the release button (1) and remove
the shaving unit (2).
C
3 Turn the wheel anticlockwise (1) and
remove the retaining frame (2).
C
4 Remove the shaving heads and place new
ones in the shaving unit.
C
5 Put the retaining frame back into the
shaving unit (1) and turn the wheel
clockwise (2).
6 Put the shaving unit back onto the shaver.
Accessories
The following accessories are available:
- HQ4« Philips shaving heads.
- HQ110 Philips shaving head cleaner (shaving
head cleaning spray).
ENGLISH 9
2
1
1
2
1
2

Environment
C
◗ Do not throw the appliance away with the
normal household waste at the end of its life,
but hand it in at an official collection point for
recycling. By doing this you will help to
preserve the environment.
Guarantee & service
If you need information or if you have a
problem, please visit the Philips Web site at
www.philips.com or contact the Philips Customer
Care Centre in your country (you will find its
phone number in the worldwide guarantee
leaflet). If there is no Customer Care Centre in
your country, turn to your local Philips dealer or
contact the Service Department of Philips
Domestic Appliances and Personal Care BV.
Troubleshooting
1 Reduced shaving performance
B
Cause 1: the shaving heads are dirty.
B
The shaver has not been cleaned well enough or
has not been cleaned for a long time.
◗ Clean the shaver thoroughly before you
continue shaving. See chapter 'Cleaning and
maintenance'.
B
Cause 2: long hairs are obstructing the shaving
heads.
ENGLISH10

◗ Clean the cutters and guards with the brush
supplied. See chapter 'Cleaning and
maintenance', section 'Every two months:
shaving heads'.
B
Cause 3: the shaving heads are damaged or worn.
◗ Replace the shaving heads. See chapter
'Replacement'.
2 The shaver does not work when the on/off
slide is pushed to position I.
B
Cause: the shaver is not connected to the mains.
◗ Put the mains plug in the wall socket.
ENGLISH 11

Ważne
Przeczytaj instrukcję zanim zaczniesz używać
golarkę i zachowaj ja w przyszłości na wszelki
wypadek.
◗ Używaj wyłącznie przewodu zasilającego, w
który zostało wyposażone urządzenie.
◗ Nie używaj uszkodzonego przewodu
zasilającego.
◗ Jeśli uszkodzony jest przewód zasilający,
wówczas dla zapewnienia bezpieczeństwa
należy zastąpić go wyłącznie przewodem
oryginalnym.
◗ Urządzenie dysponuje automatycznym
przełącznikiem napięcia i przystosowane jest
do napięcia zasilania od 100 V do 240 V.
◗ Przechowuj urządzenie w temperaturze
pomiędzy 5cC oraz 35cC.
C
◗ Utrzymuj urządzenie i przewód zasilający w
stanie suchym.
◗ Poziom hałasu: Lc= 62 dB [A]
Sposób używania
Golenie
C
1 Włóż małą wtyczkę przewodu zasilającego
do golarki.
2 Wetknij wtyczkę do gniazdka ściennego.
3 Włącz golarkę, przesuwając przełącznik
on/off do pozycji I.
POLSKI12

C
4 Przesuwaj głowice po skórze, wykonując
zarówno proste, jak i okrężne ruchy.
Najlepsze efekty golenia osiąga się na skórze
suchej.
Skóra Twojej twarzy potrzebuje pewnego czasu
(2-3 tygodni), by przyzwyczaić się do nowego
systemu golenia.
5 Wyłącz urządzenie, przesuwając
przełącznik on/off do pozycji 0.
C
6 Po każdym użyciu załóż na golarkę
ochronną osłonkę, zabezpieczającą głowice
golące przed uszkodzeniem mechanicznym.
Trymer
Do kształtowania bokobrodów i wąsów.
C
1 Otwórz trymer przesuwając suwak do
góry.
Trymer może być używany po uprzednim
włączeniu urządzenia.
Czyszczenie i konserwacja
Regularne oczyszczanie golarki gwarantuje lepsze
efekty golenia.
POLSKI 13

Co tydzień: moduł golący i komorę na
ścięte włosy
1 Wyłącz golarkę, wyjmij wtyczkę zasilania z
gniazdka ściennego oraz wyjmij małą
wtyczkę z golarki.
C
2 Najpierw oczyść górną część urządzenia
przy pomocy załączonej szczoteczki.
C
3 Wciśnij przycisk zwalniający (1) i wyjmij
moduł golący (2).
C
4 Oczyść szczoteczką moduł golący oraz
komorę na włosy.
C
5 Ponownie zamontuj moduł golący na
golarce.
Trymer
1 Wyłącz golarkę, wyjmij wtyczkę zasilania z
gniazdka ściennego oraz wyjmij małą
wtyczkę z golarki.
POLSKI14
2
1

C
2 Wciśnij przycisk zwalniający (1) i wyjmij
moduł golący (2).
C
3 Obróć kółkiem w kierunku przeciwnym
do ruchu wskazówek zegara (1) i wyjmij
obsadę (2).
C
4 Wyjmij i oczyść głowice golące (nożyki i
osłonki) pojedynczo.
Nie pomieszaj nożyków i osłonek.
Tylko dokładne dopasowanie nożyków do
osłonek zapewnia optymalną skuteczność
działania każdego z zestawów.
C
5 Oczyść nożyk tą stroną szczoteczki, która
jest zakończona krótszym włosiem.
Ostrożnie oczyszczaj w kierunku wskazanym
przez strzałkę.
C
6 Oczyść osłonkę.
POLSKI 15
2
1
1
2

C
7 Ponownie załóż głowice golące na moduł
golący. Następnie załóż obsadę na moduł
golący (1) i obróć kółkiem w kierunku
zgodnym z ruchem wskazówek zegara (2).
8 Ponownie zamontuj moduł golący na
golarce.
B
Aby wykonać dodatkowe kompletne czyszczenie
głowic, wkładaj je co sześć miesięcy do płynu
usuwającego tłuszcz (np. spirytusu). Aby zdjąć
głowice golące, postępuj zgodnie z wymienionymi
wyżej czterema krokami. Po zakończeniu
czyszczenia nasmaruj środkowy punkt wnętrza
osłonek kroplą oleju maszynowego, co zapobiegnie
zużywaniu się głowic golących.
Trymer
Oczyszczaj trymer po każdym użyciu.
1 Wyłącz golarkę, wyjmij wtyczkę zasilania z
gniazdka ściennego oraz wyjmij małą
wtyczkę z golarki.
C
2 Trymer oczyść dołączoną do golarki
szczoteczką.
C
3 Co 6 miesięcy należy naoliwić ząbki
trymera kroplą oleju maszynowego.
POLSKI16
1
2

Przechowywanie
C
◗ Załóż na golarkę ochronną pokrywę, by
uniknąć uszkodzenia.
◗ Urządzenie może być przechowywane w
załączonym pokrowcu.
Wymiana
Aby zapewnić optymalne funkcjonowanie
urządzenia, co dwa lata wymieniaj głowice golące.
Uszkodzone lub zużyte głowice golące wymieniaj
jedynie na oryginalne głowice golące HQ4«.
1 Wyłącz golarkę, wyjmij wtyczkę zasilania z
gniazdka ściennego oraz wyjmij małą
wtyczkę z golarki.
C
2 Wciśnij przycisk zwalniający (1) i wyjmij
moduł golący (2).
C
3 Obróć kółkiem w kierunku przeciwnym
do ruchu wskazówek zegara (1) i wyjmij
obsadę (2).
C
4 Zdejmij głowice golące z modułu golącego
i załóż nowe.
POLSKI 17
2
1
1
2

C
5 Następnie załóż obsadę na moduł golący
(1) i obróć kółkiem w kierunku zgodnym z
ruchem wskazówek zegara (2).
6 Ponownie zamontuj moduł golący na
golarce.
Akcesoria
Poniższe akcesoria są dostępne:
- Głowice golące HQ4« Philips.
Dbamy o nasze środowisko naturalne
C
◗ Nie wyrzucaj urządzenia po jego zużyciu wraz
z resztą odpadków, urżądzenie powinno
zostać oddane do punktu surowców
wtórnych.To prosty sposób dbania o nasze
naturalne środowisko.
Gwarancja i serwis
Jeśli potrzebne Ci są informacje lub napotykasz
jakiś problem, skontaktuj się z Biurem Obsługi
Klienta (numer telefonu znajdziesz w Karcie
Gwarancyjnej), lub też z najbliższym punktem
serwisowym sprzętu AGD, autoryzowanym przez
firmę Philips.
Rozwiązywanie problemów
1 Zmniejszona wydajność golenia
B
Przyczyna 1: głowice golące są zanieczyszczone.
POLSKI18
1
2

B
Golarka nie była zbyt starannie czyszczona lub nie
była czyszczona przez długi okres czasu.
◗ Zanim przystąpisz do golenia, dokładnie
oczyść golarkę. Patrz: rozdział "Czyszczenie i
konserwacja".
B
Przyczyna 2: długie włoski blokują głowice golące.
◗ Za pomocą dołączonej szczoteczki oczyść
nożyki i osłonki. Patrz: rozdział "Czyszczenie i
konserwacja", punkt "Co dwa miesiące:
głowice golące".
B
Przyczyna 3: głowice golące są zużyte lub
uszkodzone.
◗ Wymień głowice golące. Patrz: rozdział
"Wymiana".
2 Golarka nie działa, gdy przełącznik on/off
przesunięty jest do pozycji I.
B
Przyczyna: golarka nie jest podłączona do sieci.
◗ Wetknij wtyczkę do gniazdka ściennego.
POLSKI 19

Important
Citiţi aceste instrucţiuni cu atenţie înainte de
utilizarea aparatului şi păstraţi-le pentru consultări
ulterioare.
◗ Folosiţi doar cablul furnizat.
◗ Nu folosiţi un cablu deteriorat.
◗ În cazul în care cablul se deteriorează,
înlocuiţi-l întotdeauna cu unul original pentru
a evita orice accident.
◗ Acest aparat este dotat cu un selector
automat de tensiune, potrivit pentru tensiuni
între 100 şi 240 V.
◗ Depozitaţi aparatul la o temperatură între
5cC şi 35cC.
C
◗ Feriţi aparatul şi cablul de alimentare de
contactul cu apa.
◗ Nivel de zgomot: Lc = 62 dB [A]
Utilizarea aparatului
Bărbierire
C
1 Introduceţi fişa în aparatul de bărbierit.
2 Introduceţi ştecherul în priză.
3 Porniţi aparatul culisând butonul
pornire/oprire pe poziţia I.
C
4 Faceţi rapid mişcări drepte şi circulare cu
capetele de bărbierire pe suprafaţa pielii.
Bărbierirea pe o piele uscată asigură cele mai
bune rezultate.
ROMÂNĂ20

Pielea dumneavoastră ar putea necesita
2-3 săptămâni până să se obişnuiască cu
sistemul Philips.
5 Opriţi aparatul de bărbierit împingând
butonul pornire/oprire pe poziţie 0.
C
6 Puneţi capacul de protecţie pe aparat după
utilizare pentru a evita deteriorarea
acestuia.
Dispozitiv de tundere
Pentru îngrijirea perciunilor şi a mustăţii.
C
1 Deschideţi dispozitivul de tundere
împingând în sus butonul culisant.
Dispozitivul de tundere poate fi activat în timp ce
motorul funcţionează.
Curăţare şi întreţinere
O curăţare regulată asigură cele mai bune
rezultate de bărbierire.
În fiecare săptămână: unitate de bărbierire şi
compartiment pentru păr
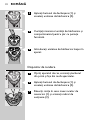
1 Opriţi aparatul de ras, scoateţi ştecherul
din priză şi fişa din mufa aparatului.
C
2 Curăţaţi mai întâi partea superioară a
aparatului cu periuţa furnizată.
ROMÂNĂ 21

C
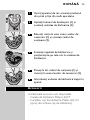
3 Apăsaţi butonul de declanşare (1) şi
scoateţi unitatea de bărbierire (2).
C
4 Curăţaţi interiorul unităţii de bărbierire şi
compartimentul pentru păr cu periuţa
furnizată.
C
5 Introduceţi unitatea de bărbierire înapoi în
aparat.
Dispozitiv de tundere
1 Opriţi aparatul de ras, scoateţi ştecherul
din priză şi fişa din mufa aparatului.
C
2 Apăsaţi butonul de declanşare (1) şi
scoateţi unitatea de bărbierire (2).
C
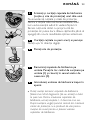
3 Răsuciţi rotiţa în sens invers acelor de
ceasornic (1) şi scoateţi cadrul de
susţinere (2).
ROMÂNĂ22
2
1
2
1
1
2
Pagina se încarcă...
Pagina se încarcă...
Pagina se încarcă...
Pagina se încarcă...
Pagina se încarcă...
Pagina se încarcă...
Pagina se încarcă...
Pagina se încarcă...
Pagina se încarcă...
Pagina se încarcă...
Pagina se încarcă...
Pagina se încarcă...
Pagina se încarcă...
Pagina se încarcă...
Pagina se încarcă...
Pagina se încarcă...
Pagina se încarcă...
Pagina se încarcă...
Pagina se încarcă...
Pagina se încarcă...
Pagina se încarcă...
Pagina se încarcă...
Pagina se încarcă...
Pagina se încarcă...
Pagina se încarcă...
Pagina se încarcă...
Pagina se încarcă...
Pagina se încarcă...
Pagina se încarcă...
Pagina se încarcă...
Pagina se încarcă...
Pagina se încarcă...
Pagina se încarcă...
Pagina se încarcă...
Pagina se încarcă...
Pagina se încarcă...
Pagina se încarcă...
Pagina se încarcă...
Pagina se încarcă...
Pagina se încarcă...
Pagina se încarcă...
Pagina se încarcă...
Pagina se încarcă...
Pagina se încarcă...
Pagina se încarcă...
Pagina se încarcă...
Pagina se încarcă...
Pagina se încarcă...
Pagina se încarcă...
Pagina se încarcă...
Pagina se încarcă...
Pagina se încarcă...
Pagina se încarcă...
Pagina se încarcă...
Pagina se încarcă...
Pagina se încarcă...
Pagina se încarcă...
Pagina se încarcă...
Pagina se încarcă...
Pagina se încarcă...
Pagina se încarcă...
Pagina se încarcă...
Pagina se încarcă...
Pagina se încarcă...
Pagina se încarcă...
Pagina se încarcă...
Pagina se încarcă...
Pagina se încarcă...
Pagina se încarcă...
Pagina se încarcă...
Pagina se încarcă...
Pagina se încarcă...
Pagina se încarcă...
Pagina se încarcă...
Pagina se încarcă...
Pagina se încarcă...
Pagina se încarcă...
Pagina se încarcă...
Pagina se încarcă...
Pagina se încarcă...
Pagina se încarcă...
Pagina se încarcă...
Pagina se încarcă...
Pagina se încarcă...
Pagina se încarcă...
Pagina se încarcă...
Pagina se încarcă...
Pagina se încarcă...
Pagina se încarcă...
Pagina se încarcă...
Pagina se încarcă...
Pagina se încarcă...
Pagina se încarcă...
Pagina se încarcă...
Pagina se încarcă...
Pagina se încarcă...
Pagina se încarcă...
Pagina se încarcă...
Pagina se încarcă...
Pagina se încarcă...
Pagina se încarcă...
Pagina se încarcă...
Pagina se încarcă...
Pagina se încarcă...
-
 1
1
-
 2
2
-
 3
3
-
 4
4
-
 5
5
-
 6
6
-
 7
7
-
 8
8
-
 9
9
-
 10
10
-
 11
11
-
 12
12
-
 13
13
-
 14
14
-
 15
15
-
 16
16
-
 17
17
-
 18
18
-
 19
19
-
 20
20
-
 21
21
-
 22
22
-
 23
23
-
 24
24
-
 25
25
-
 26
26
-
 27
27
-
 28
28
-
 29
29
-
 30
30
-
 31
31
-
 32
32
-
 33
33
-
 34
34
-
 35
35
-
 36
36
-
 37
37
-
 38
38
-
 39
39
-
 40
40
-
 41
41
-
 42
42
-
 43
43
-
 44
44
-
 45
45
-
 46
46
-
 47
47
-
 48
48
-
 49
49
-
 50
50
-
 51
51
-
 52
52
-
 53
53
-
 54
54
-
 55
55
-
 56
56
-
 57
57
-
 58
58
-
 59
59
-
 60
60
-
 61
61
-
 62
62
-
 63
63
-
 64
64
-
 65
65
-
 66
66
-
 67
67
-
 68
68
-
 69
69
-
 70
70
-
 71
71
-
 72
72
-
 73
73
-
 74
74
-
 75
75
-
 76
76
-
 77
77
-
 78
78
-
 79
79
-
 80
80
-
 81
81
-
 82
82
-
 83
83
-
 84
84
-
 85
85
-
 86
86
-
 87
87
-
 88
88
-
 89
89
-
 90
90
-
 91
91
-
 92
92
-
 93
93
-
 94
94
-
 95
95
-
 96
96
-
 97
97
-
 98
98
-
 99
99
-
 100
100
-
 101
101
-
 102
102
-
 103
103
-
 104
104
-
 105
105
-
 106
106
-
 107
107
-
 108
108
-
 109
109
-
 110
110
-
 111
111
-
 112
112
-
 113
113
-
 114
114
-
 115
115
-
 116
116
-
 117
117
-
 118
118
-
 119
119
-
 120
120
-
 121
121
-
 122
122
-
 123
123
-
 124
124


Philips HQ5413 Manual de utilizare
- Categorie
- Aparate de bărbierit
- Tip
- Manual de utilizare
- Acest manual este potrivit și pentru
în alte limbi
- slovenčina: Philips HQ5413 Používateľská príručka
- eesti: Philips HQ5413 Kasutusjuhend