Graphite 52G671 Manualul proprietarului
- Categorie
- Scarificatoare de gazon
- Tip
- Manualul proprietarului

0

1
INSTRUKCJA OBSŁUGI ........................................................................................................................ 4
INSTRUCTION MANUAL.................................................................................................................... 11
BETRIEBSANLEITUNG ........................................................................................................................ 15
РУКОВОДСТВО ПО ЭКСПЛУАТАЦИИ ............................................................................................ 19
ІНСТРУКЦІЯ З ЕКСПЛУАТАЦІЇ ......................................................................................................... 24
HASZNÁLATI UTASÍTÁS .................................................................................................................... 28
INSTRUCTIUNI DE DESERVIRE .......................................................................................................... 33
INSTRUKCE K OBSLUZE ..................................................................................................................... 37
NÁVOD NA OBSLUHU ....................................................................................................................... 41
NAVODILA ZA UPORABO .................................................................................................................. 45
APTARNAVIMO INSTRUKCIJA .......................................................................................................... 49
LIETOŠANAS INSTRUKCIJA ............................................................................................................... 53
KASUTUSJUHEND .............................................................................................................................. 57
ИНСТРУКЦИЯ ЗА ОБСЛУЖВАНЕ .................................................................................................... 61
UPUTE ZA UPOTREBU ....................................................................................................................... 66
UPUTSTVO ZA UPOTREBU ................................................................................................................ 70
ΟΔΗΓΙΕΣ ΧΡΗΣΗΣ .............................................................................................................................. 75
INSTRUCCIONES DE USO .................................................................................................................. 79
MANUALE PER L’USO ........................................................................................................................ 84
GEBRUIKSAANWIJZING .................................................................................................................... 88
MANUEL D’INSTRUCTION ................................................................................................................ 92

2
52G671
52G672
52G673

3

4
TŁUMACZENIE INSTRUKCJI ORYGINALNEJ
KOSIARKA SPALINOWA Z NAPĘDEM
52G671, 52G672, 52G673
UWAGA! WAŻNE! PRZED PRZYSTĄPIENIEM DO
UŻYTKOWANIA URZĄDZENIA NALEŻY UWAŻNIE PRZECZYTAĆ
NINIEJSZĄ INSTRUKCJĘ I ZACHOWAĆ JĄ DO DALSZEGO
WYKORZYSTANIA.
SZCZEGÓŁOWE PRZEPISY BEZPIECZEŃSTWA
INSTRUKCJE BEZPIECZEŃSTWA UŻYTKOWANIA KOSIAREK
SPALINOWYCH TRAWNIKOWYCH
Bezpieczeństwo użytkowania kosiarek spalinowych w praktyce
1. Instruktaż
a) Przeczytaj dokładnie instrukcje. Zapoznaj się z układami
sterowniczymi i prawidłowym użytkowaniem urządzenia.
b) Nigdy nie pozwalaj na obsługę urządzenia przez dzieci i
osoby nie zapoznane z instrukcjami obsługi urządzenia.
Przepisy krajowe mogą określać dokładnie wiek operatora.
c) Nigdy nie koś, gdy inne osoby, szczególnie dzieci lub
zwierzęta domowe, są w pobliżu.
d) Pamiętaj, że operator lub użytkownik jest odpowiedzialny
za wypadki lub występujące zagrożenia wobec innych
osób lub otoczenia.
2. Przygotowanie
a) Podczas koszenia zawsze noś solidne obuwie i długie
spodnie. Nie obsługuj urządzenia z bosą stopą lub w
odkrytych sandałach. Unikaj zniszczonego ubrania, które
jest zbyt luźne lub które ma zwisające paski lub tasiemki.
b) Sprawdź dokładnie teren, na którym urządzenie będzie
pracować i usuń wszystkie przedmioty, które mogłyby
dostać się do urządzenia.
c) Przed użyciem zawsze sprawdź, czy noże, śruby i
wyposażenie zespołu noży nie są zużyte lub uszkodzone.
Wymień zużyte lub uszkodzone części w zestawach, w celu
zachowania wyważenia. Zastąp uszkodzone lub nieczytelne
tabliczki.
d) Należy tankować na świeżym powietrzu, przy zimnym
silniku. Nigdy nie tankuj oraz nie odkręcaj zbiornika paliwa
podczas pracy silnika.
e) Podczas tankowania należy zachować ostrożność, oraz
upewnić się czy w pobliżu nie występuje źródło ognia.
3. Użytkowanie
a) Nigdy nie blokuj elementów sterujących urządzeniem.
Może to być przyczyną utraty kontroli nad urządzeniem
oraz spowodować wypadek.
b) Nie uruchamiaj urządzenia w pomieszczeniach. Istnieje
ryzyko zatrucia lub uduszenia w skutek nagromadzenia
spalin.
c) Koś tylko w świetle dziennym lub przy dobrym oświetleniu
sztucznym.
d) Unikaj koszenia mokrej trawy.
e) Zawsze upewnij się, że twoje nogi na pochyłości stoją
pewnie.
f) Chodź, nigdy nie biegaj.
g) Koś w poprzek zbocza, nigdy w górę lub w dół.
h) Zachowaj szczególną ostrożność przy zmianie kierunku
jazdy na zboczu.
i) Nie koś na nadmiernie pochylonych zboczach –
maksymalnie do 15 stopni nachylenia.
j) Zwracaj szczególną uwagę przy cofaniu lub ciągnięciu
urządzenia do siebie.
k) Wyłącz napęd elementu(-w) tnącego(-y), jeżeli urządzenie
należy przechylić podczas przemieszczania go po innych
niż trawiaste powierzchniach i gdy jest transportowane do
miejsca koszenia i z powrotem.
l) Nie używaj urządzenia z uszkodzonymi osłonami lub
obudowami oraz bez urządzenia zabezpieczającego, np.
dołączonych osłon i/lub pojemników na trawę.
m) Włączaj silnik ostrożnie zgodnie z instrukcją, zwracając
uwagę, czy stopy są z dala od elementu(-w) tnącego(-y).
n) Nie przechylaj urządzenia podczas włączania silnika, z
wyjątkiem sytuacji, gdy wymaga ono przechylenia podczas
uruchomienia. W tym przypadku nie przechylaj więcej, niż
to jest konieczne i podnoś tylko tę część, która jest z dala
od operatora.
o) Nie uruchamiaj urządzenia, stojąc przed otworem
wyrzutowym.
p) Nie trzymaj rąk i stóp w pobliżu obracających się części.
Pilnuj, aby otwór wyrzutowy przez cały czas nie był
zapchany.
q) Nie przenoś urządzenia z włączonym silnikiem.
r) Zatrzymaj urządzenie. Upewnij się, że wszystkie części
ruchome nie są w ruchu
− za każdym razem, gdy odchodzisz od urządzenia,
− przed czyszczeniem lub przepychaniem wylotu,
− przed sprawdzeniem, czyszczeniem lub naprawą
urządzenia,
− po uderzeniu obcym przedmiotem. Sprawdź, czy
urządzenie nie jest uszkodzone i jeżeli jest to
konieczne, dokonaj naprawy przed ponownym
uruchomieniem i pracą urządzenia
jeżeli urządzenie zaczyna nadmiernie drgać
(natychmiast sprawdź)
− sprawdź pod kątem uszkodzenia,
− wymień lub napraw każdą uszkodzoną część,
− sprawdź i dokręć poluzowane części.
4. Konserwacja i przechowywanie
a) Wyłącz silnik i wyciągnij przewody świec zapłonowych
przed rozpoczęciem czynności obsługowych lub
naprawczych
b) Utrzymuj w należytym stanie wszystkie nakrętki, śruby i
wkręty, aby być pewnym, że urządzenie będzie pracowało
bezpiecznie.
c) Sprawdzaj często pojemnik na trawę, czy nie jest zużyty
lub uszkodzony.
d) W przypadku urządzeń wielonożowych uważaj, gdyż obrót
jednego elementu tnącego może spowodować obrót
innych noży.
e) Zachowaj ostrożność podczas regulacji urządzenia, aby
uniknąć dostania się palców między poruszające się noże a
stałe części urządzenia.
f) Podczas obsługi noży zachowaj ostrożność, mimo że
napęd jest wyłączony, ponieważ noże mogą ciągle się
obracać.
g) Wymieniaj, w celu zachowania bezpieczeństwa, zużyte lub
uszkodzone części. Używaj tylko oryginalnych części
zamiennych i wyposażenia.
Objaśnienie zastosowanych piktogramów

5
1. OSTRZEŻENIE: PRZECZYTAJ INSTRUKCJĘ OBSŁUGI!
2. OSTRZEŻENIE: NIE POZWÓL ZBLIŻAĆ SIĘ OSOBĄ
POSTRONNYM!
3. OSTRZEŻENIE: RĘCE I STOPY TRZYMAJ Z DALEKA OD NOŻY!
4. Wyłącz silnik i wyciągnij przewody świec zapłonowych przed
rozpoczęciem czynności obsługowych lub naprawczych
5. Zachowaj bezpieczną odległość od gorącej powierzchni
6. Używaj środki ochrony osobistej (gogle ochronne, ochronniki
słuchu)
7. Używaj odzieży ochronnej
8. Nie dopuszczać dzieci do narzędzia
9. Chroń urządzenie przed wilgocią
10. Recykling
BUDOWA I ZASTOSOWANIE
Kosiarka spalinowa jest urządzeniem napędzanym silnikiem
spalinowym czterosuwowym, posiada układ napędzający koła, co
ułatwia jej prowadzenie po nierównym terenie. Kosiarka spalinowa
służy do koszenia trawników w przydomowych ogródkach jak i
większych obszarów obsadzonych trawą, np. boiska i tereny
rekreacyjne. Skoszona trawa może być gromadzona w koszu na
trawę, wyrzucana z boku przez otwór wyrzutu bocznego lub
mielona. Należy stosować wyłącznie akcesoria odpowiednie dla
danego urządzenia i przestrzegać wskazówek podanych w instrukcji
obsługi. Kosiarka spalinowa przeznaczona jest wyłącznie do
zastosowań amatorskich.
OSTRZEŻENIE! Nie wolno używać urządzenia niezgodnie z jego
przeznaczeniem.
OPIS STRON GRAFICZNYCH
Poniższa numeracja odnosi się do elementów urządzenia
przedstawionych na stronach graficznych niniejszej instrukcji.
1. Dźwignia sprzęgła napędu kół
2. Rękojeść górna
3. Dźwignia hamulca silnika
4. Półka na napoje
5. Nakrętka mocująca rękojeści
6. Osłona wyrzutu tylnego
7. Rękojeść dolna
8. Korek wlewu paliwa
9. Obudowa filtra powietrza
10. Ręczna pompka paliwa
11. Osłona wyrzutu bocznego
12. Korek wlewu oleju
13. Koło napędowe
14. Dźwignia regulacji wysokości koszenia
15. Kosz na trawę
16. Linka rozruchowa
17. Przesłona wyrzutu tylnego
18. Wskaźnik poziomu oleju
19. Korek spustowy oleju
20. Nóż tnący
21. Śruba mocowania noża tnącego
22. Osłona filtra powietrza
23. Filtr powietrza
24. Przewód świecy zapłonowej
25. Świeca zapłonowa
26. Klucz do świec zapłonowych
27. Styki świecy zapłonowej
* Mogą występować różnice między rysunkiem a wyrobem.
WYPOSAŻENIE I AKCESORIA
1. Kosz na trawę - 1 szt.
2. Rękojeść dolna - 1 szt.
3. Rękojeść górna - 1 szt.
4. Półka na napoje + wsporniki - 1 kpl.
5. Przesłona wyrzutu tylnego - 1 szt.
6. Element do wyrzutu bocznego - 1 szt.
7. Uchwyt linki rozruchowej - 1 szt.
8. Klipsy - 2 szt.
9. Śruby, nakrętki, wkręty - 1 kpl.
PRZYGOTOWANIE DO PRACY
OSTRZEŻENIE! Nie wolno pracować kosiarką spalinową bez
kosza na trawę z podniesioną osłoną wyrzutu tylnego.
OSTRZEŻENIE! Wszystkie czynności obsługi, naprawy, regulacji
i przygotowawcze do pracy należy wykonywać przy
wyłączonym silniku.
MONTAŻ RĘKOJEŚCI
• Zamontować rękojeść dolną (7) do obudowy kosiarki i
zamocować śrubami i nakrętkami (istnieje możliwość ustawienia
kąta pochylenia rękojeści).
• Połączyć rękojeść górną (2) z rękojeścią dolną (7) za pomocą
dostarczonych śrub i nakrętek (dźwigni dla 52G673).
• Zamontować uchwyt linki rozruchowej po prawej stronie
rękojeści górnej (2) i przełożyć linkę rozruchową (16) przez uchwyt.
• Przypiąć linki sterujące do rękojeści za pomocą dostarczonych
klipsów (rys. A).
MOCOWANIE KOSZA NA TRAWĘ
• Unieść osłonę wyrzutu tylnego (6).
• Podwiesić kosz na trawę (15) u wylotu wyrzutu tylnego z
wykorzystaniem dwóch zaczepów „a” w górnej części obudowy
kosiarki (rys. B).
• Opuścić osłonę wyrzutu tylnego (6).
Kosz na trawę utrzymywany jest we właściwym położeniu za pomocą siły
sprężyny osłony wyrzutu tylnego. Kosz na trawę posiada wygodny
uchwyt do przenoszenia w celu opróżnienia go ze ściętej trawy.
UWAGA! Zawsze należy upewnić się czy kosz na trawę jest właściwie
zamocowany.
USTAWIENIE OSŁONY WYRZUTU BOCZNEGO
• Zdjąć kosz na trawę (15) i opuścić osłonę wyrzutu tylnego (6).
• Obrócić kosiarkę „na bok”.
• Zamontować przesłonę wyrzutu tylnego (17).
• Odciągnąć osłonę wyrzutu bocznego (11) od obudowy kosiarki.
• Zainstalować na zaczepach obudowy element do wyrzutu
bocznego i zwolnić osłonę wyrzutu bocznego (11)
• Postawić kosiarkę na kołach.
USTAWIENIE FUNKCJI MIELENIA
• Zdjąć kosz na trawę (15) i opuścić osłonę wyrzutu tylnego (6).
• Zamontować przesłonę wyrzutu tylnego (17).
• Zdemontować element do wyrzutu bocznego (jeśli jest
zamontowany) i zwolnić osłonę wyrzutu bocznego (11).
USTAWIENIE WYSOKOŚCI KOSZENIA
Wysokość koszenia jest regulowana za pomocą dźwigni wysokości
koszenia (14) w 5 (lub 8 dla 52G673) położeniach w zakresie 25 – 65 mm.
• Odciągnąć dźwignię regulacji wysokości koszenia (14) (rys. D).
• Przesuwając dźwignię regulacji koszenia wybrać odpowiednią
wysokość koszenia.
• Umiejscowić dźwignię regulacji wysokości koszenia w jednym z
wybranych zagłębień blokady dźwigni regulacji wysokości koszenia
(14) na obudowie kosiarki (rys. D).
UWAGA! Wysokość koszenia ustawiana jest jednocześnie na
wszystkich czterech kołach jezdnych.

6
NAPEŁNIENIE OLEJEM SILNIKOWYM
OSTRZEŻENIE! Nie wolno uruchamiać kosiarki spalinowej bez
oleju, takie uruchomienie spowoduje uszkodzenie silnika.
• Odkręcić korek wlewu oleju (12).
• Wlać przygotowaną ilość oleju.
• Sprawdzić poziom oleju na wskaźniku poziomu oleju (12) (rys. E).
• Zakręcić korek wlewu oleju (12).
UWAGA! Pierwszej wymiany oleju dokonać po 5 godzinach
pracy, kolejne, co 25 godzin. Olej zlać do naczynia
olejoodpornego poprzez odkręcenie korka spustu oleju (19)
(rys. E).
NAPEŁNIENIE BENZYNĄ
OSTRZEŻENIE! Jako paliwo do kosiarki spalinowej należy
stosować benzynę bezołowiową o liczbie oktanowej 95.
• Odkręcić korek wlewu paliwa (8).
• Wlać benzynę do zbiornika i zakręcić korek wlewu paliwa (8).
OSTRZEŻENIE! Po zakończeniu nalewania paliwa należy
upewnić się czy korek wlewu paliwa został pewnie dokręcony.
Nie dopuścić do rozlania się paliwa.
UWAGA! Większość kłopotów z silnikami spalinowymi
pośrednio lub bezpośrednio jest związana z rodzajem
zastosowanego paliwa.
MONTAŻ PÓŁKI NA NAPOJE
• Zamontować półkę na napoje (4) do wsporników na rękojeści
górnej (2) i zamocować dokręcając od spodu plastikowe elementy
za pomocą wkrętów.
PRACA / USTAWIENIA
URUCHAMIANIE SILNIKA
OSTRZEŻENIE! W żadnym wypadku nie wolno używać kosiarki
bez zamontowanych osłon. Stosowanie niewłaściwych lub
uszkodzonych osłon może stać się przyczyną poważnych
obrażeń.
OSTRZEŻENIE! Użycie niewłaściwego lub zużytego noża
tnącego powoduje wzrost wibracji.
Kosiarka spalinowa jest wyposażona w układ zabezpieczający
przed przypadkowym uruchomieniem.
• Napompować paliwo ręczną pompką paliwa (10) wciskając
przycisk kilka razy (rys. F).
• Przyciągnąć do rękojeści górnej (2) dźwignię hamulca silnika (3)
(rys. G).
• Energicznie pociągnąć za linkę rozruchową (16).
ZATRZYMANIE PRACY SILNIKA
• Puścić przyciągniętą do rękojeści górnej (2) dźwignię hamulca
silnika (3).
OSTRZEŻENIE! Po zatrzymaniu silnika ostrze jest nadal w ruchu
przez kilka sekund.
UWAGA! Nigdy nie wolno posługiwać się kosiarką spalinową w
czasie deszczu i w otoczeniu wilgotnym. Nigdy nie wolno
pracować uszkodzonym urządzeniem. Wszystkie części
powinny być odpowiednio zamontowane i spełniać wymagania
zapewniające właściwą pracę kosiarki spalinowej. Jakikolwiek
uszkodzony element zabezpieczający lub część powinny zostać
natychmiast naprawione lub wymienione.
URUCHOMIENIE NAPĘDU KÓŁ
• Uruchomić silnik.
• Przyciągnąć do rękojeści górnej (2) dźwignię sprzęgła napędu kół
(1).
Każdorazowe zwolnienie nacisku na dźwignię sprzęgła napędu kół
(1) powoduje zatrzymanie przekazania napędu na koła przy nadal
pracującym silniku. Koszenie można również przeprowadzić bez
korzystania z funkcji napędu kół pchając kosiarkę.
OSTRZEŻENIE! Przed uruchomieniem napędu kół upewnić się
czy na drodze kosiarki nie znajduje się jakakolwiek
przeszkoda.
WSKAZÓWKI DOTYCZĄCE BEZPIECZNEGO UŻYTKOWANIA
• Kosiarkę należy przesuwać ruchem płynnym trzymając obiema
rękami za rękojeść.
• Pracującą kosiarkę należy utrzymywać z dala od twardych
obiektów i roślin uprawnych.
• Kosiarką można pracować wyłącznie wtedy, gdy trawa jest sucha.
• Częste opróżnianie kosza na trawę (po napełnieniu go w 2/3) zapewni
sprawniejszy przebieg koszenia (plastikowa klapka umieszczona na
górnej pokrywie kosza na trawę sygnalizuje stopień napełnienia kosza).
Kosiarkę można użytkować z zamontowanym koszem na trawę lub
bez. Należy jednak pamiętać, że w przypadku koszenia bez kosza na
trawę osłona wyrzutu tylnego musi być opuszczona.
OSTRZEŻENIE! Silnik kosiarki jest bardzo gorący zarówno
podczas pracy, jak i zaraz po jej ukończeniu. Dotknięcie może
spowodować oparzenie skóry.
OSTRZEŻENIE! Spaliny zawierają tlenek węgla, którego
wdychanie może spowodować zatrucie. Dlatego też nigdy nie
należy uruchamiać urządzenia w pomieszczeniach lub w
miejscach o słabej wentylacji. Nigdy nie uruchamiaj kosiarki w
pomieszczeniach zamkniętych lub w pobliżu materiałów
łatwopalnych.
OBSŁUGA I KONSERWACJA
OSTRZEŻENIE! Przed przystąpieniem do czyszczenia,
sprawdzania czy naprawy kosiarki należy mieć pewność, że
silnik urządzenia został zatrzymany i nie jest gorący. Odłączyć
przewód od świecy zapłonowej, aby zapobiec przypadkowemu
uruchomieniu silnika.
WYMIANA NOŻA TNĄCEGO
• Zdemontować kosz na trawę (15).
• Położyć kosiarkę „na bok”.
• Uchwycić pewnie nóż tnący (20) (należy stosować rękawice
ochronne) (rys. H).
• Odkręcić śrubę mocowania noża tnącego (21) kluczem
pokręcając w lewo(rys. H).
• Wymienić lub naostrzyć nóż tnący (w przypadku wymiany noża
tnącego na nowy - musi on być tego samego rozmiaru).
• Zamocować nóż tnący postępując jak wyżej w odwrotnej
kolejności.
• Czynność ostrzenia lub wymiany noża tnącego najlepiej
powierzyć osobie wykwalifikowanej wykorzystując części
oryginalne.

7
FILTR POWIETRZA
Zabrudzony filtr powietrza powoduje obniżenie mocy silnika
spalinowego oraz zwiększenie zużycia paliwa. Filtr powietrza należy
czyścić po każdych 5 godzinach pracy kosiarki.
• Zdjąć osłonę filtra powietrza (22) (rys. I).
• Wyjąć filtr powietrza (23) z osłony filtra powietrza (rys. I).
• Otrzepać z pyłu i przedmuchać filtr powietrza sprężonym
powietrzem o niskim ciśnieniu.
• Zamontować filtr powietrza i osłonę filtra powietrza.
UWAGA! Aby uniknąć zagrożenia pożarem lub powstania
niebezpiecznych oparów, filtra powietrza nie wolno myć w
benzynie lub w innych łatwopalnych rozpuszczalnikach.
ŚWIECA ZAPŁONOWA
W celu niezawodnego działania urządzenia należy okresowo
sprawdzać stan świecy zapłonowej.
• Zdjąć przewód świecy zapłonowej (24) ze świecy zapłonowej (25)
(rys. J).
• Założyć klucz do świec (26) i odkręcić świecę zapłonową.
• Oczyścić styki świecy zapłonowej (25) (rys. K).
• Sprawdzić przerwę między stykami świecy zapłonowej (27) (rys.
L).
• Jeśli trzeba wymienić świecę zapłonową na nową.
PRZECHOWYWANIE
• Przechowując kosiarkę należy opróżnić całkowicie układ
paliwowy.
• Spuścić paliwo ze zbiornika paliwa, uruchomić silnik i zezwolić,
aby przestał pracować z powodu braku paliwa.
• Co sezon stosuj świeże paliwo. Nigdy nie wolno do zbiornika
paliwa stosować żadnych środków czyszczących, ponieważ może
to spowodować uszkodzenie silnika.
• Należy zwrócić szczególną uwagę, aby otwory wentylacyjne
obudowy silnika były drożne.
• Przy kosiarce mogą być przeprowadzane wyłącznie zabiegi
konserwacyjne opisane w niniejszej instrukcji. Wszelkie inne
czynności mogą być wykonywane tylko przez autoryzowany serwis.
• Nie wolno dokonywać jakichkolwiek zmian w konstrukcji kosiarki.
• Kosiarka, gdy nie jest użytkowana powinna być przechowywana
w stanie czystym, na płaskiej powierzchni, w suchym miejscu,
niedostępnym dla dzieci.
• Regularnie usuwać resztki trawy.
• Nigdy nie wolno czyścić kosiarki spalinowej za pomocą wody,
agresywnych płynów lub rozpuszczalników. Kosiarkę spalinową
należy czyścić za pomocą szczotki, sprężonego powietrza lub
delikatnej tkaniny.
• Okresowo kontrolować stan świecy zapłonowej silnika spalinowego.
Zużytą świecę zapłonową wymienić na nową zalecaną przez
producenta.
• Używać zalecanych przez producenta noży tnących.
UWAGA! Paliwa z domieszką alkoholu (etylowego lub
metylowego) mogą pochłaniać wilgoć, co w czasie
przechowywania prowadzi do separacji składników mieszanki
paliwowej i tworzenia się kwasów. Zakwaszona benzyna może
doprowadzić do uszkodzenia silnika.
Wszelkiego rodzaju usterki powinny być usuwane przez
autoryzowany serwis producenta.
PARAMETRY TECHNICZNE
DANE ZNAMIONOWE
DANE DOTYCZĄCE HAŁASU I DRGAŃ
Model
52G671
52G672
52G673
Poziom cisnienia
akustycznego
LpA= 80,3
dB(A) K=
3 dB(A)
LpA= 83,4
dB(A) K=
3 dB(A)
LpA= 83,4
dB(A) K=
3 dB(A)
Zmierzony poziom
mocy akustycznej
LwA= 94
dB(A) K=
3 dB(A)
LwA= 96
dB(A) K=
3 dB(A)
LwA= 97
dB(A) K=
3 dB(A)
Wartość
przyśpieszeń drgań
ah= 4,52
m/s2 K=
1,5 m/s2
ah= 3,37
m/s2 K=
1,5 m/s2
ah= 3,36
m/s2 K=
1,5 m/s2
Kosiarka spalinowa z napędem
Parametr
Wartość
Model
52G671
52G672
52G673
Pojemność
silnika
139 cm3
173 cm3
196 cm3
Maksymaln
a moc
silnika
2,2 kW
(3 KM)
3,0 kW
(4 KM)
3,2 kW
(4,35 KM)
Maksymaln
a prędkość
bez
obciążenia
2850 min-1
2800 min-1
2850 min-1
Gaźnik
1P65FA
H127-3A;
KDH107A;
1P70-1A;
DY1P70FA;
1P70F;
DY1P70FA
DY1P70FB
Rodzaj
paliwa
Benzyna
bezołowiowa
95
Benzyna
bezołowiowa
95
Benzyna
bezołowiowa
95
Olej
silnikowy
Do
czterosuwowy
ch urządzeń
ogrodowych
Do
czterosuwowy
ch urządzeń
ogrodowych
Do
czterosuwowy
ch urządzeń
ogrodowych
Świeca
zapłonowa
F7RTC
F7RTC
F7RTC
Pojemność
zbiornika
paliwa
1,3 l
1,5 l
1,0 l
Pojemność
zbiornika
oleju
0,6 l
0,6 l
0,6 l
Pojemność
zbiornika
na trawę
55 l
55 l
60 l
Zakres i
Ilość
ustawień
wysokości
koszenia
25-65 mm
5 pozycji
25-65 mm
5 pozycji
25-65 mm
8 pozycji
Napęd
samojezdn
y
Tak
Tak
Tak
Mulczowan
ie
Tak
Tak
Tak
Wyrzut
boczny
Tak
Tak
Tak
Szerokość
cięcia
460 mm
502 mm
525 mm
Grubość
noża
2,5 mm
3,0 mm
3,0 mm
Masa
31 kg
36 kg
36,5 kg
Rok
produkcji
2020
2020
2020
52G671, 52G672, 52G673 oznacza zarówno typ oraz określenie
maszyny

8
Informacje na temat hałasu i wibracji
Poziom emitowanego hałasu przez urządzenie opisano poprzez:
poziom emitowanego ciśnienia akustycznego LpA oraz poziom
mocy akustycznej LwA (gdzie K oznacza niepewność pomiaru).
Drgania emitowane przez urządzenie opisano poprzez wartość
przyśpieszeń drgań ah (gdzie K oznacza niepewność pomiaru).
Podane w niniejszej instrukcji: poziom emitowanego ciśnienia
akustycznego LpA, poziom mocy akustycznej LwA oraz wartość
przyśpieszeń drgań ah zostały zmierzone zgodnie z Dyrektywą
2000/14/EC o emisji hałasu do środowiska. Podany poziom drgań
ah może zostać użyty do porównywania urządzeń oraz do wstępnej
oceny ekspozycji na drgania.
Podany poziom drgań jest reprezentatywny jedynie dla
podstawowych zastosowań urządzenia. Jeżeli urządzenie zostanie
użyte do innych zastosowań lub z innymi narzędziami roboczymi,
poziom drgań może ulec zmianie. Na wyższy poziom drgań będzie
wpływać niewystarczająca czy zbyt rzadka konserwacja urządzenia.
Podane powyżej przyczyny mogą spowodować zwiększenie
ekspozycji na drgania podczas całego okresu pracy.
Aby dokładnie oszacować ekspozycję na drgania, należy
uwzględnić okresy kiedy urządzenie jest wyłączone lub kiedy
jest włączone ale nie jest używane do pracy. Po dokładnym
oszacowaniu wszystkich czynników łączna ekspozycja na
drgania może okazać się znacznie niższa.
W celu ochrony użytkownika przed skutkami drgań należy
wprowadzić dodatkowe środki bezpieczeństwa, takie jak: cykliczna
konserwacja urządzenia i narzędzi roboczych, zabezpieczenie
odpowiedniej temperatury rąk oraz właściwa organizacja pracy.
OCHRONA ŚRODOWISKA
Produktów zasilanych silnikiem spalinowym nie należy
wyrzucać wraz z domowymi odpadkami, lecz oddać je do
utylizacji w odpowiednich zakładach. Informacji na temat
utylizacji udzieli sprzedawca produktu lub miejscowe
władze. Zużyty sprzęt zawiera substancje nieobojętne dla
środowiska naturalnego. Sprzęt niepoddany
recyclingowi stanowi potencjalne zagrożenie dla
środowiska i zdrowia ludzi.
* Zastrzega się prawo dokonywania zmian.
„Grupa Topex Spółka z ograniczoną odpowiedzialnością” Spółka komandytowa z
siedzibą w Warszawie, ul. Pograniczna 2/4 (dalej: „Grupa Topex”) informuje, iż
wszelkie prawa autorskie do treści niniejszej instrukcji (dalej: „Instrukcja”), w tym
m.in. jej tekstu, zamieszczonych fotografii, schematów, rysunków, a także jej
kompozycji, należą wyłącznie do Grupy Topex i podlegają ochronie prawnej
zgodnie z ustawą z dnia 4 lutego 1994 roku, o prawie autorskim i prawach
pokrewnych (tj. Dz. U. 2006 Nr 90 Poz 631 z późn. zm.). Kopiowanie,
przetwarzanie, publikowanie, modyfikowanie w celach komercyjnych całości
Instrukcji jak i poszczególnych jej elementów, bez zgody Grupy Topex wyrażonej
na piśmie, jest surowo zabronione i może spowodować pociągnięcie do
odpowiedzialności cywilnej i karnej.
GWARANCJA I SERWIS
Warunki gwarancji oraz opis postępowania w przypadku
reklamacji zawarte są w załączonej Karcie Gwarancyjnej.
Serwis Centralny
GTX Service tel. +48 22 573 03 85
Ul. Pograniczna 2/4 fax.+48 22 573 03 83
02-285 Warszawa e-mail [email protected]
Sieć Punktów Serwisowych do napraw gwarancyjnych i
pogwarancyjnych dostępna na platformie internetowej
gtxservice.pl
GRAPHITE zapewnia dostępność części zamiennych oraz materiałów
eksploatacyjnych dla urządzeń i elektronarzędzi. Pełna oferta na
platformie internetowej gtxservice.pl
Zeskanuj QR kod i wejdź na gtxservice.pl

9
Deklaracja Zgodności WE
/EC Declaration of Conformity//Megfelelőségi Nyilatkozat EK/
/ES vyhlásenie o zhode// Prohlášení o shodě ES/
/ЕО декларация за съответствие//Declarația de conformitate CE/
/EG-Konformitätserklärung/
PL EN HU SK CS BG RO DE
Producent
/Manufacturer//Gyártó//Výrobca//Výrobce/
/Производител//Producător//Hersteller/
Grupa Topex Sp. z o.o. Sp.k.
ul. Pograniczna 2/4, 02-285 Warszawa
Wyrób
/Product/
/Termék/
/Produkt/
/Produkt/
/Продукт/
/Produs/
/Produkt/
Kosiarka spalinowa
/Gasoline lawn mower/
/Benzines fűnyíró/
/Benzínová kosačka na trávu/
/Benzínová sekačka na trávu/
/Бензинова косачка за трева/
/Mașină de tuns iarba pe benzină/
/Benzin Rasenmäher/
Model
/Model//Modell//Model//Model//Модел//Model//Modell/
52G672
Nazwa handlowa
/Commercial name//Kereskedelmi név/
/Obchodný názov//Obchodního názvu/
/Търговско наименование//Nume comercial//Handelsname/
GRAPHITE
Numer seryjny
/Serial number//Sorszám//Poradové číslo/
/Výrobního čísla//Сериен номер//Număr de serie/
/Ordnungsnummer/
00001 ÷ 99999
Opisany wyżej wyrób jest zgodny z następującymi dokumentami:
/The above listed product is in conformity with the following UE Directives://A fent jelzett termék megfelel az alábbi irányelveknek:/
/Vyššie popísaný výrobok je v zhode s nasledujúcimi dokumentmi://Výše popsaný výrobek splňuje následující dokumenty://Описаният по-
горе продукт отговаря на следните документи://Produsul descris mai sus respectă următoarele documente://Das oben beschriebene
Produkt entspricht den folgenden Dokumenten:/
Dyrektywa Maszynowa 2006/42/WE
/Machinery Directive 2006/42/EC/
/2006/42/EK Gépek/
/Smernica Európskeho Parlamentu a Rady 2006/42/ES/
/Směrnice Evropského Parlamentu a Rady 2006/42/ES/
/Директива за машините 2006/42/ЕО/
/Directiva 2006/42 / CE privind utilajele
/Maschinenrichtlinie 2006/42 / EG/
Dyrektywa o Kompatybilności Elektromagnetycznej 2014/30/UE
/EMC Directive 2014/30/EU/
/2014/30/EU Elektromágneses összeférhetőség/
/EMC Smernica Európskeho Parlamentu a Rady 2014/30/EÚ/
/EMC Směrnice Evropského Parlamentu a Rady 2014/30/EU/
/Директива за електромагнитната съвместимост
2014/30/ЕС/
/Directiva 2014/30 / UE privind compatibilitatea electromagnetică/
/Richtlinie über elektromagnetische Verträglichkeit 2014/30 / EU/
Dyrektywa o Emisji Hałasu 2000/14/WE zmieniona 2005/88/WE
/Noise Emission Directive 2000/14/EC as amended 2005/88/EC/
/A 2005/88/EK módosított 2000/14/EK zajkibocsátási irányelv/ /
/Smernica o emisiách hluku 2000/14/ES, 2005/88/ES/
/Směrnice o emisích hluku 2000/14/ES, 2005/88/ES /
/Директива за шумовите емисии 2000/14/ЕО, 2005/88/ЕО/
/Directiva 2000/14/ CE privind zgomotul modificată prin
2005/88/CE/
/Lärmschutzrichtlinie 2000/14 / EG geändert durch 2005/88 / EG/
Gwarantowany poziom mocy akustycznej LWA= 97 dB(A)
/Guaranteed sound power level/
/garantált mennyiség/
/zaručená hladina akustického výkonu/
/Zaručená hladina akustického výkonu/
/гарантирано ниво на звукова мощност/
/Nivel de putere sonor garantat/
/Garantierter Schallleistungspegel/
Zmierzony poziom mocy akustycznej LWA= 96 dB(A) K=3 dB(A)
/The measured sound power level/
/A mért hangteljesítményszint/
/Nameraná hladina akustického výkonu/
/Měřená hladina akustického výkonu/
/Измереното ниво на звукова мощност/
/Nivelul de putere sonor măsurat/
/Gemessener Schallleistungspegel/
oraz spełnia wymagania norm:
/and fulfils requirements of the following Standards://valamint megfelel az alábbi szabványoknak://a spĺňa požiadavky://a splňuje požadavky
norem:/ /и отговаря на изискванията на стандартите:// și îndeplinește cerințele standardelor://und erfüllt die Anforderungen der
Normen:/
EN ISO 5395-1:2013+A1:2018; EN ISO 5395-2:2013+A1:2016+A2:2017;
EN ISO 14982:2009

10
Deklaracja ta odnosi się wyłącznie do maszyny w stanie, w jakim została wprowadzona do obrotu i nie obejmuje części składowych dodanych
przez użytkownika końcowego lub przeprowadzonych przez niego późniejszych działań. /This declaration relates exclusively to the machinery
in the state in which it was placed on the market, and excludes components which are added and/or operations carried out subsequently by the
final user.//Ez a nyilatkozat a gépnek kizárólag arra az állapotára vonatkozik, amelyben forgalomba hozták, és kizár minden olyan alkatrészt,
amelyet hozzáadnak, és/vagy olyan műveletet, amit a végső felhasználó ezt követően végez rajta.//Toto vyhlásenie sa vzťahuje výlučne na
strojové zariadenie v stave, v akom sa uvádza na trh, a nezahŕňa pridané komponenty a/alebo činnosti vykonávané následne koncovým
používateľom.//Toto prohlášení se vztahuje výlučně na strojní zařízení ve stavu, v jakém bylo uvedeno na trh, a nevztahuje se na součásti, které
byly následně přidány konečným uživatelem, nebo následně provedené zásahy konečného uživatele.//Тази декларация се отнася
изключително за машината в състоянието, в което е пусната на пазара, и изключва компоненти, които са добавени и / или
операции, извършени впоследствие от крайния потребител.// Această declarație se referă doar la mașina din starea în care a fost
introdusă pe piață și nu acoperă componentele adăugate de utilizatorul final sau acțiunile ulterioare efectuate de utilizatorul final.//Diese
Erklärung bezieht sich nur auf die Maschine in dem Zustand, in dem sie in Verkehr gebracht wurde, und gilt nicht für vom Endbenutzer
hinzugefügte Komponenten oder nachfolgende vom Endbenutzer durchgeführte Aktionen./
Jednostka notyfikowana która wydała certyfikat zgodności w oparciu o dyrektywę 2004/14/WE załącznik VI /Notified Body that issued the
certificate of conformity pursuant to Directive 2004/14/EC, Annex VI//a 2004/14/EK irányelv VI melléklete alapján a megfelelőségi igazolást
kiállító bejelentett szervezet//Notifikovaný Orgán, ktorý vydal osvedčenie o zhode na základe smernice 2004/14/ES, príloha
VI//Нотифицираният орган, издал сертификата за съответствие съгласно Директива 2004/14/ЕО, приложение VI//Organismul
notificat care a emis certificatul de conformitate în conformitate cu Directiva 2004/14 / CE, anexa VI//Die benannte Stelle, die die
Konformitätsbescheinigung gemäß der Richtlinie 2004/14 / EG, Anhang VI ausgestellt hat/
No. 0359 INTERTEK TESTING & CERTIFICATION LTD Intertek House, Cleeve Road Leatherhead, Surrey KT22 7SA United Kingdom
Nazwisko i adres osoby mającej miejsce zamieszkania lub siedzibę w UE upoważnionej do przygotowania dokumentacji technicznej:
/Name and address of the person who established in the Community and authorized to compile the technical file://A műszaki dokumentáció
összeállítására felhatalmazott, a közösség területén lakóhellyel vagy székhellyel rendelkező személy neve és címe://Meno a adresa osoby alebo
bydliska v EÚ poverená zostavením technickej dokumentácie:// Jméno a adresu osoby pověřené sestavením technické dokumentace, přičemž
tato osoba musí být usazena ve Společenství://Име и адрес на лицето, което пребивава или е установено в ЕС, упълномощено да съставя
техническото досие://Numele și adresa persoanei care locuiește sau este stabilită în UE autorizată să întocmească dosarul tehnic://Name und
Anschrift der Person mit Wohnsitz oder Niederlassung in der EU, die zur Erstellung der technischen Akte berechtigt ist:/
Podpisano w imieniu:
/Signed for and on behalf of:/
/A tanúsítványt a következő nevében és megbízásából írták alá/
/Podpísané v mene:/
/Podepsáno jménem:/
/Подписано от името на:/
/Semnat în numele:/
/Unterzeichnet im Namen von:/
Grupa Topex Sp. z o.o. Sp.k.
ul. Pograniczna 2/4
02-285 Warszawa
Paweł Kowalski
Pełnomocnik ds. jakości firmy GRUPA TOPEX
/GRUPA TOPEX Quality Agent/
/A GRUPA TOPEX Minőségügyi meghatalmazott képviselője/
/Splnomocnenec Kvalita TOPEX GROUP/
/Zástupce pro Kvalitu TOPEX GROUP/
/Качествен представител на GRUPA TOPEX/
/Reprezentant de calitate al GRUPA TOPEX/
/Qualitätsbeauftragter von GRUPA TOPEX/
Warszawa, 2020-11-13

11
TRANSLATION OF THE ORIGINAL MANUAL
DRIVEN PETROL MOWER
52G671, 52G672, 52G673
WARNING! IMPORTANT! BEFORE USING THE DEVICE, READ THIS
MANUAL CAREFULLY AND KEEP IT FOR FUTURE REFERENCE.
DETAILED SAFETY REGULATIONS
SAFETY INSTRUCTIONS FOR THE USE OF PETROL MOWERS
Safety of using petrol lawn mowers in practice
1. Teaching
a) Read the instructions carefully. Become familiar with the controls
and the correct use of the device.
b) Never allow the device to be operated by children or persons
unfamiliar with the device's operating instructions. National
regulations may specify the exact age of the operator.
c) Never mow when other people, especially children or pets, are
nearby.
d) Remember that the operator or user is responsible for accidents or
threats to other people or the environment.
2. Preparation
a) Always wear sturdy shoes and long trousers when mowing. Do not
operate the device with bare feet or in open sandals. Avoid
damaged clothing that is too loose or has hanging straps or ribbons.
b) Check the area where the device is to be operated and remove any
objects that might get into the device.
c) Before use, always check the blades, screws and knife assembly
accessories for wear or damage. Replace worn or damaged parts in
kits to keep them balanced. Replace damaged or illegible labels.
d) Refuel outdoors, with the engine cold. Never refuel or unscrew the
fuel tank while the engine is running.
e) Be careful when refueling and make sure that there is no source of
fire nearby.
3. Use
a) Never block device controls. This may cause you to lose control of
the equipment and cause an accident.
b) Do not start up the device indoors. There is a risk of poisoning or
suffocation from the accumulation of exhaust gases.
c) Mow only in daylight or under good artificial light.
d) Avoid mowing wet grass.
e) Always make sure your feet are firmly on the slope.
f) Come on, never run.
g) Mow across the slope, never up or down.
h) Be especially careful when changing direction on a slope.
i) Do not mow on excessively sloped slopes - up to a maximum of 15
degrees.
j) Be especially careful when backing up or pulling the machine
towards you.
k) Switch off the drive of the cutting element (s) if the machine must
be tilted when it is being moved over non-grass surfaces and when
it is being transported to and from the mowing area.
l) Do not use the machine with damaged covers or housings and
without a safety device such as attached covers and / or grass
catchers.
m) Start the engine carefully as instructed, taking care that your feet
are away from the cutting element (s).
n) Do not tilt the machine when starting the engine, except where it
needs to be tilted to start. In this case, do not tilt more than
necessary and only lift the part that is away from the operator.
o) Do not start the device while standing in front of the discharge
opening.
p) Keep your hands and feet away from rotating parts. Make sure that
the discharge opening is not blocked at all times.
q) Do not carry the power tool with the engine running.
r) Stop the device. Make sure all moving parts are not moving
− every time you walk away from the device,
− before cleaning or pushing through the outlet,
− before checking, cleaning or repairing the device,
− after being hit by a foreign object. Check that the device is not
damaged and, if necessary, repair it before restarting and
operating the device if the device starts to vibrate excessively
(check immediately)
− check for damage,
− replace or repair any damaged part,
− check and tighten loose parts.
4. Maintenance and storage
a) Stop the engine and remove the spark plug leads before servicing
or repairing
b) Keep all nuts, bolts, and screws in good condition to ensure that the
unit operates safely.
c) Check the grass collector frequently for wear or damage.
d) With multi-knife implements, be careful as the rotation of one
cutting element may cause the rotation of the other blades.
e) Be careful when adjusting the machine to avoid getting your fingers
caught between the moving knives and fixed parts of the machine.
f) Be careful when handling the knives, even though the drive is
disengaged as the knives may still rotate.
g) Replace worn or damaged parts for safety. Use only original spare
parts and accessories.
Explanation of the pictograms used
1. WARNING: READ INSTRUCTIONS FOR USE!
2. WARNING: KEEP OUT OF REACH OF ANOTHER PERSON!
3. WARNING: KEEP HANDS AND FEET AWAY FROM THE BLADES!
4. Stop the engine and remove the spark plug wires before
starting any maintenance or repair work
5. Keep a safe distance from the hot surface
6. Use personal protective equipment (safety goggles, hearing
protection)
7. Use protective clothing
8. Keep children away from the tool
9. Protect the device against moisture
10. Recycling
CONSTRUCTION AND APPLICATION
The petrol mower is a device powered by a four-stroke internal
combustion engine, it has a wheel drive system, which makes it easy
to drive on uneven terrain. The petrol lawn mower is used for
mowing lawns in home gardens as well as larger areas planted with
grass, e.g. sports fields and recreational areas. The grass clippings
can be collected in the grass catcher, thrown from the side through
the side discharge opening, or ground. Only use accessories that are

12
suitable for your device and follow the instructions in the operating
manual. The petrol lawn mower is intended only for amateur use.
WARNING! Do not use the device contrary to its intended use.
DESCRIPTION OF GRAPHIC PAGES
The numbering below refers to the components of the device
shown on the graphic pages of this manual.
1. Wheel drive clutch lever
2. Top handle
3. Engine brake lever
4. Shelf for drinks
5. Handle fixing nut
6. Rear discharge cover
7. Bottom handle
8. The fuel filler cap
9. Air filter housing
10. Manual fuel pump
11. Side discharge cover
12. The oil filler cap
13. Driving wheel
14. Cutting height adjustment lever
15. Grass catcher
16. Boot rope
17. Rear discharge shutter
18. Oil level indicator
19. Oil drain plug
20. Cutting knife
21. Cutting knife mounting bolt
22. Air filter cover
23. Air filter
24. Spark plug wire
25. Spark plug
26. Spark plug wrench
27. Spark plug contacts
* There may be differences between the drawing and the product.
EQUIPMENT AND ACCESSORIES
1. Grass catcher - 1 pc.
2. Bottom handle - 1 pc.
3. Top handle - 1 pc.
4. Shelf brackets drinks + - 1 set.
5. Rear discharge shutter - 1 pc.
6. Side discharge element - 1 pc.
7. Starting rope holder - 1 pc.
8. Clips - 2 pcs.
9. Bolts, nuts, screws - 1 set.
PREPARATION TO WORK
WARNING! Do not operate the petrol mower without the grass
catcher with the rear discharge cover raised.
WARNING! All maintenance, repairs, adjustments and work
preparation activities must be performed with the engine off.
HANDLE ASSEMBLY
• Install the lower handle (7) to the mower housing and fasten
with bolts and nuts (you can adjust the angle of the handle).
• Attach the upper handle (2) to the lower handle (7) with the
supplied bolts and nuts (lever for 52G673).
• Install the starter rope handle on the right side of the upper
handle (2) and pass the starter rope (16) through the handle.
• Attach the control cables to the handlebar with the clips
provided (Fig. A).
ATTACHING GRASS BASKET
• Lift the rear discharge guard (6).
• Hang the grass catcher (15) from the rear discharge outlet using
the two catches " a " on the top of the mower housing (fig. B).
• Lower the rear discharge guard (6).
The grass catcher is held in place by the spring force of the rear discharge
guard. The grass catcher has a convenient carrying handle to empty it of
grass clippings.
WARNING! Always make sure that the grass catcher is properly
attached.
SIDE-DISCHARGE GUARD ADJUSTMENT
• Remove the grass catcher (15) and lower the rear discharge
cover (6).
• Turn the mower "on its side".
• Install the rear discharge shutter (17).
• Pull the side discharge cover (11) away from the mower housing.
• Install the side discharge shroud on the housing hooks and
release the side discharge shroud (11)
• Place the mower on wheels.
SETTING THE GRINDING FUNCTION
• Remove the grass catcher (15) and lower the rear discharge
shield (6).
• Install the rear discharge shutter (17).
• Remove the side discharge element (if fitted) and release the
side discharge shroud (11).
ADJUSTING THE CUTTING HEIGHT
The cutting height is adjusted with the cutting height lever (14) in 5 (or 8
for 52G673) positions from 25 - 65 mm.
• Pull back the cutting height adjustment lever (14) (fig. D).
• Select the desired mowing height by moving the mowing
adjustment lever.
• Place the cutting height adjustment lever in one of the selected
recesses of the cutting height adjustment lever lock (14) on the
mower housing (fig. D).
WARNING! The cutting height is set simultaneously on all four road
wheels.
FILLING WITH ENGINE OIL
WARNING! Do not start the petrol mower without oil, such
starting will damage the engine.
• Unscrew the oil filler cap (12).
• Pour in the prepared amount of oil.
• Check the oil level on the dipstick (12) (fig. E).
• Screw on the oil filler plug (12).
WARNING! Change the oil for the first time after 5 hours of
operation and then every 25 hours of operation. Drain the oil
into an oil-resistant container by unscrewing the oil drain plug
(19) (fig. E).
FILLING WITH GASOLINE
WARNING! Unleaded petrol with an octane number of 95
should be used as a fuel for a petrol lawn mower.
• Unscrew the fuel filler cap (8).
• Pour gasoline into the tank and tighten the fuel filler cap (8).
WARNING! After refueling, make sure the fuel filler cap is
tightened securely. Do not allow fuel to spill.

13
WARNING! Most of the problems with internal combustion
engines are directly or indirectly related to the type of fuel
used.
ASSEMBLY OF THE BEVERAGE RACK
• Attach the drinks shelf (4) to the brackets on the upper handle
(2) and fasten it by tightening the plastic parts from below with
screws.
OPERATION / SETTINGS
STARTING THE ENGINE
WARNING! Under no circumstances should the mower be used
without the guards installed. The use of incorrect or damaged
guards can cause serious injury.
WARNING! Using an incorrect or worn cutting knife will
increase vibration.
The petrol lawn mower is equipped with a system to prevent
accidental start-up.
• Pump up the fuel with the hand fuel pump (10) by pressing the
button a few times (fig. F).
• Pull the engine brake lever (3) (fig. G) against the upper handle
(2).
• Pull the starter rope (16) sharply.
STOPPING THE ENGINE
• Release the engine brake lever (3) from the upper handle (2).
WARNING! The blade continues to move for a few seconds after
the engine stops.
WARNING! Never use the petrol mower in rain or in a wet
environment. Never work with a damaged device. All parts
should be properly installed and meet the requirements
ensuring proper operation of the petrol lawn mower. Any
damaged safety component or part should be repaired or
replaced immediately.
STARTING THE WHEEL DRIVE
• Start the engine.
• Pull the wheel drive clutch lever (1) against the upper handle (2).
Each time the pressure on the clutch lever of the wheel drive (1) is
released, the transmission of drive to the wheels is stopped while
the engine is still running. Mowing can also be performed without
using the wheel drive function by pushing the mower.
WARNING! Before starting the wheel drive, make sure that
there is no obstacle in the way of the mower.
TIPS FOR SAFE USE
• Move the mower in a smooth motion, holding the handle with
both hands.
• When the mower is running, keep it away from hard objects and
crops.
• The mower may only be used when the grass is dry.
• Frequent emptying of the grass catcher (after 2/3 full of it) will ensure a
more efficient mowing process (the plastic flap on the top cover of the
grass catcher indicates how full the catcher is)
The mower can be used with or without the grass catcher fitted.
Note, however, that the rear discharge guard must be folded down
when mowing without the grass catcher.
WARNING! The mower engine gets very hot both during
operation and immediately after operation. Touching it may
cause skin burns.
WARNING! The exhaust fumes contain carbon monoxide, the
inhalation of which may cause poisoning. Therefore, never run
the device indoors or in poorly ventilated areas. Never start the
mower indoors or near flammable materials.
CARE AND MAINTENANCE
WARNING! Before commencing cleaning, checking or
repairing the mower, make sure that the machine's engine is
stopped and not hot. Disconnect wire from spark plug to
prevent accidental engine starting.
CHANGING THE CUTTING KNIFE
• Remove the grass catcher (15).
• Lay the mower "aside".
• Firmly grasp the cutting knife (20) (wear protective gloves) (fig.
H).
• Unscrew the cutting knife mounting bolt (21) with a spanner by
turning it to the left (fig. H).
• Replace or sharpen the cutting knife (when replacing the cutting
knife with a new one, it must be of the same size).
• Attach the cutting knife in the reverse order as above.
• The sharpening or replacement of the cutting knife is best
entrusted to a qualified person using original parts.
AIR FILTER
A dirty air filter reduces the power of the combustion engine and
increases fuel consumption. The air filter should be cleaned after
every 5 hours of mower operation.
• Remove the air filter cover (22) (Fig. I).
• Remove the air filter (23) from the air filter cover (Fig. I).
• Knock dust off and blow air filter clean with low pressure
compressed air.
• Install the air filter and the air filter cover.
WARNING! To avoid the risk of fire or the formation of
hazardous vapors, the air filter must not be washed in gasoline
or other flammable solvents.
SPARK PLUG
For reliable operation of the device, the condition of the spark
plug should be checked periodically.
• Remove spark plug wire (24) from spark plug (25) (Fig. J).
• Install the spark plug wrench (26) and remove the spark plug.
• Clean the spark plug contacts (25) (fig. K).
• Check the gap between the spark plug contacts (27) (fig. L).
• If necessary, replace the spark plug with a new one.
STORAGE
• When storing the mower, empty the fuel system completely.
• Drain the fuel tank, start the engine, and allow it to stop running
for lack of fuel.
• Use fresh fuel every season. Never use any cleaning agents in the
fuel tank as this may damage the engine.
• Make sure that the ventilation holes of the motor housing are
not obstructed.
• Only the maintenance procedures described in this manual may
be carried out on the mower. Any other activities may only be
performed by an authorized service center.
• It is not allowed to make any changes to the mower's structure.
• When not in use, the mower should be stored clean, on a flat
surface, in a dry place, out of the reach of children.

14
• Regularly remove grass residues.
• Never clean the petrol lawn mower with water, aggressive fluids
or solvents. Clean the petrol mower with a brush, compressed air
or a soft cloth.
• Periodically check the condition of the spark plug of the combustion
engine. Replace the worn spark plug with a new one recommended by
the manufacturer.
• Use the cutting knives recommended by the manufacturer.
WARNING! Fuels with an admixture of alcohol (ethyl or methyl)
can absorb moisture, which during storage leads to separation
of fuel mixture components and formation of acids. Acidified
gasoline can damage the engine.
All kinds of faults should be removed by the manufacturer's
authorized service.
TECHNICAL SPECIFICATIONS
RATED DATA
Petrol lawn mower with drive
Parameter
Value
Model
52G671
52G672
52G673
Engine
capacity
139 cm 3
173 cm 3
196 cm 3
Maximum
engine
power
2.2 kW
(3 HP)
3.0 kW
(4 HP)
3.2 kW
(4.35 HP)
Maximum
speed
without
load
2850 min -1
2800 min -1
2850 min -1
Carburetor
1P65FA
H127-3A;
KDH107A;
1P70-1A;
DY1P70FA;
1P70F;
DY1P70FA
DY1P70FB
Type of
fuel
95 lead-free
petrol
95 lead-free
petrol
95 lead-free
petrol
Engine oil
For 4-stroke
garden
equipment
For 4-stroke
garden
equipment
For 4-stroke
garden
equipment
Spark plug
F7RTC
F7RTC
F7RTC
Fuel tank
capacity
1.3 l
1.5 l
1.0 l
Oil tank
capacity
0.6 l
0.6 l
0.6 l
Grass box
capacity
55 l
55 l
60 l
Range and
number of
cutting
height
settings
25-65 mm
5 items
25-65 mm
5 items
25-65 mm
8 items
Self-
propelled
drive
Yes
Yes
Yes
Mulching
Yes
Yes
Yes
Side
discharge
Yes
Yes
Yes
Cutting
width
460 mm
502 mm
525 mm
Knife
thickness
2.5 mm
3.0 mm
3.0 mm
Mass
31 kg
36 kg
36.5 kg
Year of
production
2020
2020
2020
52G671, 52G672, 52G673 means both the type and the designation
of the machine
NOISE AND VIBRATION DATA
Model
52G671
52G672
52G673
Sound
pressure level
Lp A = 80.3 dB
(A) K = 3 dB
(A)
Lp A =
83.4 dB
(A) K = 3
dB (A)
Lp A =
83.4 dB
(A) K = 3
dB (A)
Measured
sound power
level
Lw A = 94 dB
(A) K = 3 dB
(A)
Lw A = 96
dB (A) K =
3 dB (A)
Lw A = 97
dB (A) K =
3 dB (A)
The value of
vibration
accelerations
a h = 4.52 m /
s 2 K = 1.5 m /
s 2
a h = 3.37
m / s 2 K =
1.5 m / s 2
a h = 3.36
m / s 2 K =
1.5 m / s 2
Information on noise and vibration
The level of noise emitted by the device is described by: the level of
the emitted sound pressure Lp A and the sound power level Lw A
(where K is the measurement uncertainty). The vibrations emitted
by the device are described by the value of the vibration
acceleration a h (where K is the measurement uncertainty).
The following information: emitted sound pressure level Lp A, sound
power level Lw A and the value of vibration acceleration a h were
measured in accordance with Directive 2000/14 / EC on noise
emission into the environment. The given vibration level a h can be
used to compare devices and for a preliminary assessment of
vibration exposure.
The stated vibration level is representative only for the basic use of
the device. If the machine is used for different applications or with
different work tools, the vibration level may change. The higher
vibration level will be influenced by insufficient or too rare
maintenance of the device. The reasons given above may result in
an increased exposure to vibration during the entire period of
operation.
To accurately estimate exposure to vibration, consider periods
when the equipment is turned off or when it is turned on but
not in use. After all factors have been carefully assessed, the
overall vibration exposure may be significantly lower.
In order to protect the user against the effects of vibrations,
additional safety measures should be implemented, such as:
periodic maintenance of the device and working tools, protection of
the appropriate temperature of hands and proper organization of
work.
ENVIRONMENTAL PROTECTION
Electrical equipment must not be disposed off with
household waste and, instead, should be utilized at
appropriate facilities. Information on utilization can be
provided by the product vendor or the local authorities.
Waste electrical and electronic equipment contains
substances that are not neutral to the natural
environment. Equipment that is not recycled constitutes
a potential hazard to the environment and to human
health.
* Right to introduce changes is reserved.
“Grupa Topex Spółka z ograniczoną odpowiedzialnością” Spółka komandytowa
with seat in Warsaw at ul. Pograniczna 2/4 (hereinafter Grupa Topex) informs, that
all copyrights to this instruction (hereinafter Instruction), including, but not
limited to, text, photographies, schemes, drawings and layout of the instruction,
belong to Grupa Topex exclusively and are protected by laws accordingly to
Copyright and Related Rights Act of 4 February 2004 (ustawa o prawie autorskim
i prawach pokrewnych, Dz. U. 2006 No 90 item 631 with later ammendments).
Copying, processing, publishing, modifications for commercial purposes of the
entire Instruction or its parts without written permission of Grupa Topex are
strictly forbidden and may cause civil and legal liability.

15
ÜBERSETZUNG DES ORIGINALHANDBUCHS
ANGETRIEBENER BENZINMÄHER
52G671, 52G672, 52G673
WARNUNG! WICHTIG! BEVOR SIE DAS GERÄT VERWENDEN, LESEN
SIE DIESES HANDBUCH SORGFÄLTIG DURCH UND BEWAHREN SIE
ES FÜR ZUKÜNFTIGE REFERENZEN AUF.
DETAILLIERTE SICHERHEITSVORSCHRIFTEN
SICHERHEITSHINWEISE FÜR DEN GEBRAUCH VON
BENZINMÄHEREN
Sicherheit von mit Benzin Rasen Rasenmäher in der Praxis
1. Lehren
a) Lesen Sie die Anweisungen sorgfältig durch. Machen Sie sich mit
den Bedienelementen und der korrekten Verwendung des Geräts
vertraut.
b) Sie niemals erlaubt das Gerät zu betreiben durch Kinder oder
Personen nicht vertraut mit dem Gerät der Betriebsanleitung.
Nationalen Vorschriften können angeben, das genaue Alter des
Betreibers.
c) Mähen Sie niemals, wenn andere Personen, insbesondere Kinder
oder Haustiere, in der Nähe sind.
d) Denken Sie daran, dass die Bediener oder Benutzer ist
verantwortlich für Unfälle oder Bedrohungen zu anderen Menschen
oder die Umwelt.
2. Vorbereitung
a) Tragen Sie beim Mähen immer feste Schuhe und lange Hosen. Sie
nicht arbeiten die Vorrichtung mit bloßen Füßen oder in offenen
Sandalen. Vermeiden Sie beschädigte Kleidung, die ist zu lose oder
hat hängende Riemen oder Bänder.
b) Überprüfen Sie den Bereich, wo das Gerät ist zu betrieben und
entfernen Sie alle Objekte, die möglicherweise kommen in die
Vorrichtung.
c) Vor dem Gebrauch, immer überprüfen Sie die Klingen, Schrauben
und Messer Montagezubehör für Abnutzung oder Beschädigung.
Ersetzen Sie verschlissene oder beschädigte Teile in Kits, um sie im
Gleichgewicht zu halten. Ersetzen Sie beschädigte oder unleserliche
Etiketten.
d) Tanken Sie im Freien bei kaltem Motor. Nie tanken oder schrauben
die Kraftstofftank während der Motor wird ausgeführt.
e) Seien Sie vorsichtig, wenn Tanken und stellen Sie sicher, dass es ist
keine Quelle von Feuer in der Nähe.
3. Verwenden
a) Blockieren Sie niemals Gerätesteuerungen. Dies kann dazu führen,
Sie zu verlieren Kontrolle der Ausrüstung und verursachen einen
Unfall.
b) Starten Sie nicht auf die Vorrichtung drinnen. Es ist eine Gefahr von
Vergiftung oder Erstickung aus der Ansammlung von Abgasgasen.
c) mähen nur in Tageslicht oder unter gutem künstlichem Licht.
d) Mähen Sie kein nasses Gras.
e) immer stellen Sie sicher, dass Ihre Füße sind fest auf dem Hang.
f) Komm schon, renn niemals.
g) Mähen Sie über den Hang, niemals nach oben oder unten.
h) Seien Sie besonders vorsichtig, wenn Sie die Richtung am Hang
ändern.
i) Mähen Sie nicht an übermäßig abfallenden Hängen - bis zu maximal
15 Grad.
j) Schreiben Sie besonders vorsichtig, wenn die Sicherung nach oben
oder ziehen Sie die Maschine in Richtung Sie.
k) ausschalten Antrieb des Schneidelement (e), wenn die Maschine
muss werden gekippt, wenn sie sich zu werden bewegt über nicht -
Grasflächen und wenn es wird wird transportiert zu und von der
Mäh- Bereich.
l) nicht verwenden, die Maschine mit beschädigten Abdeckungen
oder Gehäusen und ohne eine Sicherheitseinrichtung wie
beispielsweise befestigte Abdeckungen und / oder Grasfänger.
m) Starten Sie den Motor sorgfältig wie angewiesen, wobei Pflege, dass
Ihre Füße sind weg von dem Schneidelement (e).
n) nicht kippt die Maschine beim Starten des Motors, außer wo es
benötigt wird gekippt zu starten. In diesem Fall, nicht kippt mehr als
nötig und nur heben Sie den Teil, der ist weg vom Bediener.
o) Sie beginnen, die nicht Gerät während vor der stehenden
Entladungsöffnung.
p) Halten Sie Ihre Hände und Füße von rotierenden Teilen fern. Stellen
Sie sicher, dass die Austrittsöffnung ist nicht blockiert zu allen
Zeiten.
q) nicht trägt das Kraftwerkzeug mit dem Motor läuft.
r) Stoppen Sie das Gerät. Stellen Sie sicher, dass alle beweglichen Teile
sind nicht bewegt
− jedes Mal Sie gehen weg von dem Gerät,
− vor der Reinigung oder Schieben durch den Auslass,
− vor dem Überprüfen, Reinigen oder Reparieren des Geräts,
− nach wird von einem Hit fremden Objekt. Überprüfen Sie, dass das
Gerät ist nicht beschädigt und, wenn nötig, reparieren sie vor dem
Neustart und Betrieb der Vorrichtung wenn das Gerät übermäßig zu
vibrieren beginnt (sofort prüfen)
− auf Beschädigungen prüfen,
− ersetzen oder repariert jeden beschädigten Teil,
− lose Teile prüfen und festziehen.
4. Wartung und Lagerung
a) Stoppen Sie den Motor und entfernen Sie die Zündkerzenstecker
führt vor der Wartung oder Reparatur
b) Halten Sie alle Muttern, Bolzen und Schrauben in gutem Zustand,
um sicherzustellen, dass das Gerät sicher funktioniert.
c) Überprüfen Sie die Grassammler häufig für Abnutzung oder
Beschädigung.
d) Mit mehreren Messern implementiert sein, vorsichtig als die
Drehung eines Schneidelements kann bewirken die Drehung der
anderen Klingen.
e) Seien Sie beim Einstellen der Maschine vorsichtig, um zu vermeiden,
dass sich Ihre Finger zwischen den beweglichen Messern und den
festen Teilen der Maschine verfangen.
f) Seien Sie vorsichtig, wenn Umgang mit den Messern, selbst wenn
der Antrieb ist ausgerückt, da das Messer kann noch drehen.
g) Ersetzen Sie abgenutzte oder beschädigte Teile aus
Sicherheitsgründen. Verwenden Sie nur Original - Ersatzteile und
Zubehör.
Erklärung der Piktogramme verwendet

16
1. WARNUNG: LESEN SIE DIE GEBRAUCHSANLEITUNG!
2. WARNUNG: KEINE ANDERE PERSON ERREICHEN!
3. WARNUNG: HÄNDE UND FÜSSE VON DEN KLINGEN
FERNHALTEN!
4. Stoppen Sie den Motor und entfernen Sie die Zündkerzenstecker
Drähte vor Start alle Wartungs- oder Reparaturarbeiten
5. Halten Sie einen sicheren Abstand zur heißen Oberfläche
6. Verwenden Sie persönliche Schutzausrüstung (Schutzbrille,
Gehörschutz)
7. Verwenden Sie Schutzkleidung
8. Halten Sie Kinder vom Werkzeug fern
9. Schützen Sie das Gerät vor Feuchtigkeit
10. Recycling
BAU UND ANWENDUNG
Die Benzin - Rasenmäher ist ein Gerät mit Strom versorgt von einem
Viertakt - internen Verbrennungsmotor, es hat ein Rad
Antriebssystem, das macht es leicht zu fahren auf unebenen
Gelände. Das Benzin Rast Rasenmäher wird verwendet für das
Mähen Rasen in Heimgärten als auch als größere Flächen gepflanzt
mit Gras, zB. Sportfelder und Erholungsgebiete. Die Grasausschnitte
können werden gesammelt in dem Grasfänger, geworfen von der
Seite durch die Seitenaustrittsöffnung, oder Boden. Nur verwenden
Zubehör, das ist geeignet für Ihr Gerät und folgen Sie den
Anweisungen in der Betriebsanleitung. Der Benzin Rasen
Rasenmäher ist bestimmt nur für Amateur - Einsatz.
WARNUNG! Sie nicht verwenden das Gerät im Gegensatz zu
seiner beabsichtigten Verwendung.
BESCHREIBUNG DER GRAFISCHEN SEITEN
Die Nummerierung unten bezieht sich auf die Komponenten der
Vorrichtung dargestellt auf den Grafikseiten der dieses Handbuchs.
1. Rad Antriebskupplungshebel
2. Oberer Griff
3. Motorbremshebel
4. Regal für Getränke
5. Griff Befestigungsmutter
6. Rückentladung Abdeckung
7. Unterer Griff
8. Der Kraftstoff Füllstoff Kappe
9. Luftfiltergehäuse
10. Manuelle Kraftstoffpumpe
11. Seitenentladung Abdeckung
12. Das Öl Füllstoff Kappe
13. fahren Rad
14. Schneidhöhenverstellung Hebel
15. Grass Fang
16. Boot Seil
17. Rückentladung Verschluss
18. Ölpegel - Anzeige
19. Ölablasstopfen
20. Schneidmesser
21. Schneidmesserbefestigungsschraube
22. Luftfilterabdeckung
23. Luftfilter
24. Zündkerzendraht
25. Zündkerze
26. Zündkerzenschlüssel
27. Zündkerze Kontakte
* Es kann sein, Unterschiede zwischen der Zeichnung und dem
Produkt.
AUSRÜSTUNG UND ZUBEHÖR
1. Grass Fänger - 1 PC.
2. Unterer Griff - 1 Stck.
3. Oberer Griff - 1 Stck.
4. Shelf Brackets Getränke + - 1 Satz.
5. Rückentladung Verschluss - 1 PC.
6. Seite Entladungselement - 1 PC.
7. Startseil Halter - 1 Stück.
8. Clips - 2 Stk.
9. Schrauben, Muttern, Schrauben - 1 Satz.
VORBEREITUNG ZUR ARBEIT
WARNUNG! Sie nicht betreiben den Benzinmäher ohne den
Grasfang mit der hinteren Entladungsabdeckung angehoben.
WARNUNG! Alle Wartung, Reparaturen, Anpassung und
Arbeitsvorbereitung Aktivitäten müssen werden durchgeführt
mit dem Motor ab.
GRIFF MONTAGE
• Installieren Sie den unteren Griff (7) mit dem Mäher Gehäuse und
befestigen mit Schrauben und Muttern (Sie können einstellen den
Winkel des Griffs).
• Befestigen Sie den oberen Griff (2) mit den mitgelieferten
Schrauben und Muttern (Hebel für 52G673) am unteren Griff (7).
• Installieren des Starterseil Griff an der rechten Seite des oberen
Handgriffs (2) und vorbei an das Starterseil (16) durch den
Handgriff.
• Befestigen Sie die Steuerkabel mit den mitgelieferten Clips am
Lenker (Abb. A).
GRASKORB BEFESTIGEN
• Heben des hinteren Entladungs guard (6).
• Hang des Grasfänger (15) von dem hinter Entladungs Auslass
unter Verwendung der zwei Rasten „ a “ auf der Oberseite des
Mähergehäuses (Fig. B).
• Den hinteren Auslassschutz (6) absenken.
Der Grasfang wird gehalten an Ort und Stelle durch die Federkraft des
hinteren Entladungs guard. Der Grasfang hat einen bequemen Tragegriff
zu entleeren es von Gras Ausschnitten.
WARNUNG! Immer machen Sie sicher, dass das Gras Fang ist richtig
angebracht.
EINSTELLUNG DES SEITENENTLADUNGSSCHUTZES
• Entfernen des Grasfänger (15) und senken die hintere
Entladungsabdeckung (6).
• Drehen Sie den Mäher "auf die Seite ".
• Installieren der hinteren Entladungs Verschluß (17).
• Ziehen die Seitenentladung Abdeckung (11) weg von dem
Mähmaschine Gehäuse.
• Installieren der Seitenentladung Ummantelung auf dem
Gehäusehaken und freizugeben, die Seitenentladung Ummantelung
(11)
• Stellen Sie den Mäher auf Räder.
EINSTELLEN DER SCHLEIFFUNKTION
• Entfernen des Grasfänger (15) und senken die hintere
Entladungsabschirmung (6).
• Installieren der hinteren Entladungs Verschluß (17).
• Entfernen des Nebenentladungselementes (falls Einbau) und
freizugeben, die Seitenentladung Ummantelung (11).
EINSTELLEN DER SCHNEIDHÖHE
Die Schnitthöhe wird eingestellt, mit der Schneidhöhe Hebel (14) in 5
(oder 8 für 52G673) Positionen 25 bis 65 mm.
• Ziehen Sie zurück die Schneidhöheneinstellungshebel (14) (Fig.
D).

17
• Wählen Sie die gewünschte Mähthöhe durch Bewegen des Mäh-
Anpassungshebel.
• Platzieren Sie die Schneidhöhenverstellung Hebel in einer der
ausgewählten Ausnehmungen der Schneidhöhenverstellung
Hebelschloß (14) auf dem Mähergehäuse (Fig. D).
•
WARNUNG! Die Schnitthöhe wird eingestellt gleichzeitig auf alle
vier Straßenräder.
FÜLLEN MIT MOTORÖL
WARNUNG! Sie nicht das Benzin starten Mäher ohne Öl, wie
zum Ausgangs wird beschädigen den Motor.
• Abzuschrauben das Öl Füllstoff Kappe (12).
• Gießen in der vorbereiteten Menge von Öl.
• Überprüfen Sie den Ölpegel auf dem Peilstab (12) (Abb. E).
• Schraube auf dem Öl Füllstoffes Topfen (12).
WARNUNG! Ändern Sie das Öl zum ersten Mal nach 5 Stunden
von Betrieb und dann alle 25 Stunden der Operation.
Entwässern das Öl in einen ölbeständigen Behälter durch
Abschrauben des Ölablassschraube (19) (Fig. E).
FÜLLEN MIT BENZIN
WARNUNG! Unverbleites Benzin mit einer Oktanzahl von 95
sollte werden verwendet als Kraftstoff für Benzin Rasen
Rasenmäher.
• Abzuschrauben den Kraftstoff Füllstoff Kappe (8).
• Gießen Benzin in den Tank und ziehen die Kraftstoff Füllstoff
Kappe (8).
WARNUNG! Nach dem Tanken, stellen Sie sicher, dass der
Kraftstoff Füllstoff Kappe wird verschärft sicher. Nicht erlaubt
Kraftstoff zu verschütten.
WARNUNG! Die meisten der Probleme mit internen
Verbrennungsmotoren sind direkt oder indirekt im
Zusammenhang mit dem Typ von Kraftstoff verwendet.
MONTAGE DES GETRÄNKESTELLS
• Befestigen die Getränke Regal (4) mit den Klammern auf dem
oberen Handgriff (2) und befestigen sie durch Anziehen der
Kunststoffteile von unten mit Schrauben.
BETRIEB / EINSTELLUNGEN
STARTEN DES MOTORS
WARNUNG! Unter keinen Umständen sollte der Mäher wird
verwendet, ohne die Wachen installiert. Die Verwendung von
falschen oder beschädigten Schutzvorrichtungen kann dazu
führen, ernsthafte Verletzungen.
WARNUNG! Unter Verwendung eines falschen oder
verschlissenen Schneidmesser wird erhöhen Vibration.
Der Benzin Rasen Rasenmäher ist ausgestattet mit einem System zu
verhindern versehentliche Inbetriebnahme.
• Pump up den Kraftstoff mit der Hand Brennstoffpumpe (10)
durch Drücken der Taste ein paar Mal (Abb. F).
• Ziehen Sie den Motorbremshebel (3) (Fig. G) gegen den oberen
Handgriff (2).
• Ziehen Sie das Starterseil (16) scharf.
STOPPEN DES MOTORS
• Lassen Sie die Motorbremshebel (3) von dem oberen Handgriff
(2)
WARNUNG! Die Klinge weiter zu bewegen, für ein paar
Sekunden, nachdem der Motor stoppt.
WARNUNG! Verwenden Sie den Benzinmäher niemals bei
Regen oder in feuchter Umgebung. Arbeiten Sie niemals mit
einem beschädigten Gerät. Alle Teile sollten werden
ordnungsgemäß installiert und erfüllen die Anforderungen
gewährleisten ordnungsgemäßen Betrieb der Benzin Rasen
Rasenmäher. Jede beschädigte Sicherheitskomponente oder
Teil sollte werden repariert oder ersetzt sofort.
STARTEN DES RADANTRIEBS
• Starten Sie den Motor.
• Ziehen des Rades Antriebskupplungshebel (1) gegen den oberen
Handgriff (2).
Jede Zeit der Druck auf den Kupplungshebel des Rades Antrieb (1)
wird freigegeben, die Übertragung des Antriebs auf die Räder wird
angehalten, während der Motor ist immer noch läuft. Mahd kann
auch sein durchgeführt, ohne mit der Rad - Antrieb Funktion durch
Drücken des Mähers.
WARNUNG! Vor dem Start der Rad - Laufwerk, stellen Sie
sicher, dass es ist kein Hindernis in den Weg des Mähers.
TIPPS FÜR DEN SICHEREN GEBRAUCH
• Bewegen Sie den Mäher in einer sanften Bewegung und halten Sie
den Griff mit beiden Händen fest.
• Wenn der Mäher wird ausgeführt, halten sie weg von harten
Gegenständen und Kulturen.
• Der Mäher kann nur sein verwendet, wenn das Gras ist trocken.
• Häufige Entleerung des Grasfang (nach 2/3 voll von ihm) wird
gewährleistet eine weitere effiziente Mähen Prozess (der
Kunststoffklappe auf der oberen Abdeckung des Grasfang zeigt an, wie
voll der Fänger ist)
Der Mäher kann werden verwendet, mit oder ohne den Grasfang
ausgestattet. Hinweis, jedoch, dass der hinteren Entladungs guard
muss sein gefaltet unten beim Mähen ohne den Grasfang.
WARNUNG! Der Rasenmäher - Motor wird sehr heiß sowohl
während Betrieb und unmittelbar nach der Operation. Berühren
sie kann dazu führen, die Haut brennt.
WARNUNG! Die Abgasdämpfe enthalten Kohlenstoff -
Monoxid, das Einatmen von denen möglicherweise verursachen
Vergiftung. Deshalb, nie die laufen Gerät drinnen oder in
schlecht belüfteten Bereichen. Starten Sie den Mäher niemals in
Innenräumen oder in der Nähe von brennbaren Materialien.
PFLEGE UND WARTUNG
WARNUNG! Vor Beginn der Reinigung, Überprüfung oder
Reparatur des Mähers, stellen Sie sicher, dass die Maschine
Motor wird gestoppt und nicht heiß. Trennen Sie das Kabel von
der Zündkerze, um ein versehentliches Starten des Motors zu
verhindern.
SCHNEIDMESSER ÄNDERN
• Entfernen Sie den Grasfänger (15).
• Legen Sie den Mäher " beiseite ".
• Fest greift das Schneidmesser (20) (Verschleißschutzhandschuh)
(Fig. H).
• Abschrauben der Schneidmesserbefestigungsschraube (21) mit
einem Schraubenschlüssel durch Drehen es an dem linken (Fig. H).

18
• Ersetzen oder Schärfen das Schneidmesser (beim Auswechseln
des Schneidmesser mit einem neuen ein, es muß die gleiche sein,
Größe).
• Bringen Sie das Schneidmesser in der umgekehrten Reihenfolge
wie oben.
• Das Schärfen oder Austausch des Schneidmesser wird am besten
anvertraut zu einer qualifizierten Person mit Originalteilen.
LUFTFILTER
Ein schmutziger Luftfilter reduziert die Leistung des
Verbrennungsmotors und erhöht Treibstoffverbrauch. Der Luftfilter
sollte werden gereinigt, nachdem alle 5 Stunden des Mähers
Betrieb.
• Entfernen der Luftfilterabdeckung (22) (Fig. I).
• Entfernen der Luftfilter (23) aus der Luftfilterabdeckung (Abb. I).
• Klopfen Sie Staub ab und bläst Luft Filter sauber mit niedrigem
Druck Druckluft.
• Installieren der Luftfilter und die Luftfilterabdeckung.
WARNUNG! Um zu vermeiden das Risiko von Feuer oder der
Bildung von gefährlichen Dämpfen, die Luftfilter muss nicht
werden gewaschen in Benzin oder anderen brennbaren
Lösungsmitteln.
ZÜNDKERZE
Für zuverlässigen Betrieb des Gerätes, der Zustand des
Zündkerzensteckers sollte werden überprüft in regelmäßigen
Abständen.
• Entfernen Funkenstecker Draht (24) von den Funkensteckern (25)
(Fig. J).
• Installieren des Zündkerzensteckschlüssel (26) und Entfernen der
Funkenstecker.
• Saubere die Funkenstecker - Kontakte (25) (Fig. K).
• Überprüfen Sie den Spalt zwischen den Zündkerzenstecker
Kontakte (27) (Abb. L).
• Falls notwendig, ersetzt die Funkenstecker mit einem neuen ein.
LAGER
• Beim Speichern des Mähers, Entleeren des Kraftstoffsystems
vollständig.
• Ablassen den Treibstofftank, starten Sie den Motor und lassen es
zu stoppen laufen für Mangel an Kraftstoff.
• Verwenden Sie zu jeder Jahreszeit frischen Kraftstoff. Nie
verwenden keine Reinigungsmittel in dem Kraftstofftank als dies
kann beschädigen den Motor.
• Stellen Sie sicher, dass die Belüftungsöffnungen des
Motorgehäuses sind nicht behindert.
• Nur die Wartungsprozeduren beschrieben in diesem Handbuch
können sein getragen auf dem aus Mäher. Jegliche andere
Aktivitäten können nur werden, durchgeführt von einem
autorisierten Service - Center.
• Es ist nicht gestattet machen keine Änderungen an den Mäher
Struktur.
• Wenn nicht in Gebrauch, der Mäher sollte werden gespeichert
sauber, auf einer flachen Oberfläche, in einem trockenen Ort
außerhalb der Reichweite von Kindern.
• Regelmäßig entfernen Grasreste.
• Nie reinigt den Benzin Rasen Rasenmäher mit Wasser,
aggressiven Flüssigkeiten oder Lösungsmitteln. Reinigen des
Benzinmäher mit einer Bürste, Druckluft oder einem weichen Tuch.
• In regelmäßigen Abständen überprüfen die Bedingung der
Funkenstecker des Verbrennungsmotors. Ersetzen Sie die
abgenutzten Funkenstecker mit einem neuen ein empfohlen durch
den Hersteller.
• Verwenden Sie das Schneidmesser empfohlen durch den
Hersteller.
WARNUNG! Brennstoffe mit einer Beimischung von Alkohol
(Ethyl oder Methyl) können absorbieren Feuchtigkeit, das
während der Lagerung führt zu Trennung von
Kraftstoffgemisch - Komponenten und die Bildung von Säuren.
Versäuertes Benzin kann den Motor beschädigen.
Alle Arten von Störungen sollten werden entfernt von den
Herstellern autorisierten Service.
TECHNISCHE SPEZIFIKATIONEN
BEWERTETE DATEN
Benzin Rasen Rasenmäher mit Antrieb
Parameter
Wert
Modell
52G671
52G672
52G673
Motorkapazität
139 cm3
173 cm3
196 cm3
Maximale
Motorleistung
2,2 kW
(3 HP)
3,0 kW
(4HP)
3,2 kW
(4,35 HP)
Maximale
Geschwindigkeit ohne
Last
2850 min-1
2800 min -
1
2850 min -
1
Vergaser
1P65FA
H127-3A;
KDH107A;
1P70-1A;
DY1P70FA;
1P70F;
DY1P70FA
DY1P70FB
Art des Kraftstoffs
95
bleifreies
Benzin
95
bleifreies
Benzin
95
bleifreies
Benzin
Motoröl
Für 4-Takt
-
Gartenger
äte
Für 4-Takt
-
Gartenger
äte
Für 4-Takt
-
Gartenger
äte
Zündkerze
F7RTC
F7RTC
F7RTC
Kraftstofftankkapazitä
t
1,3 l
1,5 l
1,0 l
Öltankkapazität
0,6 l
0,6 l
0,6 l
Grass Box Kapazität
55 l
55 l
60 l
Bereich und Anzahl
der
Schnitthöheneinstellu
ngen
25-65 mm
5 Artikel
25-65 mm
5 Artikel
25-65 mm
8 Artikel
Selbstfahrender
Antrieb
Ja
Ja
Ja
Mulchen
Ja
Ja
Ja
Seitenentladung
Ja
Ja
Ja
Schnittbreite
460 mm
502 mm
525 mm
Messer Dicke
2,5 mm
3,0 mm
3,0 mm
Masse
31 kg
36 kg
36,5 kg
Jahr der Produktion
2020
2020
2020
52G671, 52G672, 52G673 Mittel sowohl die Art und die Bezeichnung
der Maschine
LÄRM- UND VIBRATIONSDATEN
Modell
52G671
52G672
52G673
Schalldruckpegel
Lp A = 80,3
dB (A)
K = 3 dB (A)
Lp A =
83,4 dB
(A) K = 3
dB (A)
Lp A =
83,4 dB
(A) K = 3
dB (A)
Gemessener
Schallleistungspegel
Lw A = 94 dB
(A)
K = 3 dB (A)
Lw A = 96
dB (A) K
= 3 dB (A)
Lw A = 97
dB (A) K
= 3 dB (A)
Der Wert von
Schwingungs
beschleunigungen
a h = 4,52 m
/ s 2 K = 1,5
m / s 2
a h = 3,37
m / s 2 K
= 1,5 m /
s 2
a h = 3,36
m / s 2 K
= 1,5 m /
s 2

19
Informationen zu Geräuschen und Vibrationen
Der Pegel des Rausch emittiert durch die Vorrichtung wird
beschrieben die: durch Pegel des ausgesendeten Schalldruck Lp A
und der Schallleistungspegel Lw A (wo K ist die Messunsicherheit).
Die Schwingungen emittiert durch die Vorrichtung werden
beschrieben durch den Wert der Schwingungsbeschleunigung a h
(wobei K ist die Messunsicherheit).
Die folgenden Informationen : emittierten Schalldruckpegel Lp A,
Schallleistungspegel Lw A und der Wert der
Schwingungsbeschleunigung a h wurden gemessen in
Übereinstimmung mit der Richtlinie 2000/14 / EG zur Lärmemission
in die Umgebung. Die gegebene Schwingungsebene ein h kann
werden verwendet, um zu vergleichen, Geräte und für eine
vorläufige Beurteilung der Schwingungsexposition.
Der angegebene Schwingungspegel ist repräsentativ nur für die
grundlegende Verwendung der Vorrichtung. Wenn die Maschine
wird verwendet für verschiedene Anwendungen oder mit
verschiedenen Arbeitswerkzeugen, die Schwingungsebene kann
geändert werden. Der höhere Schwingungspegel wird werden
beeinflusst durch eine unzureichende oder zu seltener Wartung des
Gerätes. Die Gründe gegeben oben kann resultieren in einer
erhöhten Exposition zu Vibrationen während der gesamten Periode
des Betriebs.
Um genau zu schätzen, Belichtung zu Vibrationen, betrachten
Perioden, wenn die Ausrüstung wird eingeschaltet
ausgeschaltet oder wenn es wird gedreht auf, aber nicht in
Gebrauch. Nachdem alle Faktoren haben wurden sorgfältig
geprüft, die Gesamtvibrationsexposition kann sein deutlich
niedriger.
Um zu schützen den Anwender vor den Auswirkungen von
Vibrationen, zusätzlichen Sicherheitsmaßnahmen sollten werden
umgesetzt, wie zum Beispiel: regelmäßige Wartung der Vorrichtung
und Arbeitswerkzeuge, Schutz der entsprechenden Temperatur der
Hände und die richtige Organisation der Arbeit.
UMWELTSCHUTZ
Werfen Sie elektrisch betriebene Produkte nicht in den
Hausmüll, sondern einer umweltgerechten Wiederverwertung
zuführen. Fragen Sie den Vertreiber oder lokale Verwaltung
nach Informationen über die Entsorgung. Elektro- und
Elektronik-Altgeräte enthalten Substanzen, die für die Umwelt
nicht neutral sind. Das der Wiederverwertung nicht zugeführte
Gerät stellt eine potentielle Gefahr für die Umwelt und
Gesundheit der Menschen dar.
* Änderungen vorbehalten.
„Grupa Topex Spółka z ograniczoną odpowiedzialnością” Spółka komandytowa
mit Sitz in Warschau, ul. Pograniczna 2/4 (nachfolgend: „Grupa Topex”) teilt mit,
dass alle Urheberrechte auf den Inhalt der vorliegenden Betriebsanleitung
(nachfolgend: „Betriebsanleitung”), darunter u. a. derer Text, Bilder, Schemata,
Zeichnungen, sowie Anordnung, ausschließlich Grupa Topex angehören und laut
Gesetz über das Urheberrecht und verwandte Rechte vom 4. Februar 1994 (GBl.
2006 Nr. 90 Pos. 631 mit späteren Änderungen) rechtlich geschützt werden. Das
Kopieren, Verarbeiten, Veröffentlichen sowie Modifizieren der gesamten
Betriebsanleitung bzw. derer Einzelelemente für kommerzielle Zwecke ohne
Einwilligung von Grupa Topex in Schriftform ist streng verboten und kann zivil-
und strafrechtlich verfolgt werden.
ПЕРЕВОД ОРИГИНАЛЬНОГО РУКОВОДСТВА
ПРИВОДНАЯ БЕНЗИНОВАЯ КОСИЛКА
52G671, 52G672, 52G673
ПРЕДУПРЕЖДЕНИЕ! ВАЖНЫЙ! ПЕРЕД ИСПОЛЬЗОВАНИЕМ
УСТРОЙСТВА ВНИМАТЕЛЬНО ПРОЧИТАЙТЕ ДАННОЕ
РУКОВОДСТВО И СОХРАНИТЕ ЕГО ДЛЯ БУДУЩЕГО
ИСПОЛЬЗОВАНИЯ.
ПОДРОБНЫЕ ПРАВИЛА БЕЗОПАСНОСТИ
ИНСТРУКЦИИ ПО БЕЗОПАСНОСТИ ПРИ ИСПОЛЬЗОВАНИИ
БЕНЗИНОВЫХ КОСИЛКИ
Безопасность в использовании бензина газонных косилок на
практике
1. Обучение
a) Внимательно прочтите инструкцию. Стать знакомы с органами
управления и правильного использования этого устройства.
b) Никогда не позволяют устройство будет работать на детей или
лиц, не знакомых с аппарата рабочих инструкций.
Национальные правила могут указывать на точный возраст
оператора.
c) Никогда не косить, когда другие люди, особенно дети или
домашние животные, находятся поблизости.
d) Помните, что оператор или пользователь является
ответственным за несчастные случаи или угрозы для других
людей или окружающей среды.
2. Подготовка
a) При стрижке всегда надевайте прочную обувь и длинные
брюки. Не работать с устройством с голыми ногами или в
открытых сандалиях. Избегайте поврежденную одежду, которая
является слишком свободно или имеет свисающие ремни или
ленты.
b) Проверьте на область, где устройство является быть
управлением и удалять любые объекты, которые могли бы
получить в на устройство.
c) Перед использованием, всегда проверять на лопасти, винты и
нож монтажные принадлежности для износа или повреждения.
Заменяйте изношенные или поврежденные детали в наборах,
чтобы поддерживать их баланс. Замените поврежденные или
неразборчивые этикетки.
d) Заправляйте топливо на открытом воздухе при холодном
двигателе. Никогда не заправляйте или отвинтить в топливном
баке, а двигатель будет запущен.
e) Будьте осторожны при заправке и сделать убедитесь, что там
нет нет источника из огня поблизости.
3. Использовать
a) Никогда не блокируйте управление устройством. Это может
привести вас к потерять контроль в оборудование и привести к
аварии.
b) Не начинайте вверх на устройство в закрытом помещении. Там
вне риск от отравления или удушья от накопления из
выхлопных газов.
c) скашивают только в дневное время или при хорошем
искусственном свете.
d) Избегайте стрижки мокрой травы.
e) Всегда сделать уверены ваши ноги находятся твердо на склоне.
f) Давай, никогда не беги.
g) Mow через по склону, никогда не вверх или вниз.
h) Будьте особенно осторожны при изменении направления на
склоне.
i) Не косите на чрезмерно наклонные склоны - до максимума 15
градусов.
j) Ве особенно осторожны при резервном вверх или потянув за
машину по направлению к вам.
Pagina se încarcă...
Pagina se încarcă...
Pagina se încarcă...
Pagina se încarcă...
Pagina se încarcă...
Pagina se încarcă...
Pagina se încarcă...
Pagina se încarcă...
Pagina se încarcă...
Pagina se încarcă...
Pagina se încarcă...
Pagina se încarcă...
Pagina se încarcă...
Pagina se încarcă...
Pagina se încarcă...
Pagina se încarcă...
Pagina se încarcă...
Pagina se încarcă...
Pagina se încarcă...
Pagina se încarcă...
Pagina se încarcă...
Pagina se încarcă...
Pagina se încarcă...
Pagina se încarcă...
Pagina se încarcă...
Pagina se încarcă...
Pagina se încarcă...
Pagina se încarcă...
Pagina se încarcă...
Pagina se încarcă...
Pagina se încarcă...
Pagina se încarcă...
Pagina se încarcă...
Pagina se încarcă...
Pagina se încarcă...
Pagina se încarcă...
Pagina se încarcă...
Pagina se încarcă...
Pagina se încarcă...
Pagina se încarcă...
Pagina se încarcă...
Pagina se încarcă...
Pagina se încarcă...
Pagina se încarcă...
Pagina se încarcă...
Pagina se încarcă...
Pagina se încarcă...
Pagina se încarcă...
Pagina se încarcă...
Pagina se încarcă...
Pagina se încarcă...
Pagina se încarcă...
Pagina se încarcă...
Pagina se încarcă...
Pagina se încarcă...
Pagina se încarcă...
Pagina se încarcă...
Pagina se încarcă...
Pagina se încarcă...
Pagina se încarcă...
Pagina se încarcă...
Pagina se încarcă...
Pagina se încarcă...
Pagina se încarcă...
Pagina se încarcă...
Pagina se încarcă...
Pagina se încarcă...
Pagina se încarcă...
Pagina se încarcă...
Pagina se încarcă...
Pagina se încarcă...
Pagina se încarcă...
Pagina se încarcă...
Pagina se încarcă...
Pagina se încarcă...
Pagina se încarcă...
Pagina se încarcă...
Pagina se încarcă...
-
 1
1
-
 2
2
-
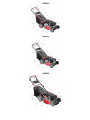 3
3
-
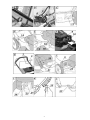 4
4
-
 5
5
-
 6
6
-
 7
7
-
 8
8
-
 9
9
-
 10
10
-
 11
11
-
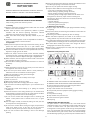 12
12
-
 13
13
-
 14
14
-
 15
15
-
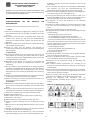 16
16
-
 17
17
-
 18
18
-
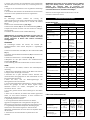 19
19
-
 20
20
-
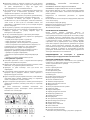 21
21
-
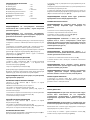 22
22
-
 23
23
-
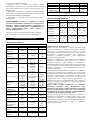 24
24
-
 25
25
-
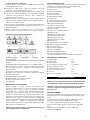 26
26
-
 27
27
-
 28
28
-
 29
29
-
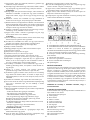 30
30
-
 31
31
-
 32
32
-
 33
33
-
 34
34
-
 35
35
-
 36
36
-
 37
37
-
 38
38
-
 39
39
-
 40
40
-
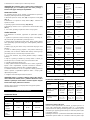 41
41
-
 42
42
-
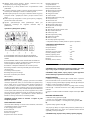 43
43
-
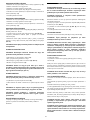 44
44
-
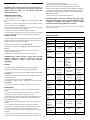 45
45
-
 46
46
-
 47
47
-
 48
48
-
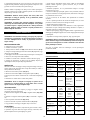 49
49
-
 50
50
-
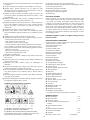 51
51
-
 52
52
-
 53
53
-
 54
54
-
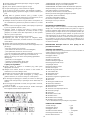 55
55
-
 56
56
-
 57
57
-
 58
58
-
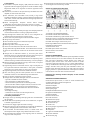 59
59
-
 60
60
-
 61
61
-
 62
62
-
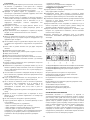 63
63
-
 64
64
-
 65
65
-
 66
66
-
 67
67
-
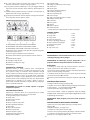 68
68
-
 69
69
-
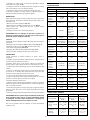 70
70
-
 71
71
-
 72
72
-
 73
73
-
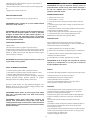 74
74
-
 75
75
-
 76
76
-
 77
77
-
 78
78
-
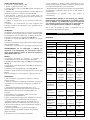 79
79
-
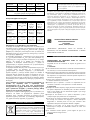 80
80
-
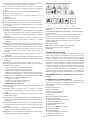 81
81
-
 82
82
-
 83
83
-
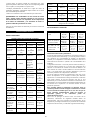 84
84
-
 85
85
-
 86
86
-
 87
87
-
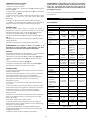 88
88
-
 89
89
-
 90
90
-
 91
91
-
 92
92
-
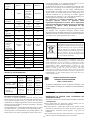 93
93
-
 94
94
-
 95
95
-
 96
96
-
 97
97
-
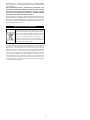 98
98


Graphite 52G671 Manualul proprietarului
- Categorie
- Scarificatoare de gazon
- Tip
- Manualul proprietarului
în alte limbi
- slovenčina: Graphite 52G671 Návod na obsluhu
- eesti: Graphite 52G671 Omaniku manuaal
Alte documente
-
Dolmar PM-4660 S1 (2013) Manualul proprietarului
-
Dolmar PM-4602 S3 Manualul proprietarului
-
-
-
Viking MB 248 T Manual de utilizare
-
Dolmar PM5600S3R Manualul proprietarului
-
Dolmar PM462C Manualul proprietarului
-
-
Texas Smart 5105WS 2-i-1 Manual de utilizare
-
 NEO TOOLS 91-015 Manualul proprietarului
