
WEF200SRELW TR
220-240V~ 50Hz 1000/2000W
www.tesy.com
is a registered trade mark of Tesy ltd.
EN ELECTRIC FIREPLACE 2-7
Installation, Operation and Storage Manual
BG ЕЛЕКТРИЧЕСКА КAМИНА 8-14
Инструкция за инсталация, експлоатация и съхранение
RO ŞEMINEU ELECTRIC 15-20
Instrucţiuni de instalare, operare şi depozitare
HR ELEKTRIČNI KAMIN 21-26
Upute za instalaciju, rad i pohranu
GR ΗΛΕΚΤΡΙΚΟ ΤΖΑΚΙ 27-33
Οδηγίες εγκατάστασης, λειτουργίας και αποθήκευσης
ES CHIMENEA ELÉCTRICA 34-39
Manual de instalación, operación y mantenimiento
PT LAREIRA ELÉTRICA 40-46
Manual do utilizador para instalação, exploração e armazenamento
RU ЭЛЕКТРИЧЕСКИЙ КAМИН 47-52
Инструкция для инсталляции, эксплуатации и хранения
LT ELEKTRINIS ŽIDINYS 53-58
Įrengimo, veikimo ir laikymo instrukcija
LV ELEKTRISKAIS KAMĪNS 59-64
Instalācijas, ekspluatācijas un uzglabāšanas instrukcija
PL KOMINEK ELEKTRYCZNY 65-71
Instrukcja obsługi, użytkowania i przechowywania
RS ЕЛЕТРИЧНИ КАМИН 72-77
Упутство за инсталацију, рад и складиштење
UA ЕЛЕКТРИЧНИЙ КАМІН 78-83
Інструкція з установки, експлуатації та зберігання
EE ELEKTRILINE KAMIN 84-89
Paigaldus-, kasutus- ja hoidimsjuhend
MK ЕЛЕКТРИЧНИ КАМИН 90-95
Упатство за инсталација, функционирање и складирање

2 Usage and Storage Instructions
EN IMPORTANT SAFETY MEASURES AND
PRECAUTIONS:
WARNING!
• Please read this manual before operating the appliance
and keep it at a safe place for future reference. In case
the appliance is obtained by a new owner, it should be
transferred together with its manual.
•CAUTION: Children under 3 years of age should be
kept away from the appliance unless they are under
constant supervision.
Children from 3 to 8 years of age are allowed to
operate the on/off button ONLY, provided that the
appliance is installed and ready for operation and
such children have been supervised and instructed in
safe operation of the appliance and they understand
all related risks.
Children from 3 to 8 years of age MUST NOT: connect
the plug to power sockets, make adjustments, clean it
or carry out user maintenance operations.
This appliance can be used by children older than
8 years of age and by people with reduced physical,
sensor and mental capabilities, as well as by people
with insufficient experience and knowledge provided
they are supervised or instructed in safe operation
of the appliance and understand the related risks.
Children should not be allowed to play with the
appliance. Cleaning and user maintenance operations
must not be carried out by children without
supervision.
•CAUTION: Some of the appliance parts may get very
hot during operation and thus cause burns to users. In
case there are children and vulnerable people in the
room, special attention should be paid.
• WARNING: In order to avoid
overheating, do not cover the fireplace!
• The appliance should not be placed right under a
socket.
• If the supply cord is damaged, it must be replaced by
the manufacturer, its service agent or similarly qualified
persons in order to avoid a hazard.
• This appliance shall be used only for the purpose it
has been designed and intended for, i.e. heating of
domestic premises. The appliance is not intended
for commercial purposes. Every other use is to be
considered improper, and therefore dangerous.
The manufacturer doesn’t bear responsibility for
damages arising from improper and irrational use.
Non-adherence to these instructions would render
the warranty invalid!
• Before switching on the appliance, check if the
voltage indicated on its technical plate corresponds
to the voltage of the electricity supplied to your place.
• Do not leave your place while the appliance is
operating: ensure that the power switch knob is
switched to OFF position. Always disconnect the
power plug from the socket.
• Keep inflammable objects, such as furniture, pillows,
bedding, paper, clothes, curtains, etc. at a distance
of at least 100 cm away of the electric fireplace.
• Do not operate the appliance in areas of use or
storage of combustible substances. Do not operate
the appliance in areas of combustible media (for
example in close proximity to inflammable gases or
aerosols) – there is great risk of explosion and fire!
• Do not insert and do not allow foreign objects to enter
the ventilation openings (inlet and outlet) because this
will cause electric shock, fire or will damage the appliance.
• This appliance is not suitable for animal breeding
and it is intended for domestic use only!
• The most common cause of overheating is fluff and
dust deposits in the appliance. Clean the ventilation
openings regularly with a vacuum cleaner. Before
that disconnect the power plug from the mains.
• Never touch the appliance with damp or wet hands
– this may be dangerous to for your life!
• The power socket must be easily accessible all the
time in case the power plug has to be disconnected
as fast as possible! Never pull the power cord or the
appliance itself in order to disconnect it from the
mains.
•ATTENTION! Outgoing air gets hot during
operation (up to more than 100°C).
• If the appliance is damaged or does not work
properly, stop it and do not repair it yourself. For
any kind of repairs call for assistance an after-sale
service centre. This is the place where you will have
your broken part replaced with an original one.
Non-adherence to this instruction will compromise
the appliance safety.
• If you decide to stop using such kind of appliance,
it is advisable to render it unusable by cutting its
power cord after disconnecting it from the mains. It
is advisable all possible risks related to the appliance
to be secured, especially in relation to children that
may play with out-of-use appliances.
• Never keep the appliance unnecessarily switched
on. Disconnect it from the power socket when you
do not intend to use it for a long period of time.
•Warning: Do not use this appliance with a
programming device, counter or any other device
which can automatically switch it on because if the

Usage and Storage Instructions 3
EN
English
appliance is covered or improperly positioned this
may cause fire.
• Position the power cord in such a way that it does
not obstruct the free movement of people and
cannot be stepped on! Use only approved extension
cords which are suitable for this appliance, i.e. have
got a conformity sign!
• Do not bend the power cord and do not stretch it
over sharp edges, do not position it over hot plates
or open flames!
• Never use the electric fireplace in close proximity to
a bathroom, a shower cabin or a swimming pool!
• Do not lift the fireplace by the front glass.
PACKING
• After unpacking the appliance, check if all its
elements are included in the packing and that it has
not been damaged during transportation! In case
damage or incomplete delivery is found, contact
your authorized retailer!
• Do not throw away the original packing! It could
be used for storage and transportation purposes in
order to avoid damages during transportation!
• Disposal of packing materials should be done in
the appropriate way! Children should be prevented
from playing with polyethylene bags!
INSTALLATION INSTRUCTIONS
Note:
The electric fireplace is intended only for
wall-mounted operation!
• The fixed elements in the packing are of small size
and they should be kept away from small children.
We recommend all elements to be put in a small
box and to be stored away from children.
• Small children should be prevented from playing
with polyethylene bags – there is risk from
suffocation. We recommend disposing of them right
after emptying them.
• Do not connect the electric fireplace until it has
been well-mounted to the wall and you have read
all important instructions above.
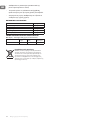
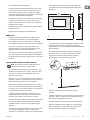
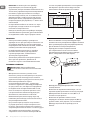
• The minimum distances in front of, above and under
the fireplace shall be observed as indicated above
and shown below.
• During mounting you should be careful about
not damaging the cables in the walls. Please pay
attention when drilling holes in the walls. Danger
from electric shock!
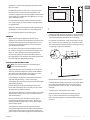
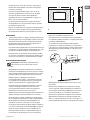
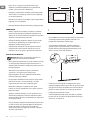
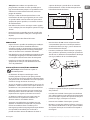
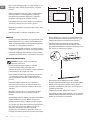
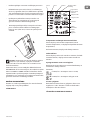
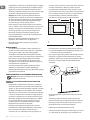
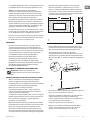
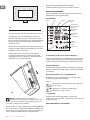
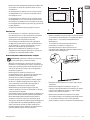
• The appliance is designed to be permanently wall-
mounted at height of minimum 300 mm from the floor.
The bearing clamp shall be in horizontal position. The
power cord is in the bottom right corner of the fireplace.
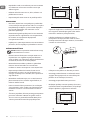
• A height of 600 mm from the floor is recommended
for optimal visualization of the flame effect (see Fig.
1 for recommended dimension for mounting).
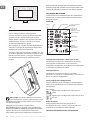
• For optimal visualization, mark the positions of the
top 5 screws for wall-mounting in accordance with
the recommended dimension for mounting (see Fig.
2. Openings with 6 mm drill bits).
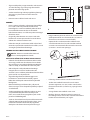
• Mount the bearing clamp to the wall by the screws.
• Carefully lift the fireplace upwards so that the upper
rear edge of the fireplace to lie over the bearing
plate fixed on the wall (see Fig. 2.) and position it
centrally.
• Carefully press the fireplace to the wall.
• Mark the position of the bottom openings (see
Fig. 3), remove the fireplace, ensuring that the
lower mounting plate is turned and will not be an
obstacle.

4 Usage and Storage Instructions
EN
• Drill the openings for the bottom holes and fix on
the wall.
• Place the fireplace on the bearing clamp, fixed on
the wall, and turn the clamp to fix the lower part.
Use the securing screw to permanently mount
the fireplace to the wall and to protect it from
unhanging.
• Unpack the log or the pebbles from the
polyethylene bag and place them along the light-
emitting element in the configuration and position
you wish.
• Place the front glass ensuring that each pair of
grooves from both sides are properly aligned
towards to supporting axes (see Fig.4). Usually two
people can accomplish this operation.
Note: During appliance operation in areas with very
low level of background noise, it is possible specific
sound to be heard which is related to the flame effect. This
is normal and should not be considered worrying.
Thank you for choosing electric fireplace -
WEF200SRELW TR. This is a product providing heating in
winter in power ranges of 1000W or 2000W, depending
on the consumers’ needs for comfortable room
temperature. If operated and taken care of properly in
accordance with these instructions, the appliance will
provide you with many years of useful operation.
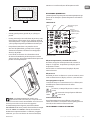
USING THE FIREPLACE
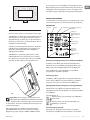
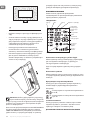
The fireplace can be operated by the switching knobs
located in the upper right part of the appliance or by the
remote control.
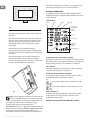
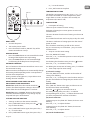
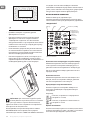
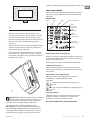
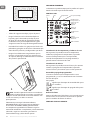
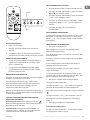
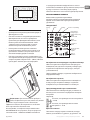
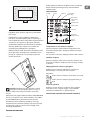
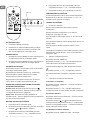
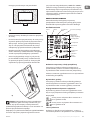
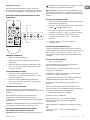
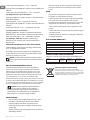
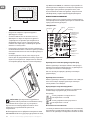
LED DISPLAY
Cursor
Heating position
Day Timer Standby
Temperature/
serial number
display
Time off
Time on
Time display
Automatic
control of
heating
Flame brightness
Temperature and serial number display
Normally it displays the room temperature; while setting
the temperature, the temperature being set is displayed;
When setting the timer, serial number is displayed.
Time display
Normally it displays the current time; while setting the
timer, the time being set is displayed.
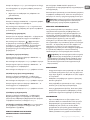
Timed starting and timed shutdown
It is displayed while setting the timer, and it is used in
combination with serial number setting.
E.g.,
means the startup time for setting 5 is 23:40;
means the shutdown time for setting 5 is 6:10.
Flame brightness
It displays the current brightness of the flame, which
ranges from one to five positions. This icon is not
displayed for color flame.
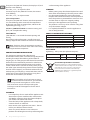
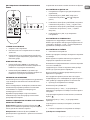
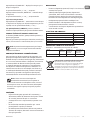
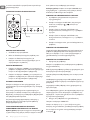
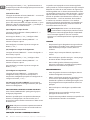
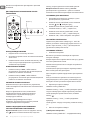
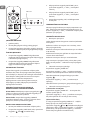
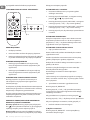
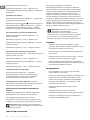
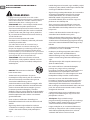
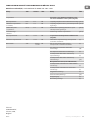
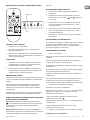
REMOTE CONTROLLER AND CONTROL SWITCH

Usage and Storage Instructions 5
EN
English
Indicator
Button
BOOT STEPS
1. Connect the power
2. Turn on the power switch
3. Press the control switch or „ON/OFF“ key of the
remote controller to start up
HEATING DEVICE
1. Press the 1000W button to can control the low-level
heating of the fireplace and stop heating
2. Press the 2000W button to can control the high-
level heating of the fireplace and stop heating.
AUTOMATIC HEATING
Press IC button on the remote controller to start or exit
the automatic heating.
When turned on, the fireplace can automatically change
the heating mode depending on the set temperature
and the room temperature.
During a timed starting process, it is possible to start
heating ahead of schedule.
MONOCHROME FLAME FIREPLACE WITH
ADJUSTABLE FLAME BRIGHTNESS
Method one: Hold down the control switch О/I (
) button, the flame brightness changes, release the
button when the desired brightness is reached.
Method two: press „DIMMER“ button on the remote
controller, the flame brightness may change step by
step with each press of the button.
SETTING THE DATE AND TIME
1. Settings are done on the remote controller;
2. Press „DATE TIME“ button, then press the or ,
key to select the date;
3. Press „DATE TIME“ button again, then press the „+“
or „-“ to set the hour
4. Press „DATE TIME“ button again, then press the „+“
or „-“ to set the minute
5. Press „OK“ button to complete
TEMPERATURE SETTING
The default set temperature is 20°C, press „+“ or „-“ on
the remote controller to set the temperature, which
ranges from 15 to 30°C, and this is the normally set
temperature (the timer is off)
TIMER SETTING
1. Description of setting
There are up to 10 items for timer setting
Each item of setting has its date, power-on time and
shutdown time
The max. duration of each item of setting is 23 hours 50
minutes
The set date for each item can be any day or days of a week
The date in each item of setting represents the date of
power-on time
If the shutdown time being set falls on the second
day, it is unnecessary to set the date – you just set the
shutdown time.
2. Steps to view the timer setting
Press the „TIMER SET“ button
Press the „+“ or „-“ to check the power-on time set by the
timer item by item
For checking the shutdown time, press the „ “ button.
Press the „+“ or „-“ to continue viewing
For deleting the current item of setting, press „C“ to delete.
3. Time setup steps for timer setting
(I) Select the settings
Press the „TIME SET“ button, and the serial number of
setting starts blinking
Press the „+“ or „-“ to change the serial number until you
get the serial number of setting that you need to set or
modify.
(II) Select date
Press „TIME SET“ button once again, and the cursor on
the left side of date starts blinking
Press the or keys to move the cursor to
the corresponding date, press the „+“ to add the
corresponding date, or press „-“ to delete the date until
you have completed the selection of all dates.
(III) Set the start time
Continue to press the „TIME SET“ button, the hour starts
blinking
Press the „+“ or „-“ to adjust the hour
Continue to press the „TIME SET“ button, the minute
starts blinking
Press the „+“ or „-“ to adjust minute.
(IV) Set the shutdown time

6 Usage and Storage Instructions
EN Then press the „TIME SET“ button, the display is off, and
the hour starts blinking
Press the „+“ or „-“ to adjust the hour
Continue to press the „TIME SET“ button, the minute
starts blinking
Press the „+“ or „-“ to adjust minute.
(V) Set temperature
Then press the „TIME SET“ button, and the temperature
set starts blinking. At this moment, the temperature
displayed is normally set temperature, which can be
adjusted by pressing „+“ or „-“
(VI) Press „TIME SET“ button to continue setting, and
press „OK“ complete the setting
TIME SWITCH
„TIME ON/OFF“ is to control the timed opening and
closing
Restart the machine after power is cut off, the original
setting is kept, but the current date and time must be reset.
Note: The device shows the temperature around the
location of the sensor and is not a means of accurately
measuring the ambient temperature.
PROTECTION FROM OVERHEATING
This appliance is equipped with safety thermal
disconnection device, which is actuated at high temperature
(resulting for example from blocking of the outlets for
outgoing air). For safety purposes the thermal disconnection
device will not be automatically restarted. In order for it to
be restarted, you need to take the power cord out of the
socket, wait for about 10 minutes and then put the plug in
the socket again. Normally the appliance will start operating,
but if this doesn’t happen, you need to check the inlet and
outlet openings. If everything is normal with them (and the
appliance has been regularly cleaned from dust), please
contact the service center in your location.
Note:
To avoid the risk of involuntary restart of
the thermal disconnection device, you should not
connect any external starting devices such as timers,
series connection switches which provide regular
switching on and off of the appliance for the sake of
convenience.
CLEANING
• It is compulsory first to switch off the appliance and
disconnect its power cord from the socket on the
wall. Before starting to clean the electric fireplace
you should wait until it cools down.
• Clean the body of the appliance with a damp cloth,
vacuum cleaner or soft brush.
• Never immerse the appliance into water – there is
risk for your life from electric shock!
• Never use petrol, thinner or coarse abrasive
products for cleaning because they will damage the
surface coating of the appliance.
STORAGE
• Before putting away the electric fireplace let it cool
down after disconnecting it from the power socket.
• Use the original packing for storing the electric
fireplace if it will not be used for a certain period of
time. The product is protected from excessive dust
and dirt when it is kept in its original packing.
• Never put a hot appliance into its packing!
• The product is necessary to be stored at a dry place
away from direct sunlight.
• It is explicitly forbidden to store the appliance in
wet or damp premises.
PRODUCT PACKING SET INCLUDES:
Fireplace 1 pc.
Clamp for wall-mounting 1 pc.
Mounting screws and securing element 1 pc.
Remote control 1 pc.
Manual 1 pc.
Guarantee certificate 1 pc.
TECHNICAL CHARACTERISTICS OF THE
APPLIANCE:
Lightening – LED system (no replacement parts)
Model Rated
power Rated voltage Rated
frequency
WEF200SRELW TR 2000W 220-240V~ 50Hz
Environment protection instructions
Old electric appliances contain valuable materials
and therefore should not be disposed of as domestic
waste! We ask you for your active cooperation to
protect the resources and the environment by
submitting your appliance to organized buy-back
stations (if there are such).

Usage and Storage Instructions 7
EN
English
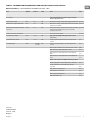
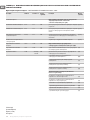
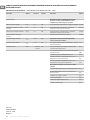
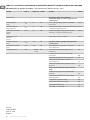
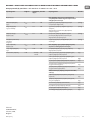
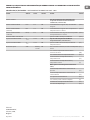
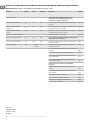
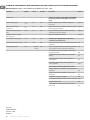
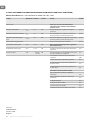
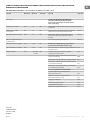
TABLE 2: INFORMATION REQUIREMENTS FOR ELECTRIC LOCAL SPACE HEATERS
Model identifier(s): 1.WEF200SRELW TR 2000W/220-240V~ 50Hz
Item Symbol Value 1. Unit Item Unit
Heat output Type of heat input for electric storage local space
heaters only (select one)
Nominal heat output Pnom 2.00 kW Manual heat charge control, with integrated thermostat [yes/no]
Minimum heat output (indicative) Pmin 1.00 kW Manual heat charge control, with room and/or outdoor
temperature feedback
[yes/no]
Maximum continuous heat output
(indicative)
Pmax,C 2.00 kW Electric heat charge control, with room and/or outdoor
temperature feedback heat charge control, with
integrated thermostat
[yes/no]
Auxiliary electricity consumption Fan assisted head output [yes/no]
At nominal heat output elmax 0.014 kW Type of heat output/room temperature control
(select one)
-
At minimum heat output elmin 0.014 kW Single stage heat output and no room temperature
control
[no]
In standby mode el SB Stand by
0.00048
kW Two or more manual stages, no room temperature
control
[no]
With mechanic thermostat room temperature control [no]
With electronic room temperature control [no]
With electronic room temperature control plus day
timer [no]
With electronic room temperature control plus week
timer [yes]
Other control options (multiple selections possible)
Room temperature control, with presence detection [no]
Room temperature control, with open window
detection [no]
With distance control option [no]
With adaptive start control [yes]
With working time limitation [no]
With black bulb sensor [no]
TESY Ltd
48 Madara Blvd,
Shumen, 9700,
Bulgaria

8 Инструкции за употреба и съхранение
BG ВАЖНИ ПРЕДПАЗНИ МЕРКИ И ИНСТРУКЦИИ ЗА
БЕЗОПАСНОСТ:
ВНИМАНИЕ!
• Прочетете настоящите инструкции преди да
използвате този уред и съхранявайте тези указания
за бъдещо ползване. При смяна на собственика,
инструкцията за експлоатация трябва да се предава
заедно с уреда.
•ВНИМАНИЕ: Деца на по-малко от 3 години, трябва
да се държат на разстояние, освен ако не са под
непрекъснато наблюдение.
Деца на възраст от 3 години до 8 години могат
само да използват бутона вкл./изкл. на уреда,
при условие, че уреда е инсталиран и е готов
за нормална работа и са били наблюдавани
и инструктирани относно използването му по
безопасен начин и разбират, че може да е опасно.
Деца на възраст от 3 години до 8 години не трябва
да включват уреда в контакта, да го настройват,
да го почистват или да извършват потребителска
поддръжка.
Този уред може да се използва от деца на
възраст над 8 години и лица с ограничени
физически, сетивни или умствени способности,
или с недостатъчен опит и познания, ако те
са наблюдавани или инструктирани относно
безопасното използване на уреда и разбират
опасностите. Децата не трябва да си играят с уреда.
Почистване и потребителска поддръжка не трябва
да се прави от деца без наблюдение.
•ВНИМАНИЕ: Някои части на този продукт може да
станат много горещи и да предизвикат изгаряния.
Там където, присъстват деца и уязвими хора,трябва
да бъде предоставено специално внимание.
• ПРЕДУПРЕЖДЕНИЕ:
За да се избегне
прегряване, не покривайте кaмината.
• Уреда не трябва да се поставя
непосредствено под щепселна кутия!
• Когато захранващият шнур се повреди, той трябва
да се замени от производителя или негов сервизен
представител, или подобно квалифицирано лице, за
да се избегне опасност.
• Този уред трябва да се използва само по
предназначението, за което е бил предвиден,
т.е. да отоплява битови помещения. Уреда
не е предназначен за търговски цели. Всяка
различна употреба да се счита за неправилна и
следователно опасна. Производителят не може
да носи отговорност за повреди, произтичащи от
неправилна и неразумна употреба. Неспазване
на информацията за безопасност ще направи
невалидна поетата гаранция за уреда!
• Преди да включите уреда – проверете дали
посоченото напрежение върху типовата табелка
съответства на напрежението доставяно до дома Ви.
• Не напускайте дома си, докато уреда е включен:
уверете се, че ключa е в положение 0 изключено.
Винаги изваждайте щепсела на уреда от контакта.
• Дръжте запалими предмети, като мебели,
възглавници, спално бельо, хартия, дрехи,
пердета и т.н. на разстояние от поне 100 см далеч
от електрическата камина.
• Не използвайте уреда в зони където се
използват или съхраняват огнеопасни вещества.
Не използвайте уреда в зони със запалими
атмосфери (например: в близост до запалими
газове или аерозоли) - съществува много голяма
опасност от експлозия и пожар!
• Не вкарвайте и не допускайте чужди тела да
попаднат в отворите за вентилация(входящи или
изходящи), тъй като това ще причини токов удар,
пожар или повреда в конвектора.
• Уреда не е подходящ за отглеждане на животни,
и същия е предвиден само за домашно ползване!
• Най-често срещаната причина за прегряване е
натрупването на мъх и прах в уреда. Редовно
почиствайте с прахосмукачка вентилационните
отвори, като преди това задължително
изключите уреда от електрическата мрежа.
• Никога не пипайте уреда с мокри или влажни
ръце- съществува опасност за живота!
• Контакта трябва да бъде достъпен по
всяко време, за да може щепсела да бъде
освобождаван при нужда възможно най-бързо !
Никога не теглете захранващия шнур или самия
уред при изключване от мрежата.
• Обърнете внимание! Изходящия въздух се
загрява по време на работа (до повече от 100°С).
• Ако уреда не е в ред или функционира
неправилно, спрете го и не го ремонтирайте.
За всякакви ремонти се обърнете за
съдействие към Сервизния Център за след
продажбено обслужване. Само там ще подменят
дефектиралата част с оригинална резервна
такава. Не спазването на това условие ще
компрометира безопасността на уреда.
• Ако решите да престанете да използвате уред
от този тип, препоръчва се да го направите
неизползваем, като срежете шнура, след като сте го
изключили от мрежата. Препоръчва се още всички
опасности, свързани с уреда да бъдат обезопасени,
особено за деца, които биха могли да използват
амортизираното устройство(уреда) за игра.
• Никога не оставяйте ненужно уреда включен.
Изключвайте го от захранващата мрежа, когато
няма да го ползвате дълго време.
•Внимание: Не използвайте този уред с
програматор, брояч или друг уред който

Инструкции за употреба и съхранение 9
BG
Български
автоматично го включва тъй като, ако уреда е
покрит или неправилно поставен съществува
опасност от пожар.
• Поставете захранващия шнур, така че да не
пречи на движението на хората и да не бъде
настъпван ! Използвайте само одобрени
удължители, които са подходящи за уреда, т.е.
имат знак за съответствие!
• Не пречупвайте шнура и не го дърпайте през
остри ръбове и не го поставяйте върху горещи
плочи или открит огън!
• Никога не ползвайте този уред в непосредствена
близост до баня, до душ или до плувен басейн!
• Не повдигайте камината чрез предното стъкло
ОПАКОВКА
• След разопаковане на уреда, проверете дали при
транспортирането не е увреден и дали е напълно
окомплектован! В случай че бъде констатирана
повреда или непълна доставка, свържете се с
Вашия упълномощен продавач!
• Не изхвърляйте оригиналната кутия! Тя би могла да
се използва за съхранение и транспортиране, за да
се избегнат бъдещи повреди от превозването!
• Изхвърлянето на опаковъчния материал трябва
да става по подходящ начин! Децата трябва да се
пазят да не си играят с полиетиленовите торби!
ИНСТАЛИРАНЕ НА УРЕДА
Забележка:
Камината е предназначена
единствено за използване чрез стенен
монтаж!
• Фиксиращите елементи в опаковката са малки по-
размер и е необходимо да се пазят далече от малки
деца. Препоръчваме всички елементи да се сложат
в малка кутия и да се обезопасят далече от деца.
• Малките деца не трябва да си играят с
полиетиленовите торби – съществува опасност
от задушаване. Препоръчваме да се изхвърлят
веднага след вземане на съдържанието им.
• Не свързвайте електрически камината , докато
същата не е добре закрепена към стената и
не сте прочели всички важни инструкции за
безопасност описани в частта по-горе .
• Минималните разстояния пред над и под камината
трябва да бъдат спазвани (описани са по-долу).
• При монтажа на уреда, трябва да се внимава да
не се повредят вкопаните в стените проводници.
Моля, бъдете внимателни при пробиване на
отворите за монтаж. Опасност от токов удар!
• Този уред е проектиран да бъде трайно закрепен
за стена на височина от минимум 300mm спрямо
пода. Носещата скоба на стената трябва да се
монтира хоризонтално. Захранващия шнур се
разположен в долния десен ъгъл на камината.
• Височина от 600mm спрямо пода е
препоръчителна за оптимално визуализиране
на горивния ефект (вж. Фиг.1 за препоръчителни
размери за фиксиране).
• За оптимално визуализиране, маркирайте
позициите на горните пет винта за закрепване
към стената в съответствие с препоръчителните
фиксиращи размери (виж Фиг.2. Отвори с шест
мм бургия).
• Фиксирайте носещата скоба към стената чрез
винтовете
• Внимателно повдигнете на камината нагоре,
така че горния заден ръб(перваз)на камината
да попадне над носещата фиксирана планка на
стената (вж. Фиг.2 ) и я поставете централно.
• Внимателно притеснете камината към стената.
• Маркирайте позицията на долните дупки( виж
Фиг.3), отстранете камината, като сте сигурни че
долната фиксираща планка е завъртяна и не пречи.

10 Инструкции за употреба и съхранение
BG
• Пробийте отворите за долните дупки и
фиксирайте на стената.
• Поставете камината към на носещата скоба
фиксирана на стената и завъртете скобата
за фиксиране на долната част. Използвайте
осигурителния винт за да закрепите окончателно
камината към стената и да я подсигурите срещу
възможност за откачане.
• Разопаковайте дънерите или речните камъчета
от полиетиленовата торбичка и ги поставете по
протежение на излъчващия светлина елемент в
желаната конфигурация и позиция.
• Поставете предното стъкло, като гледате да са
влезли два по два жлебовете от всяка страна
спрямо опорните оси (виж Фиг.4). Обикновено са
необходими двама души за тази операция
Забележка: При използване на уреда в среда
където фоновия шум е много малък е възможно
да се чува звук, който е свързан с действието на
ефектния-пламък. Това е нормално и не трябва да
бъде причина за безпокойство.
Благодарим Ви, че избрахте електрическата камина
WEF200SRELW TR. Това е изделие, което предлага
отопление през зимата от 1000W или 2000W в зависимост
от нуждите за постигане на комфортна топлина в
отопляемото помещение. При правилна експлоатация и
грижа, както е описано в тези инструкции, уредът ще Ви
осигури много години полезно функциониране.
ИЗПОЛЗВАНЕ НА КАМИНАТА
Камината може да се управлява чрез
превключвателите позиционирани в горната дясна
част на камината или чрез дистанционно управление.
LED ДИСПЛЕЙ
Курсор
Ниво на отопление
Ден Таймер Готовност (Standby)
Показване на
температурата /
пореден номер
Време на
изключване
Време на
включване
Показва
времето
Автоматичен
контрол на
отоплението
Яркост на
пламъка
Показване на температура и пореден номер
Обикновено дисплеят показва температурата в
стаята; докато се настройва температурата, на
дисплея се показва настройваната температура;
Когато се настройва таймера, дисплеят показва
пореден номер.
Показване на часа
Обикновено дисплеят показва настоящия час и
минути; когато се настройва таймера, дисплеят
показва настройваните час и минути.
Програмиран старт и изключване
Показва се докато се настройва таймера и се
използва в комбинация с поредния номер на
настройката.
Например,
означава, че времето за стартиране на
настройка 5 е 23:40;
означава, че времето за изключване на
настройка 5 е 6:10.
Яркост на пламъка
Показва настоящата яркост на пламъка, която може
да бъде настройвана от ниво 1 до ниво 5. Тази икона
не се показва при модели с цветен пламък.

Инструкции за употреба и съхранение 11
BG
Български
ДИСТАНЦИОННО УПРАВЛЕНИЕ И КОНТРОЛЕН
ПАНЕЛ
Индикатор
Бутон
СТЪПКИ ЗА ВКЛЮЧВАНЕ
1. Свържете към захранване
2. Поставете ключа на захранването в позиция
„включен“
3. Натиснете ключа на захранването или бутона
„ON/OFF“ на дистанционното управление, за да
включите уреда
ОТОПЛИТЕЛЕН УРЕД
1. Натиснете бутона 1000W, за да можете да
регулирате отоплението на ниска мощност на
камината и за да спрете отоплението;
2. Натиснете бутона 2000W, за да можете да
регулирате отоплението на висока мощност на
камината и за да спрете отоплението.
АВТОМАТИЧНО ОТОПЛЕНИЕ
Натиснете бутона IC на дистанционното управление,
за да активирате или изключите автоматичното
отопление.
Когато тази функция е активирана, камината може
автоматично да променя режима на отопление
в зависимост от зададената температура и
температурата в стаята.
В режим на програмиран старт е възможно
отоплението да започне преди да е настъпило
програмираното време.
КАМИНА С ЕДНОЦВЕТЕН ПЛАМЪК И РЕГУЛИРУЕМА
ЯРКОСТ НА ПЛАМЪКА
Първи начин: Задръжте натиснат бутона О/I ( )
яркостта на пламъка се променя; отпуснете бутона,
когато достигнете желаната яркост.
Втори начин: Натиснете бутона „DIMMER“ на
дистанционното управление – яркостта на пламъка
се променя постепенно с всяко натискане на бутона.
НАСТРОЙВАНЕ НА ДАТА И ЧАС
1. Настройките се правят чрез дистанционното
управление;
2. Натиснете бутона „DATE TIME“, след това с
натискане на бутоните или , изберете
датата;
3. Натиснете отново бутона „DATE TIME“, след това с
натискане на бутоните „+“ или „-“, задайте часа;
4. Натиснете отново бутона „DATE TIME“, след това
с натискане на бутоните „+“ или „-“, задайте
минутите;
5. Натиснете бутона „OK“, за да завършите
настройките
НАСТРОЙВАНЕ НА ТЕМПЕРАТУРА
Зададената по подразбиране температура е 20°C.
Можете да настроите температурата в диапазона от
15 до 30°C с бутоните „+“ или „-“ на дистанционното
управление (таймерът е изключен).
НАСТРОЙВАНЕ НА ТАЙМЕР
1. Описание на настройката
Можете да зададете максимум 10 отделни настройки
на таймера.
Всяка отделна настройка има своя дата, време на
стартиране и време на изключване.
Максималната продължителност на всяка настройка
е 23 часа и 50 минути.
Зададената дата за всяка настройка може да бъде
който и да е ден или дни от седмицата.
Датата на всяка настройка представлява датата на
времето на стартиране.
Ако зададеното време на изключване се пада на
следващия ден, не е необходимо да задавате датата –
само трябва да зададете времето на изключване.
2. Преглед на настройките на таймера
Натиснете бутона „TIMER SET“.
Натиснете бутона „+“ или „-“, за да проверите
времето на стартиране на таймера за всяка отделна
настройка.
За да проверите времето на изключване, натиснете
бутона „ “.
Натиснете бутона „+“ или „-“, за да продължите
прегледа.
За да изтриете настоящата настройка, натиснете
бутона „C“.
3. Стъпки за задаване на настройки на таймера
(I) Изберете настройките

12 Инструкции за употреба и съхранение
BG Натиснете бутона „TIMER SET“ – поредният номер на
настройката започва да мига.
С натискане на бутоните „+“ или „-“ се придвижвате до
поредния номер на настройката, която е необходимо
да зададете или промените.
(II) Изберете дата
Натиснете отново бутона „TIMER SET“ – курсорът
отляво на датата започва да мига.
С натискане на бутоните или преместете
курсора на съответната дата; натиснете бутона „+“,
за да добавите датата или натиснете бутона „-“, за да
изтриете датата, докато приключите с избора на дати.
(III) Задаване на времето за стартиране
Натиснете продължително бутона „TIMER SET“ – часът
започва да мига.
С натискане на бутоните „+“ или „-“, задайте часа.
Натиснете продължително бутона „TIMER SET“ –
минутите започват да мигат.
С натискане на бутоните „+“ или „-“, задайте минутите.
(IV) Задаване на времето за изключване
Натиснете бутона „TIMER SET“ – дисплеят е изключен
и часът започва да мига.
С натискане на бутоните „+“ или „-“, задайте часа.
Натиснете продължително бутона „TIMER SET“ –
минутите започват да мигат.
С натискане на бутоните „+“ или „-“, задайте минутите.
(V) Задаване на температура
Натиснете бутона „TIMER SET“ – зададената
температура започва да мига. На дисплея се показва
зададената температура, която може да настроите с
натискане на бутоните „+“ или „-“.
(VI) Натиснете бутона „TIME SET“, за да
продължите с настройките или натиснете бутона
„OK“, за да завършите настройката.
ОТЛОЖЕНО ВКЛЮЧВАНЕ/ИЗКЛЮЧВАНЕ НА УРЕДА
С бутона „TIMER ON/OFF“ можете да управлявате
програмираното включване и изключване.
Рестартирайте уреда след спиране на ел.
захранването; настройките са запазени, но е
необходимо да бъдат въведени отново настоящите
дата и време.
Забележка: Уредът показва температурата
около местоположението на сензора и не е
средство за прецизно измерване на температурата на
околната среда.
ЗАЩИТА ОТ ПРЕГРЯВАНЕ
Този уред е окомплектован с защитен
термоизключвател, които се задейства при
висока температура(например блокиране на
изходящите отвори за въздух). С цел безопасност,
термоизключвателя няма автоматично да се
рестартира. За да бъде рестартиран, е необходимо
да се извади шнура от контакта – да се изчака около
10 минути и да се вкара отново плуга в контакта.
Уреда нормално би заработил – ако това не се
случи е необходимо да се проверят входящите и
изходящи отвори. Ако при тях всичко е нормално(и
уреда редовно е почистван от прах) се обърнете към
сервизната база във вашето населено място.
Забележка:
За да се избегне опасността от
непреднамерено рестартиране на
термоизключвателя , на този уред не трябва да се
поставя външно устройство за превключване,
като таймер, или свързан последователно във
веригата ключ , които редовно се включва или
изключва за удобство.
ПОЧИСТВАНЕ
• Задължително първо изключете уреда от ключа
и извадете щепсела от контакта в стената. Преди
да започнете да почиствате камината, оставете я
да изстине.
• Почиствайте корпуса с влажна кърпа,
прахосмукачка или четка.
• Никога не потапяйте уреда във вода - съществува
опасност за живота от токов удар!
• Никога не използвайте бензин, разредител или
груби абразивни продукти за почистване, тъй
като те ще повредят покритието на уреда.
СЪХРАНЕНИЕ
• Преди да приберете камината , оставете я да
изстине като го изключите от контакта
• Използвайте оригиналната опаковка за съхранение
на камината ако същата няма да се използва
за известно време. Продукта се предпазва от
прекомерно запрашаване и замърсяване като се
прибира в оригиналната си опаковка.
• Никога не прибирайте топъл уред в опаковка му!
• Продукта е необходимо да се съхранява в
сухо и защитено от пряка слънчева светлина
местоположение.
• Изрично се забранява неговото съхраняване във
влажни или мокри помещения.

Инструкции за употреба и съхранение 13
BG
Български
ОКОМПЛЕКТОВКА В ЕДНА ОПАКОВКА:
Камина 1 брой
Скоба за фиксиране към стена 1 брой
Фиксиращи винтове и осигурителен елемент 1 брой
Дистанционно управление 1 брой
Инструкция 1 брой
Гаранционна карта 1 брой
ТЕХНИЧЕСКИ ПАРАМЕТРИ НА УРЕДА:
Осветление - LED система (няма заменяеми части)
Модел Обявена
мощност Обявено
захранващо
напрежение
Обявена
честота
WEF200SRELW TR 2000W 220-240V~ 50Hz
Указания за опазване на околната среда
Старите електроуреди съдържат ценни материали
и поради това не трябва да се изхвърлят заедно с
битовата смет! Молим Ви да съдействате с активния
си принос за опазване на ресурсите и околната
среда и да предоставите уреда в организираните
изкупвателни пунктове (ако има такива).

14 Инструкции за употреба и съхранение
BG ТАБЛИЦА 2: ИЗИСКВАНИЯ КЪМ ИНФОРМАЦИЯТА ЗА ЕЛЕКТРИЧЕСКИ ЛОКАЛНИ ОТОПЛИТЕЛНИ
ТОПЛОИЗТОЧНИЦИ
Идентификатори на модела: 1.WEF200SRELW TR 2000W/220-240V~ 50Hz
Позиция Символ Стойност 1. Мерна
единица
Позиция Мерна
единица
Топлинна мощност Вид топлинно зареждане, само за електрически
акумулиращи локални отоплителни
топлоизточници (изберете един)
Номинална топлинна мощност Pnom 2.00 kW ръчен регулатор на топлинното зареждане с вграден
термостат
[да/не]
Минимална топлинна мощност Pmin 1.00 kW ръчен регулатор на топлинното зареждане с обратна
връзка за температурата в помещението и/или
навън
[да/не]
Максимална непрекъсната
топлинна мощност
Pmax,C 2.00 kW електронен регулатор на топлинното зареждане с
обратна връзка за температурата в помещението и/
или навън
[да/не]
Спомагателно потребление на
електроенергия
отдавана чрез обдухване топлинна енергия [да/не]
При номинална топлинна
мощност
elmax 0.014 kW Вид топлинна мощност/регулиране на
температурата в помещението (изберете един)
При минимална топлинна
мощност
elmin 0.014 kW една степен на топлинна мощност и без регулиране
на температурата в помещението
[не]
В режим готовност el SB Stand by
0.00048
kW Две или повече ръчни степени, без регулиране на
температурата на помещението
[не]
с механичен термостат за регулиране на
температурата в помещението [не]
с електронен регулатор на температурата в
помещението [не]
електронен регулатор на температурата в
помещението и денонощен таймер [не]
електронен регулатор на температурата в
помещението и седмичен таймер [Да]
Други варианти за регулиране (възможен е
повече от един избор)
регулиране на температурата в помещението с
откриване на човешко присъствие [не]
регулиране на температурата в помещението с
откриване на отворен прозорец [не]
с възможност за дистанционно управление [не]
с адаптивно управление на пускането в действие [Да]
с ограничение на времето за работа [не]
с датчик във вид на черна полусфера [не]
ТЕСИ ООД
бул.Мадара 48,
Шумен, 9700,
България

Instrucţuni de utilizare şu depozitare 15Românesc
RO
PRECAUŢII IMPORTANTE ŞI INSTRUCŢIUNI DE
SIGURANŢĂ:
PRUDENŢĂ!
• Citiţi instrucţiunile de utilizare înaintea utilizării
produsului. Păstraţi instrucţiunile de utilizare pe
toata durata de viaţa a produsului, pentru eventuale
consultări ulterioare La schimbarea proprietarului,
instrucţiunile trebuie să fie transmise, împreună cu
aparatul!
•PRUDENȚĂ: Copiii mai mici de 3 ani, trebui să fie
ţinute departe, cu excepţia cazului în care acestea sunt
sub supraveghere constantă.
Copiii în vârsta între 3 şi 8 ani pot folosi doar butonul
porn./opr. a aparatului cu condiţia ca aparatul este
instalat și este gata pentru funcţionarea normală și
au fost monitorizate și instruiţi cu privire la utilizarea
acestuia în condiţii de siguranţă și înţeleg că ar putea
fi periculos.Copiii în vârsta între 3 şi 8 ani nu trebui să
sa pună cablul aparatului in priză, să-l setează sau să
efectueze întreţinerea.
Acest aparat nu este destinat utilizării de către persoane
(inclusiv copii mici), cu capacităţi fizice, senzoriale
sau mentale reduse, precum şi lipsa de experienţă şi
cunoştinţe cu excepţia cazului în care au văzut sau au
fost dat instrucţiuni cu privire la utilizarea aparatului de
către o persoană responsabilă pentru siguranţa lor!Nu
lăsaţi copiii mici să se joace cu aparatul! Curăţarea
și întreţinerea nu trebui să fie făcută de către copii
nesupravegheaţi.
•PRUDENȚĂ: Unele părţi acestui aparat pot deveni
foarte fierbinţi și pot cauza arsuri. Acolo unde sunt
copii și persoanele vulnerabile trebuie să se acorde o
atenţie deosebită.
•ATENȚIE: Pentru a evita supraîncălzirea,
nu acoperiţi şemineul.
• Aparatul nu trebui să fie aşezat direct sub cutia
prizei!
• În cazul în care cablul de alimentare este deteriorat,
acesta trebuie înlocuit de producător, agentul de
service sau de persoane calificate în mod similar,
pentru a evita un pericol.
• Acest aparat trebuie folosit numai în scopul pentru
care au fost achiziţionat, şi anume a încălzi camere
de utilitate. Aparatul nu este destinat pentru scopuri
comerciale. Orice altă utilizare poate fi considerată
improprie şi, prin urmare, periculoasă. Producătorul nu
poate fi tras la răspundere pentru pagubele rezultate
din utilizarea incorectă şi nerezonabilă. Nerespectarea
informaţiilor de siguranţa va anula garanţia aparatului!
• Înainte de a porni aparatul - verificaţi dacă tensiunea
de pe plăcuţa de tip corespunde tensiunii furnizate
la casă dumneavoastră.
• Nu plecaţi de acasă în timp ce aparatul este pornit:
asiguraţi-vă că comutatorul este în poziţia 0 oprit.
Scoateţi întotdeauna aparatul de la priza de
alimentare.
• Păstraţi o distanţa între convectorul şi obiectele
inflamabile, cum ar fi mobila, perne, lenjerie de pat,
hârtie, îmbrăcăminte, perdele, de cel puţin 100 de
cm de la şemineul electric.
• Nu utilizaţi aparatul în zonele în care sunt utilizate
sau depozitate substanţe inflamabile. Nu utilizaţi
aparatul în zone cu atmosfere inflamabile (de
exemplu: în apropierea gazelor inflamabile sau
aerosolilor) - există un pericol extrem de explozie şi
incendiu!
• Nu introduceţi sau nu permite obiecte străine să
cadă în orificiile de ventilaţie (de intrare sau de
ieşire), deoarece acest lucru va provoca un şoc
electric, incendiu sau deteriorare a convectorului.
• Aparatul nu este potrivit pentru utilizare în creşterea
animalelor, acesta este destinat numai pentru uz
casnic!
• Cea mai frecventa cauza de supraîncălzire este
acumularea de scame și praf în unitate. Curăţaţi
regulat cu aspirator orificiile de ventilare, dar
înainte de aceasta scoateţi aparatul de la reţeaua de
alimentare.
• Nu atingeţi aparatul cu mâini ude - există pericol
pentru viaţă!
• Priză trebuie să fie ușor accesibilă pentru a scoate
ștecherul când este nevoie cât mai repede posibil!!
Nu trageţi niciodată de cablul de alimentare sau de
aparatul pentru a-l deconecta de la priza.
• ATENŢIE! Aerul de evacuare este încălzit în timpul
funcţionării (mai mult de 100°С).
• În cazul în care unitatea nu este în ordine sau
funcţionează defectuos, opriţi - și nu reparaţi. Pentru
orice reparaţii, pentru asistenţa contactaţi Centrul
de Servicii pentru servicii post-vanzare. Numai acolo
vor înlocui piesa defectuoasă cu piesă originală.
Nerespectarea acestei condiţii ar putea compromite
siguranţa aparatului.
• Dacă decideţi să nu mai utilizaţi un dispozitiv de
acest tip, se recomandă să - faceţi inutilizabil, şă
tăiaţi cablul, după ce l-aţi deconectat de la sursa de
alimentare. Se recomandat toate pericolele asociate
cu aparatul să fie protejate, în special pentru
copiii care ar putea folosi dispozitivul amortizat
(dispozitiv) pentru a se juca cu el.
• Niciodată nu lăsaţi aparatul pornit inutil.
Deconectaţi-l din reţeaua de alimentare, dacă nu-l

16 Instrucţuni de utilizare şu depozitare
RO veţi folosi o perioada lungă de timp.
•Atenție: Nu conectaţi aparatul la un cronometru,
programator sau orice alt dispozitiv care conectează
aparatul automat, pentru că există riscul de a lua
foc dacă aeroterma este acoperită sau poziţionată
incorect.
• Conectaţi cablul de alimentare astfel încât să nu
împiedice circulaţia persoanelor şi să nu fie încălcat!
Utilizaţi numai prelungitoare aprobate, care sunt
adecvate pentru acest instrument, adică au semn de
conformitate!
• Nu striviţi cablul şi nu-l trageţi peste muchii ascuţite.
Nu-l amplasaţi deasupra unor plite încinse sau
deasupra flăcărilor!
• Niciodată nu folosiţi acest aparat în apropiere de
baie, duş sau o piscina!
• Nu ridicaţi şemineul prin sticlă din faţă
AMBALAJ
• După despachetarea aparatului, verii caţi
integralitatea acestuia şi existenţa unor eventuale
deteriorări apărute la transport În cazul constatării
unei deteriorări sau al unei livrări incomplete,
contactaţi distribuitorul autorizat!
• Nu aruncaţi cutia originală! Aceasta poate fi utilizată
la depozitare şi mutare pentru evitarea eventualelor
deteriorări la transportare!
• Evacuaţi materialul ambalajului la deşeuri într-un
mod corespunzător! Nu lăsaţi pungile de plastic la
îndemâna copiilor!
INSTALAREA APARATULUI
Nota:
Şemineul este destinat exclusiv utilizării prin
montare pe perete!
• Elementele de fixare în ambalaj sun cu dimensiune
mică şi trebuie feriţi departe de copii mici.
Recomandăm să puneţi toate elementele într-o
cutie mică, care să fie aşezată departe de copii.
• Copiii mici nu ar trebui să se joace cu sacii de plastic
- există pericol de sufocare. Recomandăm să le
aruncaţi imediat după scoaterea conţinutul lor.
• Nu conectaţi şemineul în priză, până când acesta
nu este bine fixat pe perete şi nu aţi citit toate
instrucţiunile de siguranţă importante descrise în
secţiunea de mai sus.
• Distanţele minime în faţa, deasupra şi peste
şemineul trebuie respectate după cum sunt descrise
mai sus şi afişate mai jos
• La instalarea aparatului, trebuie să aveţi grija să nu
deterioraţi firele încorporate în pereţi. Vă rugăm să
fiţi atenţi atunci când găuriţi găuri pentru montare.
Pericol de electrocutare!
• Acest aparat este conceput pentru a fi permanent
fixat de perete la o înălţime minimă de 300 mm de
la podea. Rulmentul de fixare de perete trebuie să
fie montat orizontal. Cablul de alimentare se află în
colţul din dreaptă jos al şemineului,
• Înălţimea de 600 mm de la podea este recomandată
pentru vizualizare optimă a efectului de flacără
(vezi ardere (vezi Figura 1 pentru dimensiunile
recomandate de fixare)
• Pentru o vizualizare optimă, marcaţi poziţiile
celor 5 şuruburi inferioare de fixare pe perete în
conformitate cu dimensiunile de fixare recomandate
(vezi Fig. 2. Deschideţi cu burghiu şase mm).
• Fixaţi suportul rulment pe perete cu ajutorul
şuruburilor.
• Ridicaţi atent şemineul în sus, astfel încât marginea
superioară din spate (pervaz) a şemineului sa cada
peste placa de rulment fixată de perete (vezi Fig.2) şi
puneţi central.
• Atent apăsaţi șemineul la perete.
• Marcaţi poziţia găurilor de jos ( vezi Fig. 3), scoateţi
şemineul, asigurându-vă că placa de fixare inferioară
este rotită şi nu interferează.

Instrucţuni de utilizare şu depozitare 17Românesc
RO
• Găuriţi găurile pentru găurile de jos şi fixaşi pe
perete.
• Puneţi şemineul pe consola fixată de perete şi rotiţi
clema pentru a fixa partea de jos. Folosiţi şurub de
securitate pentru a asigura şemineul final de perete
şi de a proteja împotriva posibilitatea de detaşare.
• Despachetaţi trunchiuri sau pietrelor de râu
din sacul de polietilenă şi puneţi-le de-a lungul
elementul emiţătoare de lumină în configuraţia
dorită şi de poziţie.
• Locul sticlă, în căutarea de a fi introduse două
de două crestăturile de pe fiecare parte a axei de
ancora (vezi Fig. 4) De obicei trebuie două persoane
pentru aceasta operaţiune
Nota: La utilizarea aparatul în medii în care
zgomotul de fond este foarte mic, este posibil să se
audă un sunet care este din cauza flăcării. Acest lucru este
normal şi nu ar trebui să fie motiv de îngrijorare.
Vă mulţumim pentru alegerea şemineului electric
WEF200SRELW TR. Acest produs oferă încălzire în timpul
iernii de 1000W sau 2000W în funcţie de nevoile de
încălzire în încăperea încălzită. Cu utilizare şi îngrijire
adecvată, aşa cum este descris în aceste instrucţiuni,
unitatea vă va oferi mulţi ani de funcţionare utilă.
UTILIZAREA ŞEMINEULUI
Şemineul poate fi operat prin comutatori poziţionate pe
partea de sus dreaptă a şemineului printr-o comandă la
distanţă.
LED DISPLAY
Cursor
Nivelul de încălzire
Ziuă Timer Modul De Așteptare
(Standby)
Afișarea
temperaturii și a
numărul de ordine
Timpul de oprire
Timpul de
pornire
Afișeză timpul
Controlul
automat de
încălzire
Luminozitatea
flăcării
Afișarea temperaturii și a numărul de ordine
De obicei, afișajul arată temperatura din cameră; în
timp ce se reglează - temperatura pe display apare
temperatura setată;
Atunci când se setează timerul, displayul afișează
numărul curent.
Afișarea orei
De obicei, pe ecran se afișează ora și minuta curentă; atunci
când se setează timer-ul, display arată oră și minutul setat.
Start programat si oprire
Se afișează timp ce se setează timer-ul și se folosește în
combinaţie cu numărul de curent al setării.
De exemplu,
înseamnă, că timpul de pornire a setării 5 este
23:40;
înseamnă că timpul pentru blocarea
setării 5 este 6:10.
Luminozitatea flăcării
Arată luminozitatea curentă a flăcării, care poate fi
setată de la nivelul 1 la nivelul 5 Aceasta pictogramă nu
este afișată la modele cu flacară colorată.
TELECOMANDA SI PANOU DE CONTROL

18 Instrucţuni de utilizare şu depozitare
RO
Indicator
Buton
PASI DE ACTIVARE
1. Conectaţi la alimentare
2. Puneţi comutatorul de alimentare în poziţia „pornit“
3. Apăsaţi comutatorul de alimentare sau butonul „ON/
OFF“ de pe telecomandă pentru a porni aparatul
APARAT DE ÎNCĂLZIRE
1. Apăsaţi butonul 1000W, astfel încât să puteţi ajusta
încălzirea de joasă putere de șemineului și pentru a
opri încălzirea;
2. Apăsaţi butonul 2000W, pentru a regla încălzirea de
mare putere de foc și de a opri încălzirea.
ÎNCĂLZIRE AUTOMATĂ
Apăsaţi butonul IC de pe telecomandă pentru a activa
sau dezactiva încălzirea automată.
Când această funcţie este activată, șemineul poate modifica
automat moduri de încălzire în funcţie de temperatura
setata și de temperatura interioara din cameră.
În modul start programat este posibil că încălzirea să
înceapă înainte de pornirea timpului programat.
ŞEMINEU CU FLACĂRA CU O CULOARE ŞI
LUMINOZITATE REGLATĂ A FLĂCĂRII
A primul metodă: în timp ce Ţineţi butonul (
) luminozitatea flăcării se schimbă; eliberaţi butonul
atunci când ajunge nivelul dorit de luminozitate.
A doua metodă: Apăsaţi butonul „DIMMER“ de pe
telecomandă – reglarea luminozităţii flăcării se schimbă
treptat, cu fiecare apăsare pe buton.
CONFIGURAREA DATEI ȘI A OREI
1. Setările se fac prin telecomanda;
2. Apăsaţi butonul „DATE TIME“, apoi apăsaţi butoanele
sau , selectaţi data;
3. Apăsaţi din nou butonul „DATE TIME“, apoi prin
apăsarea butoanelor „+“ sau „-“, setaţi ora;
4. Apăsaţi din nou butonul „DATE TIME“, apoi prin
apăsarea butoanelor „+“ sau „-“, setaţi minutele;
5. Apăsaţi butonul „OK“ pentru a finaliza setările
SETAREA TEMPERATURII
Temperatura implicită este 20°C. Puteţi seta intervalul de
temperatura de la 15 la 30°C cu ajutorul butoanelor „+“
sau „-“ de pe telecomandă (temporizator oprit).
SETAREA TIMERULUI
1. Descrierea setării
Puteţi seta maxim 10 setări separate a timerului.
Fiecare setare separată are data, timp de pornire şi timp
de oprire.
Durata maximă pentru fiecare setare este de 23 ore și
50 minute.
Data setată pentru fiecare setare poate fi orice zi a
săptămânii.
Data fiecărei setări reprezintă data timpului de pornire.
Dacă ora de oprire este pentru a doua zi, nu trebuie să
configuraţi data – trebuie doar să setaţi ora de oprire.
2. Vizualizarea setărilor timerului
Apăsaţi butonul „TIMER SET“.
Apăsaţi butonul „+“ sau „ - „ pentru a verifica timpul de
pornire a timerului pentru fiecare setare.
Pentru a verifica timpul de oprire, apăsaţi butonul „ “.
Apăsaţi butonul „+“ sau „ - „ pentru a continua
vizualizarea.
Pentru a şterge setările curente, apăsaţi butonul „C“.
3. Paşi pentru ajustarea setării timerului
(I) Selectați setările
Apăsaţi butonul „TIMER SET“ – numărul de ordine al
parametrului începe să clipească.
Cu apăsarea butoanelor „+“ sau „-“ treceţi la numărul următor
al setării, care este necesar să setaţi sau să modificaţi.
(II) Selectați data
Apăsaţi din nou butonul „TIMER SET“ – cursorul de la
stânga la data începe să clipească.
Cu butoanele sau se mută cursorul pe data
corespunzătoare; apăsaţi butonul „ + „pentru a adăuga
data sau apăsaţi butonul“ - „ pentru a şterge dată, în
timp ce terminaţi cu alegerea datei.
(III) Setarea timpului de pornire
Apăsaţi continuu butonul „TIMER SET“ – ora începe să
clipească pe afișaj.
Cu ajutorul butoanelor „+“ sau „ - „ setaţi ora.
Apăsaţi continuu butonul „TIMER SET“ – minutele încep
să clipească.
Cu ajutorul butoanelor „+“ sau „ - „ setaţi minutele.
(IV) Setarea timpului de oprire

Instrucţuni de utilizare şu depozitare 19Românesc
RO
Apăsaţi butonul „TIMER SET“ - displayul este oprit şi ora
începe să clipească.
Cu ajutorul butoanelor „+“ sau „ - „ setaţi ora.
Apăsaţi continuu butonul „TIMER SET“ – minutele încep
să clipească.
Cu ajutorul butoanelor „+“ sau „ - „ setaţi minutele.
(V) Setarea temperaturii
Apăsaţi butonul „TIMER SET“ - temoeratura setată începe
să clipească. Pe display este afișată temperatura, pe care
o puteţi seta cu ajutorul butoanelor „+“ sau „-“.
(VI) Apăsați butonul „TIME SET“, pentru a continua
setările sau apăsaţi butonul „OK“ pentru a finaliza setarea.
PORNIRE ÎNTÂRZIATĂ/OPRIREA APARATULUI
Cu butonul „TIMER ON/OFF“, puteţi controla pornirea și
oprirea programată.
Reporniţi aparatul după întreruperea alimentării; setările sunt
salvate, dar este necesar să reintroduceţi data și ora curente.
Notă: Dispozitivul arată temperatura în jurul locației
senzorului și nu este un mijloc de măsurare exactă a
temperaturii ambiante.
PROTECŢIE ÎMPOTRIVA SUPRAÎNCĂLZIRII
Acest aparat este dotat cu termostat de siguranţa, care
porneşte la temperaturi ridicate (de exemplu, blocarea
orificiilor de ieşire a aerului). Pentru siguranţa, termostatul
nu se va reseta automat. Pentru a fi repornit, este necesar
să scoateţi cablul de alimentare de la priza de perete -
să aşteptaţi aproximativ 10 minute si să conectaţi din
nou în priză. În mod normal aparatul va funcţiona - în
cazul în care acest lucru nu se întâmplă, este necesar să
se verificaţi deschiderile de ieşirile şi intrare. Dacă totul
este normal (şi aparatul este regulat curăţat de praf),
contactaţi baza de service din locaţia dumneavoastră.
Nota:
Pentru a evita riscul de repornire
accidentală a termostatului, acest aparat nu
trebuie să fie conectat cu un dispozitiv extern, cum ar fi
de exemplu un timer, sau cheie conectată, întrerupător
de circuit, care regulat se opreşte sau porneşte pentru
comoditate.
CURĂŢARE
• În primul rând opriţi aparatul de la comutator şi
deconectaţi cablul de alimentare de la priza. Înainte
de a curăţa şemineul lăsaţi-l să se răcească.
• Curăţaţi carcasa cu o cârpă umedă, aspirator sau o
perie.
• Nu scufundaţi niciodată aparatul în apă - există
pericol pentru viaţa de şoc electric!
• Nu utilizaţi niciodată benzină, diluant sau produse
abrazive de curăţare, deoarece acestea vor deteriora
finisajul aparatului.
DEPOZITARE
• Înainte să depozitaţi şemineul, lăsaţi-l să se răcească,
scoateţi-l de la priza.
• Utilizaţi ambalajul original pentru depozitarea
şemineului, dacă acesta nu este folosit o anumită
perioada de timp. Produsul este protejat de praf şi
murdărie când este depozitat în ambalajul original.
• Nu depozitaţi aparatul cald în ambalajul său!
• Produsul trebuie să fie depozitat în locuri uscate şi
protejate de lumina directă a soarelui.
• Se interzice în mod expres depozitarea aparatului în
zone umede sau ude.
PIESE ÎNTR-UN AMBALAJ:
Şemineu 1 buc
Consola de fixare la perete 1 buc
Şuruburi de fixare şi element de asigurare 1 buc
Telecomandă 1 buc
Instrucţiuni 1 buc
Carte de garanție 1 buc
PARAMETRII TEHNICI AI APARATULUI:
Iluminare – sistem LED (nu are piese de schimb)
Model Putere
declarată Tensiune de
alimentare
declarată
Frecvenţa de
alimentare
declarată
WEF200SRELW TR 2000W 220-240V~ 50Hz
Indicații pentru protecția mediului înconjurător
Aparatele electrice uzate sunt materiale valoroase,
motiv pentru care locul lor nu este la gunoiul menajer!
Din această cauză, vă rugăm să ne sprijiniţi şi să
participaţi la protejarea resurselor naturale şi a mediului
înconjurător, prin predarea acestui aparat la centrele de
preluare a acestora, în cazul în care ele există.

20 Instrucţuni de utilizare şu depozitare
RO TABELUL 2 CERINŢE PRIVIND INFORMAŢIILE REFERITOARE LA APARATELE ELECTRICE PENTRU
ÎNCĂLZIRE LOCALĂ
Identificatorul de model(e): 1.WEF200SRELW TR 2000W/220-240V~ 50Hz
Parametru Simbol Valoare 1. Unitate Parametru Unitate
Puterea termică Modul de acumulare a căldurii, numai în cazul
aparatelor electrice pentru încălzire locală cu
acumulator de căldură (alegeți o variantă)
Puterea termică nominală Pnom 2.00 kW control manual al sarcinii termice, cu termostat integrat [da/nu]
Puterea termică minimă (cu titlu
indicativ)
Pmin 1.00 kW control manual al sarcinii termice, ca răspuns la
temperatura camerei și/sau exterioară
[da/nu]
Puterea termică maximă continuă Pmax,C 2.00 kW control electronic al sarcinii termice, ca răspuns la
temperatura camerei și/sau exterioară
[da/nu]
Consumul auxiliar de energie
electrică
putere termică comandată de ventilator [da/nu]
La putere termică nominală elmax 0.014 kW Tip de putere termică/controlul temperaturii
camerei (selectați o variantă)
-
La putere termică minimă elmin 0.014 kW cu o singură treaptă de putere termică și fără controlul
temperaturii camerei
[nu]
În modul standby el SB Stand by
0.00048
kW două sau mai multe trepte de putere manuale, fără
controlul temperaturii camerei
[nu]
cu controlul temperaturii camerei prin intermediul unui
termostat mecanic [nu]
cu control electronic al temperaturii camerei [nu]
cu control electronic al temperaturii camerei și cu
temporizator cu programare zilnică [nu]
cu control electronic al temperaturii camerei și cu
temporizator cu programare săptămânală [da]
Alte opțiuni de control (se pot selecta mai multe
variante)
controlul temperaturii camerei, cu detectarea prezenţei [nu]
controlul temperaturii camerei, cu detectarea unei
ferestre deschise [nu]
cu opţiune de control la distanţă [nu]
cu demaraj adaptabil [da]
cu limitarea timpului de funcţionare [nu]
cu senzor cu bulb negru [nu]
TESY Ltd
48 Madara Blvd,
Shumen, 9700,
Bulgaria
Pagina se încarcă ...
Pagina se încarcă ...
Pagina se încarcă ...
Pagina se încarcă ...
Pagina se încarcă ...
Pagina se încarcă ...
Pagina se încarcă ...
Pagina se încarcă ...
Pagina se încarcă ...
Pagina se încarcă ...
Pagina se încarcă ...
Pagina se încarcă ...
Pagina se încarcă ...
Pagina se încarcă ...
Pagina se încarcă ...
Pagina se încarcă ...
Pagina se încarcă ...
Pagina se încarcă ...
Pagina se încarcă ...
Pagina se încarcă ...
Pagina se încarcă ...
Pagina se încarcă ...
Pagina se încarcă ...
Pagina se încarcă ...
Pagina se încarcă ...
Pagina se încarcă ...
Pagina se încarcă ...
Pagina se încarcă ...
Pagina se încarcă ...
Pagina se încarcă ...
Pagina se încarcă ...
Pagina se încarcă ...
Pagina se încarcă ...
Pagina se încarcă ...
Pagina se încarcă ...
Pagina se încarcă ...
Pagina se încarcă ...
Pagina se încarcă ...
Pagina se încarcă ...
Pagina se încarcă ...
Pagina se încarcă ...
Pagina se încarcă ...
Pagina se încarcă ...
Pagina se încarcă ...
Pagina se încarcă ...
Pagina se încarcă ...
Pagina se încarcă ...
Pagina se încarcă ...
Pagina se încarcă ...
Pagina se încarcă ...
Pagina se încarcă ...
Pagina se încarcă ...
Pagina se încarcă ...
Pagina se încarcă ...
Pagina se încarcă ...
Pagina se încarcă ...
Pagina se încarcă ...
Pagina se încarcă ...
Pagina se încarcă ...
Pagina se încarcă ...
Pagina se încarcă ...
Pagina se încarcă ...
Pagina se încarcă ...
Pagina se încarcă ...
Pagina se încarcă ...
Pagina se încarcă ...
Pagina se încarcă ...
Pagina se încarcă ...
Pagina se încarcă ...
Pagina se încarcă ...
Pagina se încarcă ...
Pagina se încarcă ...
Pagina se încarcă ...
Pagina se încarcă ...
Pagina se încarcă ...
Pagina se încarcă ...
-
 1
1
-
 2
2
-
 3
3
-
 4
4
-
 5
5
-
 6
6
-
 7
7
-
 8
8
-
 9
9
-
 10
10
-
 11
11
-
 12
12
-
 13
13
-
 14
14
-
 15
15
-
 16
16
-
 17
17
-
 18
18
-
 19
19
-
 20
20
-
 21
21
-
 22
22
-
 23
23
-
 24
24
-
 25
25
-
 26
26
-
 27
27
-
 28
28
-
 29
29
-
 30
30
-
 31
31
-
 32
32
-
 33
33
-
 34
34
-
 35
35
-
 36
36
-
 37
37
-
 38
38
-
 39
39
-
 40
40
-
 41
41
-
 42
42
-
 43
43
-
 44
44
-
 45
45
-
 46
46
-
 47
47
-
 48
48
-
 49
49
-
 50
50
-
 51
51
-
 52
52
-
 53
53
-
 54
54
-
 55
55
-
 56
56
-
 57
57
-
 58
58
-
 59
59
-
 60
60
-
 61
61
-
 62
62
-
 63
63
-
 64
64
-
 65
65
-
 66
66
-
 67
67
-
 68
68
-
 69
69
-
 70
70
-
 71
71
-
 72
72
-
 73
73
-
 74
74
-
 75
75
-
 76
76
-
 77
77
-
 78
78
-
 79
79
-
 80
80
-
 81
81
-
 82
82
-
 83
83
-
 84
84
-
 85
85
-
 86
86
-
 87
87
-
 88
88
-
 89
89
-
 90
90
-
 91
91
-
 92
92
-
 93
93
-
 94
94
-
 95
95
-
 96
96


în alte limbi
Alte documente
-
Silvercrest SEKU 2000 A1 Operating Instructions Manual
-
Eurom 363210 Manual de utilizare
-
Samsung AR12NXWSQWKNEE Manual de utilizare
-
-
Fujitsu UTY-LBTYH Instrucțiuni de utilizare
-
Samsung AR24TXFCAWKX Manual de utilizare
-
Samsung AR09TXFYAWKX Manual de utilizare
-
Somogyi FKKI 03 Built-in Electric Fireplace Manual de utilizare