
1
USER MANUAL
CITY COMBI

2
EN.
..................................................................................................................
3
BG.....................................................................................................................19
CZ.
................................................................................................................
33
DA.
................................................................................................................
46
DE.
................................................................................................................
58
EL.
.................................................................................................................
72
ES.
................................................................................................................
87
FI.
................................................................................................................
101
FR.
..............................................................................................................
114
HR.
.............................................................................................................
128
HU.
.............................................................................................................
141
IT.
..............................................................................................................
155
NL.
.............................................................................................................
169
NO.
.............................................................................................................
182
PL.
.............................................................................................................
194
PT.
.............................................................................................................
208
RO.
.............................................................................................................
221
RU.
.............................................................................................................
234
SK.
.............................................................................................................
250
SL.
..............................................................................................................
263
SR.
..............................................................................................................
276
SV.
..............................................................................................................
289
UKR.
...........................................................................................................
300

3
SAFETY
INFORMATION
Please read the operating
and installation instructions
carefully!
They contain important
information on how to
install, use and maintain the
appliance.
The manufacturer is not
liable if you fail to comply
with the instructions and
warnings.
Retain all documents for
subsequent use or for the
next owner.
Do not connect the
appliance to the
electricity supply until
all packing and transit
protectors have been
removed. Keep children
away from packaging
and its parts.
Danger of suffocation
from folding cartons
and plastic film!
Leave to stand for at
least 4 hours before
switching on the
product, to allow
compressor oil to
settle if transported
horizontally.
Make sure there is no
transport damage.
Do not damage the
refrigerant circuit.
Maintain the
ventilation openings
in the appliance
enclosure or in the
built-in structure, free
of obstruction.
Never use water to
wash the compressor
position, wipe it with
a dry cloth
thoroughly after
cleaning to prevent
rust.
Handle the appliance
always with at least
two persons because
it is heavy.

4
Install and level the
appliance in an area
suitable for its size
and use.
Make sure that the
electrical information
on the rating plate
agrees with the
power supply. If it
does not, contact an
electrician.
The appliance is
operated by a 220-240
VAC/50 Hz power
supply. Abnormal
voltage fluctuation
may cause the
appliance to fail to
start, or damage to
the temperature
control or compressor,
or there may be an
abnormal noise when
operating. In such
case, an automatic
regulator shall be
mounted.
Only for UK:
The appliance’s
power cable is fitted
with 3-
cord (grounding) plug
that fits a standard
3-cord (grounded)
socket. Never cut off
or dismount the
third pin
(grounding). After
the ap- pliance is
installed,
the plug should be
accessible.
Make sure that
mains cable is not
caught under the
appliance during
and after
carrying/moving the
appliance, to avoid
the mains cable
becoming cut or
damaged. If the
supply cord is
damaged, it must be
replaced by the
manufacturer, its
service agent or
similarly qualified
person in order to
avoid a hazard.

5
Do not install the
appliance in humid, oily
or dusty places, nor
expose it to direct
sunlight and to water.
Do not install the
appliance near
heaters or
inflammable materials.
FOR appliances with a
freezer compartment: if
there is a power failure
do not open the lid.
Frozen food should not
be affected if the failure
lasts for less than the
hours indicated on the
rating label
(Temperature rise time).
If the failure is longer,
then the food should be
checked and eaten
immediately or cooked
and then refrozen.

6
If you find that the lid
of the appliance is
difficult to open just
after you have closed
it, don’t worry. This is
due to the pressure
difference which will
equalize and allow
the lid to be opened
normally after a few
minutes.
Do not store
medicines, bacteria
or chemical agents in
the appliance. This
appliance is a
household appliance,
it is not
recommended to
store materials that
require strict
temperatures.
Do not excessively
pull or fold the power
cord or touch the
plug with wet hands.
Do not store
products which
contain flammable
propellant (e.g. spray
cans) or explosive
substances in the
appliance. Risk of
explosion!
Do not place
unstable articles
(heavy objects,
containers filled with
water) on top of the
refrigerator, to
ovoidpersonal injury
caused by falling or
electric shock
caused by contact
with water.

7
Do not use electrical
appliances inside the
food storage
compartments, unless
they are of the type
recommended by the
manufacturer.
Do not touch internal
cooling
elements, especially
with wet hands, to
avoid cracks or
injuries.
At risk here are
children, people who
have limited physical,
mental or sensory
abilities, as well as
people who have
inadequate
knowledge
concerning safe
operation of the
appliance.
Check that children
and vulnerable people
have understood the
hazards. A person
responsible for safety
must supervise or
instruct children and
vulnerable people
who are using the
appliance. Only
children aged 8 years
and above may use
the appliance.

8
Children should
not play with the
appliance.
Children aged
from 3 to 8 years
are allowed to
load and unload
this appliance.
FOR appliances
with a freezer
compartment: do
not store bottled
or canned liquids
(especially
carbonated
drinks) in the
freezer
compartment.
Bottles and cans
may burst!
FOR appliances
with a freezer
compartment:
never put frozen
food straight
from the freezer
compartment in
your mouth.
Risk of low-
temperature
burns!
Keep plastic
parts and the
door seal free of
oil and grease.
Otherwise,
plastic parts and
the door seal will
become porous.
Before
performing any
operation,
unplug the
power cord from
the power
socket.
Do not use
mechanical
devices or other
means to
accelerate the
defrosting
process, other
than those
recommended
by the
manufacturer.

9
Do not use
pointed or sharp-
edged objects
such as knives or
forks to remove
the frost.
Never use
hairdryers,
electrical heaters
or other such
electrical
appliances for
defrosting.
It is recommended
to keep the plug
clean, any
excessive dust
residues on the
plug can be the
cause fire.
Do not try to
repair,
disassemble or
modify the
appliance by
yourself. In case
of repair please
contact always
our customer
service.
Supervise
children while the
appliance is being
cleaned or
maintained.
Do not clean the
cold glass shelves
with hot water.
Sudden
temperature
change may cause
the glass to break.
WARNING: The
tubes of the
refrigeration
circuit convey a
small quantity of
an
environmentally
friendly but
flammable
refrigerant (R600a)
and insulating gas
(cyclopentane). It
does not damage
the ozone layer
and does not
increase the
greenhouse effect.
If refrigerant
escapes, it may
injure your eyes
or ignite.

10
If the refrigerant
circuit should be
damaged:
-
Switch off the
appliance and
pull out the
mains plug,
-
Keep naked
flames and/or
ignition sources
away from the
appliance,
-
Thoroughly
ventilate the
room for several
minutes,
-
Inform customer
service.
WARNING: Do
not damage the
plug and/or the
power cord; this
could cause
electrical shocks
or fires.
WARNING: Do
not use multiple
portable socket-
outlets or
portable power
supplies. We do
not recommend
the use of
extension leads
and multi- way
adapters.
Do not attempt
to sit or stand on
the top of the
appliance. You
could injure
yourself or
damage it. This
appliance is not
designed for
stacking with
any other ones.
The product is
designed and built
for domestic
household use
only.
Only original
parts supplied by
the manufacturer
may be used.The
manufacturer
guarantees that
only these parts
satisfy the safety
requirements.
Opening the door
for long periods
can cause a

11
significant
increase of the
temperature in the
compartments of
the appliance.
Clean regularly
surfaces that can
come in contact
with food and
accessible
drainage systems.
Clean water tanks
if they have not
been used for 48h;
flush the water
system connected
to a water supply
if water has not
been drawn for 5
days.
Store raw meat and
fish in suitable
containers in the
refrigerator, so that
it is not in contact
with or drip onto
other food.
Two-star frozen-
food
compartments(if
they are presented
in the appliance) are
suitable for storing
pre- frozen food,
storing or making
ice-cream and
making ice cubes.
One-, two- and
three -star
compartments, if
present in the
appliance, are not
suitable for the
freezing of fresh
food.
If the appliance is
left empty for long
periods, switch off,
defrost, clean, dry
and leave the door
open to prevent
mould developing
within the appliance.
FOR Wine Coolers:
this appliance is
intended to be used
exclusively for the
storage of wine
FOR a free standing
appliance: this
refrigerating
appliance is not
intended to be used
as a built-in

12
appliance
FOR appliances
without a 4-star
compartment: this
refrigerating
appliance is not
suitable for freezing
food stuffs.
This product
contains a light
source of energy
efficiency class G.
Replaceable (LED
only) light source
by a professional.

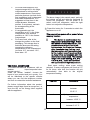
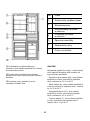
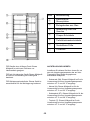
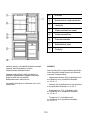
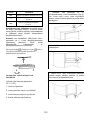
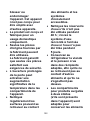
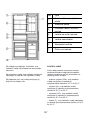
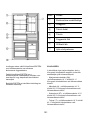
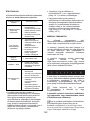
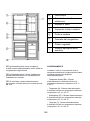
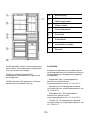
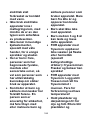
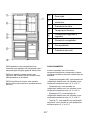
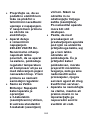
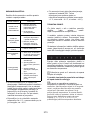
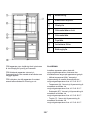
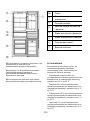
13
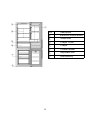
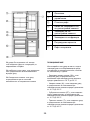
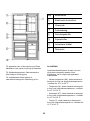
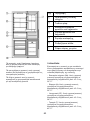
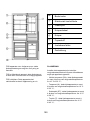
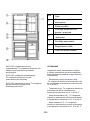
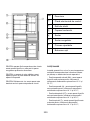
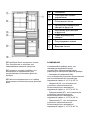
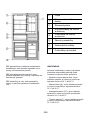
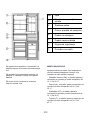
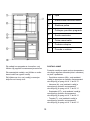
No
Description
1
Electronic control board
2
Glass shelf
3
Crisper Cover
4
Crisper
5
Freezer drawer
6
Adjustable feet
7
Door balcony
①
②
③
④
⑤
⑥
⑦

14
FOR appliances without a 4-star
compartment: this refrigerating appliance is
not suitable for freezing foodstuffs
FOR a free standing appliance: this
refrigerating appliance is not intended to be
used as a built-in appliance
FOR Wine Coolers: this appliance is
intended to be used exclusively for the
storage of wine
POSITIONING
Install the appliance at a location where the
ambient temperature corresponds to the
climate class indicated on the rating plate of
the appliance:
- Extended temperate (SN): ‘this
refrigerating appliance is intended to be used
at ambient temperatures ranging from 10 °C
to 32 °C’
- Temperate (N): ‘this refrigerating
appliance is intended to be used at ambient
temperatures ranging from 16 °C to 32 °C’
- Subtropical (ST): ‘this refrigerating
appliance is intended to be used at ambient
temperatures ranging from 16 °C to 38 °C’
- Tropical (T): ‘this refrigerating appliance
is intended to be used at ambient
temperatures ranging from 16 °C to 43 °C’
FOOD STORAGE
Position different food in different
compartments according to be below table
Refrigerator
compartment
Type of food
Door or balconies
of fridge
compartment
Foods with
natural
preservatives,
such as jams,
juices, drinks,
condiments.
Do not store
perishable foods
Crisper drawers
(salad drawer)
Fruits, herbs and
vegetables
should be placed
separately in the
crisper bin
Do not store
bananas, onions,
potatoes, garlic in
the refrigerator
Fridge shelf –
middle
Dairy products,
eggs
Fridge shelf – top
Foods that do not
need to be
cocked, such as
ready-to-eat
foods, deli meats,
leftovers.
Freezer
drawer(s)/tray
Foods for long-term
storage
Bottom drawer for
raw meet, poultry,
fish
Middle drawer for
frozen vegetables,
chips.
Top tray for ice
cream, frozen fruit,
frozen baked
goods.

15
For most food categories, the
longest storage time in the fridge
compartment is achieved with
colder temperatures. Since some
particular products (as fresh fruits
and vegetables) may be damaged
with colder temperatures, it is
suggested to keep them in the
crisper drawers, whenever
present. If not present, maintain
an average setting of the
thermostat.
It’s suggested to set the
temperature at 4°C in the fridge
compartment, and, whether
possible, at -18°C in the freezer
compartment.
For frozen food, refer to the
storage time written on the food
packaging. This storage time is
achieved whenever the setting
respects the reference
temperatures of the compartment
(one-star -6°C, two stars -12°C,
three stars -18°
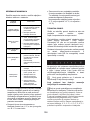
TECHNICAL ASSISTANCE
To contact the technical assistance, visit our
website: https://corporate.haier-
europe.com/en/
Under the section “website”, choose the
brand of your product and your country. You
will be redirected to the specific website
where you can find the telephone number
and form to contact the technical assistance
For further information about the product,
please consult https://eprel.ec.europa.eu/ or
scan the QR on the energy label supplied
with the appliance
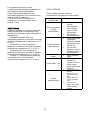
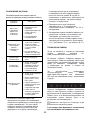
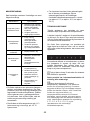
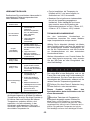
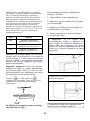
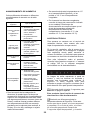
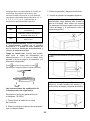
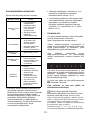
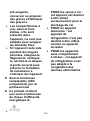
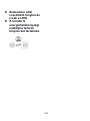
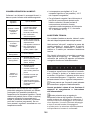
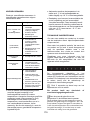
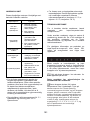
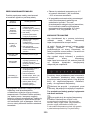
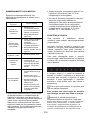
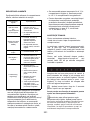
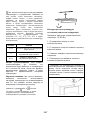
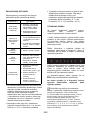
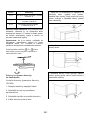
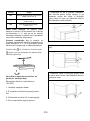
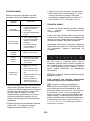
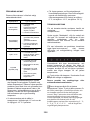
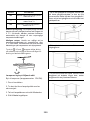
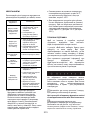
The above image is the control panel, and only
the buttons on left and right are functional to
control the refrigerator. The left button is to
switch on/off the refrigerator, while the right
button is to adjust the temperature.
Press this button for 3 seconds to switch the
appliance on or off.
This product has power-off or power failure
memory function.
This button is used to adjust the
temperature within the fridge. Press
this sensor to make adjustment, the
number starts to flash, and if the
button stops, the lit number flashes,
after 5 seconds stop flashing , and
the temperature shift corresponding
to the number is confirmed, and then
as many times as necessary until the
desired level is selected. The settings
range from super cooling, 2°C, 3°C,
4°C, 6°C, 8°C,and it will represent
the approximate fridge temperature .
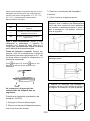
Start super cooling: when super cooling
selected, it means refrigerator will work at 2°C
for 24 hours, after that, the function will quit
automatically, then back to the original
temperature setting.
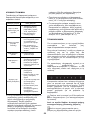
Position
Conditions
2&3
Summer or ambient temperature
between
25-35 °C
4
Spring, autumn or ambient
temperature
between 15-25 °C
6&8
Winter, or ambient temperature
between 5-15 °C

16
Please note: Where possible, avoid
having the temperature setting on super
cooling or 2°C all of the time. This will
help to alleviate strain on the
compressor and refrigeration system.
Press the for 15s, key flickering,
then access to the laboratory adjustable
state
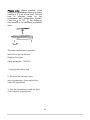
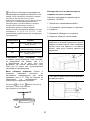
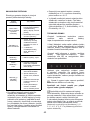
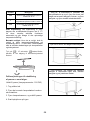
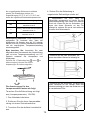
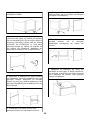
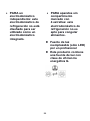
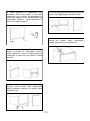
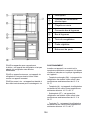
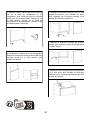
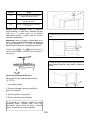
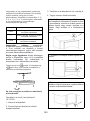
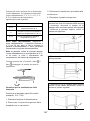
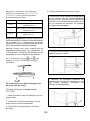
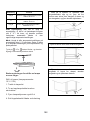
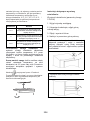
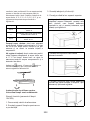
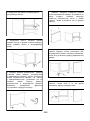
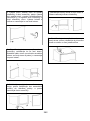
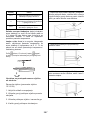
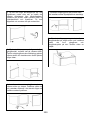
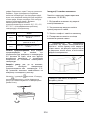
The lamp replacement operation
instructions are as follows:
Replace the lights
(lamp parameter: 12V/5W)
1, Unplug the power plug.
2, Remove the top light cover
with a screwdriver, then replace the
new LED light board.
3, Use the screwdriver install the light
cover back to original place,

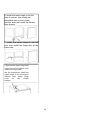
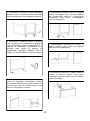
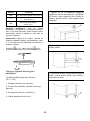
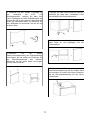
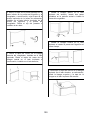
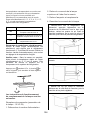
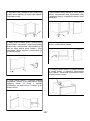
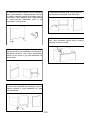
17
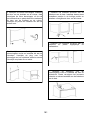
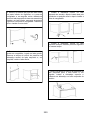
1. Make sure that the refrigerator is
unplugged, remove the hinge cover on
the right side of refrigerator.
Remove the screws on the upper hinge,
and then remove the hinge and the
fridge door.
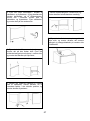
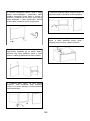
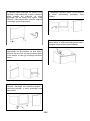
2. Remove the screws that on the center
hinge.
3. Remove the screws that on the bottom of
right side of refrigerator, then remove the
lower hinge and adjustable feet.
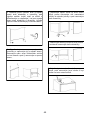
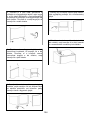
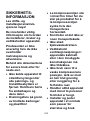
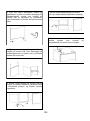
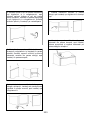
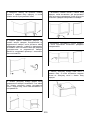
4. Remove the stopper on the
bottom of right side of fridge door,
then get the opposite door stopper
from the accessory bag, install it on
the bottom of left side of fridge door,
after that do the same for the
freezer door.
Remove the pin shaft from the
lower hinge, and install to other
side.
5. Remove the hinge hole cover from right
side of freezer door, then install to left side.
Remove the center hinge screw cover on the
left side of cabinet, then install its to right side
of cabinet.

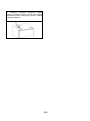
18
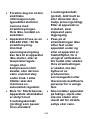
6. Install the lower hinge to the left
side of cabinet, then install two
adjustable feet on the current
position, after that install the freezer
door directly.
7. Install the center hinge to the left
side, then install the fridge door at the
same time.
8. Remove the upper hinge hole
cover from left of Cabinet, then
install to the right side,
Use the screwdriver install the
upper hinge to the left side of
cabinet, then install hinge
cover on the current
position.

19
Ръководство за потребителя

20
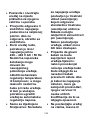
ИНФОРМАЦИЯ ЗА
БЕЗОПАСНОСТ
Моля, прочетете
внимателно
инструкциите за
експлоатация и монтаж!
Те съдържат важна
информация за това как
да инсталирате,
използвате
и поддържате уреда.
При неспазване на
инструкциите
и предупрежденията
производителят не носи
отговорност.
Запазете всички
документи за
последваща справка
или за следващия
собственик.
Не свързвайте уреда
към електрическото
захранване, докато
всички предпазни
елементи от
опаковката и за
транспорта не бъдат
премахнати.
Не допускайте
опаковката и нейните
съставни части да
попаднат в ръцете на
деца.
Опасност от
задушаване от
сгъваеми кашони
и найлоново фолио!
Оставете го в покой
поне 4 часа преди да
го включите, за да
може компресорното
масло да се
разпредели, ако
е пренасян
хоризонтално.
Уверете се, че няма
транспортни повреди.
Не повреждайте
охладителната верига.
Поддържайте
вентилационните
отвори на корпуса на
уреда или на
вградената
конструкция свободни
от препятствия.
Pagina se încarcă...
Pagina se încarcă...
Pagina se încarcă...
Pagina se încarcă...
Pagina se încarcă...
Pagina se încarcă...
Pagina se încarcă...
Pagina se încarcă...
Pagina se încarcă...
Pagina se încarcă...
Pagina se încarcă...
Pagina se încarcă...
Pagina se încarcă...
Pagina se încarcă...
Pagina se încarcă...
Pagina se încarcă...
Pagina se încarcă...
Pagina se încarcă...
Pagina se încarcă...
Pagina se încarcă...
Pagina se încarcă...
Pagina se încarcă...
Pagina se încarcă...
Pagina se încarcă...
Pagina se încarcă...
Pagina se încarcă...
Pagina se încarcă...
Pagina se încarcă...
Pagina se încarcă...
Pagina se încarcă...
Pagina se încarcă...
Pagina se încarcă...
Pagina se încarcă...
Pagina se încarcă...
Pagina se încarcă...
Pagina se încarcă...
Pagina se încarcă...
Pagina se încarcă...
Pagina se încarcă...
Pagina se încarcă...
Pagina se încarcă...
Pagina se încarcă...
Pagina se încarcă...
Pagina se încarcă...
Pagina se încarcă...
Pagina se încarcă...
Pagina se încarcă...
Pagina se încarcă...
Pagina se încarcă...
Pagina se încarcă...
Pagina se încarcă...
Pagina se încarcă...
Pagina se încarcă...
Pagina se încarcă...
Pagina se încarcă...
Pagina se încarcă...
Pagina se încarcă...
Pagina se încarcă...
Pagina se încarcă...
Pagina se încarcă...
Pagina se încarcă...
Pagina se încarcă...
Pagina se încarcă...
Pagina se încarcă...
Pagina se încarcă...
Pagina se încarcă...
Pagina se încarcă...
Pagina se încarcă...
Pagina se încarcă...
Pagina se încarcă...
Pagina se încarcă...
Pagina se încarcă...
Pagina se încarcă...
Pagina se încarcă...
Pagina se încarcă...
Pagina se încarcă...
Pagina se încarcă...
Pagina se încarcă...
Pagina se încarcă...
Pagina se încarcă...
Pagina se încarcă...
Pagina se încarcă...
Pagina se încarcă...
Pagina se încarcă...
Pagina se încarcă...
Pagina se încarcă...
Pagina se încarcă...
Pagina se încarcă...
Pagina se încarcă...
Pagina se încarcă...
Pagina se încarcă...
Pagina se încarcă...
Pagina se încarcă...
Pagina se încarcă...
Pagina se încarcă...
Pagina se încarcă...
Pagina se încarcă...
Pagina se încarcă...
Pagina se încarcă...
Pagina se încarcă...
Pagina se încarcă...
Pagina se încarcă...
Pagina se încarcă...
Pagina se încarcă...
Pagina se încarcă...
Pagina se încarcă...
Pagina se încarcă...
Pagina se încarcă...
Pagina se încarcă...
Pagina se încarcă...
Pagina se încarcă...
Pagina se încarcă...
Pagina se încarcă...
Pagina se încarcă...
Pagina se încarcă...
Pagina se încarcă...
Pagina se încarcă...
Pagina se încarcă...
Pagina se încarcă...
Pagina se încarcă...
Pagina se încarcă...
Pagina se încarcă...
Pagina se încarcă...
Pagina se încarcă...
Pagina se încarcă...
Pagina se încarcă...
Pagina se încarcă...
Pagina se încarcă...
Pagina se încarcă...
Pagina se încarcă...
Pagina se încarcă...
Pagina se încarcă...
Pagina se încarcă...
Pagina se încarcă...
Pagina se încarcă...
Pagina se încarcă...
Pagina se încarcă...
Pagina se încarcă...
Pagina se încarcă...
Pagina se încarcă...
Pagina se încarcă...
Pagina se încarcă...
Pagina se încarcă...
Pagina se încarcă...
Pagina se încarcă...
Pagina se încarcă...
Pagina se încarcă...
Pagina se încarcă...
Pagina se încarcă...
Pagina se încarcă...
Pagina se încarcă...
Pagina se încarcă...
Pagina se încarcă...
Pagina se încarcă...
Pagina se încarcă...
Pagina se încarcă...
Pagina se încarcă...
Pagina se încarcă...
Pagina se încarcă...
Pagina se încarcă...
Pagina se încarcă...
Pagina se încarcă...
Pagina se încarcă...
Pagina se încarcă...
Pagina se încarcă...
Pagina se încarcă...
Pagina se încarcă...
Pagina se încarcă...
Pagina se încarcă...
Pagina se încarcă...
Pagina se încarcă...
Pagina se încarcă...
Pagina se încarcă...
Pagina se încarcă...
Pagina se încarcă...
Pagina se încarcă...
Pagina se încarcă...
Pagina se încarcă...
Pagina se încarcă...
Pagina se încarcă...
Pagina se încarcă...
Pagina se încarcă...
Pagina se încarcă...
Pagina se încarcă...
Pagina se încarcă...
Pagina se încarcă...
Pagina se încarcă...
Pagina se încarcă...
Pagina se încarcă...
Pagina se încarcă...
Pagina se încarcă...
Pagina se încarcă...
Pagina se încarcă...
Pagina se încarcă...
Pagina se încarcă...
Pagina se încarcă...
Pagina se încarcă...
Pagina se încarcă...
Pagina se încarcă...
Pagina se încarcă...
Pagina se încarcă...
Pagina se încarcă...
Pagina se încarcă...
Pagina se încarcă...
Pagina se încarcă...
Pagina se încarcă...
Pagina se încarcă...
Pagina se încarcă...
Pagina se încarcă...
Pagina se încarcă...
Pagina se încarcă...
Pagina se încarcă...
Pagina se încarcă...
Pagina se încarcă...
Pagina se încarcă...
Pagina se încarcă...
Pagina se încarcă...
Pagina se încarcă...
Pagina se încarcă...
Pagina se încarcă...
Pagina se încarcă...
Pagina se încarcă...
Pagina se încarcă...
Pagina se încarcă...
Pagina se încarcă...
Pagina se încarcă...
Pagina se încarcă...
Pagina se încarcă...
Pagina se încarcă...
Pagina se încarcă...
Pagina se încarcă...
Pagina se încarcă...
Pagina se încarcă...
Pagina se încarcă...
Pagina se încarcă...
Pagina se încarcă...
Pagina se încarcă...
Pagina se încarcă...
Pagina se încarcă...
Pagina se încarcă...
Pagina se încarcă...
Pagina se încarcă...
Pagina se încarcă...
Pagina se încarcă...
Pagina se încarcă...
Pagina se încarcă...
Pagina se încarcă...
Pagina se încarcă...
Pagina se încarcă...
Pagina se încarcă...
Pagina se încarcă...
Pagina se încarcă...
Pagina se încarcă...
Pagina se încarcă...
Pagina se încarcă...
Pagina se încarcă...
Pagina se încarcă...
Pagina se încarcă...
Pagina se încarcă...
Pagina se încarcă...
Pagina se încarcă...
Pagina se încarcă...
Pagina se încarcă...
Pagina se încarcă...
Pagina se încarcă...
Pagina se încarcă...
Pagina se încarcă...
Pagina se încarcă...
Pagina se încarcă...
Pagina se încarcă...
Pagina se încarcă...
Pagina se încarcă...
Pagina se încarcă...
Pagina se încarcă...
Pagina se încarcă...
Pagina se încarcă...
Pagina se încarcă...
Pagina se încarcă...
Pagina se încarcă...
Pagina se încarcă...
Pagina se încarcă...
Pagina se încarcă...
Pagina se încarcă...
Pagina se încarcă...
Pagina se încarcă...
Pagina se încarcă...
Pagina se încarcă...
Pagina se încarcă...
Pagina se încarcă...
Pagina se încarcă...
Pagina se încarcă...
Pagina se încarcă...
Pagina se încarcă...
Pagina se încarcă...
Pagina se încarcă...
-
 1
1
-
 2
2
-
 3
3
-
 4
4
-
 5
5
-
 6
6
-
 7
7
-
 8
8
-
 9
9
-
 10
10
-
 11
11
-
 12
12
-
 13
13
-
 14
14
-
 15
15
-
 16
16
-
 17
17
-
 18
18
-
 19
19
-
 20
20
-
 21
21
-
 22
22
-
 23
23
-
 24
24
-
 25
25
-
 26
26
-
 27
27
-
 28
28
-
 29
29
-
 30
30
-
 31
31
-
 32
32
-
 33
33
-
 34
34
-
 35
35
-
 36
36
-
 37
37
-
 38
38
-
 39
39
-
 40
40
-
 41
41
-
 42
42
-
 43
43
-
 44
44
-
 45
45
-
 46
46
-
 47
47
-
 48
48
-
 49
49
-
 50
50
-
 51
51
-
 52
52
-
 53
53
-
 54
54
-
 55
55
-
 56
56
-
 57
57
-
 58
58
-
 59
59
-
 60
60
-
 61
61
-
 62
62
-
 63
63
-
 64
64
-
 65
65
-
 66
66
-
 67
67
-
 68
68
-
 69
69
-
 70
70
-
 71
71
-
 72
72
-
 73
73
-
 74
74
-
 75
75
-
 76
76
-
 77
77
-
 78
78
-
 79
79
-
 80
80
-
 81
81
-
 82
82
-
 83
83
-
 84
84
-
 85
85
-
 86
86
-
 87
87
-
 88
88
-
 89
89
-
 90
90
-
 91
91
-
 92
92
-
 93
93
-
 94
94
-
 95
95
-
 96
96
-
 97
97
-
 98
98
-
 99
99
-
 100
100
-
 101
101
-
 102
102
-
 103
103
-
 104
104
-
 105
105
-
 106
106
-
 107
107
-
 108
108
-
 109
109
-
 110
110
-
 111
111
-
 112
112
-
 113
113
-
 114
114
-
 115
115
-
 116
116
-
 117
117
-
 118
118
-
 119
119
-
 120
120
-
 121
121
-
 122
122
-
 123
123
-
 124
124
-
 125
125
-
 126
126
-
 127
127
-
 128
128
-
 129
129
-
 130
130
-
 131
131
-
 132
132
-
 133
133
-
 134
134
-
 135
135
-
 136
136
-
 137
137
-
 138
138
-
 139
139
-
 140
140
-
 141
141
-
 142
142
-
 143
143
-
 144
144
-
 145
145
-
 146
146
-
 147
147
-
 148
148
-
 149
149
-
 150
150
-
 151
151
-
 152
152
-
 153
153
-
 154
154
-
 155
155
-
 156
156
-
 157
157
-
 158
158
-
 159
159
-
 160
160
-
 161
161
-
 162
162
-
 163
163
-
 164
164
-
 165
165
-
 166
166
-
 167
167
-
 168
168
-
 169
169
-
 170
170
-
 171
171
-
 172
172
-
 173
173
-
 174
174
-
 175
175
-
 176
176
-
 177
177
-
 178
178
-
 179
179
-
 180
180
-
 181
181
-
 182
182
-
 183
183
-
 184
184
-
 185
185
-
 186
186
-
 187
187
-
 188
188
-
 189
189
-
 190
190
-
 191
191
-
 192
192
-
 193
193
-
 194
194
-
 195
195
-
 196
196
-
 197
197
-
 198
198
-
 199
199
-
 200
200
-
 201
201
-
 202
202
-
 203
203
-
 204
204
-
 205
205
-
 206
206
-
 207
207
-
 208
208
-
 209
209
-
 210
210
-
 211
211
-
 212
212
-
 213
213
-
 214
214
-
 215
215
-
 216
216
-
 217
217
-
 218
218
-
 219
219
-
 220
220
-
 221
221
-
 222
222
-
 223
223
-
 224
224
-
 225
225
-
 226
226
-
 227
227
-
 228
228
-
 229
229
-
 230
230
-
 231
231
-
 232
232
-
 233
233
-
 234
234
-
 235
235
-
 236
236
-
 237
237
-
 238
238
-
 239
239
-
 240
240
-
 241
241
-
 242
242
-
 243
243
-
 244
244
-
 245
245
-
 246
246
-
 247
247
-
 248
248
-
 249
249
-
 250
250
-
 251
251
-
 252
252
-
 253
253
-
 254
254
-
 255
255
-
 256
256
-
 257
257
-
 258
258
-
 259
259
-
 260
260
-
 261
261
-
 262
262
-
 263
263
-
 264
264
-
 265
265
-
 266
266
-
 267
267
-
 268
268
-
 269
269
-
 270
270
-
 271
271
-
 272
272
-
 273
273
-
 274
274
-
 275
275
-
 276
276
-
 277
277
-
 278
278
-
 279
279
-
 280
280
-
 281
281
-
 282
282
-
 283
283
-
 284
284
-
 285
285
-
 286
286
-
 287
287
-
 288
288
-
 289
289
-
 290
290
-
 291
291
-
 292
292
-
 293
293
-
 294
294
-
 295
295
-
 296
296
-
 297
297
-
 298
298
-
 299
299
-
 300
300
-
 301
301
-
 302
302
-
 303
303
-
 304
304
-
 305
305
-
 306
306
-
 307
307
-
 308
308
-
 309
309
-
 310
310
-
 311
311
-
 312
312
-
 313
313
-
 314
314
-
 315
315


în alte limbi
- français: Hoover HOCT3L517DS Manuel utilisateur
- slovenčina: Hoover HOCT3L517DS Používateľská príručka
- italiano: Hoover HOCT3L517DS Manuale utente
- dansk: Hoover HOCT3L517DS Brugermanual
Lucrări înrudite
Alte documente
-
Samsung RL38SBPS Manual de utilizare
-
Samsung RL44WGTB1/BUL Manual de utilizare
-
Heinner HF-205A+ Manual de utilizare
-
Samsung RL55VJBIH Manual de utilizare
-
 KASA TRF-37LE CITY COMBI Refrigerator Manual de utilizare
-
-
Samsung RSG5FUBP Manual de utilizare
-
Candy CMCL 5172XN Manual de utilizare
-
Candy CMCL5172BK Fridge Freezer Manual de utilizare
