Yamaha YVC-1000 Ghid de inițiere rapidă
- Categorie
- Microfoane
- Tip
- Ghid de inițiere rapidă

Unified Communications Microphone & Speaker System
Update the firmware and use the latest features.
Please also refer to the user's manual that provides detailed information on how to use this
product.
You can download the latest firmware and user's manual from the following website:
https://uc.yamaha.com/resources/support/
YVC-1000
FR JA ESKO
IT
DEZH PT RU
EN
Quick Start Guide
Guide de référence rapide
Kurzanleitung
Guida rapida
Guía de Inicio Rápido
Guia de Início Rápido
Краткое вводное руководство

YVC-1000 Quick Start Guide
1
English
IMPORTANT SAFETY INSTRUCTIONS .............2
Safety Precautions ......................................................3
Precautions for Use .....................................................5
About Bluetooth
®
.....................................................5
Locations of name plates ............................................6
Introduction .................................................................7
Check the contents ....................................................7
About this manual .....................................................7
Please read other instruction manuals as well as
this manual ................................................................8
Using the Latest Features ..........................................8
Use of open-source software .....................................8
Controls and Functions ..............................................9
Control Unit (YVC-CTU1000) .................................9
Control Unit (YVC-CTU1000): Back ....................10
Control Unit (YVC-CTU1000): Bottom .................10
Microphone (YVC-MIC1000) ................................11
Microphone (YVC-MIC1000): Side .......................11
Microphone (YVC-MIC1000): Bottom ..................12
Setting up for use ...................................................... 13
Installation .............................................................. 13
Connecting the microphone and power cables ....... 14
Changing the setting ................................................ 14
Changing the language of the voice guidance ........ 14
Connecting to communication equipment ............. 15
Connecting to a PC or Mac using the USB
cable ........................................................................ 15
Connecting to a video conference system using
audio cables ............................................................ 15
Connecting to a smartphone or tablet via
Bluetooth ................................................................ 16
Specifications ............................................................ 17
General ................................................................... 17
Audio ...................................................................... 18
Contents

YVC-1000 Quick Start Guide
2
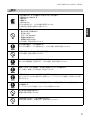
• Explanation of Graphical Symbols
1 Read these instructions.
2 Keep these instructions.
3 Heed all warnings.
4 Follow all instructions.
5 Do not use this apparatus near water.
6 Clean only with dry cloth.
7 Do not block any ventilation openings. Install in accordance with
the manufacturer’s instructions.
8 Do not install near any heat sources such as radiators, heat
registers, stoves, or other apparatus (including amplifiers) that
produce heat.
9 Do not defeat the safety purpose of the polarized or grounding-
type plug. A polarized plug has two blades with one wider than the
other. A grounding type plug has two blades and a third grounding
prong. The wide blade or the third prong are provided for your
safety. If the provided plug does not fit into your outlet, consult an
electrician for replacement of the obsolete outlet.
10 Protect the power cord from being walked on or pinched
particularly at plugs, convenience receptacles, and the point where
they exit from the apparatus.
11 Only use attachments/accessories specified by the manufacturer.
12 Use only with the cart, stand, tripod, bracket, or table specified by
the manufacturer, or sold with the apparatus. When a cart is used,
use caution when moving the cart/apparatus combination to avoid
injury from tip-over.
13 Unplug this apparatus during lightning storms or when unused for
long periods of time.
14 Refer all servicing to qualified service personnel. Servicing is
required when the apparatus has been damaged in any way, such as
power-supply cord or plug is damaged, liquid has been spilled or
objects have fallen into the apparatus, the apparatus has been
exposed to rain or moisture, does not operate normally, or has been
dropped.
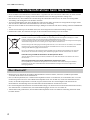
IMPORTANT SAFETY INSTRUCTIONS
CAUTION: TO REDUCE THE RISK OF ELECTRIC
SHOCK, DO NOT REMOVE COVER (OR BACK).
NO USER-SERVICEABLE PARTS INSIDE. REFER
SERVICING TO QUALIFIED SERVICE PERSONNEL.
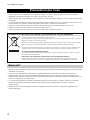
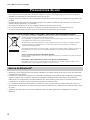
The lightning flash with arrowhead symbol,
within an equilateral triangle, is intended to alert
you to the presence of uninsulated “dangerous
voltage” within the product’s enclosure that may
be of sufficient magnitude to constitute a risk of
electric shock to persons.
The exclamation point within an equilateral
triangle is intended to alert you to the presence of
important operating and maintenance (servicing)
instructions in the literature accompanying the
appliance.
CAUTION
RISK OF ELECTRIC SHOCK
DO NOT OPEN
FCC INFORMATION (for US customers)
1 IMPORTANT NOTICE: DO NOT MODIFY THIS UNIT!
This product, when installed as indicated in the instructions contained in this manual, meets FCC requirements. Modifications not
expressly approved by Yamaha may void your authority, granted by the FCC, to use the product.
2 IMPORTANT: When connecting this product to accessories and/or another product use only high quality shielded cables. Cable/s
supplied with this product MUST be used. Follow all installation instructions. Failure to follow instructions could void your FCC
authorization to use this product in the USA.
3 NOTE: This product has been tested and found to comply with the requirements listed in FCC Regulations, Part 15 for Class “A” digital
devices. Compliance with these requirements provides a reasonable level of assurance that your use of this product, in a commercial
environment, will not result in harmful interference with other electronic devices. However, operation of this product in a residential area
is likely to cause interference in some form. In this case you, the user, bear the responsibility of correcting this condition.
This product generates/uses radio frequencies and, if not installed and used according to the instructions found in the users manual, may
cause interference harmful to the operation of other electronic devices. Compliance with FCC regulations does not guarantee that
interference will not occur in all installations. If this product is found to be the source of interference, which can be determined by turning
the product “OFF” and “ON”, please try to eliminate the problem by using one of the following measures:
Relocate either the product generating the interference or the device that is being affected by the interference.
Utilize power outlets that are on different branch (circuit breaker or fuse) circuits or install AC line filter/s.
In the case of radio or TV interference, relocate/reorient the antenna. If the antenna lead-in is 300 ohm ribbon lead, change the lead-in to
co-axial type cable.
If these corrective measures do not produce satisfactory results, please contact the local retailer that is authorized to distribute this type of
product. If you can not locate the appropriate retailer, please contact Yamaha Unified Communications, Inc., 144 North Rd, Suite 3250
Sudbury, MA 01776
The above statements apply ONLY to those products distributed by Yamaha Unified Communications, Inc.

YVC-1000 Quick Start Guide
3
English
1 Please ensure to immediately remove the power plug from the
outlet in any of the following cases.
Failure to observe this may result in fire or an electric shock.
Please ensure to request the dealer concerned to carry out any
necessary repairs or inspections.
• Any abnormal odor or noise occurs;
• Smoke is emitted;
• The product is broken; or
• The product has been exposed to water.
2 Ensure not to damage the power cable. Failure to observe this
could result in fire, electric shock, or damage to the product.
• Ensure not to place any heavy objects on the cable.
• Ensure not to process the cable in any way.
• Ensure not use any staples to fix the cable in place.
• Ensure not to apply excessive force to the cable.
• Ensure to keep the cable away from anything hot.
3 Ensure to only use the included power cable. Failure to observe
this could result in fire, electric shock, or damage to the product.
4 Ensure to only use the specified power supply voltage. Failure to
observe this could result in fire, electric shock, or damage to the
product.
5 Connect the power plug to an outlet that you can see and reach in
thereby ensuring that you can easily remove it if the necessity
arises.
6 Ensure to fully and securely insert the power plug into the outlet.
Being insufficiently inserted could result in an electric shock. It
could also lead to dust accumulating on the plug, which could then
result in heat or fire.
7 Verify that the current capacity of the outlet or a power strip in
thereby ensuring that use of the product does not exceed it. Any
overheating or degradation of the power strip could result in fire.
8 Do not touch the terminals with your fingers or metal objects.
Failure to observe this may result in electric shock or damage to
the product.
9 Ensure the product does not fall or strongly impacted. The internal
parts could break, which could then result in electric shock, fire, or
damage to the product.
10 If the product has been damaged, request repair or inspection
services from a dealer.
Continued use of the product may result in fire or electric shock.
11 Do not disassemble or alter this product in any way.
Failure to observe this could result in fire, electric shock, or
damage to the product.
12 Do not obstruct heat dissipation.
– Do not place a cloth, tablecloth or other such object over the
product.
– Do not place the product on top of a rug, carpet, etc.
– Do not wedge or squeeze the product into a narrow space that
has poor air circulation.
– Do not block the ventilation holes.
Allow ventilation space of at least 1 cm on the top, 1 cm on the left
and right, and 5 cm on the back of this product.
Failure to observe the above may result in heat being trapped
inside the product and cause a fire or damage to the product.
13 Do not place the product outdoors or in a location where water
may drip on it.
Failure to observe this may result in fire, electric shock or damage
to the product.
14 Do not install the product anywhere it will be exposed to dust or
humidity, oily smoke or steam, or corrosive gas. Failure to observe
this could result in fire, electric shock, or damage to the product.
15 Ensure that the product is on the level.
Do not place it upside down or in a vertical orientation. Failure to
observe this may result in fire, electric shock or damage to the
product.
16 Avoid installing the product where foreign object may fall onto the
product and/or the product may be exposed to liquid dripping or
splashing. On the top of the product, do not place:
• Other components, as they may cause damage and/or
discoloration on the surface of the product.
• Burning objects (i.e. candles), as they may cause fire, damage to
the product, and/or personal injury.
• Containers with liquid in them, as they may fall and liquid may
cause electrical shock to the user and/or damage to the product.
17 Do not insert foreign objects such as metal or paper in the product.
Failure to observe this may result in fire, electric shock or damage
to the product.
18 If thunder is heard, avoid touching the product.
Failure to observe this may result in electric shock.
19 Periodically remove any dirt and dust from the power plug. Failure
to observe this could result in fire.
20 The product should be used at least 22 cm away from persons
using a pacemaker, defibrillator, or similar device.
Failure to observe this may affect the pacemaker, resulting in a
serious accident.
21 Do not use this product near medical equipment. Radio waves
from this product may adversely affect the operation of electro-
medical equipment. Do not use this product in locations where use
of radio waves is restricted, such as near medical equipment.
22 Avoid damaging the USB and microphone cables.
• Do not place heavy objects on cables.
• Do not modify cables.
• Do not affix cables using staples.
• Do not apply unnecessary force to cables.
• Do not place cables near heat sources.
Doing so may result in fire, electric shock or damage to the
product.
23 Be sure to use the USB and microphone cables that come with the
product.
Using other USB or microphone cables may result in fire, electric
shock, or damage to the product.
24 When this product is not used for a long period of time, be sure to
unplug all power plugs.
Failure to observe this may result in fire or electric shock.
25 Ensure your hands are dry when connecting or disconnecting the
power plug or cables.
Failure to observe this may result in electric shock or damage to
the product.
26 Ensure not to install the product anywhere unstable or where it will
be exposed to vibrations as it could fall over or turn upside down,
thus resulting in injury or damage to the product.
27 Ensure not to install the product anywhere it will be exposed to
direct sunlight or extraordinarily high temperatures (near a heater,
etc.). Failure to observe this could result in damage to the product.
28 Do not sit/stand on the product or place other objects on top of it.
Failure to observe this may result in damage to the product.
Safety Precautions

YVC-1000 Quick Start Guide
4
29 Turn the volume down to the minimum level before starting
playback.
Failure to observe this will cause loud noises to be emitted that
may result in hearing impairment.
30 Ensure not to use the product anywhere it will be exposed to rapid
changes in the ambient temperature. Any rapid change in the
ambient temperature could result in condensation on the product,
which could then result in damage to the product. Ensure to leave
the product for a while until it has dried off with the power turned
off if any condensation has occurred.
31 Ensure not to connect any cables while the power is turned on.
Failure to observe this could result in damage to the product and
any connected equipment.
32 Ensure to earth any static electricity from your body or clothing
before touching the product. Failure to observe this could result in
damage to the product.
33 Route and connect the cables correctly.
If the cables are pulled or become caught on someone’s leg, the
product or connected equipment could tip over or fall, thus
resulting in injury or damage to the product.
34 Before connecting external equipment, thoroughly read the
instruction manuals provided with the equipment and make
connections according to the instructions.
This unit is not disconnected from the AC power source as long as it is connected to the AC wall outlet, even if this unit
itself is turned off. This state is called the standby mode. In this state, this unit is designed to consume a very small quantity
of power.
WARNING
TO REDUCE THE RISK OF FIRE OR ELECTRIC SHOCK, DO NOT EXPOSE THIS APPARATUS TO RAIN OR
MOISTURE.
WARNING
This is a class A product. In a domestic environment this product may cause radio interference in which case the user may
be required to take adequate measures.

YVC-1000 Quick Start Guide
5
English
• This product is intended for use in general offices and is not designed for use in any fields requiring a high degree of
reliability in the handling of human lives or valuable assets.
• Please note that Yamaha cannot assume any responsibility for any damage resulting from improper use or configuration of
the product.
• Depending on the usage environment, this product may generate noise in a telephone, radio, television etc. If this occurs,
change the location where it is installed or its orientation.
• If you transfer this product to a third party, please pass this manual and accessories along with it.
• Ensure to follow the instructions of your local government when disposing of the product.
• Do not connect any equipment that generates any noise on the same power line as the product.
• Bluetooth is a technology for wireless communication employing the 2.4 GHz frequency band, a band which can be used
without a license.
• The 2.4 GHz band used by Bluetooth compatible devices is a radio band shared by many types of equipment. While
Bluetooth compatible devices use a technology minimizing the influence of other components using the same radio band,
such influence may reduce the speed or distance of communications and in some cases interrupt communications.
• The speed of signal transfer and the distance at which communication is possible differs according to the distance between
the communicating devices, the presence of obstacles, radio wave conditions and the type of equipment.
• Yamaha does not guarantee all wireless connections between this product and devices compatible with Bluetooth function.
Precautions for Use
This device complies with part 15 of FCC Rules and Industry Canada’s licence-exempt RSSs. Operation is subject to the following two
conditions: (1) this device may not cause harmful interference, and (2) this device must accept any interference received, including interference
that may cause undesired operation.
This transmitter must not be co-located or operated in conjunction with any other antenna or transmitter.
This equipment complies with FCC/IC radiation exposure limits set forth for an uncontrolled environment and meets the FCC radio frequency
(RF) Exposure Guidelines and RSS-102 of the IC radio frequency (RF) Exposure rules. This equipment has very low levels of RF energy that it
deemed to comply without maximum permissive exposure evaluation (MPE). But it is desirable that it should be installed and operated keeping
the radiator at least 20 cm or more away from person’s body.
Information for users on collection and disposal of old equipment:
This symbol on the products, packaging, and/or accompanying documents means that used electrical and electronic
products should not be mixed with general household waste.
For proper treatment, recovery and recycling of old products, please take them to applicable collection points, in
accordance with your national legislation.
By disposing of these products correctly, you will help to save valuable resources and prevent any potential negative
effects on human health and the environment which could otherwise arise from inappropriate waste handling.
For more information about collection and recycling of old products, please contact your local municipality, your
waste disposal service or the point of sale where you purchased the items.
For business users in the European Union:
If you wish to discard electrical and electronic equipment, please contact your dealer or supplier for further
information.
Information on Disposal in other Countries outside the European Union:
This symbol is only valid in the European Union. If you wish to discard these items, please contact your local
authorities or dealer and ask for the correct method of disposal.
About Bluetooth®

YVC-1000 Quick Start Guide
6
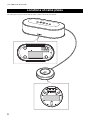
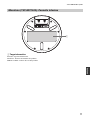
The name plates are placed on the bottom of the Control Unit and the microphone.
Locations of name plates

YVC-1000 Quick Start Guide
7
English
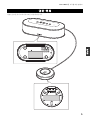
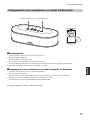
Thank you for purchasing a Yamaha YVC-1000. The YVC-1000 is a unified communications microphone and speaker system
that serves as an audio terminal when connected to communication equipment, such as a PC or a Mac, a smartphone or tablet,
and a video conference system.
Please thoroughly read this manual before installing and connecting the product.
Keep this manual in a safe place for future reference.
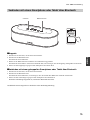
• Control Unit (YVC-CTU1000) x 1
• Microphone (YVC-MIC1000) x 1
• Power cable (3 m) x 1
• USB cable (5 m) x 1
• Microphone cable (5 m) x 1
• Quick Start Guide (this manual) x 1
■About abbreviations
In this manual, the product names are described as follows.
• Yamaha YVC-1000: the product
• Microsoft
®
Windows
®
: Windows
• macOS
®
: macOS
■About trademarks
• Microsoft and Windows are registered trademarks of Microsoft Corporation in the United States and other countries.
• Mac and macOS are registered trademarks of Apple Inc.
• Android
™
is a trademark or registered trademark of Google Inc.
• Bluetooth
®
is a registered trademark of the Bluetooth SIG and is used by Yamaha in accordance with a license agreement.
• NFC logo (N-Mark) is a trademark or registered trademark of NFC Forum, Inc.
Introduction
• No part of this manual may be copied or used in any form without permission of Yamaha.
• The contents of this manual apply to the latest specifications as of the publishing date. To obtain the latest manual,
access the following website then download the manual file.
https://uc.yamaha.com/resources/support/
• Yamaha is not liable for any loss or damage to data resulting from use of the product. Please note that the warranty
covers repair of the product only.
Check the contents
About this manual

YVC-1000 Quick Start Guide
8
This manual contains fundamental information only.
For detailed information on how to use the product, please read the following:
User’s manual: Contains information about utilizing the product, including detailed settings and useful features.
Please download the latest user’s manual from the download page of our website.
To configure the settings of communication equipment, refer to the instruction manuals provided with the equipment.
You can download the firmware (program of the product) from the download page of our website to use the latest features.
■Download page
https://uc.yamaha.com/resources/support/
This product uses open-source software.
The contents of the license are included in the user’s manual.
Please read other instruction manuals as well as this manual
Using the Latest Features
Use of open-source software

YVC-1000 Quick Start Guide
9
English
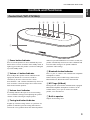
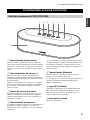
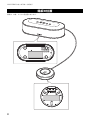
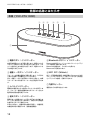
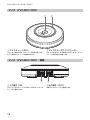
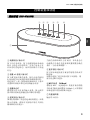
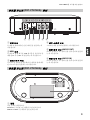
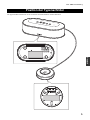
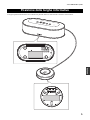
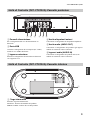
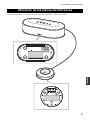
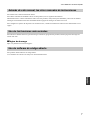
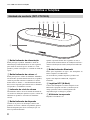
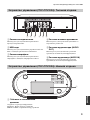
1 Power button/indicator
Press to turn the product on. Press and hold the power
button for two or more seconds to enter standby mode. It
lights up green when the product is turned on and lights
up red in standby mode.
2 Volume +/- button/indicator
Press to adjust the speaker volume. Hold down the
appropriate button for 0.5 or more seconds to
continuously increase or decrease the volume.
Press both the + and - buttons simultaneously for two or
more seconds to switch the output device between the
built-in and external speakers.
3 Volume level indicator
It normally indicates the input level of an incoming
voice. It indicates settings when adjusting the speaker
volume or when selecting an output speaker.
4 Tuning fork button/indicator
It lights up or flashes orange if there is a problem. If a
problem is indicated, press the tuning fork button to
activate the voice guidance about the detected problem.
When it is pressed and held for two or more seconds, the
product automatically measures acoustic conditions and
tunes the audio settings to an optimal condition
(automatic audio tuning).
5 Bluetooth button/indicator
Press to pair or connect with a Bluetooth compatible
smartphone or tablet.
If this button is pressed while being connected to a
Bluetooth device, Bluetooth will be disconnected.
6 NFC logo (N-Mark)
Placing an NFC (Near Field Communication)-equipped
Bluetooth compatible smartphone or tablet over the
N-Mark allows you to pair or connect it with the
product, or to disconnect it.
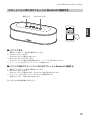
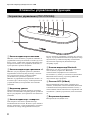
7 Built-in speaker
Outputs an incoming voice.
Controls and Functions
Control Unit (YVC-CTU1000)
123 4 5 6
7

YVC-1000 Quick Start Guide
10
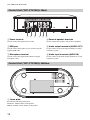
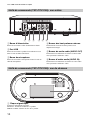
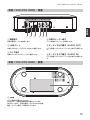
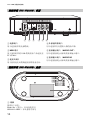
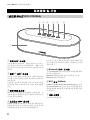
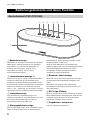
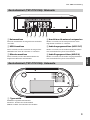
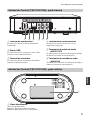
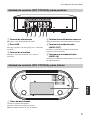
1 Power terminal
Used to connect the supplied power cable.
2 USB port
Used to connect the product to a PC or Mac using the
supplied USB cable.
3 Microphone terminal
Used to connect the supplied microphone using the
microphone cable.
4 External speaker terminals
Used to connect the speakers with a built-in amplifier.
5 Audio output terminals (AUDIO OUT)
Used to connect to the audio input terminals of a video
conference system.
6 Audio input terminals (AUDIO IN)
Used to connect to the audio output terminals of a video
conference system.
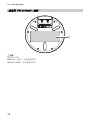
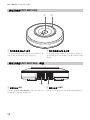
1 Name plate
Provides the following information.
Model No.: Model number of the product
SERIAL LABEL: Serial number of the product
Control Unit (YVC-CTU1000): Back
1 2 3 4 5 6
Control Unit (YVC-CTU1000): Bottom
1

YVC-1000 Quick Start Guide
11
English
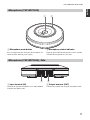
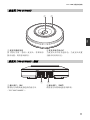
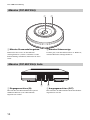
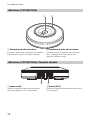
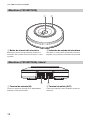
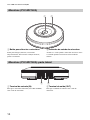
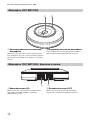
1 Microphone mute button
Press to temporarily turn off (mute) the microphone. To
cancel the mute function, press it again.
2 Microphone status indicator
Lights up green when the microphone is active. Flashes
red when the microphone is set to mute.
1 Input terminal (IN)
Connects the optional microphone (YVC-MIC1000EX)
using the microphone cable.
2 Output terminal (OUT)
Connects the Control Unit using the microphone cable.
Microphone (YVC-MIC1000)
12
Microphone (YVC-MIC1000): Side
12

YVC-1000 Quick Start Guide
12
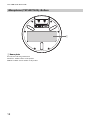
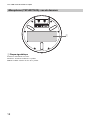
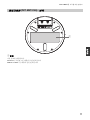
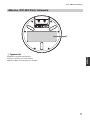
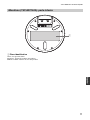
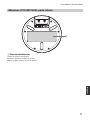
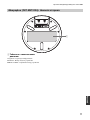
1 Name plate
Provides the following information.
Model No.: Model number of the product
SERIAL LABEL: Serial number of the product
Microphone (YVC-MIC1000): Bottom
1

YVC-1000 Quick Start Guide
13
English
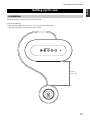
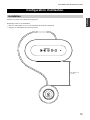
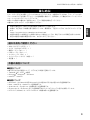
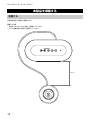
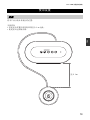
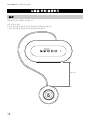
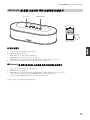
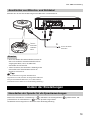
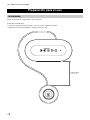
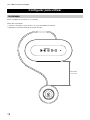
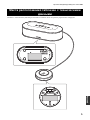
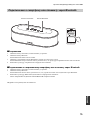
Install the product in a location where it will be used.
Notes on installation
• Place the microphone at least 1 m (3.3 ft) away from the Control Unit.
• Keep the microphone away from any noise sources.
Setting up for use
Installation
At least
1 m (3.3 ft)

YVC-1000 Quick Start Guide
14
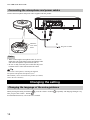
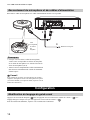
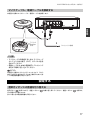
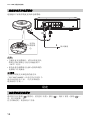
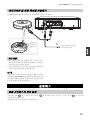
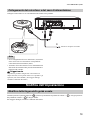
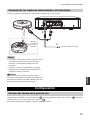
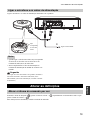
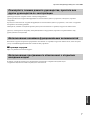
Connect the microphone and power cables supplied with the product.
• When connecting the microphone cable, be sure to
match the color of the labels on the microphone cable
and of the microphone output terminal (OUT).
• Be sure to fully insert the power cable into the power
terminal of the Control Unit and into the outlet.
Tip
A total of five microphones, including the supplied
microphone and optional microphones (YVC-
MIC1000EX), can be connected to the product. (For details,
refer to the user’s manual.)
While pressing the tuning fork button ( ), press the volume + button ( ) repeatedly. The language changes every
time you press the volume + button ( ).
For detailed instructions, refer to the user’s manual.
Connecting the microphone and power cables
Notes
1
1
3
2
Match the
color of the
labels.
Plug into an outlet
Changing the setting
Changing the language of the voice guidance

YVC-1000 Quick Start Guide
15
English
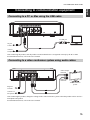
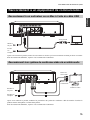
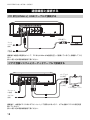
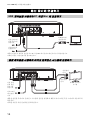
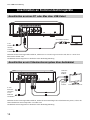
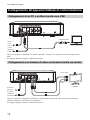
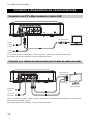
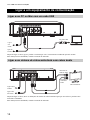
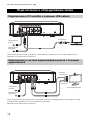
After connecting the product, turn the product on and confirm that it is recognized correctly by the PC or Mac.
For detailed instructions, refer to the user’s manual.
After connecting the product, change the settings of the video conference system so that the product will be used as a
microphone and speaker.
For detailed instructions, refer to the user’s manual.
Connecting to communication equipment
Connecting to a PC or Mac using the USB cable
Connecting to a video conference system using audio cables
To USB port
Plug into
an outlet
Connect to a
microphone
Audio Output
terminals
Video conference
system
Audio Input
terminals
Plug into
an outlet
Connect to a
microphone

YVC-1000 Quick Start Guide
16
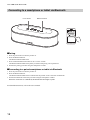
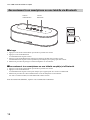
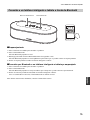
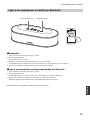
■Pairing
1 Press the power button to turn the product on.
2 Press the Bluetooth button.
The Bluetooth button blinks blue.
3 Press and hold the Bluetooth button for two or more seconds.
The Bluetooth button blinks blue quickly to indicate that pairing can be performed.
4 Perform the pairing procedure using the smartphone or tablet.
■Connecting to a paired smartphone or tablet via Bluetooth
1 Press the power button to turn the product on.
2 Press the Bluetooth button.
The Bluetooth button blinks blue to indicate that the product can be connected via Bluetooth.
3 Perform the Bluetooth-connection procedure using the smartphone or tablet.
When the connection is established, the Bluetooth button lights up blue.
For detailed instructions, refer to the user’s manual.
Connecting to a smartphone or tablet via Bluetooth
Power button
Bluetooth button

YVC-1000 Quick Start Guide
17
English
(*1) For the supported versions, refer to the following website:
https://uc.yamaha.com/
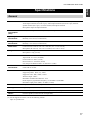
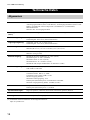
Specifications
General
Interface: Control Unit: USB 2.0 High Speed, Bluetooth, NFC (Near Field Communication),
Audio Input terminals (stereo RCA pin), Audio Output terminals (stereo RCA pin), External
speaker terminal (RCA pin) x 2, Power terminal, Microphone terminal
Microphone: Input and output terminals
Power
consumption
(max):
20 W (one microphone connected), 35 W (five microphones connected)
Operating
environment:
Temperature: 0 to 40°C (32 to 104°F)
Humidity: 20 to 85% (no condensation)
Storage
environment:
Temperature: -20 to +50°C (-4 to 122°F)
Humidity: 10 to 90% (no condensation)
Dimensions: Control Unit (W x H x D): 332 x 95 x 162 mm (13.1 x 3.74 x 6.38 in)
Microphone (W x H x D): 136 x 36 x 136 mm (5.35 x 1.42 x 5.35 in)
Weight: Control Unit: 1.8 kg (4.0 lbs)
Microphone: 0.4 kg (0.9 lbs)
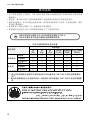
Power source: US and Canada models: AC 120 V (60 Hz)
Japan model: AC 100 V (50/60Hz)
China model: AC 220 V (50 Hz)
Korea model: AC 110/220 V (60 Hz)
UK, Europe and Russia models: AC 220-240 V (50 Hz)
PC/Mac
environment:
OS: Windows (*1), macOS (*1)
USB: USB 2.0 or later
Bluetooth: Bluetooth specification version: 2.1 + EDR
Supported profiles: HFP (1.6), A2DP
Supported Codec: SBC, mSBC, CVSD
Wireless output: Class 2
Maximum communication distance: 10 m
Radio frequency (Operational frequency): 2,402 MHz to 2,480 MHz
Maximum output power (EIRP): 4.0 dBm (2.5 mW)
NFC: Compatible devices: NFC-compatible Android devices
Voice guidance: English, Japanese, Chinese, Korean, French, Spanish, German
Accessories: Power cable (3 m), USB cable (5 m), Microphone cable (5 m), Quick Start Guide
Others: Firmware update (transfer from PC through USB)

YVC-1000 Quick Start Guide
18
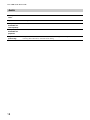
Audio
Microphone
units:
Unidirectional x 3
Speaker unit: Full-range x 1
Frequency
bandwidth for
sound pickup:
100 to 20,000 Hz
Frequency
bandwidth for
playback:
100 to 20,000 Hz
Signal
processing:
Adaptive echo canceller, Noise reduction, Automatic tracking, Automatic gain control, Automatic
room EQ, Dereverberation, Automatic audio tuning

YVC-1000 Guide de référence rapide
1
Français
PRÉCAUTIONS CONCERNANT LA
SÉCURITÉ ..................................................................2
Consignes de sécurité ..................................................3
Précautions d’utilisation ............................................5
À propos de Bluetooth
®
............................................5
Emplacements des plaques signalétiques ..................6
Introduction .................................................................7
Vérification du contenu .............................................7
À propos de ce mode d’emploi .................................7
Veillez lire les autres manuels d’instructions en
plus de ce mode d’emploi .........................................8
Utilisation des dernières fonctions ............................8
Utilisation de logiciels Open Source .........................8
Commandes et leurs fonctions ...................................9
Unité de commande (YVC-CTU1000) .....................9
Unité de commande (YVC-CTU1000): vue
arrière ......................................................................10
Unité de commande (YVC-CTU1000): vue de
dessous ....................................................................10
Microphone (YVC-MIC1000) ................................11
Microphone (YVC-MIC1000): vue latérale ...........11
Microphone (YVC-MIC1000): vue de dessous ......12
Configuration d’utilisation ...................................... 13
Installation .............................................................. 13
Raccordement du microphone et des câbles
d’alimentation ......................................................... 14
Configuration ............................................................ 14
Modification du langage du guide vocal ................ 14
Raccordement à un équipement de
communication ......................................................... 15
Raccordement à un ordinateur ou un
Mac à l’aide du câble USB ..................................... 15
Raccordement à un système de conférence vidéo
via un câble audio ................................................... 15
Raccordement à un smartphone ou une tablette
via Bluetooth .......................................................... 16
Caractéristiques techniques .................................... 17
Généralités .............................................................. 17
Son .......................................................................... 18
Table des matières
Pagina se încarcă ...
Pagina se încarcă ...
Pagina se încarcă ...
Pagina se încarcă ...
Pagina se încarcă ...
Pagina se încarcă ...
Pagina se încarcă ...
Pagina se încarcă ...
Pagina se încarcă ...
Pagina se încarcă ...
Pagina se încarcă ...
Pagina se încarcă ...
Pagina se încarcă ...
Pagina se încarcă ...
Pagina se încarcă ...
Pagina se încarcă ...
Pagina se încarcă ...
Pagina se încarcă ...
Pagina se încarcă ...
Pagina se încarcă ...
Pagina se încarcă ...
Pagina se încarcă ...
Pagina se încarcă ...
Pagina se încarcă ...
Pagina se încarcă ...
Pagina se încarcă ...
Pagina se încarcă ...
Pagina se încarcă ...
Pagina se încarcă ...
Pagina se încarcă ...
Pagina se încarcă ...
Pagina se încarcă ...
Pagina se încarcă ...
Pagina se încarcă ...
Pagina se încarcă ...
Pagina se încarcă ...
Pagina se încarcă ...
Pagina se încarcă ...
Pagina se încarcă ...
Pagina se încarcă ...
Pagina se încarcă ...
Pagina se încarcă ...
Pagina se încarcă ...
Pagina se încarcă ...
Pagina se încarcă ...
Pagina se încarcă ...
Pagina se încarcă ...
Pagina se încarcă ...
Pagina se încarcă ...
Pagina se încarcă ...
Pagina se încarcă ...
Pagina se încarcă ...
Pagina se încarcă ...
Pagina se încarcă ...
Pagina se încarcă ...
Pagina se încarcă ...
Pagina se încarcă ...
Pagina se încarcă ...
Pagina se încarcă ...
Pagina se încarcă ...
Pagina se încarcă ...
Pagina se încarcă ...
Pagina se încarcă ...
Pagina se încarcă ...
Pagina se încarcă ...
Pagina se încarcă ...
Pagina se încarcă ...
Pagina se încarcă ...
Pagina se încarcă ...
Pagina se încarcă ...
Pagina se încarcă ...
Pagina se încarcă ...
Pagina se încarcă ...
Pagina se încarcă ...
Pagina se încarcă ...
Pagina se încarcă ...
Pagina se încarcă ...
Pagina se încarcă ...
Pagina se încarcă ...
Pagina se încarcă ...
Pagina se încarcă ...
Pagina se încarcă ...
Pagina se încarcă ...
Pagina se încarcă ...
Pagina se încarcă ...
Pagina se încarcă ...
Pagina se încarcă ...
Pagina se încarcă ...
Pagina se încarcă ...
Pagina se încarcă ...
Pagina se încarcă ...
Pagina se încarcă ...
Pagina se încarcă ...
Pagina se încarcă ...
Pagina se încarcă ...
Pagina se încarcă ...
Pagina se încarcă ...
Pagina se încarcă ...
Pagina se încarcă ...
Pagina se încarcă ...
Pagina se încarcă ...
Pagina se încarcă ...
Pagina se încarcă ...
Pagina se încarcă ...
Pagina se încarcă ...
Pagina se încarcă ...
Pagina se încarcă ...
Pagina se încarcă ...
Pagina se încarcă ...
Pagina se încarcă ...
Pagina se încarcă ...
Pagina se încarcă ...
Pagina se încarcă ...
Pagina se încarcă ...
Pagina se încarcă ...
Pagina se încarcă ...
Pagina se încarcă ...
Pagina se încarcă ...
Pagina se încarcă ...
Pagina se încarcă ...
Pagina se încarcă ...
Pagina se încarcă ...
Pagina se încarcă ...
Pagina se încarcă ...
Pagina se încarcă ...
Pagina se încarcă ...
Pagina se încarcă ...
Pagina se încarcă ...
Pagina se încarcă ...
Pagina se încarcă ...
Pagina se încarcă ...
Pagina se încarcă ...
Pagina se încarcă ...
Pagina se încarcă ...
Pagina se încarcă ...
Pagina se încarcă ...
Pagina se încarcă ...
Pagina se încarcă ...
Pagina se încarcă ...
Pagina se încarcă ...
Pagina se încarcă ...
Pagina se încarcă ...
Pagina se încarcă ...
Pagina se încarcă ...
Pagina se încarcă ...
Pagina se încarcă ...
Pagina se încarcă ...
Pagina se încarcă ...
Pagina se încarcă ...
Pagina se încarcă ...
Pagina se încarcă ...
Pagina se încarcă ...
Pagina se încarcă ...
Pagina se încarcă ...
Pagina se încarcă ...
Pagina se încarcă ...
Pagina se încarcă ...
Pagina se încarcă ...
Pagina se încarcă ...
Pagina se încarcă ...
Pagina se încarcă ...
Pagina se încarcă ...
Pagina se încarcă ...
Pagina se încarcă ...
Pagina se încarcă ...
Pagina se încarcă ...
Pagina se încarcă ...
Pagina se încarcă ...
Pagina se încarcă ...
Pagina se încarcă ...
-
 1
1
-
 2
2
-
 3
3
-
 4
4
-
 5
5
-
 6
6
-
 7
7
-
 8
8
-
 9
9
-
 10
10
-
 11
11
-
 12
12
-
 13
13
-
 14
14
-
 15
15
-
 16
16
-
 17
17
-
 18
18
-
 19
19
-
 20
20
-
 21
21
-
 22
22
-
 23
23
-
 24
24
-
 25
25
-
 26
26
-
 27
27
-
 28
28
-
 29
29
-
 30
30
-
 31
31
-
 32
32
-
 33
33
-
 34
34
-
 35
35
-
 36
36
-
 37
37
-
 38
38
-
 39
39
-
 40
40
-
 41
41
-
 42
42
-
 43
43
-
 44
44
-
 45
45
-
 46
46
-
 47
47
-
 48
48
-
 49
49
-
 50
50
-
 51
51
-
 52
52
-
 53
53
-
 54
54
-
 55
55
-
 56
56
-
 57
57
-
 58
58
-
 59
59
-
 60
60
-
 61
61
-
 62
62
-
 63
63
-
 64
64
-
 65
65
-
 66
66
-
 67
67
-
 68
68
-
 69
69
-
 70
70
-
 71
71
-
 72
72
-
 73
73
-
 74
74
-
 75
75
-
 76
76
-
 77
77
-
 78
78
-
 79
79
-
 80
80
-
 81
81
-
 82
82
-
 83
83
-
 84
84
-
 85
85
-
 86
86
-
 87
87
-
 88
88
-
 89
89
-
 90
90
-
 91
91
-
 92
92
-
 93
93
-
 94
94
-
 95
95
-
 96
96
-
 97
97
-
 98
98
-
 99
99
-
 100
100
-
 101
101
-
 102
102
-
 103
103
-
 104
104
-
 105
105
-
 106
106
-
 107
107
-
 108
108
-
 109
109
-
 110
110
-
 111
111
-
 112
112
-
 113
113
-
 114
114
-
 115
115
-
 116
116
-
 117
117
-
 118
118
-
 119
119
-
 120
120
-
 121
121
-
 122
122
-
 123
123
-
 124
124
-
 125
125
-
 126
126
-
 127
127
-
 128
128
-
 129
129
-
 130
130
-
 131
131
-
 132
132
-
 133
133
-
 134
134
-
 135
135
-
 136
136
-
 137
137
-
 138
138
-
 139
139
-
 140
140
-
 141
141
-
 142
142
-
 143
143
-
 144
144
-
 145
145
-
 146
146
-
 147
147
-
 148
148
-
 149
149
-
 150
150
-
 151
151
-
 152
152
-
 153
153
-
 154
154
-
 155
155
-
 156
156
-
 157
157
-
 158
158
-
 159
159
-
 160
160
-
 161
161
-
 162
162
-
 163
163
-
 164
164
-
 165
165
-
 166
166
-
 167
167
-
 168
168
-
 169
169
-
 170
170
-
 171
171
-
 172
172
-
 173
173
-
 174
174
-
 175
175
-
 176
176
-
 177
177
-
 178
178
-
 179
179
-
 180
180
-
 181
181
-
 182
182
-
 183
183
-
 184
184
-
 185
185
-
 186
186
-
 187
187
-
 188
188
-
 189
189
-
 190
190


Yamaha YVC-1000 Ghid de inițiere rapidă
- Categorie
- Microfoane
- Tip
- Ghid de inițiere rapidă
în alte limbi
- français: Yamaha YVC-1000 Guide de démarrage rapide
- čeština: Yamaha YVC-1000 Rychlý návod
- русский: Yamaha YVC-1000 Инструкция по началу работы
- English: Yamaha YVC-1000 Quick start guide
- polski: Yamaha YVC-1000 Skrócona instrukcja obsługi
- Deutsch: Yamaha YVC-1000 Schnellstartanleitung
- 日本語: Yamaha YVC-1000 クイックスタートガイド
- italiano: Yamaha YVC-1000 Guida Rapida
- español: Yamaha YVC-1000 Guía de inicio rápido
- dansk: Yamaha YVC-1000 Hurtig start guide
- português: Yamaha YVC-1000 Guia rápido
- Nederlands: Yamaha YVC-1000 Snelstartgids
Lucrări conexe
-
Yamaha YVC-1000 Ghid de inițiere rapidă
-
Yamaha YVC-MIC1000EX Manual de utilizare
-
-
-
-
-
-
-
Yamaha YVC-200 Ghid de inițiere rapidă
-