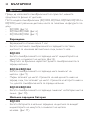
Philips RQ1050/15 Manual de utilizare
- Categorie
- Aparate de bărbierit
- Tip
- Manual de utilizare

3
B
A
E
C
D
F
G
K
J
I
H
4

4

RQ1090, RQ1062, RQ1060, RQ1052, RQ1050 (no charger)
ENGLISH 6
18
31
43
54
66
78
91
103
114
126
138
151
163
174
186

6
Introduction
Thank you for buying this Philips shaver. Please read this user manual, as it
contains information about the wonderful features of this shaver as well
as some tips to make shaving easier and more enjoyable.
Important
Read this user manual carefully before you use the shaver and the Power
Pod. Save the user manual for future reference.
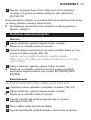
Danger
Make sure the adapter does not get wet (Fig. 1).
Warning
Be careful with hot water. Always check if the water is not too hot, to
prevent your hands from getting burnt.
The adapter contains a transformer. Do not cut off the adapter to
replace it with another plug, as this causes a hazardous situation.
The shaver and the Power Pod are not intended for use by persons
(including children) with reduced physical, sensory or mental
capabilities, or lack of experience and knowledge, unless they have
been given supervision or instruction concerning use of the
appliances by a person responsible for their safety.
Children should be supervised to ensure that they do not play with
the shaver and the Power Pod.
Caution
Do not use the shaver, the Power Pod or the adapter if it is damaged.
Charge and store the shaver at a temperature between 5°C and
35°C.
Always put the protection cap on the shaver to protect the shaving
heads when you are travelling.
Never use scouring pads, abrasive cleaning agents or aggressive liquids
such as petrol or acetone to clean the appliance.
Only use the adapter supplied.
If the adapter is damaged, always have it replaced with one of the
original type in order to avoid a hazard.
-
-
-
-
-
-
-
-
-
-
-
ENGLISH

Never immerse the Power Pod in water, nor rinse it under the
tap (Fig. 2).
Compliance with standards
The shaver complies with the internationally approved IEC safety
regulations and can be safely cleaned under the tap (Fig. 3).
These Philips appliances comply with all standards regarding
electromagnetic elds (EMF). If handled properly and according to the
instructions in this user manual, the appliances are safe to use based
on scientic evidence available today.
General
The adapter transforms 100-240 volts to a safe low voltage of less
than 24 volts.
Noise level: Lc = 64 dB [A]
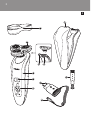
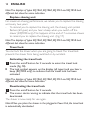
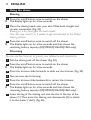
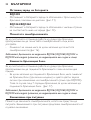
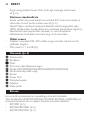
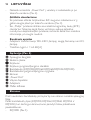
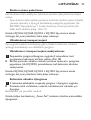
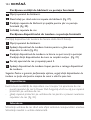
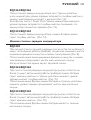
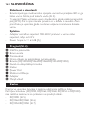
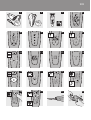
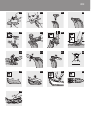
Overview (Fig. 4)
A Protection cap
B Shaving unit
C Trimmer
D Trimmer on/off slide
E Shaver (RQ1090/RQ1062/RQ1060/RQ1052/RQ1050)
F Shaver on/off button
G Display
H Power Pod
I Cleaning brush
J Adapter
K Small plug
Before you use the shaver for the rst time, remove the protective foil
from the display.
The ve shaver types (RQ1090, RQ1062, RQ1060, RQ1052 and
RQ1050) have different displays, which are shown in the gures below.
RQ1090 (Fig. 5)
RQ1062/RQ1060 (Fig. 6)
RQ1052/RQ1050 (Fig. 7)
-
-
-
-
-
-
-
-
ENGLISH 7

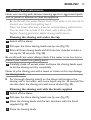
Charging
Charging takes approx. 1 hour.
When you place the shaver in the Power Pod, the
display automatically switches off after approx. 5 hours.
RQ1090
When the shaver is charging, the minutes indication and the plug
symbol ash (Fig. 8).
The shaving minutes increase until the shaver is fully charged.
RQ1062/RQ1060
When the shaver is charging, the plug symbol ashes. (Fig. 9)
First the arrowheads of the bottom charge level ash, then the
arrowheads of the second level ash, and so on until the shaver is
fully charged.
RQ1052/RQ1050
When the shaver is charging, the battery symbol ashes
blue. (Fig. 10)
RQ1090
When the battery is fully charged, the minutes indication is visible on
the display and the plug symbol disappears from the display. (Fig. 11)
RQ1062/RQ1060
When the battery is fully charged, all arrowheads and all charge level
lights light up blue continuously and the plug symbol disappears from
the display (Fig. 12).
When you remove the shaver from the Power Pod, the arrowheads
of the top charge level light up blue to indicate that the battery is
full (Fig. 13).
RQ1052/RQ1050
When the battery is fully charged, the battery symbol lights up blue c
ontinuously. (Fig. 14)
-
-
-
-
-
-
-
-
-
-
-
ENGLISH8

RQ1090
When the battery is almost empty (when there are only 5 or fewer
shaving minutes left), the minutes indication and the plug symbol start
to ash (Fig. 8).
When you switch off the shaver, the shaving minutes and the plug
symbol continue to ash for a few more seconds. You hear a beep
when there are no minutes left.
RQ1062/RQ1060
When the battery is almost empty (when there are only 5 or fewer
shaving minutes left), the battery symbol ashes red and the
arrowheads of the bottom charge level ash blue. (Fig. 15)
When you switch off the shaver, the battery symbol and the
arrowheads of the bottom charge level continue to ash for a few
seconds.
RQ1052/RQ1050
When the battery is almost empty (when there are only 5 or fewer
shaving minutes left), the battery symbol lights up red. (Fig. 10)
When you switch off the shaver, the battery symbol starts to ash for
a few seconds.
RQ1090
The remaining battery capacity is indicated by the number of shaving
minutes shown on the display. (Fig. 11)
RQ1062/RQ1060
The remaining battery capacity is indicated by the ashing
arrowheads of a particular charge level (Fig. 13)
Clean shaver
For optimal shaving performance, we advise you to clean the shaver after
every use.
The tap symbol ashes to remind you to clean the shaver (Fig. 16).
-
-
-
-
-
-
-
-
-
ENGLISH 9

Note: The displays of types RQ1062, RQ1060, RQ1052 and RQ1050 look
different but show the same indication.
Replace shaving unit
For maximum shaving performance, we advise you to replace the shaving
unit every two years.
To remind you to replace the shaving unit, the shaving unit symbol
ashes (all types) and you hear a beep when you switch off the
shaver (RQ1090 only). This happens at the end of 7 successive shaves
to remind you to replace the shaving unit. (Fig. 17)
Note: The displays of types RQ1062, RQ1060, RQ1052 and RQ1050 look
different but show the same indication.
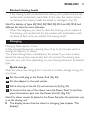
You can lock the shaver when you are going to travel. The travel lock
prevents the shaver from being switched on by accident.
1 Press the on/off button for 3 seconds to enter the travel lock
mode (Fig. 18).
The lock symbol appears on the display (all types) and you hear a
beep (RQ1090 only) to indicate that the travel lock has been
activated.
Note: The displays of types RQ1062, RQ1060, RQ1052 and RQ1050 look
different but show the same indication.
1 Press the on/off button for 3 seconds.
The motor starts running to indicate that the travel lock has been
deactivated.
The shaver is now ready for use again.
Note: When you place the shaver in the plugged-in Power Pod, the travel lock
is automatically deactivated.
-
,
,
ENGLISH10

If the shaving heads are blocked, the shaving unit symbol and the tap
symbol with exclamation mark ash. In this case, the motor cannot
run because the shaving heads are soiled or damaged. (Fig. 19)
Note: The displays of types RQ1062, RQ1060, RQ1052 and RQ1050 look
different but show the same indication.
When this happens, you have to clean the shaving unit or replace it.
The shaving unit symbol and the tap symbol with exclamation mark
continue to ash until you unblock the shaving heads.
Charging
Charging takes approx. 1 hour.
A fully charged shaver has a shaving time of up to 65 minutes, which is
enough for approx. 21 shaves.
The actual shaving time is calculated by the shaver. If you have a heavy
beard, the shaving time may be less than 65 minutes. The shaving time
may also vary over time, depending on your shaving behaviour and beard
type.
After the shaver has charged for 5 minutes, it contains enough energy for
one shave.
1 Put the small plug in the Power Pod (Fig. 20).
2 Put the adapter in the wall socket.
3 Pull at the top of the lid (1) and remove it (2) (Fig. 21).
4 First insert the top of the shaver into the Power Pod (1) and then
press the bottom part into the Power Pod (2) (Fig. 22).
Note: The shaver cannot be placed in the Power Pod when the protection cap
is on the shaving unit.
The display shows that the shaver is charging (see chapter ‘The
display’).
-
-
-
,
ENGLISH 11

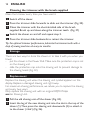
Shaving
1 Press the on/off button once to switch on the shaver.
The display lights up for a few seconds.
2 Move the shaving heads over your skin. Make both straight and
circular movements (Fig. 23).
Shaving on a dry face gives the best results.
Your skin may need 2 or 3 weeks to get accustomed to the Philips
shaving system.
3 Press the on/off button once to switch off the shaver.
The display lights up for a few seconds and then shows the
remaining battery capacity (RQ1090/RQ1062/RQ1060 only).
You can use the trimmer to groom your sideburns and moustache.
1 Pull the shaving unit off the shaver (Fig. 24).
2 Press the on/off button once to switch on the shaver.
The display lights up for a few seconds.
3 Press the trimmer slide forwards to slide out the trimmer (Fig. 25).
4 You can now start trimming.
5 Press the trimmer slide backwards to retract the trimmer.
6 Press the on/off button once to switch off the shaver.
The display lights up for a few seconds and then shows the
remaining battery capacity (RQ1090/RQ1062/RQ1060 only).
7 Insert the lug of the shaving unit into the slot in the top of the
shaver (1). Then press the shaving unit downwards (2) to attach
it to the shaver (‘click’) (Fig. 26).
,
-
-
,
,
,
ENGLISH12

Cleaning and maintenance
Never use scouring pads, abrasive cleaning agents or aggressive liquids
such as petrol or acetone to clean the appliance.
Be careful with hot water. Always check if the water is not too hot, to
prevent your hands from getting burnt.
Clean the shaver after every shave for optimal shaving performance.
You can clean the outside of the shaver with a damp cloth.
Regular cleaning guarantees better shaving performance.
Cleaning the shaving unit under the tap
1 Switch off the shaver.
2 Pull open the three shaving heads one by one (Fig. 27).
3 Rinse all three shaving heads and all three hair chambers under a
hot tap for 30 seconds. (Fig. 28)
Be careful with hot water. Always check if the water is not too hot, to
prevent your hands from getting burnt.
4 Carefully shake off excess water and leave the shaving heads open
to let the shaving unit dry completely.
Never dry the shaving unit with a towel or tissue, as this may damage
the shaving heads.
For thorough cleaning, switch on the shaver and immerse the
shaving unit in hot water with some liquid soap for 30 seconds. You
can also clean the shaving unit with some alcohol (Fig. 29).
Cleaning the shaving unit with the brush supplied
1 Switch off the shaver.
2 Pull open the three shaving heads one by one (Fig. 27).
3 Clean the shaving heads and the hair chambers with the brush
supplied (Fig. 30).
4 Close the shaving heads.
-
-
-
-
,
ENGLISH 13

Cleaning the trimmer with the brush supplied
Clean the trimmer every time you have used it.
1 Switch off the shaver.
2 Press the trimmer slide forwards to slide out the trimmer (Fig. 25).
3 Clean the trimmer with the short-bristled side of the brush
supplied. Brush up and down along the trimmer teeth. (Fig. 31)
4 Switch the shaver on and off and repeat step 3.
5 Press the trimmer slide backwards to retract the trimmer.
Tip: For optimal trimmer performance, lubricate the trimmer teeth with a
drop of sewing machine oil every six months.
Storage
There are two ways to store the shaver or to take it with you when you
travel:
put the shaver in the Power Pod. Make sure the protection cap is not
on the shaving unit.
slide the protection cap onto the shaving unit to prevent damage to
the shaving heads (Fig. 32).
Replacement
Replace the shaving unit when the shaving unit symbol appears on the
display. Replace a damaged shaving unit right away.
For maximum shaving performance, we advise you to replace the shaving
unit every two years.
Only replace the shaving unit with an original RQ10 Philips
arcitec Shaving Unit.
1 Pull the old shaving unit off the shaver (Fig. 24).
2 Insert the lug of the new shaving unit into the slot in the top of the
shaver (1). Then press the shaving unit downwards (2) to attach it
to the shaver (‘click’) (Fig. 26).
-
-
ENGLISH14

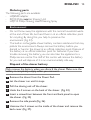
Ordering parts
The following parts are available:
HQ8500 adapter
RQ10 Philips arcitec Shaving Unit
HQ110 Philips Shaving Head Cleaning Spray
Environment
Do not throw away the appliances with the normal household waste
at the end of their life, but hand them in at an ofcial collection point
for recycling. By doing this, you help to preserve the
environment (Fig. 33).
The built-in rechargeable shaver battery contains substances that may
pollute the environment. Always remove the battery before you
discard or hand in the shaver at an ofcial collection point. Dispose of
the battery at an ofcial collection point for batteries. If you have
trouble removing the battery, you can also take the appliance to a
Philips service centre. The staff of this centre will remove the battery
for you and will dispose of it in an environmentally safe way.
Only remove the battery when you discard the shaver. Make sure the
battery is completely empty when you remove it.
1 Remove the shaver from the Power Pod.
2 Let the shaver run until it stops.
3 Pull the shaving unit off the shaver.
4 Undo the 2 screws on the back of the shaver. (Fig. 34)
5 Insert a screwdriver between the front and back panel to open
the shaver. (Fig. 35)
6 Remove the side panels (Fig. 36).
7 Unscrew the 3 screws on the inside of the shaver and remove the
back cover (Fig. 37).
-
-
-
-
-
ENGLISH 15

8 Pull the wires out of the motor unit and remove the
battery (Fig. 38).
Be careful, the battery strips are sharp.
Do not put the shaver back into the plugged-in Power Pod after you
have removed the battery.
Guarantee & service
If you need service or information or if you have a problem, please visit
the Philips website at www.philips.com or contact the Philips Consumer
Care Centre in your country (you nd its phone number in the
worldwide guarantee leaet). If there is no Consumer Care Centre in
your country, go to your local Philips dealer.
Guarantee restrictions
The shaving heads (cutters and guards) are not covered by the terms of
the international guarantee because they are subject to wear.
1 Why doesn’t the shaver shave as well as it used to?
The shaver may not be properly clean. Switch on the shaver and
immerse the shaving unit in hot water with some liquid soap (see
chapter ‘Cleaning and maintenance’).
The shaving heads may be damaged or worn. Replace the shaving
unit (see chapter ‘Replacement’).
2 Why doesn’t the shaver work when I press the on/off button?
The battery may be empty. Recharge the battery (see chapter
‘Charging’).
The travel lock may be activated. Press the on/off button for 3
seconds to deactivate the travel lock.
The shaving unit is soiled or damaged to such an extent that the
motor cannot run. In this case, the shaving unit symbol, the tap
symbol and the exclamation mark ash. When this happens, you have
-
-
-
-
-
ENGLISH16

to clean the shaving unit or replace it. Immerse the shaving unit in hot
water with some liquid soap.
The temperature of the shaver may be too high. In this case, the
shaver does not work and the exclamation mark on the display
ashes. As soon as the temperature of the shaver has dropped
sufciently, you can switch on the shaver again.
3 Why is the shaver not fully charged after I charged it in the Power
Pod?
You may not have placed the shaver in the Power Pod properly. Make
sure you press the shaver until it locks into place.
-
-
ENGLISH 17

18
Благодарим ви, че купихте тази самобръсначка Philips. Прочетете
внимателно това ръководство за експлоатация, тъй като то съдържа
информация за прекрасните функции на тази самобръсначка, а също
и някои съвети, които ще направят бръсненето ви по-бързо и по-
приятно.
Преди да използвате самобръсначката и зарядната поставка,
прочетете внимателно това ръководство за експлоатация. Запазете
го за справка в бъдеще.
Внимавайте щепселът да не се мокри (фиг. 1).
Внимавайте с горещата вода. Винаги проверявайте дали водата
не е прекалено гореща, за да предпазите ръцете си от изгаряне.
В адаптера има трансформатор. Не отрязвайте адаптера, за да го
замените с друг щепсел, тъй като това носи опасност.
Самобръсначката и зарядната поставка не са предназначени за
ползване от хора (включително деца) с намалени физически
възприятия или умствени недъзи или без опит и познания, ако са
оставени без наблюдение и не са инструктирани от страна на
отговарящо за тяхната безопасност лице относно начина на
използване на уредите.
Наглеждайте децата, за да не си играят със самобръсначката и
зарядната поставка.
Не използвайте самобръсначката, зарядната поставка или
адаптера, ако са повредени.
Зареждайте и съхранявайте самобръсначката при температури
от 5°C до 35°C.
За да предпазите бръснещите глави при пътуване, винаги
поставяйте предпазната капачка на самобръсначката.
-
-
-
-
-
-
-
-

Никога не използвайте за почистване на уреда фибро гъби,
абразивни почистващи препарати или агресивни течности, като
бензин или ацетон.
Използвайте само включения в комплекта адаптер.
С оглед на предотвратяване на злополука, винаги заменяйте
повредения адаптер само с оригинален такъв.
Никога не потапяйте зарядната поставка във вода и не я
плакнете с течаща вода (фиг. 2).
Уредът съответства на международно одобрената нормативна
уредба за безопасност IEC и може да се почиства безопасно под
чешмата (фиг. 3).
Тези уреди Philips са в съответствие с всички стандарти по
отношение на електромагнитните излъчвания (EMF). Ако се
употребяват правилно и съобразно напътствията в
Ръководството, уредите са безопасни за използване според
наличните досега научни факти.
Адаптерът преобразува 100-240 волта в безопасно ниско
напрежение под 24 волта.
Ниво на шум: Lc = 64 dB [A]
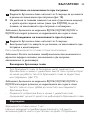
A Предпазна капачка
B Бръснещ блок
C Машинка за подстригване
D Плъзгач вкл./изкл. на приставката за подстригване
E Самобръсначка (RQ1090/RQ1062/RQ1060/RQ1052/RQ1050)
F Бутон за вкл./изкл. на самобръсначката
G Дисплей
H Зарядна поставка
I Четка за почистване
J Адаптер
K Малък жак
-
-
-
-
-
-
-
-
19

Преди да използвате самобръсначката за пръв път, махнете
предпазното фолио от дисплея.
Петте модела самобръсначки (RQ1090, RQ1062, RQ1060, RQ1052 и
RQ1050) имат различни дисплеи, които са показани на фигурите по-
долу.
RQ1090 (фиг. 5)
RQ1062/RQ1060 (фиг. 6)
RQ1052/RQ1050 (фиг. 7)
Зареждането отнема около 1 час.
Когато поставите самобръсначката в зарядната поставка,
дисплеят се изключва автоматично след около 5 часа.
RQ1090
Когато самобръсначката се зарежда, мигат индикаторите на
минутите и символът на щепсел (фиг. 8).
Минутите за бръснене нарастват, докато самобръсначката се
зареди напълно.
RQ1062/RQ1060
Когато самобръсначката се зарежда, мига символът на
щепсел. (фиг. 9)
Първи започват да мигат стрелките на най-долното ниво на
заряда, след тях започват да мигат стрелките на второто ниво и
т.н., докато самобръсначката се зареди напълно.
RQ1052/RQ1050
Когато самобръсначката се зарежда, символът на батерия мига в
синьо. (фиг. 10)
RQ1090
Когато батерията е напълно заредена, на дисплея се виждат
индикаторите на минутите, а символът на щепсел
изчезва. (фиг. 11)
-
-
-
-
-
-
-
-
-
-
-
20

RQ1062/RQ1060
Когато батерията е напълно заредена, всички стрелки и всички
нива на заряда светят непрекъснато в синьо, а символът на
щепсел изчезва от дисплея (фиг. 12).
Когато махнете самобръсначката от зарядната поставка,
стрелките на най-горното ниво на заряда светват в синьо, за да
укажат, че батерията е заредена докрай (фиг. 13).
RQ1052/RQ1050
Когато батерията е напълно заредена, символът на батерия
свети непрекъснато в синьо. (фиг. 14)
RQ1090
Когато батерията е почти изтощена (когато остават само 5 или
по-малко минути за бръснене), индикаторите на минутите и
символът на щепсел започват да мигат (фиг. 8).
Когато изключите самобръсначката, минутите за бръснене и
символът на щепсел ще продължат да мигат още няколко
секунди. Ще чуете кратък звуков сигнал, когато няма повече
останали минути.
RQ1062/RQ1060
Когато батерията е почти изтощена (когато остават само 5 или
по-малко минути за бръснене), символът на батерия започва да
мига в червено, а стрелките на най-долното ниво на заряда мигат
в синьо. (фиг. 15)
Когато изключите самобръсначката, символът на батерия и
стрелките на най-долното ниво на заряда продължават да мигат
още няколко секунди.
RQ1052/RQ1050
Когато батерията е почти изтощена (когато остават само 5 или
по-малко минути за бръснене), символът на батерия светва
червено. (фиг. 10)
Когато изключите самобръсначката, символът на батерия започва
да мига за няколко секунди.
-
-
-
-
-
-
-
-
-
21

RQ1090
Оставащият в батерията заряд се обозначава с броя минути за
бръснене, показани на дисплея. (фиг. 11)
RQ1062/RQ1060
Оставащият в батерията заряд се обозначава с мигащи стрелки
на съответното ниво на заряда (фиг. 13).
За да постигнете оптимална работа на уреда при бръснене,
препоръчваме ви да почиствате самобръсначката след всяка
употреба.
Символът на чешма мига, за да ви напомня да почистите
самобръсначката (фиг. 16).
Забележка: Дисплеите на моделите RQ1062, RQ1060, RQ1052 и
RQ1050 изглеждат различно, но индикацията им е една и съща.
За да постигнете оптимална работа на уреда при бръснене,
препоръчваме ви да подменяте бръснещите глави на всеки две
години.
За да ви напомня да подмените бръснещия блок, мига символът
на бръснещ блок (при всички модели) и чувате кратък звуков
сигнал при изключване на самобръсначката (само при RQ1090).
Това се случва след 7 поредни бръснения, за да ви напомня да
подмените бръснещия блок. (фиг. 17)
Забележка: Дисплеите на моделите RQ1062, RQ1060, RQ1052 и
RQ1050 изглеждат различно, но индикацията им е една и съща.
Можете да заключите самобръсначката, когато ви предстои да
пътувате. Заключването при пътуване предпазва самобръсначката от
случайно включване.
-
-
-
-
22
Pagina se încarcă...
Pagina se încarcă...
Pagina se încarcă...
Pagina se încarcă...
Pagina se încarcă...
Pagina se încarcă...
Pagina se încarcă...
Pagina se încarcă...
Pagina se încarcă...
Pagina se încarcă...
Pagina se încarcă...
Pagina se încarcă...
Pagina se încarcă...
Pagina se încarcă...
Pagina se încarcă...
Pagina se încarcă...
Pagina se încarcă...
Pagina se încarcă...
Pagina se încarcă...
Pagina se încarcă...
Pagina se încarcă...
Pagina se încarcă...
Pagina se încarcă...
Pagina se încarcă...
Pagina se încarcă...
Pagina se încarcă...
Pagina se încarcă...
Pagina se încarcă...
Pagina se încarcă...
Pagina se încarcă...
Pagina se încarcă...
Pagina se încarcă...
Pagina se încarcă...
Pagina se încarcă...
Pagina se încarcă...
Pagina se încarcă...
Pagina se încarcă...
Pagina se încarcă...
Pagina se încarcă...
Pagina se încarcă...
Pagina se încarcă...
Pagina se încarcă...
Pagina se încarcă...
Pagina se încarcă...
Pagina se încarcă...
Pagina se încarcă...
Pagina se încarcă...
Pagina se încarcă...
Pagina se încarcă...
Pagina se încarcă...
Pagina se încarcă...
Pagina se încarcă...
Pagina se încarcă...
Pagina se încarcă...
Pagina se încarcă...
Pagina se încarcă...
Pagina se încarcă...
Pagina se încarcă...
Pagina se încarcă...
Pagina se încarcă...
Pagina se încarcă...
Pagina se încarcă...
Pagina se încarcă...
Pagina se încarcă...
Pagina se încarcă...
Pagina se încarcă...
Pagina se încarcă...
Pagina se încarcă...
Pagina se încarcă...
Pagina se încarcă...
Pagina se încarcă...
Pagina se încarcă...
Pagina se încarcă...
Pagina se încarcă...
Pagina se încarcă...
Pagina se încarcă...
Pagina se încarcă...
Pagina se încarcă...
Pagina se încarcă...
Pagina se încarcă...
Pagina se încarcă...
Pagina se încarcă...
Pagina se încarcă...
Pagina se încarcă...
Pagina se încarcă...
Pagina se încarcă...
Pagina se încarcă...
Pagina se încarcă...
Pagina se încarcă...
Pagina se încarcă...
Pagina se încarcă...
Pagina se încarcă...
Pagina se încarcă...
Pagina se încarcă...
Pagina se încarcă...
Pagina se încarcă...
Pagina se încarcă...
Pagina se încarcă...
Pagina se încarcă...
Pagina se încarcă...
Pagina se încarcă...
Pagina se încarcă...
Pagina se încarcă...
Pagina se încarcă...
Pagina se încarcă...
Pagina se încarcă...
Pagina se încarcă...
Pagina se încarcă...
Pagina se încarcă...
Pagina se încarcă...
Pagina se încarcă...
Pagina se încarcă...
Pagina se încarcă...
Pagina se încarcă...
Pagina se încarcă...
Pagina se încarcă...
Pagina se încarcă...
Pagina se încarcă...
Pagina se încarcă...
Pagina se încarcă...
Pagina se încarcă...
Pagina se încarcă...
Pagina se încarcă...
Pagina se încarcă...
Pagina se încarcă...
Pagina se încarcă...
Pagina se încarcă...
Pagina se încarcă...
Pagina se încarcă...
Pagina se încarcă...
Pagina se încarcă...
Pagina se încarcă...
Pagina se încarcă...
Pagina se încarcă...
Pagina se încarcă...
Pagina se încarcă...
Pagina se încarcă...
Pagina se încarcă...
Pagina se încarcă...
Pagina se încarcă...
Pagina se încarcă...
Pagina se încarcă...
Pagina se încarcă...
Pagina se încarcă...
Pagina se încarcă...
Pagina se încarcă...
Pagina se încarcă...
Pagina se încarcă...
Pagina se încarcă...
Pagina se încarcă...
Pagina se încarcă...
Pagina se încarcă...
Pagina se încarcă...
Pagina se încarcă...
Pagina se încarcă...
Pagina se încarcă...
Pagina se încarcă...
Pagina se încarcă...
Pagina se încarcă...
Pagina se încarcă...
Pagina se încarcă...
Pagina se încarcă...
Pagina se încarcă...
Pagina se încarcă...
Pagina se încarcă...
Pagina se încarcă...
Pagina se încarcă...
Pagina se încarcă...
Pagina se încarcă...
Pagina se încarcă...
Pagina se încarcă...
Pagina se încarcă...
Pagina se încarcă...
Pagina se încarcă...
Pagina se încarcă...
Pagina se încarcă...
Pagina se încarcă...
Pagina se încarcă...
Pagina se încarcă...
Pagina se încarcă...
Pagina se încarcă...
Pagina se încarcă...
-
 1
1
-
 2
2
-
 3
3
-
 4
4
-
 5
5
-
 6
6
-
 7
7
-
 8
8
-
 9
9
-
 10
10
-
 11
11
-
 12
12
-
 13
13
-
 14
14
-
 15
15
-
 16
16
-
 17
17
-
 18
18
-
 19
19
-
 20
20
-
 21
21
-
 22
22
-
 23
23
-
 24
24
-
 25
25
-
 26
26
-
 27
27
-
 28
28
-
 29
29
-
 30
30
-
 31
31
-
 32
32
-
 33
33
-
 34
34
-
 35
35
-
 36
36
-
 37
37
-
 38
38
-
 39
39
-
 40
40
-
 41
41
-
 42
42
-
 43
43
-
 44
44
-
 45
45
-
 46
46
-
 47
47
-
 48
48
-
 49
49
-
 50
50
-
 51
51
-
 52
52
-
 53
53
-
 54
54
-
 55
55
-
 56
56
-
 57
57
-
 58
58
-
 59
59
-
 60
60
-
 61
61
-
 62
62
-
 63
63
-
 64
64
-
 65
65
-
 66
66
-
 67
67
-
 68
68
-
 69
69
-
 70
70
-
 71
71
-
 72
72
-
 73
73
-
 74
74
-
 75
75
-
 76
76
-
 77
77
-
 78
78
-
 79
79
-
 80
80
-
 81
81
-
 82
82
-
 83
83
-
 84
84
-
 85
85
-
 86
86
-
 87
87
-
 88
88
-
 89
89
-
 90
90
-
 91
91
-
 92
92
-
 93
93
-
 94
94
-
 95
95
-
 96
96
-
 97
97
-
 98
98
-
 99
99
-
 100
100
-
 101
101
-
 102
102
-
 103
103
-
 104
104
-
 105
105
-
 106
106
-
 107
107
-
 108
108
-
 109
109
-
 110
110
-
 111
111
-
 112
112
-
 113
113
-
 114
114
-
 115
115
-
 116
116
-
 117
117
-
 118
118
-
 119
119
-
 120
120
-
 121
121
-
 122
122
-
 123
123
-
 124
124
-
 125
125
-
 126
126
-
 127
127
-
 128
128
-
 129
129
-
 130
130
-
 131
131
-
 132
132
-
 133
133
-
 134
134
-
 135
135
-
 136
136
-
 137
137
-
 138
138
-
 139
139
-
 140
140
-
 141
141
-
 142
142
-
 143
143
-
 144
144
-
 145
145
-
 146
146
-
 147
147
-
 148
148
-
 149
149
-
 150
150
-
 151
151
-
 152
152
-
 153
153
-
 154
154
-
 155
155
-
 156
156
-
 157
157
-
 158
158
-
 159
159
-
 160
160
-
 161
161
-
 162
162
-
 163
163
-
 164
164
-
 165
165
-
 166
166
-
 167
167
-
 168
168
-
 169
169
-
 170
170
-
 171
171
-
 172
172
-
 173
173
-
 174
174
-
 175
175
-
 176
176
-
 177
177
-
 178
178
-
 179
179
-
 180
180
-
 181
181
-
 182
182
-
 183
183
-
 184
184
-
 185
185
-
 186
186
-
 187
187
-
 188
188
-
 189
189
-
 190
190
-
 191
191
-
 192
192
-
 193
193
-
 194
194
-
 195
195
-
 196
196
-
 197
197
-
 198
198
-
 199
199
-
 200
200
-
 201
201
-
 202
202


Philips RQ1050/15 Manual de utilizare
- Categorie
- Aparate de bărbierit
- Tip
- Manual de utilizare
în alte limbi
- slovenčina: Philips RQ1050/15 Používateľská príručka
- eesti: Philips RQ1050/15 Kasutusjuhend
Lucrări înrudite
-
Philips RQ1050/18 Manual de utilizare
-
Philips RQ1075/21 Manual de utilizare
-
Philips RQ1090/20 Manual de utilizare
-
Philips HQ8261/21 Manual de utilizare
-
Philips HP6350 Manual de utilizare
-
Philips HQ 8290/21 Manual de utilizare
-
-
Philips RQ1260/16 Manual de utilizare
-