
LED-DECKENLEUCHTE MIT
BEWEGUNGSSENSOR/
LED CEILING LIGHT WITH MOTION
SENSOR / PLAFONNIER À LED AVEC
DÉTECTEUR DE MOUVEMENTS
LED-DECKENLEUCHTE MIT
BEWEGUNGSSENSOR
Bedienungs- und Sicherheitshinweise
LED CEILING LIGHT WITH MOTION SENSOR
Operation and Safety Notes
PLAFONNIER À LED AVEC DÉTECTEUR DE
MOUVEMENTS
Instructions d‘utilisation et consignes de sécurité
LED-PLAFONDLAMP MET BEWEGINGSSENSOR
Gebruik en veiligheidsrichtlijnen
LAMPA SUFITOWA LED Z CZUJNIKIEM RUCHU
Uwagi dotyczące obsługi i bezpieczeństwa
STROPNÍ LED SVÍTIDLO S POHYBOVÝM
SENZOREM
Návod k použití a bezpečnostní pokyny
LED STROPNÉ SVIETIDLO S POHYBOVÝM
SENZOROM
Pokyny pre obsluhu a bezpečnostné pokyny
LÁMPARA LED DE TECHO CON SENSOR DE
MOVIMIENTO
Instrucciones de utilización y de seguridad
LED-LOFTSLAMPE MED BEVÆGELSESSENSOR
Betjenings- og sikkerhedsbemærkninger
LAMPADA A LED DA SOFFITTO CON
RILEVATORE DI MOVIMENTO
Indicazioni per l’uso e per la sicurezza
LED MENNYEZETI LÁMPA
MOZGÁSÉRZÉKELŐVEL
Kezelési és biztonsági utalások
STROPNA LED-SVETILKA S
SENZORJEM GIBANJA
Navodila za upravljanje in varnostna opozorila
LED STROPNA SVJETILJKA SA SENZOROM
POKRETA
Napomene u vezi upotrebe i sigurnostit
PLAFONIERĂ CU LED ȘI SENZOR DE MIȘCARE
Note privind siguranţa şi operarea
LED ЛАМПИОН СЪС СЕНЗОР ЗА ДВИЖЕНИЕ
Бележки за работа и безопасност
ΦΩΤΙΣΤΙΚΌ ΌΡΌΦΉΣ LED ΜΕ ΑΙΣΘΉΤΉΡΑ
ΚΙΝΉΣΉΣ
Ενημερώσεις για τη λειτουργία και την ασφάλεια
IAN 498845_2204

DE / AT / CH Bedienungs- und Sicherheitshinweise Seite 7
GB / IE Operation and Safety Notes Page 15
FR / BE Instructions d‘utilisation et consignes de sécurité Page 23
NL / BE Gebruik en veiligheidsrichtlijnen Pagina 32
PL Uwagi dotyczące obsługi i bezpieczeństwa Strona 40
CZ Návod k použití a bezpečnostní pokyny Strana 48
SK Pokyny pre obsluhu a bezpečnostné pokyny Strana 56
ES Instrucciones de utilización y de seguridad Página 64
DK Betjenings- og sikkerhedsbemærkninger Side 72
IT Indicazioni per l’uso e per la sicurezza Pagina 80
HU Kezelési és biztonsági utalások Oldal 88
SI Navodila za upravljanje in varnostna opozorila Stran 96
HR Napomene u vezi upotrebe i sigurnosti Stranica 104
RO Note privind siguranţa şi operarear Pagina 112
BG Бележки за работа и безопасност Страница 120
GR / CY Ενημερώσεις για τη λειτουργία και την ασφάλεια Σελίδα 129

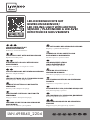
3x 3x
ø 4 x 35mm
ø 6mm
ø 6 x 95mm

7mm
6mm


7 DE/AT/CH
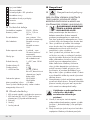
Legende der verwendeten Piktogramme .................................. Seite 8
Einleitung ................................................................ Seite 8
Bestimmungsgemäße Verwendung ........................................... Seite 8
Teilebeschreibung ........................................................ Seite 8
Technische Daten ......................................................... Seite 9
Lieferumfang............................................................. Seite 9
Sicherheit ................................................................ Seite 9
Sicherheitshinweise ....................................................... Seite 9
Vor der Inbetriebnahme .................................................. Seite 10
Montage ................................................................. Seite 10
Leuchtmittel wechseln .................................................... Seite 11
Bewegungssensor einstellen .............................................. Seite 11
Wartung und Reinigung................................................... Seite 13
Entsorgung ............................................................... Seite 13
Vereinfachte
EU-Konformitätserklärung ................................................ Seite 13
Garantie und Service ..................................................... Seite 14
Garantie................................................................ Seite 14
Abwicklung im Garantiefall ................................................. Seite 14
Service ................................................................. Seite 14

8 DE/AT/CH
LED-DECKENLEUCHTE MIT
BEWEGUNGSSENSOR
Einleitung
Wir beglückwünschen Sie zum Kauf Ihres
neuen Produkts. Sie haben sich damit für
ein hochwertiges Produkt entschieden. Die
Bedienungsanleitung ist Teil dieses Produkts.
Sie enthält wichtige Hinweise für Sicherheit,
Gebrauch und Entsorgung. Machen Sie sich vor
der Benutzung des Produkts mit allen Bedien-
und Sicherheitshinweisen vertraut. Benutzen Sie
das Produkt nur wie beschrieben und für die
angegebenen Einsatzbereiche. Händigen Sie alle
Unterlagen bei Weitergabe des Produkts an Dritte
mit aus.
Bestimmungsgemäße
Verwendung
Dieses Produkt eignet sich für den Einsatz im
Innen- und Außenbereich. Das Produkt kann an
allen Oberflächen mit normaler Entflammbarkeit
montiert werden. Der Elektriker, der das Produkt
installiert, muss sicherstellen, dass das Produkt
nicht an einer feuchten oder leitfähigen Fläche
installiert wird! Das Produkt ist nicht für den
gewerblichen Einsatz bestimmt.
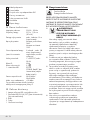
Teilebeschreibung
1 Glasabdeckung
2 Dichtung der Glasabdeckung
3 Basis
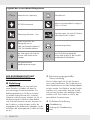
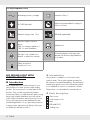
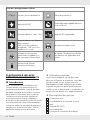
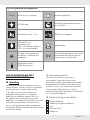
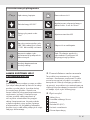
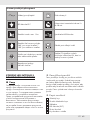
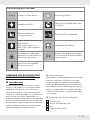
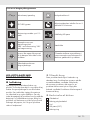
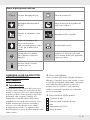
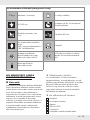
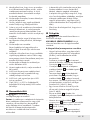
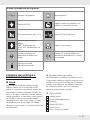
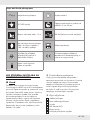
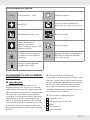
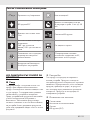
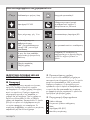
Legende der verwendeten Piktogramme
Wechselstrom/-spannung Schutzklasse II
E27-LED-Leuchtmittel Light-on-time adjustable from approx.
5 sec. to 30 min.
Erkennungsreichweite: 12 m Das Licht eignet sich nicht für Dimmer
oder elektronische Schalter.
Erkennungswinkel: des
Bewegungssensors:
360° bei Deckeninstallation /
150° bei Wandinstallation
Spritzwassergeschützt
Das Licht eignet sich nicht für
Dimmer oder elektronische
Schalter.
Das CE-Zeichen bestätigt die
Konformität mit den für das Produkt
zutreffenden EU-Richtlinien.
Sicherheitshinweise
Handlungsanweisungen

9 DE/AT/CH
4 LED-Leuchtmittel (E27)
5 Dichtungsring
6 Leuchtenanschlussabdeckung
7 Anschlussleitung
8 Kabelverankerung
9 Bewegungssensor mit DIP-Schalterswitch
10 Montageöffnungen
11 Montageschrauben und -dübel
12 Dichtung
13 Leuchtenanschluss
14 Sleeve tube
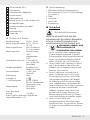
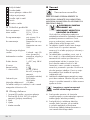
Technische Daten
Betriebsspannung: 230 V∼, 50 Hz
Abmessungen der Lampe: 27,5 x 11,5 cm
(Ø x H)
Erkennungsreichweite: max. Durchmesser
12 m (einstellbar)
Erkennungswinkel: Deckenmontage:
360°
Wandmontage:
150°
Einschaltdauer des Lichts: 5 Sekunden bis
max. 30 Minuten
(einstellbar)
Umgebungshelligkeit: Einstellbar; kann
deaktiviert werden
Leuchtmittelhalter: 1 x E27, max.
20-W-LED
IP-Bewertung: IP44
Schutzklasse: II /
1 x LED-Leuchtmittel: 9,5 W, 2700 K,
Ra ≥ 97, nicht dimmbar
(warmweißes Licht)
Frequenzband: 5855 MHz–
5865 MHz
Max. übertragene
Leistung: <10 dBm
Dieses Produkt enthält eine Lichtquelle der
Energieeffizienzklasse „G“.
Lieferumfang
1 LED-Deckenleuchte mit Bewegungssensor
1 LED-Leuchtmittel (9,5 W, E27) (nicht dimmbar)
[vorinstalliert]
3 Dübel
3 Schrauben
1 Sleeve tube
1 Kurzanleitung
Sicherheit
Sicherheitshinweise
LESEN SIE DIE ANLEITUNG VOR DER
VERWENDUNG DES ARTIKELS! BEWAHREN
SIE ALLE SICHERHEITSHINWEISE UND
ANWEISUNGEN FÜR DIE ZUKUNFT AUF!
WARNUNG! LEBENS- UND
UNFALLGEFAHR FÜR
KLEINKINDER UND KINDER!
Lassen Sie Kinder niemals unbeaufsichtigt
mit dem Verpackungsmaterial. Es besteht
Erstickungsgefahr durch Verpackungsmaterial.
Kinder unterschätzen häufig die Gefahren.
Halten Sie Kinder stets vom Produkt fern.
Dieses Produkt ist kein Spielzeug, es gehört
nicht in Kinderhände. Kinder können die
Gefahren, die im Umgang mit dem Produkt
entstehen, nicht erkennen.
Dieses Produkt kann von Kindern ab 8
Jahren und darüber sowie von Personen
mit verringerten physischen, sensorischen
oder mentalen Fähigkeiten oder Mangel
an Erfahrung und Wissen benutzt werden,
wenn sie beaufsichtigt oder bezüglich des
sicheren Gebrauchs des Produkts unterwiesen
wurden und die daraus resultierenden
Gefahren verstehen. Kinder dürfen nicht
mit dem Produkt spielen. Reinigung und
Benutzerwartung dürfen nicht von Kindern
ohne Beaufsichtigung durchgeführt werden.
Lassen Sie das Produkt oder
Verpackungsmaterial nicht achtlos liegen.
Plastikfolien/-tüten, Styroporteile etc. könnten
für Kinder zu einem gefährlichen Spielzeug
werden.

10 DE/AT/CH
Vermeiden Sie Lebensgefahr
durch elektrischen Schlag!
Vergewissern Sie sich vor der Benutzung,
dass die vorhandene Netzspannung mit der
benötigten Betriebsspannung des Produkts
übereinstimmt (siehe „Technische Daten“).
Überprüfen Sie vor jedem Netzanschluss
das Produkt und das Netzanschlusskabel auf
etwaige Beschädigungen. Ein beschädigtes
Produkt bedeutet Lebensgefahr durch
elektrischen Schlag.
Verwenden Sie das Produkt nicht, wenn Sie
irgendwelche Beschädigungen feststellen.
Wenden Sie sich bei Beschädigungen,
Reparaturen oder anderen Problemen am
Produkt an eine Elektrofachkraft.
Öffnen Sie niemals eines der elektrischen
Betriebsmittel oder stecken irgendwelche
Gegenstände in dieselben. Derartige Eingriffe
bedeuten Lebensgefahr durch elektrischen
Schlag.
Bitte wenden Sie sich bei der Installation im
Zweifelsfall an einen qualifiziertem Elektriker.
Verwenden Sie dieses Produkt nicht für
Dimmer oder elektronische Schalter. Es eignet
sich nicht für diese Zwecke.
Prüfen Sie vor der Installation, ob das
mitgelieferte Montagematerial für die Wand
oder Decke, an der Sie das Produkt montieren
möchten, geeignet ist.
Verwenden Sie die Lampe nicht, wenn sie
sichtbare Schäden aufweist.
Falls die Glasabdeckung gebrochen ist, muss
das gesamte Produkt ersetzt werden.
Das LED-Leuchtmittel ist nicht dimmbar.
Die Lampe ist nicht mit einem Dimmer
kompatibel.
Das LED-Leuchtmittel darf nur durch dasselbe
Modell oder denselben Typ von LED-
Leuchtmittel ersetzt werden.
Verwenden Sie nur LED-Leuchtmittel für
230 V∼ Wechselspannung mit einer E27
Basis und einer maximalen Ausgabe von
20 W.
Vor der Inbetriebnahme
Hinweis: Entfernen Sie sämtliches
Verpackungsmaterial vom Produkt.
Wichtig: Der elektrische Anschluss muss von
einem qualifizierten Elektriker oder einer Person,
die Elektroinstallationen vornehmen kann,
durchgeführt werden. Der Elektriker muss mit den
Eigenschaften der Lampe und den Richtlinien
elektrischer Anschlüsse vertraut sein.
Machen Sie sich vor der Installation mit allen
Anweisungen und Abbildungen in diesem
Heft sowie mit der Lampe selbst vertraut.
Stellen Sie vor Installation sicher, dass keine
Spannung am Kabel anliegt, an das Sie
die Lampe anschließen möchten. Entfernen
Sie dazu die Sicherung oder schalten Sie
den Trennschalter im Sicherungskasten aus
(Position 0).
Prüfen Sie mit einem Spannungsprüfer, dass
keine Spannung anliegt.
Montage
Hinweis: Für die Montage benötigen Sie eine
Bohrmaschine.
VORSICHT! VERLETZUNGSGEFAHR!
Ziehen Sie die Bedienungsanleitung Ihrer
Bohrmaschine hinzu.
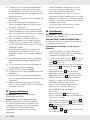
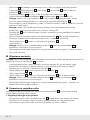
Montage der Leuchte an einer Wand/
Decke
Entfernen Sie die Sicherung oder schalten Sie
den Trennschalter im Sicherungskasten aus
(Position 0), bevor Sie mit der Installation des
Produktes beginnen.
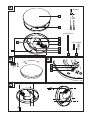
Drehen Sie die Glasabdeckung
1
entgegen
dem Uhrzeigersinn gegen die Basis
3
(siehe Abb. B).
Schrauben Sie die
Leuchtenanschlussabdeckung
6
und die
Kabelverankerung
8
ab und entfernen Sie
sie (siehe Abb. C).
Halten Sie die Basis
3
in der gewünschten
Installationsposition. Beachten Sie, dass das
Anschlusskabel
7
durch die Basis geführt
wird. Markieren Sie mit einem Stift die Punkte,
an der die Löcher an der gewünschten
Installationsposition gebohrt werden müssen
(siehe Abb. D).

11 DE/AT/CH
Bohren Sie mit einem 6-mm-Steinbohrer
etwa 40 mm tiefe Löcher an den markierten
Positionen (siehe Abb. E).
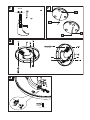
Stecken Sie in jedes Bohrloch einen Dübel
11
. Versenken Sie sie bei Bedarf mit einem
Hammer.
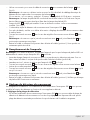
Führen Sie das Anschlusskabel
7
durch das
Hüllrohr
14
und in die Dichtung
12
durch die
vorgesehene Öffnung in der Basis
(siehe Abb. F).
Befestigen Sie die Basis
3
mit den
Montageschrauben
11
an der Wand/Decke.
Ziehen Sie das Anschlusskabel
7
mit einem
Schraubendreher am Leuchtenanschluss
13
fest (siehe Abb. H).
Hinweis: Achten Sie darauf, die einzelnen
Drähte der elektrischen Verdrahtung
des Gebäudes in die entsprechende
Kennzeichnung im Leuchtenanschluss
13
zu
stecken und zu befestigen.
Spannungsführender Draht: schwarz oder
braun, L-Symbol. Neutraler Draht: blau,
N-Symbol. Erdungsdraht: grün-gelb.
Hinweis: Die LED-Deckenleuchte hat ein
zweifach isoliertes Design. Der Erdungsdraht
muss nicht angeschlossen werden und
kann innerhalb der LED-Deckenleuchte lose
bleiben.
Das LED-Leuchtmittel
4
ist bereits
vorinstalliert. Schrauben Sie es fest und prüfen
Sie erneut, ob es richtig installiert ist
(siehe Abb. I).
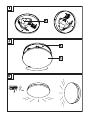
Passen Sie den Bewegungssensor mit DIP-
Schalter
9
bei Bedarf an. Einzelheiten
finden Sie im Abschnitt „Bewegungssensor
einstellen“.
Drehen Sie die Glasabdeckung
1
im
Uhrzeigersinn gegen die Basis
3
(siehe Abb. A).
Hinweis: Achten Sie darauf, dass die
Dichtung der Glasabdeckung
2
und der
Dichtungsring
5
richtig positioniert und an
Ort und Stelle sind.
Bringen Sie die Sicherung wieder an
oder schalten Sie den Trennschalter im
Sicherungskasten wieder ein (Position I). Das
Produkt ist nun einsatzbereit.
Leuchtmittel wechseln
Hinweis: Wechseln Sie das Leuchtmittel zur
Vermeidung von Verbrennungen nur, wenn die
LED-Deckenlampe vom Stromnetz getrennt und
das LED-Leuchtmittel
4
abgekühlt ist.
Stellen Sie vor dem Auswechseln des
Leuchtmittels sicher, dass keine Spannung
mehr anliegt. Entfernen Sie dazu die
Sicherung oder schalten Sie den Trennschalter
im Sicherungskasten aus (Position 0).
Warten Sie ca. 3 Minuten, bis sich das LED-
Leuchtmittel
4
abgekühlt hat.
Drehen Sie die Glasabdeckung
1
entgegen
dem Uhrzeigersinn gegen die Basis
3
.
Setzen Sie das neue LED-Leuchtmittel ein
4
.
Drehen Sie die Glasabdeckung
1
im
Uhrzeigersinn gegen die Basis
3
, bis sie fest
ist .
Hinweis: Achten Sie darauf, dass die
Dichtung der Glasabdeckung
2
und der
Dichtungsring
5
richtig positioniert und an
Ort und Stelle sind.
Bringen Sie die Sicherung wieder an
oder schalten Sie den Trennschalter im
Sicherungskasten wieder ein (Position I).
Prüfen Sie, ob die LED-Deckenlampe richtig
funktioniert.
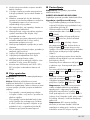
Bewegungssensor einstellen
Durch Änderung der Kombination am
Bewegungssensor mit DIP-Schalter
9
können
Sie die Sensorfunktion für Ihre spezifische
Anwendung einstellen.
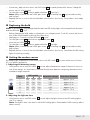
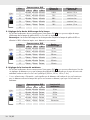
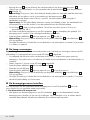
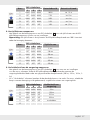
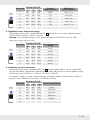
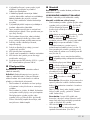
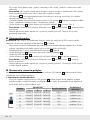
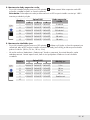
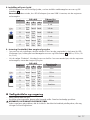
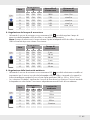
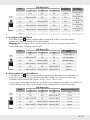
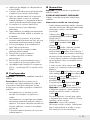
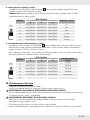
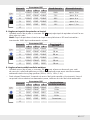
1. Erkennungsbereich anpassen
Über den Bewegungssensor mit DIP-Schalter
9
können Sie den Erkennungsbereich
des Bewegungssensor auf eine von fünf
Einstellungen anpassen. Sie müssen beachten,
dass der maximale Erkennungsbereich mit
zunehmender Installationshöhe abnehmen
kann.

12 DE/AT/CH
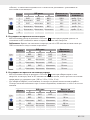
Fall DIP-Wechsel Erkennungsbereich Erkennungsentfernung
1 2 3
IEin Ein Ein 100 % ca. 12 m
II Aus Ein Ein 75 % ca. 9 m
III Ein Aus Ein 50 % ca. 6 m
IV Aus Aus Ein 25 % ca. 3 m
VAus Aus Aus 10 % ca. 1,2 m
VI - - - - -
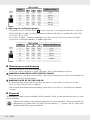
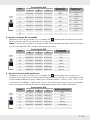
2. Einschaltdauer des Lichts anpassen
Über den Bewegungssensor mit DIP-Schalter
9
können Sie die Einschaltdauer des Lichts der LED-
Deckenlampe auf eine von sechs Einstellungen anpassen.
Hinweis: Die Einschaltdauer des Lichts ist die Dauer, wie lange die LED-Deckenlampe bei 100 %
Intensität nach Erkennung einer Bewegung leuchtet.
Fall DIP-Wechsel Einschaltdauer des
Lichts
4 5 6
IEin Ein Ein 5 s
II Aus Ein Ein 30 s
III Ein Aus Ein 90 s
IV Aus Aus Ein 3 min
VEin Ein Aus 20 min
VI Aus Aus Aus 30 min
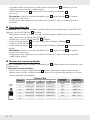
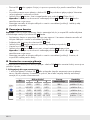
3. Umgebungshelligkeit anpassen
Durch Verwendung des Bewegungssensors mit DIP-Schalter
9
können Sie eine von sechs
Einstellungen für den Sensor wählen, damit die LED-Deckenlampe nur aufleuchtet, wenn die
Umgebungshelligkeit unter den angegebenen Schwellenwert fällt. (50 Lux, 25 Lux, 10 Lux, 2 Lux)
Wenn Sie „Deaktivieren“ wählen, bedeutet dies, dass der Tageslichtsensor nicht funktioniert. Der
Sensor schaltet das Licht ein, sobald unabhängig von der Umgebungsbeleuchtung eine Bewegung
erkannt wird.
Fall DIP-Wechsel Umgebungshelligkeit
7 8 9
IEin Ein Ein 2 Lux
II Ein Ein Aus 10 Lux
III Aus Ein Aus 25 Lux
IV Ein Aus Aus 50 Lux
VAus Aus Aus Deaktivieren
VI - - - -

13 DE/AT/CH
Wartung und Reinigung
Lassen Sie das Produkt vollständig abkühlen.
Benutzen Sie keine Lösungsmittel, Benzin o. ä.
Das Produkt würde hierbei Schaden nehmen.
WARNUNG! LEBENSGEFAHR DURCH
ELEKTRISCHEN SCHLAG! Schalten
Sie vor allen Arbeiten an dem Produkt den
Stromkreis am Sicherungskasten aus oder
entfernen Sie die Schraubsicherungen im
Sicherungskasten.
WARNUNG!
STROMSCHLAGGEFAHR!
Aus Gründen der elektrischen Sicherheit darf
das Produkt niemals mit Wasser oder anderen
Flüssigkeiten gereinigt oder gar in Wasser
getaucht werden.
Verwenden Sie zur Reinigung nur ein
trockenes, fusselfreies Tuch.
Setzen Sie nach der Reinigung die
Sicherung wieder ein oder schalten Sie den
Leitungsschutzschalter wieder an.
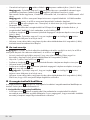
Entsorgung
Die Verpackung besteht aus umweltfreundlichen
Materialien, die Sie über die örtlichen
Recyclingstellen entsorgen können.
Beachten Sie die Kennzeichnung der
Verpackungsmaterialien bei der
Abfalltrennung, diese sind
gekennzeichnet mit Abkürzungen (a)
und Nummern (b) mit folgender
Bedeutung: 1–7: Kunststoffe/20–22:
Papier und Pappe/80–98:
Verbundstoffe.
Produkt:
+
Das Produkt inkl. Zubehör und die
Verpackungsmaterialien sind recyclebar
und unterliegen einer erweiterten
Herstellerverantwortung.
Entsorgen Sie diese getrennt, den abgebildeten
Info-tri (Sortierinformation) folgend, für eine
bessere Abfallbehandlung.
Das Triman-Logo gilt nur für Frankreich.
Möglichkeiten zur Entsorgung des
ausgedienten Produkts erfahren Sie bei
Ihrer Gemeinde oder Stadtverwaltung.
Gerät entsorgen
Das Symbol der durchgestrichenen
Mülltonne bedeutet, dass dieses
Gerät am Ende der Nutzungszeit nicht über den
Haushaltsmüll entsorgt werden darf. Das Gerät ist
bei eingerichteten Sammelstellen, Wertstoffhöfen
oder Entsorgungsbetrieben abzugeben.
Zudem sind Vertreiber von Elektro- und
Elektronikgeräten sowie Vertreiber von
Lebensmitteln zur Rücknahme verpflichtet. LIDL
bietet Ihnen Rückgabemöglichkeiten direkt in den
Filialen und Märkten an. Rückgabe und
Entsorgung sind für Sie kostenfrei.
Beim Kauf eines Neugerätes haben Sie das
Recht, ein entsprechendes Altgerät unentgeltlich
zurückzugeben.
Zusätzlich haben Sie die Möglichkeit, unabhängig
vom Kauf eines Neugerätes, unentgeltlich (bis
zu drei) Altgeräte abzugeben, die in keiner
Abmessung größer als 25 cm sind.
Bitte löschen Sie vor der Rückgabe alle
personenbezogenen Daten.
Bitte entnehmen Sie vor der Rückgabe
Batterien oder Akkumulatoren, die nicht vom
Altgerät umschlossen sind, sowie Lampen, die
zerstörungsfrei entnommen werden können und
führen diese einer separaten Sammlung zu.
Vereinfachte
EU-Konformitätserklärung
Die OWIM GmbH & Co. KG, Stiftsbergstraße
1, 74167 Neckarsulm, DEUTSCHLAND, erklärt
hiermit, dass das Produkt LED-DECKENLEUCHTE
MIT BEWEGUNGSSENSOR HG09811, den
Richtlinien 2014/53/EU, 2011/65/EU und
2009/125/EG entspricht.
Den vollständigen Text der
EU-Konformitätserklärung finden Sie unter
folgender Internetadresse: www.owim.com

14 DE/AT/CH
Garantie und Service
Garantie
Das Produkt wurde nach strengen
Qualitätsrichtlinien hergestellt und vor der
Auslieferung sorgfältig geprüft. Im Falle von
Material- oder Herstellungsfehlern haben
Sie gegenüber dem Verkäufer des Produkts
gesetzliche Rechte. Ihre gesetzlichen Rechte
werden in keiner Weise durch unsere unten
aufgeführte Garantie eingeschränkt.
Die Garantie für dieses Produkt beträgt 3 Jahre
ab Kaufdatum. Die Garantiezeit beginnt mit dem
Kaufdatum. Bewahren Sie den Originalkaufbeleg
an einem sicheren Ort auf, da dieses Dokument
als Nachweis des Kaufs erforderlich ist.
Alle Schäden oder Mängel, die bereits zum
Zeitpunkt des Kaufs vorhanden sind, müssen
unverzüglich nach dem Auspacken des Produkts
gemeldet werden.
Sollte das Produkt innerhalb von 3 Jahren ab
Kaufdatum einen Material- oder Herstellungsfehler
aufweisen, werden wir es – nach unserer Wahl
– kostenlos für Sie reparieren oder ersetzen.
Die Garantiezeit verlängert sich durch einen
stattgegebenen Gewährleistungsanspruch nicht.
Dies gilt auch für ersetzte und reparierte Teile.
Diese Garantie erlischt, wenn das Produkt
beschädigt oder unsachgemäß verwendet oder
gewartet wurde.
Die Garantie deckt Material- und
Herstellungsfehler ab. Diese Garantie
erstreckt sich weder auf Produktteile, die
normalem Verschleiß unterliegen, und somit als
Verschleißteile gelten (z. B. Batterien, Akkus,
Schläuche, Farbpatronen), noch auf Schäden an
zerbrechlichen Teilen, z. B. Schalter oder Teile
aus Glas.
Abwicklung im Garantiefall
Um eine schnelle Bearbeitung Ihres Anspruchs
zu gewährleisten, beachten Sie die folgenden
Hinweise:
Halten Sie den Originalkaufbeleg und die
Artikelnummer (IAN 498845_2204) als
Nachweis für den Kauf bereit.
Sie finden die Artikelnummer auf dem
Typenschild, einer Gravur auf dem Produkt, der
Startseite der Bedienungsanleitung (unten links)
oder als Aufkleber auf der Rück- oder Unterseite
des Produkts.
Sollten Funktionsfehler oder sonstige Mängel
auftreten, wenden Sie sich zunächst telefonisch
oder per E-Mail an die unten aufgeführte
Serviceabteilung.
Sobald das Produkt als defekt erfasst wurde,
können Sie es kostenlos an die Ihnen mitgeteilte
Service-Anschrift zurücksenden. Stellen Sie sicher,
dass Sie den Originalkaufbeleg (Kassenbon)
sowie eine kurze, schriftliche Beschreibung
beilegen, in der die Einzelheiten des Defekts und
der Zeitpunkt des Auftretens dargelegt sind.
Service
Service Deutschland
Tel.: 0800 5435 111
E-Mail: [email protected]
Service Österreich
Tel.: 0800 292726
E-Mail: [email protected]
Service Schweiz
Tel.: 0800562153
E-Mail: [email protected]

15 GB/IE
List of pictograms used ................................................... Page 16
Introduction .............................................................. Page 16
Intended use............................................................. Page 16
Parts description.......................................................... Page 16
Technical data ........................................................... Page 17
Scope of delivery......................................................... Page 17
Safety.................................................................... Page 17
Safety instructions ........................................................ Page 17
Before use................................................................ Page 18
Installation ............................................................... Page 18
Replacing the bulb........................................................ Page 19
Setting the motion sensor ................................................. Page 19
Maintenance and cleaning . . . . . . . . . . . . . . . . . . . . . . . . . . . . . . . . . . . . . . . . . . . . . . . . Page 20
Disposal.................................................................. Page 20
Simplified EU declaration of conformity ................................... Page 21
Warranty and service..................................................... Page 21
Warranty ............................................................... Page 21
Warranty claim procedure.................................................. Page 21
Service ................................................................. Page 22

16 GB/IE
LED CEILING LIGHT WITH
MOTION SENSOR
Introduction
We congratulate you on the purchase of your
new product. You have chosen a high quality
product. The instructions for use are part of the
product. They contain important information
concerning safety, use and disposal. Before using
the product, please familiarise yourself with all
of the safety information and instructions for use.
Only use the product as described and for the
specified applications. If you pass the product on
to anyone else, please ensure that you also pass
on all the documentation with it.
Intended use
This product is suitable for use in indoor and
outdoor areas. The product can be mounted on
all surfaces of normal flammability. The electrician
installing the product must ensure that the product
is not installed on a moist or conductive surface!
The product is not intended for commercial use.
Parts description
1 Glass cover
2 Seal of glass cover
3 Base
4 LED bulb (E27)
5 Sealing ring
List of pictograms used
Alternating current / voltage Protection Class II
E27 LED light bulb Light-on-time adjustable from approx.
5 sec. to 30 min.
Detection range: max. 12 m LED-bulb replaceable
Detection angle of motion
sensor:
360° for ceiling installation /
150° for wall installation
Splash-proof
The light is not suitable for a
dimmer or electronic switches.
CE mark indicates conformity with
relevant EU directives applicable for
this product.
Safety instructions
Instruction for use

17 GB/IE
6 Luminaire connector cover
7 Connection cable
8 Cable anchorage
9 Motion sensor with DIP switch
10 Mounting holes
11 Mounting screws and dowels
12 Seal
13 Luminaire connector
14 Sleeve tube
Technical data
Operating voltage: 230 V∼, 50 Hz
Light dimensions: 27.5 x 11.5 cm
(Ø x H)
Detection range: max. diameter 12 m
(adjustable)
Detection angle: Ceiling mounting:
360°
Wall mounting:
150°
Light-on time: 5 seconds – max. 30
minutes (adjustable)
Ambient brightness: adjustable; can be
deactivated
Bulb holder: 1 x E27, max.
20 W LED
IP rating: IP44
Protection class: II /
1 x LED bulb: 9.5 W, 2700 K,
Ra≥97, non dimmable
(warm white light)
Frequency band: 5855 MHz–
5865 MHz
Max. Transmitted power: <10 dBm
This product contains a light source of energy
efficiency class G.
Scope of delivery
1 LED ceiling light with motion sensor
1 LED bulb (9.5 W, E27) (non-dimmable) [Pre-
installed]
3 Dowels
3 Screws
1 Sleeve tube
1 Short manual
Safety
Safety instructions
READ THESE INSTRUCTIONS BEFORE USING
THE PRODUCT! PLEASE KEEP ALL SAFETY
INSTRUCTIONS AND INSTRUCTIONS FOR
USE FOR FUTURE REFERENCE!
WARNING! DANGER TO
LIFE AND RISK OF ACCIDENT
FOR INFANTS AND
CHILDREN! Never leave children
unsupervised with the packaging material.
The packaging material represents a
danger of suffocation. Children frequently
underestimate the dangers. Please keep the
product out of the reach of children at all
times.
This product is not a toy. Keep away from
children. Children are not able to understand
the dangers that can arise when handling this
product.
This product may be used by children aged
8 years and up, as well as by persons
with reduced physical, sensory or mental
capacities, or lacking experience and/or
knowledge, so long as they are supervised
or instructed in the safe use of the product
and understand the associated risks. Do
not allow children to play with the product.
Cleaning and user maintenance should not
be performed by children without supervision.
Do not allow the product or the packaging
materials to lie around unattended. Plastic
film or bags, Styrofoam etc. can turn into
dangerous toys for children.
Avoid the danger of death from
electric shock!
Verify the existing mains voltage corresponds
to the required voltage of the product (see
“technical data”) before using it.
Always check the product and the mains
supply for damage before connecting it to
the mains. A damaged product represents the
danger of death from electric shock.

18 GB/IE
Do not use the product if you detect any
damage.
In the event of damage, repairs or other
problems with the product, please consult an
electrician.
Never open any of the components of the
electrical equipment or insert any objects into
the same components. This will pose a risk of
fatal injury from electric shock.
For installation, please contact qualified
electrician if you have any doubt.
Do not use this product for dimmers or
electronic switches. It is not suitable for these
purposes.
Before installation, check whether the
included mounting material is suitable for the
wall or ceiling on which you are aiming to
mount the product.
Do not use the light if it is visibly damaged in
any way.
If the glass cover is broken, the entire product
must be replaced.
The LED bulb is not dimmable.
The luminaires is not compatible with any
dimmer
The LED bulb can only be replaced by same
model or same type of LED bulb.
Only use 230 V∼ LED bulbs with a E27 base
and a maximum output of 20 W.
Before use
Note: Remove all packaging materials from the
product.
Important: The electrical connection must
be established by a qualified electrician or a
person instructed in electrical installation. They
must be aware of the properties of the light and
regulations on electrical connections.
Before installation, familiarise yourself with all
instructions and illustrations in this booklet and
with the light itself.
Before installation, make sure that there is
no voltage present in the cable to which you
plan to connect the light. To do this, remove
the fuse or turn off the circuit breaker in the
fuse box (0 position).
Use a voltage tester to check that no voltage
is present.
Installation
Note: You will need an electric drill for the
installation.
CAUTION! RISK OF INJURY! Please refer to
the operating instructions of your electric drill.
Mounting the light on a wall/ ceiling
Remove the fuse or turn off the circuit breaker
in the fuse box (0 position) before you start to
install the product.
Turn the glass cover
1
anti-clockwise against
the base
3
. (See Fig B)
Unscrew and remove luminaire connector
cover
6
and cable anchorage
8
.
(See Fig C)
Hold the base
3
in the desired installation
position. Note the connection cable
7
will
be fed through the base. Use a pencil to mark
where to drill holes for the desired installation
position. (See Fig. D)
Using a 6 mm masonry drill, drill an approx.
40 mm deep hole into the marked positions.
(See Fig. E)
Insert the dowel
11
into each drill hole. If
necessary, use a hammer to help you insert
the plugs.
Guide the connection cable
7
through the
sleeve tube
14
and into the seal
12
through
the opening provided in the base
3
(See Fig. F).
Fix the base
3
to the ceiling/ wall using the
mounting screws
11
.
Use a screwdriver to fasten the connection
cable
7
to luminaire connector
13
(See Fig. H).
Note: Make sure that you insert and fasten
the individual wires from the building’s
electrical wiring to the correct marking in the
luminaire connector
13
.
Live wire: black or brown, L symbol. Neutral
wire: blue, N symbol. Earth wire: green-
yellow.
Note: The LED ceiling light has a double-
insulated design. The earth wire does not
need to be connected and can be left loose
within the LED ceiling light.
LED bulb
4
is pre-installed already. Screw
and check again if it is proper installed.
(See Fig. I)

19 GB/IE
If necessary, adjust motion sensor with DIP switch
9
. For detail, please refer section "Setting the
motion sensor" in full manual.
Turn the glass cover
1
clockwise against the base
3
(See Fig. J).
Note: Make sure that the seal of the glass cover
2
and sealing ring
5
is positioned correctly
and in place.
Replace the fuse or turn on the circuit breaker in the fuse box (I position). The product is now ready
for use.
Replacing the bulb
Note: To avoid burns, only change the bulb when the LED ceiling light is disconnected from the mains
and the LED bulb
4
is cool.
Before changing the bulb, make sure that there is no voltage present. To do this, remove the fuse or
turn off the circuit breaker in the fuse box (0 position).
Wait approx. 3 minutes until the LED bulb
4
is cool.
Turn the glass cover
1
anti-clockwise against the base
3
.
Insert the new LED bulb
4
.
Turn the glass cover
1
clockwise against the base
3
until tight.
Note: Make sure that the seal of the glass cover
2
and sealing ring
5
is positioned correctly
and in place.
Replace the fuse or turn on the circuit breaker in the fuse box (I position). Check that the LED ceiling
light is functioning correctly.
Setting the motion sensor
By changing the combination on the motion sensor with DIP switch
9
you can set the sensor function
for your specific application.
1. Adjusting the detection range
Using motion sensor with DIP switch
9
you can adjust the detection range of the motion sensor to
one of five settings. It is important to note that the maximum detection range may decrease as the
installation height increases.
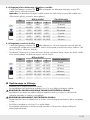
Case DIP switch Detection range Detection distance
1 2 3
I ON ON ON 100% approx. 12 m
II OFF ON ON 75% approx. 9 m
III ON OFF ON 50% approx. 6 m
IV OFF OFF ON 25% approx. 3 m
V OFF OFF OFF 10% approx. 1.2 m
VI - - - - -
2. Adjusting the light-on time
Using motion sensor with DIP switch
9
you can adjust the light-on time of the LED ceiling light to
one of six settings
Note: The light-on time is the time for which LED ceiling light is illuminated at 100% intensity after it
detects motion.

20 GB/IE
Case DIP switch Light-on time
4 5 6
I ON ON ON 5 sec
II OFF ON ON 30 sec
III ON OFF ON 90 sec
IV OFF OFF ON 3 min
V ON ON OFF 20 min
VI OFF OFF OFF 30 min
3. Adjusting the ambient brightness
Using motion sensor with DIP switch
9
you can select one of six settings for the sensor so that the
LED ceiling light only lights up when the ambient brightness falls below a specified threshold. (50
lux, 25 lux, 10 lux, 2 lux)
If you select “Disable”, it means the daylight sensor does not work. The sensor will turn on light
once motion is detected regardless of ambient light level.
Case DIP switch Ambient brightness
7 8 9
I ON ON ON 2 lux
II ON ON OFF 10 lux
III OFF ON OFF 25 lux
IV ON OFF OFF 50 lux
V OFF OFF OFF Disable
VI - - - -
Maintenance and cleaning
Allow the product to cool down completely.
Do not use solvents, benzene or similar substances. They could damage the product.
WARNING! DANGER TO LIFE BY ELECTRIC SHOCK!
Before carrying out any tasks on the product, switch off the electrical circuit at the circuit breaker box
or remove the fuse from the fuse box.
WARNING! RISK OF ELECTRIC SHOCK!
For electrical safety, never clean the product with water or other liquids, or immerse it in water.
Only use a dry, lint-free cloth for cleaning.
After finished the maintenance and cleaning, screw the fuse on and / or switch the circuit breaker
on again.
Disposal
The packaging is made of environmentally friendly materials, which you be disposed through your local
recycling facilities.
Observe the marking of the packaging materials for waste separation, which are marked with
abbreviations (a) and numbers (b) with following meaning: 1–7: plastics/20–22: paper and
fibreboard/80–98:composite materials.

21 GB/IE
Product:
+
The product incl. accessories and packaging
materials are recyclable and are subject to
extended producer responsibility.
Dispose them separately, following the illustrated
Info-tri (sorting information), for better waste
treatment.
The Triman logo is valid in France only.
Contact your local refuse disposal
authority for more details of how to
dispose of your wornout product.
To help protect the environment, please
dispose of the product properly when it
has reached the end of its useful life
and not in the household waste.
Information on collection points and
their opening hours can be obtained
from your local authority.
Simplified EU declaration of
conformity
Hereby, OWIM GmbH & Co. KG,
Stiftsbergstraße 1, 74167 Neckarsulm,
GERMANY, declares that the product LED
CEILING LIGHT WITH MOTION SENSOR
HG09811, is in compliance with Directives
2014/53/EU, 2011/65/EU and
2009/125/EC.
The full text of the EU declaration of conformity is
available at the following internet address:
www.owim.com
Warranty and service
Warranty
The product has been manufactured to strict
quality guidelines and meticulously examined
before delivery. In the event of material or
manufacturing defects you have legal rights
against the retailer of this product. Your legal
rights are not limited in any way by our warranty
detailed below.
The warranty for this product is 3 years from the
date of purchase. The warranty period begins
on the date of purchase. Keep the original sales
receipt in a safe location as this document is
required as proof of purchase.
Any damage or defects already present at the
time of purchase must be reported without delay
after unpacking the product.
Should the product show any fault in materials
or manufacture within 3 years from the date of
purchase, we will repair or replace it – at our
choice – free of charge to you. The warranty
period is not extended as a result of a claim
being granted. This also applies to replaced and
repaired parts.
This warranty becomes void if the product
has been damaged, or used or maintained
improperly.
The warranty covers material or manufacturing
defects. This warranty does not cover product
parts subject to normal wear and tear, thus
considered consumables (e.g. batteries,
rechargeable batteries, tubes, cartridges), nor
damage to fragile parts, e.g. switches or glass
parts.
Warranty claim procedure
To ensure quick processing of your claim, observe
the following instructions:
Make sure to have the original sales receipt and
the item number (IAN 498845_2204) available
as proof of purchase.
You can find the item number on the rating plate,
an engraving on the product, on the front page of
the instruction manual (bottom left), or as a sticker
on the rear or bottom of the product.
If functional or other defects occur, contact
the service department listed below either by
telephone or by e-mail.
Once the product has been recorded as defective
you can return it free of charge to the service
address that will be provided to you. Ensure to
enclose the proof of purchase (sales receipt) and
Pagina se încarcă...
Pagina se încarcă...
Pagina se încarcă...
Pagina se încarcă...
Pagina se încarcă...
Pagina se încarcă...
Pagina se încarcă...
Pagina se încarcă...
Pagina se încarcă...
Pagina se încarcă...
Pagina se încarcă...
Pagina se încarcă...
Pagina se încarcă...
Pagina se încarcă...
Pagina se încarcă...
Pagina se încarcă...
Pagina se încarcă...
Pagina se încarcă...
Pagina se încarcă...
Pagina se încarcă...
Pagina se încarcă...
Pagina se încarcă...
Pagina se încarcă...
Pagina se încarcă...
Pagina se încarcă...
Pagina se încarcă...
Pagina se încarcă...
Pagina se încarcă...
Pagina se încarcă...
Pagina se încarcă...
Pagina se încarcă...
Pagina se încarcă...
Pagina se încarcă...
Pagina se încarcă...
Pagina se încarcă...
Pagina se încarcă...
Pagina se încarcă...
Pagina se încarcă...
Pagina se încarcă...
Pagina se încarcă...
Pagina se încarcă...
Pagina se încarcă...
Pagina se încarcă...
Pagina se încarcă...
Pagina se încarcă...
Pagina se încarcă...
Pagina se încarcă...
Pagina se încarcă...
Pagina se încarcă...
Pagina se încarcă...
Pagina se încarcă...
Pagina se încarcă...
Pagina se încarcă...
Pagina se încarcă...
Pagina se încarcă...
Pagina se încarcă...
Pagina se încarcă...
Pagina se încarcă...
Pagina se încarcă...
Pagina se încarcă...
Pagina se încarcă...
Pagina se încarcă...
Pagina se încarcă...
Pagina se încarcă...
Pagina se încarcă...
Pagina se încarcă...
Pagina se încarcă...
Pagina se încarcă...
Pagina se încarcă...
Pagina se încarcă...
Pagina se încarcă...
Pagina se încarcă...
Pagina se încarcă...
Pagina se încarcă...
Pagina se încarcă...
Pagina se încarcă...
Pagina se încarcă...
Pagina se încarcă...
Pagina se încarcă...
Pagina se încarcă...
Pagina se încarcă...
Pagina se încarcă...
Pagina se încarcă...
Pagina se încarcă...
Pagina se încarcă...
Pagina se încarcă...
Pagina se încarcă...
Pagina se încarcă...
Pagina se încarcă...
Pagina se încarcă...
Pagina se încarcă...
Pagina se încarcă...
Pagina se încarcă...
Pagina se încarcă...
Pagina se încarcă...
Pagina se încarcă...
Pagina se încarcă...
Pagina se încarcă...
Pagina se încarcă...
Pagina se încarcă...
Pagina se încarcă...
Pagina se încarcă...
Pagina se încarcă...
Pagina se încarcă...
Pagina se încarcă...
Pagina se încarcă...
Pagina se încarcă...
Pagina se încarcă...
Pagina se încarcă...
Pagina se încarcă...
Pagina se încarcă...
Pagina se încarcă...
Pagina se încarcă...
Pagina se încarcă...
Pagina se încarcă...
Pagina se încarcă...
-
 1
1
-
 2
2
-
 3
3
-
 4
4
-
 5
5
-
 6
6
-
 7
7
-
 8
8
-
 9
9
-
 10
10
-
 11
11
-
 12
12
-
 13
13
-
 14
14
-
 15
15
-
 16
16
-
 17
17
-
 18
18
-
 19
19
-
 20
20
-
 21
21
-
 22
22
-
 23
23
-
 24
24
-
 25
25
-
 26
26
-
 27
27
-
 28
28
-
 29
29
-
 30
30
-
 31
31
-
 32
32
-
 33
33
-
 34
34
-
 35
35
-
 36
36
-
 37
37
-
 38
38
-
 39
39
-
 40
40
-
 41
41
-
 42
42
-
 43
43
-
 44
44
-
 45
45
-
 46
46
-
 47
47
-
 48
48
-
 49
49
-
 50
50
-
 51
51
-
 52
52
-
 53
53
-
 54
54
-
 55
55
-
 56
56
-
 57
57
-
 58
58
-
 59
59
-
 60
60
-
 61
61
-
 62
62
-
 63
63
-
 64
64
-
 65
65
-
 66
66
-
 67
67
-
 68
68
-
 69
69
-
 70
70
-
 71
71
-
 72
72
-
 73
73
-
 74
74
-
 75
75
-
 76
76
-
 77
77
-
 78
78
-
 79
79
-
 80
80
-
 81
81
-
 82
82
-
 83
83
-
 84
84
-
 85
85
-
 86
86
-
 87
87
-
 88
88
-
 89
89
-
 90
90
-
 91
91
-
 92
92
-
 93
93
-
 94
94
-
 95
95
-
 96
96
-
 97
97
-
 98
98
-
 99
99
-
 100
100
-
 101
101
-
 102
102
-
 103
103
-
 104
104
-
 105
105
-
 106
106
-
 107
107
-
 108
108
-
 109
109
-
 110
110
-
 111
111
-
 112
112
-
 113
113
-
 114
114
-
 115
115
-
 116
116
-
 117
117
-
 118
118
-
 119
119
-
 120
120
-
 121
121
-
 122
122
-
 123
123
-
 124
124
-
 125
125
-
 126
126
-
 127
127
-
 128
128
-
 129
129
-
 130
130
-
 131
131
-
 132
132
-
 133
133
-
 134
134
-
 135
135
-
 136
136


în alte limbi
- français: LIVARNO 498845 Le manuel du propriétaire
- slovenčina: LIVARNO 498845 Návod na obsluhu
- italiano: LIVARNO 498845 Manuale del proprietario