
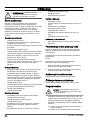
GBV 322, GBV 322VX
EN Operator's manual 6-15
BG Ръководство за експлоатация 16-27
BS Korisnički priručnik 28-37
CS Návod k použití 38-47
DA Brugsanvisning 48-58
DE Bedienungsanweisung 59-70
EL Οδηγίες χρήσης 71-82
ES Manual de usuario 83-93
ET Kasutusjuhend 94-103
FI Käyttöohje 104-113
FR Manuel d'utilisation 114-125
HR Priručnik za korištenje 126-135
HU Használati utasítás 136-146
IT Manuale dell'operatore 147-157
LT Operatoriaus vadovas 158-168
LV Lietošanas pamācība 169-179
NL Gebruiksaanwijzing 180-190
NO Bruksanvisning 191-200
PL Instrukcja obsługi 201-211
PT Manual do utilizador 212-222
RO Instrucţiuni de utilizare 223-233
RU Руководство по эксплуатации 234-245
SK Návod na obsluhu 246-256
SL Navodila za uporabo 257-266
SR Priručnik za rukovaoca 267-277
SV Bruksanvisning 278-287
TR Kullanım kılavuzu 288-297
UK Посібник користувача 298-309
GHB28VPR

15
19
1
2 3 4 5 6 7
8 9 10 11 12 13
14 15 16 17 18 19
20

21
A
B
22
23 24
A
B
25 26
27 28

29 30
31
A
B
32
33
C
34
35 36

37 38
39 40
41

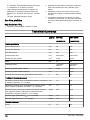
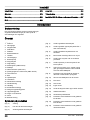
Contents
Introduction..................................................................... 6
Safety..............................................................................7
Assembly...................................................................... 10
Operation...................................................................... 10
Maintenance................................................................. 12
Technical data.............................................................. 13
Contents of the EC Declaration of Conformity..............15
Introduction
Operator's manual
The initial language of this operator's manual is English.
Operator's manuals in other languages are translations
from English.
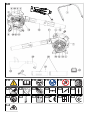
Overview
(Fig. 1)
1. Shoulder strap
2. Throttle trigger
3. STOP switch
4. Cruise control
5. Fan housing
6. Fuel tank cap
7. Air filter
8. Choke control
9. Primer bulb
10. Inlet cover
11. Vacuum handle
12. Mulch blade (GBV 322VX)
13. Fan impeller
14. Lower blower tube (GBV 322 )
15. VX
™
blower tube (GBV 322VX)
16. Upper blower tube
17. Bolt
18. Muffler
19. Ground wire
20. Starter rope handle
21. Starter device
22. Handle
23. Combination tool
24. Collection bag tube
25. Collection bag
26. Vaccum tube in two sections
27. Screw
28. Operator's manual
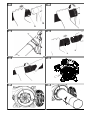
Symbols on the product
(Fig. 2)
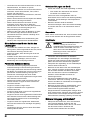
Warning
(Fig. 3) Read this manual
(Fig. 4) Use approved head protection
(Fig. 4) Use approved hearing protection
(Fig. 4) Use approved eye protection (ANSI Z87.1 or
equivalent)
(Fig. 5) Use approved protective boots and gloves
(Fig. 5) Wear long sleeves and trousers
(Fig. 6) Do not wear jewelry when you operate the
product.
(Fig. 7) Use the tip of the screwdriver to release the
latch.
(Fig. 8) Do not vacuum stones, gravel, metal,
broken glass, rubber mulch, or other
material which can cause damage to the
impeller.
(Fig. 9) The product can cause objects to eject,
which can cause damage to the eyes
(Fig. 10) Do not go near the impeller as it turns
(Fig. 11) Full choke
(Fig. 12) Half choke
(Fig. 13) No choke
(Fig. 14) Make sure that long hair is put up above
your shoulders.
(Fig. 15) Safe distance
(Fig. 16) Guaranteed sound power level
(Fig. 17) This product agrees with the applicable EC
directives.
(Fig. 18) The product agrees with the applicable EAC
directives.
(Fig. 19) The product agrees with the applicable
Ukraine directives.
6 728 - 008 - 10.06.2019

(Fig. 20) The product agrees with the Australian
electromagnetic compatibility (EMC)
regulations.
Note: Other symbols/decals on the product refer to
certification requirements for other commercial areas.
EU V
WARNING: Tampering with the engine voids
the EU type-approval of this product.
Product liability
As referred to in the product liability laws, we are not
liable for damages that our product causes if:
• the product is incorrectly repaired.
• the product is repaired with parts that are not from
the manufacturer or not approved by the
manufacturer.
• the product has an accessory that is not from the
manufacturer or not approved by the manufacturer.
• the product is not repaired at an approved service
center or by an approved authority.
Safety
Safety definitions
The definitions below give the level of severity for each
signal word.
WARNING: Injury to persons.
CAUTION: Damage to the product.
Note: This information makes the product easier to use.
General safety instructions
• Use the product correctly. Injury or death is a
possible result of incorrect use. Only use the product
for the tasks found in this manual. Do not use the
product for other tasks.
• Obey the instructions in this manual. Obey the safety
symbols and the safety instructions. If the operator
does not obey the instructions and the symbols,
injury, damage or death is a possible result.
• Do not discard this manual. Use the instructions to
assemble, to operate and to keep your product in
good condition. Use the instructions for correct
installation of attachments and accessories. Only
use approved attachments and accessories.
• Do not use a damaged product. Obey the
maintenance schedule. Only do the maintenance
work that you find an instruction about in this
manual. An approved service center must do all
other maintenance work.
• This manual cannot include all situations that can
occur when you use the product. Be careful and use
your common sense. Do not operate the product or
do maintenance on the product if you are not sure
about of the situation. Speak to a product expert,
your dealer, service agent or approved service
center for information.
• Disconnect the spark plug cable before you
assemble the product, put the product into storage or
do maintenance.
• Do not use the product if it is changed from its initial
specification. Do not change a part of the product
without approval from the manufacturer. Only use
parts approved by the manufacturer. Injury or death
is a possible result of incorrect maintenance.
• Do not breathe in the fumes from the engine. Long-
term inhalation of the engine's exhaust fumes is a
health risk.
• Do not start the product indoors or near flammable
material. The exhaust fumes are hot and can contain
a spark which can start a fire. Not sufficient airflow
can cause injury or death because of asphyxiation or
carbon monoxide.
• When you use this product the engine makes an
electromagnetic field. The electromagnetic field can
cause damage to medical implants. Speak to your
physician and medical implant manufacturer before
you operate the product.
• Do not let a child operate the product. Do not let a
person without knowledge of the instructions operate
the product.
• Make sure that you always monitor a person, with
decreased physical capacity or mental capacity, that
uses the product. A responsible adult must be there
at all times.
• Lock the product in an area that children and
unapproved persons cannot access.
• The product can eject objects and cause injuries.
Obey the safety instructions to decrease the risk of
injury or death.
• Do not go away from the product when the engine is
on.
• The operator of the product is responsible if an
accident occurs.
• Make sure that parts are not damaged before you
use the product.
• Make sure that you are at minimum 15 m (50 ft)
away from other persons or animals before you use
the product. Make sure that persons in the adjacent
area know that you will use the product.
728 - 008 - 10.06.2019
7

• Refer to national or local laws. They can prevent or
decrease the operation of the product in some
conditions.
• Do not use the product if you are fatigued or
influenced by alcohol, drugs or medicine. They can
have effects on your vision, alertness, coordination
or judgment.
Vibration safety
This product is for occasional operation only.
Continuous or regular operation of the product can
cause “white finger” or equivalent medical problems
from vibrations. Examine the condition of your hands
and fingers if you operate the product continuously or
regularly. If your hands or fingers have discoloration,
have pain, tingle, or are numb, stop work and speak to a
physician immediately.
Safety instructions for operation of the
blower
• Use the product only for blowing or removal of
leaves and other debris on the ground.
• Do not operate the product when you are tired, ill, or
have used alcohol, drugs or medicine.
• Do not let bystanders or animals to be less than 15
m (50 ft) from the operator.
• The product can eject objects at high speed that can
ricochet and hit the operator. This can cause eye
damage.
• Do not point the blower nozzle in the direction of
persons or animals.
• Make sure that long hair is put above your
shoulders.
• Stop the engine before you assemble or
disassemble the accessories or other components.
• Do not operate the product without the guard.
• Do not operate the product if there are persons in
the work area. Stop the product if a person goes into
the work area.
• Do not operate the product in a space with
unsatisfactory airflow. If the airflow is not sufficient, it
can cause injury or death because of asphyxiation or
carbon monoxide.
• The muffler is very hot while the product is on, after it
stops and when it runs at idle speed. Be careful near
flammable materials and flammable fumes.
• Do not touch the inlet cover area. Keep jewelry and
loosely hanging clothing away from the inlet area.
• Always keep correct footing and operate the product
only on safe and level surfaces. Slippery or not
stable surfaces, such as ladders, can cause a loss of
balance or control.
• Do not operate the product in a high area, such as
on a roof.
• Secure the product during transport.
• Operate the product only at recommended hour.
Obey the local regulations. Usual recommendations
are 9:00 a.m. to 5:00 p.m. Monday through
Saturday.
• Operate the product at the lowest possible throttle to
do the work.
• Make sure that you cannot fall when you use the
product. Do not tilt when you operate the product.
• Make sure that the product is in good condition
before operation, specially the muffler, air intake and
air filter.
• Use a rake or a broom to loosen ground debris
before operation of the product.
• If the work area is dirty, spray it with a hose.
• Use the product as an alternative to a hose to save
water.
• Blow debris safely. Look out for children, animals,
open windows or vehicles.
• Do not point the product at easily damaged plants.
• Do not blow air in the direction of objects such as
walls, large rocks, vehicles and fences.
• If you do work at inner corners blow from the corner
and into the center of the work area. If not, debris
can hit your face and cause eye injury.
• Use the full nozzle extension to keep the air stream
near the ground.
• It is necessary that bystanders wear eye protection.
• Dispose the debris in the waste receptacles after use
of the product.
Safety instructions for operation of the vacuum
• Prevent damage to the fan. Do not vacuum large,
solid objects such as wood, cans, rubber mulch or
long pieces of string.
• Do not let the vacuum tube hit the ground.
• Stop the engine and disconnect the spark plug cap
before you remove a blockage or clogged material.
Personal protective equipment
• Always use correct personal protective equipment
when you operate the product. The personal
protective equipment does not erase the risk of
injury. The personal protective equipment decreases
the grade of injury if an accident occurs.
• Always use an approved eye protection while you
operate the product.
• Do not operate the product with bare feet or with
open shoes. Always use heavy-duty slip-resistant
boots.
• Use heavy, long pants.
• If it is necessary, use approved protective gloves.
• Use a helmet if it is possible that objects fall on your
head.
• Always use approved ear protection while you
operate the product. Noise for a long period can
cause noise-induced hearing loss.
• Always use an approved dust mask while you
operate the product in dusty environments.
• Make sure that you have a first aid kit near.
8
728 - 008 - 10.06.2019

Protective devices on the product
• Make sure that you regularly do the maintenance to
the product.
• The life of the product increases.
• The risk of accidents decreases.
Let an approved dealer or an approved service
center regularly examine the product to do
adjustments or repairs.
• Do not use a product with damaged protective
equipment. If the product is damaged, speak to an
approved service center.
Stop switch
Start the engine. Make sure that the engine stops when
you move the stop switch to the stop position.
Muffler
WARNING: Do not touch the muffler if it is
hot. The muffler is very hot while the engine
runs and after it stops. If you touch the
muffler, it can cause burns.
• Do not use an engine with a damaged muffler. A
damaged muffler increases the noise level and the
risk of fire. Keep a fire extinguisher near.
• Examine regularly that the muffler is attached to the
product.
• Do not touch the engine or the muffler when then
engine is on. Do not touch the engine or the muffler
for a while after the engine stops. Hot surfaces can
cause injuries.
• A hot muffler can cause a fire. Be careful, if you use
the product near flammable liquids or fumes.
• Do not touch the parts in the muffler, if the muffler is
damaged. The parts can contain some carcinogenic
chemicals.
• Some blower models are have a spark-arresting
screen.Clean and replace the screen at specified
intervals. See the Maintenance section
(
Maintenance on page 12
).
Fuel safety
• Do not start the product if there is fuel or engine oil
on the product. Remove the unwanted fuel/oil and let
the product dry. Remove unwanted fuel from the
product.
• If you spill fuel on your clothing, change clothing
immediately.
• Do not get fuel on your body, it can cause injury. If
you get fuel on your body, use a soap and water to
remove the fuel.
• Do not start the engine if you spill oil or fuel on the
product or on your body.
• Do not start the product if the engine has a leak.
Examine the engine for leaks regularly.
• Be careful with fuel. Fuel is flammable and the fumes
are explosive and can cause injuries or death.
• Do not breathe in the fuel fumes, it can cause injury.
Make sure that there is a sufficient airflow.
• Do not smoke near the fuel or the engine.
• Do not put warm objects near the fuel or the engine.
• Do not add the fuel when the engine is on.
• Make sure that the engine is cool before you refuel.
• Before you refuel, open the fuel tank cap slowly and
release the pressure carefully.
• Do not add fuel to the engine in an indoor area. Not
sufficient airflow can cause injury or death because
of asphyxiation or carbon monoxide.
• Tighten the fuel tank cap carefully or a fire can
occur.
• Move the product at a minimum of 3 m (10 ft) from
the position where you filled the tank before a start.
• Do not put too much fuel in the fuel tank.
• Make sure that a leak cannot occur when you move
the product or fuel container.
• Do not put the product or a fuel container where
there is an open flame, spark or pilot light. Make
sure that the storage area does not contain an open
flame.
• Only use approved containers when you move the
fuel or put the fuel into storage.
• Empty the fuel tank before long-term storage. Obey
the local law on where to dispose fuel.
• Clean the product before long-term storage.
• Remove the spark plug cable before you put the
product into storage to make sure that the engine
does not start accidentally.
Safety instructions for maintenance
WARNING: Incorrect maintenance can
result in serious engine damage or in
serious injury.
The owner is responsible for the performance of all
necessary maintenance as specified in the operator's
manual. Disconnect the spark plug before maintenance.
Do not disconnect the spark plug before carburetor
adjustments.
728 - 008 - 10.06.2019
9

Assembly
WARNING: Read and understand the safety
chapter before you assemble the product.
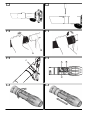
To install the upper blower tube
1. Align the slot on the upper blower tube (A) with the
tab in the blower outlet (B). (Fig. 21)
2. Push the upper blower tube fully onto the blower
outlet.
3. Turn the upper blower tube until the hole in the tube
is aligned with the threads in the nut in the blower
outlet. (Fig. 22)
4. Install the screw (C). (Fig. 23)
5. Turn the screw clockwise with a screwdriver to
attach the tube.
To install the lower blower tube
1. Align the slots on the lower blower tube (A) with the
tabs on the upper blower tube (B). (Fig. 24)
2. Push the lower blower tube fully onto the upper
blower tube.
3. Turn the lower blower tube fully until the tab is
engaged at the end of the slot. (Fig. 25)
To install the VX
™
blower tube
1. Align the slots on the VX
™
blower tube (A) with the
tabs on the upper blower tube (B). (Fig. 24)
2. Push the VX
™
blower tube fully onto the upper
blower tube.
3. Turn the VX
™
blower tube fully until the tab is
engaged at the end of the slot. (Fig. 25)
To install the upper vacuum tube
1. Insert the tip of a screwdriver into the latch area of
the vacuum inlet. (Fig. 26)
2. Gently tilt the handle of the screwdriver toward the
front of the product to release the latch.
3. Hold the vacuum inlet cover open until the upper
vacuum tube is in place. (Fig. 27)
4. Align the rib on the inside of the vacuum inlet with
the slots on the upper vacuum tube.
Note: Align the indicators at the vacuum inlet
opening and on the upper vacuum tube.
5. Push the upper vacuum tube fully into the vacuum
inlet.
6. Turn the upper vacuum tube fully clockwise until you
feel a click. (Fig. 28)
To install the lower vacuum tube
1. Align the slot on the lower vacuum tube with the tab
on the upper vacuum tube.
2. Push the lower vacuum tube fully onto the upper
vacuum tube until the tab is engaged at the end of
the slot. (Fig. 29)
3. Install the screw.
4. Turn the screw clockwise with a screwdriver to
attach the tube. (Fig. 30)
To install the collection bag tube
1. Align the slot on the collection bag tube (A) with the
tab in the blower outlet (B). (Fig. 31)
2. Push the collection bag tube fully onto the blower
outlet.
3. Turn the collection bag tube until the hole in the tube
is aligned with the threads in the nut in the blower
outlet. (Fig. 32)
4. Install the screw (C).
5. Turn the screw clockwise with a screwdriver to
attach the tube. (Fig. 33)
Operation
WARNING: Read and understand the safety
chapter before you operate the product.
Fuel
To use fuel
CAUTION: This product has a two-cycle
engine. Use a mixture of gasoline and two-
cycle engine oil. Make sure to use the
correct quantity of oil in the mixture.
Incorrect ratio of gasoline and oil can cause
damage to the engine.
Gasoline
CAUTION: Do not use gasoline with an
octane number less than 90 RON (87 AKI).
This can cause damage to the product.
CAUTION: Do not use gasoline with more
than 10% ethanol concentration (E10). This
can cause damage to the product.
10 728 - 008 - 10.06.2019

• Always use new unleaded gasoline with a minimum
octane number of 90 RON (87 AKI) and with less
than 10% ethanol concentration (E10).
• Use gasoline with a higher octane number if you
frequently use the product at continuously high
engine speed.
Two-cycle engine oil
• Use only high quality two-cycle engine oil. Use only
an air cooled engine oil.
• Do not use other types of oil.
• Mixture ratio 50:1 (2%)
Gasoline Oil
1 U.S. Gal. 77 ml (2,6 oz)
1 UK Gal. 95 ml (3,2 oz)
5 l 100 ml (3,4 oz)
To make the fuel mixture
Note: Always use a clean fuel container when you mix
the fuel.
Note: Do not make more than 30 days quantity of fuel
mixture.
1. Add half of the gasoline quantity.
2. Add the full quantity of oil.
3. Shake the fuel mixture to mix the contents.
4. Add the remaining gasoline quantity.
5. Shake the fuel mixture to mix the contents.
6. Fill the fuel tank.
To add fuel
• Always use a fuel container with an antispill valve.
• If there is some fuel on the container, remove the
unwanted fuel and let the container dry.
• Make sure that the area near the fuel tank cap is
clean.
• Shake the fuel container before you add the fuel
mixture to the fuel tank.
To start and stop
Before you start the engine
• Examine the product for missing, damaged, loose or
worn parts.
• Examine the collection bag. Make sure that the
collection bag is not damaged and that the zipper is
closed.
• Examine the nuts, screws and bolts.
• Examine the air filter.
• Examine the throttle trigger for correct operation.
• Examine the stop switch for correct operation.
• Examine the product for fuel leaks.
To start a cold engine
WARNING: Do not wind the starter rope
around your arm.
CAUTION: Do not hold the product with your
foot.
CAUTION: Do not pull the starter rope to the
end position. Do not let go of the starter rope
handle when the starter rope is extended.
This can cause damage to the product.
Note: If the engine stops, move the choke control to the
closed position and do the starting steps again.
1. Fill the fuel tank with a clean fuel mixture.
2. Use your left hand to hold the body of the machine
on the ground. Make sure the blower end is pointed
away from persons, animals, glass and solid objects.
3. Slowly push the air purge bulb 10 times.
4. Move the choke lever to the FULL CHOKE position.
5. Squeeze and hold the throttle trigger.
6. Pull the starter rope handle quickly until the engine
tries to run, but no more than 3 pulls.
Note:
If the temperature is less than 4°C (40°F),
continue to pull the starter rope handle until the
engine tries to start.
7. Move the choke lever to the HALF CHOKE position.
8. Pull the starter rope handle quickly until the engine
runs.
9. Let the engine run for 10 seconds.
10. Move the choke lever to the NO CHOKE position.
To start a warm engine
1. Slowly push the air purge bulb 10 times.
2. Move the choke lever to the HALF CHOKE position.
3. Pull the starter rope handle quickly until the engine
runs.
4. Move the choke lever to the NO CHOKE position.
To start an engine with vapor lock
Vapor lock occurs when the fuel in the fuel line or
carburetor vaporizes because of increased heat.
The product may have vapor lock if it does not restart in
an ambient temperature of more than 35°C (95°F) and it
has been shut off for 15-45 minutes.
1. Push the air purge bulb again and again for 10-15
seconds.
728 - 008 - 10.06.2019
11

2. Move the choke lever to the HALF CHOKE position.
3. Pull the starter rope handle quickly until the engine
runs.
4. Let the engine warm up for 3 minutes at idle speed.
5. Move the choke lever to the NO CHOKE position.
To stop the engine
• Push and release the engine STOP switch. The
switch automatically returns to the ON position. Wait
7 seconds before you try to restart the product to
make sure that the switch resets.
To adjust the VX
™
blower tube
1. Align the correct slot (A or B) on the outer VX
™
blower tube with the tab (C) on the inner tube. (Fig.
34)
Note: You cannot see the tab when the tubes are
assembled. You must feel the position of the tab as
you move the outer tube.
Note: Engage the tab in position "A" for a large
blower opening. A large blower opening moves wide
areas of dry leaves and other unwanted material.
Engage the tab in position "B" for a small blower
opening. A small blower opening makes air flow
faster to clean cracks and edging and to move heavy
material such as wet leaves.
2. Turn the outer tube as shown to disengage the tab
from the slot. (Fig. 35)
3. Move the outer tube along the inner tube to change
the position. (Fig. 36)
4. Turn the outer tube as shown until the tab is fully
engaged at the end of the correct slot location. (Fig.
37)
Operation position
• Blower (Fig. 38)
• Vacuum (Fig. 39)
To vacuum
Before you vacuum, put on the necessary safety
equipment.
WARNING: Make sure that the collection
bag is not damaged and that the zipper is
closed before use. Do not use a bag that is
damaged. This prevents injury caused by
flying debris. Left hand operation increases
the risk. Do not let your body touch the
exhaust outlet area.
WARNING: Do not start the blower if the
inlet cover is open or damaged (except if the
vacuum tube is fitted).
• During operation of the blower the collection bag
must be held by the shoulder strap. The strap must
be worn on the top of the shoulder.
• Start the blower. Obey the instructions in the start
and stop section
To start and stop on page 11
. Read
the safety instructions
Safety on page 7
.
To empty the collection bag
WARNING: Always examine the collection
bag. Make sure that it is not damaged and
that the zipper is closed before use. Do not
use a damaged bag. There is a risk of injury
because of flying debris. Be careful if left
hand operation is applied. Do not touch the
exhaust outlet area.
1. Stop the product.
2. Open the zipper on the side.
3. Empty the collection bag.
4. Close the zipper.
Maintenance
WARNING: Read and understand the safety
chapter before you clean, repair or do
maintenance on the product.
Maintenance schedule
Make sure that you obey the maintenance schedule.
The intervals are calculated from daily use of the
product. The intervals are different if you do not use the
product each day. Only do the maintenance work that is
found in this manual. Speak to an approved service
center about other maintenance work not found in this
manual.
Daily maintenance
• Clean the external surfaces.
• Examine the speed control and the throttle trigger
function. Replace damaged parts.
• Examine the stop switch. If it is necessary, replace it.
• Examine the idle speed.
• Clean the air filter. If it is necessary, replace it.
• Make sure that the inlet cover can be locked in
closed position. Make sure that the impeller is clean.
• Tighten all nuts and screws.
• Make sure that the housings are free of cracks.
• Make sure that the collection bag is not damaged
and that the zipper works. Replace the bag if
necessary.
Weekly maintenance
12 728 - 008 - 10.06.2019

• Examine the condition of the starter device, the
starter rope and the tension spring. Replace all
damaged parts.
• Examine the condition of the air intake at the starter
device. Remove debris if the air intake is clogged.
• Clean the external side of the spark plug. Remove it
and examine the electrode gap. Adjust the distance
to 6 mm (0.024 in) or replace the spark plug.
• Clean the blades on the impeller.
• Clean the spark-arresting screen and replace it if
necessary (not on mufflers with a catalytic
converter).
• Clean the carburetor area.
• Clean the air filter.
Monthly maintenance
• Examine the starter rope handle and the starter
rope.
• Clean the fuel tank.
• Clean the carburetor and the area around it.
• Clean the blades on the impeller.
• Examine the fuel lines for cracks or other damage.
Change if necessary
• Change the fuel filter in the fuel tank.
• Examine all cables and connections.
• Replace the spark plug.
• Change the air filter.
Yearly maintenance
• Examine the spark plug.
• Clean the external surface of the carburetor and its
adjacent areas.
• Clean the cooling system.
• Examine the spark arrester screen.
• Examine the fuel filter.
• Examine the fuel hose for damage.
• Examine all cables and connections.
50 hours maintenance
• Have an approved service center repair or replace
the muffler.
To adjust the idle speed
Make sure that the air filter is clean and the air filter
cover is attached before you adjust the idle speed.
Adjust the idle speed with the idle adjustment screw.
(Fig. 40)
The idle speed is correct when the engine operates
smoothly in all positions.
1. Turn the idle adjustment screw clockwise for higher
speed.
2. Turn the idle adjustment screw counterclockwise for
lower speed.
To do maintenance on the spark
arrester screen
Use a wire brush to clean the spark arrester screen.
To clean the cooling system
Clean the parts of the cooling system with a brush.
To examine the spark plug
CAUTION: Always use the recommended
spark plug type. Incorrect spark plug type
can cause damage to the product.
• Examine the spark plug if the engine is low on
power, is not easy to start or does not operate
correctly at idle speed.
• To decrease the risk of unwanted material on the
spark plug electrodes, obey these instructions:
a) Make sure that the idle speed is correctly
adjusted.
b) Make sure that the fuel mixture is correct.
c) Make sure that the air filter is clean.
• If the spark plug is dirty, clean it and make sure that
the electrode gap is correct. See
Technical data on
page 13
. (Fig. 41)
• Replace the spark plug, if necessary.
To do the maintenance to the air filter
To clean the air filter
1. Remove the air filter cover and remove the air filter.
2. Clean the air filter with warm soap water. Make sure
that the air filter is dry before you install it.
3. Replace the air filter if it is too dirty to fully clean it.
Always replace a damaged air filter.
4. If your product has a foam air filter, apply air filter oil.
Only apply air filter oil to a foam filter. Do not apply
oil to a felt filter.
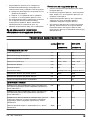
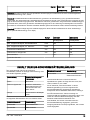
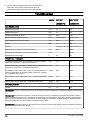
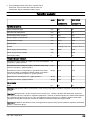
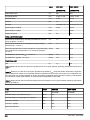
Technical data
unit GBV 322
(GHB28VPR)
GBV 322VX
(GHB28VPR)
Engine Specifications
728 - 008 - 10.06.2019 13

unit GBV 322
(GHB28VPR)
GBV 322VX
(GHB28VPR)
Cylinder displacement cm
3
26 26
Electrode gap mm 0.6 0.6
Fuel tank volume cm
3
500 500
Idling speed min
-1
2800 - 3200 2800 - 3200
Maximum power speed min
-1
8000 8000
Power output kW 0.8 0.8
Spark plug Champion RCJ-6Y Champion RCJ-6Y
Maximum speed blow mode min
-1
8600 8600
Maximum speed vacuum mode min
-1
-- 7500
Emission durability period h 50 50
Noise and Vibration Data
Equivalent vibration level at handles with blower tubes and
nozzle (original) - see note 1
m/s
2
7.5 7.5
Equivalent vibration level at handles with vaccum tubes (origi-
nal), left/right - see note 1
m/s
2
7.4 7.4
Equivalent sound pressure level at the operators' ear measured
according to ISO 22868 equipped with blower tubes and nozzle
(original) - see note 3
dB(A) 95.6 95.6
Sound power level, guaranteed (L
WA
) - see note 2 dB(A) 112 112
Sound power level, measured - see note 2 dB(A) 109 109
Product Dimensions
Weight kg 4.4 4.5
Note 1: Reported data for equivalent vibration level has a typical statistical dispersion (standard deviation) of 1.5
m/s
2
.
Note 2: Noise emissions in the environment measured as sound power (L
WA
) in conformity with EC directive
2000/14/ EC. Reported sound power level for the machine has been measured with the original attachment that
gives the highest level. The difference between guaranteed and measured sound power is that the guaranteed
sound power also includes dispersion in the measurement result and the variations between different machines of
the same model according to Directive 2000/14/EC.
Note 3: Reported data for equivalent sound pressure level for the machine has a typical statistical dispersion (stand-
ard deviation) of 3 dB (A).
Fan unit GBV 322 GBV 322VX
Type Radial fan Radial fan
Max. air velocity, standard nozzle km/h 322 -
Max. air velocity, VX
™
blower tube* km/h - 370
Air volume blow mode cfm 370 450
14 728 - 008 - 10.06.2019

Fan unit GBV 322 GBV 322VX
Air volume vacuum mode cfm 490 490
Mulch ratio 10:1 16:1
*optional accessory
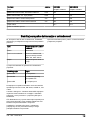
Contents of the EC Declaration of Conformity
We, Husqvarna AB, SE 561 82 Huskvarna, SWEDEN,
declare under our sole responsibility that the
represented product:
Description Gasoline Blower/ Blower-
Vacuum
Brand McCulloch
Platform / Type / Model Platform GHB28VPR, rep-
resenting model GBV 322,
GBV 322VX
Batch Serial number dating 2018
and onwards
complies fully with the following EU directives and
regulations:
Directive/Regulation
Description
2006/42/EC “relating to machinery”
2014/30/EU “relating to electromagnet-
ic compatibility”
2000/14/EC “relating to outdoor noise”
Harmonized standards and/or technical specifications
applied are as follows: EN ISO 12100, EN 15503,
CISPR 12, ISO 14982
In accordance with directive 2000/14/EC, Annex V, the
declared sound values are stated in the technical data
section of this manual and in the signed EC Declaration
of Conformity.
TÜV Rheinland N.A. has carried out a voluntary
examination on behalf of Husqvarna AB, providing a
Certificate of conformity to EC Council directive 2006/42/
EC for machinery.
The certificate, as provided on the signed EC
Declaration of Conformity, is applicable to all
manufacturing locations and Countries of Origin, as
stated on the product.
The supplied Gasoline Blower/ Blower-Vacuum
conforms to the example that underwent examination.
728 - 008 - 10.06.2019
15

Содержание
Въведение................................................................... 16
Безопасност.................................................................17
Монтиране................................................................... 20
Експлоатация.............................................................. 21
Поддръжка...................................................................23
Технически характеристики....................................... 25
Съдържание на ЕО декларацията за
съответствие............................................................... 26
Въведение
Инструкция за експлоатация
Оригиналната версия на настоящата инструкция за
експлоатация е на английски език. Инструкциите за
експлоатация на други езици са преведени от
английски.
Преглед
(Фиг. 1)
1. Презраменен ремък
2. Спусък на газта
3. Превключвател за спиране
4. Функция за задържане
5. Капак на вентилатора
6. Капачка на резервоара за гориво
7. Въздушен филтър
8. Смукач
9. Подкачваща помпа
10. Входен капак
11. Вакуумна дръжка
12. Нож за мулчиране (GBV 322VX)
13. Ротор на вентилатора
14. Долна продухваща тръба (GBV 322 )
15. VX
™
продухваща тръба (GBV 322VX)
16. Горна продухваща тръба
17. Болт
18. Ауспух
19. Заземяващ проводник
20. Дръжка на въжето на стартера
21. Стартерно устройство
22. Ръкохватка
23. Комбиниран инструмент
24. Тръба на торбичката за събиране
25. Торбичка за събиране
26. Вакуумна тръба от две секции
27. Винт
28. Инструкция за експлоатация
Символи върху машината
(Фиг. 2)
Предупреждение
(Фиг. 3) Прочетете това ръководство
(Фиг. 4) Използвайте одобрена защита за глава
(Фиг. 4) Използвайте одобрени антифони
(Фиг. 4) Използвайте одобрени защитни средства
за очите (ANSI Z87.1 или еквивалентен)
(Фиг. 5) Използвайте одобрени защитни ботуши и
ръкавици
(Фиг. 5) Носете дълги ръкави и панталони
(Фиг. 6) Не носете бижута, когато работите с
продукта.
(Фиг. 7) Използвайте върха на отвертката за
освобождаване на фиксатора.
(Фиг. 8) Не засмуквайте камъни, чакъл, метал,
счупени стъкла, каучукови стърготини или
други материали, които могат да
повредят ротора.
(Фиг. 9) Възможно е изхвърчане на предмети от
продукта, което може да доведе до
увреждане на очите
(Фиг. 10) Не се приближавайте до ротора, когато
работи
(Фиг. 11) Пълен смукач
(Фиг. 12) Половин смукач
(Фиг. 13) Без смукач
(Фиг. 14) Уверете се, че дългата коса е прибрана
над раменете.
(Фиг. 15) Безопасно разстояние
(Фиг. 16) Гарантирано ниво на звукова мощност
(Фиг. 17) Този продукт е в съответствие с
приложимите директиви на EO.
(Фиг. 18) Продуктът е в съответствие с
приложимите директиви на EAC.
16 728 - 008 - 10.06.2019

(Фиг. 19) Продуктът е в съответствие с
приложимите директиви на Украйна.
(Фиг. 20) Продуктът е в съответствие с
регламентите относно електромагнетична
съвместимост (EMC) на Австралия.
Забележка: Останалите символи/стикери на
продукта се отнасят до изисквания по отношение на
сертификати за други търговски зони.
EU V
ПРЕДУПРЕЖДЕНИЕ: Намесата в
двигателя прави невалидно ЕС
одобрението на тип на този продукт.
Отговорност за вреди, причинени от
стоки
Както е посочено в законите за отговорност за
вреди, причинени от стоки, ние не носим отговорност
за щети, причинени от нашия продукт, ако:
• продуктът е неправилно ремонтиран.
• продуктът е ремонтиран с части, които не са от
производителя или не са одобрени от
производителя.
• продуктът има принадлежност, която не е от
производителя или не е одобрена от
производителя.
• продуктът не е ремонтиран в одобрен сервизен
център или от одобрен орган.
Безопасност
Дефиниции за безопасност
Дефинициите по-долу предоставят нивото на
сериозност за всяка една предупредителна дума.
ПРЕДУПРЕЖДЕНИЕ: Нараняване на
лица.
ВНИМАНИЕ: Повреда на продукта.
Забележка: Тази информация прави продукта по-
лесен за използване.
Общи инструкции за безопасност
• Използвайте правилно продукта. Неправилната
употреба може да доведе до нараняване или
смърт. Използвайте продукта само за задачите,
описани в настоящето ръководство. Не
използвайте продукта за други задачи.
• Спазвайте инструкциите в тази инструкция за
експлоатация. Спазвайте символите за
безопасност и инструкциите за безопасност. Ако
операторът не спазва инструкциите и символите,
резултатът може да е нараняване, повреда или
смърт.
• Не изхвърляйте това ръководство. Следвайте
инструкциите за монтиране, използване и
поддръжка на продукта в добро състояние.
Следвайте инструкциите за правилен монтаж на
приспособленията и принадлежностите.
Използвайте само одобрени приспособления и
принадлежности.
• Не използвайте повреден продукт. Спазвайте
графика за техническо обслужване. Извършвайте
само дейностите по техническо обслужване, за
които ще намерите инструкция в това
ръководство. Всички други дейности по
техническото обслужване трябва да бъдат
извършени от одобрен сервизен център.
• Това ръководство не може да включва всички
ситуации, които биха могли да възникнат при
използване на продукта. Бъдете внимателни и
действайте разумно. Не работете с продукта и не
извършвайте техническо обслужване на същия,
ако не сте наясно със ситуацията. За да получите
информация, говорете с експерт по продукта,
Вашия дистрибутор, сервиз или с одобрен
сервизен център.
• Разкачете проводника на запалителната свещ
преди сглобяване, складиране или техническо
обслужване на продукта.
• Не използвайте продукта, ако е променен спрямо
първоначалните му спецификации. Не сменяйте
някоя част на продукта без одобрение от
производителя. Използвайте само одобрени от
производителя части. Неправилното техническо
обслужване е възможно да доведе до
нараняване или смърт.
• Не вдишвайте изпарения от двигателя.
Продължителното вдишване на отработените
газове от двигателя е опасно за здравето.
• Не стартирайте продукта на закрито или близо до
запалими материали. Отработените газове са
горещи и биха могли да съдържат искри, които да
предизвикат пожар. Недостатъчният въздушен
поток може да доведе до нараняване или смърт
поради задушаване или въглероден окис.
• Когато използвате този продукт, двигателят
създава електромагнитно поле.
Електромагнитното поле може да предизвика
повреда на медицински импланти. Говорете с
Вашия лекар или с производителя на
медицинския имплант, преди да започнете
работа с продукта.
728 - 008 - 10.06.2019
17

• Не позволявайте на деца да работят с продукта.
Не позволявайте на лица, които не са запознати с
инструкциите, да работят с продукта.
• Уверете се, че винаги наблюдавате лица с
намален физически или умствен капацитет, които
използват продукта. През цялото време трябва
да присъства отговорен възрастен.
• Заключете продукта в зона, до която нямат
достъп деца и неодобрени лица.
• Възможно е от продукта да изхвърчат предмети i
да причинят наранявания. Спазвайте
инструкциите за безопасност, за да намалите
опасността от нараняване или смърт.
• Не се отдалечавайте от продукта, когато
двигателят работи.
• Операторът на продукта е отговорен при
възникването на инцидент.
• Уверете се, че частите не са повредени, преди да
използвате продукта.
• Уверете се, че сте на разстояние от най-малко 15
m (50 ft) от други лица или животни, преди да
използвате продукта. Уверете се, че хората,
които се намират близо до Вас, са наясно, че ще
използвате продукта.
• Направете справка с националните или местните
закони. Те биха могли да предотвратят или
ограничат работата на продукта при определени
условия.
• Не използвайте продукта, ако сте уморен(а) или
сте под въздействието на алкохол, наркотици или
лекарства. Те могат да окажат въздействие върху
Вашето зрение, бдителност, координация или
преценка.
Безопасност при вибрация
Този продукт е само за сравнително рядка работа.
Продължителната или редовната работа с продукта
може да доведе до „вибрационна болест“ или
подобни медицински проблеми, причинени от
вибрации. Ако работите продължително или често с
продукта, проверявайте състоянието на ръцете и
пръстите си. Ако ръцете или пръстите ви се
обезцветяват, имате болка, изтръпване или
схващане, спрете работа и незабавно се
консултирайте с лекар.
Инструкции за безопасност при
работа с компресорното оборудване
• Използвайте продукта само за издухване или
отстраняване на листа и други отпадъци по
земята.
• Не работете с продукта, когато сте уморени,
болни или под въздействието на алкохол,
наркотици или лекарства.
• Не допускайте странични наблюдатели, нито
животни на по-малко от 15 m (50 ft) от оператора,
използващ продукта.
• Възможно е от продукта да изхвърчат предмети с
висока скорост, които може да рикошират и да
ударят оператора. Това може да доведе до
увреждане на очите.
• Не насочвайте накрайника на компресорното
оборудване по посока хора или животни.
• Уверете се, че дългата коса е вдигната над
раменете.
• Спирайте двигателя преди монтиране или
демонтиране на приспособления или други
компоненти.
• Не работете с продукта без предпазителя.
• Не работете с продукта, ако има хора в
работната зона. Спрете продукта, ако в
работната зона влезе човек.
• Не работете с продукта на места с недостатъчен
въздушен поток. Недостатъчният въздушен поток
може да доведе до нараняване или смърт поради
задушаване или вдишване на въглероден окис.
• Ауспухът е извънредно горещ, докато продуктът
работи, включително при обороти на празен ход,
както и след като спре. Внимавайте в близост до
запалителни материали или изпарения.
• Не докосвайте зоната на входния капак.
Украшения и широки дрехи трябва да са далеч от
зоната на входния отвор.
• Винаги стъпвайте стабилно и работете с
продукта само на сигурна и равна повърхност.
Хлъзгавите или нестабилни повърхности, като
например стълби, могат да предизвикат загуба
на баланс или контрол.
• Не работете с продукта, когато се намирате на
високо място, например на покрив.
• Обезопасете продукта при транспортиране.
• Работете с продукта само в препоръчаните
часове. Съблюдавайте местните разпоредби.
Обикновено препоръките са от 09:00 до 17:00 ч.
от понеделник до петък.
• При работа с продукта използвайте най-ниските
възможни обороти, необходими за конкретната
работа.
• Уверете се, не можете да паднете, когато
използвате продукта. Не накланяйте при работа с
продукта.
• Уверете се, че продуктът е в добро състояние,
преди да започнете работа с него, най-вече
ауспухът, смукателният въздухопровод и
въздушният филтър.
• Разровете отпадъците по земята с гребло или
метла, преди да включите продукта.
• Ако работната площ е замърсена, напръскайте я
с маркуч.
• Продуктът може да се използва вместо маркуч за
спестяване на вода.
• Издухвайте отпадъците безопасно. Внимавайте
за деца, домашни любимци, отворени прозорци
или превозни средства.
• Не насочвайте продукта към крехки растения.
18
728 - 008 - 10.06.2019

• Не насочвайте духалката към обекти от рода на
стени, големи камъни, превозни средства или
огради.
• Ако работите в ъглови части, издухвайте от
ъгъла към центъра на работната зона. В
противен случай е възможно отпадъците да Ви
ударят в лицето и да предизвикат увреждане на
очите.
• Използвайте пълния удължител на накрайника,
така че въздушният поток да бъде близо до
земята.
• Необходимо е страничните наблюдатели да
носят защитни средства за очите.
• След използване на продукта изхвърлете
отпадъците в контейнерите за боклук.
Инструкции за безопасност при работа със
смукалката
• Пазете вентилатора от повреда. Не засмуквайте
големи и твърди отпадъци от сорта на парчета
дърво, кутии, каучуков мулч или дълги части от
въже.
• Не позволявайте на вакуумната тръба да докосне
земята.
• Спрете двигателя и разкачете лулата на
запалителната свещ, преди да премахнете
пречката или задръстващия материал.
Лични предпазни средства
• Винаги използвайте правилните лични предпазни
средства, когато работите с продукта. Личните
предпазни средства не елиминират опасността
от нараняване. Личните предпазни средства
намаляват степента на нараняване при
възникването на инцидент.
• Винаги използвайте одобрени защитни средства
за очите, когато работите с продукта.
• Не работете с продукта с голи крака или с
отворени обувки. Винаги използвайте устойчиви
на плъзгане ботуши за тежък режим на работа.
• Използвайте дълги панталони от здрав плат.
• Ако е необходимо, използвайте одобрени
защитни ръкавици.
• Използвайте каска, ако е възможно, за да се
предпазите от падащи на главата предмети.
• Винаги използвайте одобрени антифони, когато
работите с продукта. Продължителният шум
може да доведе до загуба на слуха, причинена от
шум.
• Винаги използвайте одобрена респираторна
маска, докато работите с продукта в запрашени
среди.
• Уверете се, че близо до Вас има комплект за
първа помощ.
Устройства за безопасност на продукта
• Уверете се, че редовно извършвате техническо
обслужване на продукта.
• Срокът на експлоатация на продукта се
увеличава.
• Рискът от злополука намалява.
Позволете на одобрен дилър или одобрен
сервизен център да извършва редовна проверка
на продукта за корекции или ремонтни дейности.
• Не използвайте продукт с повредени предпазни
средства. Ако продуктът е повреден, се
консултирайте с одобрен сервизен център.
Превключвател за спиране
Стартирайте двигателя. Уверете се, че двигателят
спира, когато преместите превключвателя за
спиране в стоп позиция.
Ауспух
ПРЕДУПРЕЖДЕНИЕ: Не докосвайте
ауспуха, ако е горещ. Ауспухът е горещ
по време на работа, но и след като
двигателят спре. При докосване на
ауспуха има възможност от изгаряния.
• Не използвайте двигател с повреден ауспух.
Повреденият ауспух повишава нивото на шума и
риска от пожар. Съхранявайте наблизо
пожарогасител.
• Редовно проверявайте дали ауспухът е закрепен
към продукта.
• Не докосвайте двигателя или ауспуха, когато
двигателят е включен. Не докосвайте двигателя
или ауспуха за известно време след спиране на
двигателя. Горещите повърхности могат да
причинят нараняване.
• Горещият ауспух може да причини пожар. Бъдете
внимателни, ако използвате продукта близо до
запалителни течности или изпарения.
• Не докосвайте частите в ауспуха, ако е повреден.
Частите могат да съдържат канцерогенни
химикали.
• Някои модели компресорно оборудване имат
предпазна искрогасителна мрежа. През
определени интервали я почиствайте и
подменяйте. Вижте раздел "Поддръжка"
(
Поддръжка на страница 23
).
Безопасност при работа с гориво
• Не включвайте продукта, ако върху него има
гориво или моторно масло. Отстранете
нежеланото гориво/масло и оставете продукта да
изсъхне. Отстранете нежеланото гориво от
продукта.
• Ако разлеете гориво по дрехите си, сменете ги
незабавно.
• Внимавайте да не попадне гориво върху тялото
Ви, това може да доведе до телесни увреждания.
Ако гориво попадне върху тялото Ви,
използвайте сапун и вода, за да го отстраните.
728 - 008 - 10.06.2019
19

• Не стартирайте двигателя, ако разлеете масло
или гориво върху продукта или тялото си.
• Не стартирайте продукта, ако от двигателя има
теч. Проверявайте редовно двигателя за течове.
• Внимавайте с горивото. Горивото е запалимо,
изпаренията са взривоопасни и могат да
причинят телесни увреждания или смърт.
• Не вдишвайте горивните изпарения, това може
да доведе до телесни увреждания. Уверете се,
че има достатъчен въздушен поток.
• Не пушете близо до горивото или двигателя.
• Не поставяйте топли предмети близо до горивото
или двигателя.
• Не добавяйте гориво, когато двигателят работи.
• Уверете се, че двигателят е изстинал преди
зареждане с гориво.
• Преди зареждане с гориво отворете бавно
капачката на резервоара за гориво и освободете
внимателно налягането.
• Не добавяйте гориво към двигателя на закрито.
Недостатъчният въздушен поток може да доведе
до нараняване или смърт поради задушаване
или въглероден окис.
• Затегнете внимателно капачката на резервоара
за гориво или може да възникне пожар.
• Преди да включите двигателя, преместете
продукта на най-малко 3 m (10 ft) от мястото,
където сте заредили резервоара.
• Не препълвайте резервоара за гориво.
• Уверете се, че няма течове, когато местите
продукта или резервоара за гориво.
• Не поставяйте продукта или резервоара за
гориво на място, където има открит огън, искри
или постоянна малка горелка. Уверете се, че в
зоната за съхранение няма открит огън.
• При преместване или съхранение на гориво
използвайте само одобрени за целта контейнери.
• Изпразнете резервоара за гориво преди
дългосрочно съхранение. Спазвайте местните
закони за това къде да изхвърляте горивото.
• Почистете продукта преди дългосрочно
съхранение.
• Отстранете проводника на запалителната свещ,
преди да оставите продукта за съхранение, за да
се уверите, че двигателят няма случайно да се
включи.
Инструкции за безопасност за
поддръжка
ПРЕДУПРЕЖДЕНИЕ: Неправилно
техническо обслужване може да доведе
до сериозна повреда на двигателя или до
сериозно нараняване.
Собственикът носи отговорност за спазването на
всички необходими операции по техническото
обслужване, описани в инструкцията за
експлоатация. Разкачете запалителната свещ преди
техническо обслужване. Не разкачвайте свещта
преди регулиране на карбуратора.
Монтиране
ПРЕДУПРЕЖДЕНИЕ: Прочетете и
разберете главата за безопасност, преди
да монтирате продукта.
За монтаж на горната продухваща
тръба
1. Подравнете прореза на горната продухваща
тръба (А) с палеца на изхода на компресорното
оборудване (В). (Фиг. 21)
2. Натиснете докрай горната продухваща тръба
върху изхода на компресорното оборудване.
3. Завъртете горната продухваща тръба, докато
отворът в тръбата се подравни с резбата на
гайката на изхода на компресорното оборудване.
(Фиг. 22)
4. Монтирайте винта (C). (Фиг. 23)
5. С отвертка завъртете винта по часовниковата
стрелка, за да присъедините тръбата.
За монтаж на долната продухваща
тръба
1. Подравнете прорезите на долната продухваща
тръба (А) с палците на горната продухваща
тръба (В). (Фиг. 24)
2. Натиснете долната продухваща тръба докрай
върху горната продухваща тръба.
3. Завъртете долната продухваща тръба докрай,
докато палецът се захване в края на прореза.
(Фиг. 25)
За монтаж на
™
продухваща тръба VX
1. Подравнете прорезите на
™
продухващата тръба
VX (А) с палците на горната продухваща тръба
(В). (Фиг. 24)
2. Натиснете
™
продухващата тръба VX докрай
върху горната продухваща тръба.
3. Завъртете
™
продухващата тръба VX докрай,
докато палецът се захване в края на прореза.
(Фиг. 25)
20 728 - 008 - 10.06.2019
Pagina se încarcă...
Pagina se încarcă...
Pagina se încarcă...
Pagina se încarcă...
Pagina se încarcă...
Pagina se încarcă...
Pagina se încarcă...
Pagina se încarcă...
Pagina se încarcă...
Pagina se încarcă...
Pagina se încarcă...
Pagina se încarcă...
Pagina se încarcă...
Pagina se încarcă...
Pagina se încarcă...
Pagina se încarcă...
Pagina se încarcă...
Pagina se încarcă...
Pagina se încarcă...
Pagina se încarcă...
Pagina se încarcă...
Pagina se încarcă...
Pagina se încarcă...
Pagina se încarcă...
Pagina se încarcă...
Pagina se încarcă...
Pagina se încarcă...
Pagina se încarcă...
Pagina se încarcă...
Pagina se încarcă...
Pagina se încarcă...
Pagina se încarcă...
Pagina se încarcă...
Pagina se încarcă...
Pagina se încarcă...
Pagina se încarcă...
Pagina se încarcă...
Pagina se încarcă...
Pagina se încarcă...
Pagina se încarcă...
Pagina se încarcă...
Pagina se încarcă...
Pagina se încarcă...
Pagina se încarcă...
Pagina se încarcă...
Pagina se încarcă...
Pagina se încarcă...
Pagina se încarcă...
Pagina se încarcă...
Pagina se încarcă...
Pagina se încarcă...
Pagina se încarcă...
Pagina se încarcă...
Pagina se încarcă...
Pagina se încarcă...
Pagina se încarcă...
Pagina se încarcă...
Pagina se încarcă...
Pagina se încarcă...
Pagina se încarcă...
Pagina se încarcă...
Pagina se încarcă...
Pagina se încarcă...
Pagina se încarcă...
Pagina se încarcă...
Pagina se încarcă...
Pagina se încarcă...
Pagina se încarcă...
Pagina se încarcă...
Pagina se încarcă...
Pagina se încarcă...
Pagina se încarcă...
Pagina se încarcă...
Pagina se încarcă...
Pagina se încarcă...
Pagina se încarcă...
Pagina se încarcă...
Pagina se încarcă...
Pagina se încarcă...
Pagina se încarcă...
Pagina se încarcă...
Pagina se încarcă...
Pagina se încarcă...
Pagina se încarcă...
Pagina se încarcă...
Pagina se încarcă...
Pagina se încarcă...
Pagina se încarcă...
Pagina se încarcă...
Pagina se încarcă...
Pagina se încarcă...
Pagina se încarcă...
Pagina se încarcă...
Pagina se încarcă...
Pagina se încarcă...
Pagina se încarcă...
Pagina se încarcă...
Pagina se încarcă...
Pagina se încarcă...
Pagina se încarcă...
Pagina se încarcă...
Pagina se încarcă...
Pagina se încarcă...
Pagina se încarcă...
Pagina se încarcă...
Pagina se încarcă...
Pagina se încarcă...
Pagina se încarcă...
Pagina se încarcă...
Pagina se încarcă...
Pagina se încarcă...
Pagina se încarcă...
Pagina se încarcă...
Pagina se încarcă...
Pagina se încarcă...
Pagina se încarcă...
Pagina se încarcă...
Pagina se încarcă...
Pagina se încarcă...
Pagina se încarcă...
Pagina se încarcă...
Pagina se încarcă...
Pagina se încarcă...
Pagina se încarcă...
Pagina se încarcă...
Pagina se încarcă...
Pagina se încarcă...
Pagina se încarcă...
Pagina se încarcă...
Pagina se încarcă...
Pagina se încarcă...
Pagina se încarcă...
Pagina se încarcă...
Pagina se încarcă...
Pagina se încarcă...
Pagina se încarcă...
Pagina se încarcă...
Pagina se încarcă...
Pagina se încarcă...
Pagina se încarcă...
Pagina se încarcă...
Pagina se încarcă...
Pagina se încarcă...
Pagina se încarcă...
Pagina se încarcă...
Pagina se încarcă...
Pagina se încarcă...
Pagina se încarcă...
Pagina se încarcă...
Pagina se încarcă...
Pagina se încarcă...
Pagina se încarcă...
Pagina se încarcă...
Pagina se încarcă...
Pagina se încarcă...
Pagina se încarcă...
Pagina se încarcă...
Pagina se încarcă...
Pagina se încarcă...
Pagina se încarcă...
Pagina se încarcă...
Pagina se încarcă...
Pagina se încarcă...
Pagina se încarcă...
Pagina se încarcă...
Pagina se încarcă...
Pagina se încarcă...
Pagina se încarcă...
Pagina se încarcă...
Pagina se încarcă...
Pagina se încarcă...
Pagina se încarcă...
Pagina se încarcă...
Pagina se încarcă...
Pagina se încarcă...
Pagina se încarcă...
Pagina se încarcă...
Pagina se încarcă...
Pagina se încarcă...
Pagina se încarcă...
Pagina se încarcă...
Pagina se încarcă...
Pagina se încarcă...
Pagina se încarcă...
Pagina se încarcă...
Pagina se încarcă...
Pagina se încarcă...
Pagina se încarcă...
Pagina se încarcă...
Pagina se încarcă...
Pagina se încarcă...
Pagina se încarcă...
Pagina se încarcă...
Pagina se încarcă...
Pagina se încarcă...
Pagina se încarcă...
Pagina se încarcă...
Pagina se încarcă...
Pagina se încarcă...
Pagina se încarcă...
Pagina se încarcă...
Pagina se încarcă...
Pagina se încarcă...
Pagina se încarcă...
Pagina se încarcă...
Pagina se încarcă...
Pagina se încarcă...
Pagina se încarcă...
Pagina se încarcă...
Pagina se încarcă...
Pagina se încarcă...
Pagina se încarcă...
Pagina se încarcă...
Pagina se încarcă...
Pagina se încarcă...
Pagina se încarcă...
Pagina se încarcă...
Pagina se încarcă...
Pagina se încarcă...
Pagina se încarcă...
Pagina se încarcă...
Pagina se încarcă...
Pagina se încarcă...
Pagina se încarcă...
Pagina se încarcă...
Pagina se încarcă...
Pagina se încarcă...
Pagina se încarcă...
Pagina se încarcă...
Pagina se încarcă...
Pagina se încarcă...
Pagina se încarcă...
Pagina se încarcă...
Pagina se încarcă...
Pagina se încarcă...
Pagina se încarcă...
Pagina se încarcă...
Pagina se încarcă...
Pagina se încarcă...
Pagina se încarcă...
Pagina se încarcă...
Pagina se încarcă...
Pagina se încarcă...
Pagina se încarcă...
Pagina se încarcă...
Pagina se încarcă...
Pagina se încarcă...
Pagina se încarcă...
Pagina se încarcă...
Pagina se încarcă...
Pagina se încarcă...
Pagina se încarcă...
Pagina se încarcă...
Pagina se încarcă...
Pagina se încarcă...
Pagina se încarcă...
Pagina se încarcă...
Pagina se încarcă...
Pagina se încarcă...
Pagina se încarcă...
Pagina se încarcă...
Pagina se încarcă...
Pagina se încarcă...
Pagina se încarcă...
Pagina se încarcă...
Pagina se încarcă...
Pagina se încarcă...
Pagina se încarcă...
Pagina se încarcă...
Pagina se încarcă...
Pagina se încarcă...
Pagina se încarcă...
Pagina se încarcă...
Pagina se încarcă...
Pagina se încarcă...
Pagina se încarcă...
Pagina se încarcă...
Pagina se încarcă...
Pagina se încarcă...
Pagina se încarcă...
Pagina se încarcă...
Pagina se încarcă...
Pagina se încarcă...
Pagina se încarcă...
Pagina se încarcă...
Pagina se încarcă...
Pagina se încarcă...
Pagina se încarcă...
Pagina se încarcă...
Pagina se încarcă...
Pagina se încarcă...
Pagina se încarcă...
-
 1
1
-
 2
2
-
 3
3
-
 4
4
-
 5
5
-
 6
6
-
 7
7
-
 8
8
-
 9
9
-
 10
10
-
 11
11
-
 12
12
-
 13
13
-
 14
14
-
 15
15
-
 16
16
-
 17
17
-
 18
18
-
 19
19
-
 20
20
-
 21
21
-
 22
22
-
 23
23
-
 24
24
-
 25
25
-
 26
26
-
 27
27
-
 28
28
-
 29
29
-
 30
30
-
 31
31
-
 32
32
-
 33
33
-
 34
34
-
 35
35
-
 36
36
-
 37
37
-
 38
38
-
 39
39
-
 40
40
-
 41
41
-
 42
42
-
 43
43
-
 44
44
-
 45
45
-
 46
46
-
 47
47
-
 48
48
-
 49
49
-
 50
50
-
 51
51
-
 52
52
-
 53
53
-
 54
54
-
 55
55
-
 56
56
-
 57
57
-
 58
58
-
 59
59
-
 60
60
-
 61
61
-
 62
62
-
 63
63
-
 64
64
-
 65
65
-
 66
66
-
 67
67
-
 68
68
-
 69
69
-
 70
70
-
 71
71
-
 72
72
-
 73
73
-
 74
74
-
 75
75
-
 76
76
-
 77
77
-
 78
78
-
 79
79
-
 80
80
-
 81
81
-
 82
82
-
 83
83
-
 84
84
-
 85
85
-
 86
86
-
 87
87
-
 88
88
-
 89
89
-
 90
90
-
 91
91
-
 92
92
-
 93
93
-
 94
94
-
 95
95
-
 96
96
-
 97
97
-
 98
98
-
 99
99
-
 100
100
-
 101
101
-
 102
102
-
 103
103
-
 104
104
-
 105
105
-
 106
106
-
 107
107
-
 108
108
-
 109
109
-
 110
110
-
 111
111
-
 112
112
-
 113
113
-
 114
114
-
 115
115
-
 116
116
-
 117
117
-
 118
118
-
 119
119
-
 120
120
-
 121
121
-
 122
122
-
 123
123
-
 124
124
-
 125
125
-
 126
126
-
 127
127
-
 128
128
-
 129
129
-
 130
130
-
 131
131
-
 132
132
-
 133
133
-
 134
134
-
 135
135
-
 136
136
-
 137
137
-
 138
138
-
 139
139
-
 140
140
-
 141
141
-
 142
142
-
 143
143
-
 144
144
-
 145
145
-
 146
146
-
 147
147
-
 148
148
-
 149
149
-
 150
150
-
 151
151
-
 152
152
-
 153
153
-
 154
154
-
 155
155
-
 156
156
-
 157
157
-
 158
158
-
 159
159
-
 160
160
-
 161
161
-
 162
162
-
 163
163
-
 164
164
-
 165
165
-
 166
166
-
 167
167
-
 168
168
-
 169
169
-
 170
170
-
 171
171
-
 172
172
-
 173
173
-
 174
174
-
 175
175
-
 176
176
-
 177
177
-
 178
178
-
 179
179
-
 180
180
-
 181
181
-
 182
182
-
 183
183
-
 184
184
-
 185
185
-
 186
186
-
 187
187
-
 188
188
-
 189
189
-
 190
190
-
 191
191
-
 192
192
-
 193
193
-
 194
194
-
 195
195
-
 196
196
-
 197
197
-
 198
198
-
 199
199
-
 200
200
-
 201
201
-
 202
202
-
 203
203
-
 204
204
-
 205
205
-
 206
206
-
 207
207
-
 208
208
-
 209
209
-
 210
210
-
 211
211
-
 212
212
-
 213
213
-
 214
214
-
 215
215
-
 216
216
-
 217
217
-
 218
218
-
 219
219
-
 220
220
-
 221
221
-
 222
222
-
 223
223
-
 224
224
-
 225
225
-
 226
226
-
 227
227
-
 228
228
-
 229
229
-
 230
230
-
 231
231
-
 232
232
-
 233
233
-
 234
234
-
 235
235
-
 236
236
-
 237
237
-
 238
238
-
 239
239
-
 240
240
-
 241
241
-
 242
242
-
 243
243
-
 244
244
-
 245
245
-
 246
246
-
 247
247
-
 248
248
-
 249
249
-
 250
250
-
 251
251
-
 252
252
-
 253
253
-
 254
254
-
 255
255
-
 256
256
-
 257
257
-
 258
258
-
 259
259
-
 260
260
-
 261
261
-
 262
262
-
 263
263
-
 264
264
-
 265
265
-
 266
266
-
 267
267
-
 268
268
-
 269
269
-
 270
270
-
 271
271
-
 272
272
-
 273
273
-
 274
274
-
 275
275
-
 276
276
-
 277
277
-
 278
278
-
 279
279
-
 280
280
-
 281
281
-
 282
282
-
 283
283
-
 284
284
-
 285
285
-
 286
286
-
 287
287
-
 288
288
-
 289
289
-
 290
290
-
 291
291
-
 292
292
-
 293
293
-
 294
294
-
 295
295
-
 296
296
-
 297
297
-
 298
298
-
 299
299
-
 300
300
-
 301
301
-
 302
302
-
 303
303
-
 304
304
-
 305
305
-
 306
306
-
 307
307
-
 308
308
-
 309
309
-
 310
310
-
 311
311
-
 312
312


McCulloch GBV 322VX Manualul proprietarului
- Tip
- Manualul proprietarului
în alte limbi
- slovenčina: McCulloch GBV 322VX Návod na obsluhu
- eesti: McCulloch GBV 322VX Omaniku manuaal
Alte documente
-
Husqvarna 125B Manualul proprietarului
-
-
Jonsered B2126 Manual de utilizare
-
Stanley SGT-51-820H Manual de utilizare
-
-
Stanley SGT-25-450V Manual de utilizare
-
Dolmar SP76504R Manualul proprietarului
-
Hikoki RB24E Manual de utilizare
-
-
Ryobi RBV26 Manualul proprietarului